
Summary
The purpose of this webpage is to assist clients to register for eFiling and manage their eFiling profiles.
eFiling is a free electronic tool designed by SARS to offer electronic services such as filing tax returns, making payments and accessing accounts to name a few. It allows you the benefit of direct, secure and real-time electronic access to your tax profile as well as the opportunity to manage this at any time and from anywhere.
You must be linked to a tax type (e.g. income tax) in order to have full access to the services on eFiling and to transact.
SARS values you, the taxpayer. In order to protect your tax account(s), please note that not all services are offered online. Services such as change of name and surname must be done at a SARS office.
Migration of Users
All eFiling users registered prior to 1 July 2019 will be authenticated and migrated to one single user sign on. If you had multiple login profiles linked to your identity/passport number, a list of your profiles will display (after you have been authenticated). You will be required to choose a primary login from the list. All your profiles will still be accessible once you logged in with your primary credentials. You can link your other logins as “Portfolios” to your profile.
Portfolios
- A registered eFiler can act in different “roles” on eFiling (e.g. tax administrator). These “roles” are referred to as Portfolio Types. For example:
- Individual – a person acting as himself/herself to administer his/her own individual taxes
- Tax Practitioner – a person registered with SARS and a Recognised Controlling Body (RCB) and has a signed power of attorney to act on behalf of another taxpayer.
- Organisation – a representative of a tax paying entity acting either as the representative taxpayer (e.g. public officer, executor of an estate, etc.) or an appointed representative with a signed Power of Attorney in place.
- eFilers with a Tax Practitioner and Organisation portfolio type can:
- Activate multiple taxpayers against that portfolio type
- Group taxpayers under the same portfolio type
- Specify a descriptive name for each group (for ease of reference).
- If you registered different portfolio types prior to 1 July 2019, you would have accessed each of the abovementioned portfolios with a unique username and password. As from 1 July 2019, you only require one username and password (referred to as the primary login) to login to eFiling. You can then choose the portfolio that you want to access.
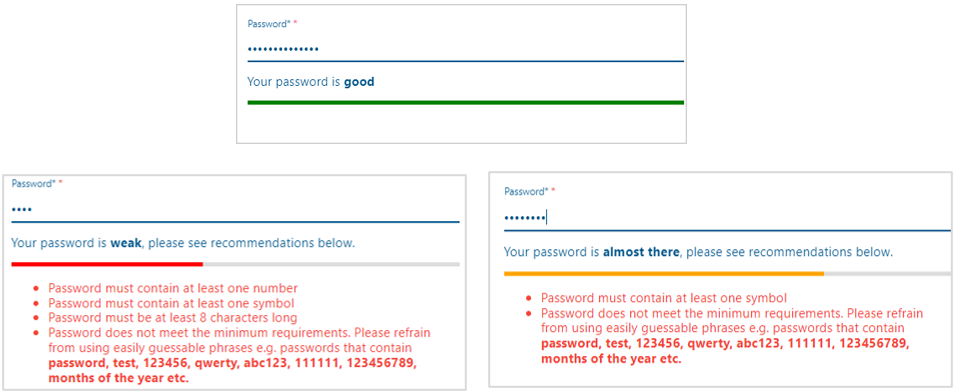
Password Rules
- When creating or changing a password on eFiling, please ensure that the password meets the following criteria:
- Contains a minimum of 8 characters
- Includes at least one uppercase, lowercase, numeric and special character
- Excludes personal information (like your name / surname / email address / username);
- Excludes repetitive or sequential characters (like “aaaaa” or “12345” etc).
- The password meter will guide you and provide an indication of the strength of your password.
Biometric Authentication
- SARS has introduced biometric facial recognition software to authenticate taxpayers and to protect taxpayer information from profile hijacking and identity fraud.
- The biometric authentication process may be required for individuals who register for eFiling using a valid South African ID. The photos captured will be matched real-time against the applicable reference data and the system will immediately provide the outcome of the biometric authentication.
- If using the eFiling website, you will require a camera-enabled device (i.e. desktop with a webcam or a laptop with a camera feature).
- If you have a smartphone with a camera, you can download the SARS MobiApp and use the smartphone for the biometric authentication.
- If the biometric authentication is unsuccessful or if you do not have access to a camera-enabled device please book an appointment for a SARS official to assist you.
Contact Details
- You must provide a valid email address and cell phone number to utilise the eFiling service. This will serve as your eFiling security contact details and will be used to send a One-Time-Pin (OTP) to authenticate you.
- If the status of your contact details is “unconfirmed” (according to SARS records), the system will prompt you to confirm/update your information as soon as you log in. For more information please refer to the Profile and Preference Setup section below
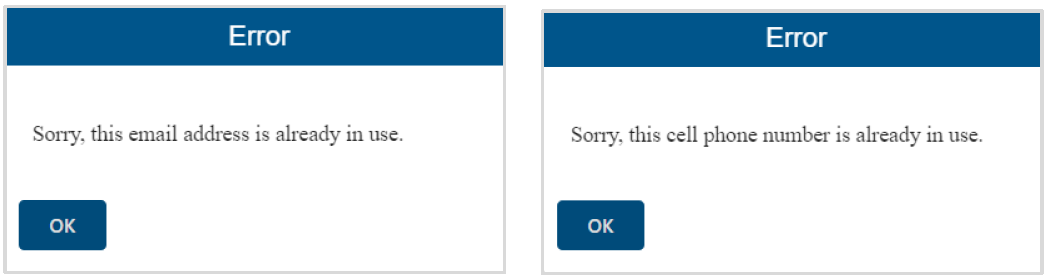
- If our system identifies that the email address or cell phone number entered has already been provided by an eFiler and is actively in use, an error message will display. Please insert alternate contact details to continue or book an appointment (via the SARS website) for a SARS office for further assistance.
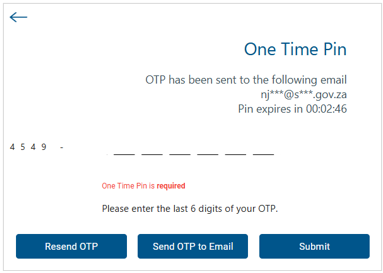
One-Time Pin (OTP)
- The OTP is a unique 6-digit security PIN and you will be required to enter this pin as confirmation when performing certain functions on eFiling.
- You can choose to receive the OTP via SMS or email. The system will send the OTP to the cell number or email address saved on your eFiling profile.
- For security reasons, the OTP is time-sensitive and you will be required to enter it within the time period indicated. If you are unable to enter the OTP within the specified time, you may request for it to be resent to you.
- For your security, you can only opt to resend an OTP twice.
Chat with SARS
Lwazi the ChatBot
- Lwazi the chatbot is a virtual assistant that provides automated answers to general queries.
- The chat bot icon appears on the bottom right side of your screen.

- Click on the chatbot icon to ask a question:
- Type a question in the input text-box
- Click on the send/arrow button on your screen or press <Enter> on your keyboard to submit the question
- Lwazi, the virtual assistant, will process your request and display the answers on your screen.
- The following personal income tax services can also be requested via the virtual assistant. Note, you will be prompted to provide certain information (e.g. ID number, email, cell number) to enable us to authenticate you for the required service:
- Request Tax Reference Number
- Request Statement of Account
- Request Refunds Status
- Request Audit Status
- Request Notice of Assessment
Registration on eFiling
How to Register as a New User on eFiling
- Log on to the SARS website. On the top right side of the home page is a list of SARS eFiling options.
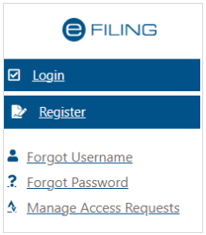
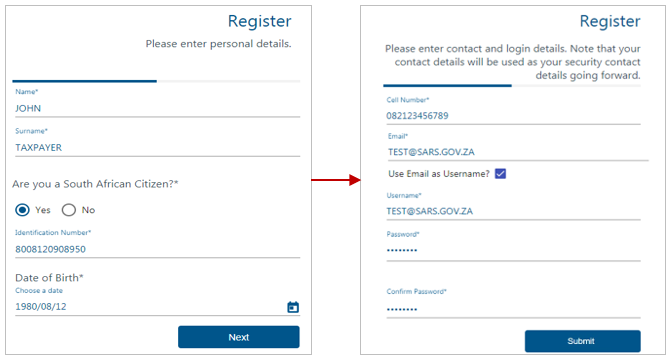
- Select <Register>
- Complete your personal details and click on <Next>
- Complete your contact details
- Note: If our system identifies that the same contact details has already been provided by an eFiler and is actively in use, an error message will display. Please insert alternate contact details to continue or contact SARS for further assistance.
- Complete your preferred username and password and click on <Submit>
- If you are a South African citizen, you will be directed to the ‘Biometric Facial Recognition Authentication’ step
- If you are a non-South African and the registration information you entered:
- Is successfully matched to the SARS records, you will be presented with the One-Time-Pin (OTP) screen. After the OTP is entered, the eFiling Login Screen will display (refer to the section on ‘First Time Login’ below).
- Cannot be matched to the SARS records, you will be required to provide documentation for authentication (refer to the section on ‘Request for Additional Information to Finalise Registration’).
Biometric Authentication Process
- Biometric Instructions:
- Note: this step is applicable if you are a South African citizen.
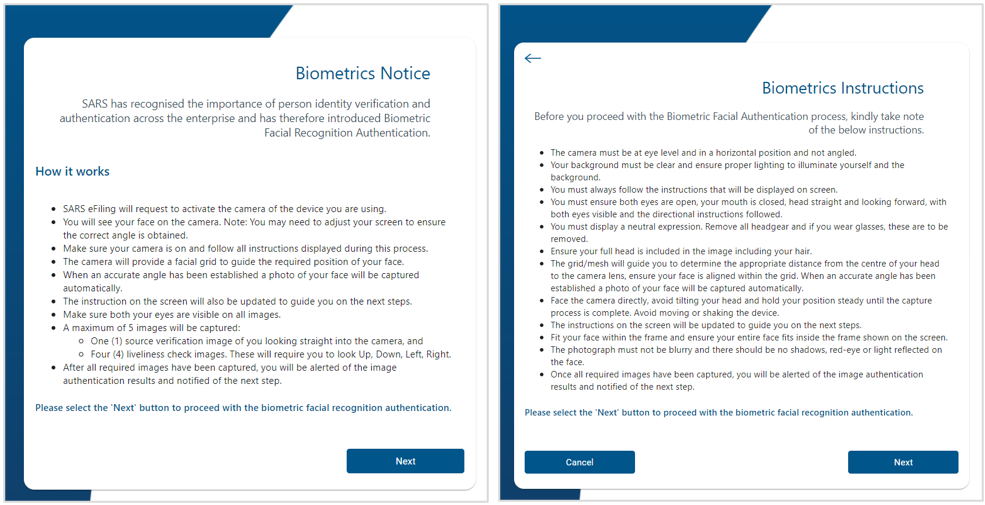
- The Biometrics Notice screen will display with an explanation of the process.
- Read the steps to understand how the biometric facial recognition authentication works
- Click on <Next>
- The Biometrics Instruction screen will display.
- Kindly take note of all the instructions (e.g. background setting, removal of head gear and glasses, position and distance from the camera, etc) to ensure that the photos are captured successfully.
- Click on <Next> to proceed with images
- If you select <Cancel> the registration process will end.
- Capture Images for Biometric Authentication:
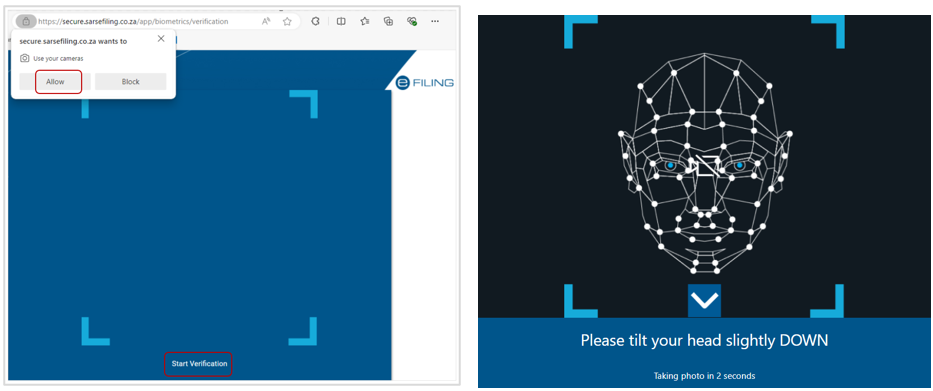
- A pop-up message will display with a request for eFiling to use your camera
- Select <Allow> on the pop-up message
- Click on <Start Verification> at the bottom of the screen.
- The biometric process will start. Follow the on screen instructions and voice prompts to capture the images.
- If the photos are not captured successfully, please try again and ensure that you follow the instructions provided on the screen.
- A pop-up message will display with a request for eFiling to use your camera
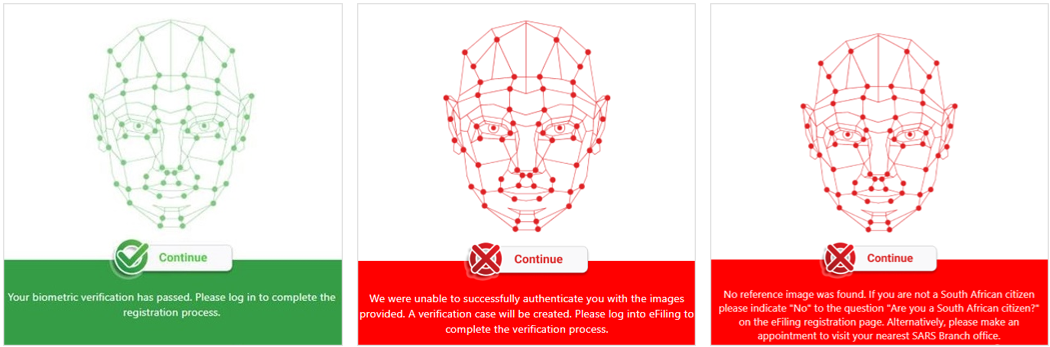
- Once all the photos are taken, the system will display the outcome of the biometric authentication.
- A successful biometric verification will be denoted by the green image below. Click on <Continue> to complete the eFiling registration process.
- If we cannot successfully match the photo with the images on our reference data, it will be denoted by the first red image below. A verification case will be created and you will be required to log on to eFiling and provide additional information (refer to the section on ‘Request for Additional Information to Finalise Registration’).
- If we cannot find any image on our reference data, it will be denoted by the second red image below and you may be required to book an appointment (via the SARS website) for a SARS official to assist you to register for eFiling.
- Once all the photos are taken, the system will display the outcome of the biometric authentication.
Please Note:
|
Request for Additional Information to Finalise Registration
- This section is applicable if you are a:
- Non-South African and we were unable to finalise your eFiling registration immediately; or
- South African citizen and the biometric authentication was unsuccessful because we could not successfully match your photo with the image on our reference data.
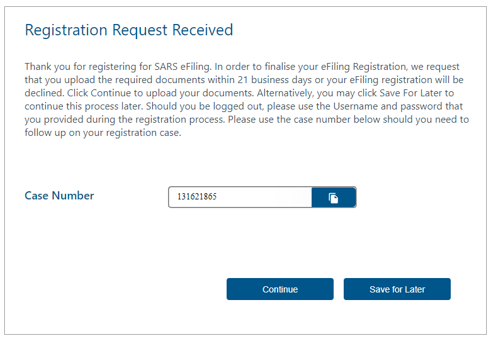
- The following message will display confirming your registration request and prompting you to upload supporting documents in order to finalise your eFiling registration.
- A case number will be allocated to you. Please quote this number when contacting SARS to follow up on the progress of your eFiling registration.
- If you are logged out, please use the username and password that you provided during the registration process to log back in.
- Please note: You will have 21 business days to upload the required documents.
- Click on <Continue>.
- The Registration Workpage will display. Click on <Upload> to upload the required supporting documents.
- The file size may not exceed 5mb.
- The following file types will be accepted:
- .doc
- .jpeg
- .png
- .docx
- .jpg
- .xls
- .jiff
- .xlsx
- Follow the screen prompts to upload the documents.
- The document file names must be unique. If you upload more than one file with the same name, an error message will display.
- Please ensure that you upload all the documents requested by SARS before you click on the <Submit>. Once the documents are submitted you will not be able to add more documents unless you receive a new request from SARS
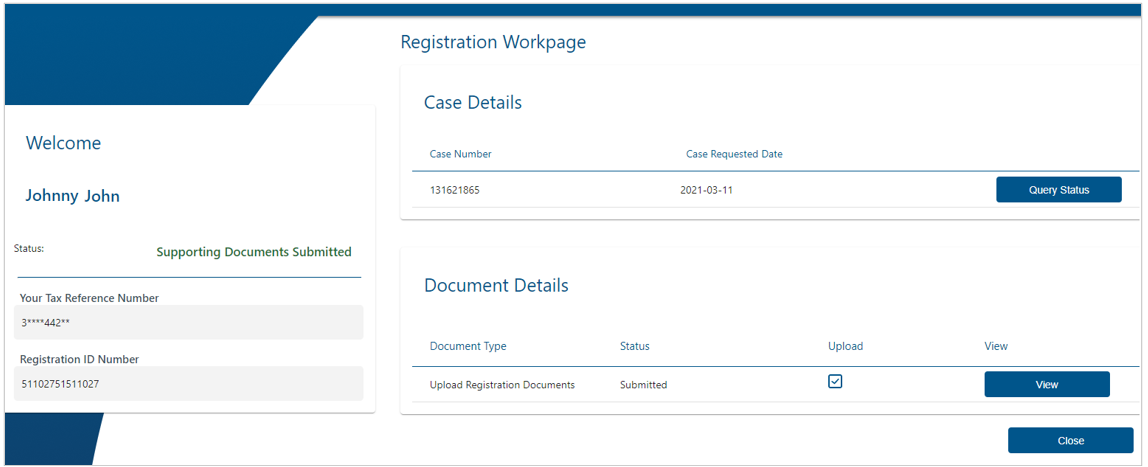
- After you have uploaded the documents, click on <Continue>.
- SARS will receive the case for review. You can log in with your username and password at any time to view the status of your registration (e.g. awaiting supporting document, documents submitted).
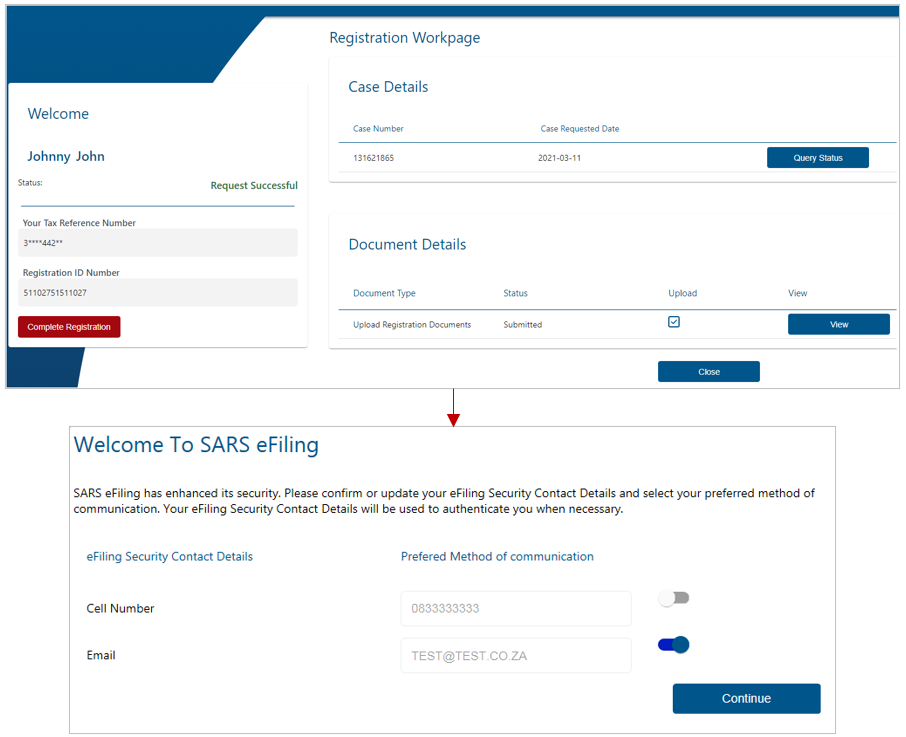
- Once SARS has verified your details, the status will change to ‘Request Successful’ and you will be notified via email and SMS.
- After successful verification, you will need to finalise the eFiling registration.
- Please use the same username and password that you provided during registration to log in.
- Click on the <Complete Registration> button.
- Select your preferred method of communication and click on <Continue>. The method you select will serve as your eFiling security contact details and to receive One-Time-Pins (OTP) to authenticate you.
- Please enter the OTP sent to either your cell number or your email address. Once done, the eFiling Login Screen will display (refer to the section on ‘First Time Login’ below).
Please Note: You may be requested to complete your address details in the following instances:
|
Automatic Registration for Income Tax
- When you register as a new eFiler, SARS will do the work for you and automatically issue a personal income tax number to you if:
- You are not yet registered for income tax
- You have a valid South African ID number.
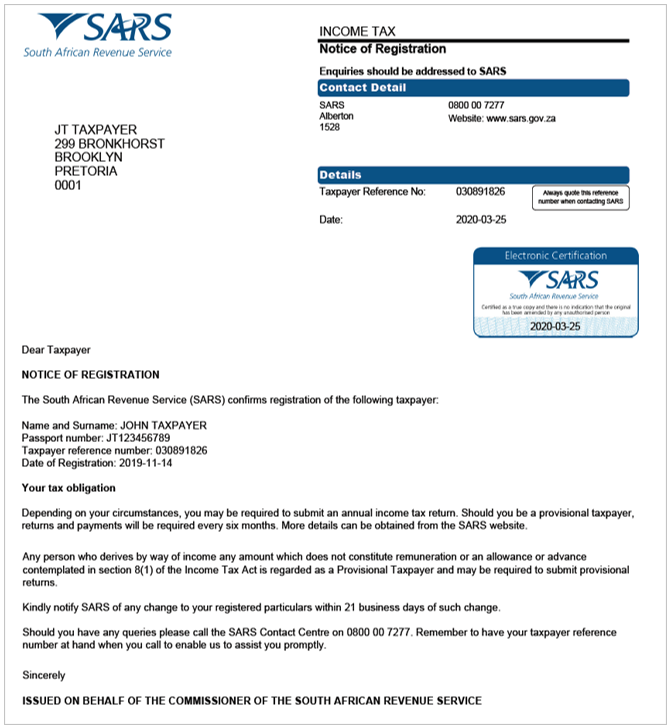
- A Notice of Registration will be available to you, should you need to provide a third party (e.g. an employer) with proof of your income tax number.
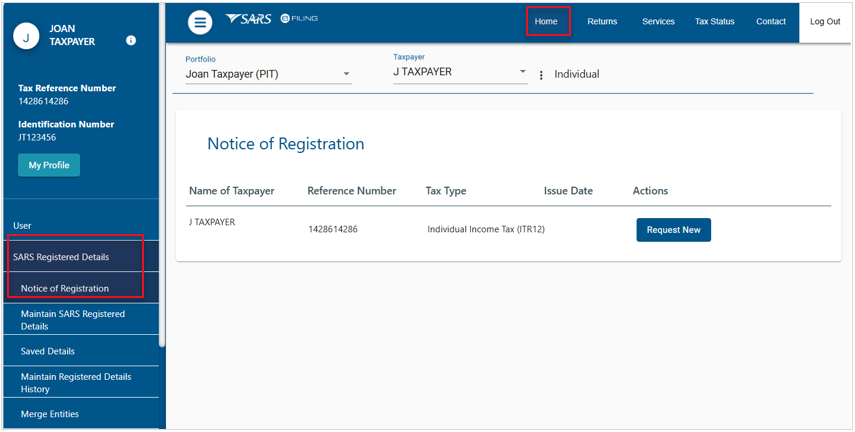
- After you have successfully registered for eFiling, login with your username and password, link the tax number to your profile and follow the steps below to access your notice of registration:
- Select <Home> from the menu on the top
- Select <SARS Registered Details> from the menu on the left
- Select <Notice of Registration>
- Click on <Request New>.
First Time Login
First Time Login for eFiling Users Registered on/after 1 July 2019
- From the SARS website, select <Login> from the top right side of the home page:
- Enter your eFiling Username and click on <Next>
- Enter your Password and click on <Login>
- Enter the OTP and click on <Submit>.

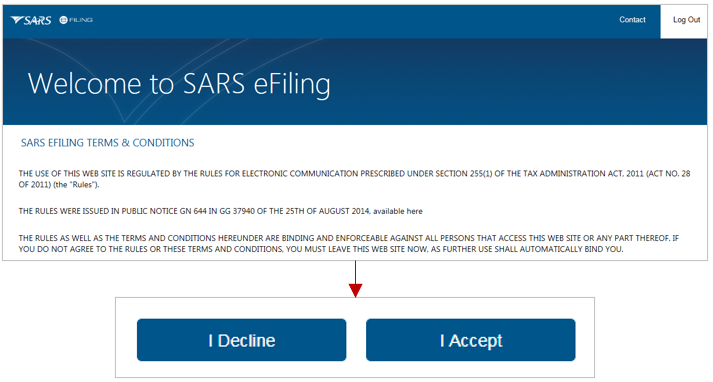
- The eFiling welcome screen will display. Please read the terms and conditions. At the bottom of the screen click on <I Accept> to continue with the log in process.
- You will be presented with a list of return types as per SARS records.
- Please click on the <Link> button for each return type that you want to activate on your profile
- Click on <Remove> to remove a return type from your profile
- After you have selected the return type(s), click on <Submit>.

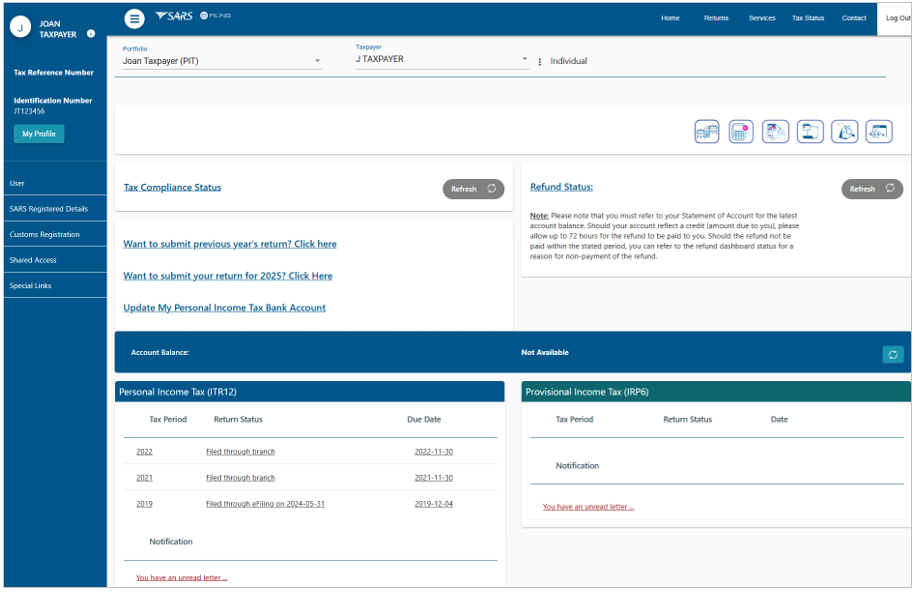
- The eFiling home page will display. This screen is also referred to as the eFiling Dashboard and provides a visual summary of your current tax affairs with SARS with regard to compliance, outstanding returns and account balance(s). You can also view your statement of account and any notifications sent by SARS.
Please Note:
|
First Time Login for eFiling User Registered Before 1 July 2019
User with Single Login Profile
- Log on to the SARS website. On the top right side of the home page select <Login> from the list of eFiling options.
- Enter your eFiling Username and click on <Next>
- Enter your Password and click on <Login>.
- The eFiling welcome screen will display.
- Please read the terms and conditions. At the bottom of the screen click on <I Accept> to continue with the log in process.
- Select your preferred method of communication and click on <Continue>.
- We will send a One-Time-Pin (OTP) to your preferred method of communication in order to authenticate you
- Note: You can edit your contact details on this screen.

- Please enter the OTP sent to either your cell number or your email address.
- Once the correct OTP is entered, the eFiling home page will display.
- This screen is also referred to as the eFiling Dashboard and provides a visual summary of your current tax affairs with SARS with regard to compliance, outstanding returns and account balance(s). You can also view your statement of account and any notifications sent by SARS.
User with Multiple Login Profiles
- Log on to the SARS website. On the top right side of the home page select <Login> from the list of eFiling options.
- Enter your eFiling Username and click on <Next>
- Enter your Password and click on <Login>
- Please read and accept the terms and conditions (refer to the section above).
- After you have accepted the terms and conditions, a screen will display with a list of all the login profiles linked to your identity/passport number prior to 1 July 2019.
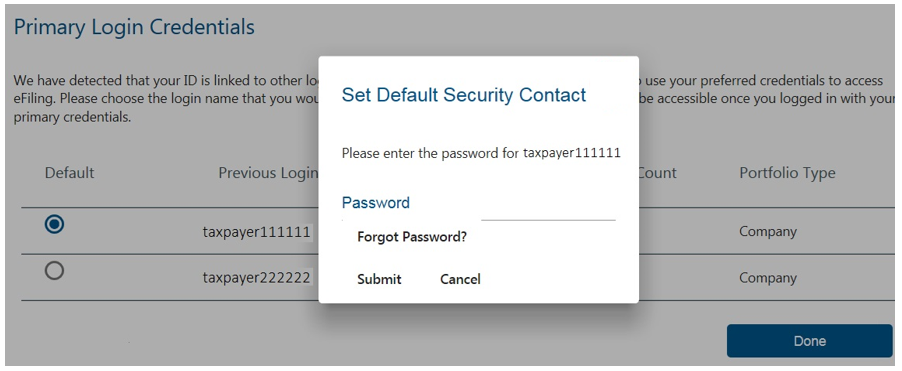
- Please select the primary login name that you would prefer to use going forward. All your profiles will still be accessible once you logged in with your primary credentials.
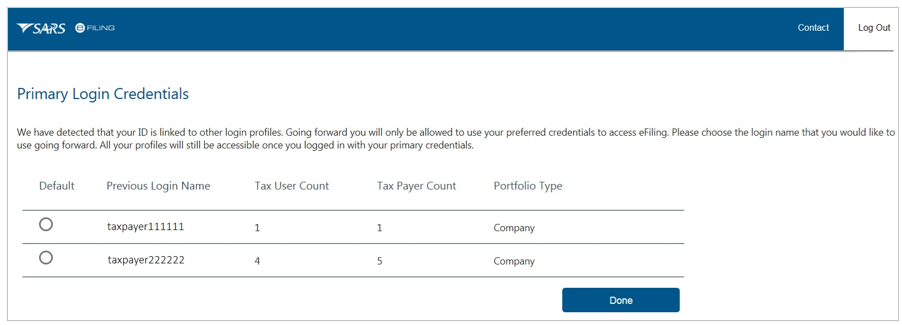
- You will be prompted to enter the password if the primary login you selected (e.g. taxpayer111111 as illustrated in the screen below) is different to the profile that you are currently logged in with (e.g. taxpayer222222). If you do not remember the password, click on <Forgot Password> to reset it.
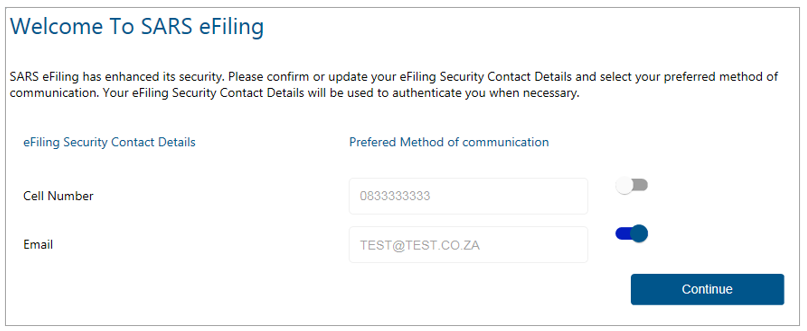
- After you select the primary login, click on <Done>. On the next screen select your preferred method of communication and click on <Continue>.
- This will serve as your eFiling security contact details. We will send a One-Time-Pin (OTP) to your preferred method of communication in order to authenticate you
- You can edit your contact details on this screen.
- Please enter the OTP sent to your cell number or email address. A message will display to confirm that your primary login has been successfully set-up. Click on <Continue>.
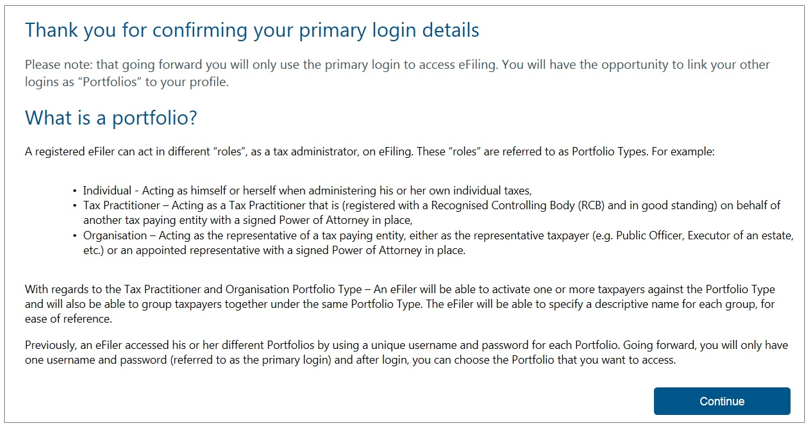
- The Portfolio Management screen will display for you to link, unlink or add portfolios. For more information please refer to the Portfolio Management section below.
Please Note:
“According to our records you have already chosen your Primary Login. Please Login with your Primary Login details and then activate your other profiles in the Portfolio Management section on eFiling.”
“Our records indicate that your own personal income tax is associated to one of your other existing Login details. Due to improved security measures implemented, please authenticate this profile by providing the applicable password below. Note – should you not be able to authenticate this profile now, you may be required to do so at a later stage to gain access to certain online transactions.” |
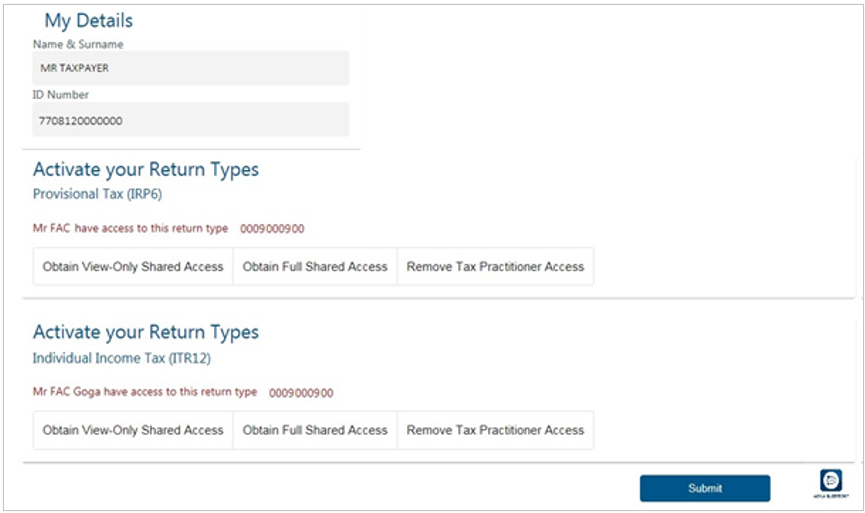
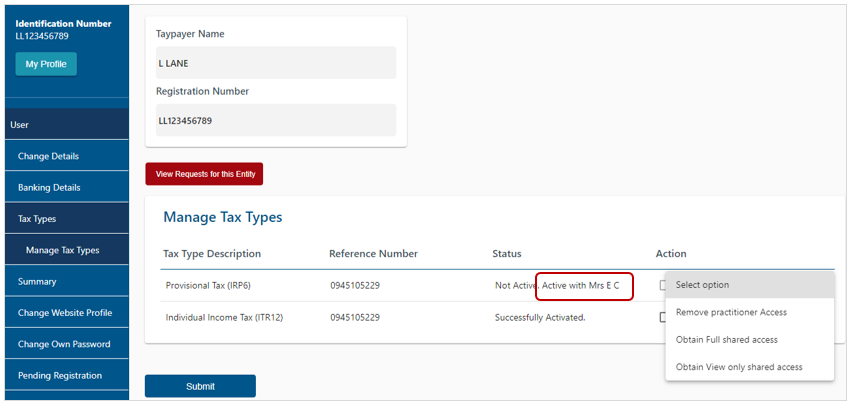
- When you log in for the first time and your tax number(s) is already registered against another party’s eFiling profile (e.g. a tax practitioner), the system will display the name of the party who has access to the tax type. You have the option to obtain shared access or revoke the other party’s access.
- Select the type of access you require (see below) and click on <Submit>:
- <Obtain View Only Shared Access> – this option will only allow you to view transactions done on your behalf on eFiling
- <Obtain Full Shared Access> – this option will allow you to have full shared access and the other party will still retain access rights to the tax type
- <Remove Tax Practitioner Access>
- <Remove My Access> – This option will display if you currently have shared access with your tax practitioner
- <Deactivate Tax Type>
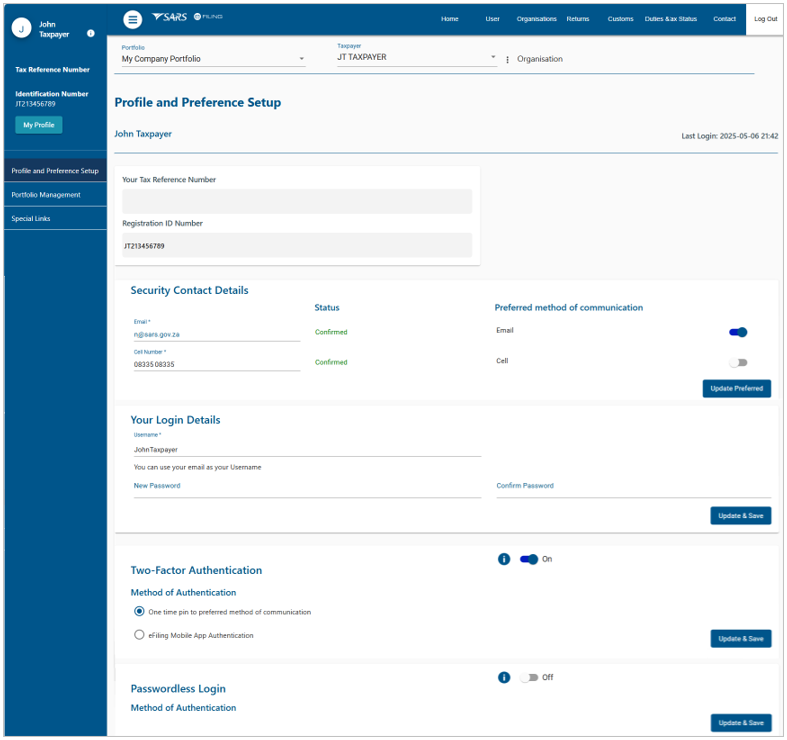
Profile and Preference Setup
- This function is used to manage your primary login details, security contact details, two-factor authentication and passwordless login (each item is discussed in the sub-sections below). You cannot change your tax reference number and identity/passport number on this screen.
Manage Security Contact Details:
- The purpose of the ‘Security Contact Details’ saved on your eFiling profile is to authenticate you and to issue One-Time-Pin (OTP) numbers required to perform certain functions on eFiling.
- Note: if you cannot remember your security contact details, please refer to the section below for the steps to ‘Update Contact Details’ without logging in.
- To update your security contact details after you have logged on, select <My Profile> from the menu on the left and click on <Profile and Preference Setup>
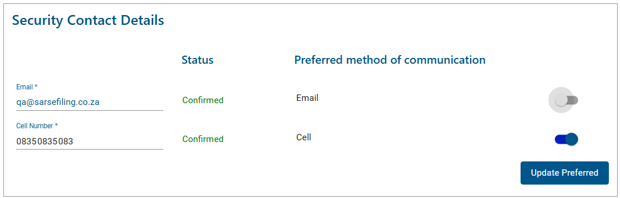
- Scroll down to the section <Security Contact Details>
- Insert your new email address and/or your new cell number.
- Note: If our system identifies that the same contact details has already been provided by an eFiler and is actively in use, an error message will display. Please insert alternate contact details to continue or contact SARS for further assistance.
- Select your preferred method of communication
- Click on <Update Preferred>
- On the pop-up screen that displays, select your preferred method of communication to receive the One-Time-Pin number
- After you have entered the correct OTP, a message will display confirming that your security contact details have been updated successfully.
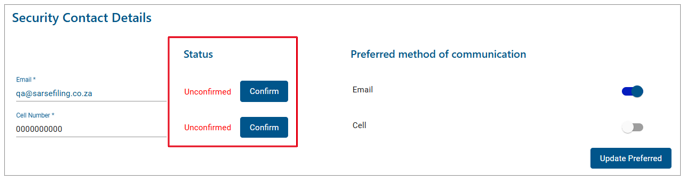
- If the status of your ‘Security Contact Details’ saved on your profile is ‘Unconfirmed’:
- Click on the <Confirm> button if the contact details displayed are correct; or
- Insert the correct contact details and click on <Update>
- An OTP number will be sent to you to confirm the action.
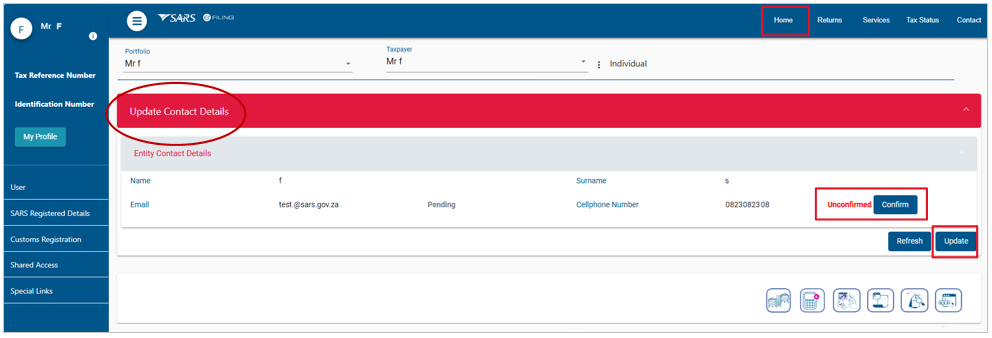
- Please note: Your ‘Entity Contact Details’ serves a different purpose compared to the ‘Security Contact Details’. The entity contact details is used to issue tax related correspondence (e.g. notice of assessment).
- Click on the <Home> button to view the entity contact details.
- The entity contact details is defaulted to the Income Tax contact details
- If you are registered for any other product (e.g. Customs, VAT), the contact details of those products will also display on this screen.
- If the status of your contact details is ‘unconfirmed’, it will be highlighted in red.
- Click on the <Confirm> button if the contact details are correct; or
- Click on the <Update> button to amend the contact details. You will be redirected to the Maintain SARS Registered Details screen. For more information, please refer to the guide ‘GEN-REG-01-G04 – How to Complete the Registration Amendments and Verification Form RAV01’ available on the SARS website.
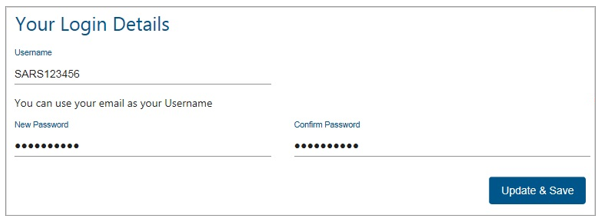
Change Username and Password:
- Select <My Profile> from the menu on the left and click on <Profile and Preference Setup>
- Scroll to the section <Your Login Details>
- Insert your new username (you may use your email address as your username)
- Insert your new password
- Insert your new password again to confirm it
- Click on <Update & Save>
- An OTP will be sent to your preferred method of communication
- After you have entered the correct OTP, a message will display confirming that your username and password have been updated successfully.
Two-Factor Authentication
- Two-factor authentication is an additional security measure and requires you to provide your password as well as a second factor of authentication to login to eFiling. You can choose one of the following methods for authentication:
- One time pin (OTP)
- SARS MobiApp
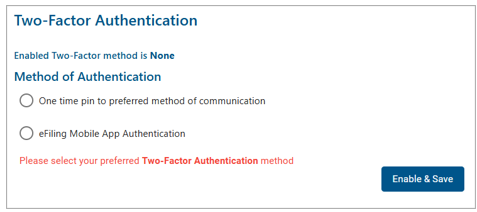
- Please note: Two-factor authentication is mandatory on all individual profiles.
- If two-factor authentication has not been activated, the following screen will display when you log on to eFiling.
- Select a preferred option and click on <Enable and Save>. Refer to the sections below for more information.
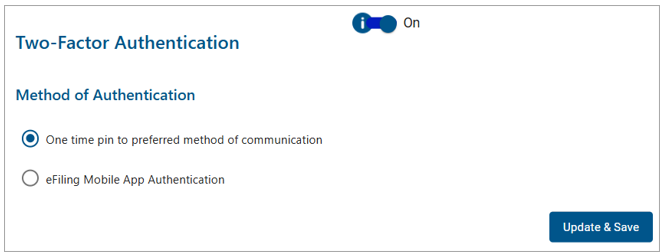
Two-Factor Authentication using a One Time Pin
- Select <My Profile> from the menu on the left and click on <Profile and Preference Setup>
- Scroll down to the section ‘Two-factor authentication’
- Select <One time pin to preferred method of communication>
- Click on <Update and Save>
- An OTP will be sent to your preferred method of communication
- After you have entered the correct OTP, a pop-up message will display confirming that your two-factor authentication has been successfully activated.
- Going forward, you will be required to do the following each time you log on to your profile via the eFiling website:
- Enter username
- Enter password
- Enter OTP.
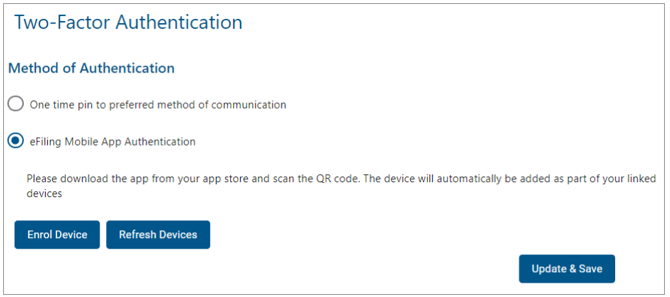
Two-Factor Authentication using the eFiling Mobile App
- If you prefer to use the mobile app for additional authentication, please download the SARS Mobile App from your app store. Once you have downloaded the app onto your device, follow the steps described below.
- Log on to the eFiling website:
- Select <My Profile> from the menu on the left and click on <Profile and Preference Setup>
- Scroll down to the section ‘Two-factor authentication’
- Select <eFiling Mobile App Authentication>
- Click on the <Enrol Device> button
- You will be issued with an OTP to confirm the device you want to enrol
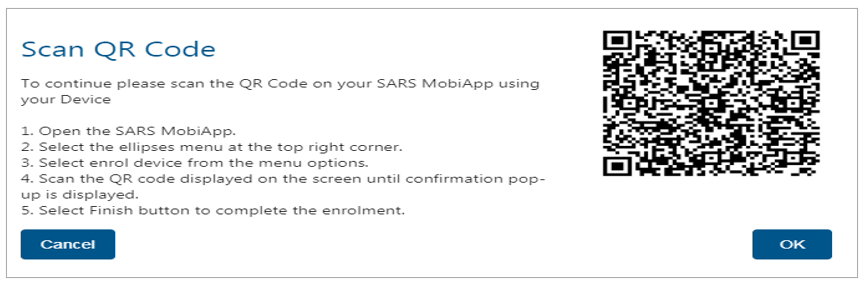
- A pop-up screen will display with a QR Code and instructions. Please ensure that you only click the <OK> button on this screen after the device enrolment is completed (refer to step ‘Launch the mobile app on your device’ below) else the device will not be added to your eFiling profile.
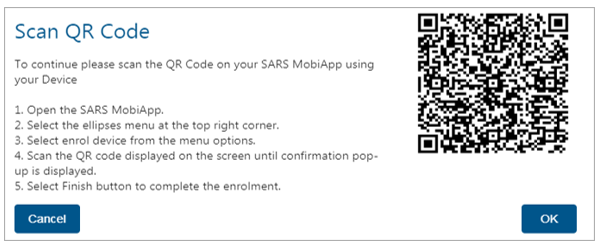
- Launch the mobile app on your device:
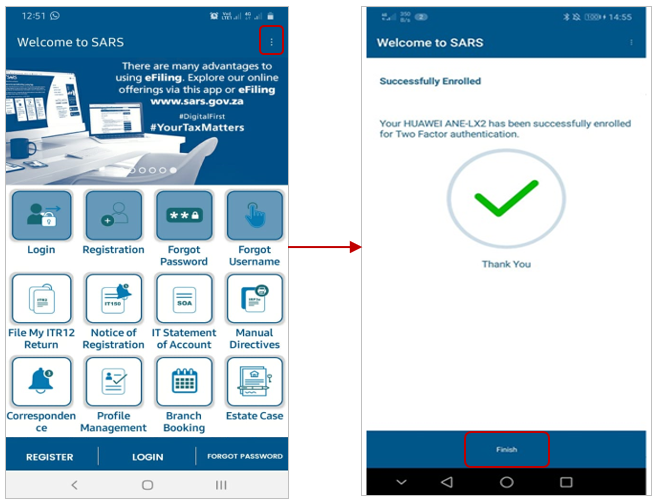
- Click on the ellipses ( ⋮ ) on the top right corner of the screen to display the menu
- Select <Enrol Device>
- Use your device to scan the QR code displayed on the eFiling website
- Once the QR Code is scanned successfully, a message will display to confirm that your device has been enrolled
- Click on the <Finish> button to complete the enrolment
- The device will automatically be added as part of your linked devices on eFiling
- For more information on how to use the app please refer to the ‘Guide to the SARS MobiApp’ which is available on the SARS website.
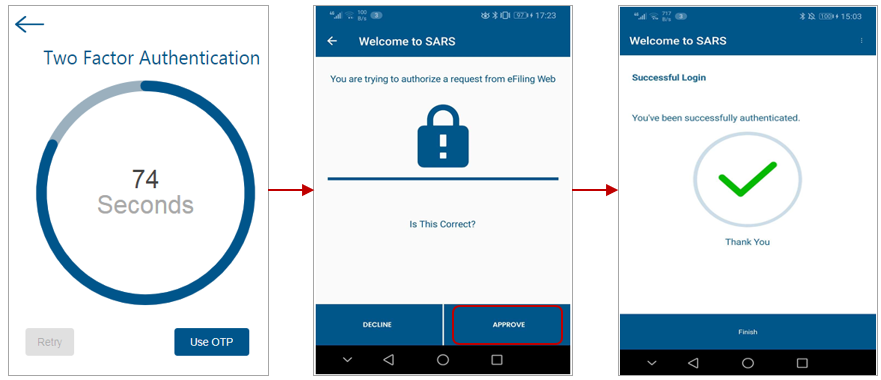
- After the device has been enrolled, you will be required to do the following each time you log on to the eFiling website:
- Enter username
- Enter password (the “Two Factor Authentication” timer will display)
- Click on <Approve> on your mobile device to authorise the request before the timer expires. You will be logged in to the eFiling website.
Please Note:
|
Passwordless Login
- Passwordless Login enables you to use your mobile device to approve the eFiling login request instead of typing in your password.
- Please download the SARS Mobile App from your app store. Once you have downloaded the app onto your device, follow the steps described below.
- Log on to the eFiling website:
- Click on <My Profile> on the menu on the left and select <Profile and Preference Setup>
- Select the button to switch on <Passwordless Login>
- Select <eFiling Mobile App Authentication>
- Click on the <Enrol Device> button. A pop-up screen will display with a QR Code and instructions.
- Launch the mobile app on your device. Follow the steps described in the section “Two-Factor Authentication Using the eFiling Mobile App” to enrol your device.
Please Note:
|
Portfolio Management
- The Portfolio Management function is used to link, and add various portfolios (roles) on your eFiling profile, such as:
- Your individual portfolio to manage your own personal taxes
- Multiple company portfolios if you are the registered representative (e.g. public officer) or employee and you manage the taxes of those companies
- Multiple tax practitioner portfolios if you manage the taxes of multiple individuals/entities as a tax practitioner.
- You can also opt to have all your roles merged into one company or tax practitioner profile.
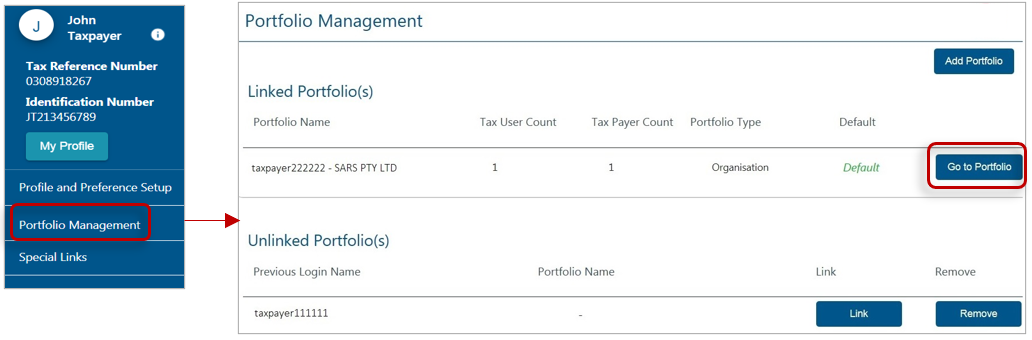
- Once you have logged on to eFiling:
- Select <My Profile> from the menu on the left
- Select <Portfolio Management>.
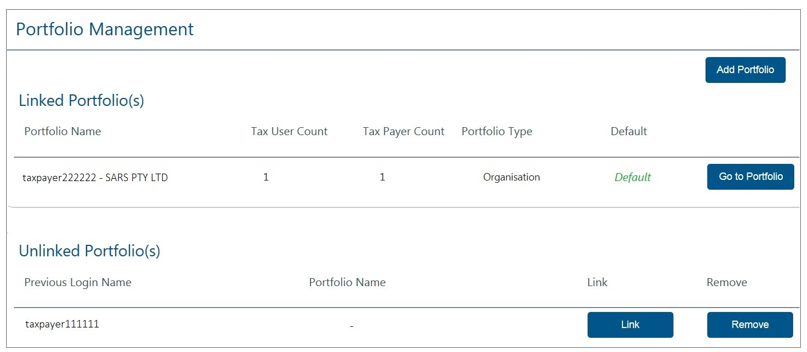
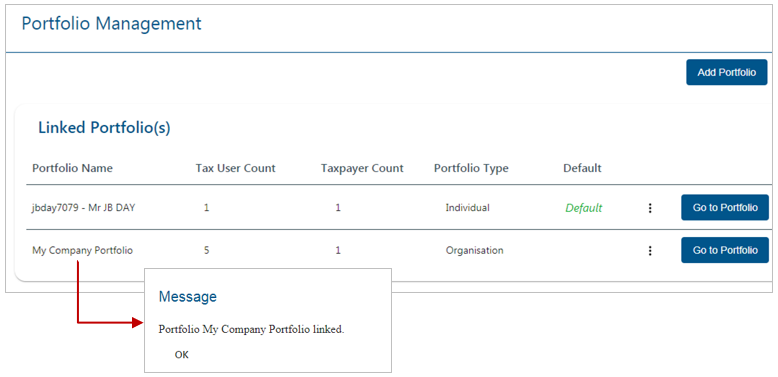
- The Portfolio Management screen will display for you to link, unlink, or add portfolios.
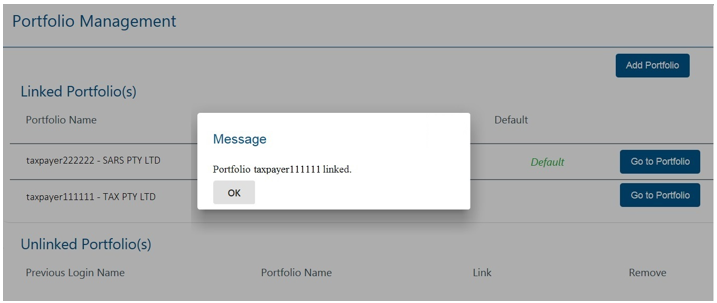
- You will be prompted to enter the password for each portfolio that you want to link.
- If you do not remember the password, click on <Forgot Password> to reset it
- After you enter the correct password, a message will display to confirm that the portfolio has been linked.
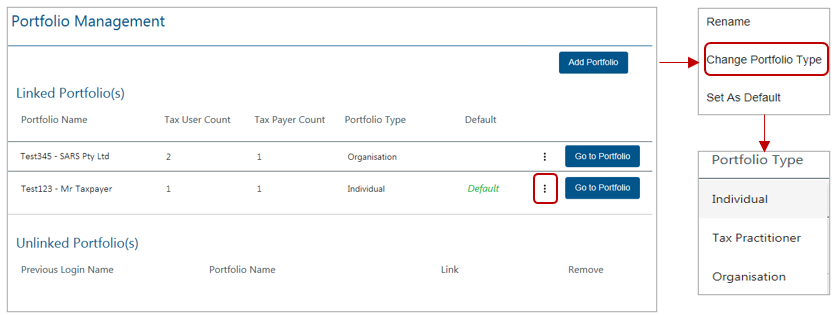
- You can set a default portfolio for the system to automatically display this portfolio when you login to eFiling. To change the default portfolio, click on the ellipses ( ⋮ ) menu icon and then either select <Set as Default> or <Remove Default>.
- You can only have one default portfolio
- Portfolios that are not linked cannot be set as a default profile.
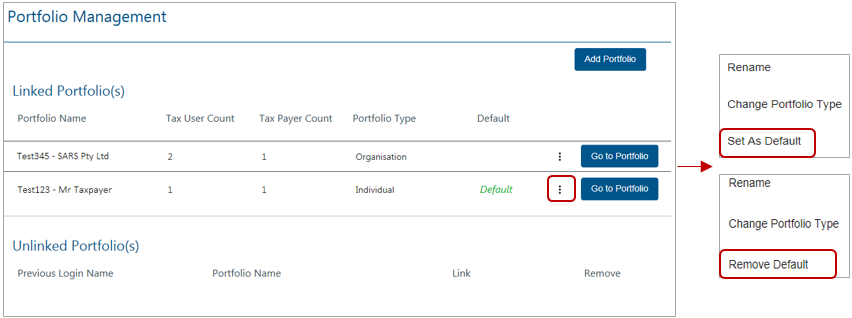
- To change the portfolio type, click on the ellipses ( ⋮ ) menu icon and select <Change Portfolio Type>.
- Select the portfolio type (i.e. Individual / Tax Practitioner / Organisation) from the drop down menu and click on <Save>
- You can have multiple Tax Practitioner and Organisation portfolios on your profile
- You can only have one Individual portfolio linked to your profile.
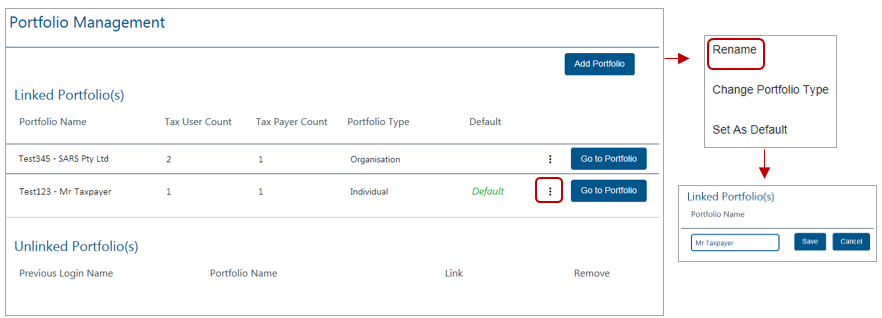
- You can rename your portfolios for your ease of reference. Click on the ellipses ( ⋮ ) menu icon and select <Rename>. Insert the new description for the portfolio and click on <Save>.
- To link a new portfolio to your profile, click on the <Add Portfolio> button. On the pop-up screen, insert the portfolio name, select the <Portfolio Type> and click on <Add Portfolio>
- You can choose to set the new portfolio as your default
- You can add taxpayers and users to this portfolio.

Manage Users on an Organisation or Tax Practitioner Portfolio
Invite, Edit and Delete a User on a Portfolio
- This function is used to add new users to a portfolio, grant access to tax types, set the required levels of authorisation for each user and delete users.
- To successfully add users to portfolios, actions are required from both the following parties:
- The Requestor – this refers to an existing user that has the ‘Manage User’ role assigned to him/her and wants to invite another person to be a user and have access to the organisation or tax practitioner portfolio.
- The User – this refers to the person (e.g. a tax practitioner’s employee) who has been invited to have access to one or more taxpayers that are managed by the requestor.
- To access the required Organisation or Tax Practitioner portfolio:
- Select <My Profile> and <Portfolio Management> from the menu on the left
- Click on <Go to Portfolio>.
- Once you have selected the required Portfolio:
- Select <User> from the menu on the top
- Select <User> again from menu on the left
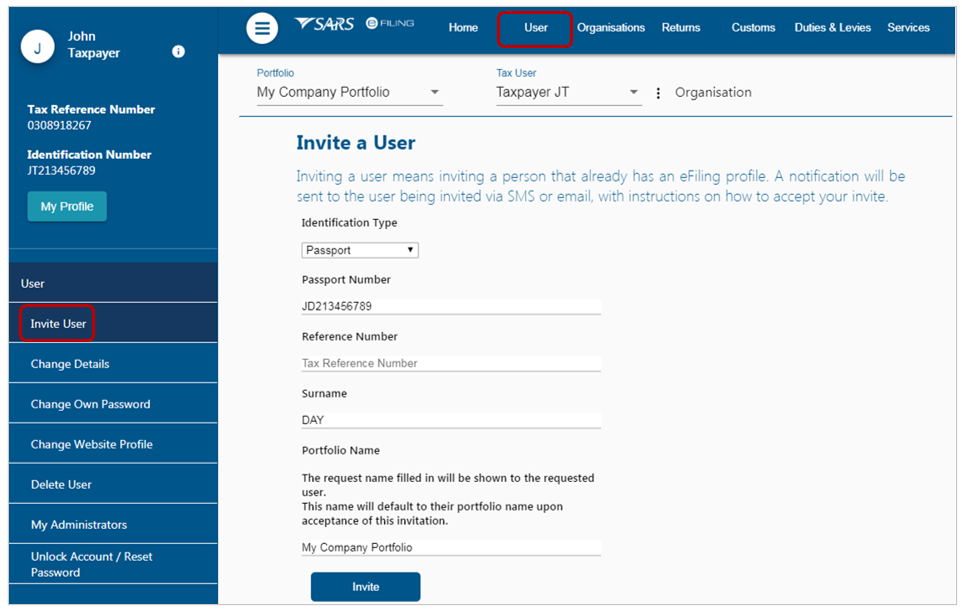
- Select <Invite User>
- Complete the following information for the user you are inviting
- Identification Type
- Passport or ID Number
- Tax Reference Number (only applicable if identification type is passport)
- Surname
- The default Organisation or Tax Practitioner Portfolio name that you want the user to view on his/her portfolio upon accepting your invite
- Click on <Invite>.
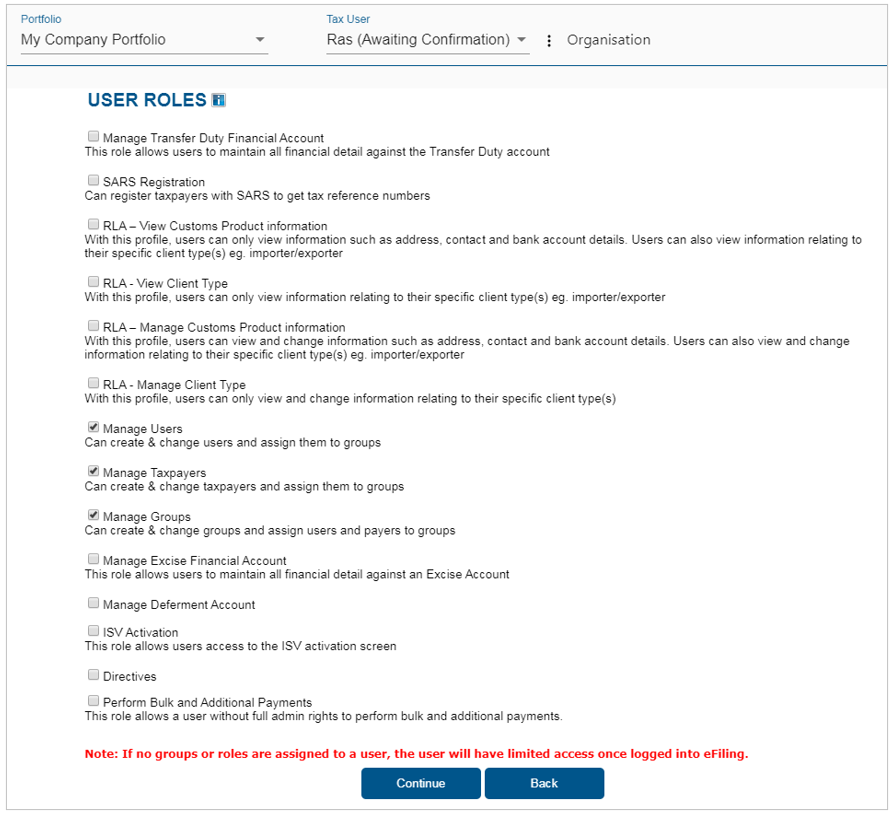
- Select the roles (i.e. permissions) that you want to assign to the user.
- Examples of roles:
- ‘Manage Transfer Duty Financial Account’ (allows users to maintain all financial detail against the Transfer Duty account)
- ‘SARS Registration’ (allows users to register taxpayers with SARS to obtain tax reference numbers)
- ‘RLA – View Customs Product information’ (allows users to only view information such as address, contact and bank account details and information relating to their specific client type(s) e.g. importer/exporter)
- ‘RLA – View Client Type (allows users to only view information relating to their specific client type(s) e.g. importer/exporter)
- ‘RLA – Manage Customs Product information’ (allows users to view and change information such as address, contact and bank account details and also change information relating to their specific client type(s) e.g. importer/exporter)
- ‘RLA – Manage Client Type’ (allows users to only view and change information relating to their specific client type(s))
- ‘Manage Users’ (allows users to add & change users and assign them to groups)
- ‘Manage Taxpayers’ (allows users to add & change taxpayers and assign them to groups)
- ‘Manage Groups’ (allows users to create & change groups and assign users and payers to groups)
- ‘Manage Excise Financial Account’ (allows users to maintain all financial detail against an Excise Account)
- ‘Manage Deferment Account’
- ‘ISV Activation’ (allows users access to the ISV activation screen)
- ‘Directives’ (allows users to access the tax directives functionality)
- ‘Perform Bulk and Additional Payments’ (allows users without full admin rights access to perform bulk and additional payments).
- Click on <Continue>
- A summary of the roles selected will display. Click on <Continue>.
- The invite will be sent to the user. You will be notified via email or SMS once the user accepts the invite.
- Examples of roles:
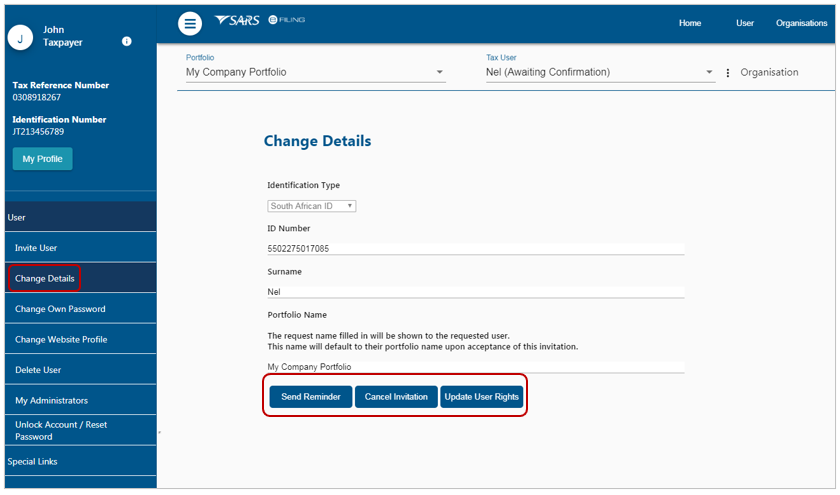
- Select <Change Details> from the menu on the left to do any of the following:
- Send Reminder – this option will resend the notification to the user to remind him/her to accept the invite.
- Cancel Invitation – this option will delete the invite, remove the user on the requestor’s portfolio and also remove the requestor’s profile from the user’s portfolio management screen.
- Update User Rights – use this option to edit roles (permissions) assigned to the user.
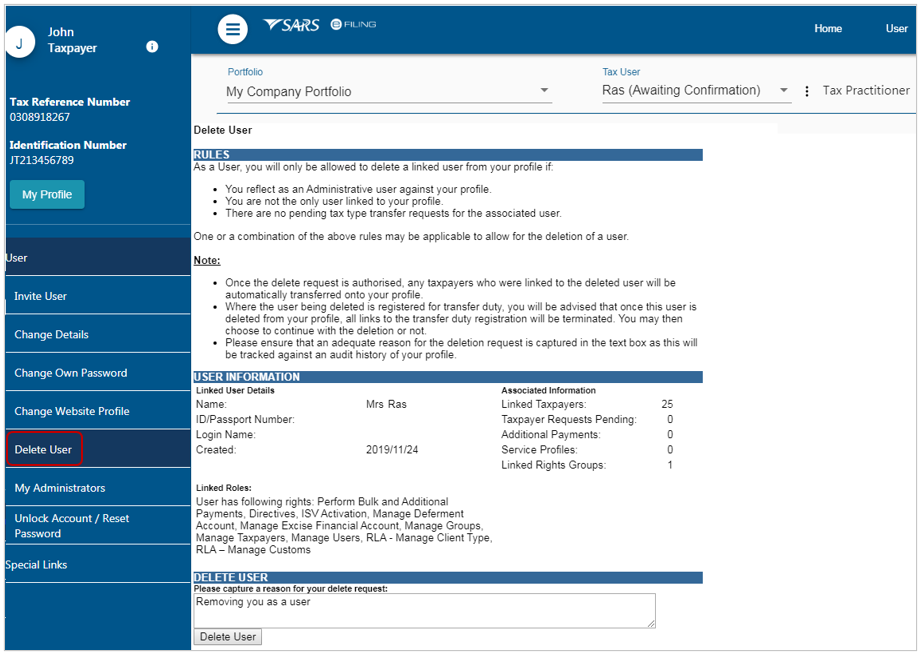
- Select <Delete User> from the menu on the left to remove a user from an existing portfolio.
- Insert a reason for deleting the user
- Click on <Delete User>
- On the pop-up message click on <OK> to confirm your request.
Please Note:
|
Accept Invite to be a User on a Portfolio
- SMS and email notifications will be sent to the person who has been invited to be a user on an organisation or tax practitioner’s portfolio.
- Log on to your eFiling profile.
- Select <My Profile>
- Select <Portfolio Management>
- The User Invitation will display. Click on <Accept>.
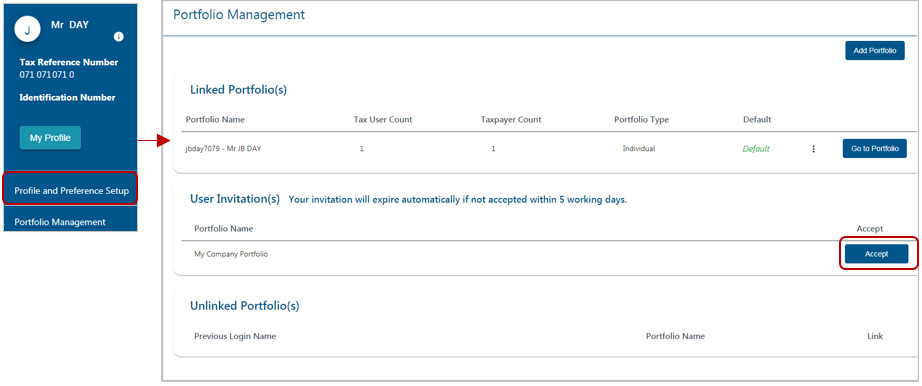
- As part of the authentication process, you will be prompted to enter the One-Time-Pin (OTP) sent to your preferred method of contact. Once the OTP is successfully entered, a pop message will display to confirm that the organisation/tax practitioner profile will be linked to your profile.
Please Note:
|
Manage Groups
- In order to activate the tax type functions and services on eFiling (e.g. Tax Directives, Tax Compliance Status, etc) you must ensure that the correct rights and authorisation levels have been allocated to users on your organisation’s portfolio.
- To activate the tax type functions and services:
- Select <Organisations> from the menu on the top
- Select <Organisation> again from menu on the left
- Click on <Rights Group>
- Click on <Manage Groups>
- The <Group Details> screen will display.
- Click on the <Setup New Group> button to create a new group (e.g. Return Submissions)
- Click on the <Manage Payers> hyperlink to add Taxpayers (activated on your organisation’s portfolio) to a specific group
- Click on the <Manage Users> hyperlink to add users on your organisation’s portfolio to a specific group (for more information refer to the section on manage users).
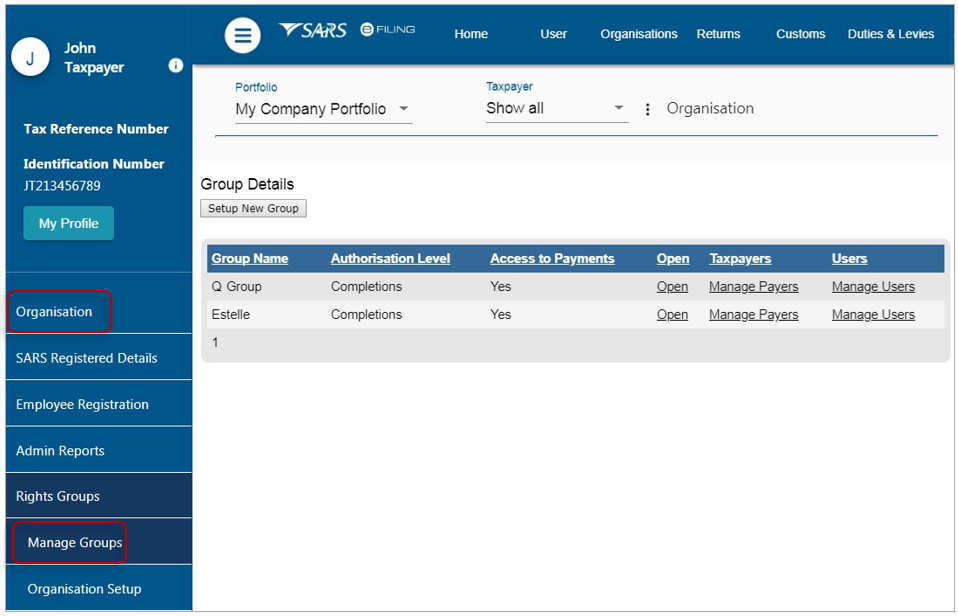
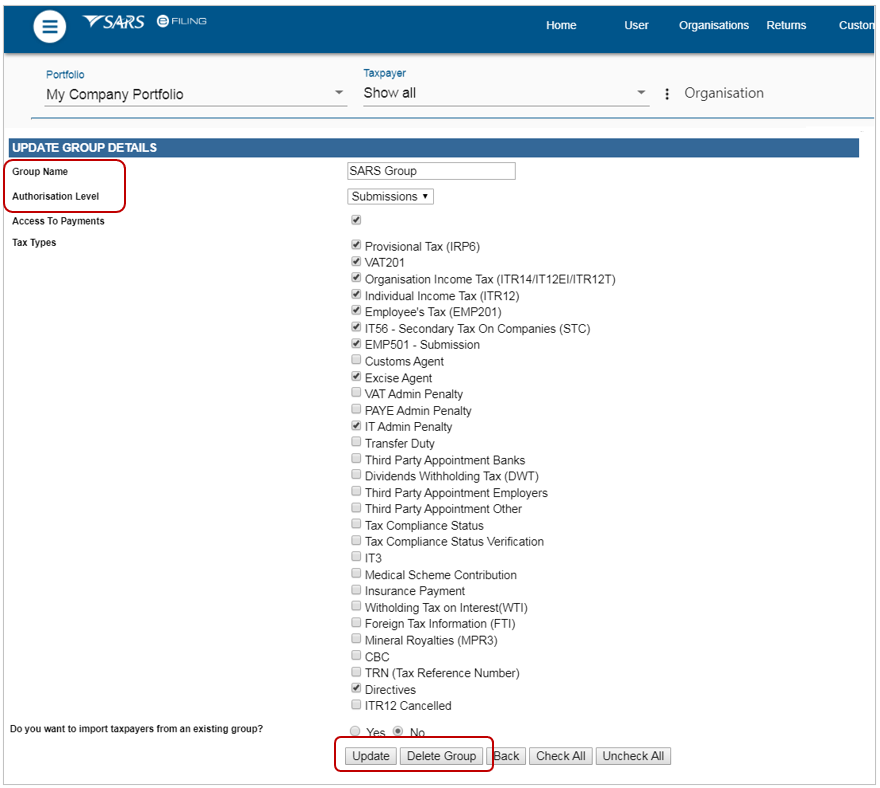
- To amend the details of an existing group click on the <Open> hyperlink:
- Edit the <Group Name> where applicable
- Select the applicable <Authorisation Level>:
- View Only: This will allow you to only have view access
- Completions: You will only be able to view and complete forms or applications
- Submissions: You will be allowed to view, complete and submit forms (e.g. tax directive applications)
- Select the applicable tax types to be activated (e.g. Directives, Tax Reference Number, Tax Compliance Status, etc.)
- Click <Update> to activate the specific tax type functionality required. You also have the option to <Delete Group>.
Manage Taxpayers on an Organisation or Tax Practitioner Portfolio
- To manage taxpayer types linked to a portfolio:
- Select <Organisations> from the menu on the top
- Select <Organisation> from menu on the left.
- To amend details of an existing taxpayer on your portfolio select <Change Details> from the menu on the left.
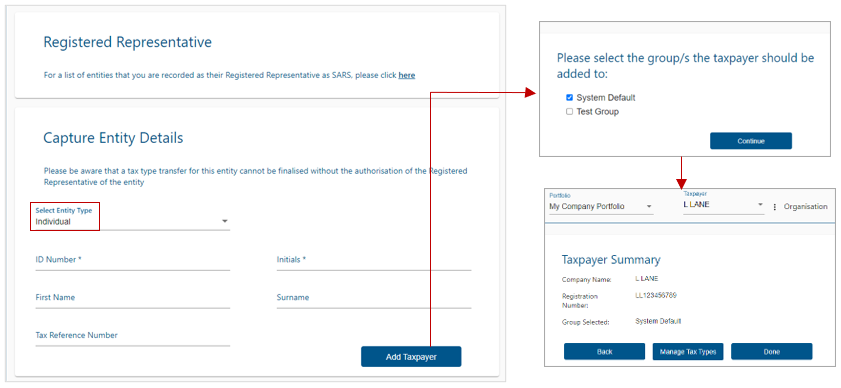
- To add a new taxpayer/entity type to your portfolio:
- Select <Register New> from the menu on the left
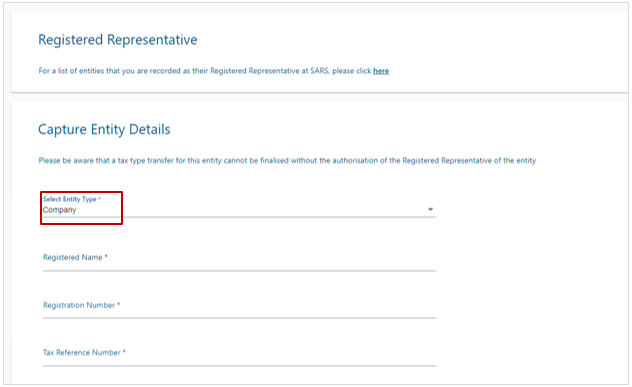
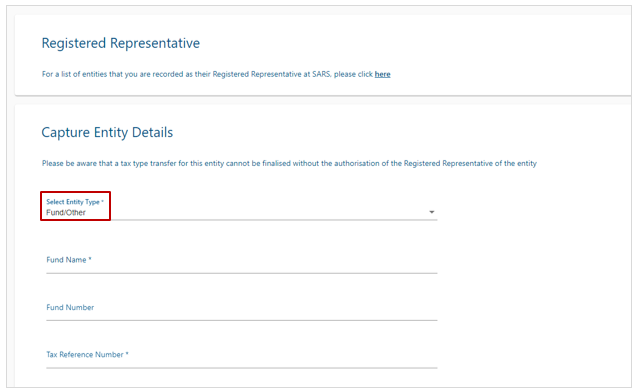
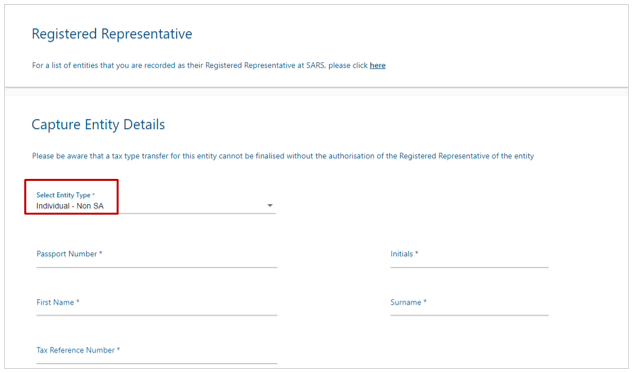
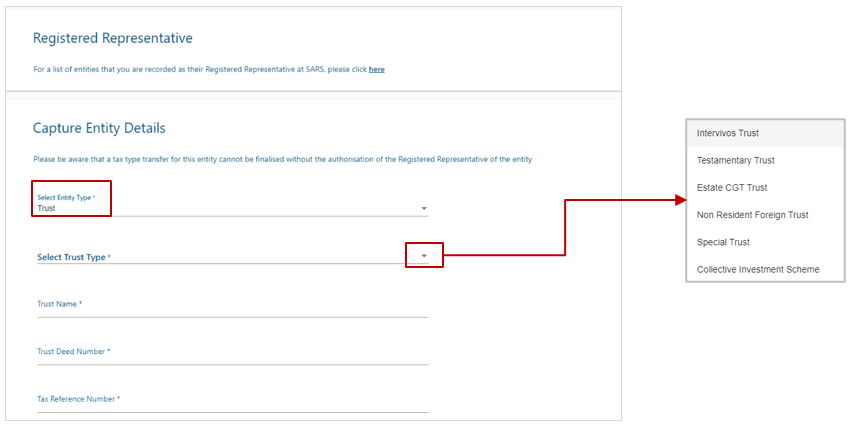
- Select the <Entity Type> from the drop down list (e.g. Individual, Company, Trust, Individual Non-SA, Fund/Other)
- If you are registering a Trust and the Trust Type is ‘Intervivos Trust’ or ‘Testamentary Trust’ or ‘Estate CGT Trust’ or ‘Special Trust’, you must provide the trust registration number issued by the Master of the High Court. A trust registration number is not required if the Trust Type is ‘Non Resident Foreign Trust’ or ‘Collective Investment Scheme’.

- The registration fields displayed will differ according to the type of entity selected (see screens below)
- Complete the applicable fields and click on <Add Taxpayer>
- On the pop-up screen select the group(s) to which the taxpayer should be added (for more information refer to the section on Manage Groups)
- A summary of the new taxpayer’s details will display. Click on <Done>
- Refer to the section on Manage Tax Types for more information on how to activate return/tax types for a taxpayer.
- Information required to add an Individual:
- Information required to add a Company:
- Information required to add a Fund/Other
- Information required to add an Individual who is a non-South African
- Information required to add a Trust and Trust Type.
- A trust deed number is not applicable to Non-resident (Foreign) Trusts or Collective Investment Schemes)
Please Note:
|
Manage Tax Types
- The purpose of this function is to enable the following:
- Activation/Deactivation of specific tax types – In order to transact on eFiling (e.g. submit returns, make payments, request statement of account) the applicable tax type must be activated on your profile
- Transfer of tax types (personal income tax and provisional tax) between taxpayers, tax practitioners and registered representatives on eFiling.
- The owner/registered representative of that tax number must approve the transfer in order to complete the process.
Individuals
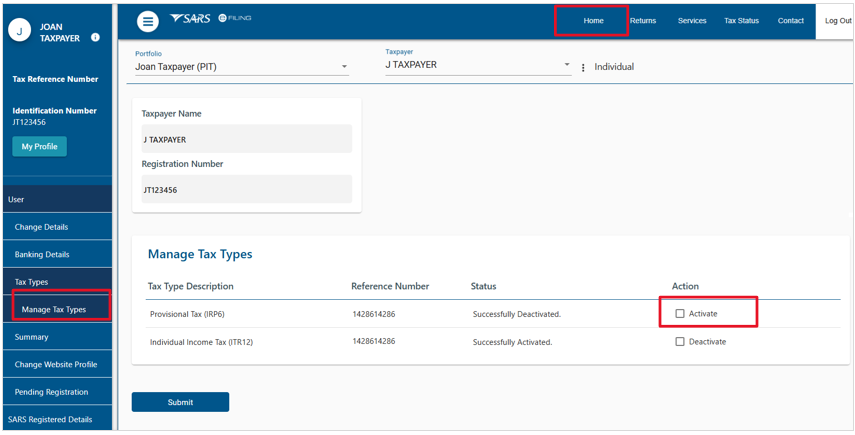
- To activate/deactivate tax types on your individual portfolio:
- Click on <Home>
- Select <User> from the menu on the left
- Select <Tax Types> and then click on <Manage Tax Types>
- A list of taxes you are registered for will display.
- Select the items that you want to activate/deactivate. Click on <Submit>.
- A summary of the actions will display. Click on <Continue> to confirm the action.
- If your tax type is activated with another party (e.g. tax practitioner), you can navigate to the <Manage Tax Types> function and select one of the following options at any time:
- <Remove Tax Practitioner Access>
- <Obtain Full Shared Access>
- <Obtain View Only Shared Access>
Organisations and Tax Practitioners
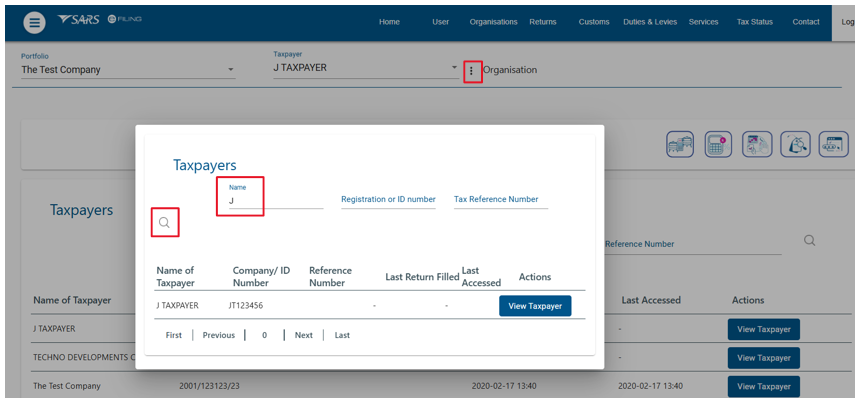
- To activate/deactivate tax types for taxpayers on your portfolio, click on the ellipses ( ⋮ ) menu icon
- Search for the specific taxpayer using the name, registration number, ID number or tax reference number
- Click on the <View Taxpayer> This option will load the existing taxpayer details.
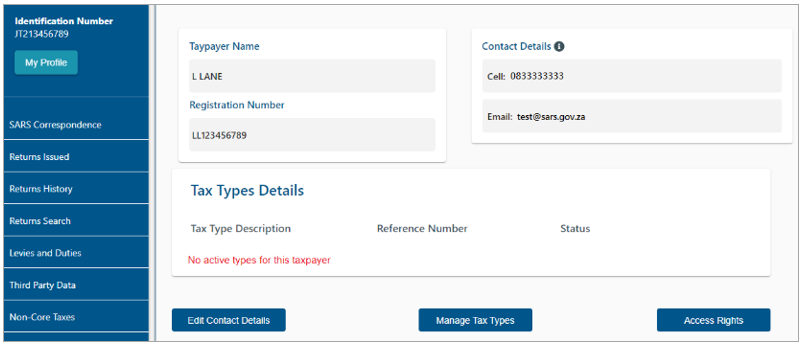
- The ‘Tax Types Details’ screen will display with the following buttons:
- <Edit contact details> – used to update eFiling correspondence details only. To update your security contact details please use the <Profile and preference setup> function
- <Manage Tax Types> – used to activate/deactivate specific taxes that you represent the client for
- <Access Rights> – used to add the taxpayer to a group if you have the manage taxpayer rights.
- Click on <Manage Tax Types>. A table will display with the following information:
- List of tax types linked to the selected taxpayer
- Reference numbers
- Activation Status
- Action that can be selected for that number (e.g. request activation, request tax type transfer, deactivate)

Request Activation or Transfer of Tax Type
- Select the tick-boxes for the applicable actions required (example: “Request Activation” or “Request Tax Type Transfer”)
- Click on the <Submit> button.
- A screen will display with the summary of the actions you selected. Click on <Continue>
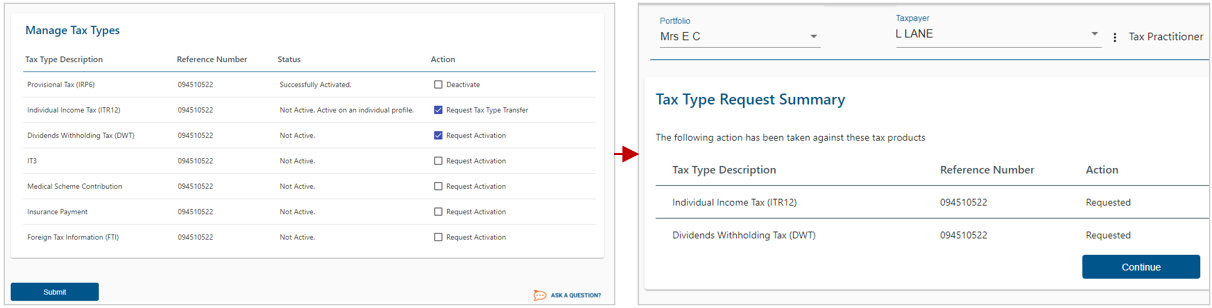
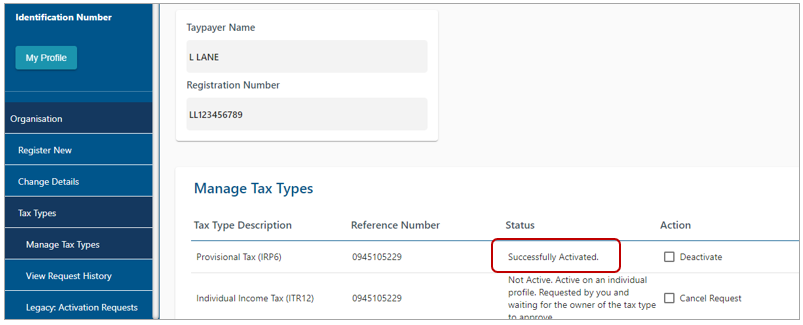
- The status of the request will change to awaiting authorisation and will require the current owner/representative of the tax number to approve the request in order to complete the process.
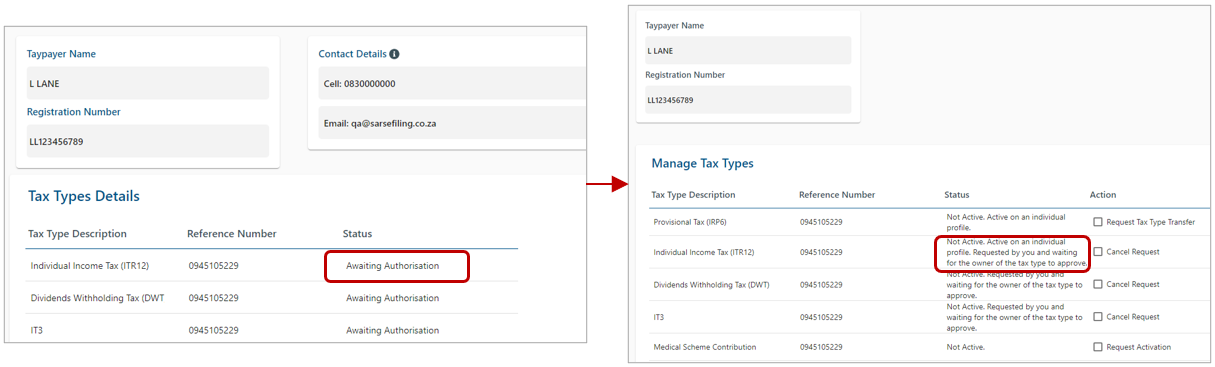
- If the owner/representative approves the request, the status will change to “Successfully Activated”.
Approve Request for Tax Type Activation or Transfer
- A notification will be sent to the current owner/representative to inform him/her:
- Of the transfer request, and
- The steps to follow to action the request
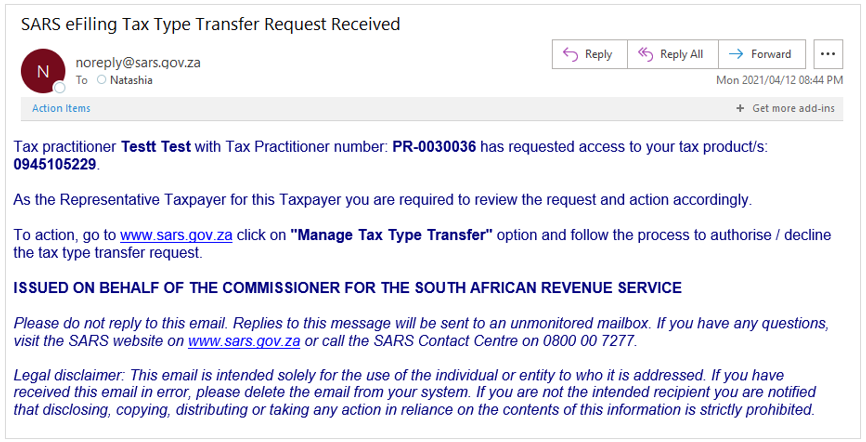
- The owner/registered representative must follow the steps below to action the request and complete the process.
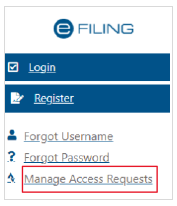
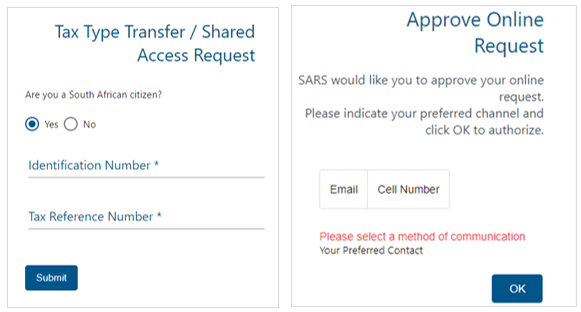
- Log on to the SARS website and select on <Manage Access Requests>
- On the <Tax Type Transfer/ Shared Access Request> screen select yes or no to indicate if you are a South Africa Citizen
- Insert your own identification number
- Insert the tax number for which the transfer is requested.
- Click on <Submit>
- As part of the authentication process, you will be required to enter a One-Time-Pin (OTP) to authorise or decline the transaction.
- Insert the OTP sent to your email or cell number
- On the <Tax Type Transfer/ Shared Access Request> screen select yes or no to indicate if you are a South Africa Citizen
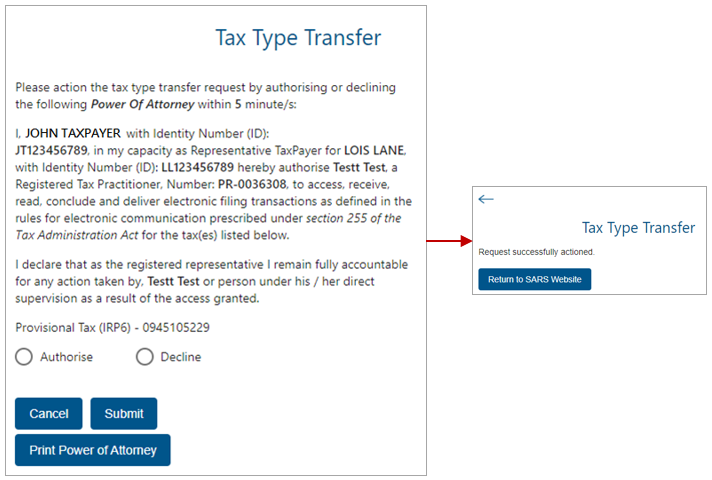
- Read the declaration and the details of the party requesting the tax type transfer and print the Power of Attorney
- Select <Authorise> or <Decline>
- Click on <Submit>
- After you have authorised or declined the request, click on <Return to SARS Website>.
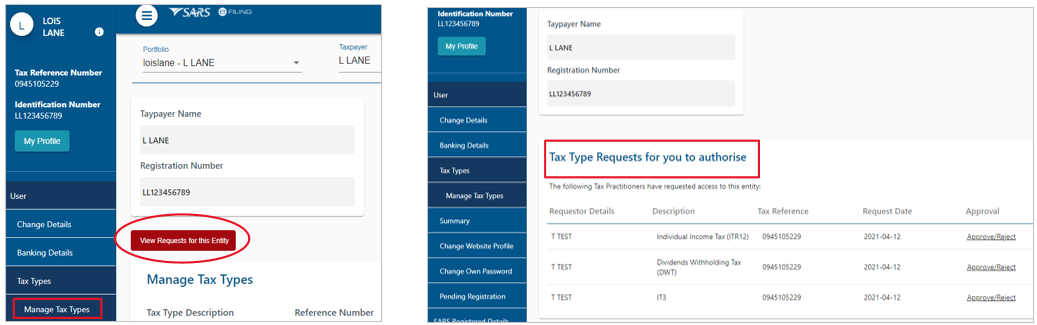
- If you are a registered eFiler, you can log on to eFiling to view a list of tax type requests that require your authorisation:
- Navigate to the <Manage Tax Types> function
- Click on <View Requests for this Entity>
Please Note:
|
Tax Types Legacy
- The legacy menu items will be available for a temporary period and is intended to allow users to view/monitor requests made via the previous Tax Type Transfer functionality (prior to the implementation of the Manage Tax Type function).
- To access the legacy requests
- Select <Organisations > from the menu on the top.
- Select <Organisation> from the menu on the left
- Select <Tax Types> from the menu on the left
- <Legacy Activation Requests> – this function is read-only and allows you to view tax types previously activated for a particular taxpayer
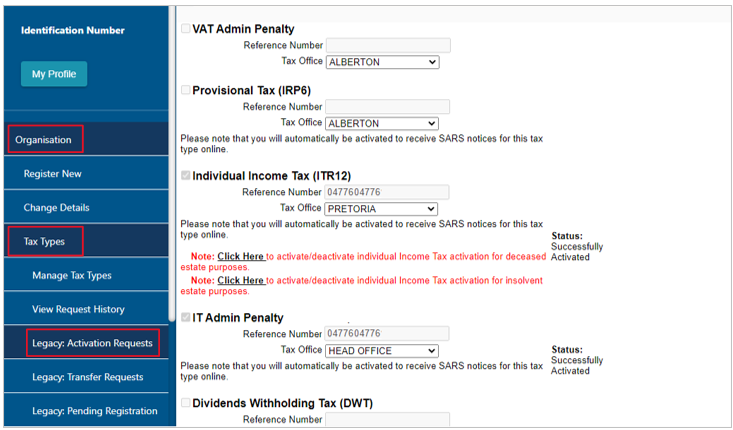
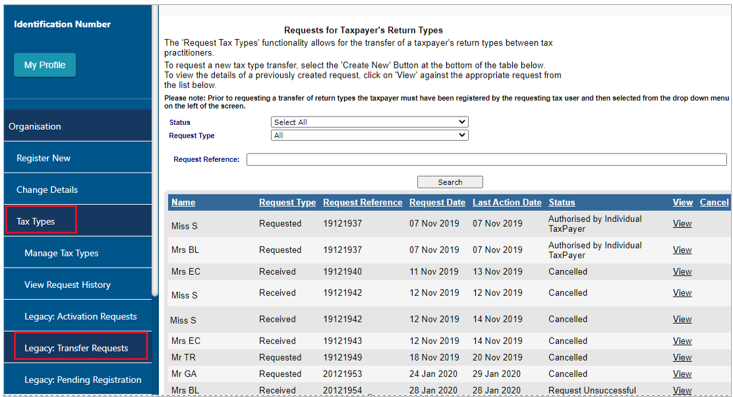
- <Legacy Transfer Requests> – this function allows you to access the list of previous tax type transfer requests.
- You can open individual requests
- Where applicable you can capture an override code that was sent for a legacy request (prior to the implementation of the Manage Tax Types function)
- You will not be able to create any new tax type transfer requests.
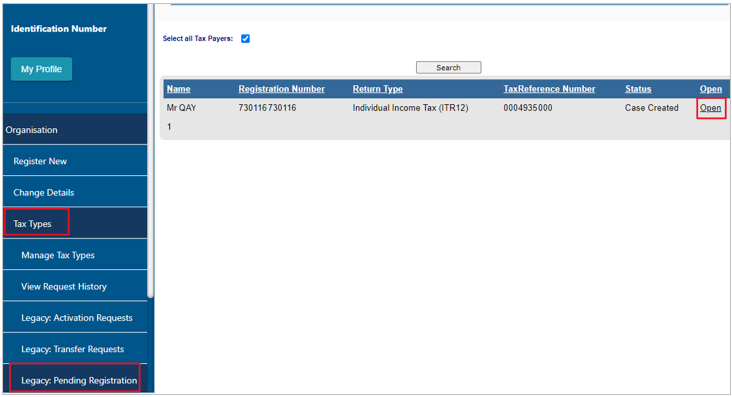
- <Legacy Pending Registration> – There may be cases where SARS needs to review a request before activating the particular tax type for eFiling. In this instance the status of the tax type activation will be “Awaiting Registration Verification” and a case number will be allocated to you. You can use this function to view the pending registration requests.
- Select the option for all taxpayers
- Click on the <Open> hyperlink
- You can view the taxpayer’s details and click on <Query Status> to view the progress of the eFiling registration.
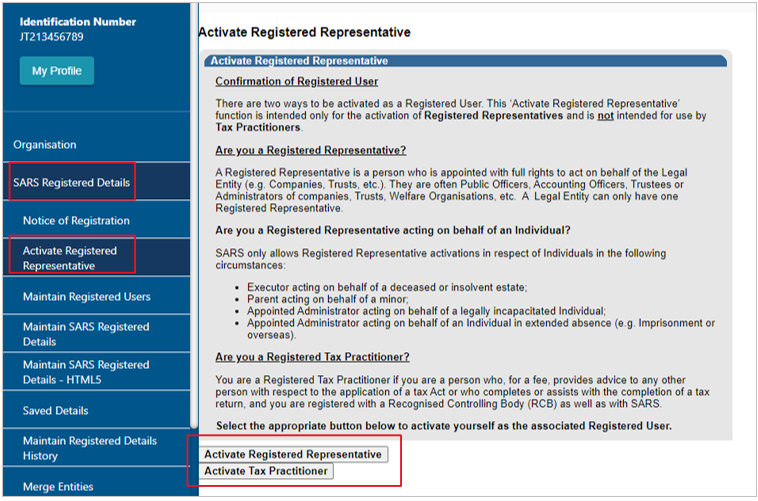
Activate Registered Representative
- If you are the appointed registered representative for an entity, you must activate the status on eFiling in order to transact on behalf of your client.
- Select <Organisations > from the menu on the top.
- Select <SARS Registered Details> from the menu on the left
- Select <Activate Registered Representative>
- Select the applicable option (i.e. Tax Practitioner or Registered Representative)
- Agree to the declaration confirming that you are the authorised representative for the taxpayer and click on <Continue>
- Complete the applicable fields and select the representative capacity (e.g. accounting officer, curator, public officer, parent guardian, etc.)
- Click the on the activate button at the bottom of the screen
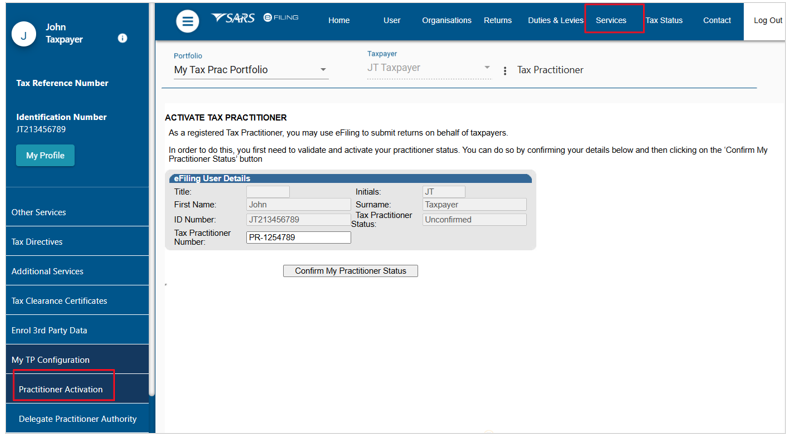
Tax Practitioner Configuration
- This functionality enables tax practitioners to confirm their tax practitioner status at SARS and allow tax practitioners to link practitioner users to other activated practitioner user profiles.
- If a user is not a confirmed practitioner or has not been linked to a practitioner user, access to ITR12 returns will be limited to only a “SAVE” functionality. This means that the tax practitioner or practitioner user will not be able to submit the ITR12 returns to SARS and the taxpayer will have to either submit the return via eFiling (if he/she has shared access to the ITR12 with the tax practitioner) or the taxpayer will have to contact a SARS branch office for assistance to submit the return.
- To access this functionality:
- click on <Services> on the menu on the top
- Select <My TP Configuration> from the menu on the left.
- Select <Practitioner Activation> from the menu on the left
- On the <Activate Tax Practitioner> screen enter a valid practitioner number in the tax practitioner number field
- Click on the <Confirm My Tax Practitioner Status> button.
Please Note:
|
Delegation Practitioner Authority
- Tax practitioners are allowed to link practitioner users to other activated practitioner users and thereby delegate authority. This is typically in cases whereby staff members of an organisation are performing functions on eFiling on behalf of the tax practitioner.
- Select < Delegate Practitioner Authority > from the menu on the left
- If the tax practitioner has not been activated against the eFiling profile, the following message will display. To activate, refer to “Practitioner Activation” step above.

- If the tax practitioner has been activated and the status indicates “Registered”, the <Delegate User Authority> page will display.
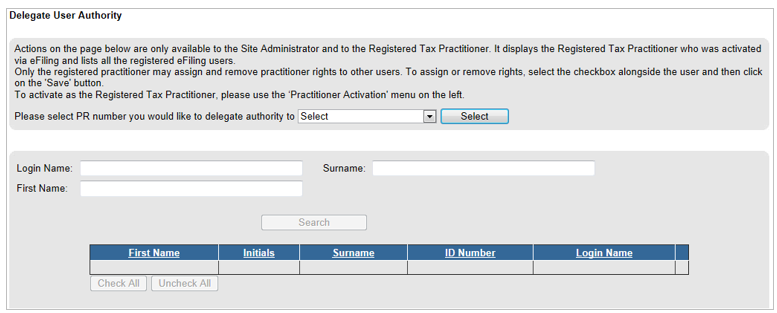
- Choose the “PR number” that you want to delegate authority to:
- Administrators or the registered tax practitioner may perform actions on this page
- The admin user on eFiling will be able to view all linked practitioners in the dropdown.
- If it is the user on eFiling, only his/her practitioner (PR) number will display on the dropdown list for selection.
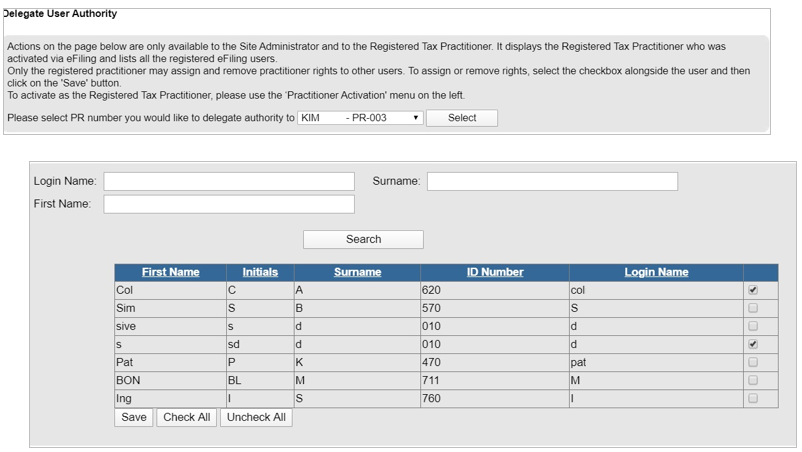
- Once the PR number has been chosen, click on <Select>
- A list of users will display. Select the users and click on the <Save> button to continue
- Click on <OK> to confirm the selection. A message will display to indicate that the users have been successfully updated.
- Administrators or the registered tax practitioner may perform actions on this page
Confirm Practitioner Registration Status
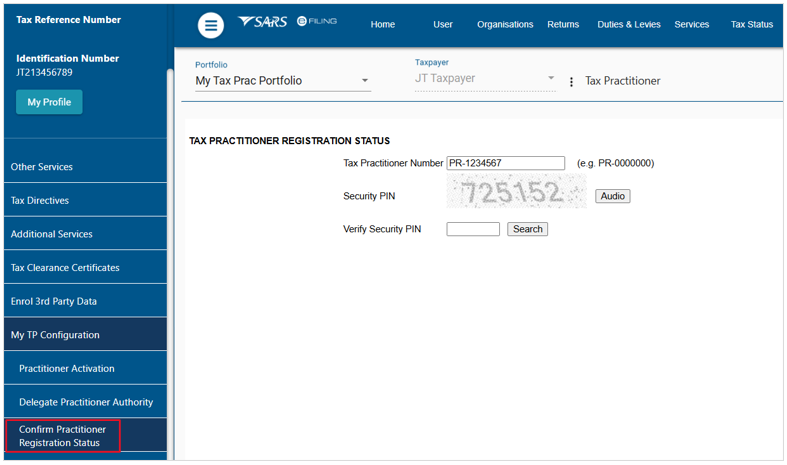
- Select <Confirm Practitioner Registration Status> from the menu on the left
- The tax practitioner registration status page will display.
- Enter the tax practitioner number. Complete and verify the security pin displayed on the screen
- Click the “Search” button to continue.
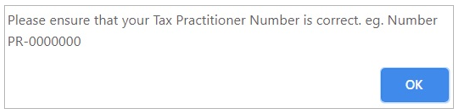
- If the tax practitioner number is incorrect, the following error message will display.
- If no registered tax practitioner can be found, a message will display on the screen.
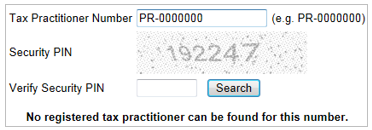
- If the tax practitioner is registered, the practitioner’s name, surname, practitioner number and registration status indicated as “Registered” will display.

SARS Correspondence
- For your convenience all letters, notices and messages issued by SARS is available in one place under ‘SARS Correspondence’.
- To search for correspondence:
- Log on to eFiling and select <SARS Correspondence> from the menu on the left
- Click on <Search Correspondence>
- The correspondence grid will display
- You can use one or more of the following filters to search for correspondence:
- Tax type
- Tax year
- Received from date (i.e. start date)
- Received to date (i.e. end date)
- Correspondence Type (such as Letters, Notices and Text Messages issued by SARS)
- Click on <Search>.
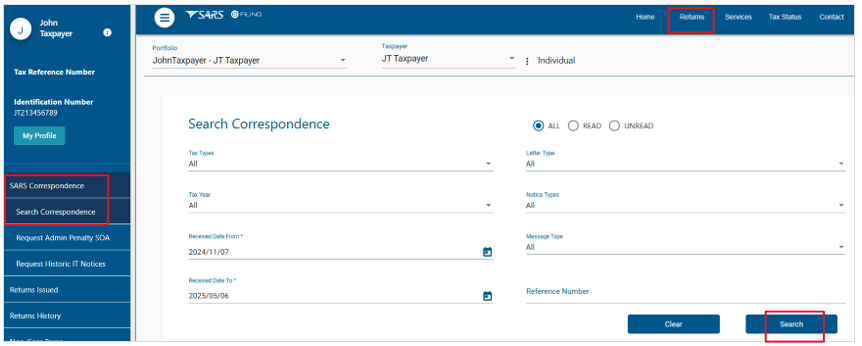
Please Note: If you navigate to other eFiling pages after logging on, you will no longer see <SARS Correspondence> on the menu on the left. To navigate back to <SARS Correspondence> select <Returns> from the menu on the top. |
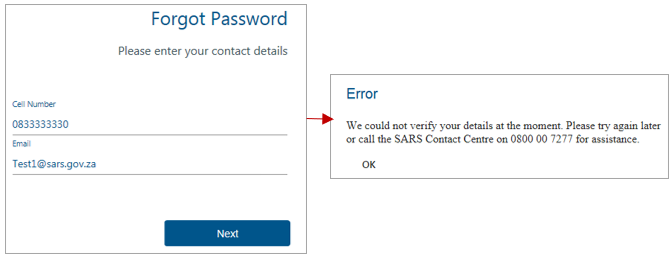
Forgot Password
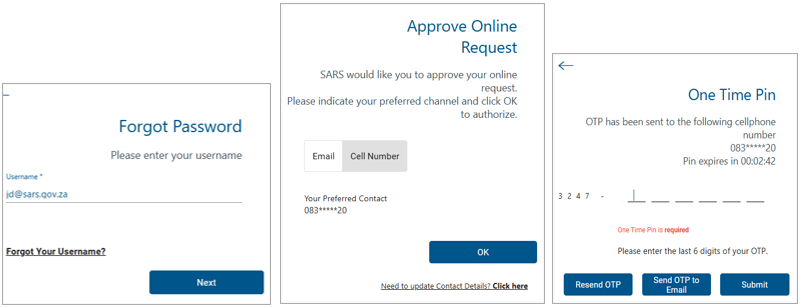
- On the eFiling login in screen click on <Forgot Password> and then enter your username.
- Select your preferred channel to receive the OTP.
- An OTP will be sent to the email address or cell number saved on your eFiling profile.
- Insert the OTP and click on <Submit>.
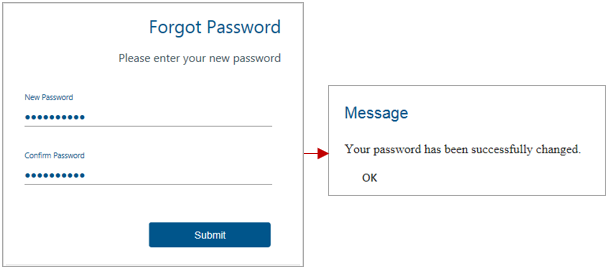
- Insert your new password and retype it to confirm.
- Click on <Submit>
- A pop-up message will display confirming that your password has been changed successfully.
- If you registered for eFiling prior to 1 July 2019 and did not provide your contact details, you will be required to enter your cell number and email address.
- If we can match your details with our records, an OTP will be sent to you
- If we cannot match your details, we will ask you a few questions to authenticate you
- If we are still unable to match your details, please call the SARS Contact Centre for further assistance.
Forgot Username
- On the eFiling login in screen click on <Forgot Your Username>. Insert the following particulars:
- Cell number
- Indicate if you are a South African citizen
- ID number (or Passport number if you are not a South African citizen)
- Tax number (if you have one).
- Select your preferred channel for the OTP
- An OTP will be sent to the email address or cell number saved on your eFiling profile.
- Insert the OTP and click on <Submit>.
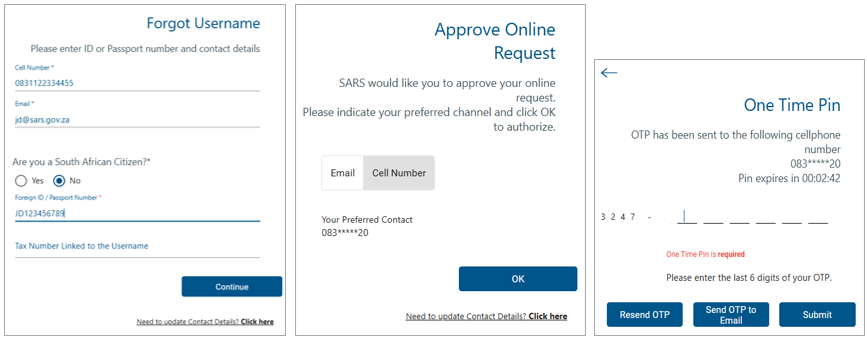
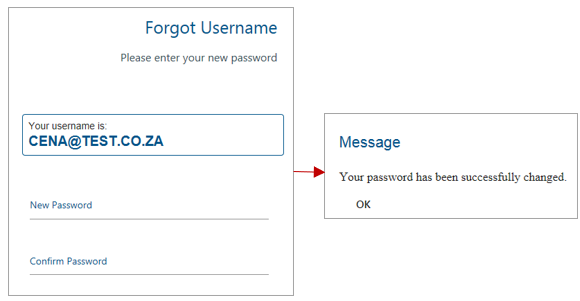
- Once you have entered the correct OTP, your username will display. You will be prompted to insert a password and retype it to confirm.
- Click on <Submit>
- A pop-up message will display confirming that your password has been changed successfully.
- If you registered for eFiling prior to 1 July 2019 and did not provide your contact details, you will be prompted to select a preferred channel to receive your OTP.
- If we can match your details with our records, an OTP will be sent to you
- If we cannot match your details, we will ask you a few questions to authenticate you
- If we are still unable to match your details, please call the SARS Contact Centre for further assistance.
Update Contact Details
- This function allows you to update your security contact details from the eFiling login page without having to log in.
- Please note the following:
- This function is only available to registered eFilers who are South African citizens
- You must pass the biometric verification step before you can update your security contact details
- If you have forgotten your security contact details and you are not a South African citizen, or you have failed the biometric verification, please either call the SARS Contact Centre or book an appointment (via the SARS website) for a SARS official to assist you.
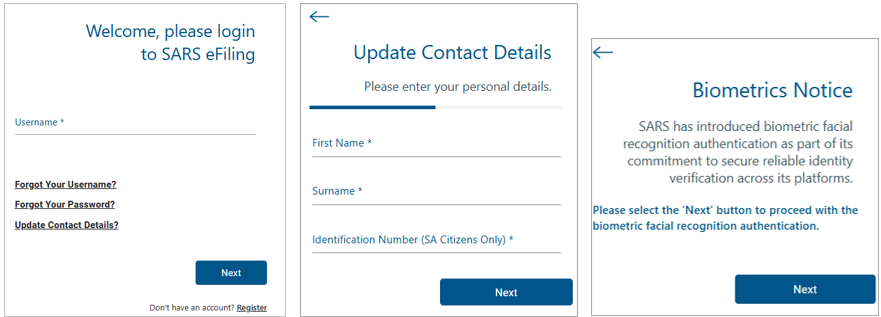
- On the eFiling login screen click on <Update Contact Details>
- Complete your personal details (first name, surname and South African identity number) and click on <Next>
- Read the ‘Biometrics Notice’ and click on <Next>
- Follow the biometric on screen instructions. For more information refer to the section ‘Biometric Authentication Process’ described above.
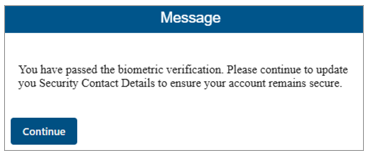
- If you pass the biometric verification, the following confirmation message will display. Click on <Continue>.
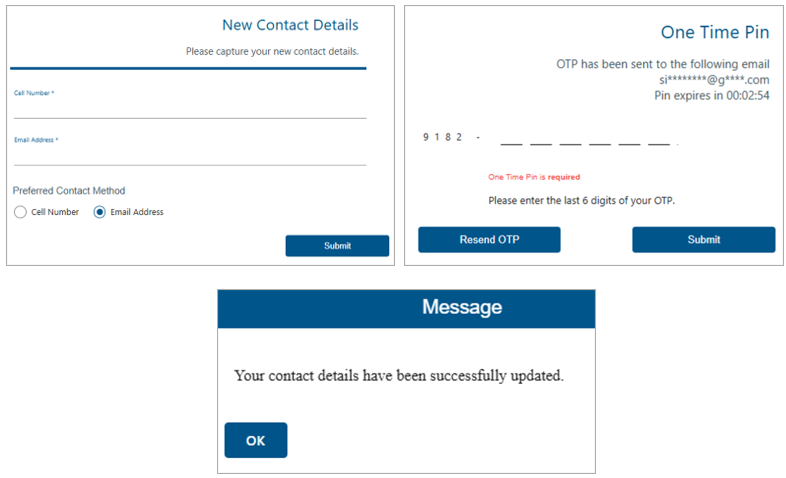
- Capture your updated contact details (cell number and email address), select a preferred contact method and click on <Submit>
- Insert the OTP that has been sent to the new cell number or email address and click on <Submit>.
- A pop up message will display to confirm that your contact details have been successfully updated.
Definitions, acronyms and abbreviations
The definitions, acronyms and abbreviations can be accessed here – Glossary webpage.
Legal disclaimer: In the event of conflict or inconsistency between this webpage and the PDF version of the guide, the latter shall prevail.