
1 Summary
The purpose of Relationship Management (RM) functionality is to provide the trader with a secure online solution to manage their trading relationships, allowing SARS to facilitate relationship management efficiently and effectively amongst traders without direct involvement in the management thereof.
RM is a component of RLA and is available to either the traders (from RLA after clicking through from eFiling) or SARS branch officers (with appropriate roles) to:
- Create new relationships;
- Cancel, Accept and Reject relationships; and
- View and manage notifications via RLA Inbox channel.
2 Disclosure of a new relationship
a) After the user logged in to eFiling as prescribed in the SC-CF-42 – RLA Customs Trader Portal – External Guide the user clicks on Dashboard under Relationship menu on the RLA menu.
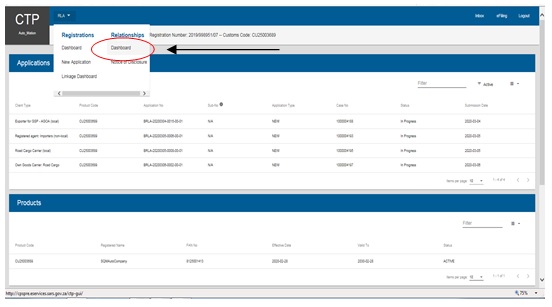
b) The system displays the RLA client’s relationship Dashboard.

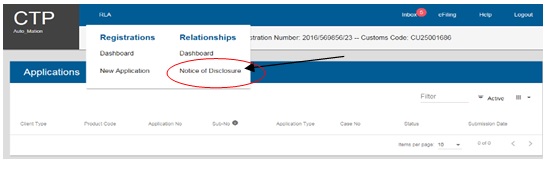
c) The user clicks on Notice of Disclosure under Relationship in order to create a new relationship case.
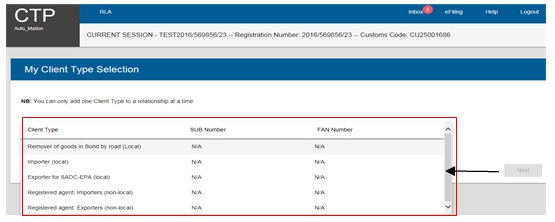
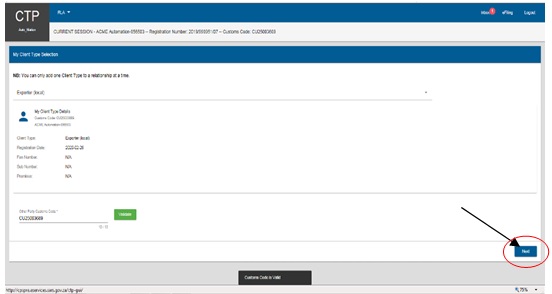
d) The user clicks on Client Type dropdown arrow on the My Client Type Selection screen.
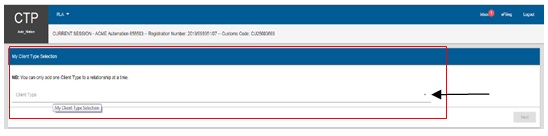
e) The user selects the nominated client type from the dropdown list displayed for which a new relationship is being created.
f) The system:
- Displays the nominated RLA client’s details; and
- Populates the other Party Customs Code text field.
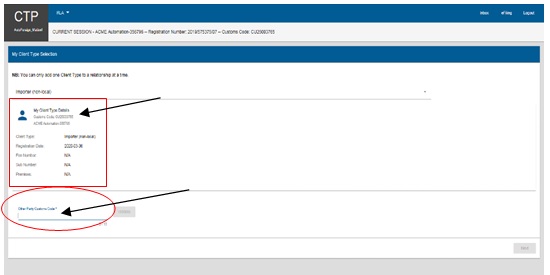
g) The user captures the nominee’s RLA client Customs client number in the text field Other Party Customs Code.
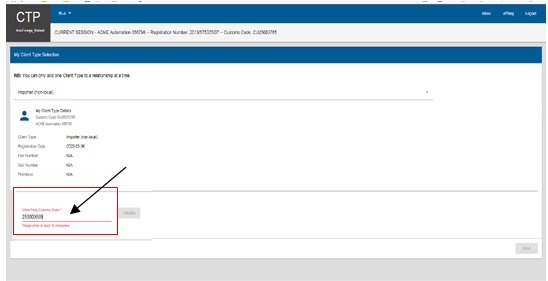
h) The user clicks on the Validate button.
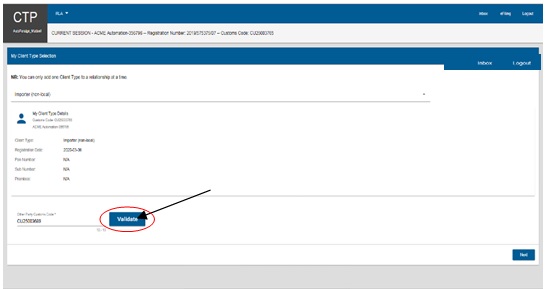
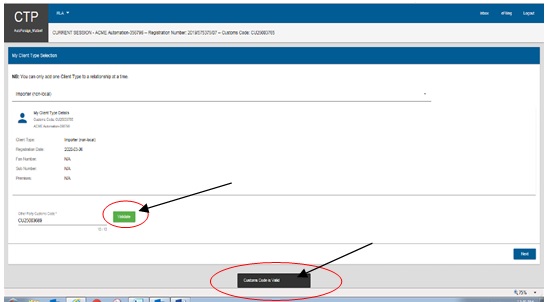
i) The system validates the nominee’s RLA Customs client number:
- If invalid, the systems displays an error message. The user must recapture the nominee’s Customs client number. For security reasons the exchange of Customs client numbers must be contractually managed between parties as it will not be controlled by SARS.
- If valid, the system displays a message that the nominee’s RLA client’s Customs client number is valid.
j) The user clicks on the Next button. The information is not editable or saved onto the RM database as the disclosure of the relationship is not yet completed until confirmed or rejected by the nominated RLA client.
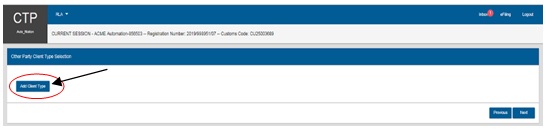
k) The system displays the Other Party Client Type Selection page.
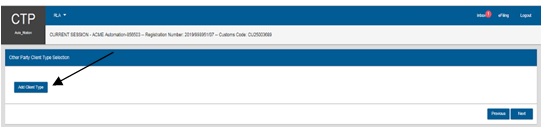
l) The user clicks on the Add Client Type button.
m) The system displays the Other Party Client Type page and the user (nominator) selects the RLA client type details of the nominee:
If the nominator is a: | The nominee must be a: |
Registered Importer (non-local) who does not have a business address in South Africa | Registered Agent registered to represent Importers (non-local) |
Registered Exporter (non-local) who does not have a business address in South Africa | Registered Agent registered to represent Exporters (non-local) |
Licensed Remover of goods in bond (non-local) who does not have a business address in South Africa | Registered Agent registered to represent licensed Removers of goods in bond (non-local) |
Carrier (non-local) who is required to register for reporting purposes but does not have a business address in South Africa | Registered Agent registered to represent Carries (non-local) |
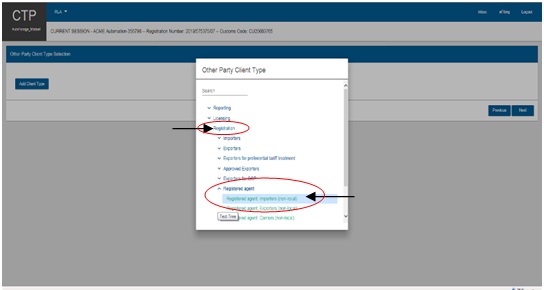
n) The system validates the nominee’s details and if:
- Any of the validations fail, the system displays an error message that the selected client type is not a valid client type for this trader. The user returns to paragraph l) above and reselects the nominee’s client type.

- Valid, the system displays the nominee’s RLA client’s details. The information is not editable or saved onto the RMM database as the disclosure of the relationship is not yet completed until confirmed or rejected by the nominated RLA client.
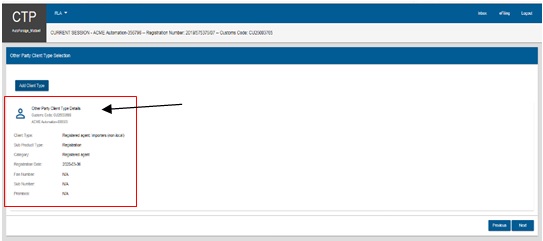
o) The user clicks on the Next button.
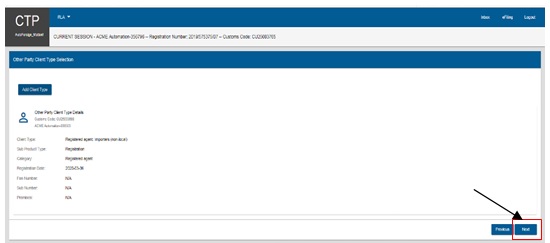
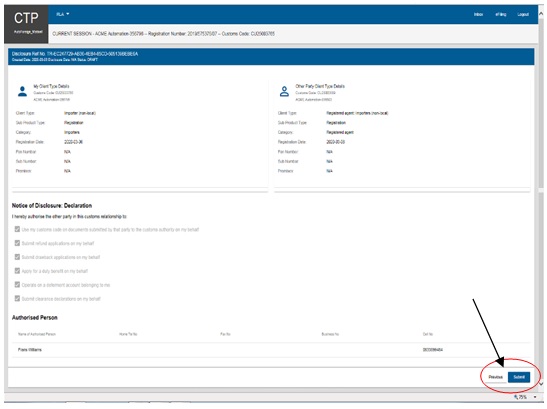
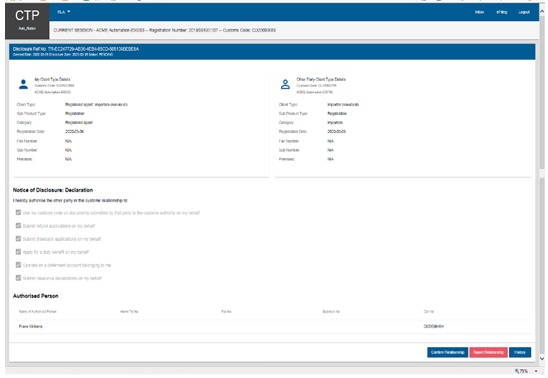
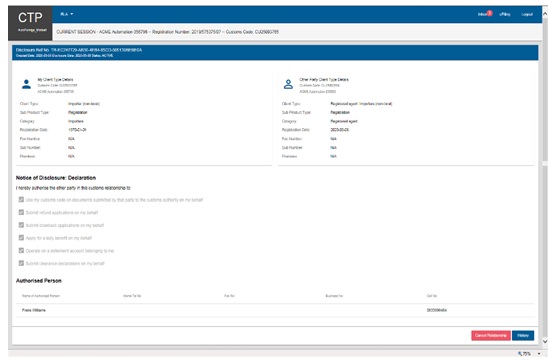
p) The system displays:
- The nominator’s detail under My Client Type Details; and
- The nominee’s details under Other Party Client Type Details.
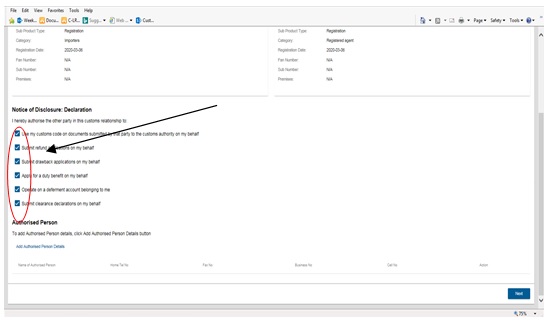
- The Notice of Disclosure: Declaration (Questionnaire).
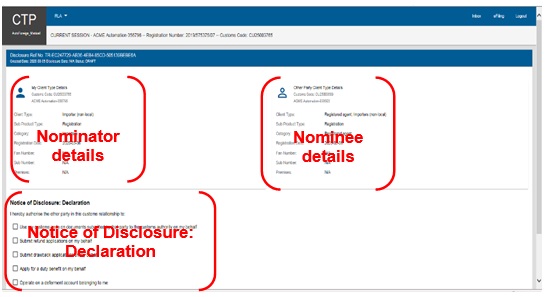
q) The user selects the applicable boxes according to the contract concluded between the two (2) parties.
3 Capturing of the details of the authorised person
a) The user clicks on the Add Authorised Person Details.
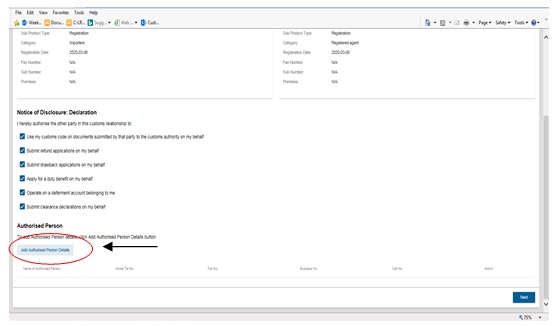
b) The system displays the Add Authorised Account capture window.
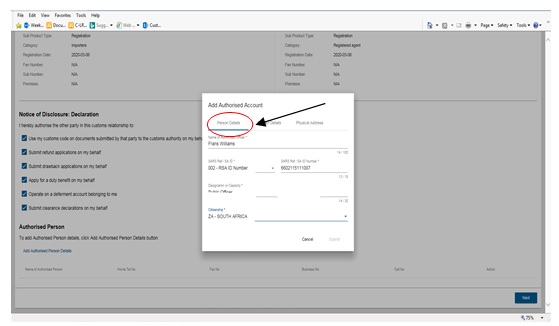
c) The user captures the following mandatory details of the authorised person (nominee) under Person Details:
- Name and surname;
- SARS reference or SA ID number;
- Designation or capacity; and
- Citizenship.
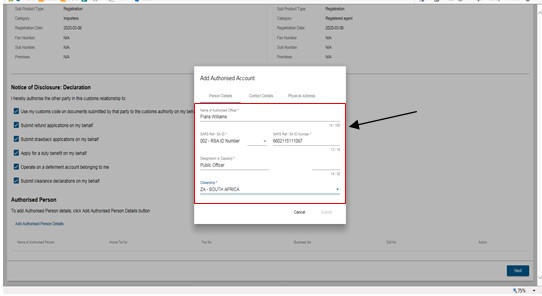
d) The details captured are automatically saved.
e) The user clicks on Contact Details on the Add Authorised Account capture window.
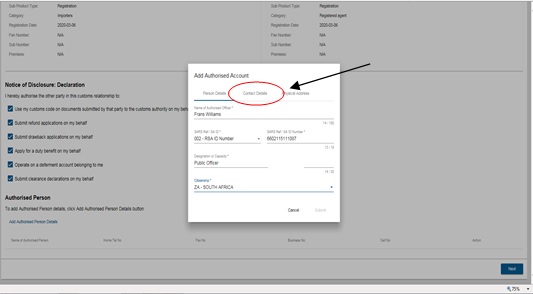
f) The system displays the contact details capture window.
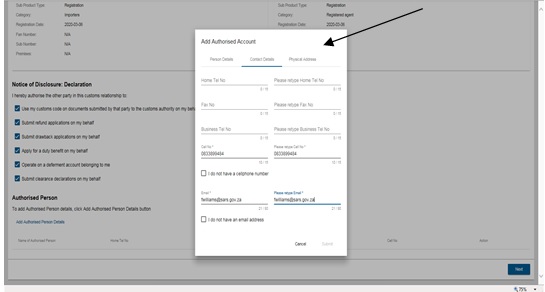
g) In order to receive electronic notifications or correspondence, the user must capture the authorised person’s (nominee’s):
- Cell phone number; and
- Email address.
h) The above details must be captured twice to avoid capturing errors.

i) If the authorised person (nominee) does not have a cell phone number or an email address, the user must select the appropriate box next to:
- I do not have a cell phone number; or
- I do not have an email address.
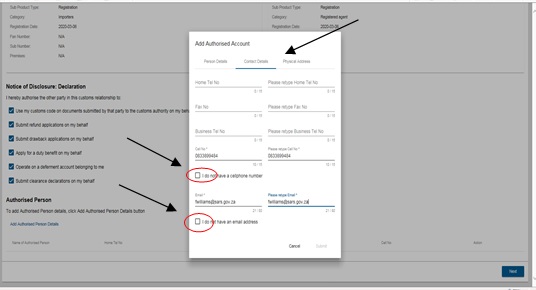
j) If no cell phone number or email address is provided, SARS will not be able to communicate any notification or correspondence electronically to the authorised person (nominee). The authorised person must visit a SARS Customs Branch office where the BFE capturing functionality is available and requests copies of notifications or correspondence issued.
k) The following contact details are optional:
- Home telephone number;
- Fax number; and
- Business telephone number.
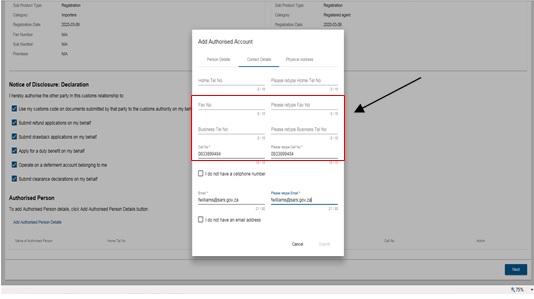
l) The details captured are automatically saved.
m) After the user captured the mandatory Contact Details of the authorised person (nominee), the user clicks on Physical address on the Add Authorised Account capture window.
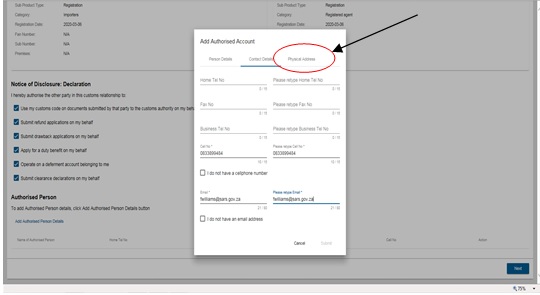
n) The system displays the Physical address capture window.
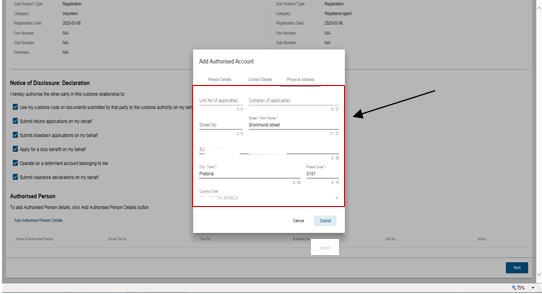
o) The user:
- Captures the following mandatory details under physical address:
- Street / Farm name;
- City / Town; and
- Postal code; and
- Clicks on the Country code dropdown arrow and selects ZA – SOUTH AFRICA.
- The following physical address details are optional:
- Unit number;
- Complex;
- Street number;
- Suburb / District; and
- Country code.
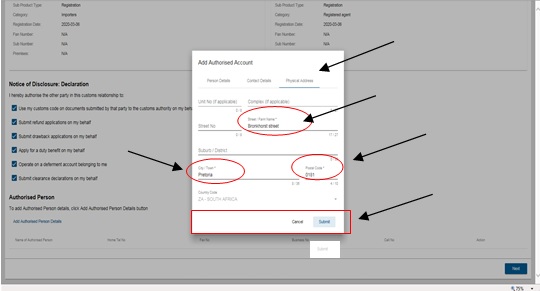
p) After the user has captured the mandatory details of the authorised person (nominee) the system activates the Submit option.
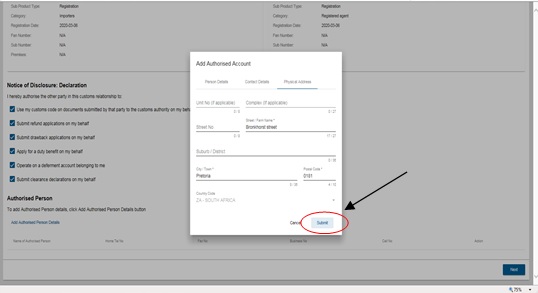
q) If the authorised person’s (nominee’s) physical address details have been:
- Incorrectly captured, the user clicks on Cancel. The system clears the details and the user is required to recapture all the mandatory details of the authorised person’s (nominee’s) physical address as prescribed in paragraph n).
- Correctly captured, the user submits the authorised person (nominee) details.

r) The system displays a summary of:
- The nominator’s details;
- The nominee’s details; and
- The Notice of Disclosure: Declaration; and
- Authorised person’s (nominee’s) details.
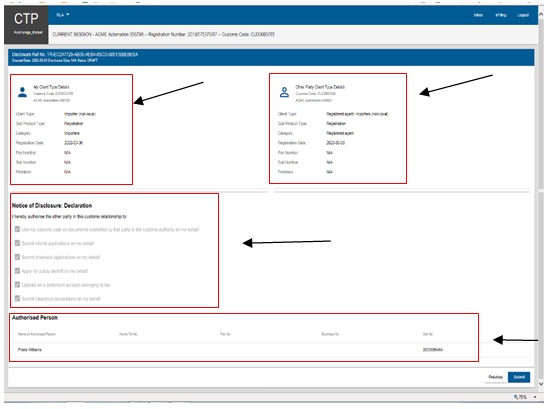
s) The user:
- Clicks on the Previous button if the disclosure declaration (see paragraph q) above) or the Authorised person’s details (paragraph 3 above) must be edited; or
- Submits the Notice of Disclosure. The information is saved on the RM database.
t) The system displays a message that the Notice of Disclosure has been successfully created.
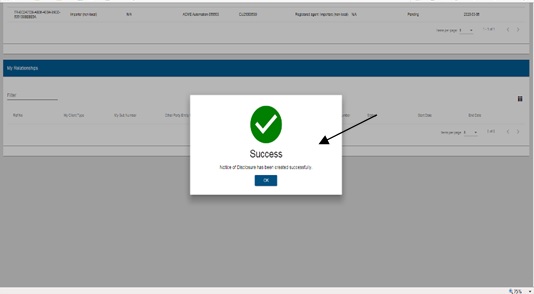
u) The user clicks on the OK button.

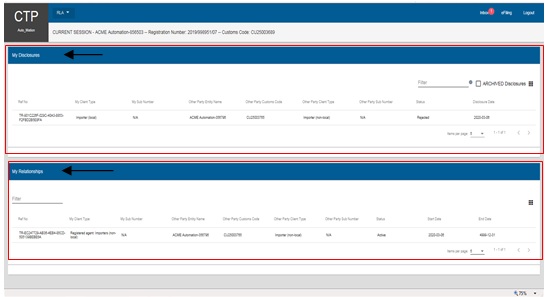
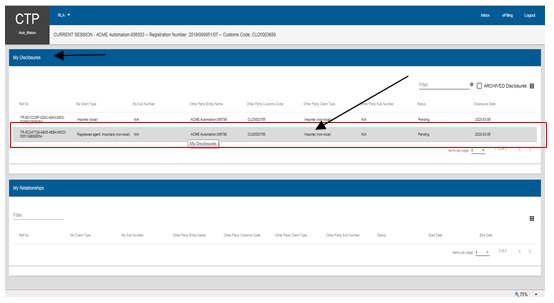
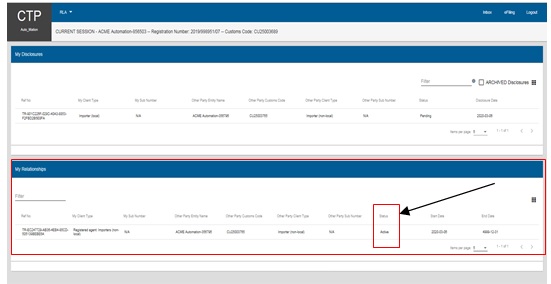
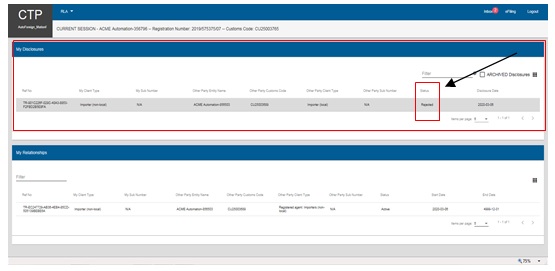
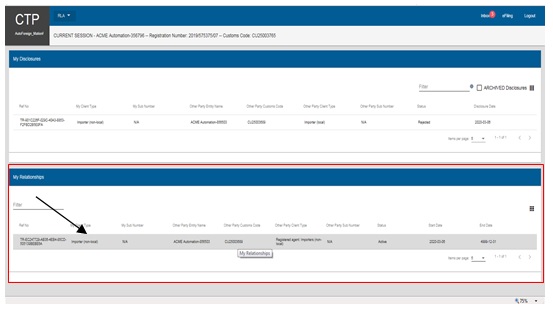
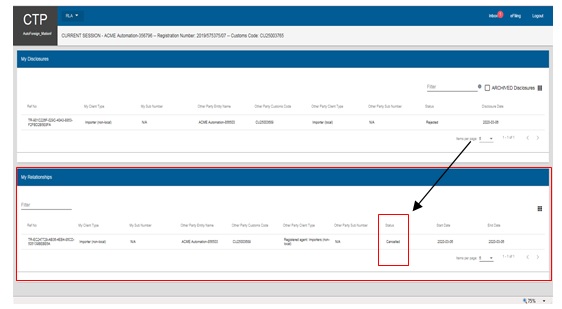
v) The system displays the client’s RLA Relationship Dashboard, refer to paragraph b) above listing the relationships status, example:
- Relationships rejected (the nominee rejected the notice of disclosure) or pending (waiting for the nominee to accept the notice of disclosure) will be listed under My Disclosures; and
- All active relationships will be listed under My Relationship.
w) The system will send a notification to the authorised person’s (nominee’s) email address if provide.

4 Acceptance, rejection or cancellation of a relationship
a) A relationship disclosed by the nominator must be actioned by the nominee within seven (7) working days from the date of the notification. If the nominee fails to action the notification to disclosure within the seven (7) working day period, the system will automatically abandon the request.
b) Once the user of the nominee has logged into the RLA Relationship dashboard via eFiling the user must accept or reject the applicable disclosure under My Disclosure option on the RLA Relationship dashboard [see paragraph 2a) to b)]. The user clicks on the relationship to be confirmed or rejected under My Disclosure.
c) The system displays the disclosure summary page.
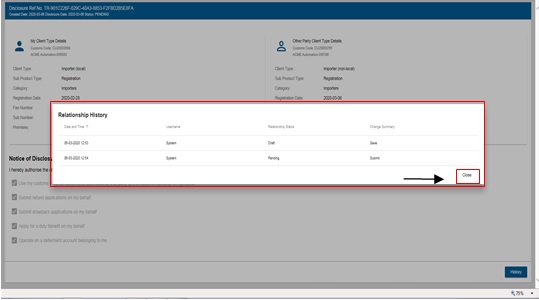
d) In order to view the history of a relationship:
- The user clicks on the History button.
- The system displays the Relationship History page.
- The user clicks on Close to return to disclosure summary page.
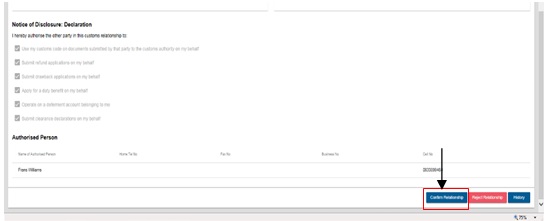
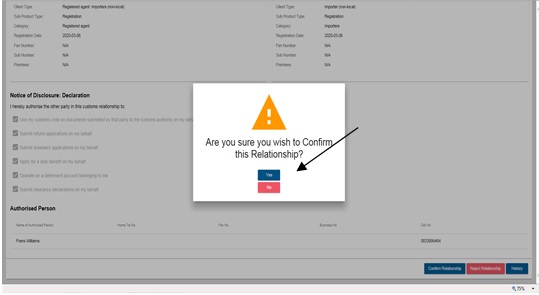
e) The acceptance of a relationship disclosed by another RLA client:
- If the nominated client accepts the relationship disclosed with the nominator, the nominee clicks on the Confirm Relationship button.
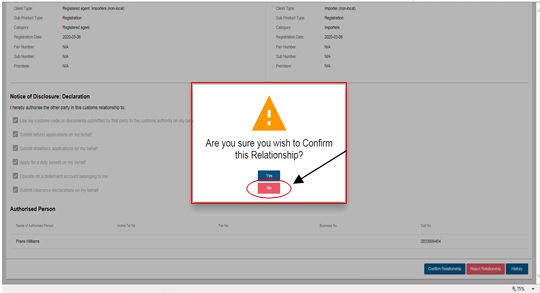
- The system asks if you wish to confirm this relationship.
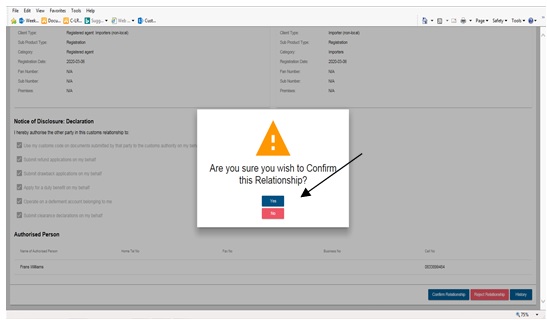
f) If the user does not accept the disclosed relationship:
- He/she clicks on the No button.
- The system updates the status of the relationship case under My Disclosure from pending to rejected and sends a notification to the nominator’s RLA Inbox prescribed in the SC-CF-42 – RLA Customs Trader Portal – External Guide.
g) If the user (e.g. nominated client) accepts the disclosed relationship, he/she clicks on the Yes button.
h) The system displays a message that the notice of disclosure has been accepted and the user then clicks on the Ok button.
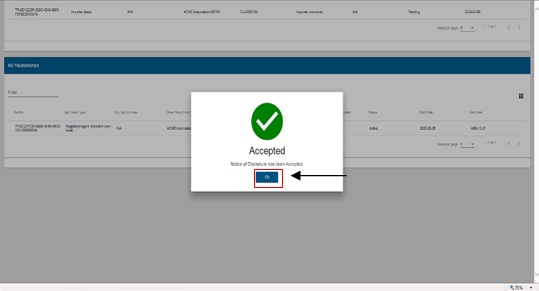
i) The system moves the relationship case from under My Disclosure to My Relationship and changes the status from pending to active.
g) The system forwards a confirmation notification to the effected client’s RLA Inbox prescribed in the SC-CF-42 – RLA Customs Trader Portal – External Guide.

h) Rejecting a relationship disclosed with another RLA client:
- The user (nominator or nominee) clicks on the Reject Relationship button.

- The system asks if you wish to reject this relationship.
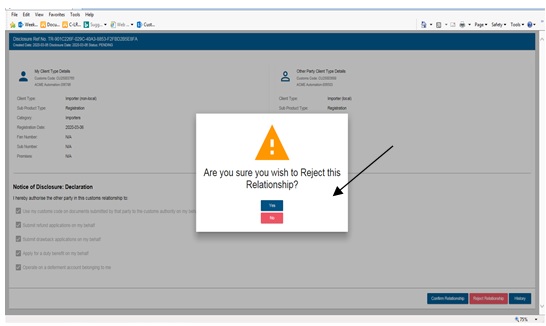
i) If the user:
- Disagrees, the user clicks on the No button and returns to paragraph ii)
- Agrees, the user clicks on the Yes button.
j) The system displays a message that the notice of disclosure has been rejected. The user clicks on the Ok button.
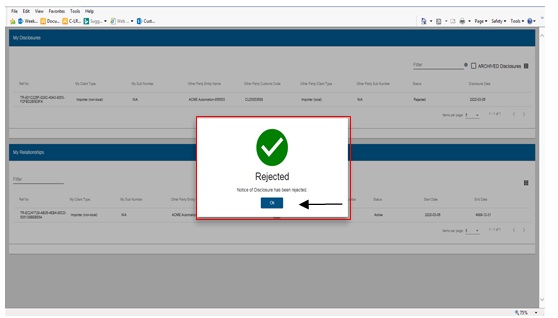
k) The system returns to the RLA Dashboard and updates the disclosed relationship status under My Disclosure from pending to rejected.
l) The system sends the rejection notification to the effected RLA client’s Inbox on the RLA Dashboard prescribed in the SC-CF-42 – RLA Customs Trader Portal – External Guide.

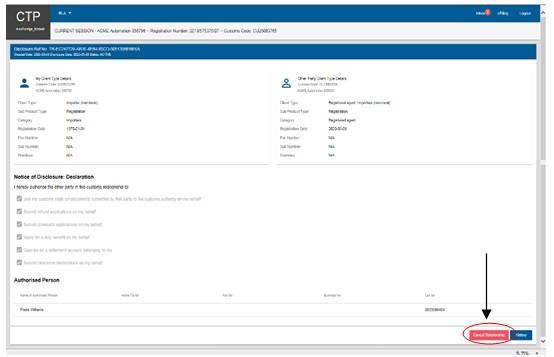
m) Cancel an existing relationship with another RLA client:
- When a nominee or nominator wishes to cancel an active relationship, the user clicks on the active relationship under My Relationships on the RLA Relationship dashboard.
- The system displays the disclosure summary page.
- The user clicks on the Cancel Relationship button.
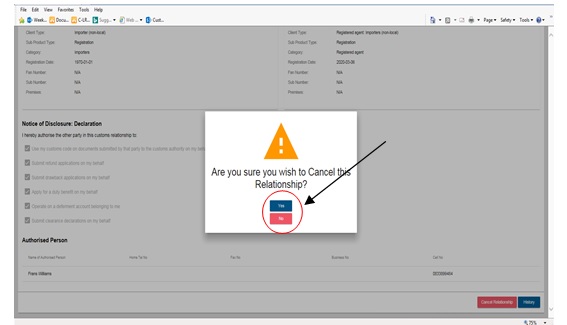
- The system asks if you wish to cancel this relationship.
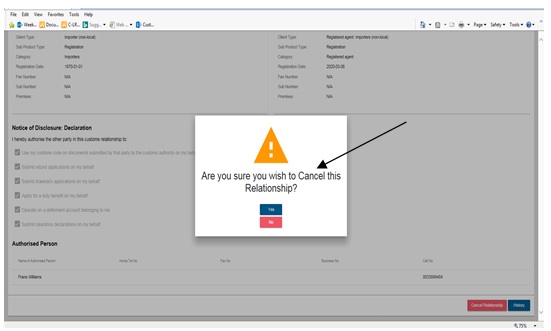
- If the user:
- Disagrees, the user clicks on the No button and the system returns to the RLA Relationship dashboard, refer to paragraph A)
- Agrees, the user clicks on the Yes button.
- The system displays a message that the relationship has been cancelled. The user clicks on OK to close the case.
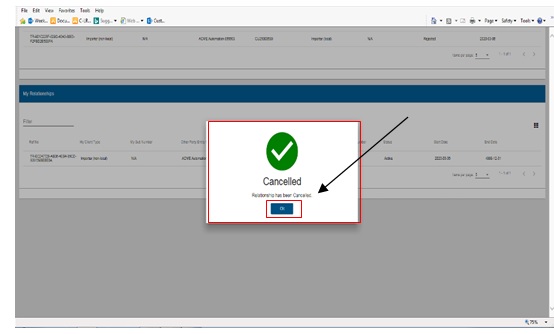
- The system updates the nominated RLA client’s active relationship status under My Relationships from active to cancelled on the client’s RLA Relationship dashboard.
- The system sends the cancellation notification to the effected clients’ RLA Inbox on the RLA Dashboard.

5 Definitions, acronyms and abbreviations
The definitions, acronyms and abbreviations can be accessed here – Glossary webpage.
Legal disclaimer: In the event of conflict or inconsistency between this webpage and the PDF version of the guide, the latter shall prevail.