
Summary
The purpose of this webpage is to assist government institutions in verifying a TCS or TCC online via eFiling. This webpage explains the steps that must be followed when activating the TCS verification system on eFiling, as well as the steps for adding users for tax compliance status access.
The TCS solution has been designed in such a way that any official, to whom the authorisation has been given, by the institution, to perform TCS verifications, can verify a TCS or TCC online via eFiling. As a consequence, the audit trail captured by the system will be recorded in the name of the institution. In order to utilise the online TCS verification functionality, the institution must be a registered eFiler on eFiling.
Tax Compliance Status Verification Functionality
In order to set up the TCS verification functionality for the institution, the eFiling administrator or registered representative of the institution, with access to the eFiling portfolio of the institution must execute the following steps:
- Step 1 – Create the TCS Verification “User Group”
- Step 2 – Invite, Edit and Delete a User
- Step 3 – Accept invite to be a User on a Portfolio
- Step 4 – Add users to the “User Group”
- Step 5 – Add taxpayers (the institution itself will be the taxpayer) to the “User Group”
- Step 6 – Activate the TCS verification service for the institution
- Step 7 – Perform the TCS/ TCC verification
Note:
- This webpage does not cover the application for TCS. For information on that functionality, please access the SARS guide called “Guide to the Tax Compliance Status Functionality on eFiling”.
- If the institution has more than one tax registration number, it is imperative that the merging of the tax products is also performed. For queries in this regard, please visit your closest SARS branch office.
Step 1 – Create the TCS Verification “User Group”
- A “User Group” assists the institution to easily maintain the roles and rights of a group of users without impacting on other users of the eFiling profile.
- The eFiling administrator or registered representative of the institution must logon to the eFiling portfolio of the institution.
- Proceed as follows:
- Click the “Organisation” tab
- Click the “Rights Groups” menu item
- Click the “Manage Groups” sub-menu. The “Group Details” page will be displayed.
- Note – If an existing group will be utilised, proceed to click the “Open” hyperlink of that group and select the “Tax Compliance Status Verification” Tax Type, or proceed to the following actions.
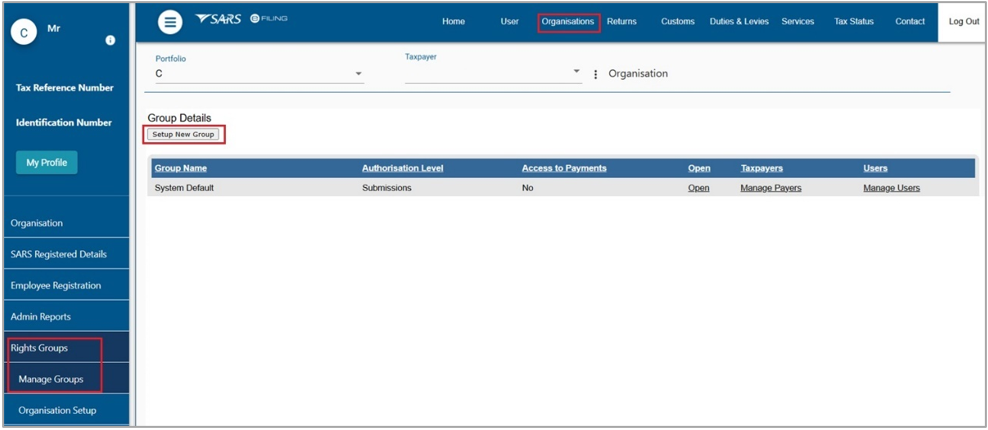
- Click the “Setup New Group” button.
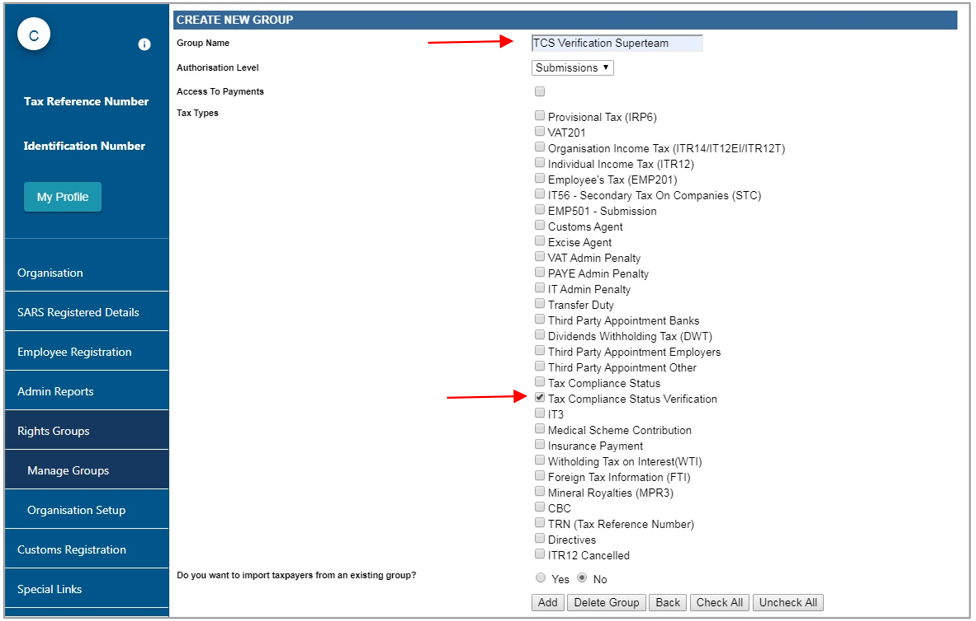
- Capture group details and click “Add”

Step 2 – Invite, Edit and Delete a User
- This function is used to add new users to a portfolio, grant access to tax types, set the required levels of authorisation for each user and delete users.
- To successfully add users to portfolios, actions are required from both the following parties:
- The Requestor – this refers to an existing user that has the ‘Manage User’ role assigned to him/her and wants to invite another person to be a user and have access to the organisation or tax practitioner portfolio.
- The User – this is the person (e.g. employee) who has been invited to have access to one or more functions or tax products that are managed by the requestor.
- Note – If all the users have already been added to the eFiling portfolio, the following actions are not required. In practice however, as the Supply Chain Management (SCM) users of the institution are not already users on eFiling, these new users will need to be registered.
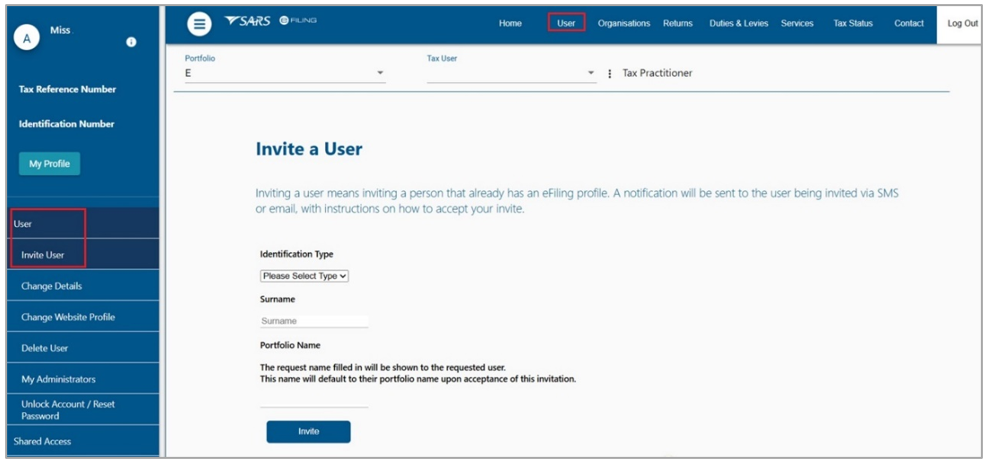
- Click the “User” tab
- Click the “User” menu item
- Select the “Invite User” sub-menu
- Capture the details of the user.
- Click on <Invite>.
- Select the applicable TCS user group and if required any applicable roles
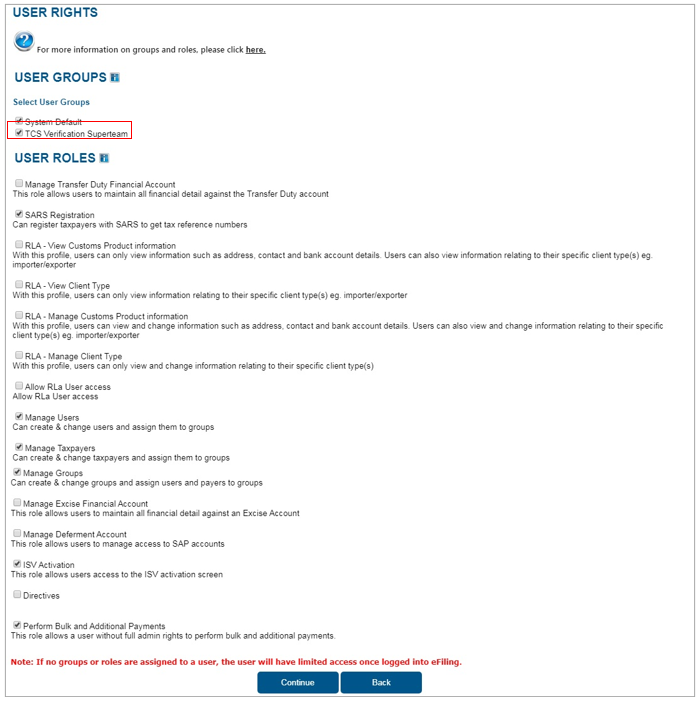
- The screen will display a result summary; if all is correct, click “Continue”.
- Repeat above to invite all the users.
- Select <Change Details> from the menu on the left to do any of the following:
- Send Reminder – this option will resend the notification to the user to remind him/her to accept the invite.
- Cancel Invitation – this option will delete the invite, remove the user on the requestor’s portfolio and also remove the portfolio linking option from the user’s portfolio management screen.
- Update User Rights – use this option to edit roles (permissions) assigned to the user.
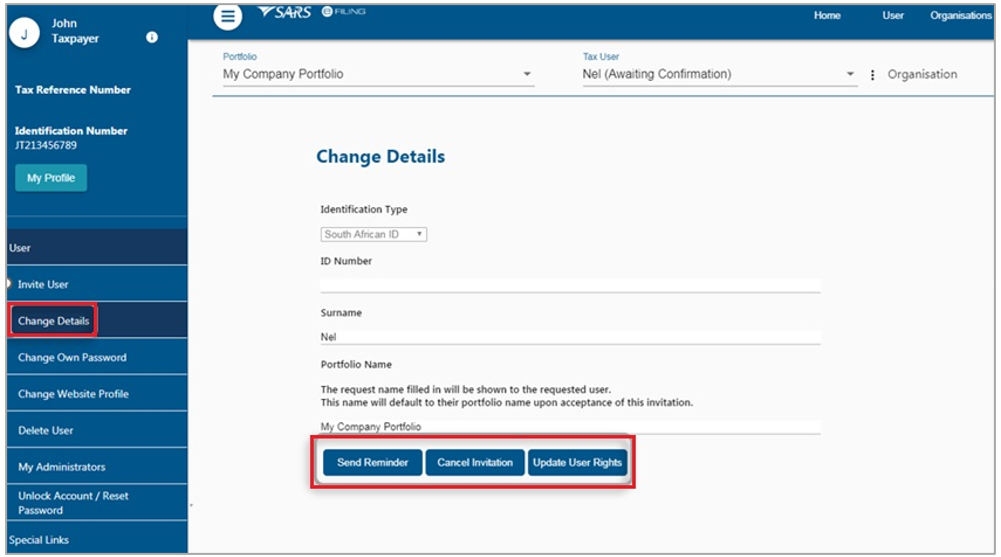
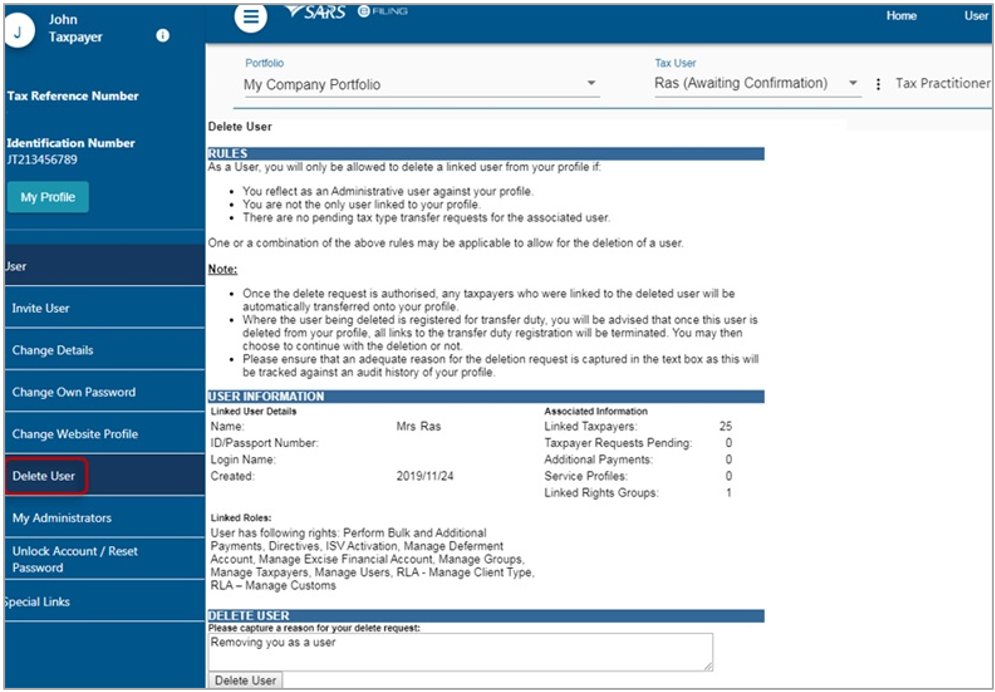
- Select <Delete User> from the menu on the left to remove a user from an existing portfolio.
- Insert a reason for deleting the user
- Click on <Delete User>
- On the pop-up message click on <OK> to confirm your request.
Please Note:
- Only a person with an existing eFiling profile can be added as a user on a portfolio. Once an invite is sent by the requestor, the user will receive an SMS and email notification with instructions on how to accept the invite.
- A requestor will not be allowed to invite a user should any of the following conditions apply:
- SARS cannot find a match for the user details entered
- The user registered for eFiling prior to 1 July 2019 and has not yet logged in to set up his/her profile on the new eFiling website
- The user has not yet completed his/her eFiling registration.
- The user already exists on the portfolio he/she is being invited to.
Step 3 – Accept Invite to be a User on a Portfolio
- SMS and email notifications will be sent to the person who has been invited to be a user on an organisation or tax practitioner’s portfolio.
- Log on to your eFiling profile.
- Select <My Profile>
- Select <Portfolio Management>
- The User Invitation will display. Click on <Accept>.
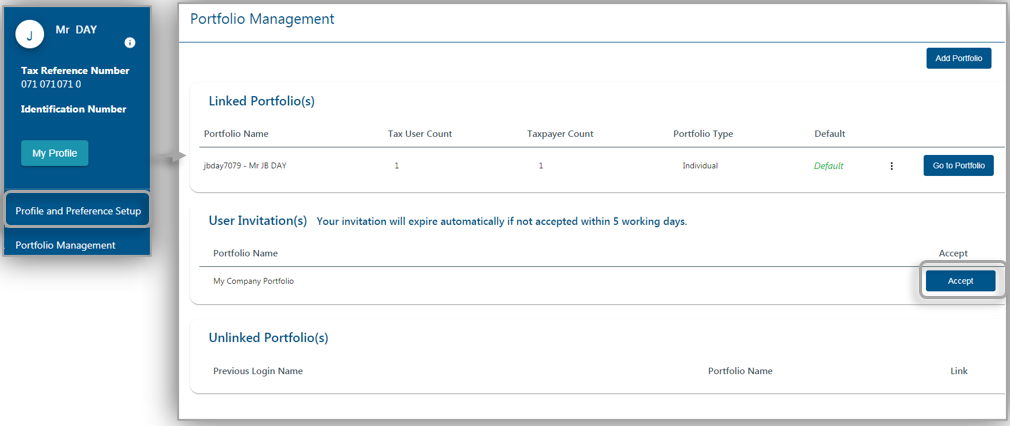
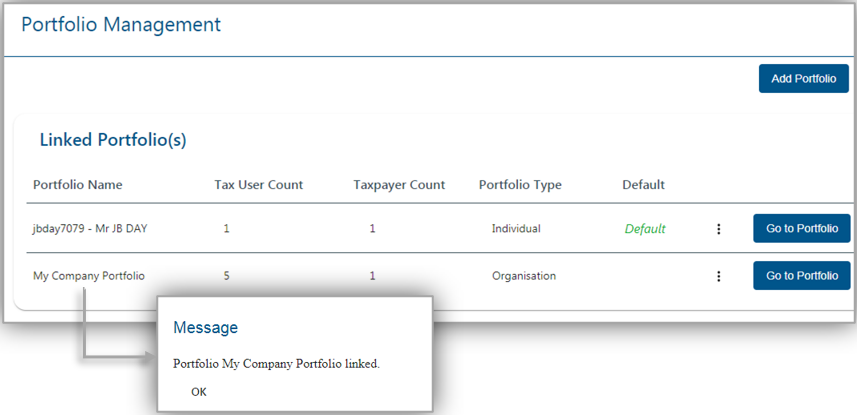
- As part of the authentication process, you will be prompted to enter the One-Time-Pin (OTP) sent to your preferred method of contact. Once the OTP is successfully entered, a pop-up message will display to confirm that the organisation/government institution portfolio will be linked to your profile.
Please Note:
- The invite from the requestor will automatically expire if not accepted by the user within 5 working days.
- If the invite expires, the record will be deleted on both the requestor’s and user’s portfolio.
- A notification will be sent to the requestor to notify him/her that the invite has expired. The requestor can opt to send a new invite.
Step 4 – Add Users to the “User Group”
- Click on “Manage Users” hyperlink.

- Drag and drop the applicable user(s) into the group and click the “save” icon.
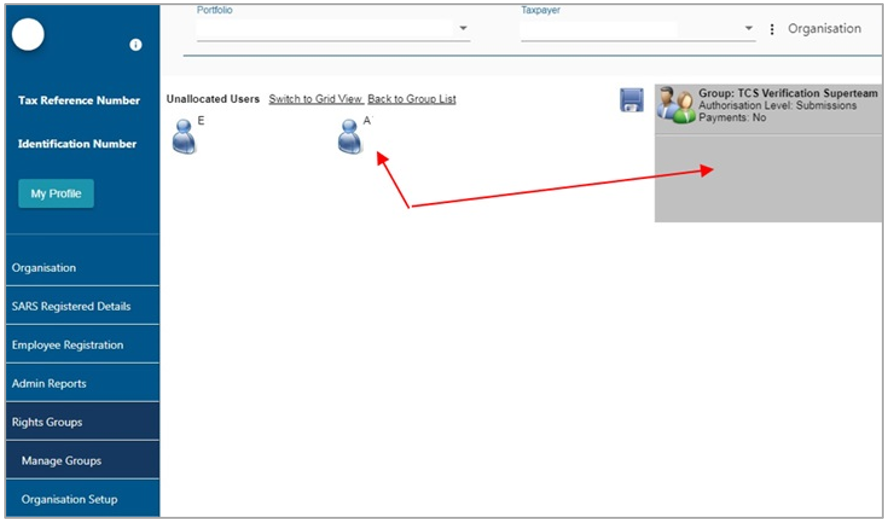
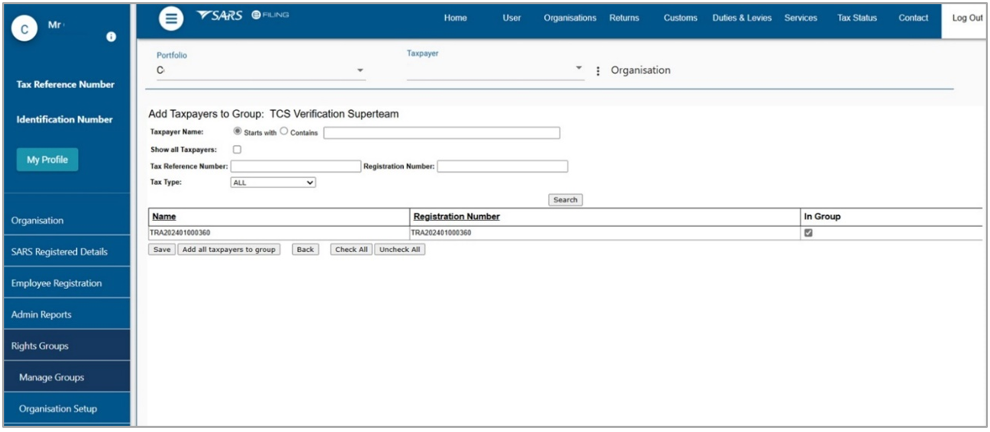
Step 5 – Add Taxpayer(s) to the “User Group”
- Click on “Manage Payers” hyperlink.

- Search for the applicable taxpayer and add it to the Group by selecting the “In Group” check box. Note – the taxpayer in this scenario would be the institution on whose behalf the users will perform the TCS verification.
Step 6 – Activate the TCS Verification Service
- Should there be multiple taxpayers on the organisation portfolio; the correct taxpayer (institution) must be selected from the “Taxpayer List”.

- In this instance it would be the institution on whose behalf the users will perform the TCS verification verifications.
- Select “Tax Status” tab.
- Select “Tax Compliance Status Verification” menu item.
- Select “Activation” sub-menu.
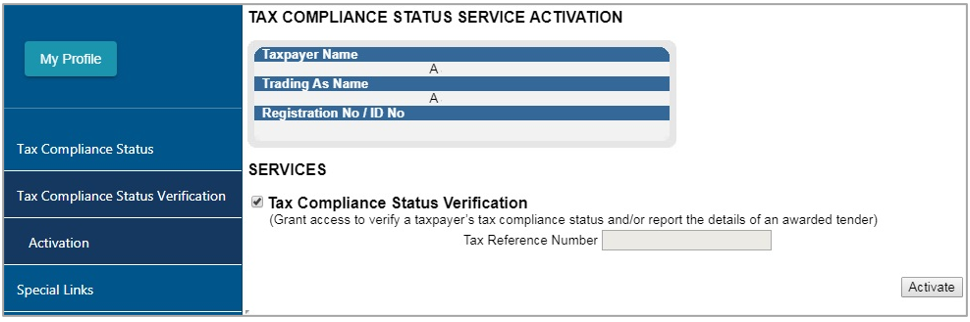
- The Tax Compliance Status Service Activation screen will be displayed. Select the “Tax Compliance Status Verification” box and click the “Activate” button to activate the verification function.
- A confirmation message will appear upon successful activation.
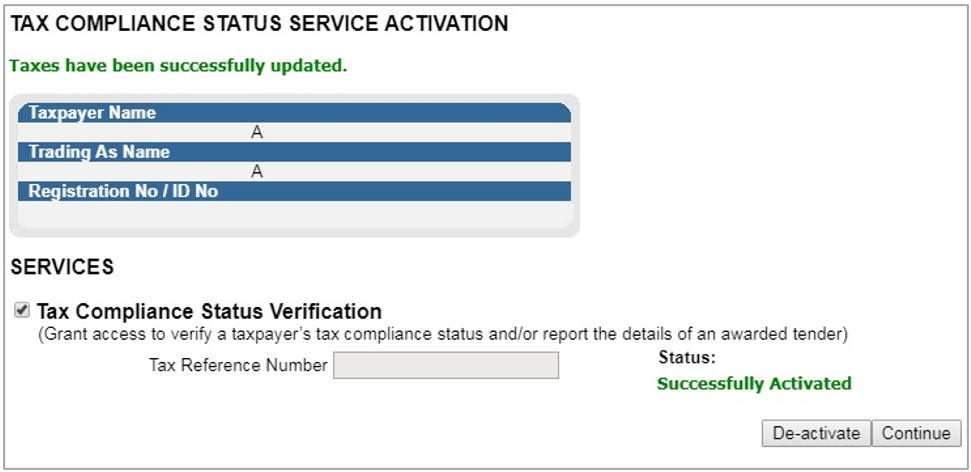
- After successful activation the rest of the sub-menus will be available in order to perform TCS verifications. It will also now be possible for the users of the newly established user group to perform TCS verifications.
Step 7 – Performance TCS Verification
- The users that are part of the user group that was created to perform the TCS verifications must now log into eFiling with their username and password after they accepted the portfolio invitation. Should there be multiple taxpayers on the organisation portfolio; the correct taxpayer (institution) must be selected from the “Taxpayer List”.
![]()
- In this instance it would be the institution on whose behalf the TCS verification will be performed.
- Select the “Tax Status” tab.
- Select “Tax Compliance Status Verification” menu item.
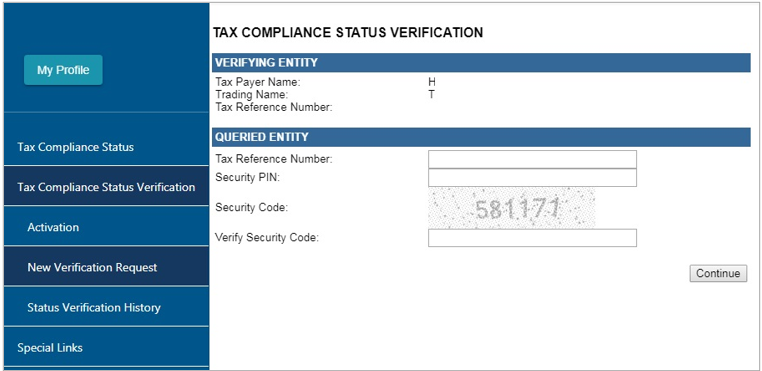
- Select “New Verification Request” sub-menu.

- If a PIN was received – Capture the PIN number and the Tax number.
- Capture the “Security Code” displayed on screen in the “Verify security code” field. Then select the “Continue” button.
- The next screen displays the taxpayer to whom the captured PIN and Tax reference number, belongs. The reason for this step is to provide the verifier with an opportunity to see if the information belongs to the taxpayer that he/she intended to verify.
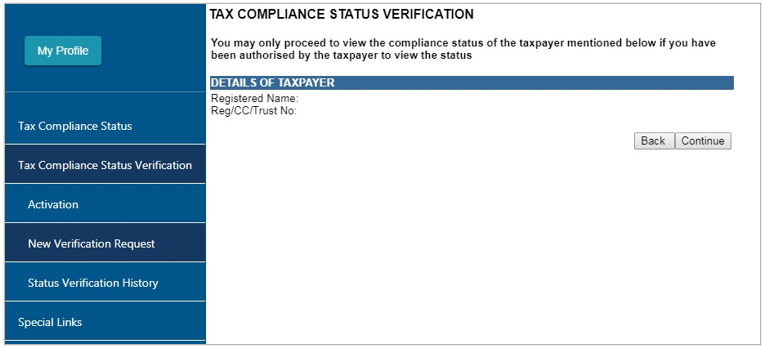
- If the details displayed do not correspond with the entity that was intended to be verified, select the “Back” button, otherwise select “Continue” to proceed to view the verification result.
- The verification result displays the registered details of the entity, the date and time stamp of the verification and the current tax compliance status of the entity as at the time stamp.
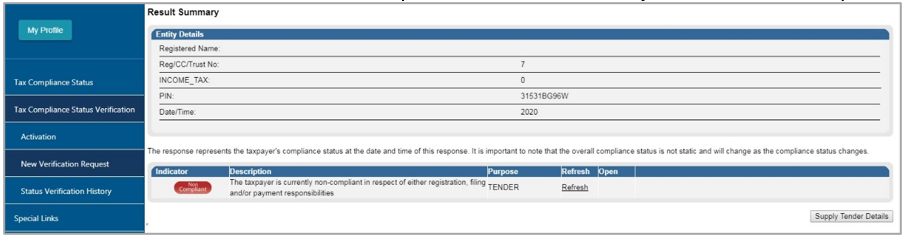
- In addition to the on-screen result, the user may also print the result in letter format by selecting the “View” hyperlink under the “Open” column.
Definitions, acronyms and abbreviations
The definitions, acronyms and abbreviations can be accessed here – Glossary webpage.
Legal disclaimer: In the event of conflict or inconsistency between this webpage and the PDF version of the guide, the latter shall prevail.