
Summary
In adopting the International Tax Transparency Standards, a function on SARS eFiling is implemented to enable Mandatory Disclosure Rules (MDR) reporting requirements by following this reporting standards, it will strengthen the integrity of reporting under Common Reporting Standards (CRS).
The MDR Disclosing Entity will be allowed to register and activate MDR as tax type in a new MDR001 form via eFling.
How to Activate MDR Tax Type
You need to be an Efiler to activate MDR as a Tax type for MDR Disclosing Entity.
To access your eFiling profile, you should have successfully activated the Mandatory Disclosure Rules as a “MDR” tax type, refer to GEN-ELEC-18-G01 – How to Register For eFiling and Manage Your User Profile – External Guide. You can also search for valuable tutorials on www.sars.gov.za if you need help to “register for eFiling profile.
Login as an Individual within the Organisational Profile.
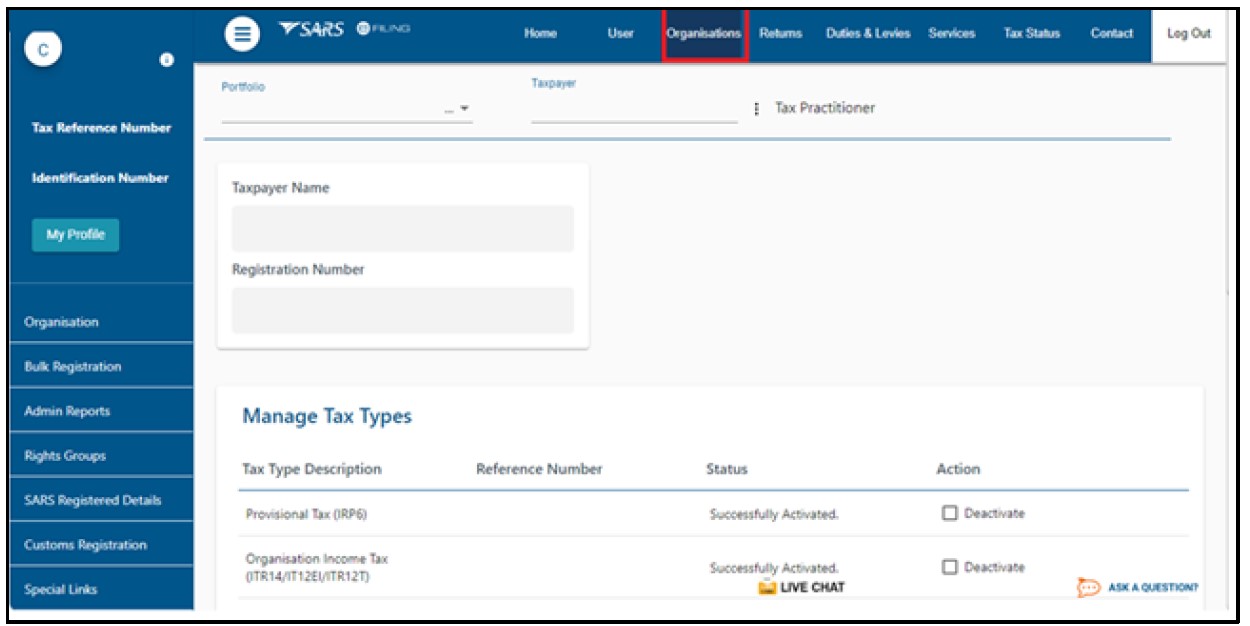
To activate MDR for Tax for an individual ,select “Organisations” on the top SARS menu bar.
- An individual screen will be displayed as follows:
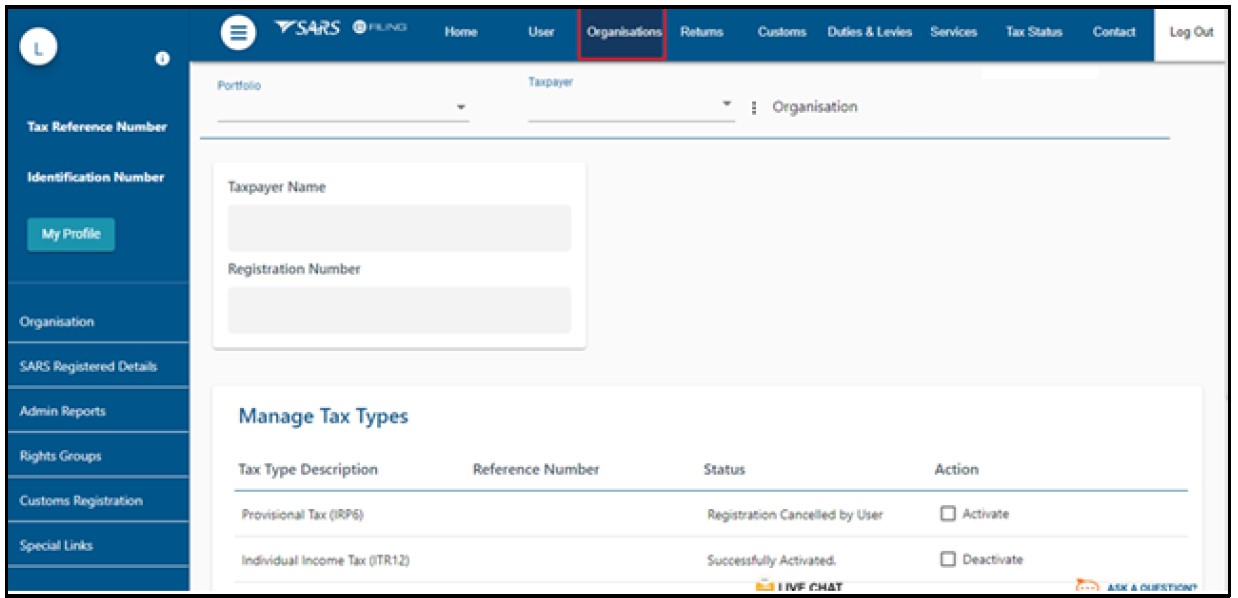
- Select “Tax Type” sub menu; and
- Select “Manage Tax Types.”
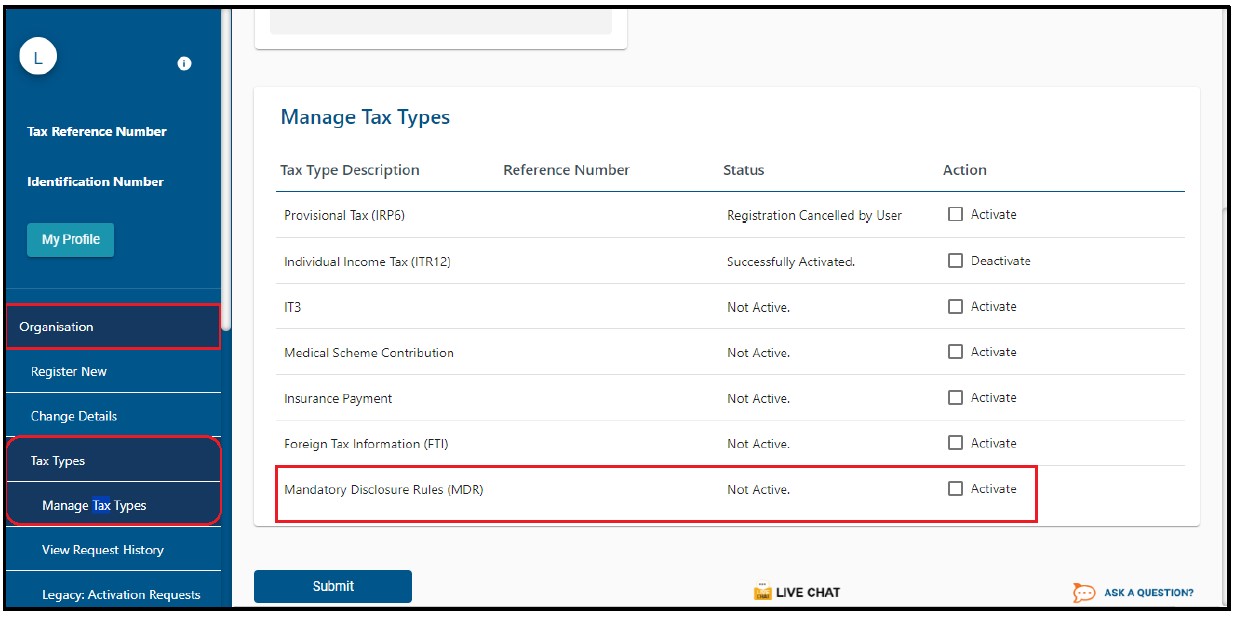
- A screen will be displayed with an individual details:
- Once the “Manage Tax Type” sub menu is selected, a list of applicable Tax products will be displayed, and you will be able to select “Mandatory Disclosure Rules (MDR)” to request for activation.
- Click on the “Submit” button and you will be shown a list of the requested actions taken for the various Tax Type Descriptions;
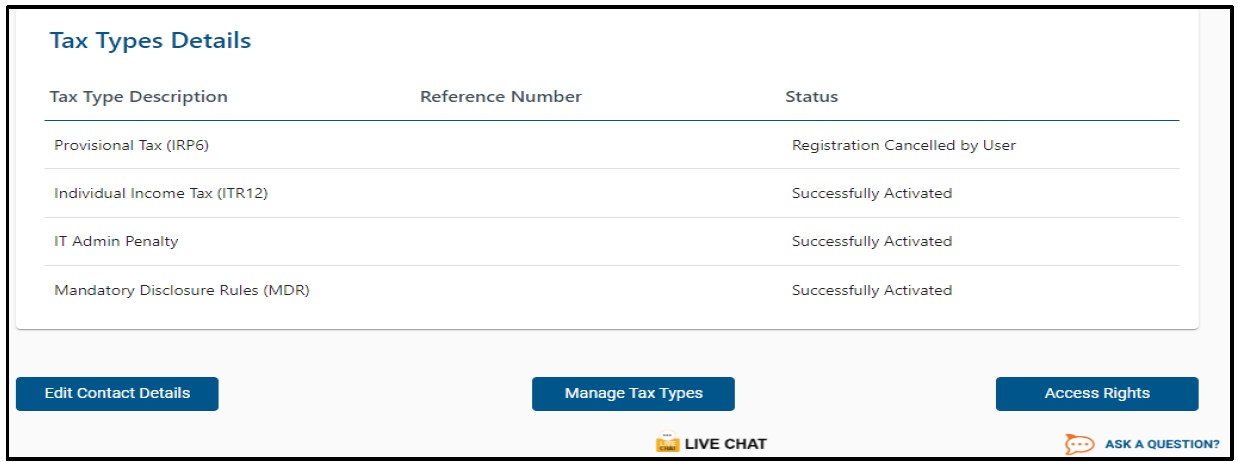
- Click on the “Continue” button and you will be redirected to activation status page.

- Once the MDR Rules is successfully activated , you will now have access to complete the MDR form
Login as Registered Representative /Tax Practitioner in the Organisation Profile.
- To activate MDR for Tax Practitioner ,select “Organisations” on the top SARS menu bar.
- The Organisational Registered Representative screen will be displayed as follows:
- The Organisational Tax Practitioner screen will be displayed as follows.
- Once you have selected the Organisations, an “Organisation” within the side main menu screen will be displayed;
- Select “Tax Type” sub menu; and
- Select “Manage Tax Types.”
- Once the “Manage Tax Type” sub menu is selected, a list of applicable Tax products will be displayed, and you will be able to select “Mandatory Disclosure Rules (MDR)” to request for activation.
- Click on the “Submit” button and you will be shown a list of the requested actions taken for the various Tax Type Descriptions;
- MDR Tax type will be linked and activated against the main tax type in order of priority starting from Income Tax, PAYE and then VAT.
- A screen will be displayed with the Tax Practitioner/Organisation details as follows:

- Click on the “Continue” button and you will be redirected to activation status page.

- Once the MDR form was successfully activated , you will now have access to complete the MDR form .

Requesting and pre-Populating MDR Form
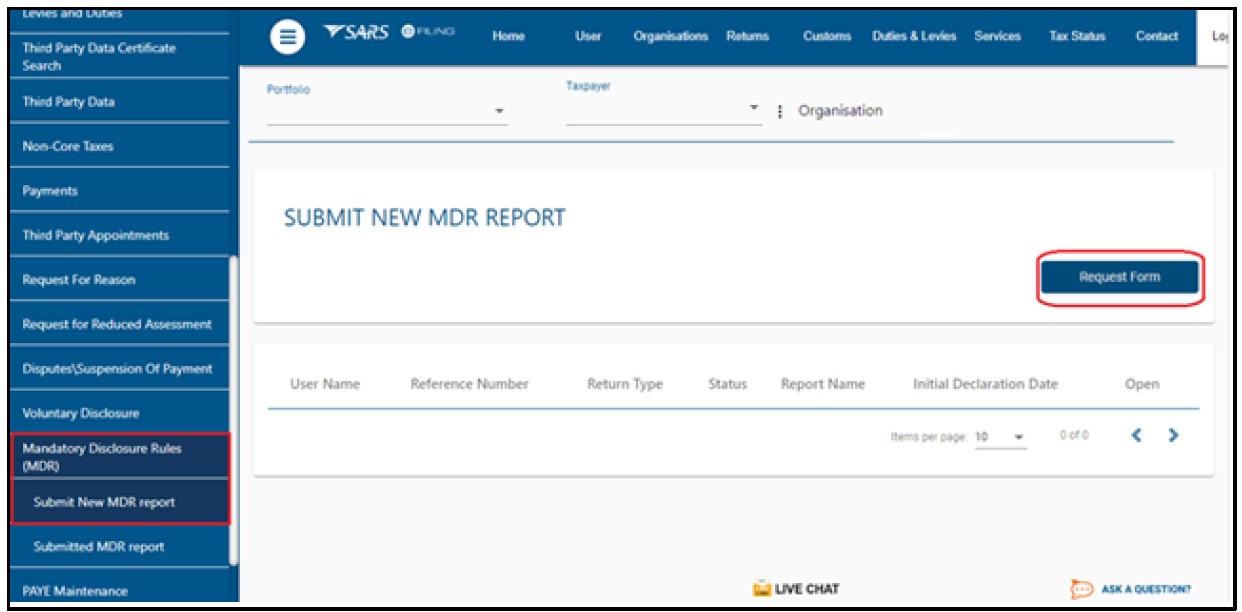
- To access the Mandatory Disclosure Rules (MDR) form:
- Select “Returns” on the top SARS menu bar:
- “Mandatory Disclosure Rules” will be displayed on the side menu, once the “MDR” tax type is activated in a profile;
- The “Mandatory Disclosure Rules” will have two sub menus, namely:
- Submit New MDR report – Requests MDR reporting form;
- Submitted MDR reports – Stores already submitted MDR reports;

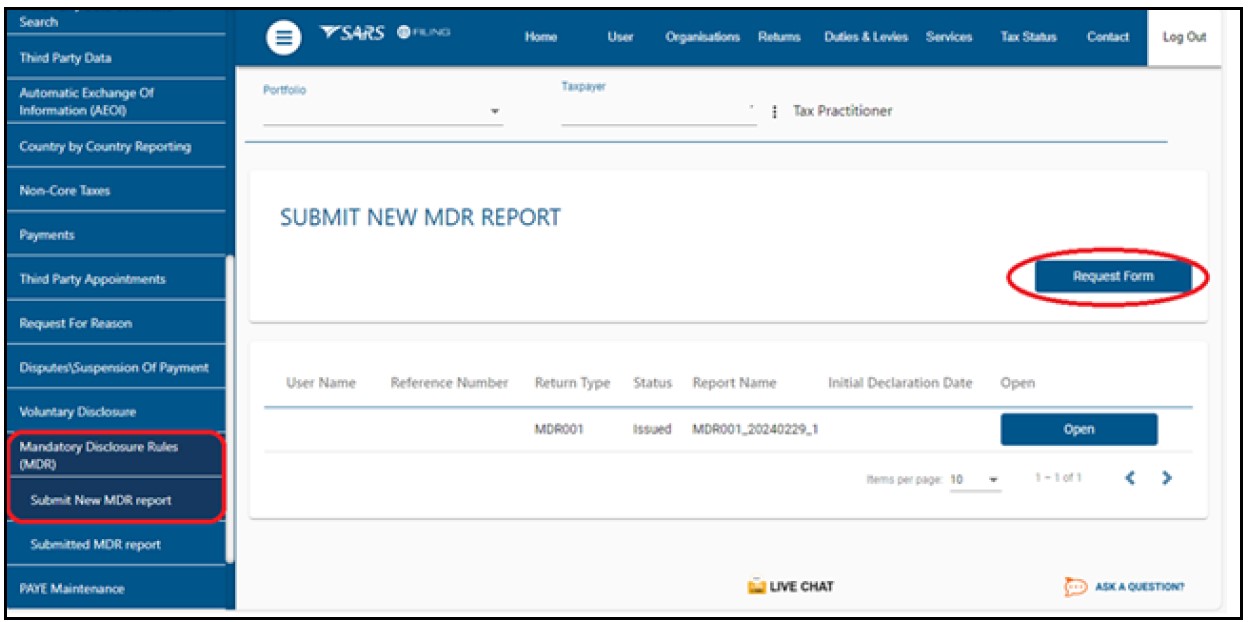
- Select the “Submit New MDR Report” to request a new MDR reporting form for initial completion.
- To request a new form, select “Request Form” button; and a pre-populated form containing the Disclosing Entity demographics will be displayed in the issued status on eFiling .
- Once the form is open, you will be able to capture the required fields; save the captured data if you wish so, which will then set the status to “Saved” and print the form in the PDF format.
- Note 1: The form will be displayed in HTML5 format;
- Note 2: Only one “issued” report form per Tax user will be maintained at a time.
The following fields will be displayed :
- Username – MDR report submitting Tax username and surname;
- Reference Number – MDR report submitting entity Tax reference number;
- Return Type – MDR001;
- Status – Latest report submission status;
- Initial Declaration date – Date and time at which the declaration was submitted;
- Open – Link to open submitted report work page:
- The Organisational Registered Representative screen will be displayed as follows.
- The Organisational Tax Practitioner screen will be displayed as follows.
Completion of MDR Form
- To complete the MDR form, “Open “button hyperlink, which then opens the pre-populated MDR Report on MDR form work page.
- Select the “MDR001” form under Return type below and the following screen will be displayed:

- To complete the MDR form it must be read in conjunction with the following documents on the website:
For Disclosing Taxpayer , select individual and the following screen will be displayed:


- Details under Disclosing Entity container – Individual.
- For Disclosing Taxpayer ,select Individual and complete the following fields:
- Organisation Details;
- Residence Country Code;
- Note: If you need to add more Residence Country Codes, click on the “Add” button.
- For Disclosing Taxpayer ,select Individual and complete the following fields:

- For Disclosing Taxpayer , select “Organisation” and the following screen will be displayed:


- Details under Disclosing Entity container – Organisation
- For Disclosing Taxpayer , select organisation and the following screen will be displayed:
- Organisation Details;
- Residence Country Code;
- Note: If you need to add more Residence Country Codes, click on the “Add” button.
- For Disclosing Taxpayer , select organisation and the following screen will be displayed:

- For a selected organisation and complete the following details:
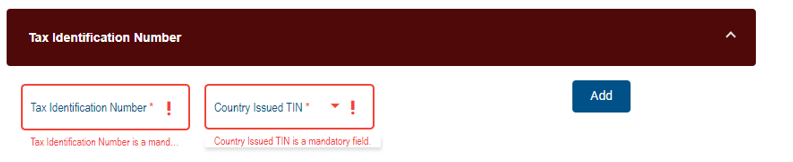
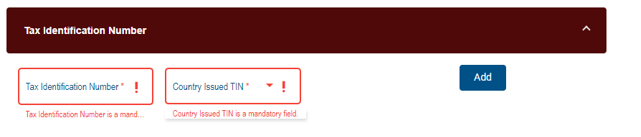
- Tax Identification Number(TIN);
- TIN issued By.
- For a selected organisation and complete the following details:

- For a selected organisation and complete the following details:
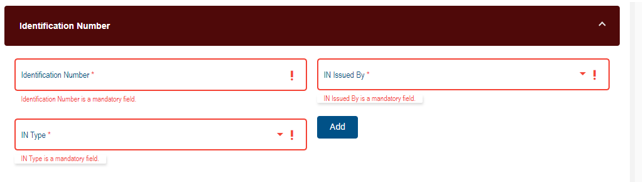
- Identification Number(IN);
- IN Issued By;
- IN Type;
- Note: If you need to add more details, click on the “Add” button.
- For a selected organisation and complete the following details:

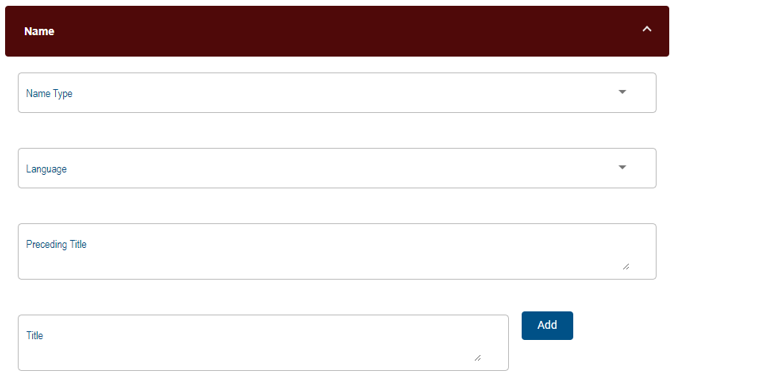
- For a selected organisation and complete the following details:
- Name;
- Language.
- Note: If you need to add more details, click on the “Add” button.
- For a selected organisation and complete the following details:

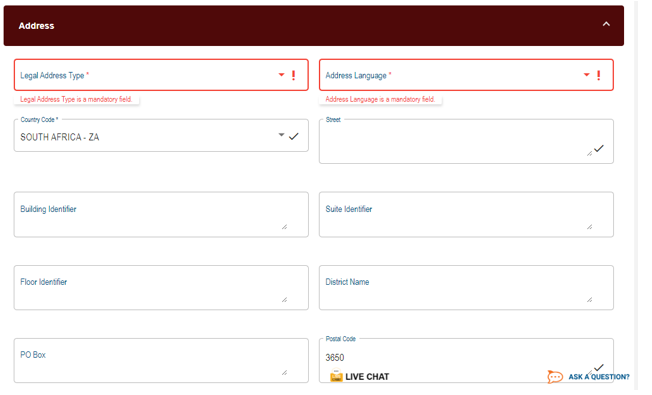
- For a selected organisation and the following screen will be displayed:
- Legal Address Type;
- Language;
- Street;
- Building Identifier;
- Floor Identifier;
- Suite Identifier
- District Name;
- PO Box;
- Postal Code;
- City;
- Country Subentity;
- Country Code.


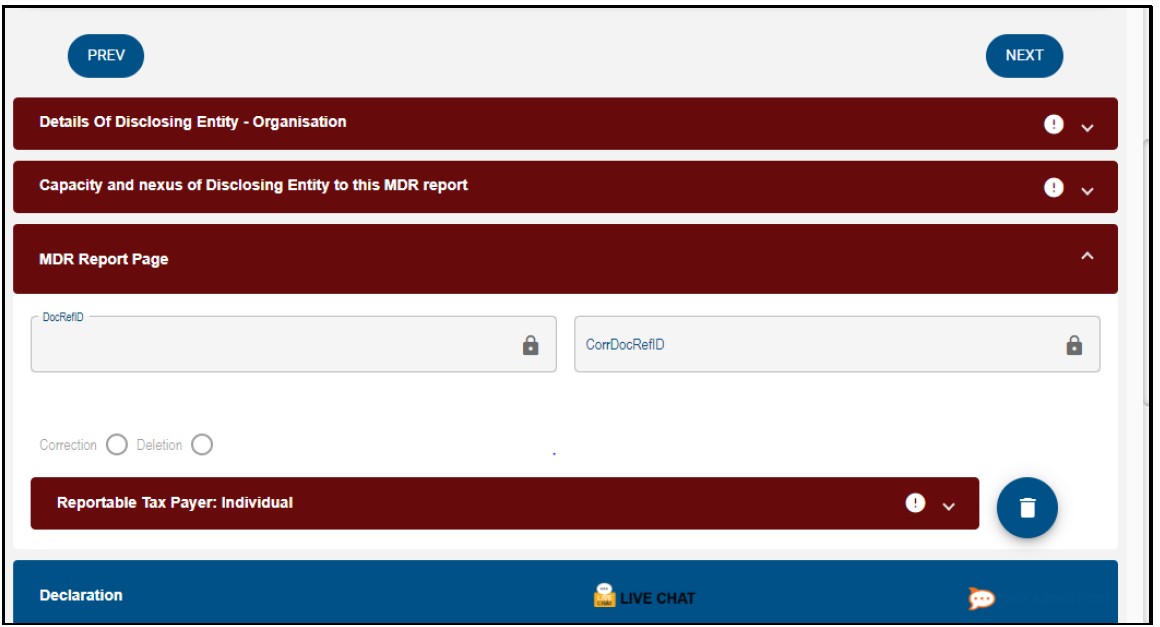
Disclosing Entity
- You need to complete either Section Details of an individual or Details of an organisation; A Capacity and nexus of Disclosing Entity to this MDR report will be displayed for completion.
- For a selected Individual/Organisation and complete the following details:
- Capacity;
- Nexus.
- Note: If you need to add more Capacity and nexus of Disclosing Entities to this MDR report, click on the “Add” button.
- For a selected Individual/Organisation and complete the following details:

Mandatory Disclosure Rules’ Report
- A MDR Reports consists of a Reportable Taxpayer, Intermediaries and Report Arrangements.
Reportable Taxpayer
- To complete the Reportable Taxpayer, you need to complete either Section Details of an Individual or Details of an Organisation, then continue with Reportable Taxpayer container”:
- Details of Reportable Taxpayer – Individual.
- For a selected Individual and the following screen will be displayed:

- To complete the details of disclosing entity as an individual.
- For a selected Individual and the following screen will be displayed:
- Residence Country Code;
- Note: If you need to add more Residence Country Code, click on the “Add” button.
- For a selected Individual and the following screen will be displayed:

- For a selected Individual and the following screen will be displayed:
- Tax Identification Number;
- Country issued TIN Issued;
- Note: If you need to add more Tax Identification Number, click on the “Add” button.
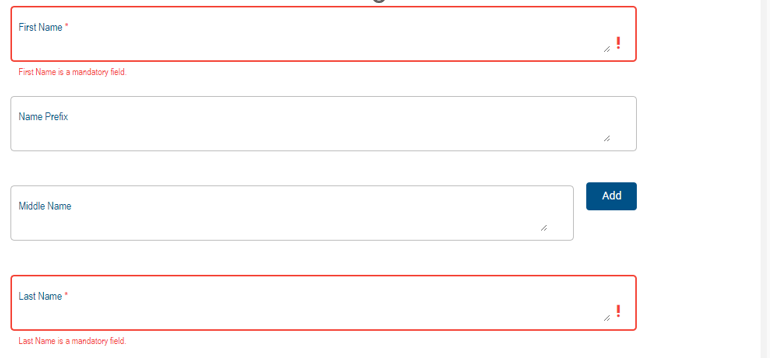
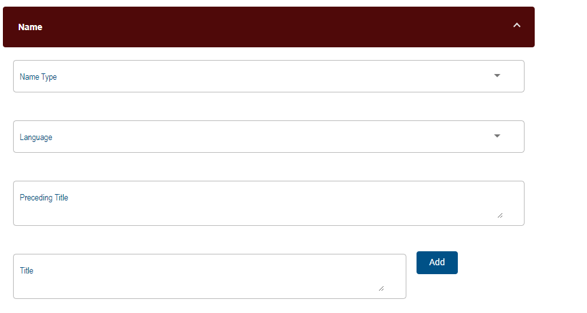
- For a selected Individual and the following screen will be displayed:Name Type;
- Language;
- Preceding Title;
- Title;
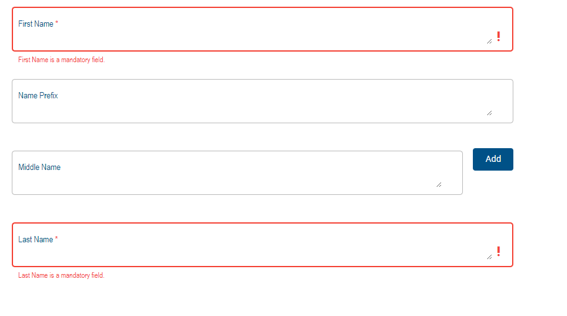
- First Name;
- Name Prefix;
- Middle Name;
- Last Name;
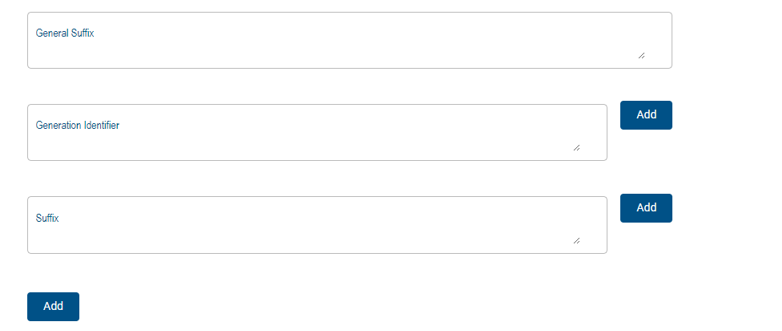
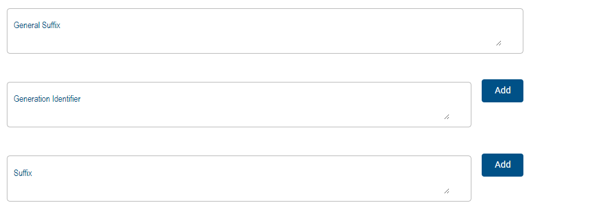
- General Suffix;
- Generation Identifier;
- Suffix
- Note: If you need to add more details, click on the “Add” button.
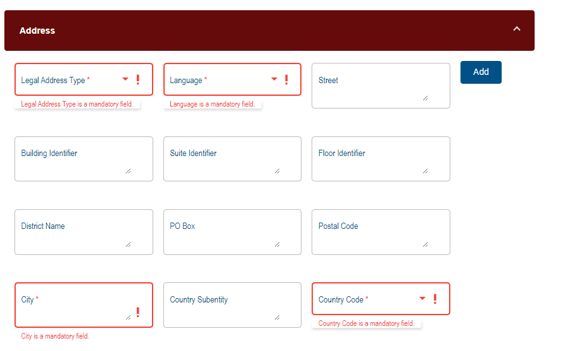
- For a selected Individual and the following screen will be displayed:
- Legal Address Type;
- Language;
- Street;
- Building Identifier;
- Floor Identifier;
- Suite Identifier;
- District Name;
- PO Box;
- Postal Code;
- City;
- Country Subentity;
- Country code.

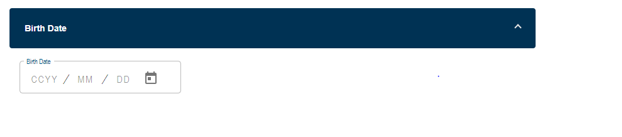
- For a selected Individual and the following screen will be displayed:
- Date of birth.
- Reportable Taxpayer – Organisation.
- To complete the Reportable Taxpayer, you need to complete either Section Details of an Individual or Details of an Organisation, then continue with Reportable Taxpayer container”:

- For a selected organisation and the following screen will be displayed:
- Residence Country Code;
- Note: If you need to add more Residence Country Code, click on the “Add” button.

- For a selected organisation and complete the following details:
- Tax Identification Number;
- Tin issued By.

- For a selected organisation and complete the following details:
- Identification Number(IN);
- IN Issued By;
- IN Type;
- Note: If you need to add more details, click on the “Add” button.
- For a selected organisation and complete the following details:
- Name;
- Language.
- Note: If you need to add more details, click on the “Add” button.

- For a selected Individual and the following screen will be displayed:
- Legal Address Type;
- Language;
- Street;
- Building Identifier;
- Floor Identifier;
- Suite Identifier
- District Name;
- PO Box;
- Postal Code;
- City;
- Country Subentity;
- Country Code .
Intermediaries
Details of Intermediary – Individual.
- To complete Intermediaries, you need to complete either Section Details of an Individual or Details of an Organisation, then continue with Intermediaries container”:
- Note: If you need to add more Intermediaries in the Disclosing Entity to this MDR Container , click on the “Add more Intermediaries” button and more containers for taxpayers will be added.

- For a selected Individual and the following screen will be displayed:
- Residence Country Code;
- Note: If you need to add more Residence Country Codes, click on the “Add” button.

For a selected Individual and the following screen will be displayed:
- Tax Identification Number;
- Country issued TIN Issued;
- Note: If you need to add more Tax Identification Number, click on the “Add” button.
- For a selected Individual and the following screen will be displayed:
- Name Type;
- Language;
- Preceding Title;
- Title;
- First Name;
- Name Prefix;
- Middle Name;
- Last Name;
- General Suffix;
- Generation Identifier;
- Suffix
- Note: If you need to add more details, click on the “Add” button.
- For a selected Individual and the following screen will be displayed:
- Legal Address Type;
- Language;
- Street;
- Building Identifier;
- Floor Identifier;
- Suite Identifier
- District Name;
- PO Box;
- Postal Code;
- City;
- Country Subentity
- Country Code.
- For a selected Individual and the following screen will be displayed:
- Date of birth.

- Details of Intermediary – Organisation
- To complete Intermediaries, you need to complete either Section Details of an Individual or Details of an Organisation, then continue with Intermediaries container”:
- Note: If you need to add more Intermediaries in the Disclosing Entity to this MDR Container , click on the “Add more Intermediaries” button and more containers for taxpayers will be added.

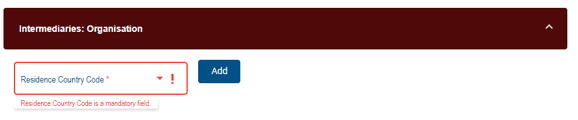
- For a selected Organisation and the following screen will be displayed:
- Residence Country Code;
- Note: If you need to add more Residence Country Code, click on the “Add” button.
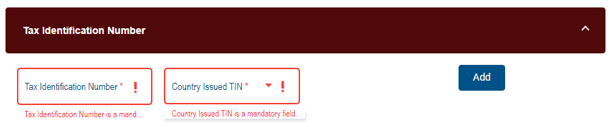
- For a selected organisation and the following screen will be displayed:
- Tax Identification Number;
- Country issued TIN ;
- Note: If you need to add more Tax Identification Number, click on the “Add” button.
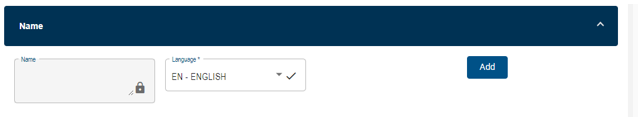
- For a selected Organisation and the following screen will be displayed:
- Name;
- Note: If you need to add more details, click on the “Add” button.
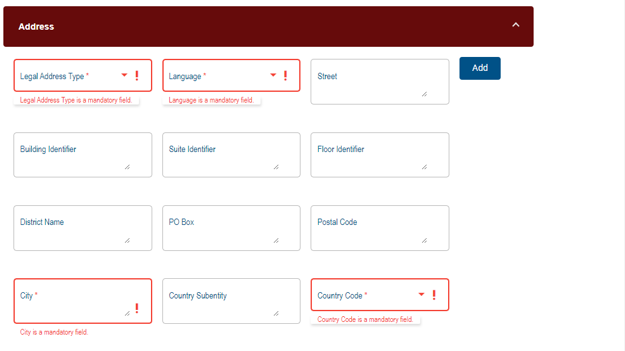
- For a selected Organisation and the following screen will be displayed:
- Legal Address Type;
- Language;
- Street;
- Building Identifier;
- Floor Identifier;
- Suite Identifier
- District Name;
- PO Box;
- Postal Code;
- City;
- Country Subentity;
- Country Code.
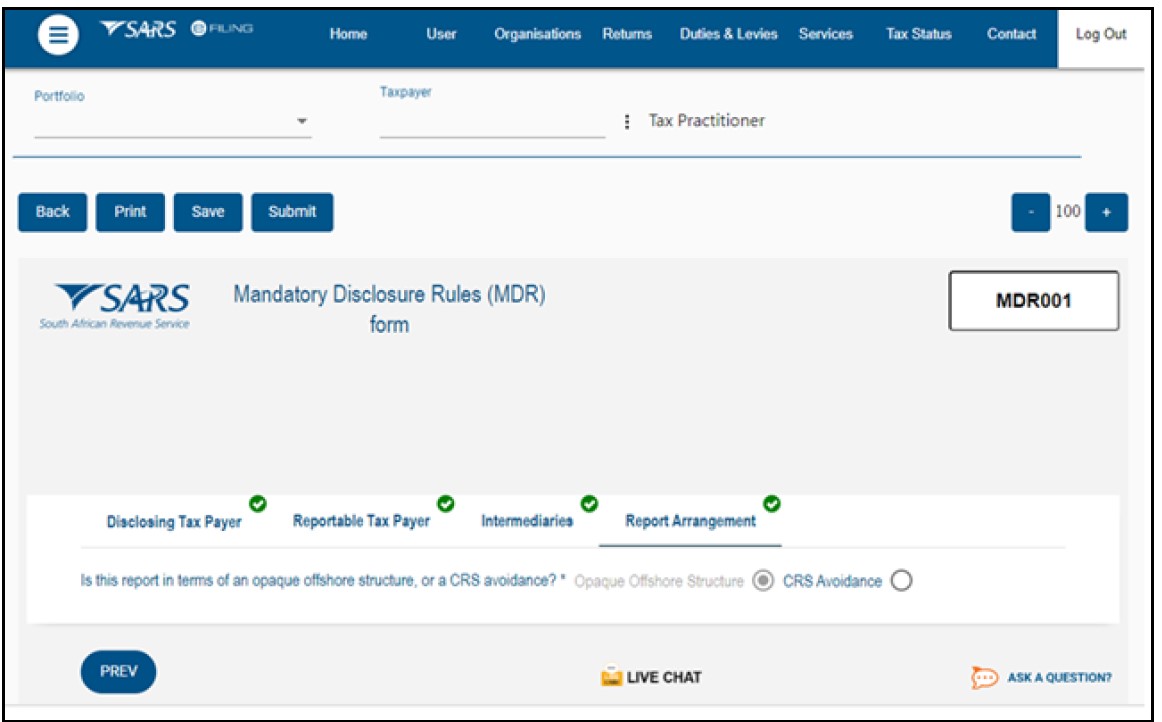
- Role of Intermediaries in respect of the Common Reporting Standards (CRS) Avoidance Details of Opaque Offshore Structure.
- Role, for a selected individual /organisation and the following screen will be displayed:

Report Arrangement
- To complete Intermediaries, you need to complete either Section Details of an Individual or Details of an Organisation,
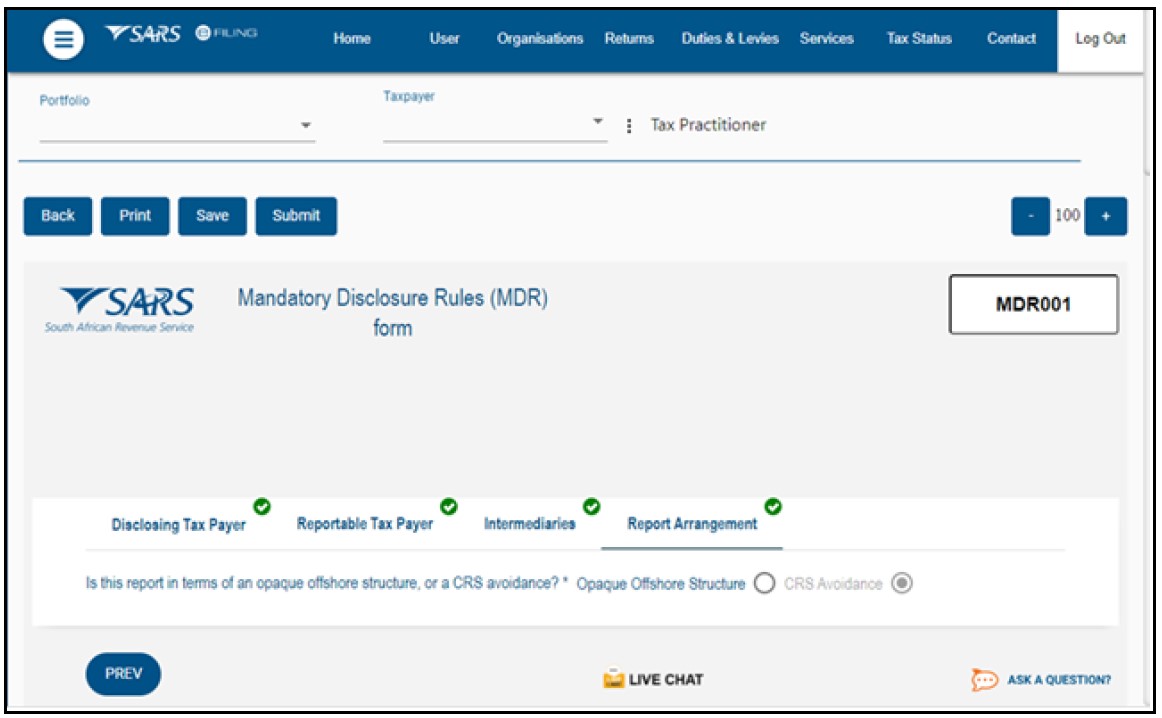
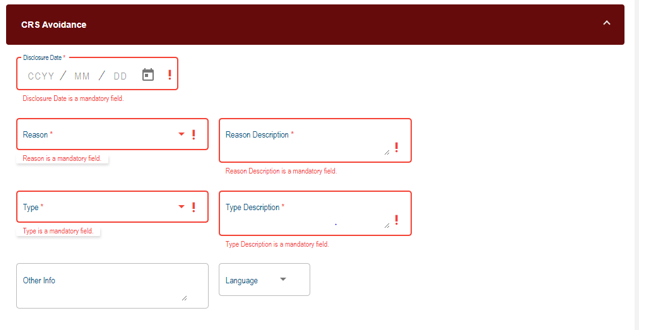
Details of Common Reporting Standards (CRS) Avoidance – Individual/Organisation.
- For a selected Individual /Organisation and complete the following fields:
- Disclosure Date;
- Reason;
- Reason Description (Free text);
- Type;
- Type Description (Free text);
- Other Information.
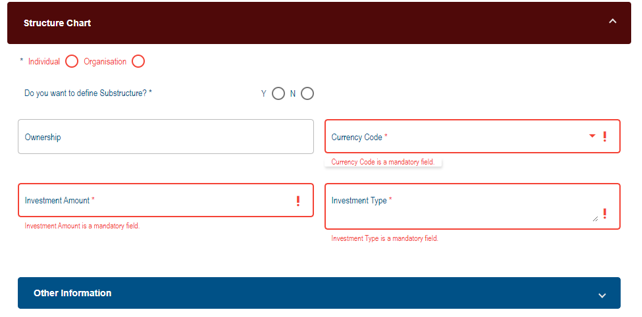
- For a selected Individual /Organisation and complete the following fields:
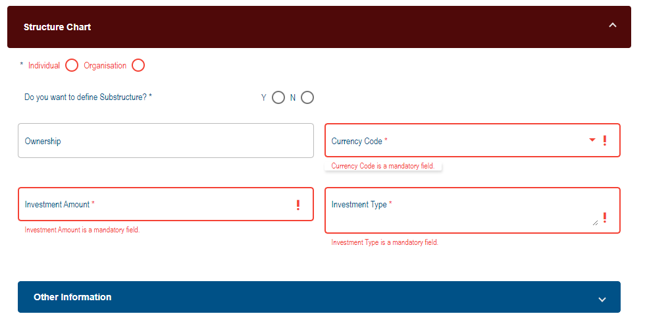
- Structure Chart, for a selected Individual /Organisation and complete the following fields :
- Do you want to define Substructure(Y/N);
- Ownership % ;
- Currency Code ;
- Investment Amount;
- Narrative (Free text);
- Investment Type ;
- Other information.
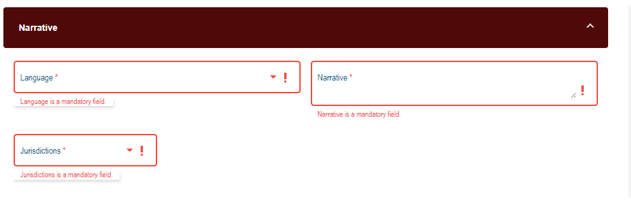
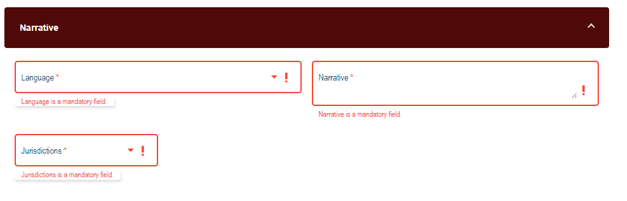
- Narrative, for a selected Individual/Organisation and complete the following fields:
- Language;
- Narrative;
- Jurisdictions.
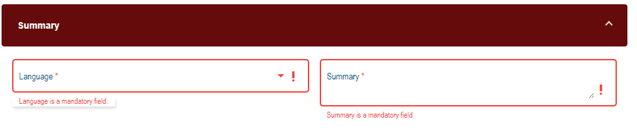
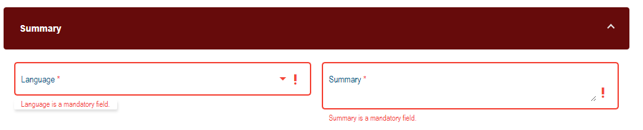
- Summary, for a selected Individual/Organisation and complete the following fields:
- Language;
- Summary
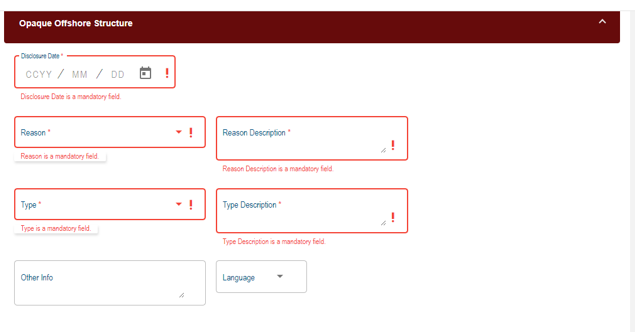
Details of Opaque Offshore Structure – Individual /Organisation
- For a selected Individual/Organisation and complete the following fields:
- Disclosure Date;
- Reason;
- Reason Description (Free text);
- Type;
- Type Description (Free text);
- Other Information.
- Structure Chart, for a selected organisation and complete the following fields :
- Do you want to define Substructure(Y/N);
- Ownership % ;
- Currency Code ;
- Investment Amount;
- Narrative (Free text);
- Investment Type ;
- Other information.
- Narrative, for a selected organisation and complete the following fields:
- Language;
- Narrative;
- Jurisdictions
- Summary, for a selected organisation and complete the following fields:
- Language;
- Summary.
- Declaration
- The disclosing entity need to sign the form after completing all the mandatory fields.
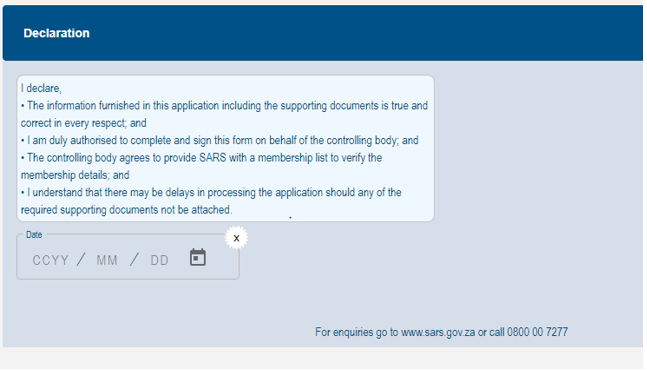
- The following buttons will be available for selection, namely:
- Back;
- Print;
- Save;
- Submit
- When all the required information has been provided/completed on the MDR form, click on the “Submit “ button to submit the MDR form to SARS.

Submission of MDR Form
- Once the form is fully completed, i.e., all mandatory fields captured, you need to click on the “Submit” button to file the MDR reporting form.

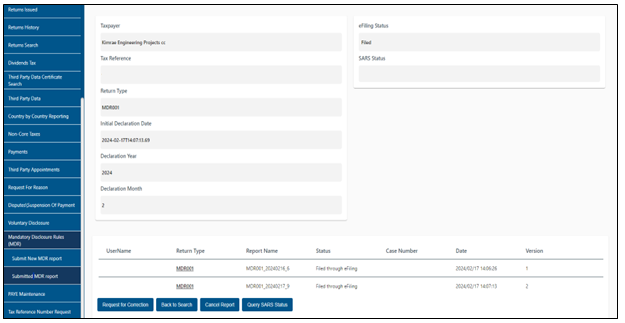
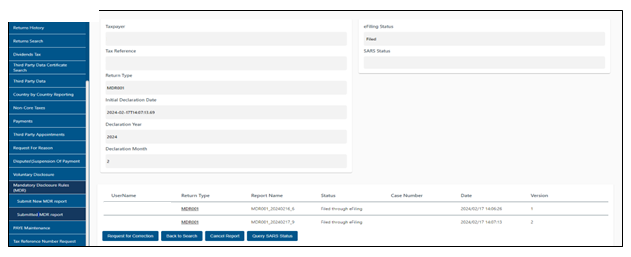
Submitted MDR Report
- The submitted MDR report will be stored under “Submitted MDR reports” sub menu and displayed with the status “Filled through eFilling”.
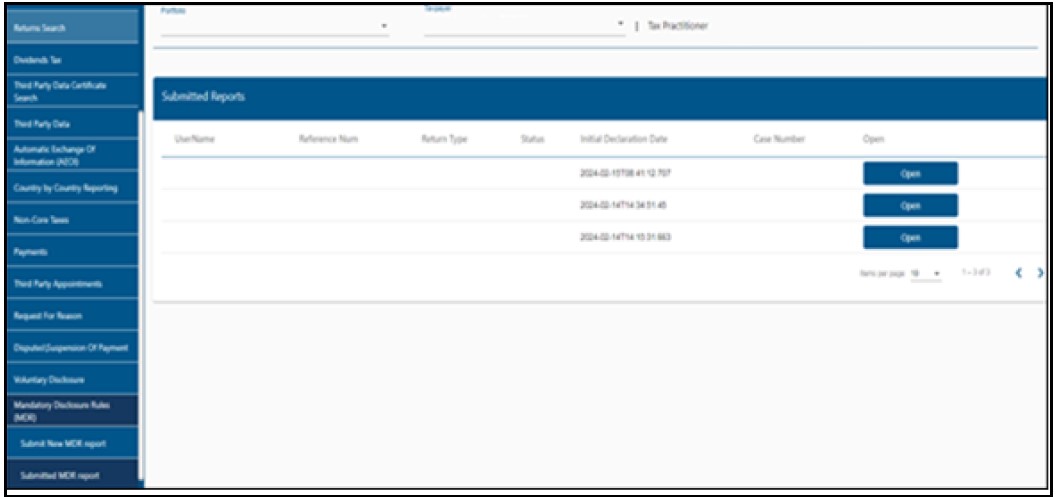
- The submitted MDR reports History list page will be displayed with following fields:
- Username – MDR report submitting Tax username and surname;
- Reference Number – MDR report submitting entity Tax reference number;
- Return Type – MDR001;
- Status – Latest report submission status;
- Initial Declaration date – Date and time at which the declaration was submitted;
- Case Number – Last Submitted report version case number;
- Open – Link to open submitted report work page:
- The initial version will be indicated as “1”;
- This initial version will be submitted with “Create Report” as a request operation;
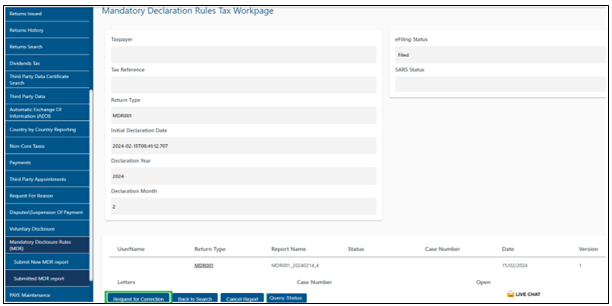
- When “Open” link is clicked from the submitted reports History list page, you will be presented with the work page as indicated in the following screen:
The MDR Work Page
The work page contains the following:
- Username – Disclosing entity Tax user’s name and Surname;
- Tax Reference number – Tax reference number of the disclosing entity;
- Return Type – MDR001.
- Report Name – Name of the report.
- Initial Declaration Date – Date and time at which the 1st version of the declaration was submitted;
- Declaration Year – Year at which the 1st version of the declaration was submitted;
- Declaration Month – Month at which the 1st version of the declaration was submitted;
- eFiling Status – Latest declaration eFiling status:
- Filed – Successfully submitted;
- Rejected – Rejected form;
- SARS Status – Status details or Status returned from the “Query Status” call;
- Status – Filed through eFiling;
- Date – MDR report submission date;
- Version – Versions of the submitted MDR reports (“1” indicate the initial report and then will increase with “1” for any subsequent versions of the same report);
- Letters – Submitted MDR report linked letters, if issued namely: MDR acknowledgement letter and then MDR Accepted outcome letter or MDR rejected outcome letter. If cancelled, MDR cancellation letter once received will be displayed;
- Case Number – Submitted MDR report linked case number issued;
- Open – Link to open a letter in PDF format;
Request for Correction (RFC).
- To request for correction, you should select “Request for correction” button from the submitted MDR reports work page.
- Once the “Request for correction” button is selected, the latest version of the submitted MDR report will be displayed;
- The RFC will be reflected as version“2” and if subsequent RFCs are submitted, then the versions will increase by 1;and in a “Saved” status;
- Note :You can be able to submit many corrections (RFC’s) as possible.
- Once the “Request for correction” button is selected, the latest version of the submitted MDR report will be displayed;
Back to Search Button
- The “Back to Search” button will redirect you back to MDR submitted reports history list.
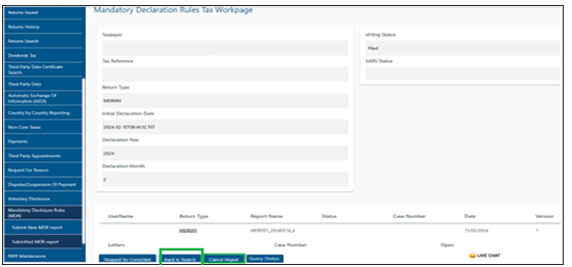
Cancel MDR Report Form;
- If you wish to cancel the submitted MDR reporting form, you need to click “Cancel MDR report” button from the submitted MDR reports work page.
- Once the click “Cancel MDR report” button is selected, the latest version of the MDR report with “Delete Report” and eFiling will set the Status to “Cancelled”;
- Once the status is set to “Cancelled”, “Request for correction” and “Cancel MDR Report” buttons will then be disabled;
- Note: You will still be able to request for the new MDR form to complete and submit.
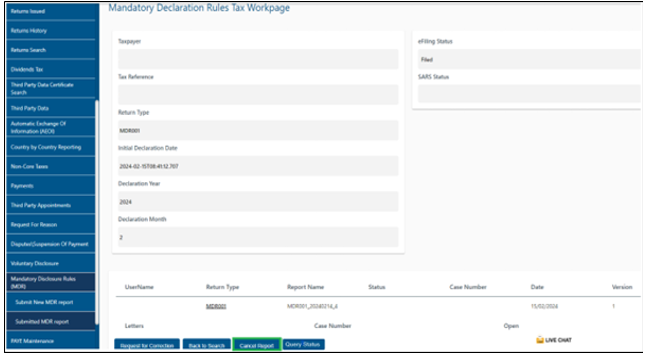
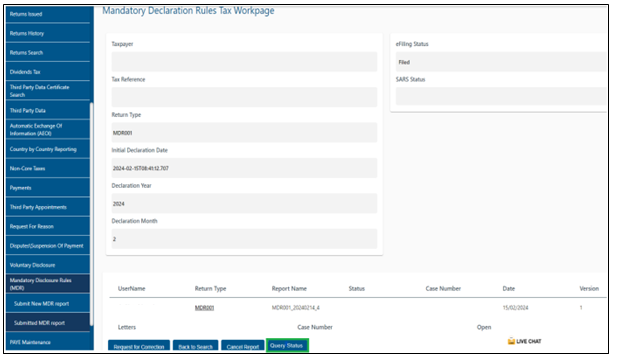
Query MDR Report Form Status;
- To get the latest status, you need to click “Query Status” button form the submitted MDR reports work page.
- Once the “Query Status” button is selected, the latest status of the MDR submitted report will be displayed under “SARS Status” section of the MDR submitted report work page.
- The following Dashboard statuses will be pushed and displayed on eFiling when queried.
- Once the “Query Status” button is selected, the latest status of the MDR submitted report will be displayed under “SARS Status” section of the MDR submitted report work page.
- You can print the submitted MDR report in the PDF format Print version will be flattened through Stream Serve;
SARS Correspondence
- When you click on “SARS Correspondence” and the sub-option “Search Correspondence” in the menu on the left-hand side of the page, a list of letters/ correspondence that were issued by SARS within the selected timeframe will be displayed:

- When MDR reporting related letters are issued, the letters will be process and be stored on eFiling;
- The letters link on the work page will open the issued letter in a PDF format;
- The letters will be provided for MDR Form will be as follows:
Letter ID | Letter name | Description | CRP Type | eFiling Status |
MDR01 | MDR Acknowledgement letter | Acknowledgement letter after submission of MDR report. | MDR_ACK_LETTER | Filed |
MDR02 | MDR Accepted outcome letter | MDR report accepted letter | MDR_ACCEPTED_LETTER | Accepted
|
MDR03 | MDR Rejected outcome letter | MDR report rejection letter | MDR_REJECTED_LETTER | Rejected
|
MDR04 | MDR Cancellation letter | MDR Cancellation confirmation letter | MDR_VOID_LETTER | Cancelled
|
Definitions, acronyms and abbreviations
The definitions, acronyms and abbreviations can be accessed here – Glossary webpage
Legal disclaimer: In the event of conflict or inconsistency between this webpage and the PDF version of the guide, the latter shall prevail.