
Summary
This webpage serves as a guide to assist eFiling users to use the Bulk and Additional Payment function on eFiling. The following is described in this webpage:
- How to create and file a Comma Separated Values (CSV) file;
- How to structure and validate your file rules;
- How to upload multiple payments using the bulk payment functionality; and
- How to create and capture additional payments.
In order to use this function, you need to be registered for eFiling and to register:
Go to www.sars.gov.za Navigate the website www.sars.gov.za, and search for the icon “eFiling –REGISTER.” Once located, select click on the icon, and follow the on screen instructions to complete the registration process.
For further assistance with eFiling registration, refer to the guide “How to register for eFiling and Manage your user Profile” available on the SARS website www.sars.gov.za.
Please note: The bulk payments function is only available during off-peak periods (16:00 – 10:00 daily). The reason for this is that these bulk payments require high processing and internet bandwidth that negatively affect the user experience of all eFiling users.
Requirements to use the Bulk and Additional Payment Function
A user must have the following:
- A valid eFiling username and password;
- Comma Separated Values (CSV) file according to the correct format and structure to upload;
- The ‘Additional/Bulk Payment’ function to upload and authorise a file.
Access Rights
What are Access Rights?
For new registrations, the registered tax user is the default administrative user for the organisation registered. By default, this administrative user is linked to a ‘System Default’ group with full authorisation level and is able to:
- Setup new groups and register other tax users for his/her organisation;
- Assign specific authorisation levels and user roles to these new tax users; and
- Register new taxpayers and assign them to the groups, which have been setup.
Authorisation and access rights refer to your ability to access the ‘Bulk and Additional Payment’ function on your eFiling profile. To be able to activate the eFiling profile, refer to the external guide – How to register for eFiling and manage your user profile, which is available on the SARS website www.sars.gov.za.
Comma Separated values (CSV) Files
- The file format CSV means this is a common text file format that contains comma-delimited values. Any spreadsheet or text editor can open the text file.
- Note: When saving the text file in an Excel format you should check the file to ensure that Excel has not changed the format (for example removing the leading zeros).
- A CSV file can be created in many ways. Excel is a good example of a program used to create such a CSV. Please keep in mind that every tool used to create a CSV will be different. However, the outcome (structure, layout, and validation rules) must be in accordance with SARS’s requirements as stipulated below.
Creation of CSV File
Below are requirements when creating a CSV file:
- A ‘comma separated values’ file format must be used.
- All information for the specific fields will be validated according to the rules prescribed by SARS.
- All validation rules as well as rules applicable to the specific transaction must be complied with when creating electronic files.
- The file must consist of the following record types:
- Header Record – Demographic information of the organisation making the payment;
- Details Record – Details of the payment transactions for multiple organisations; or individuals;
- Trailer Record – Summary of the detail records.
- A comma to identify the field must separate each field on all of the abovementioned record types.
- All numeric fields with decimal values (i.e., rand and cents) must have the decimal point specified as a point and not a comma.
- A comma must not precede the first field of each record.
- A comma must not follow the last field of each record.
- Each record must start in a new line.
- The file name must be structured according to the validation rules.
- The information required to identify the organisation must be carried in the Header Record.
- The information required to create the payment transactions must be in the Detail Record.
Rejection of CSV Files will occur if:
Below are requirements to reject the CSV file:
- File test indicator does not match system test indicator: N.
- Trailer record count check failed. Trailer count not equal to actual count.
- Trailer file total check failed. Trailer amount not equal to actual amount.
- Bank branch code field in incorrect format. Expected format: 174000,
- Bank account number field in incorrect format. Expected format: 1740000000,
- File creation date/time is invalid: 2.01011E+13. Expected format: CCYYMMDDhhmmss.
- Tax reference number field in incorrect format. Expected format, 0309180164.
- Banking information CDV validation failed. Message: Please check that you have entered the correct branch code.
- Only one payment method allowed per payment group. CP/DP.
- Taxpayer status is invalid.
To prevent taxpayers from submitting files with PRNs filled with zeros (000…) or nines (999…) for Admin Penalties, the following validation rule has been introduced:
- When a taxpayer selects the Tax Type “ITPEN” (Payments towards Third Party Appointments for Admin penalties, such as AA88 notices issued by employers), the 12th character of the PRN must always be a “I”.
- The characters between positions 13 and 19 must be numeric and cannot consist entirely of zeros or nines. The 19-digit modules must apply.
- If any of the above conditions are not met, as per the specifications, then the file must be rejected.
Example of a CSV layout According to Specifications
The data in the file should look as follows when viewed:
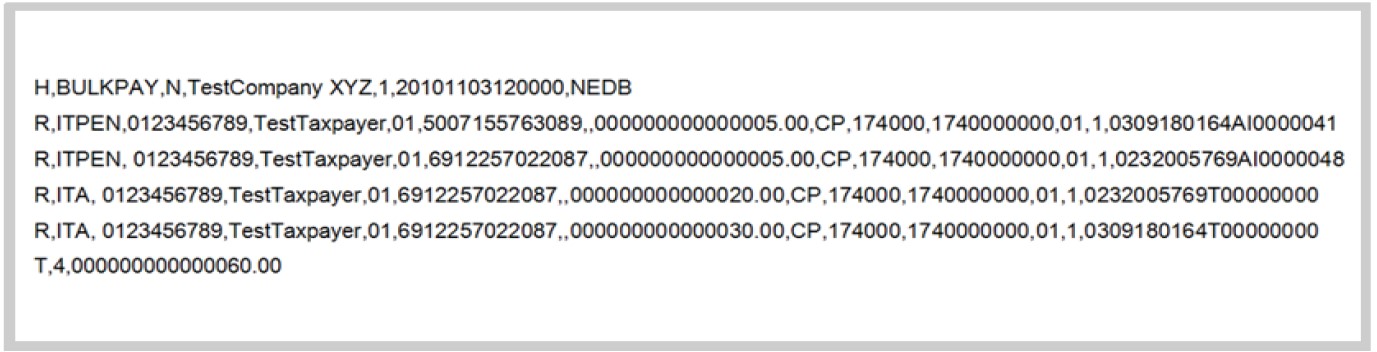
File layout Explanation
Header record
- This record must start with record ID type “H”;
- This record must contain all the demographic information of the organisation (e.g., file name, data, type, organisation name, file transmission number, date and time created, bank name, etc.);
- This record is used to identify the organisation making the payment.
Layout of the header record

Details Record
- This record must start with record ID type “R”;
- This record must contain all the details of the payment transactions for the multiple organisations or individuals (e.g., tax type, tax reference number, taxpayer name, entity type, entity ID number, period, tax amount, payment method, bank code, bank account number, bank account type, payment grouping no., payment reference number);
- Each record must start in a new line.
Layout of the detail record

Trailer Record
- This record must start with record ID type “T;”
- This record must contain the number of detail records;
- This record must contain the total value of the records in the file.
Layout of the trailer record

CSV File Structure and Validation Rules
Header Record Bulk Payment
| Field Name | Description | Validation/Indicator | Remarks |
| SEC-ID | Section identifier. Identifies the type of record (Header record) | “H“ | Demographic information of organisation |
| INFO-TYPE | Information type | “BULKPAY” | Identifies the information in the record |
| TEST-DATA | Test data indicator | “Y“ or “N” | File indicator, where: Y-Test file N-Production file. |
| INFO-SOURCE | The details of the file orgin (Organisation Name) | Alphanumeric | Uniquely identifies a file |
| TRANSMIT-NO | File transmission number created by the organisation. (This field is not mandatory) | Numeric | Sequence number to the files submitted. |
| GEN-TIME | Date and time of file creation | CCYYMMDDhhmmss | Uniquely identifies a file |
| BANK | Bank through which the payment will be processed | Alphanumeric | Bank name:e.g. “ABSA” |
Detail Record Bulk Payment File
| Field Name | Description | Format | Remarks |
| REC-ID | Data record identifier. Identifies the type of record (Detail record) | R | Details of the payment transactions for multiple organisations or individuals |
| TAX-TYPE | Tax Type (see list below for allowed entries) a) “PAYE” – Employees Tax b) “EMP” – Normal payment assigned to a specific PRN number. c) “VAT” – Value-Added Tax d) “PTAX” – Provisional Tax e) “ITA” – Individual Assessed income tax (this can be used towards payment of Third Party appointments for assessed tax by individuals including Third Party appointment debt) f) “STC” – Secondary Taxes on Companies g) “CUS” – Customs payments h) “RFT” – Retirement Fund Taxes i) “ITPEN” – Payments towards Third Party Appointments for Admin penalty (AA88 notices by employers) Note: IT88 is not a valid Tax Type and will be rejected. If none of the above is met (for example, I0000000) the ‘ITPEN’ will be rejected. | Alphanumeric | The code at the beginning of the descriptors must be included in the field. PRN Format: |
| TAX-REF | Tax reference number differ for each tax type. | Numeric | The standard 10 digit reference number. |
| TAXPAYER-NAME | Name of the taxpayer. | Alpha numeric | The name of the Organisation, company or fund,for an Individual please provide Initial and surname e.g. J Smith |
| ENT-TYPE | Entity Type (see below) a) “00” – Unknown b) “01” – South African ID Number c) “02” – Company/CC Registration Number i)“03” – Trust Deed Number ii)“04” – Passport Number iii)“05”- Fund Number | Alpha numeric | Validation of the ID number provided |
| ENTITY-ID-NO | Entity ID number depends on the entity type and will be validated for completeness. | Alpha numeric | Entity ID number a) South African ID Number – 13 digit SA ID b) Company/CC Registration Number – 9999/999999/99 c) Trust Deed Number – number registered with SARS d) Passport Number – number registered with SARS e) Fund Number – 18204999999 |
| PERIOD | The period depends on the tax type (see notes) a) PAYE: CCYYMM (C = century, Y = year, M = month, e.g: 200102). b) ITPEN: No period required. Field should be empty (e.g: ,,) c) VAT: CCYYMM (e.g: 200102). d) PTAX : CCYYNN (C = century, Y = year, N = period [01, 02 or 03], e.g. 200402). e) ITA: No period required. Field should be empty (e.g: ) f) STC: CCYYMMDD ( e.g. 20010203). g) CUS: CCYYMMDD (e.g. 20010203). h) RFT: NMCCYY (N = period [1, 2 or 3], M = month [2 or 8], C = century, Y = year, eg: 282003). i) EMP: CCYYMM (e.g200102). | Alpha numeric | Period code will be validated based on the Tax Type. |
| TAX-AMOUNT | Tax amount | Numeric | Amounts should be zero padded and include a decimal point as in the example provided: 000000000001000.25 |
| PAY- METHOD | Payment Method: a) “CP” – Credit Push | Alpha | The payment method Credit Push needs to be identified in order to determine the bank account details needed. |
| BANK-BRANCH – CODE | Bank Code: a) “CP” – Blank detail can be placed in the branch code. | Numeric | The standard validation for branch and bank account will apply. |
| BANK – ACC | Bank Account Number: a) “CP” – The Account Number must contain the Account Access Number. | Numeric | The standard validation for branch and bank account will apply. |
| BANK – ACC-TYPE | Bank Account Type: a) “01”- Cheque or Current Account b) “02”- Savings Account c) “03”- Transmission Account | Numeric | Identyfies the type of account. |
| PAY-GRP | Payment grouping no.: a) If a single payment sequence number = 1 b) If the payments are to be split into 3 groups sequence number = 1,2,3 c) If each entry is required to generate a separate payment sequence = Start with 1 onwards. | Numeric | Payment grouping will consist of a numeric number that will allow the linking of payments for consolidation. |
| PRN | Payment Reference No | Alpha numeric | The Payment Reference Number (PRN is a new 19 digit reference number issued by SARS. Mandatory for EMP, AA88, ITPEN, EMPPEN, VATPEN, WDT and Third Party appointment debt payment types.) |
Trailer Record Bulk Payment File
| Name | Description | Validation | Remarks |
| SEC-ID | Section identifier. Identifies the type of record (Trailer record) | “T“ | Summary of the detail record |
| REC-NO | The number of data records contained in this file | Numeric | The number of records in the file |
| TAX-AMOUNT-SUM | The total value of tax amounts contained in the data file | Numeric | The total value of bulk payment file. |
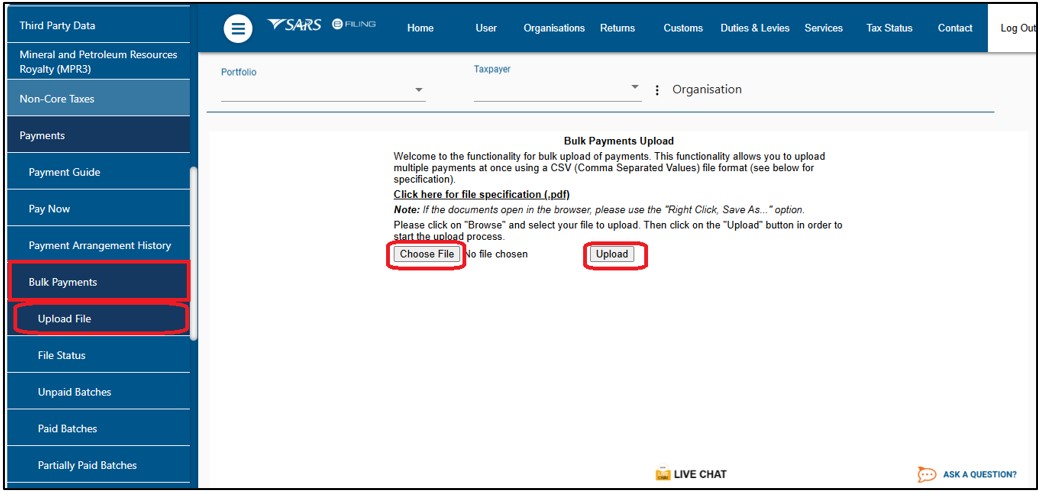
Process to upload a Bulk Payment File
Once the CSV file has been created, it can be uploaded to eFiling and when the user selects “Bulk Payments,” the below menu items will appear as submenus:
- Upload File;
- File Status;
- Unpaid Batches;
- Paid Batches; and
- Partially Paid Batches.

The process to upload a bulk payment file involves the following:
Step 1 – How to upload a file.
- Select <Returns> from the menu on the top;
- Select <Bulk Payments> from menu on the left;
- Click <Upload File>;
- Click <Choose File> and select your file to upload; and
- Click <Upload> to start the process.
Please note –
- Currently a CSV is limited to 500 records per file. If the records exceed 500, the additional records must be uploaded in another file;
- The file format will be verified for accuracy, which will include the validation of reference numbers etc. Should the file fail the format or content verification, the process will be terminated, and the error indicated next to the file. You will receive a notification once the file has been successfully uploaded.
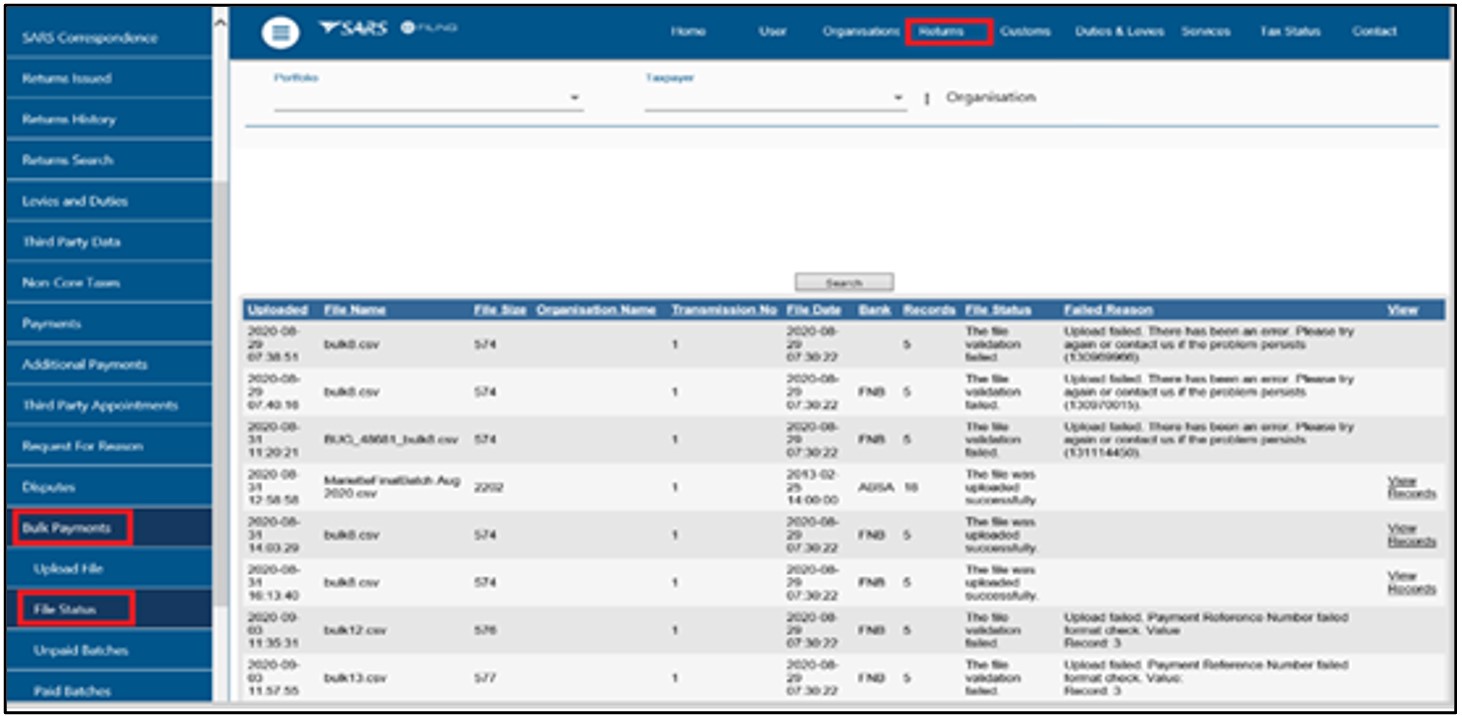
Step 2 – How to view the uploaded file.
- Select <Returns> from the top menu;
- Click on <Bulk Payments> from the menu on the left;
- Select <File Status> to view the upload status;
- The status will be displayed as ‘Successful’ or ‘The file validation failed’ with a failed reason error indicated next to each file on the right-hand side of the screen.
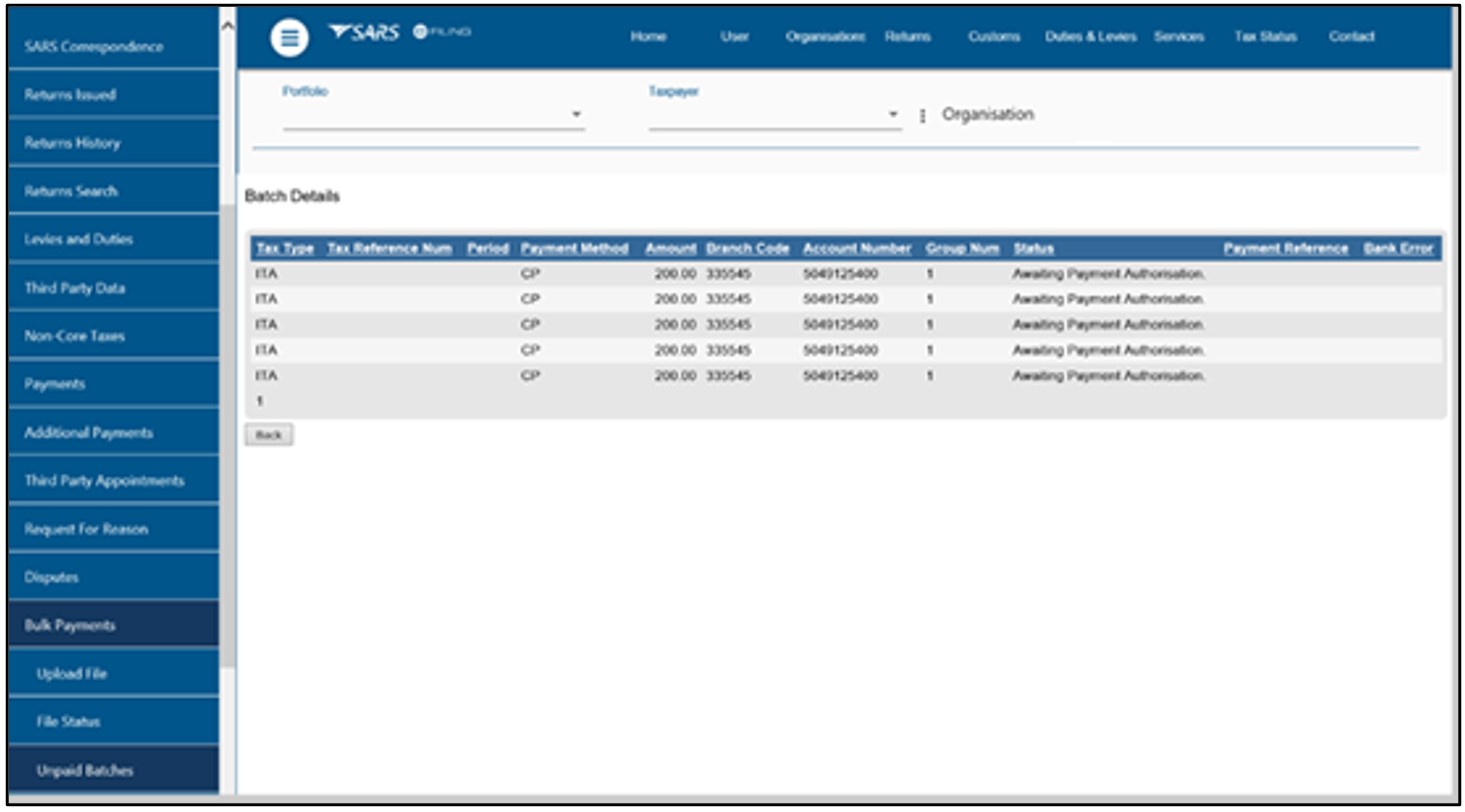
Step 3 – To view unpaid batches.
- Select <Unpaid Batches >to see the files that were successfully uploaded for payment entries created under bulk payments.
- Click on <View Detail> hyperlink to view the status of each payment entry.
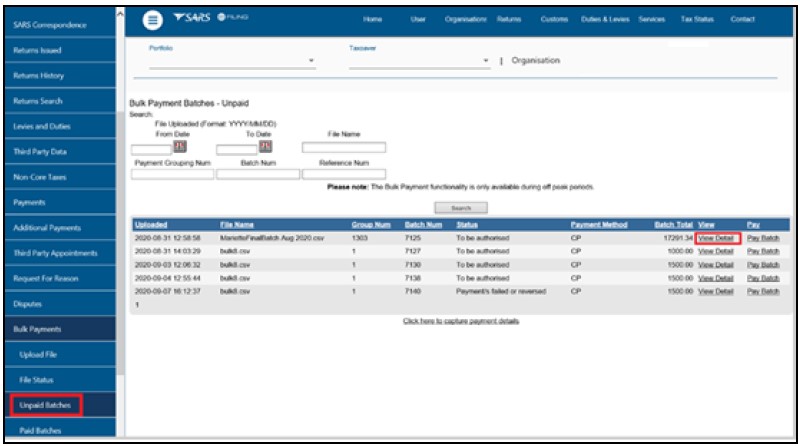
- The status will be displayed as indicated below after clicking on view detail.
Grouping Functionality for Payments Sub-menu Items
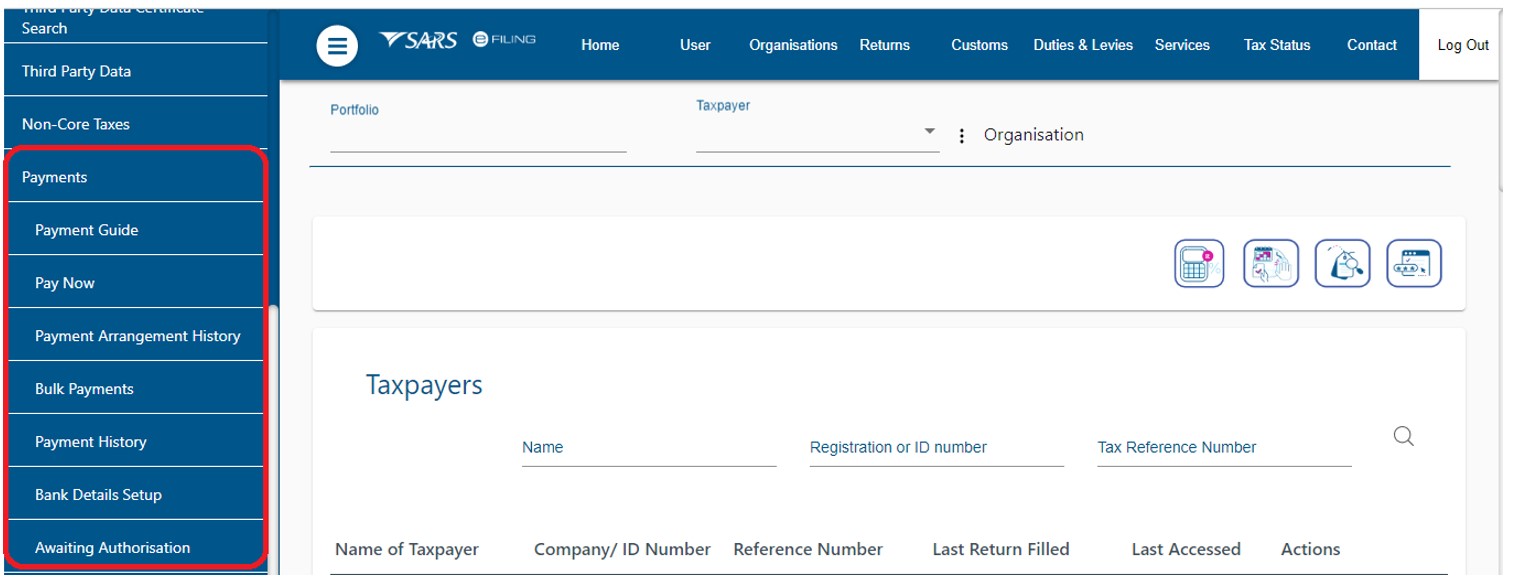
All the payment options as sub-menu items will be grouped together under the Payments Menu item, so that the user/taxpayer can easily navigate through the different payment options.
Payment Sub-menu
Logon to eFiling:
- Navigate to Payments menu item;
- Select the Payments menu item to view the sub-menu items;
The menu items below will be displayed as sub-menus within the Payments menu item:
- Payment Guide;
- Pay Now;
- Payment Arrangement History;
- Bulk Payments;
- Payment History;
- Bank Details Setup;
- Awaiting Authorisation.
Payment Guide
When the user/Taxpayer selects “Payment Guide,” user/taxpayer will be redirected to the SARS website to read the information in terms of eFiling Payments.
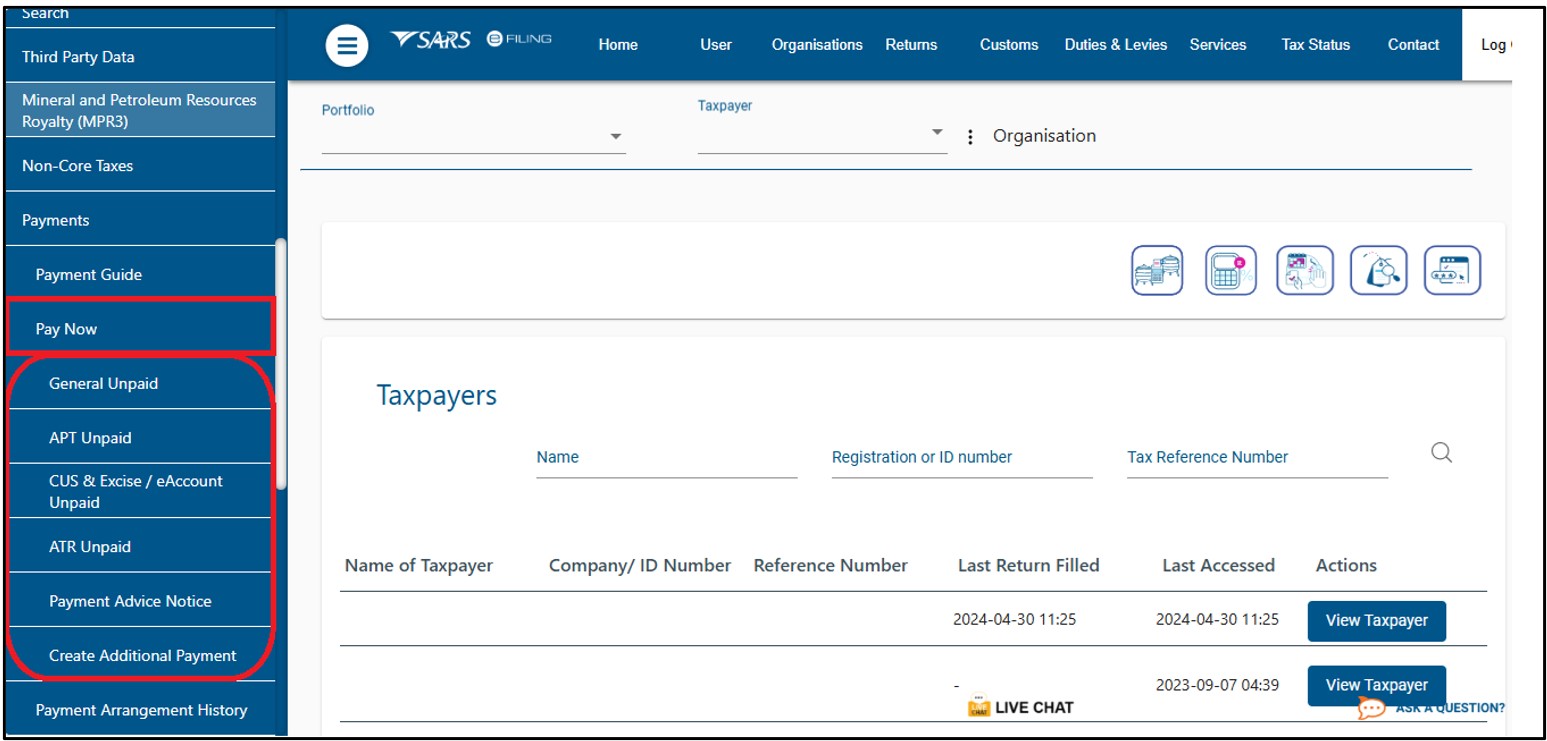
Pay Now
When the user selects “Pay Now,” the below menu items will appear as submenus:
- General Unpaid;
- APT Unpaid;
- CUS & Excise / e-Account Unpaid;
- ATR Unpaid;
- Payment Advice Notice; and
- Create Additional Payments.
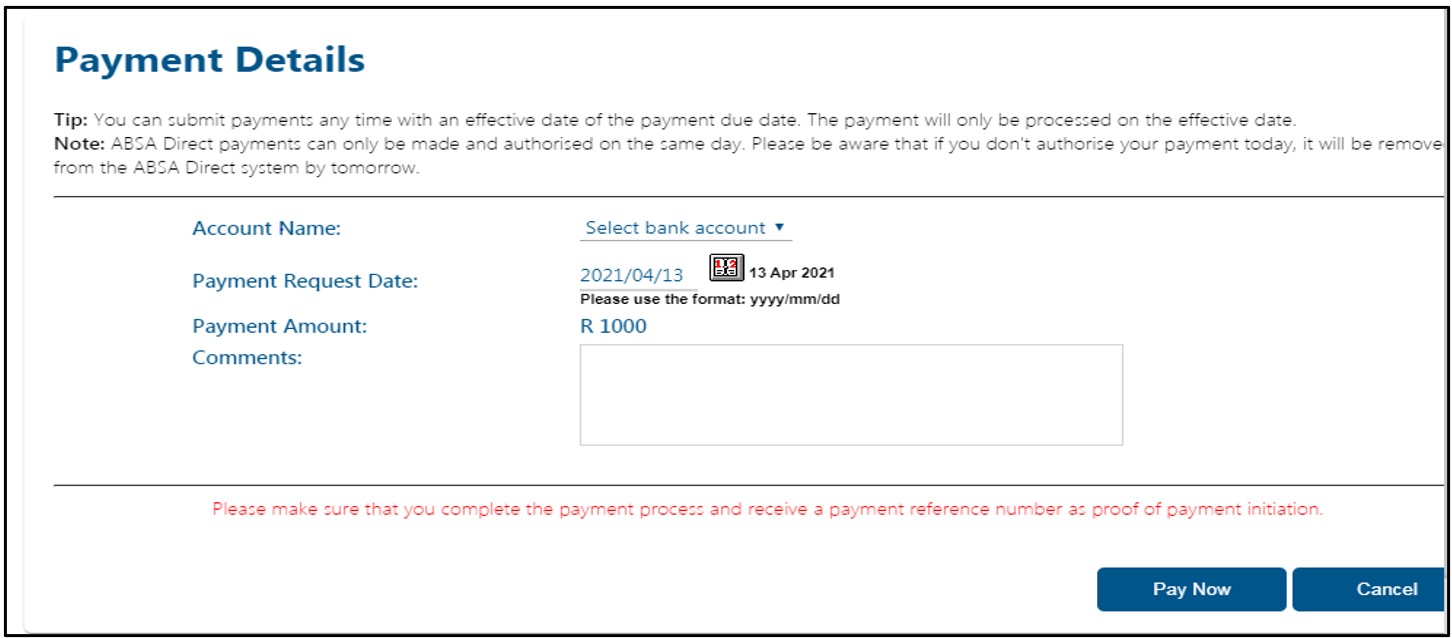
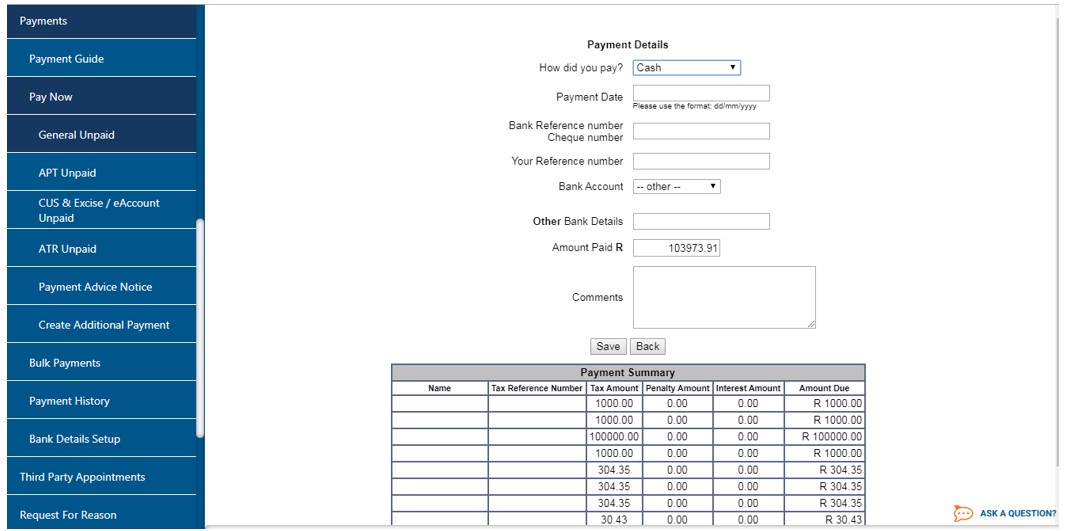
Create Additional Payment – How to make a payment
- Select <Returns> on the top menu;
- Click on <Pay Now> on the left menu;
- Click on <Create Additional Payment>;
- Capture the payment details.
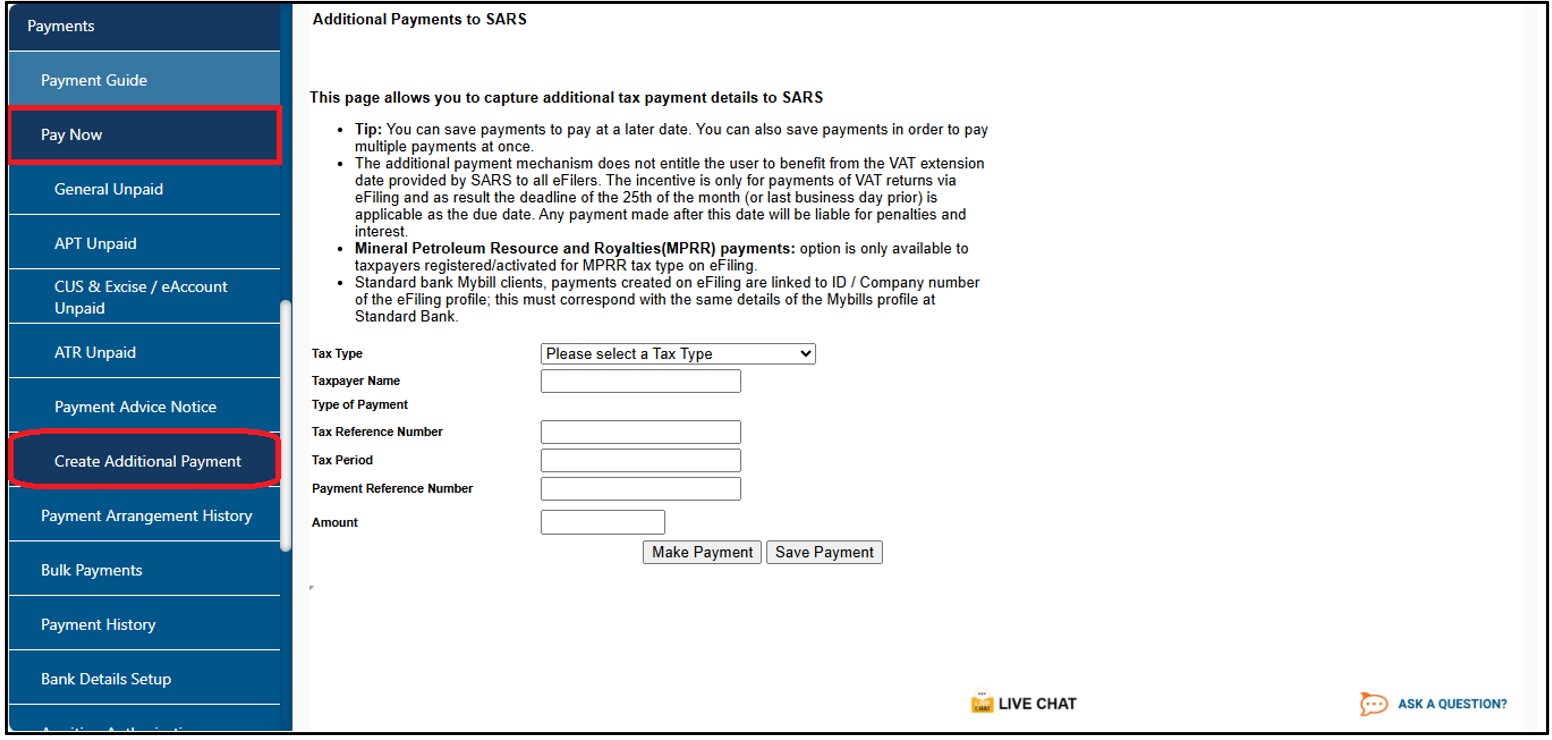
When you have completed the information above, Select one of the following options:
- ‘Make Payment’ to make the payment immediately; or
- ‘Save Payment’ to make the payment at a later stage.
If ‘Save Payment” is selected, a message will be displayed indicating that your additional payments have been saved and saved payment can then be viewed under general unpaid.
If ‘Make Payment’ is selected above, a pop-up message will be displayed to confirm the payment that you want to make. Click OK to continue.

A ‘Payment Initiation Result’ page will be displayed indicating:
- That the payment has been sent to the bank for processing, and
- The Payment Reference Number.
Remember:
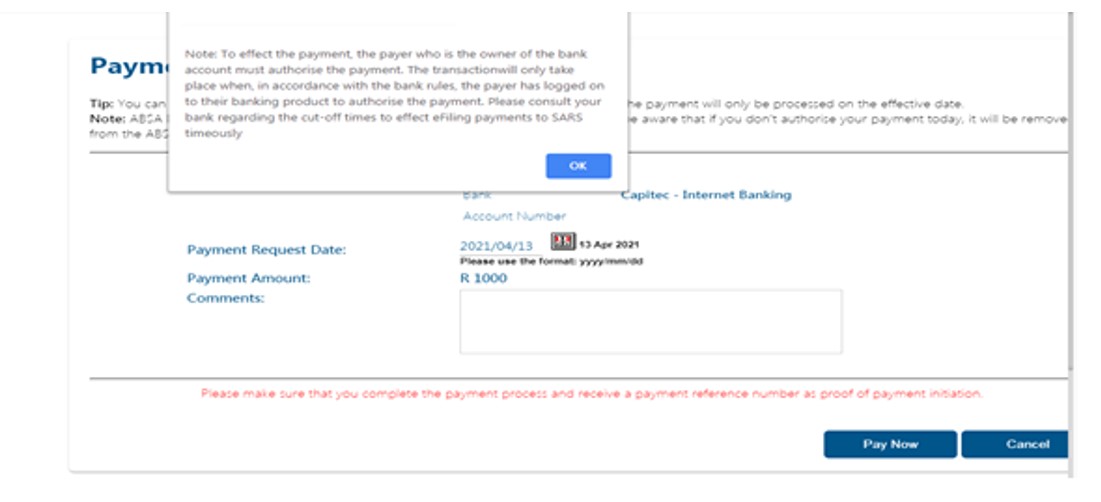
- If you selected credit push as your method of payment to SARS, you would still need to login to your banking product to approve or reject the transaction.
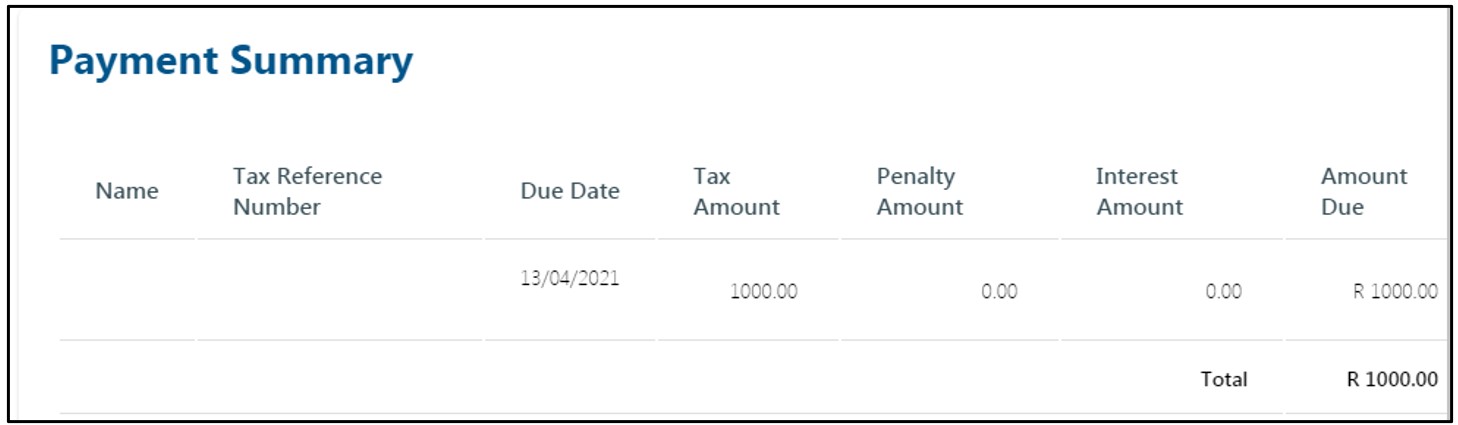
- The payment summary will be displayed below:
- Click on ‘Pay Now’ and click “Ok.’
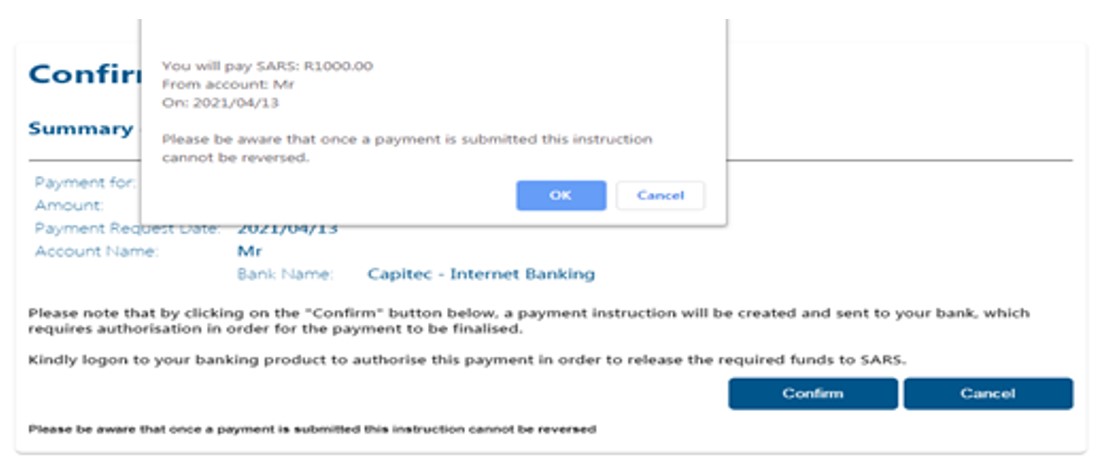
- Confirm if the payment details are correct and then click ‘Confirm’ to continue. Once a payment is submitted the instruction cannot be reversed.
The “Confirm Payment Initiation” screen will be displayed:
Click “Ok” button and the following screen will be displayed:
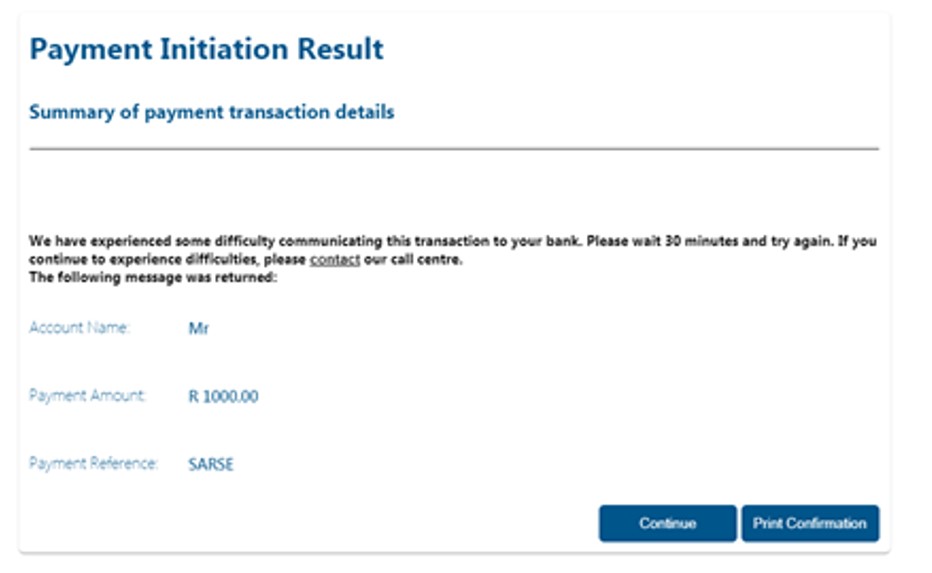
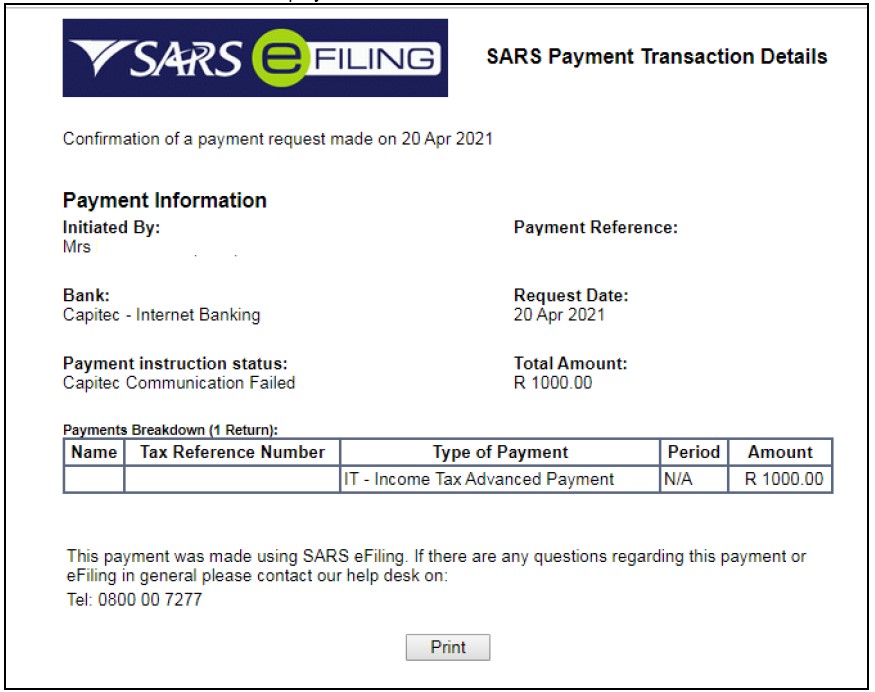
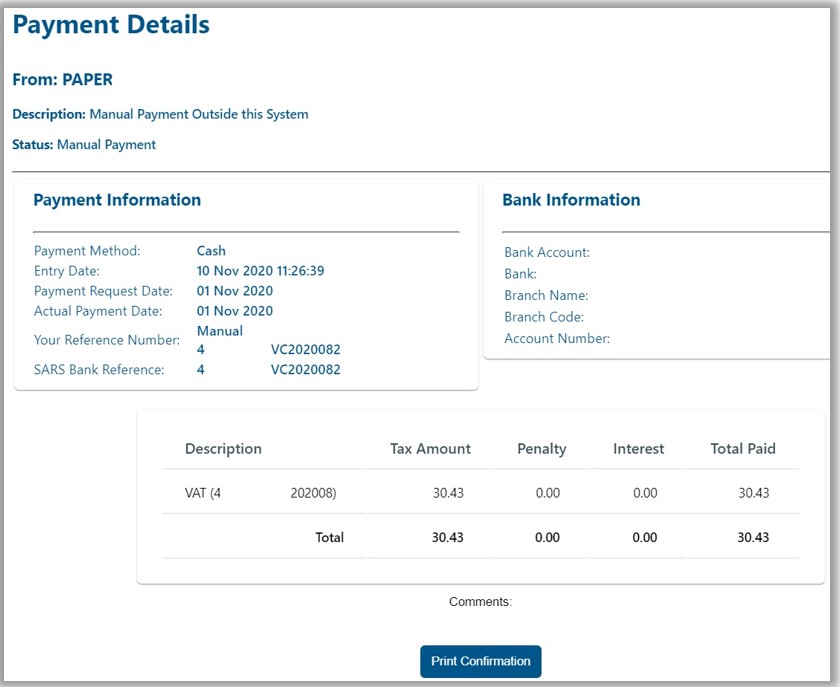
When the payment is made and you need the confirmation, click “Print Confirmation” button and the screen will be displayed as follows:
- When you click the “Continue” button, you will be redirected to Payment history refer to Payment history.
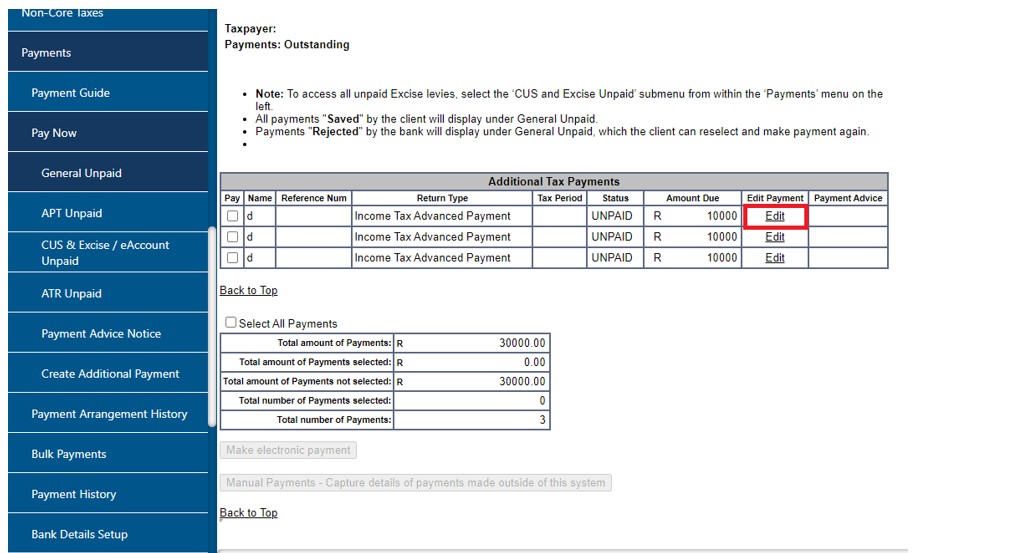
Additional tax payments saved
To view a list of additional tax payments captured and saved:
- Select <Returns> from the top menu;
- Select <Payments> from the menu on the left;
- Click <General / APT / CUS & Excise /eAccount / ATR Unpaid>.
To finalise the payments, you can either:
- Select the required items and make payment or
- Click on ‘Select All Payments’ to make one payment for all the items listed.
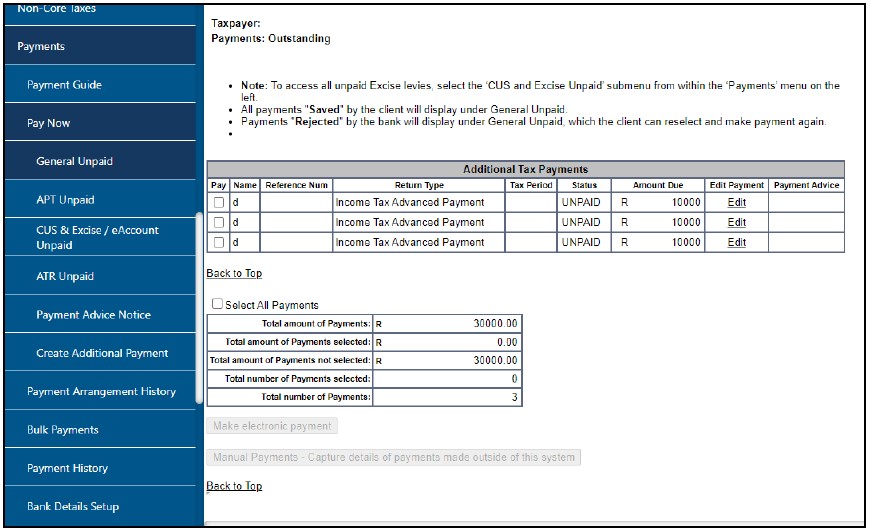
- You will be redirected to the following screen where you will be able to amend the amount or reference by clicking the “Edit” hyperlink.
The following screen will display, select the bank account from which the payment should be made and the date you wish to make the payment:
- If you select “Make electronic payment,” follow section Create Additional Payment – How to make a payment process.
- If you selected “Manual Payments” you will be required to complete the following screen:
Payment History
When the user selects “Payments History,” The Payment History page will allow the user to search or filter for the payments according to following fields:
- Taxpayer Name;
- Tax Product;
- Tax Reference Number;
- Payment Reference Number;
- Payment Status;
- Date From, will be defaulted to last 7 days, this field will be mandatory;
- Date To, will be defaulted to today’s date, this field will be mandatory;
- Actual Payment Date (Note: The payment date is the date that the payment was approved on your bank product as per your bank account).
Payment History only displays the payments already approved on the client’s banking product and other status but not awaiting authorisation.
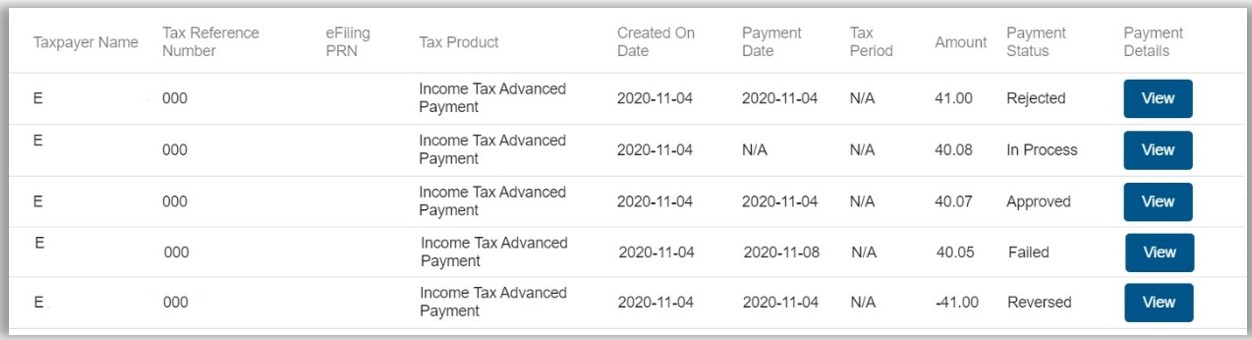
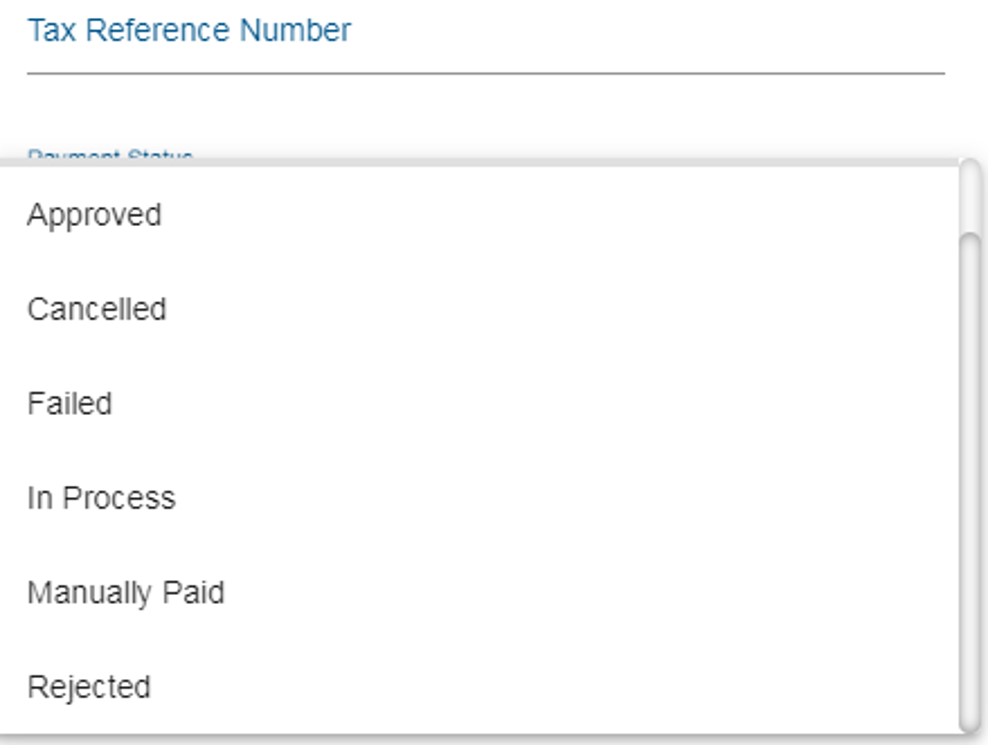
The payment history screen below will be displayed and will indicate all payment statuses been cancelled/failed/approved/reversed and rejected.
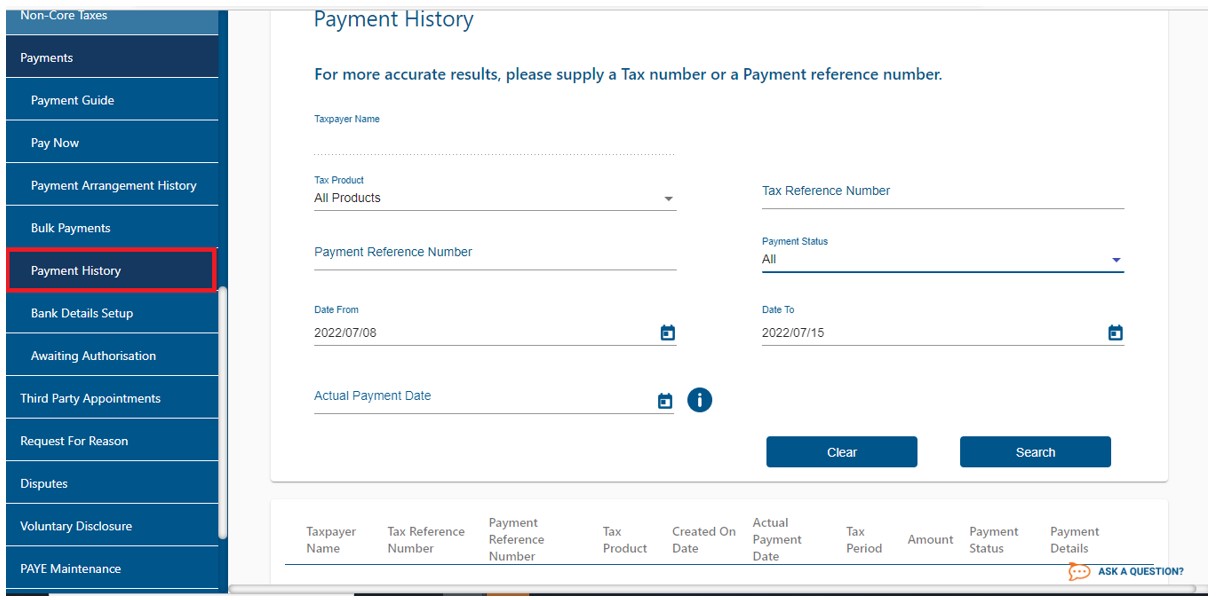
- After the payment(s) has been submitted on eFiling, navigate to ‘Payments’ under ‘Payment History “menu to view details of payments made to SARS.
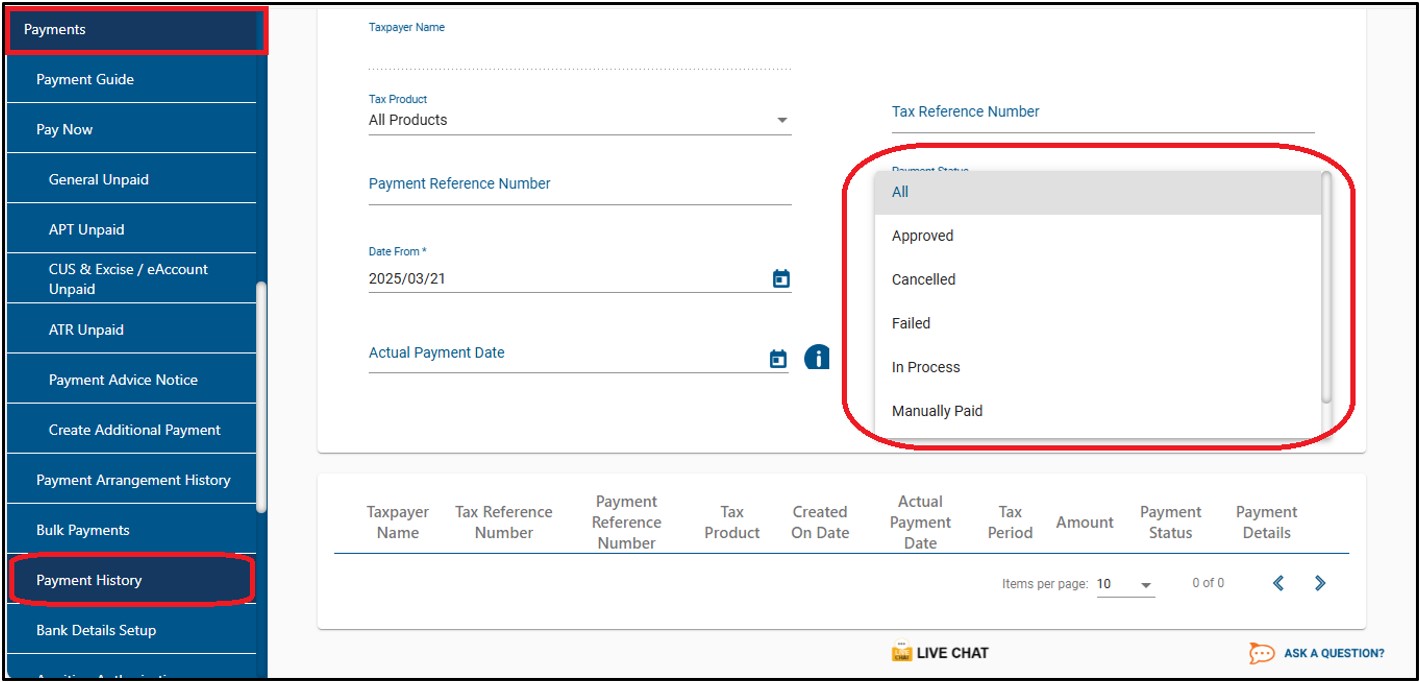
Select on “Payment Statuses” and click “Search” button, the different statuses will be displayed select “the status” you need to view, see below:
Details of the transactions will be displayed as follows:
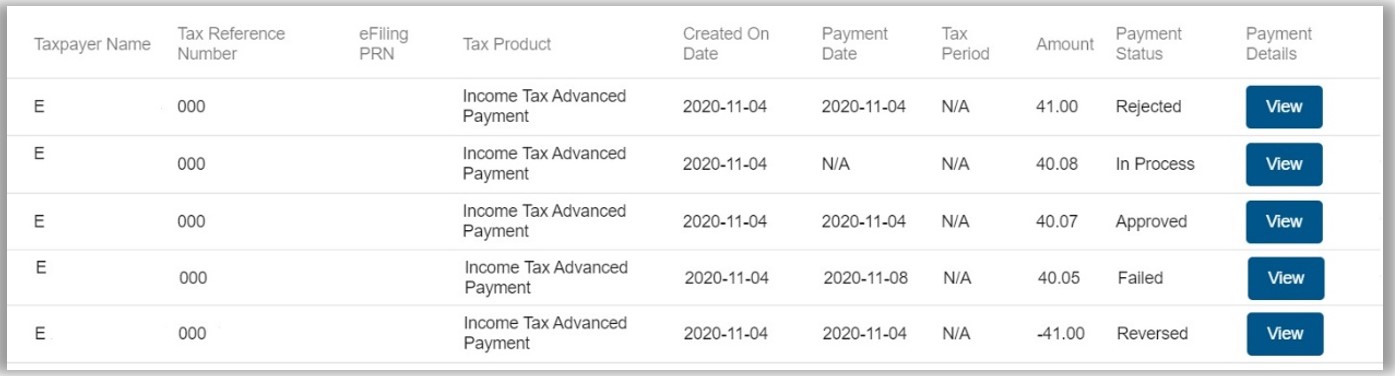
- Click the ‘View’ link to see the payment details of each transaction.
- Click the “Print Confirmation” button to view and print the payment confirmation.
NOTE: You will only be able to cancel a payment – initiated request on eFiling if you have NOT authorised your payment at your bank.
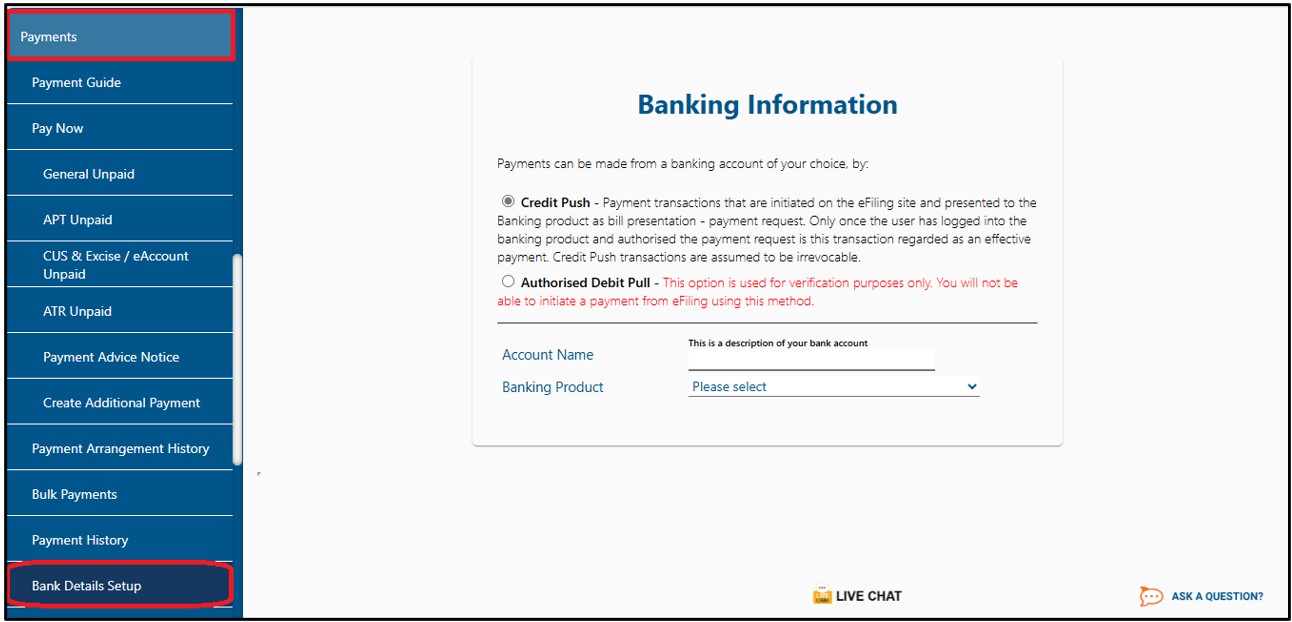
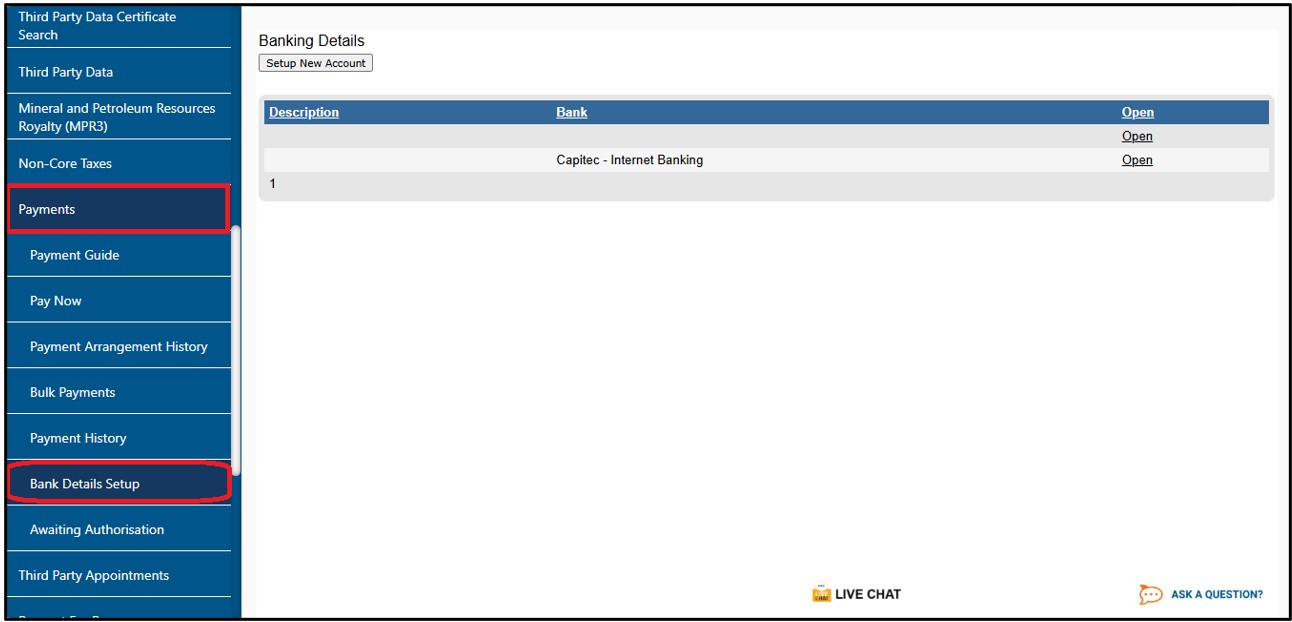
How to make a Bank set-up via eFiling
Before you can make a payment, ensure that your banking details are set up.
Step 1 – How to set up banking details.
- Select <Returns> from the menu on top;
- Select <Payments> from menu bar on the left;
- Select <Bank Details Setup>;
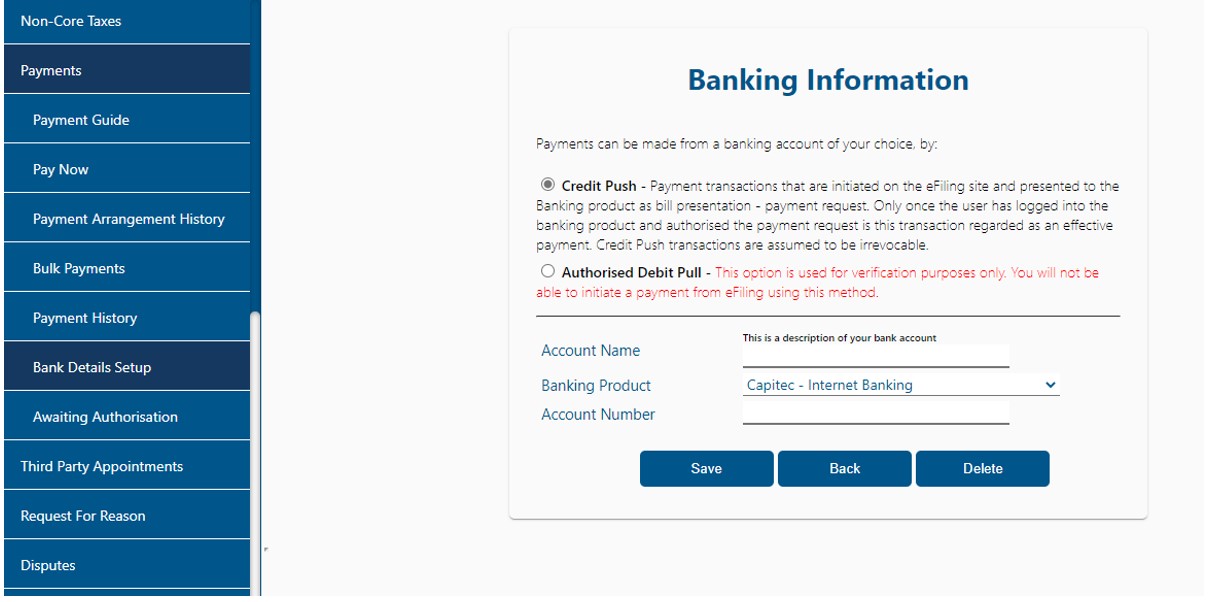
- Complete the bank details.
When the bank details are set up/created the following screen will be created:
- In order to use the facility, you need to be registered at the relevant bank before use;
- As of the end of October 2013 Debit Pull transactions has been discontinued. Taxpayers are advised to set-up a Credit Push payment option or use one of our alternative methods of payment. Refer to www.sars.gov.za for more information on the credit push set-up and payment rules.
When you have captured the bank details, go to “Open” button to see that you have captured the details correctly.

The following screen will be displayed:
- If the details are not captured correctly, you have an option either to go “Back” to recapture the details or “Delete” to remove the details;
- If the details are captured correctly you can click on the “Save” button.
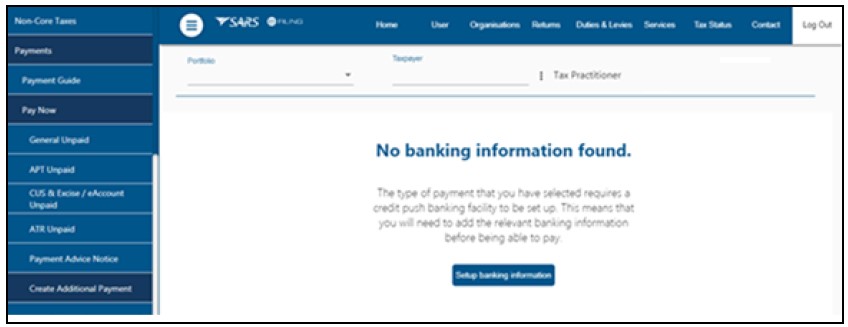
- Click “Confirm” button to make payment, and if no banking information is found, an enhanced “No banking information screen” will be displayed as per existing functionality and you will be required to complete “banking information” screen,
- Click on the “Setup banking information” and follow the, How to make a Bank set-up via eFiling step 1 process to set up banking details.
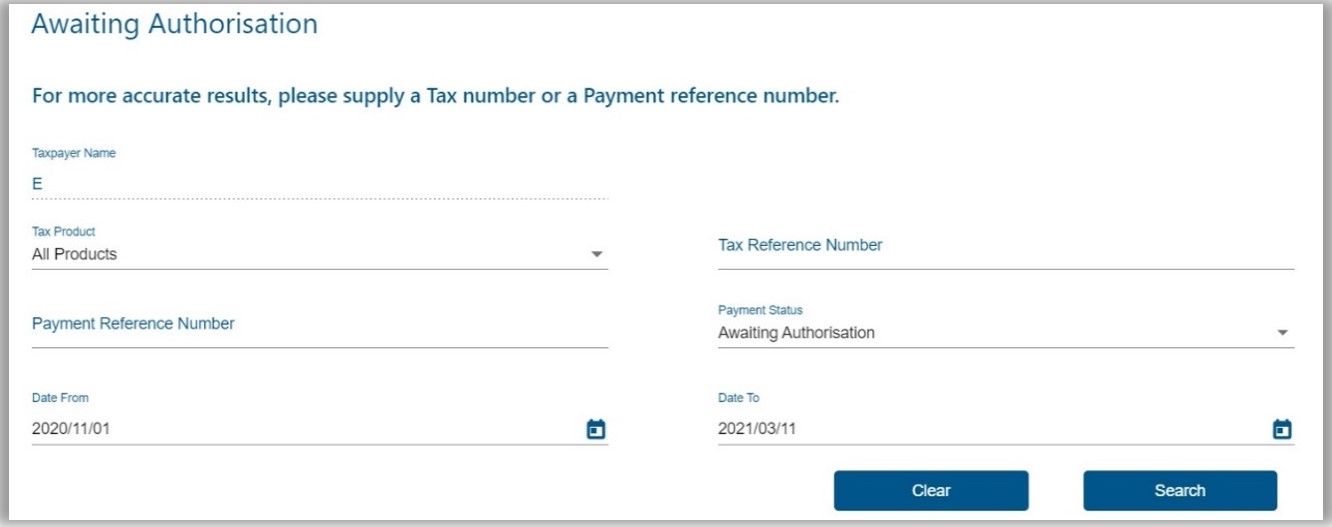
Awaiting Authorisation
To view a list of Awaiting Authorisation tax payments captured and saved:
- Select <Returns> from the top menu;
- Select <Payments> from the menu on the left;
- Click <Awaiting Authorisation>.
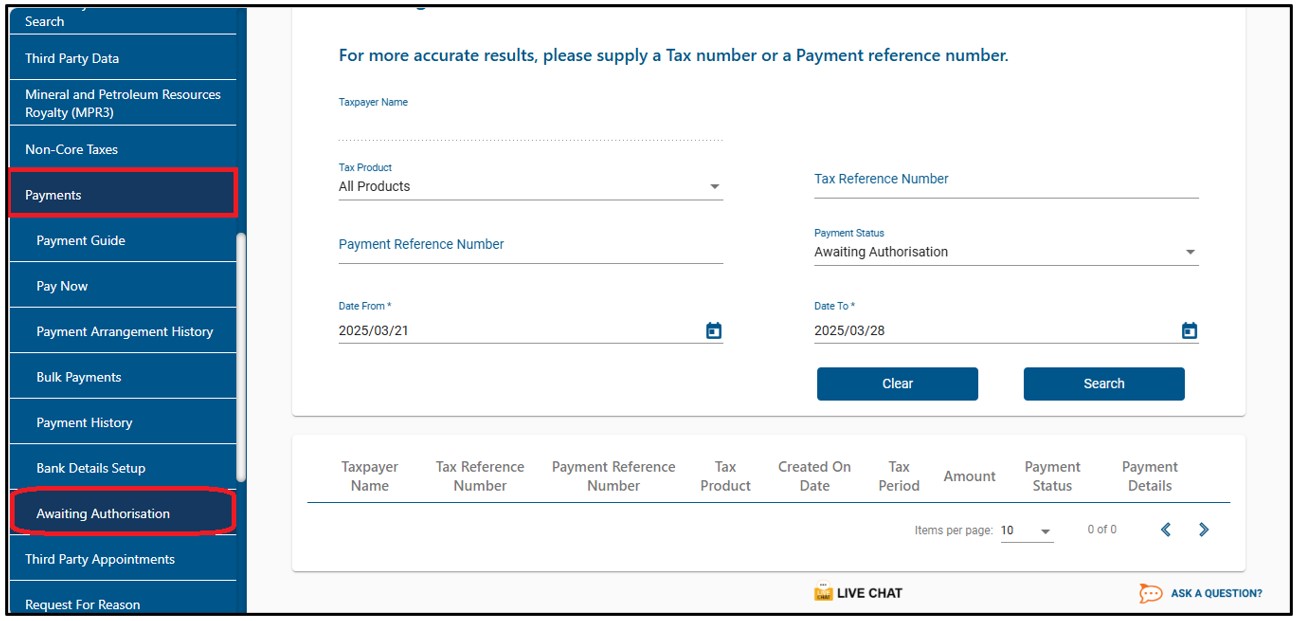
The ‘Awaiting Authorisation’ page will allow the user to search or filter for the payments according to following fields:
- Taxpayer Name;
- If you enter a specific Taxpayer Name in the “Taxpayer Name” field, the Awaiting Authorisation page will display all payments related to the captured Taxpayer name when “Select All” has been selected from the Taxpayer drop down list;
- If a specific Taxpayer has been selected from the Taxpayer drop down list, the “Taxpayer Name” field will be disabled and the selected taxpayer name at the top will be populated into this field.
- Tax Product;
- If the user selects a specific product from the Tax Product drop down list,Awaiting Authorisation page will display all payments for all the taxpayers related to the selected Tax Product that are still waiting to be approved on the banking product.
- Tax Reference Number;
- Payment Reference Number;
- Payment Status;
- Date From;
- Date To.
- If there are no payments in awaiting authorisation status, the results section on the screen will be blank.A warning message will be displayed to indicate that no records exist for the search criteria. Click ‘OK’ on the message to proceed.

- If you have made payments, they are still awaiting approval on your bank product, the result section will display the payment (s).

- Select the ‘View’ button and the ‘Payment Details’ screen will be displayed.
- Note: The cancellation of payment functionality has been introduced to enable eFiling users to cancel payment requests before it is authorised with their banks. The payment request will be initiated on eFiling as per the current process.

- To cancel the payment, click the ‘Cancel Payment’ button. A confirmation message will be displayed. Click ‘OK’ to confirm the cancellation of the payment.

- Once the payment has been cancelled, a message will be displayed to indicate that the payment has been cancelled successfully.
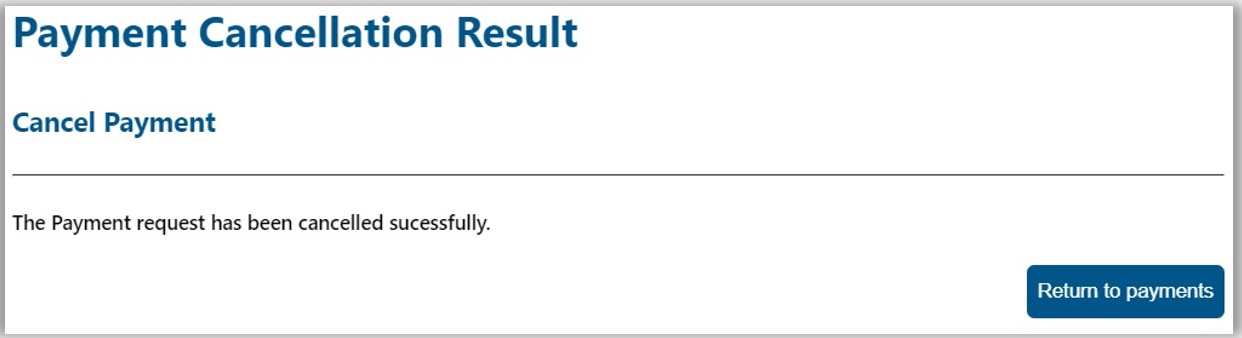
- The cancelled payment will be moved to Payments History and the status will be indicated as ‘Cancelled.’
- Note: If the payment is cancelled on eFiling it is not cancelled on your banking product.

Definitions, acronyms and abbreviations
The definitions, acronyms and abbreviations can be accessed here – Glossary webpage
Legal disclaimer: In the event of conflict or inconsistency between this webpage and the PDF version of the guide, the latter shall prevail.