
Summary
Electronic submission
The application types indicated in SC-CF-19-A01 with an E in the submission channels can be submitted either through:
- eFiling; or
- The Registration Licensing and Accreditation (RLA) capturing functionality on SARS Service Manager System (SSM).
The applicant can submit:
- New Customs client type or Authorised Economic Operator (AEO) applications;
- Amend existing information pertaining to his/her:
- Customs product; or
- Client type;
- Accredited client status;
- The cancellation (withdrawal) of a Customs client type; or
- The renewal of a Customs client’s licence.
When applying for a Customs client type manually as indicated in SC-CF-19-A01 with an M in the submission channels, the application must:
Complete the DA 185 and the relevant annexure manually; and
Submit to any Customs Branch Office the:
- Manually completed DA 185, the relevant annexure; and
- The relevant supporting documents as prescribed in:
- The DA 185;
- The relevant annexure; and
- SC-CF-19-A01.
Log in to eFiling
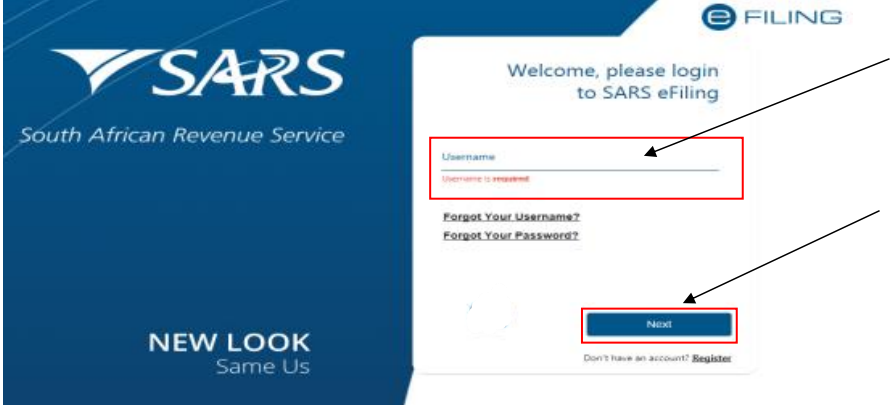
- In order to access the eFiling platform, the user needs to visit the SARS website, click on the eFiling icon and enter his/her login details.
- A user can only use a single username and password (referred to as the primary login) to login to eFiling.
- Once the user captures his/her username and clicks on the Next button.
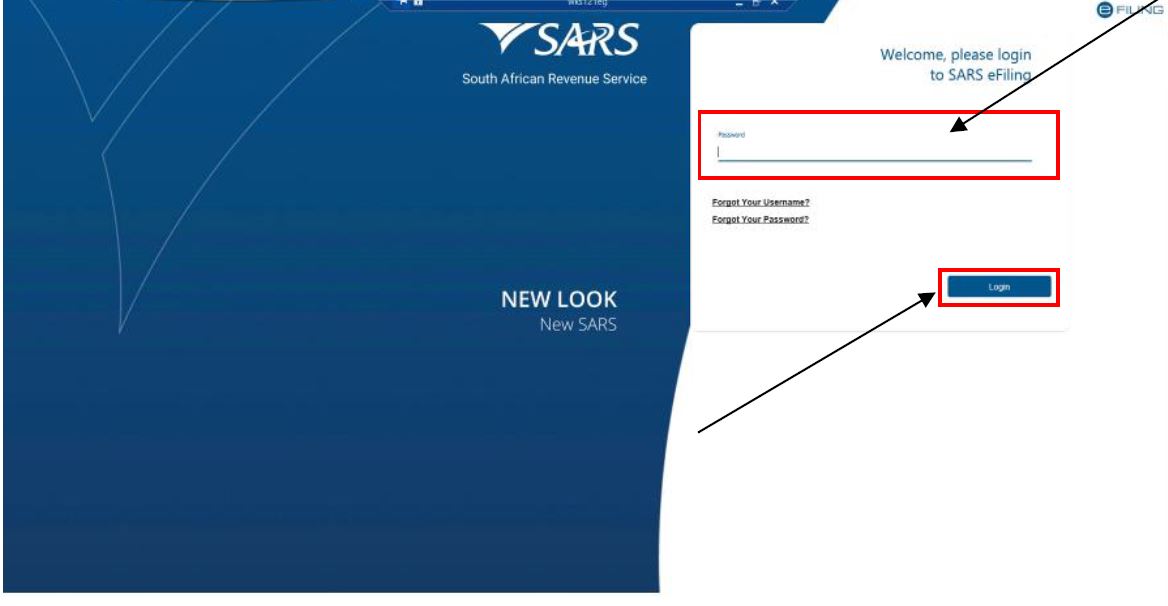
- The user captures his/her password and clicks on the Login button. The password requirements are explained in GEN-ELEC-18-G01.
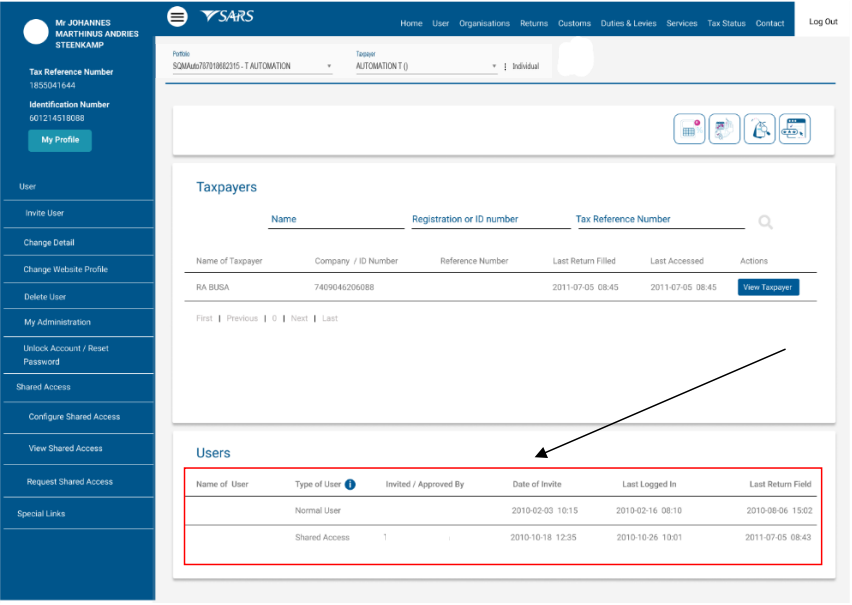
The system displays the eFiling home page. The following additional fields have been added:
- Type of user – this field makes a distinction between the two (2) types of eFiling users:
- A Normal eFiling user who is invited through the invite user functionality on eFiling.
- Share Access eFiling User who is invited through the shared access functionality described in SC-CF-43.
- Invited or Approved by – this field displays the eFiling user’s name and surname who has been invited or approved to have shared access to an entity’s portfolio.
- Date of Invite – this field displays the date when another eFiling user has been invited to share access.
Change Portfolio Type and Taxpayer Details on eFiling
If the user is an individual
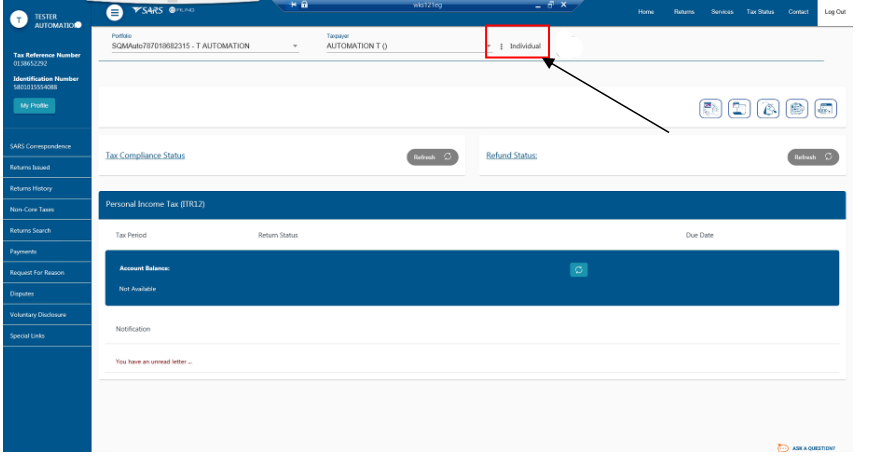
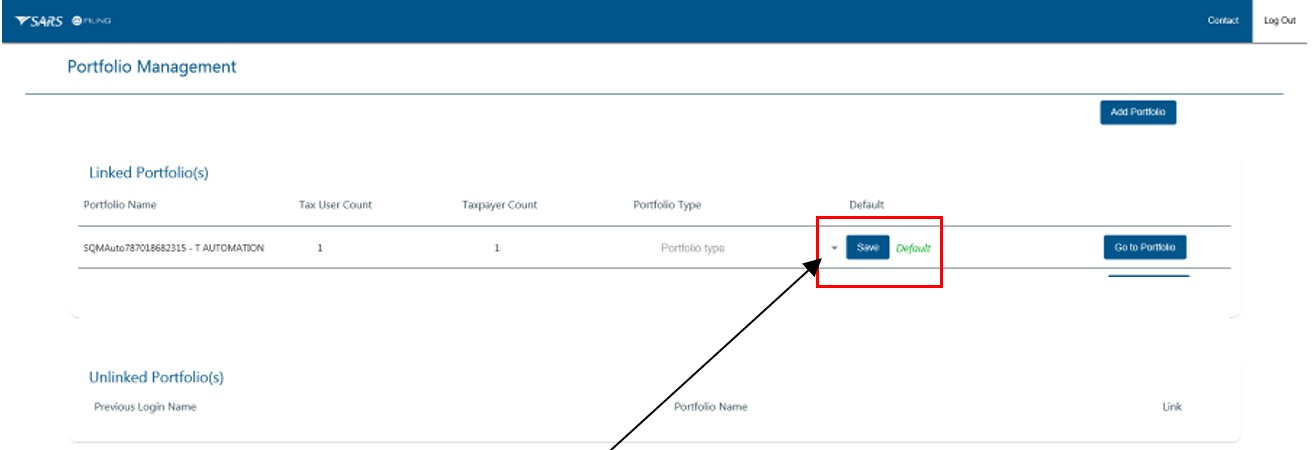
- The user must change his/her portfolio type from individual to organisation in order to submit an application for a Customs client type through eFiling. The user clicks on the three dots next to his/her portfolio type individual.
- The system displays a dropdown box. The user clicks on Portfolio Management.
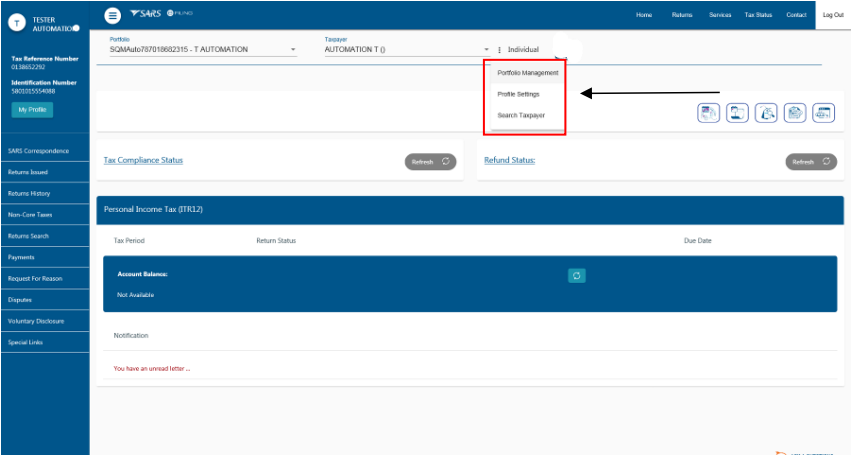
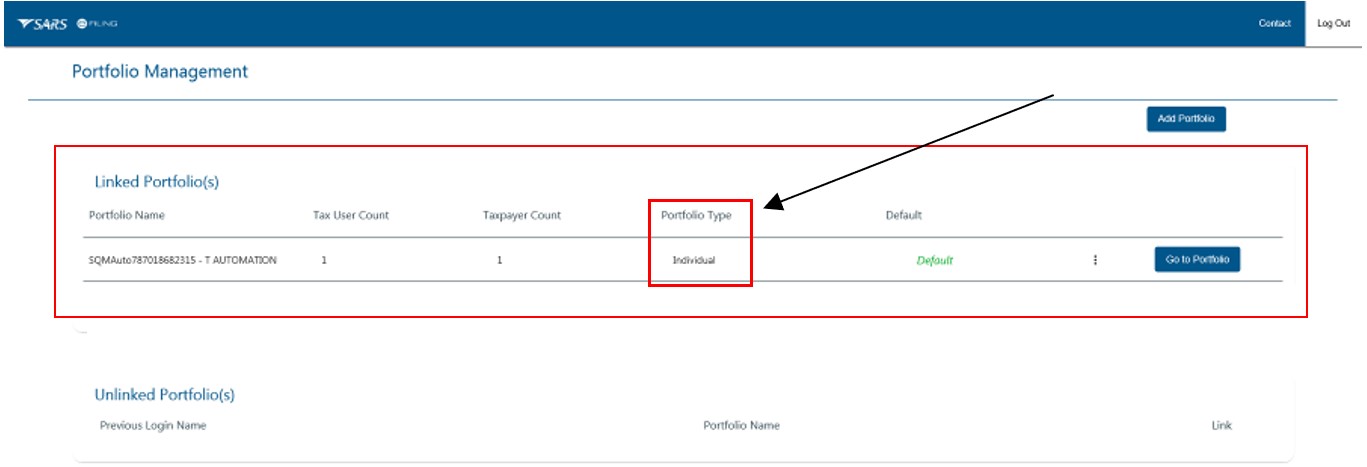
- The system displays the Portfolio Management page and the details of the user (Refer to External Guide GEN-ELEC-18-G01)
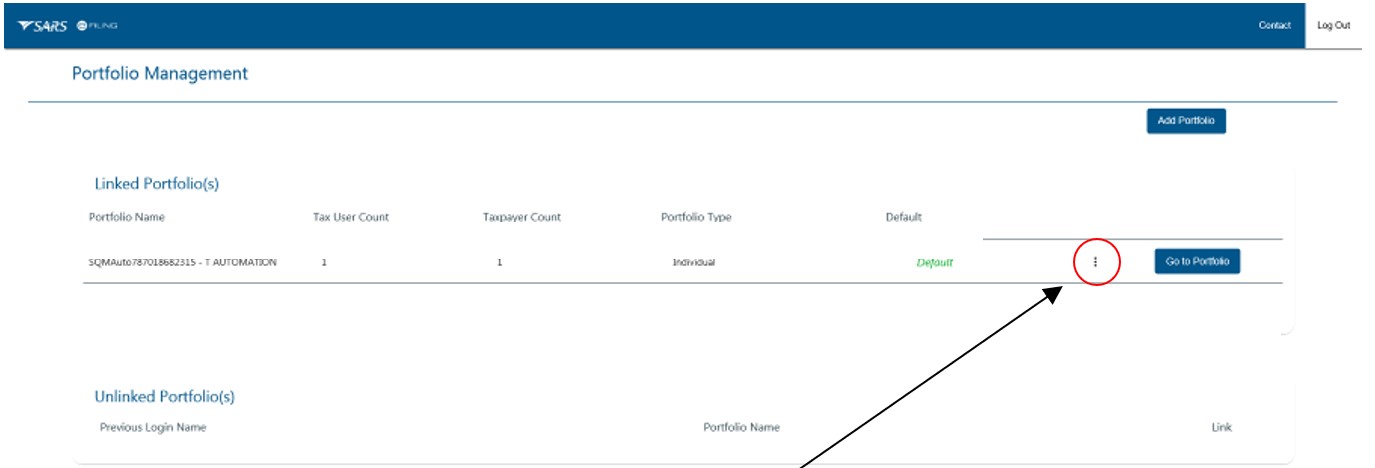
- The user clicks on the three dots, next to Go to Portfolio.
- The system displays a dropdown list. The user clicks on Change Portfolio type.
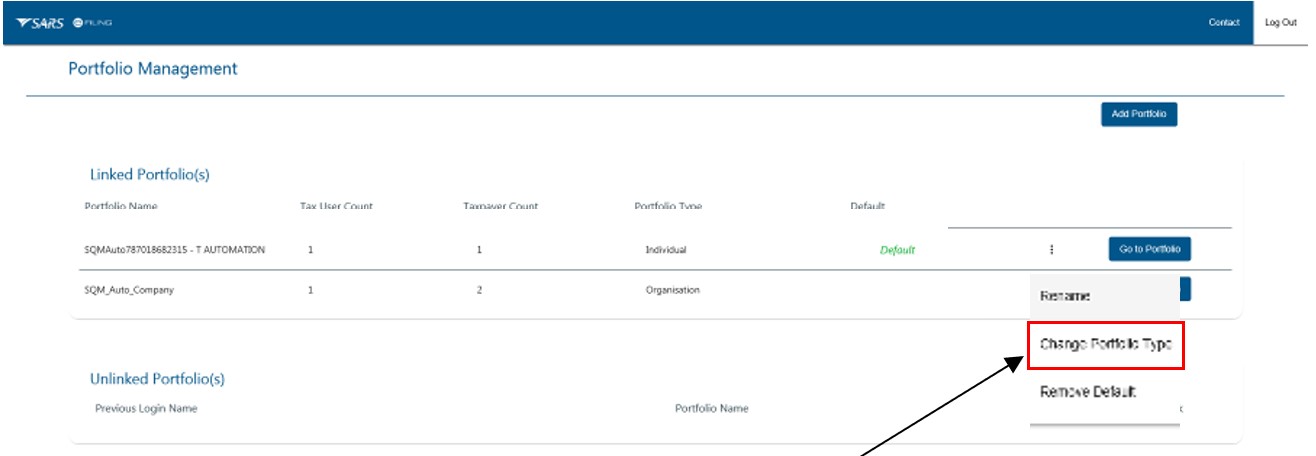
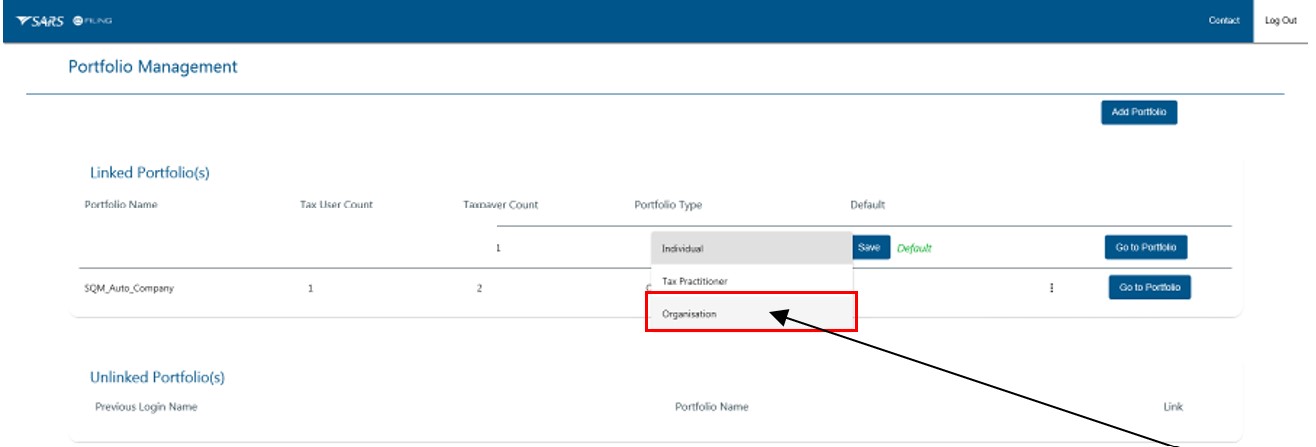
- The user clicks on the Portfolio type dropdown box next to the SAVE button.
- The system displays the list of Portfolio Type options. The user selects Organisation.
- The system changes the portfolio type from individual to organisation. In order to save the changes, the user clicks the Save button.
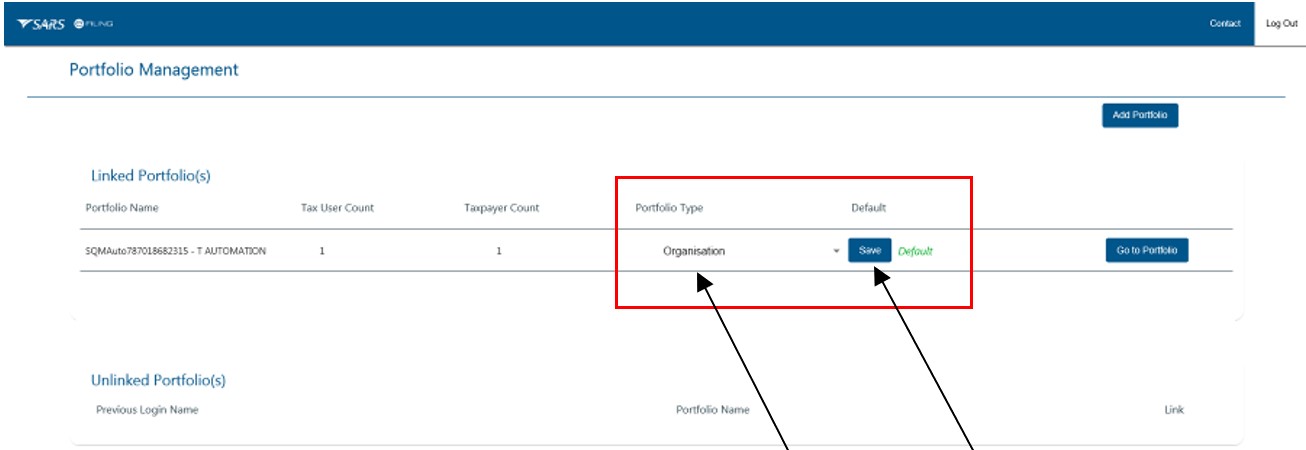
- The system updates the user’s portfolio type to organisation. The user clicks on Go to Portfolio button.
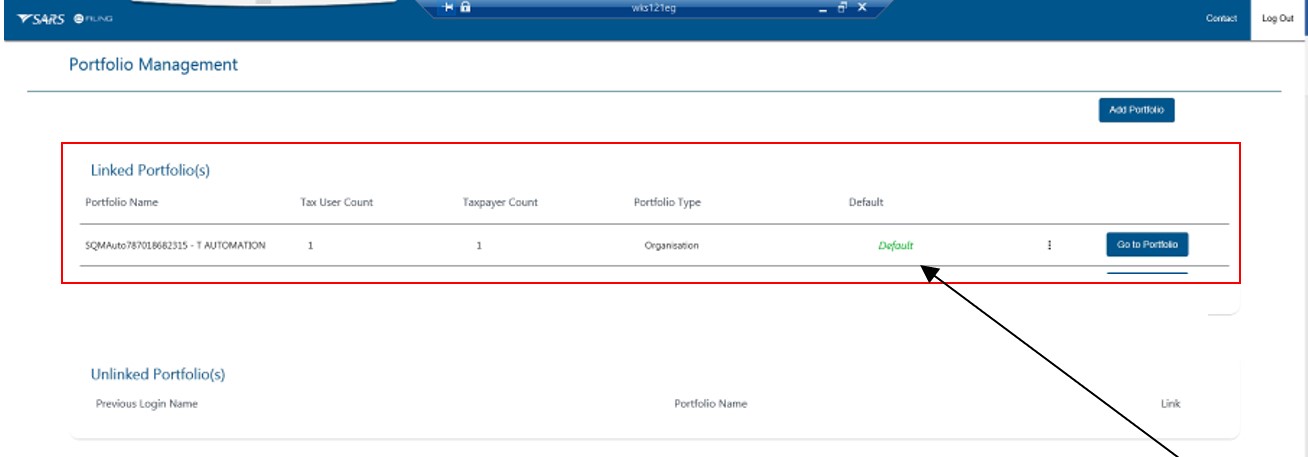
- The system displays the user’s changed portfolio details. The user continues with the process prescribed in Assign RLA user Right or Roles on eFiling to check or verify if his/her user rights and / or roles on eFiling is correct. If correct the user continues with If the user knows that the portfolio of the organisation on whose behalf the user wishes to apply for an RLA client type is linked to his/her profile) below.
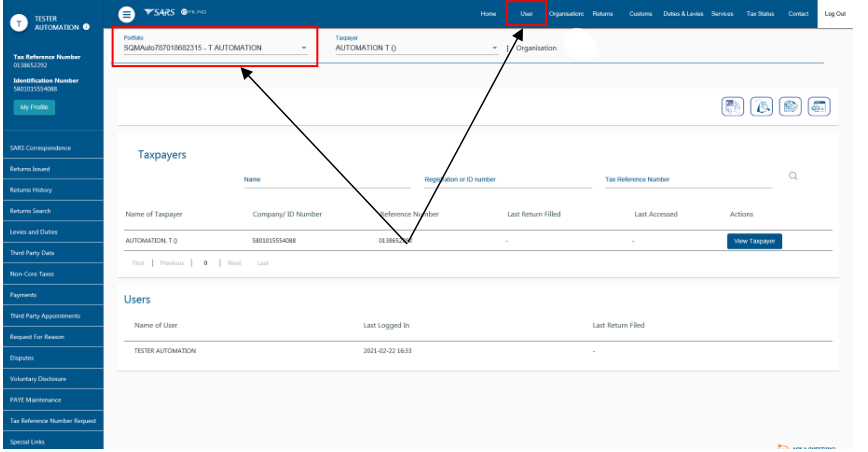
If the user needs to confirm whether the organisation profile is linked to his/her profile
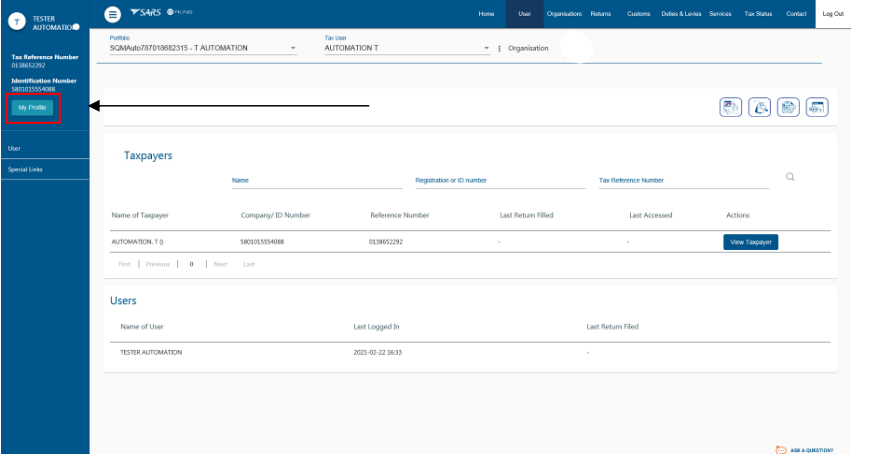
- The user clicks on the My Profile button on the left side of the screen.
- The system displays the My profile options on the left side of the screen.
- The user clicks on Portfolio Management.

- The system displays the Portfolio Management page indicating the organisation portfolios that are linked to user’s portfolio. The user must click on the Go to Profile button of the organisation on whose behalf the user wishes to apply for an RLA client type.
- The system changes the individual user’s porfolio to that of the linked organisation.
- The user must select the relevant taxpayer from the dropdown box before he/she continues with the process prescribed in The user must either click on the portfolio dropdown icon to display the details of the organisations who are linked to his/her profile below
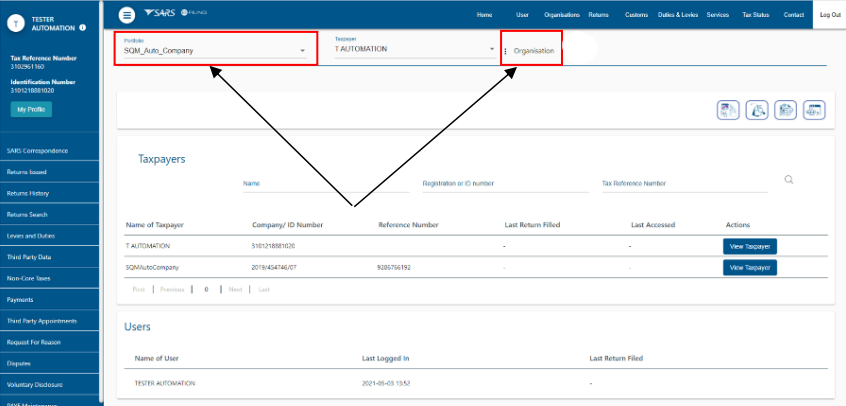
If the user knows that the portfolio of the organisation on whose behalf the user wishes to apply for an RLA client type is linked to his/her profile
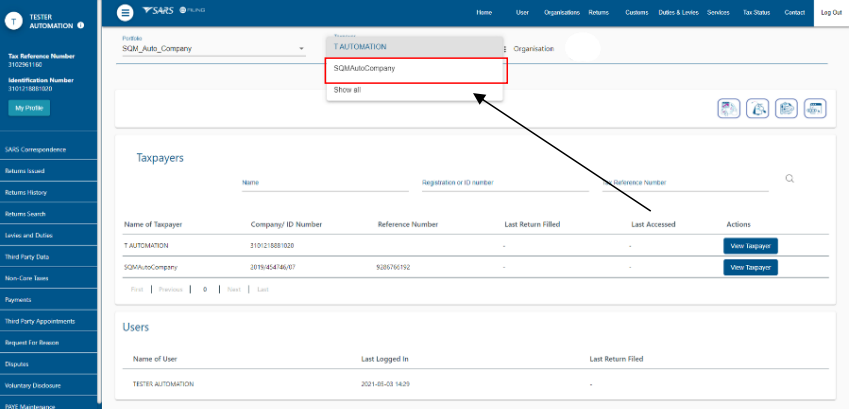
- The user must either click on the portfolio dropdown icon to display the details of the organisations who are linked to his/her profile.
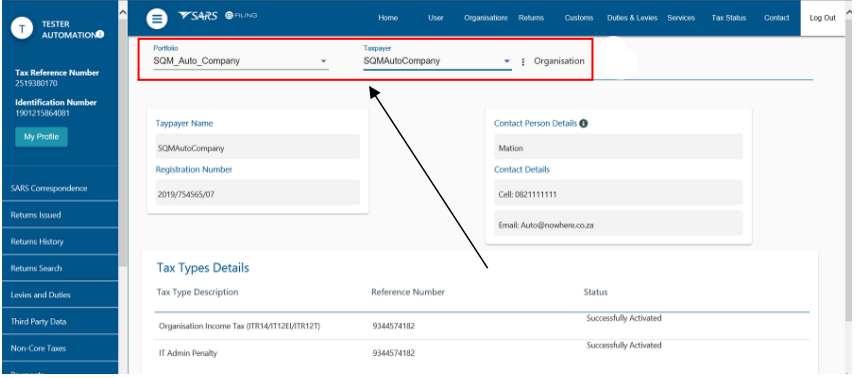
- The system displays the dropdown list of the organisations linked to the user’s portfolio. The user clicks on the applicable organisations for example SQM Auto Company.
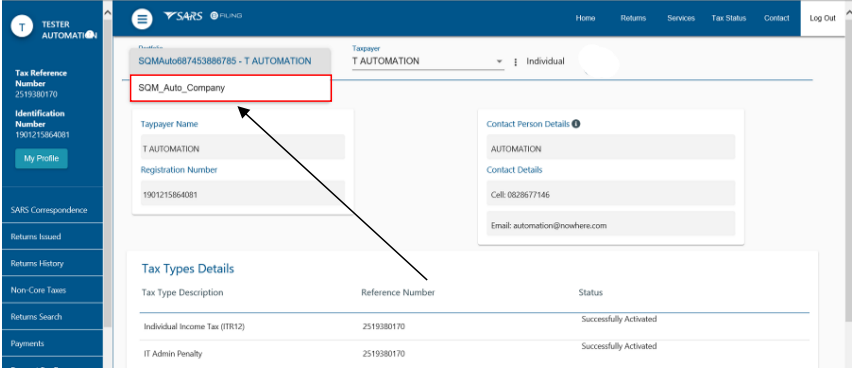
- The system displays the organisation’s portfolio
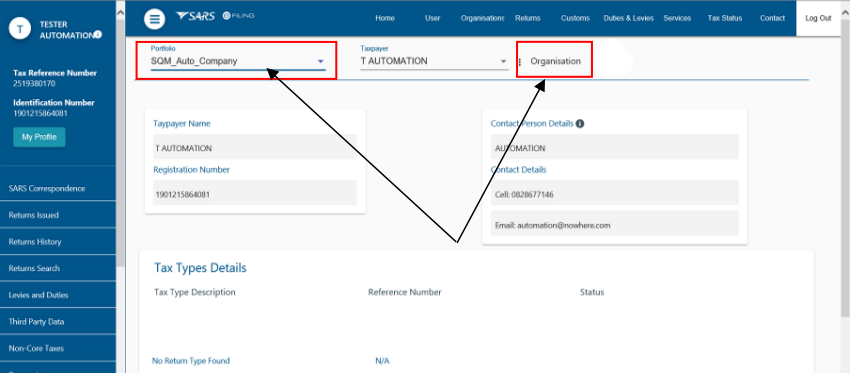
- The user clicks on the taxpayer dropdown box to select the applicable taxpayer on whose behalf he/she will be submitting an application for an RLA client type.
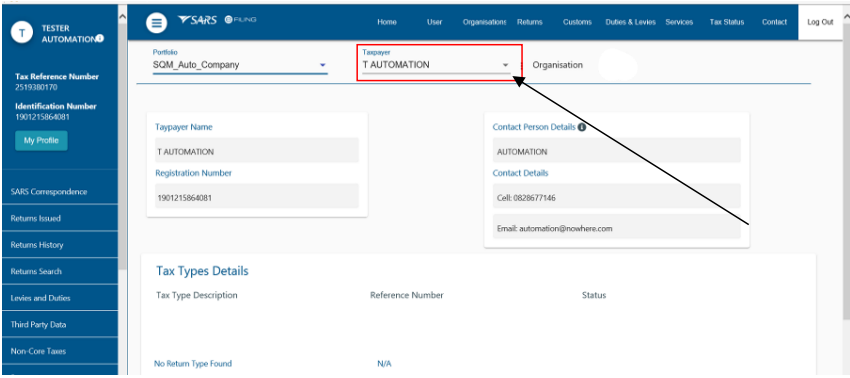
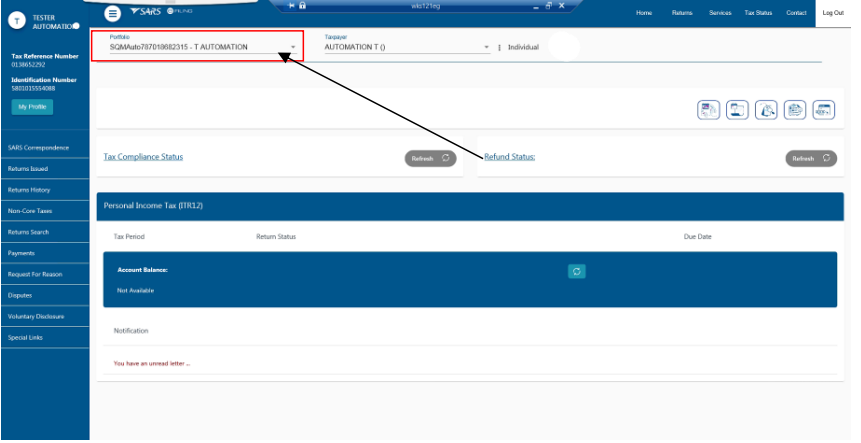
- The system displays the list of all the taxpayer’s linked to the user’s profile. The user clicks on the taxpayer on whose behalf he/she will be submitting an application for an RLA client type.
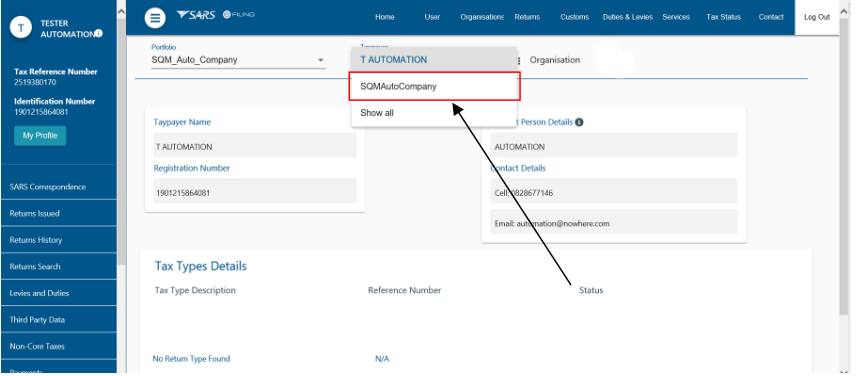
- The system displays the selected taxpayer company name.
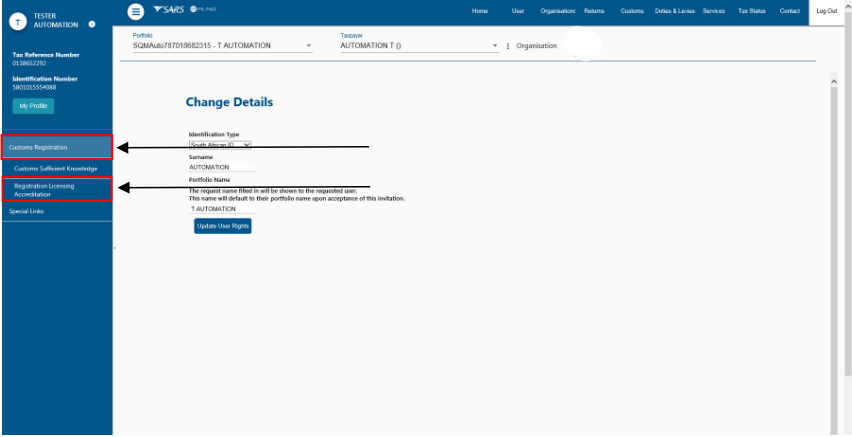
Assign RLA User Rights or Roles on eFiling
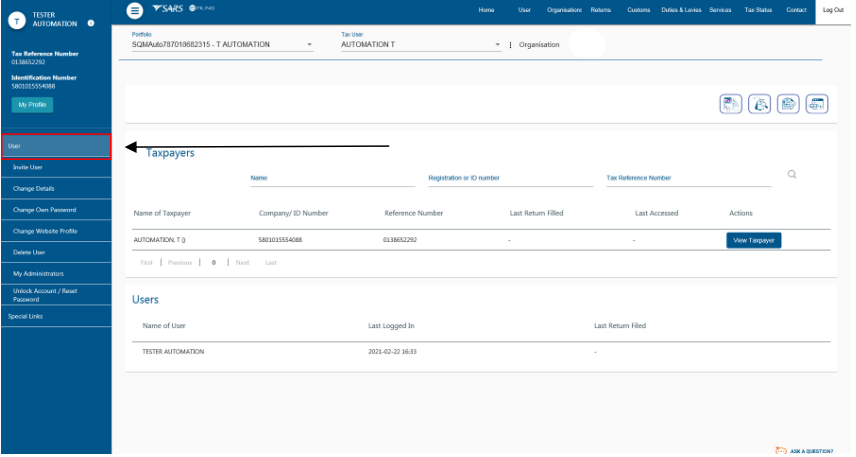
- In order to check if the user’s rights and / or roles on eFiling is correct, the user selects the User tab in the top ribbon after the user changes his/her portfolio to organisation.
- The system displays the user’s taxpayer and user details. The user clicks on the User option displayed on the left side of the screen.
- The system displays the User Menu option. The user clicks on the Change Details option under the User Menu.
- The system displays the Change Details page. The user:
- Verifies his/her identification type, surname and profile name; and
- Clicks on Update User Rights.
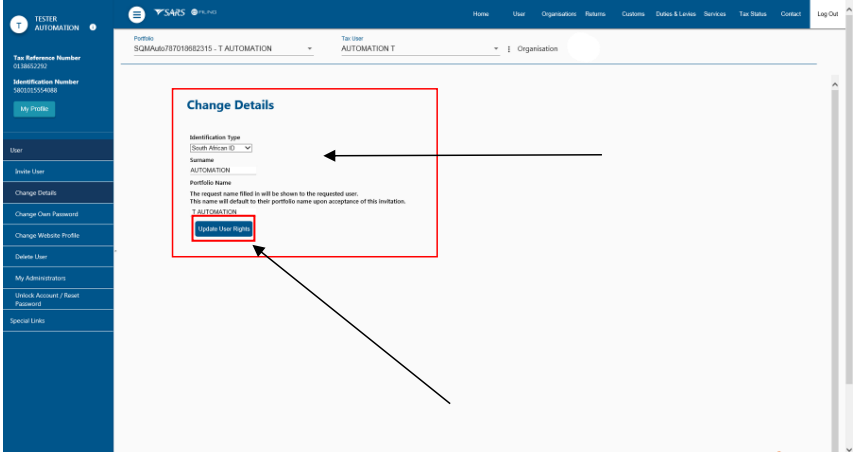
- The system displays the User Rights and Roles page.
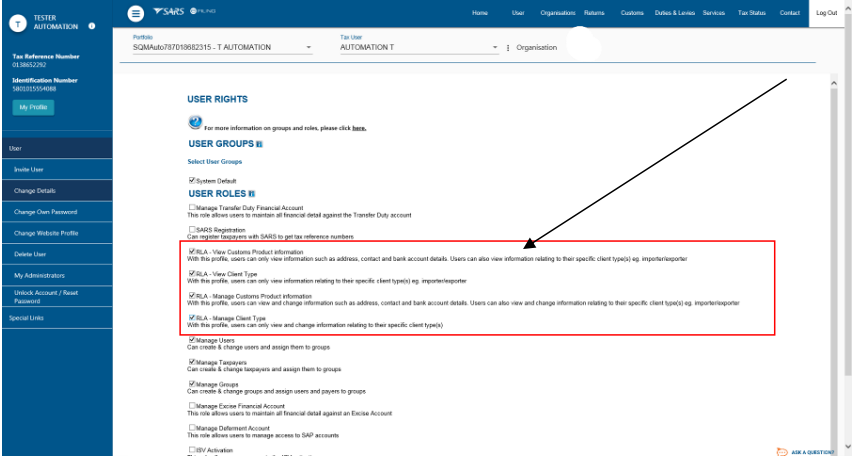
The user selects the applicable RLA user role. Only one (1) RLA user role can be selected at a time. Not all RLA user roles allow for the submission of new applications. Below is an explanation of each of the RLA user roles:
- RLA – View Customs Product Information – With the profile a user can only view information such as address, contact and bank account details, including information that relates to his/her specific client type.
- RLA – View Client Type – With this profile a user can only view information that relates to his/her specific client type(s) e.g. importer / exporter.
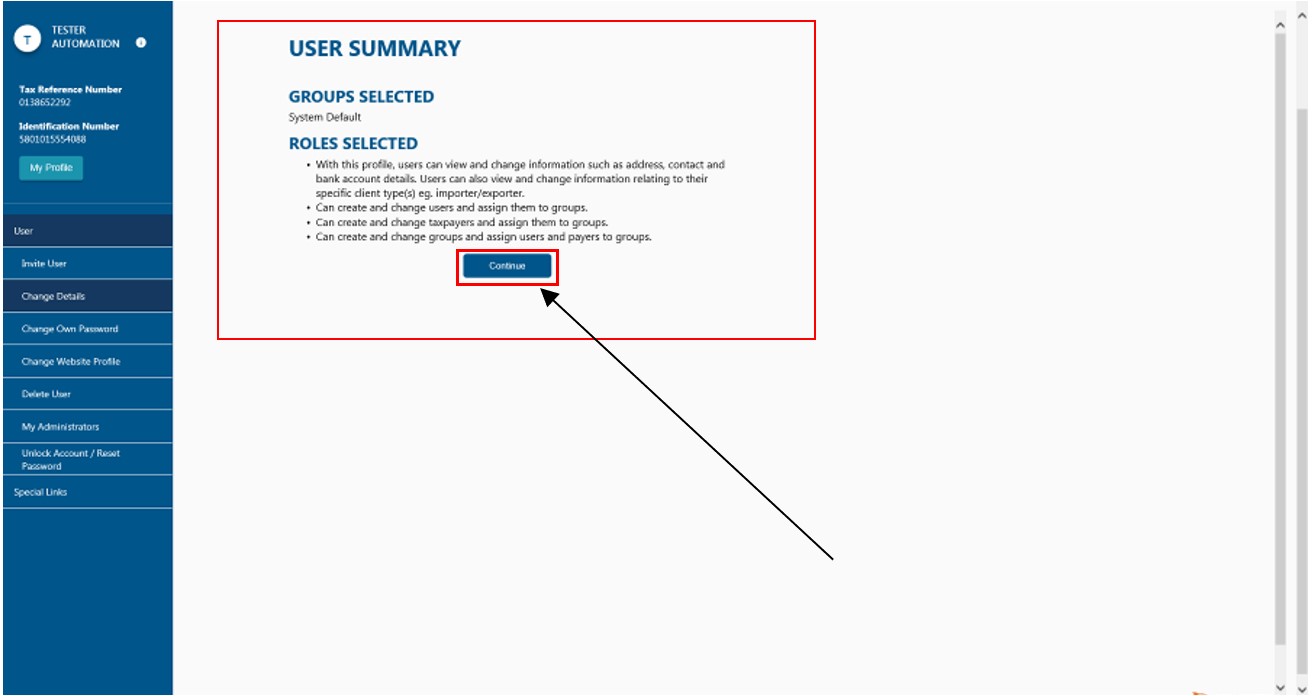
- RLA – Manage Customs Product information – With this profile a user can view and change his/her information such as address, contact and bank account details, including information that relates to a specific or related client type.
- RLA – Manage Client type – With this profile a user can only view and change information that relates to his/her client type(s) and not information pertaining to his/her Customs product information.
In order to submit a new Customs client type application, the user:
- Selects the RLA user role, RLA – Manage Customs Product Information. If any of the other RLA user roles had been selected previously by the user he/she must click on the block next to the RLA user role to deselect the roles not applicable.
- Clicks on the continue button if in agreement with his/her selection.
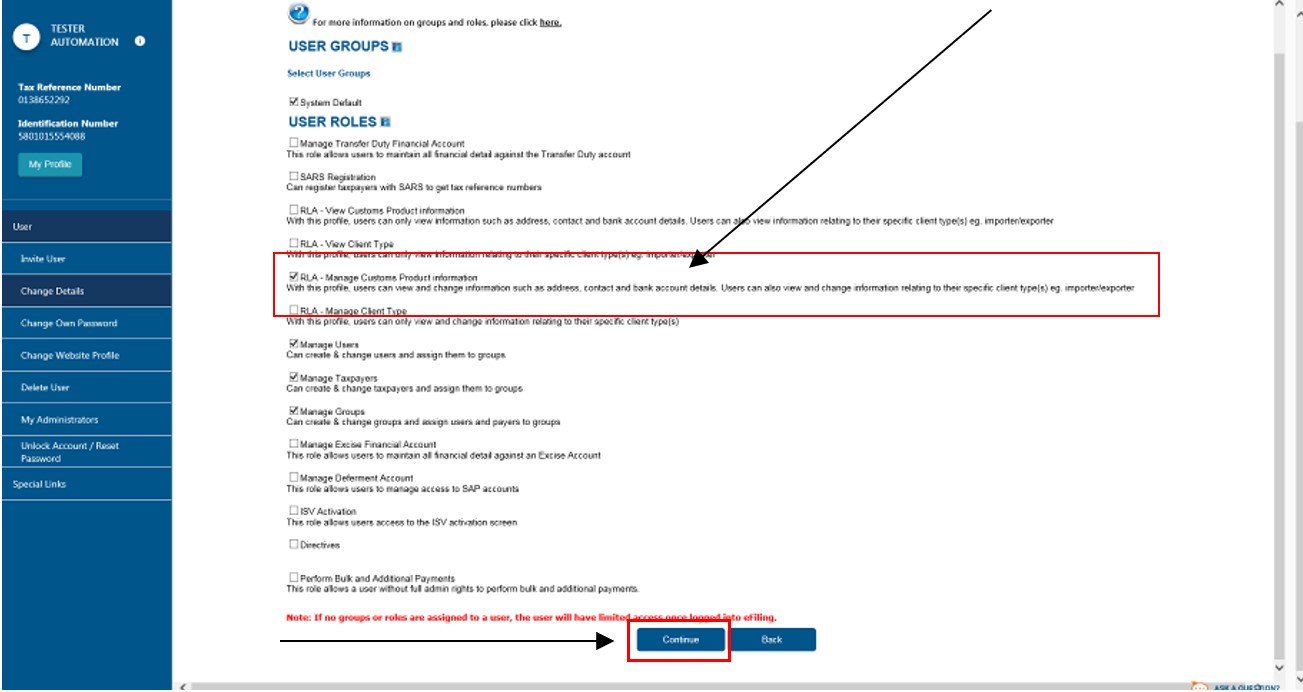
- The system displays the User summary page and the selected RLA user role. The user clicks on the Continue button.
Capturing RLA Client Application
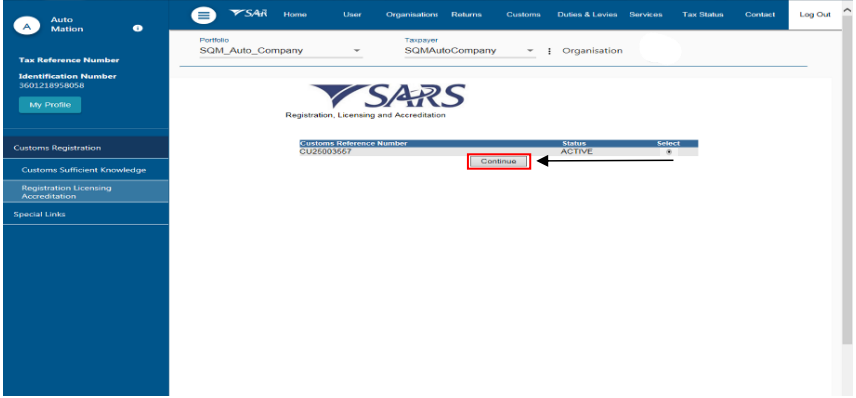
- After the user selected the applicable organisation’s portfolio and taxpayer applying for an RLA client type, the user clicks on the Customs tab in the top ribbon.
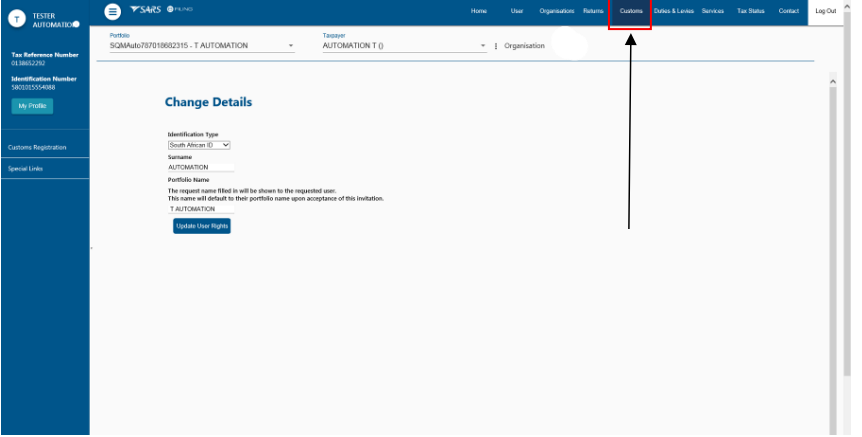
- The system displays the Customs Menu bar and the user clicks on:
- Custom Registration; and
- Registration Licensing Accreditation.
- The system displays the Registration Licensing and Accreditation page and if applying for a Customs client type:
- For the first time the user must select the radio button next to New Application.
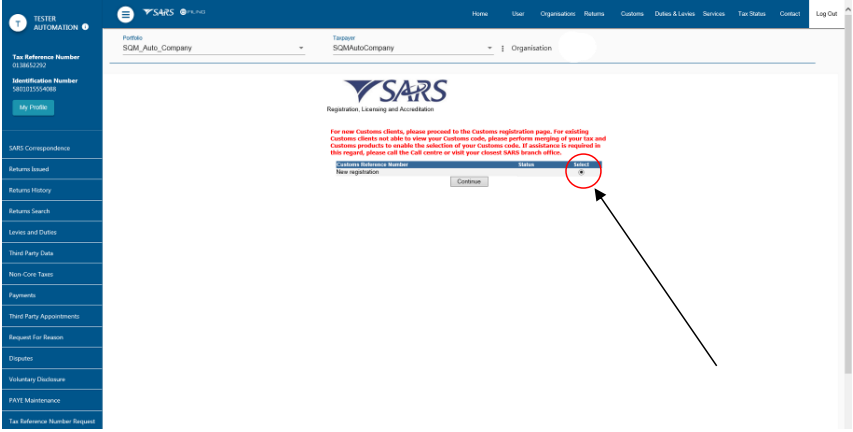
- For another RLA client type the user selects the radio button next to the active Customs Reference number.
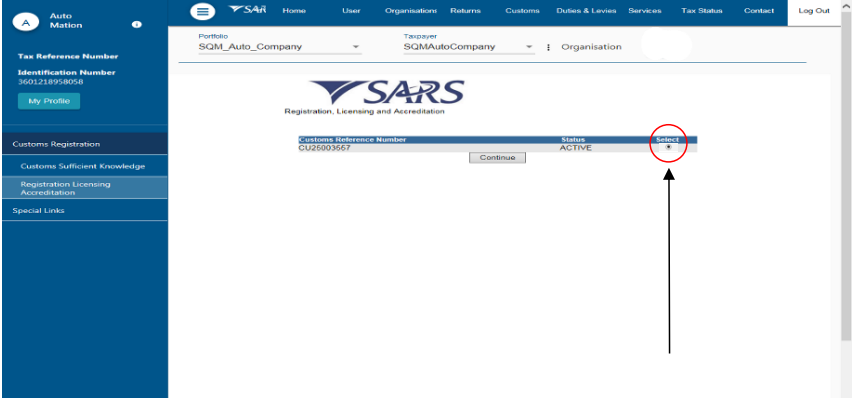
- The user clicks on the Continue button.
- The system displays the entity’s RLA Dashboard. The green notification ribbon will only display if another eFiler has been granted shared access as prescribed in SC-CF-43
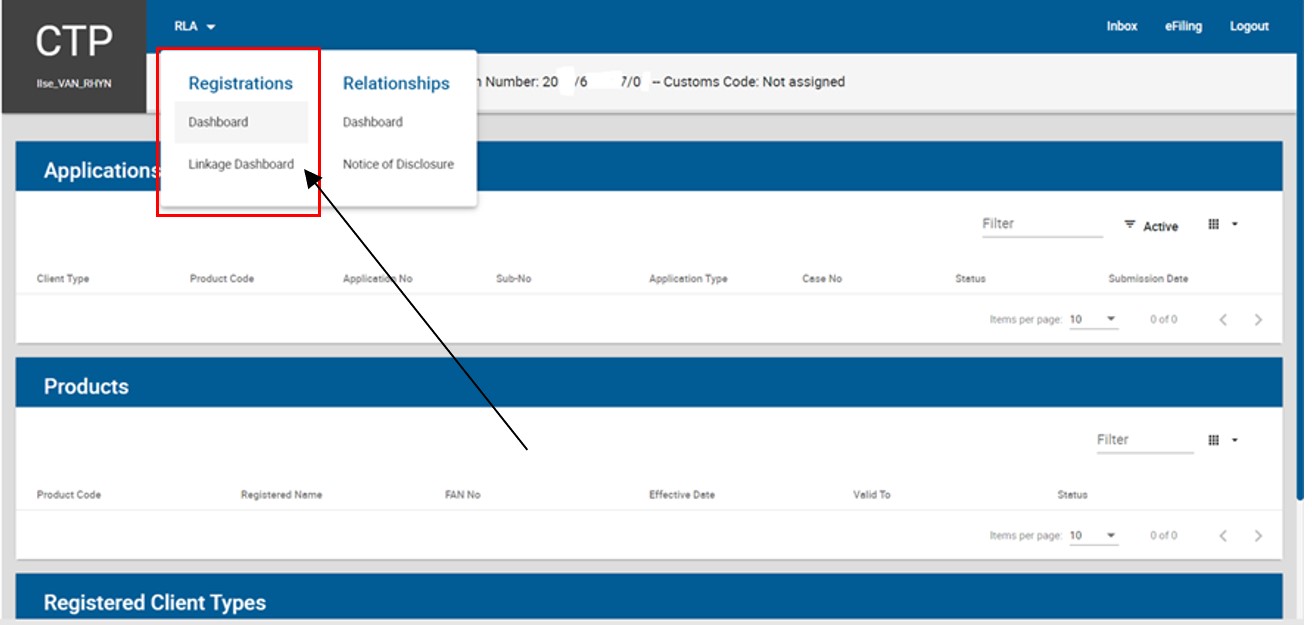
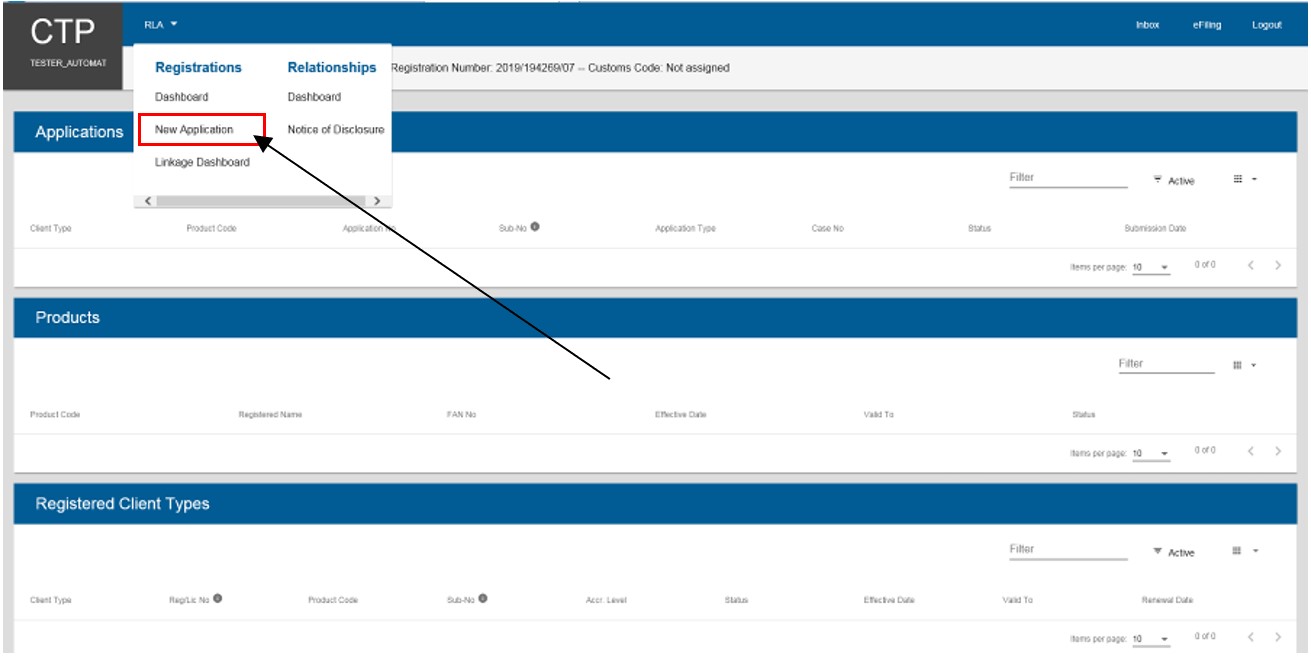
- The user clicks on the RLA dropdown arrow to display the RLA Menu.
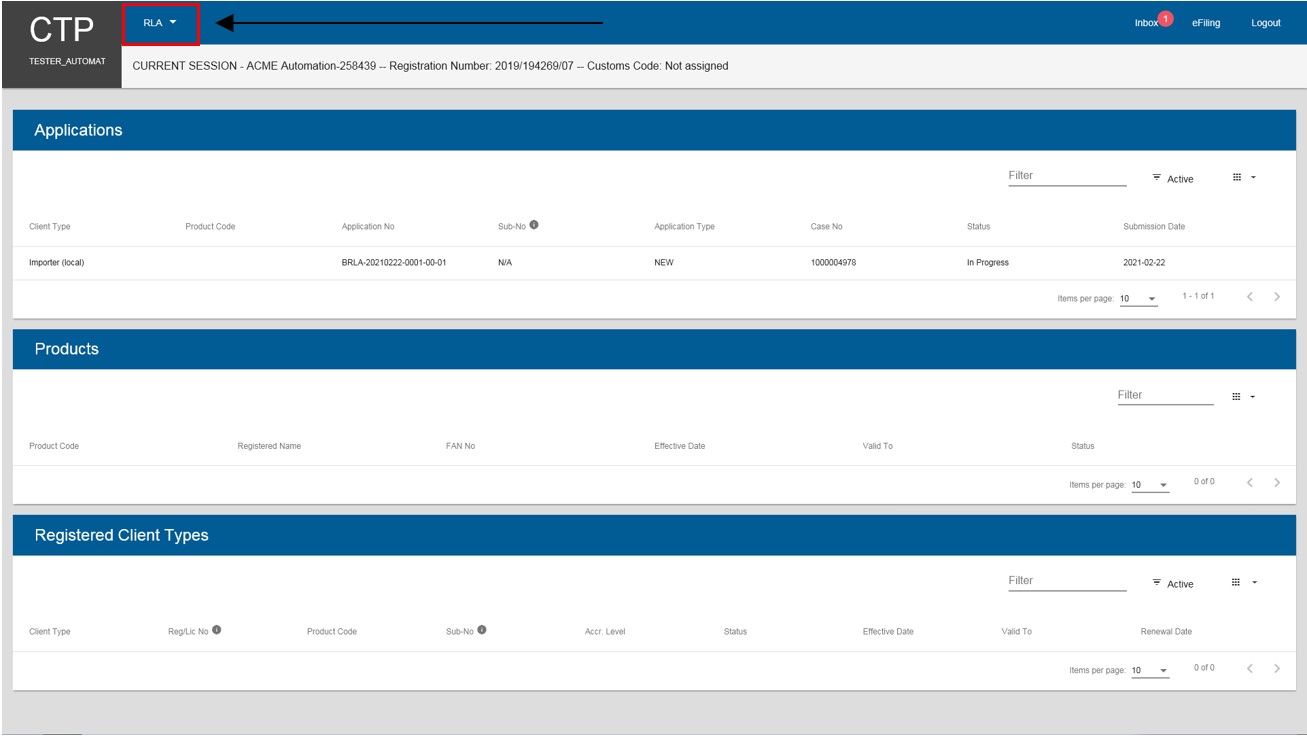
- The system displays the RLA Menu.
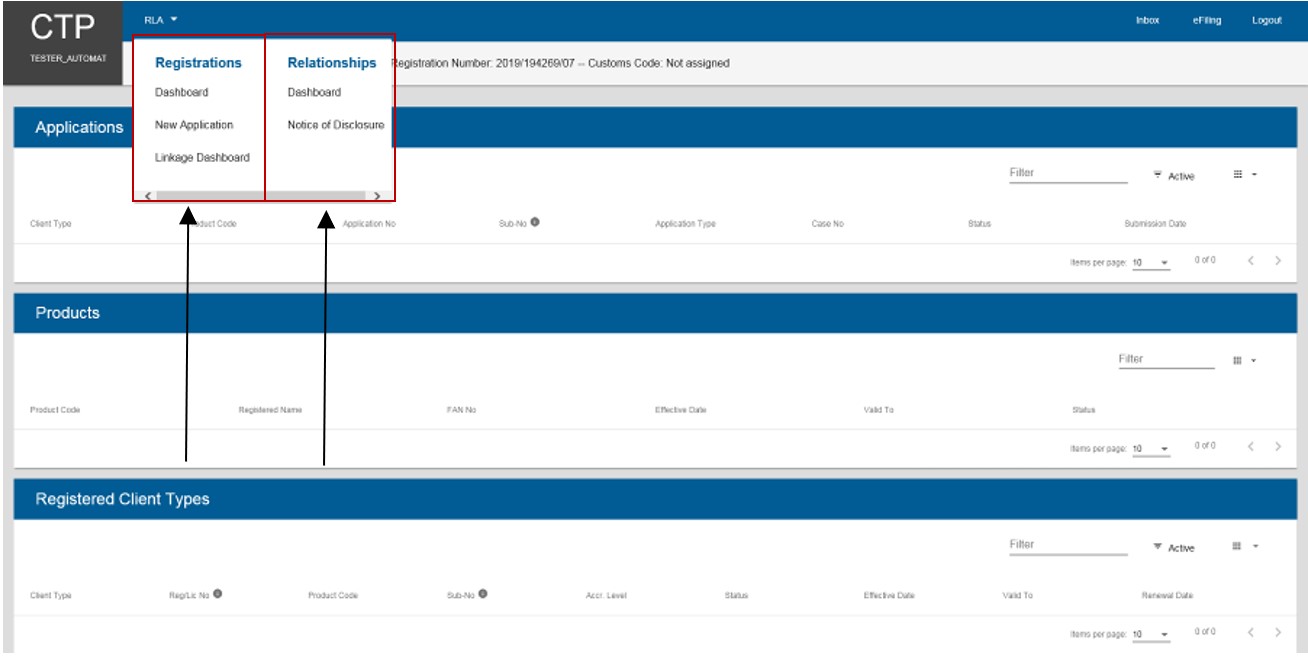
- If the option New Application is not displayed under the RLA Registration menu then this means that not all the mandatory information pertaining to the legal entity has been captured on the RAV01. In order to resolve this follow the process described in GEN-REG-01-G04.
- Resolving error messages
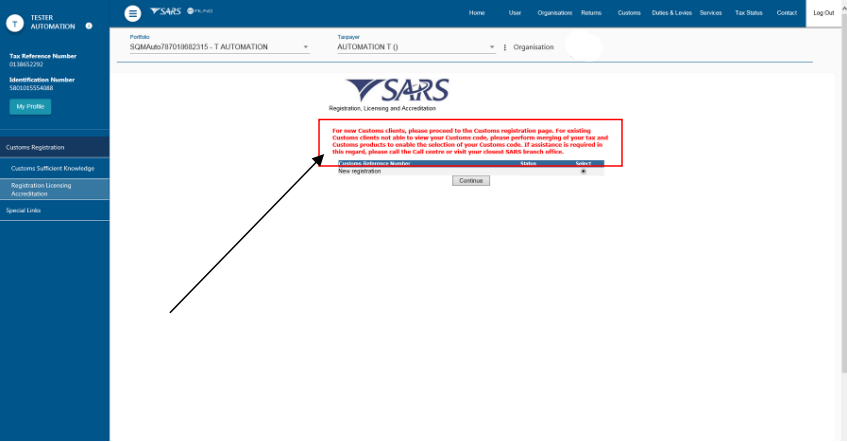
- If the user is already a registered or licensed RLA client and his/her RLA Customs client number does not display on the RLA page, the user is required to perform merging of tax and Customs products. The process of merging is prescribed in GEN-ELEC-15-G01
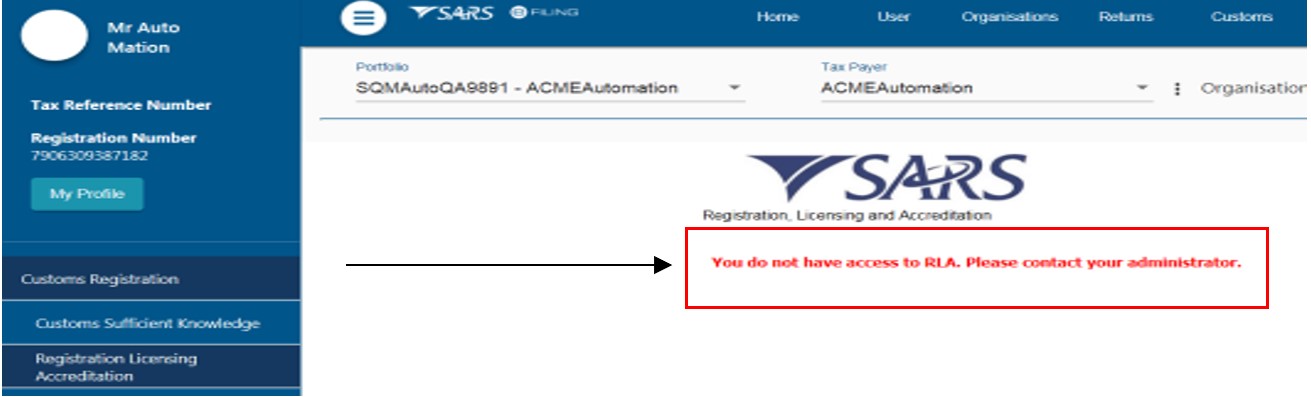
- If the incorrect eFiling user roles have been assigned to an eFiler user profile, the system displays a message indicating that the eFiler does not have access to RLA. The eFiler must contact his/her eFiling administrator to correct it, Refer to external Guide GEN-ELEC-18-G01
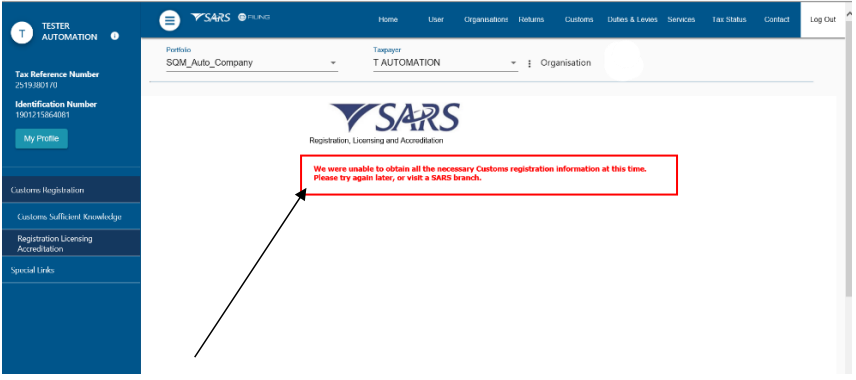
If the system displays a message that the necessary Customs registration information is not available, the user must check if he/she:
- Selected the correct RLA user role as prescribed in Assign RLA User Rights or Roles on eFiling here ; or
- Changed his/her portfolio from individual to company as prescribed in change Portfolio type and Taxpayer details on eFiling
Identify applicable client type
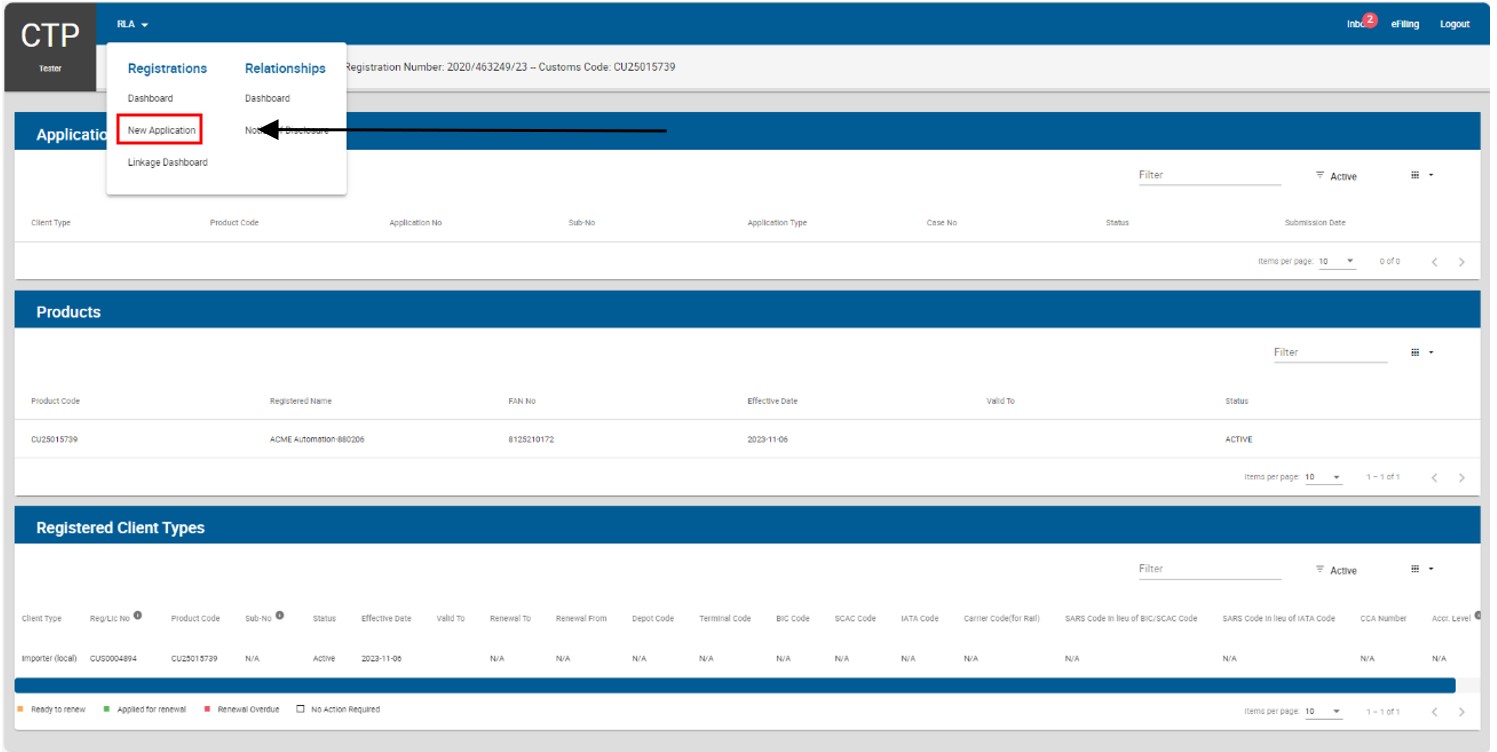
- After the user logged in on eFiling as prescribed in Log in to eFiling and change portfolio type and taxpayer details on eFiling paragraph and wishes to submit an application for a Customs RLA client type the user clicks on New Application under the RLA Registration menu.
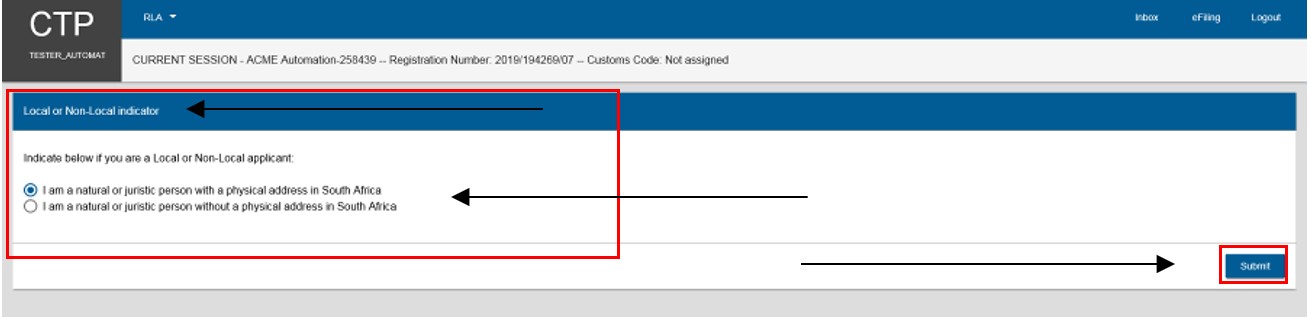
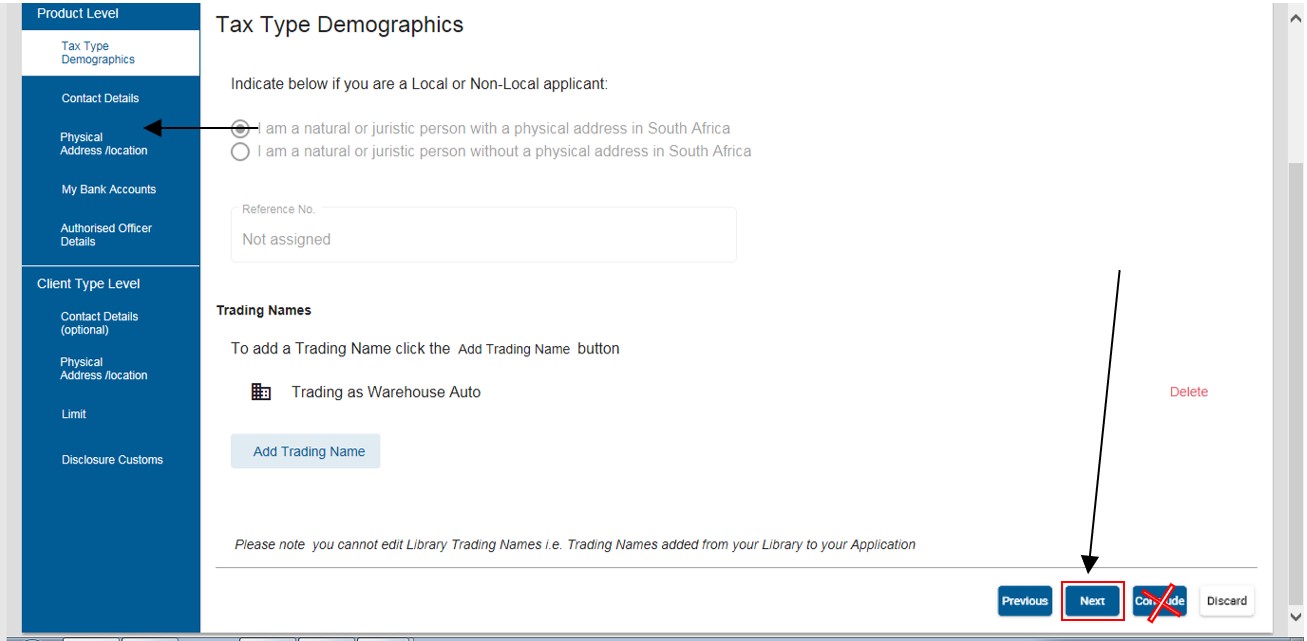
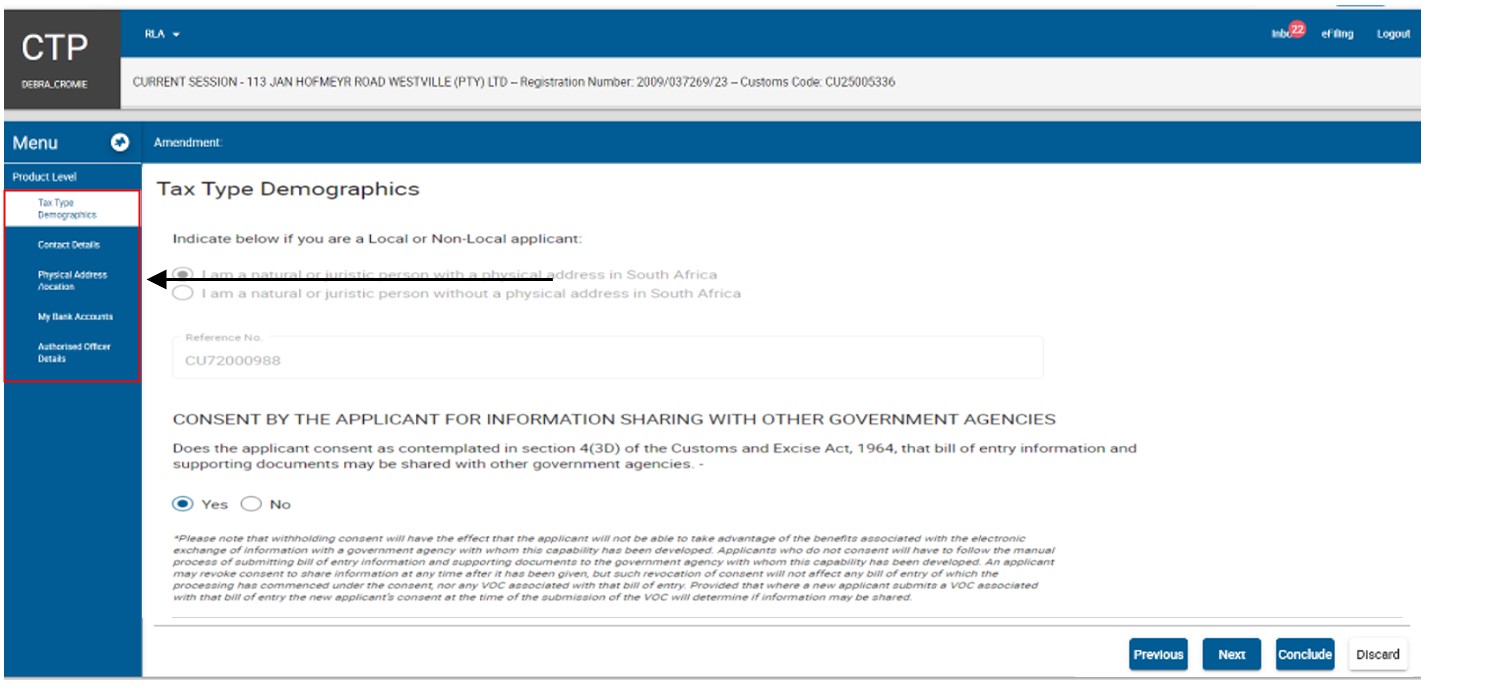
If applying for a Customs client for the first time on RLA the system displays the Local or Non-Local indicator:
- The user must select the applicable radio button to indicated if the applicant is a natural or juristic person:
- The user clicks on the Submit button and proceeds with paragraph here) below.
If applying for another Customs client on RLA the user selects the RLA client type applying for under the selected category (e.g. Registration, Licensing or Reporting) by:
- Clicking on the dropdown arrow next to the applicable category to select the RLA client type from the dropdown list; or
- Capturing the name of the RLA client type in the search field.
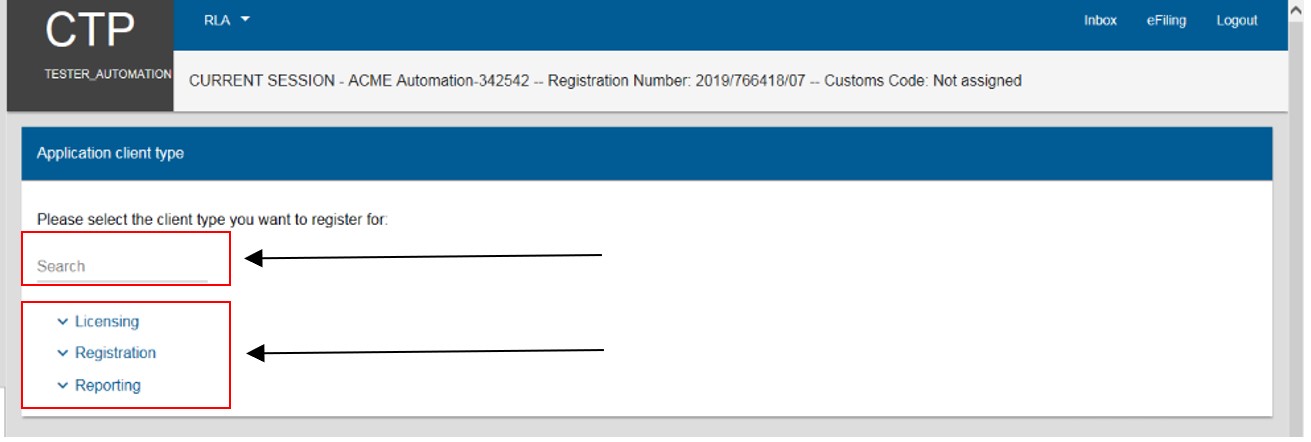
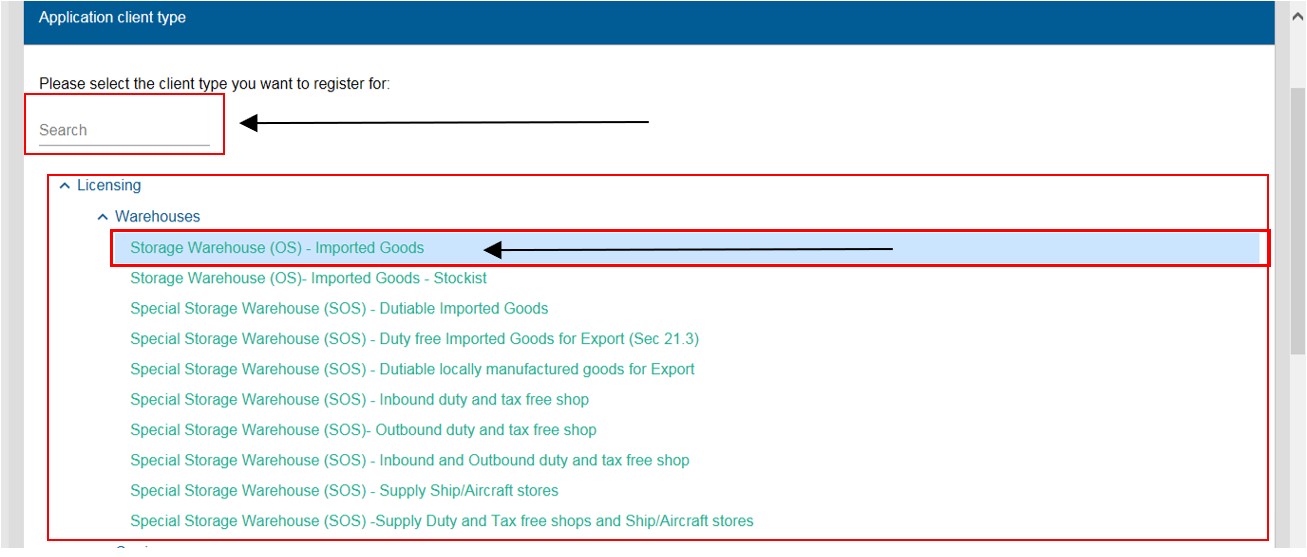
The system displays the required details to be captured by the user.
- If applying for an RLA client type for the first time, the user must capture the applicant’s Product level details (refer to Product level details) and client Level details (refer to Client type level ).
- If an existing RLA client is applying for another RLA client type, the user only captures the Client Level details of the applicant (refer to Client type level) not previously captured.
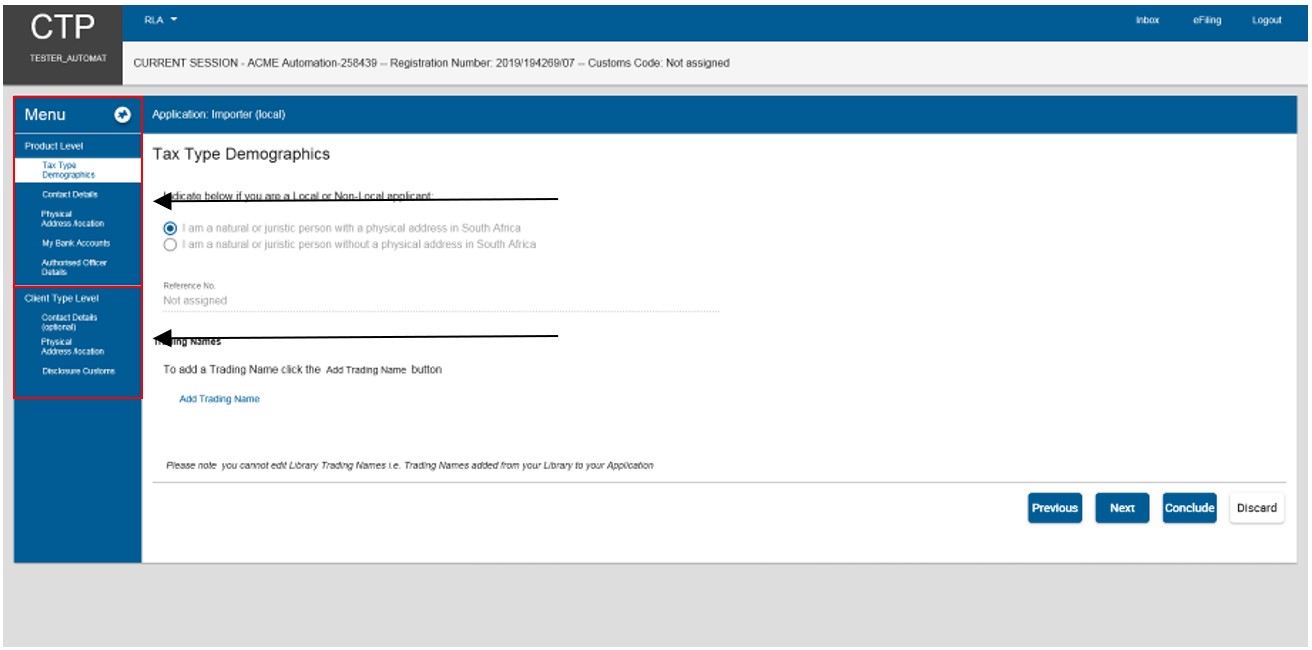
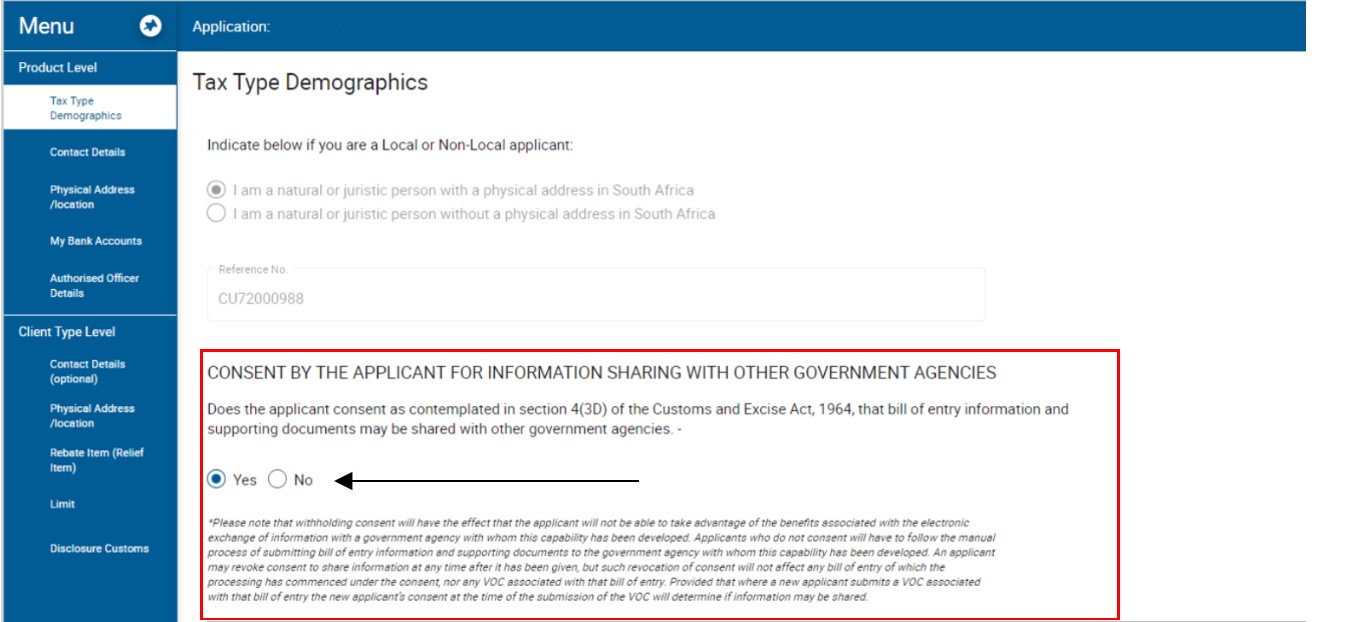
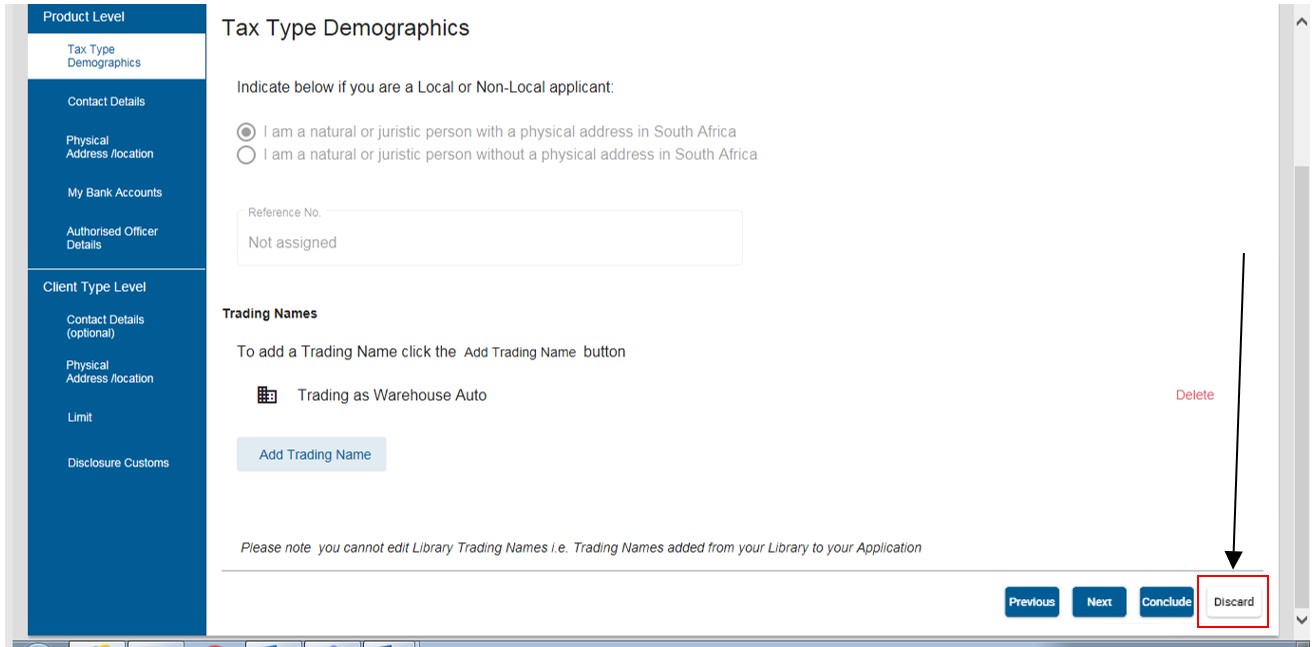
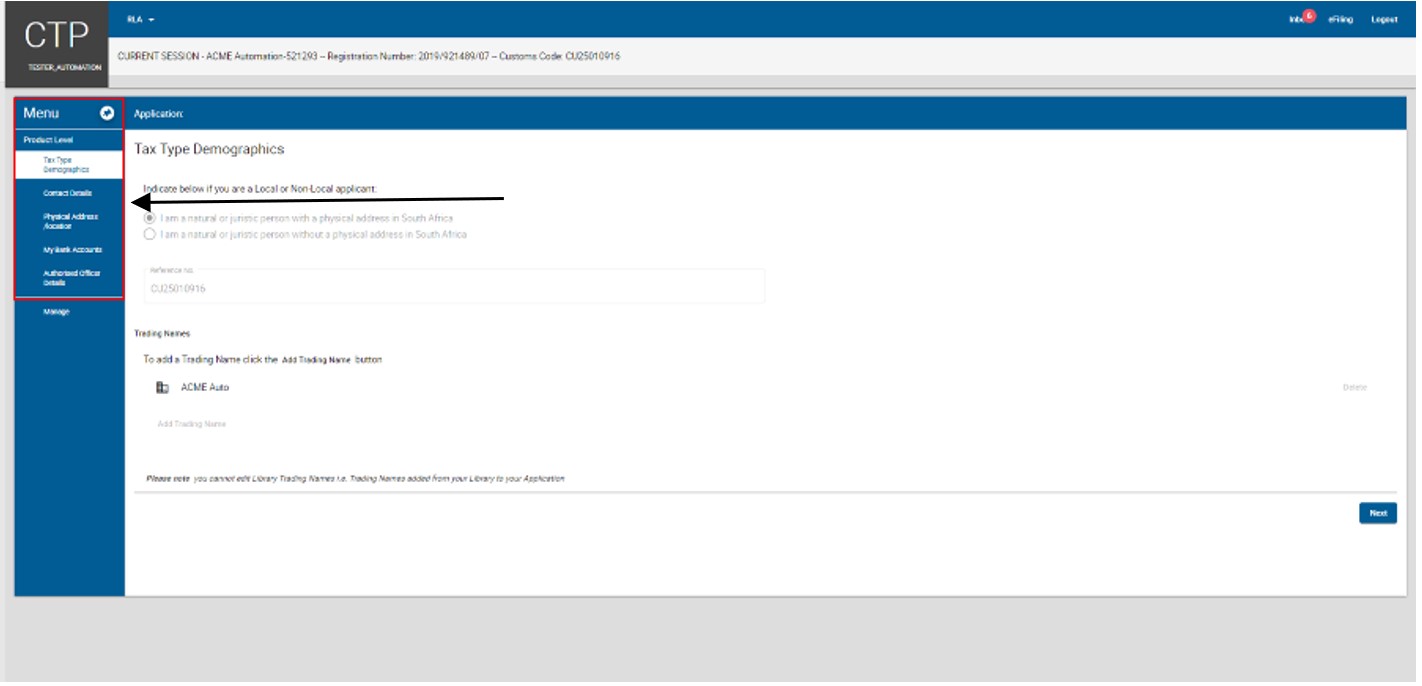
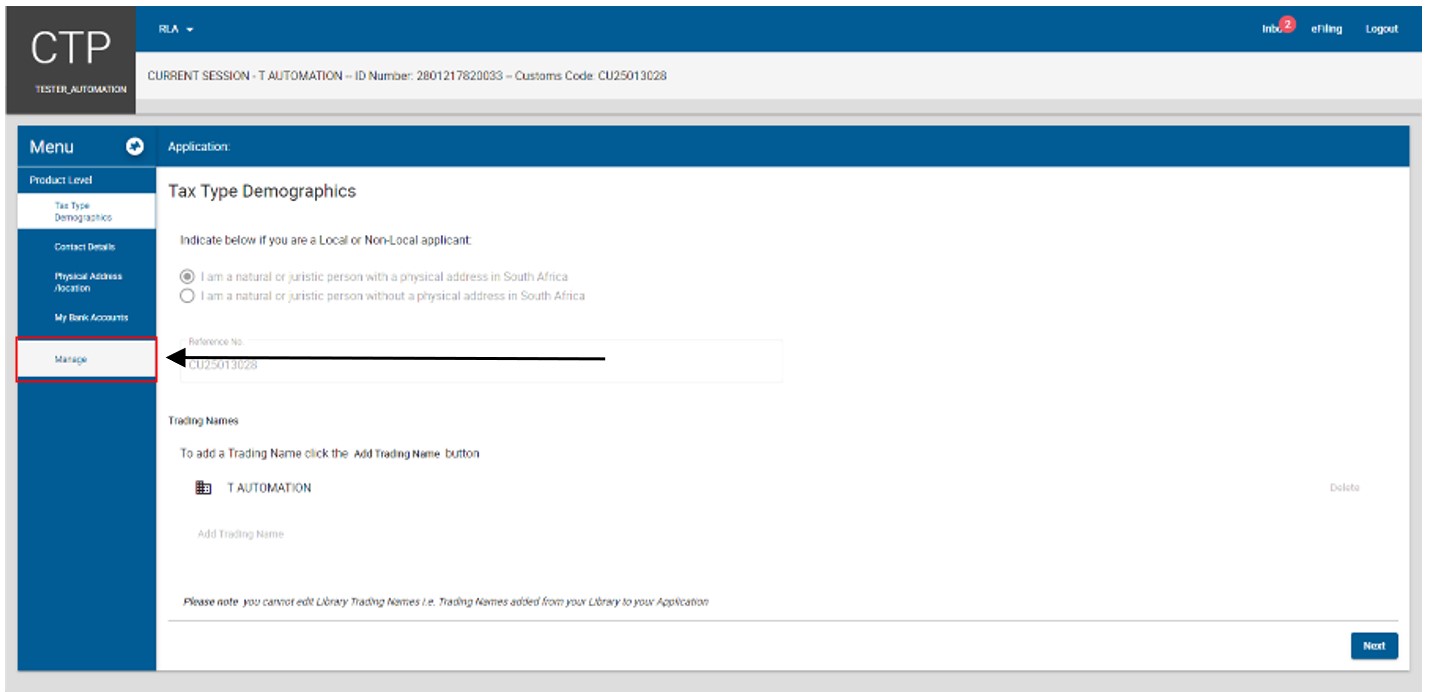
Tax type demographics
- SARS would like to exchange your declaration information electronically with other government agencies (OGAs) when your imported or exported goods have been detained for inspection by them.
- When applying for an importer or exporter client type you are therefore required to tick the:
- Yes radio button to grant SARS consent; or
- No radio button to refuse consent.
- The user clicks on Add Trading Name in order to capture the applicant’s trading name.
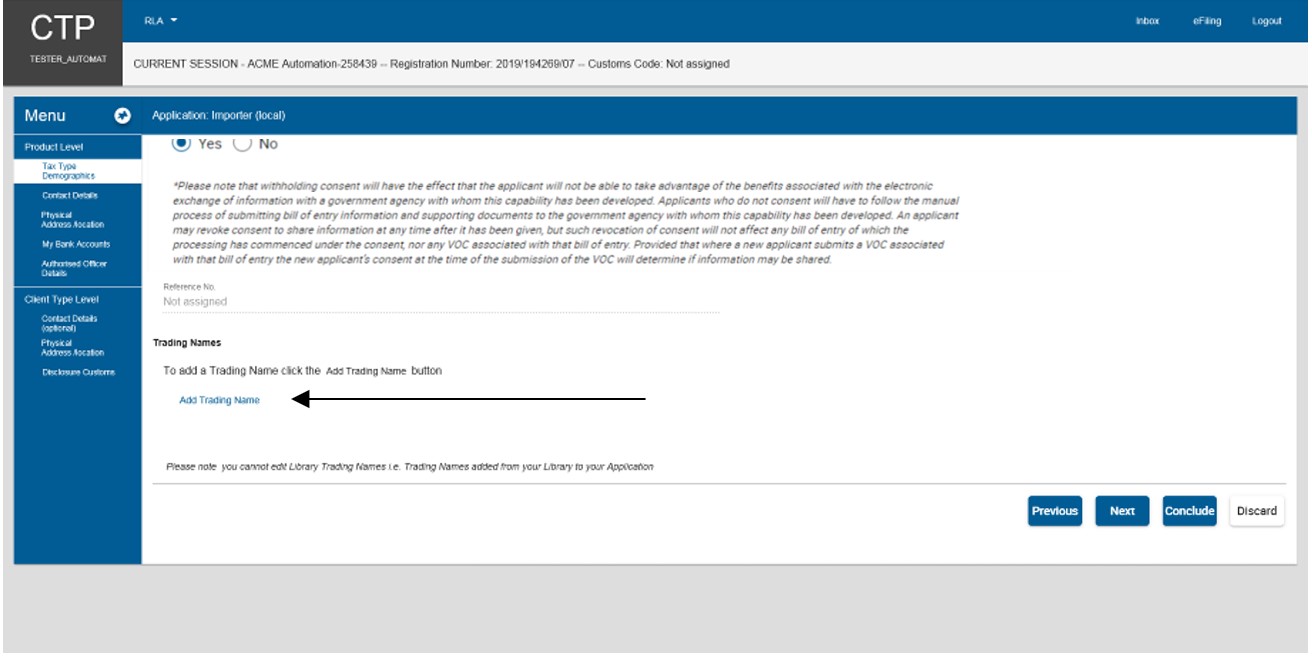
- The system displays the Add trading name window:
- The Library items contains a list of all previously captured trading names. The Library items enables a user to reuse previously captured data by clicking on that information which is then populated onto his/her electronic application form.
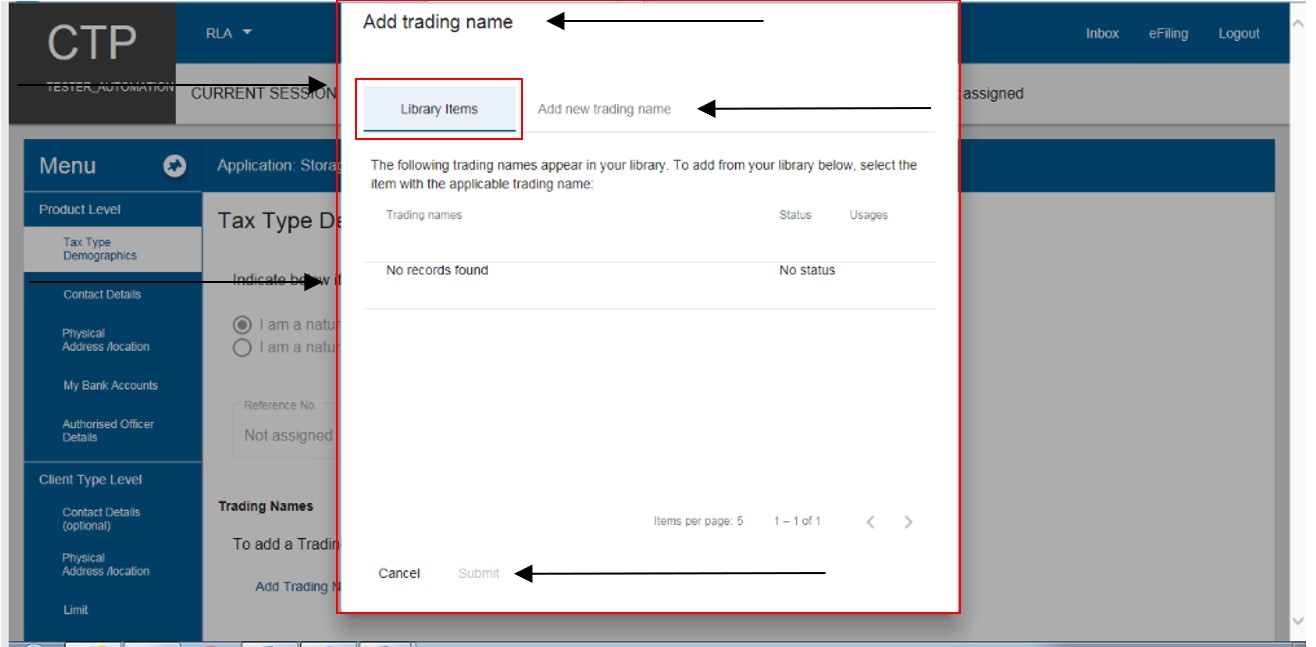
- If no records is found under Library Items, the user:
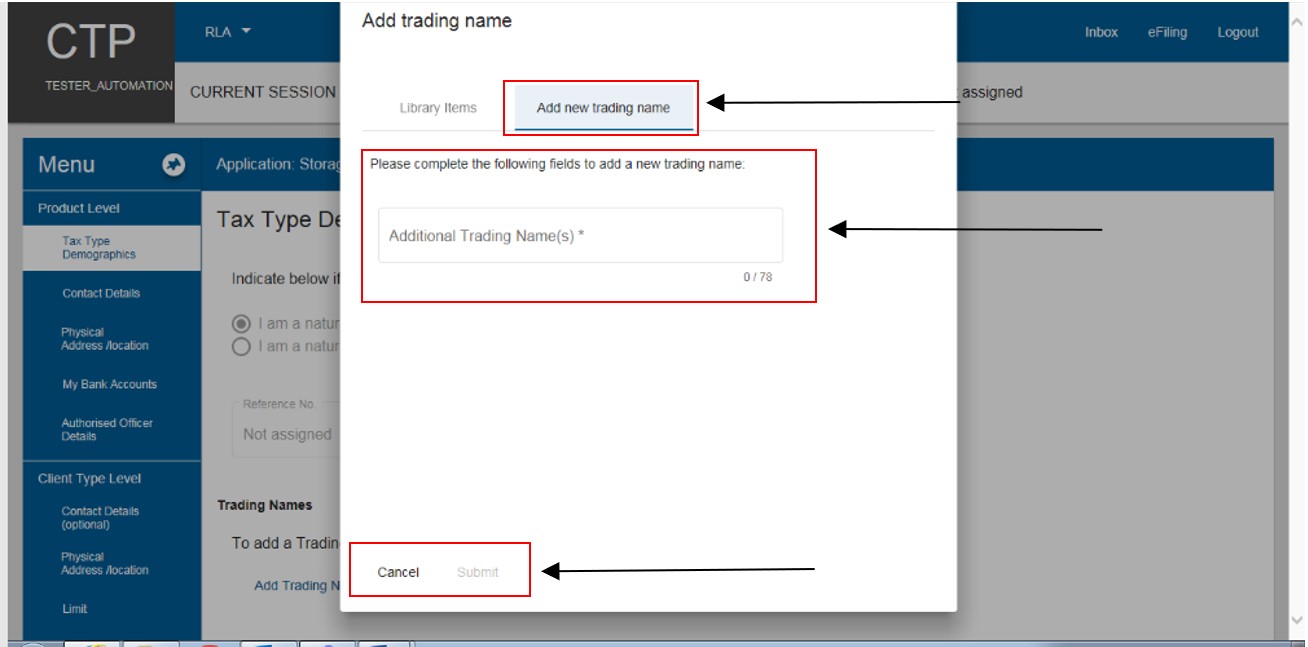
- Clicks on the Add new trading name option to display the Add trading name capture window; and
- Captures the trading name.
- Once the trading name has been captured, the system activates the Submit option. If the information is:
- Correct the user clicks Submit; or
- Not correct the user clicks on the Cancel option.
- If no records is found under Library Items, the user:
- The system populates the trading name onto the Tax Type Demographics page.
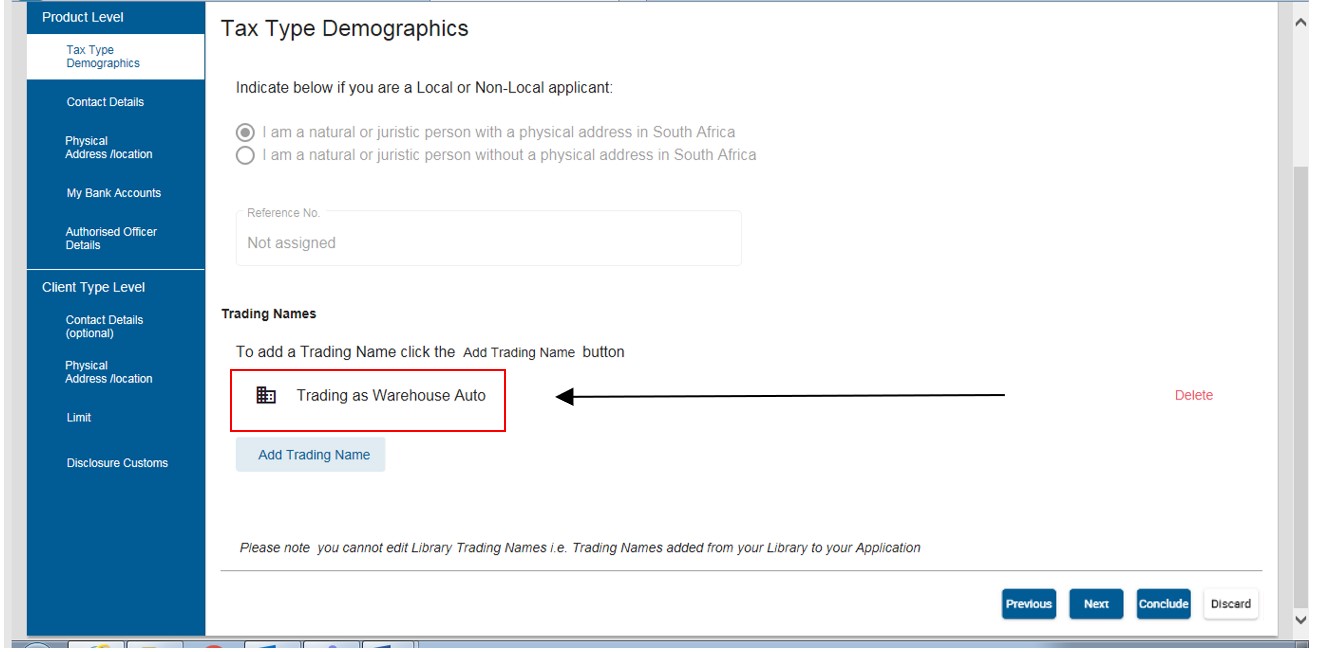
- If incorrectly captured, the user will be able to delete it by clicking on Delete and then on Add trading name.
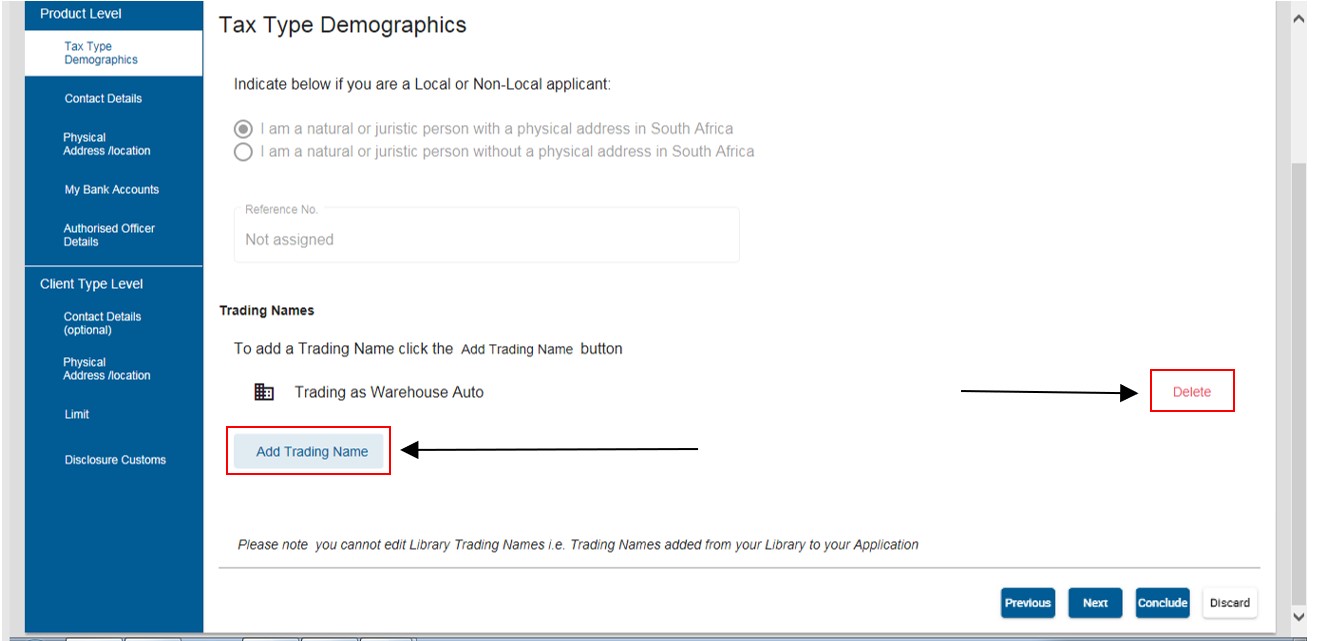
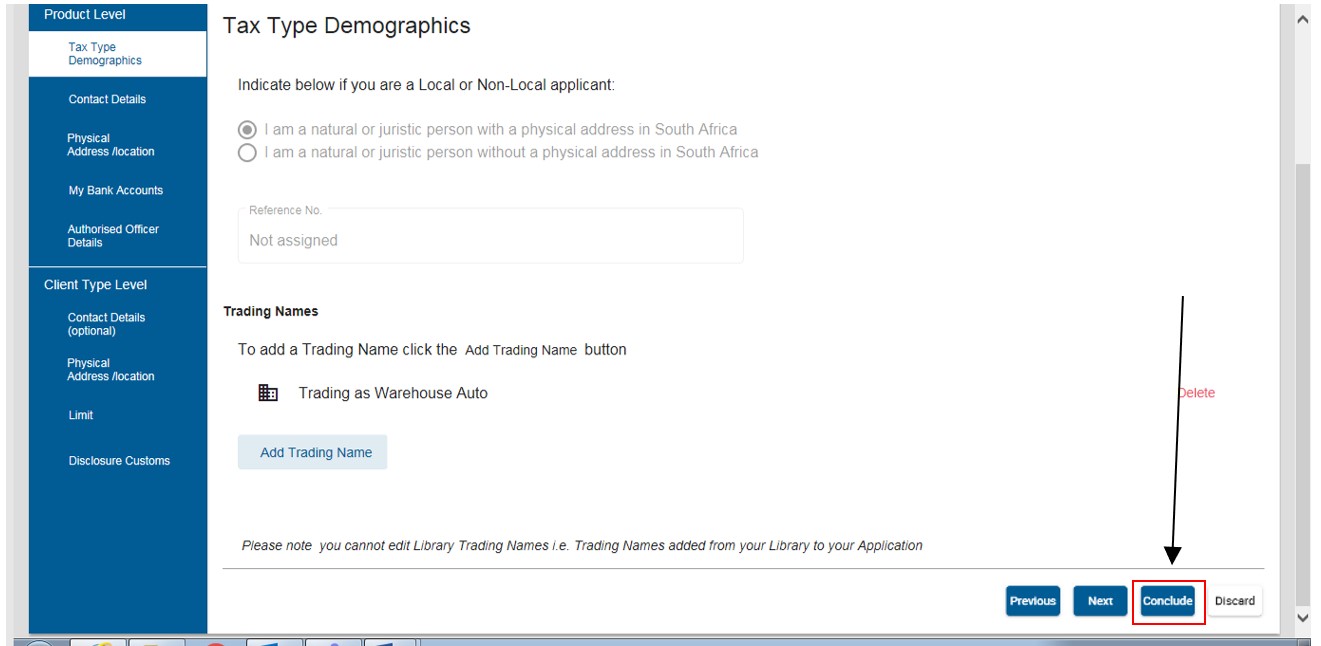
- If the trading name is correct:
- The user clicks on the Next button to progress to the next field which is Contact details under Product Level; or
- The user clicks on the Contact Details link in the Menu; and
- The trading name captured by the user is automatically saved.
- If the trading name is correct:
- If the user clicks on the Conclude button by mistake, the system displays an error message, refer to paragraph here) below to resolve the error.
- If the user wishes to discontinue his/her application, the user clicks on the Discard button and continues with the process prescribed in Discarding of Application below.
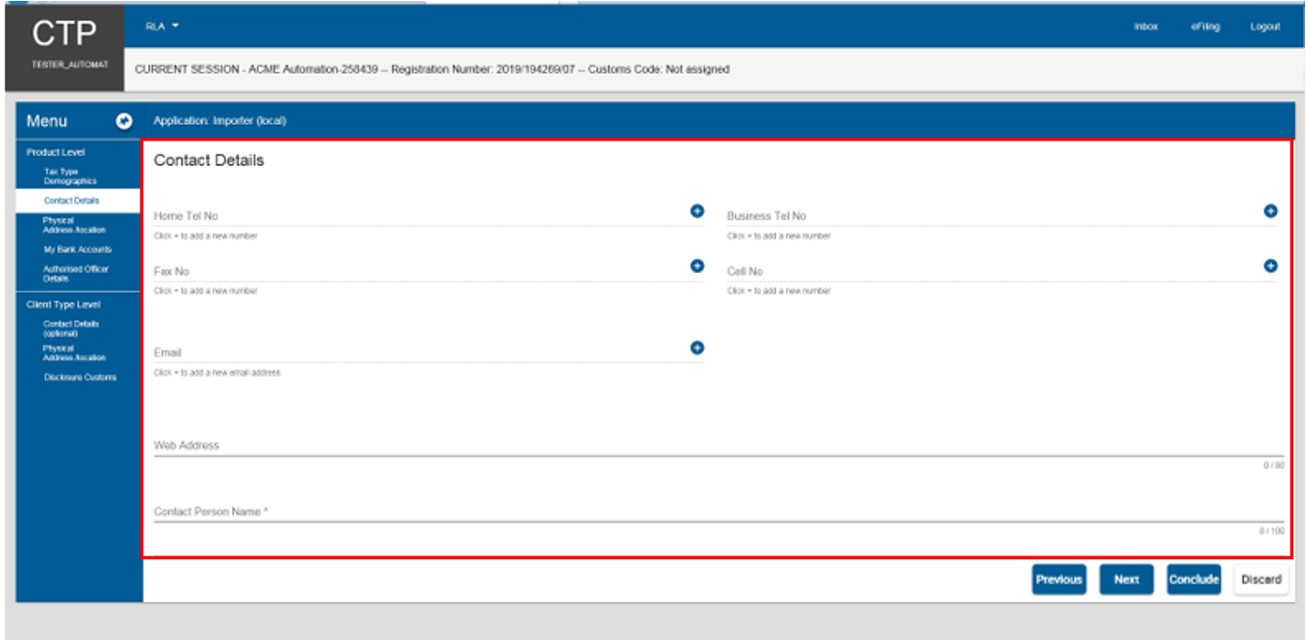
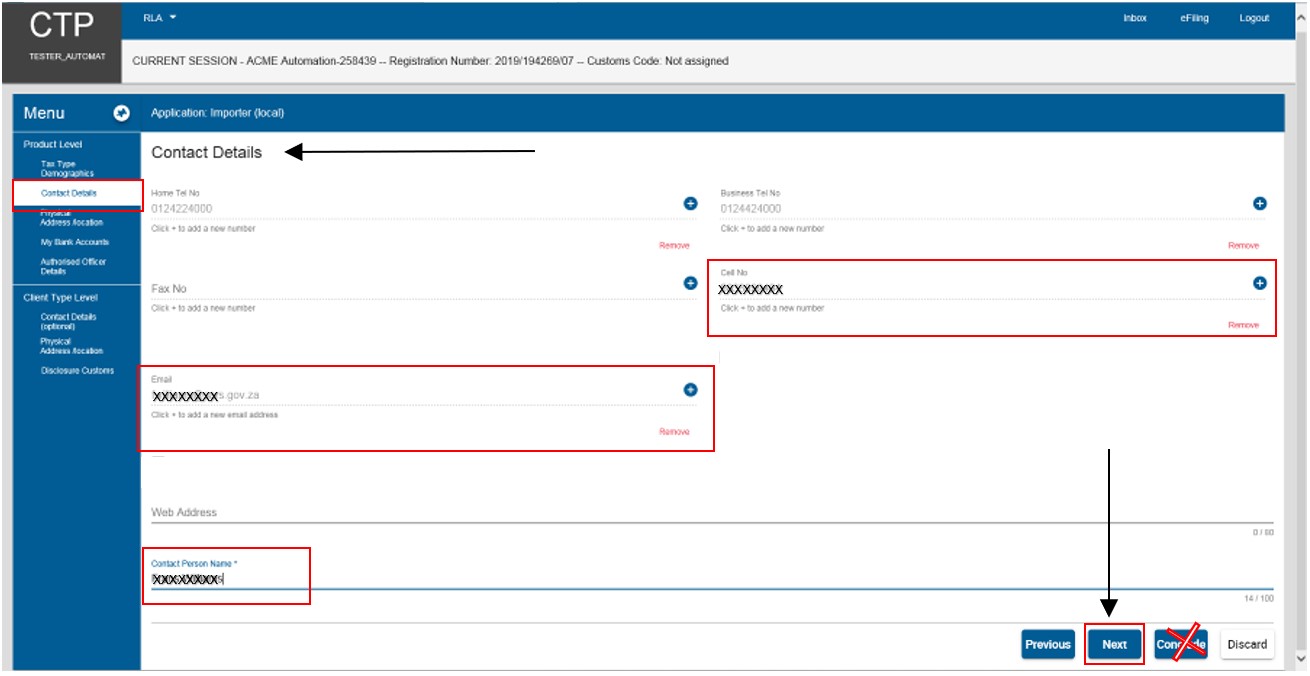
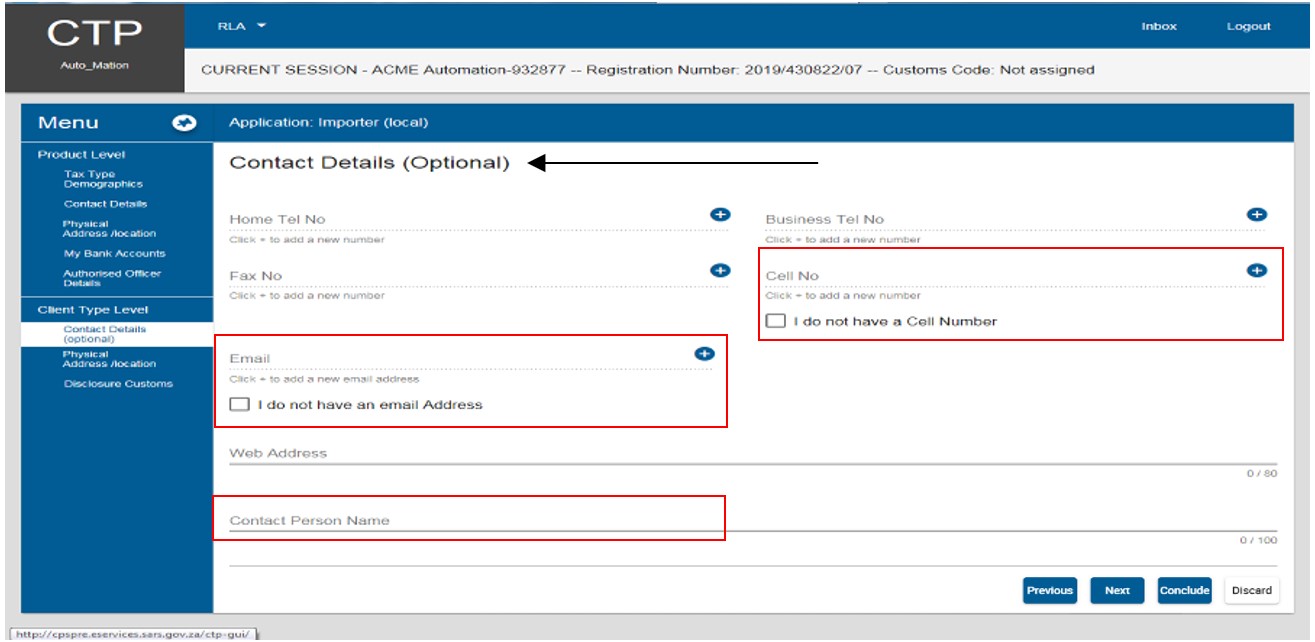
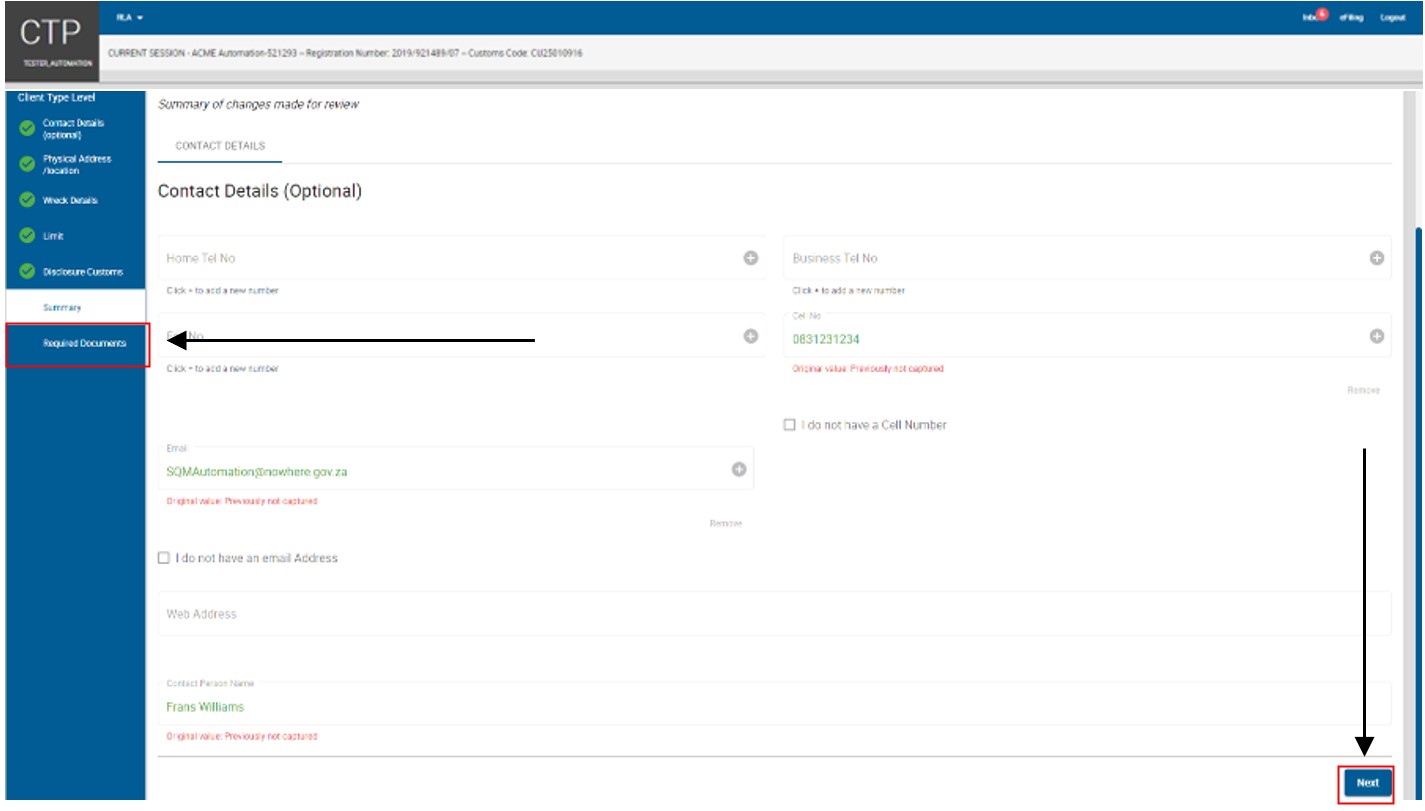
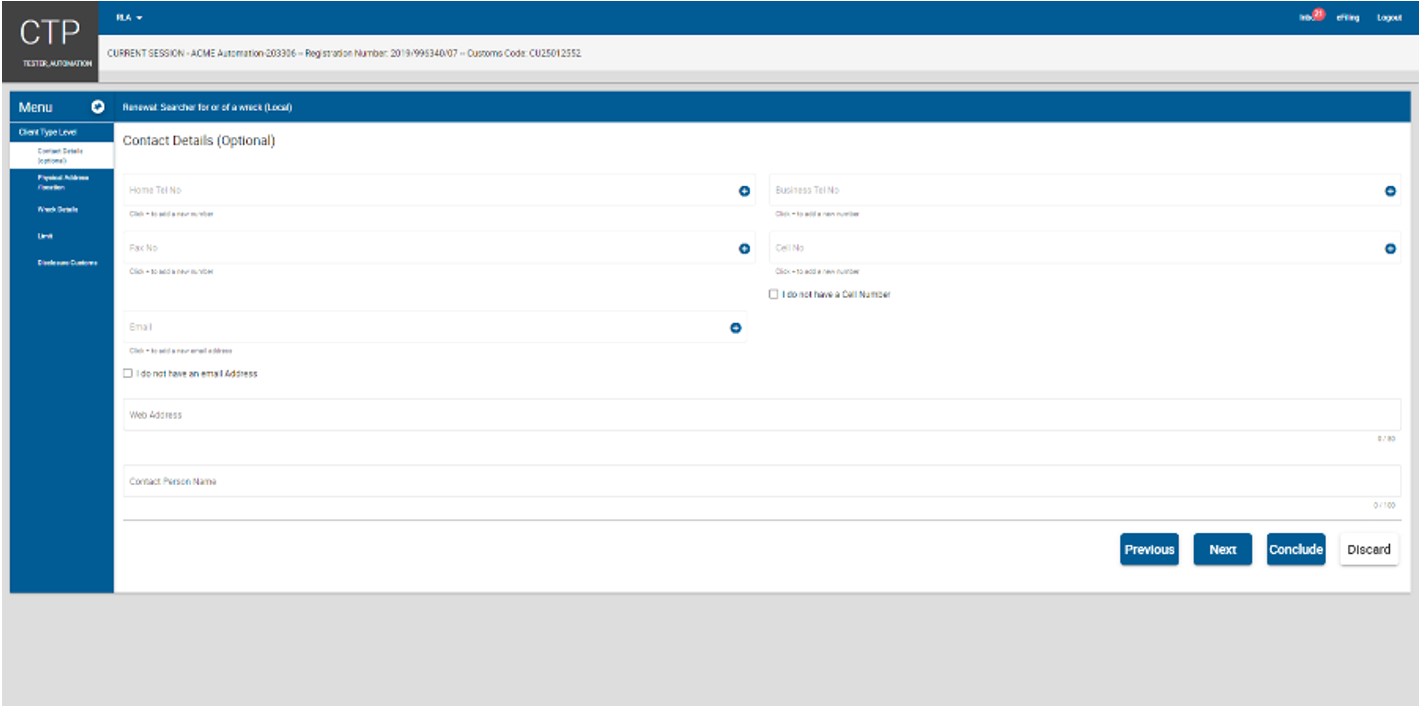
- In order to receive electronic notifications, the user must capture his/her:
- Cell phone number;
- Email address; and
- Contact person’s name.
- The fields home / business telephone number, fax number and / or web address are optional.
- Cell phone
- If no cell phone number is displayed or the user must add another cell phone number he/she must click on the (+) plus icon next to Cell No to display the Add cell phone number window.
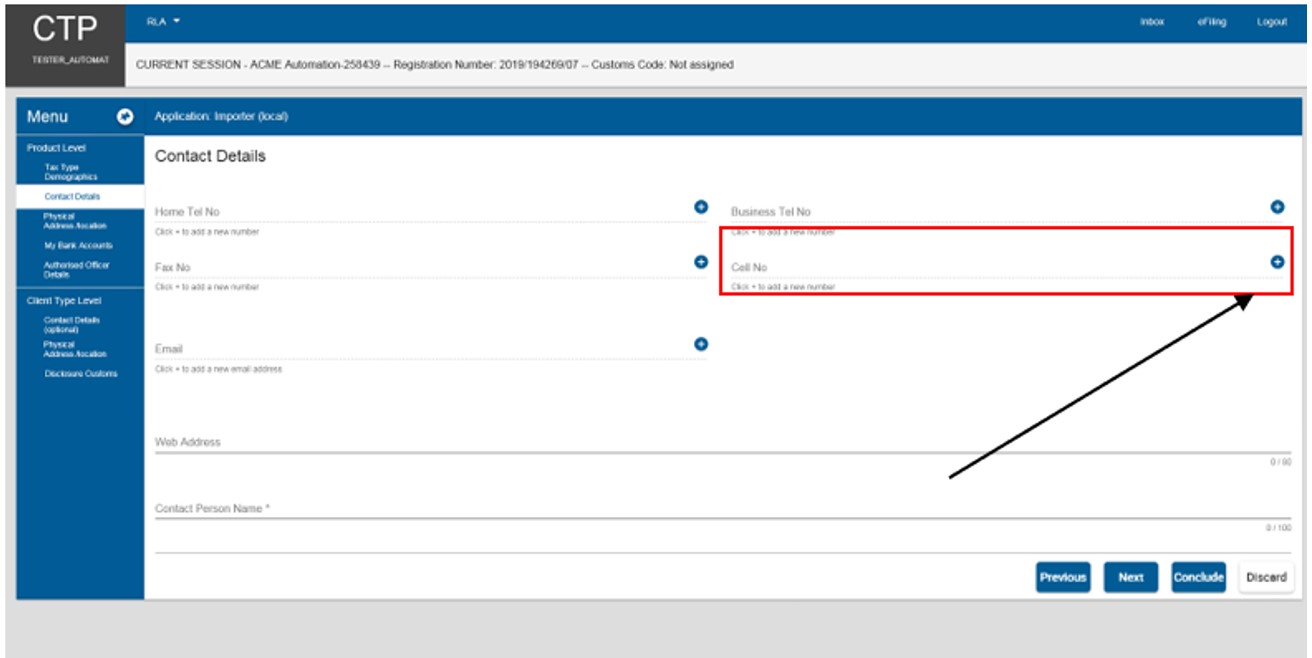
- If the cell phone number is displayed under the Library Items, the user selects the applicable cell phone number and submits the selected information. If the status of the selected Library item is:
- Verified, the user will not be required to upload the supporting documents.
- Unverified, the user is required to upload supporting documents for verification purposes as prescribed in Uploading of Required Supporting Documents.
- If the cell phone number is displayed under the Library Items, the user selects the applicable cell phone number and submits the selected information. If the status of the selected Library item is:
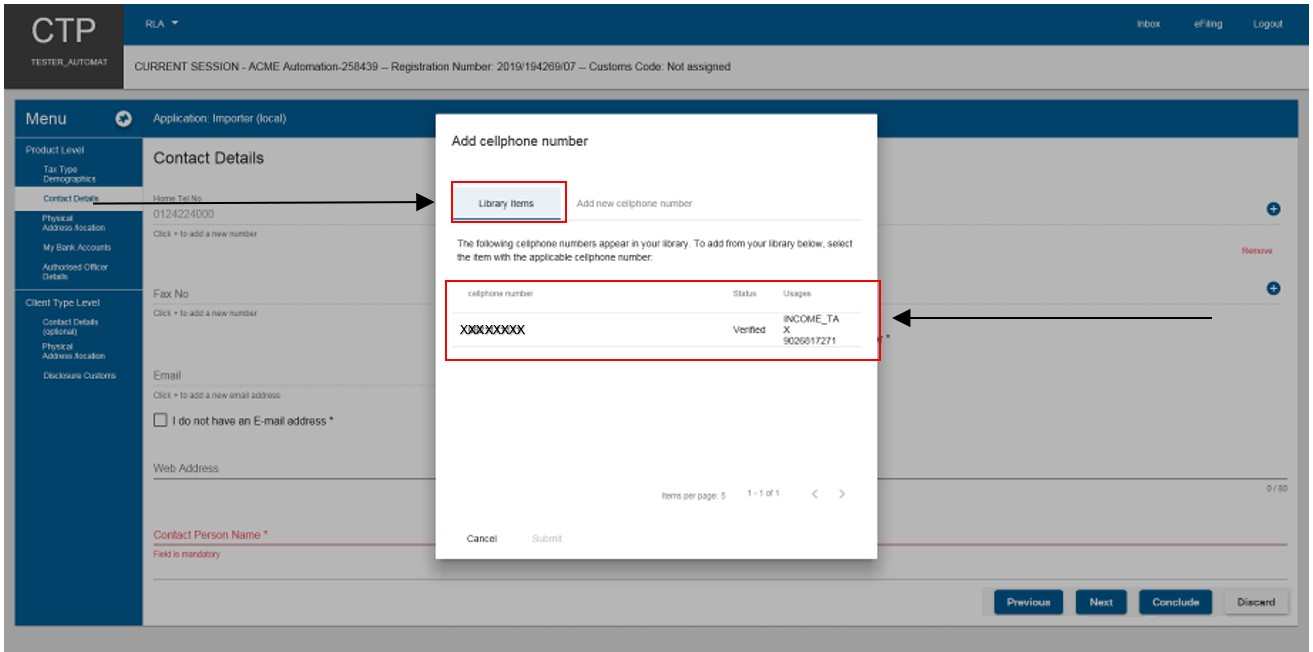
- If the cell phone number to be captured is not displayed under the Library Items:
- The user clicks on Add new cell phone number.
- If the cell phone number to be captured is not displayed under the Library Items:
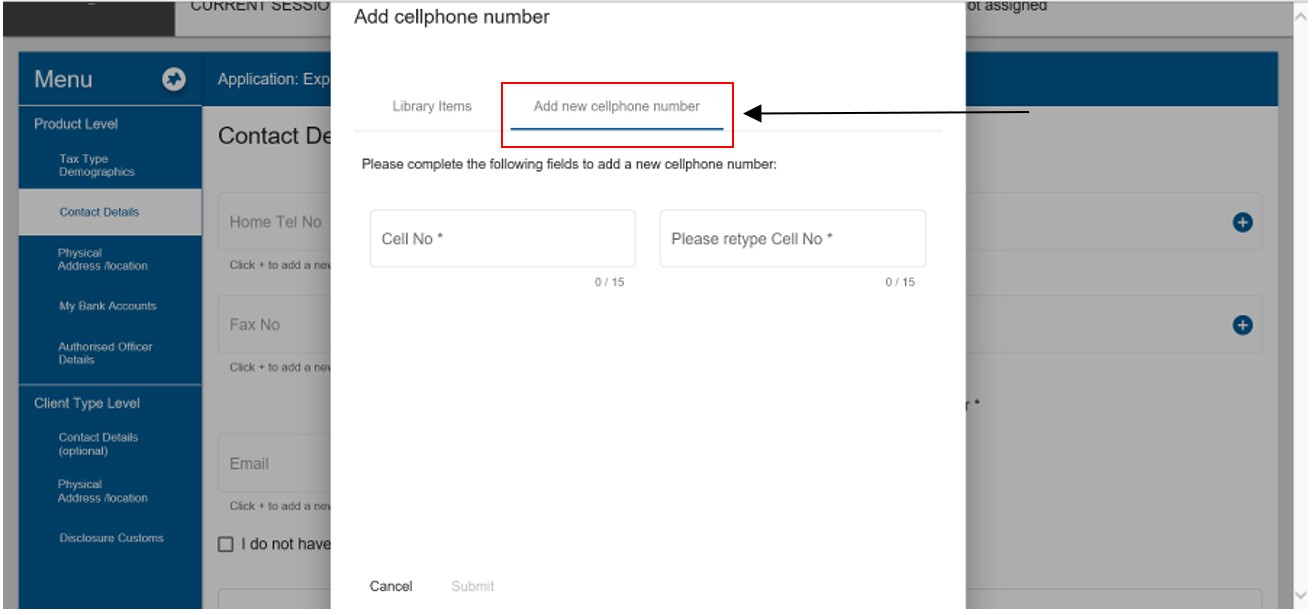
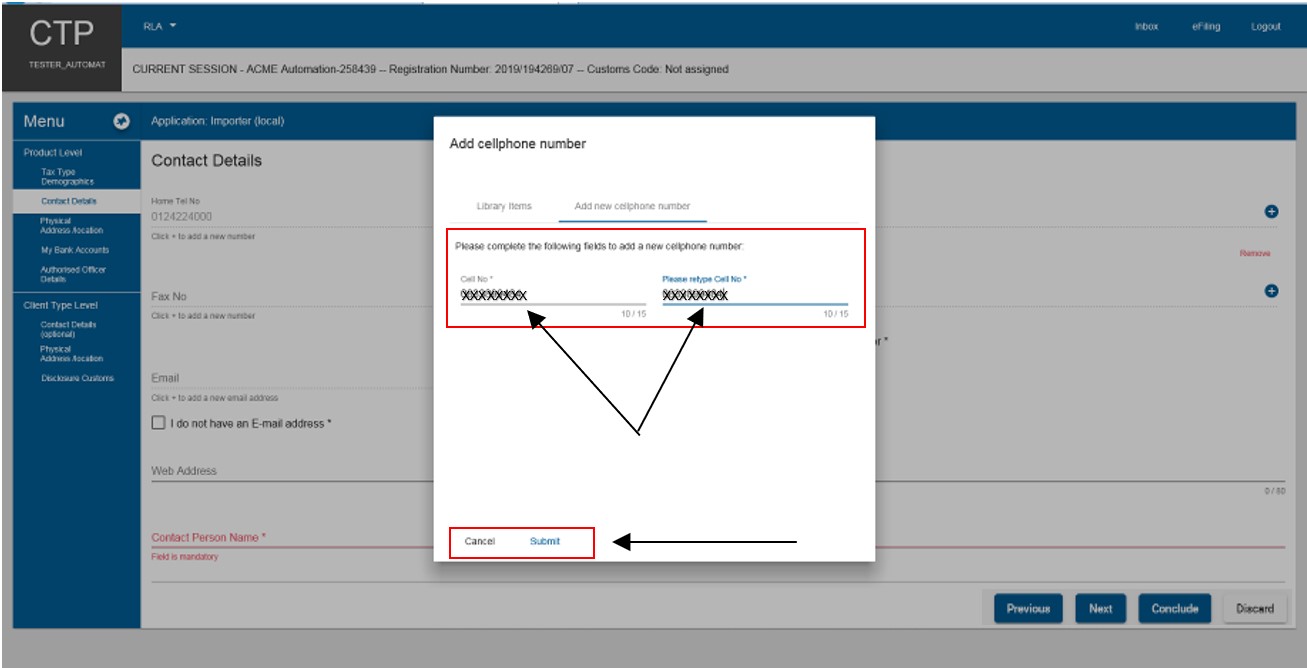
- The system displays the Add cell phone capturing window.
- The user captures the cell phone number twice to avoid capturing errors. If captured:
- Correctly, the user clicks on Submit; or
- Incorrectly, the user clicks on Cancel and recaptures the correct cell phone number
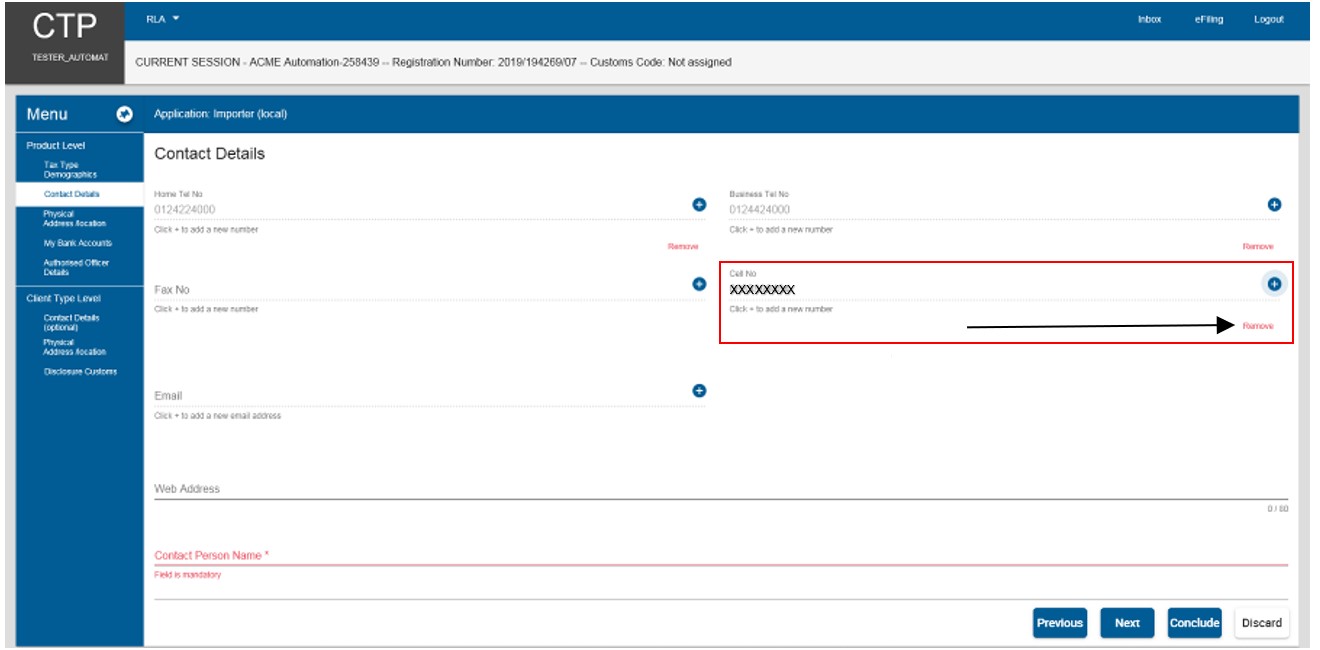
- After submiting the added cell phone number the system:
- Returns to the main Contact Details page; and
- Displays the cell phone number added.
- If captured incorrectly, the user clicks on Remover and recaptures his/his cell phone number.
- After submiting the added cell phone number the system:
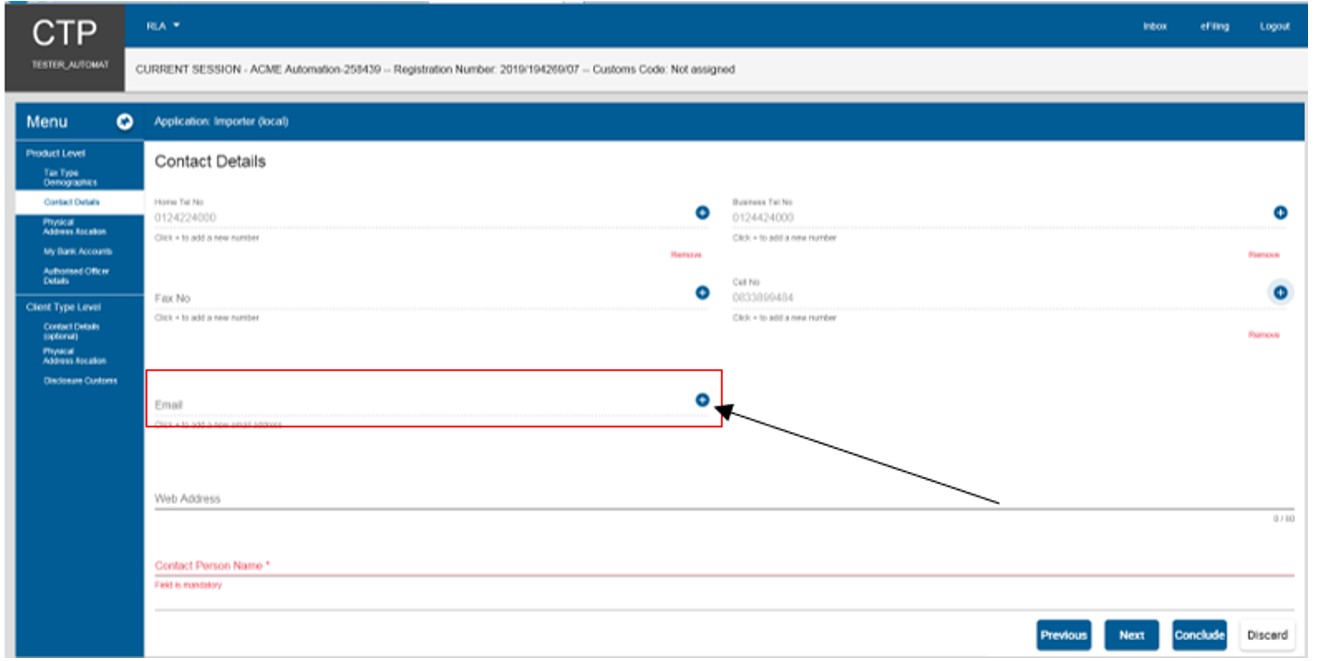
- Email address
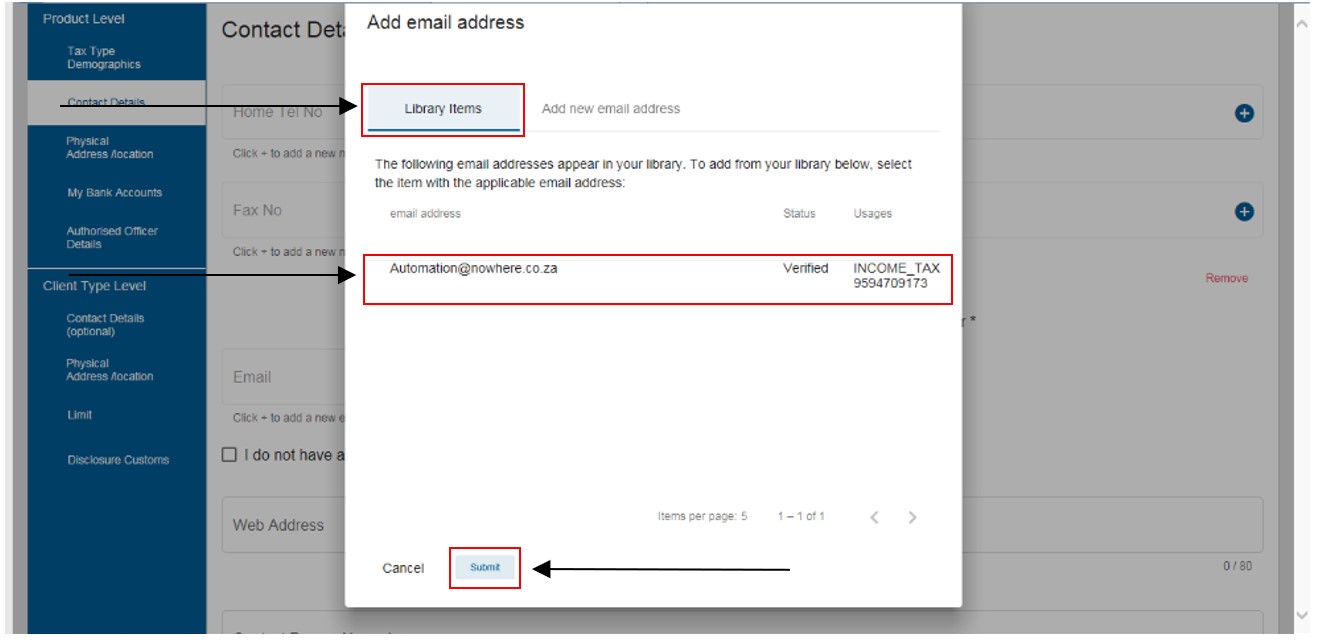
- If no email address is displayed or the user must add another email address he/she must click on the (+) plus icon next to Email to display the Add email window
- If the email address is displayed under Library Items, the user selects the applicable email address and submits the selected information. If the status of the selected Library item is:
- Verified, the user will not be required to upload the supporting documents.
- Unverified, the user is required to upload supporting documents for verification purposes as prescribed in Uploading of Required Supporting Documents.
- If the email address is displayed under Library Items, the user selects the applicable email address and submits the selected information. If the status of the selected Library item is:
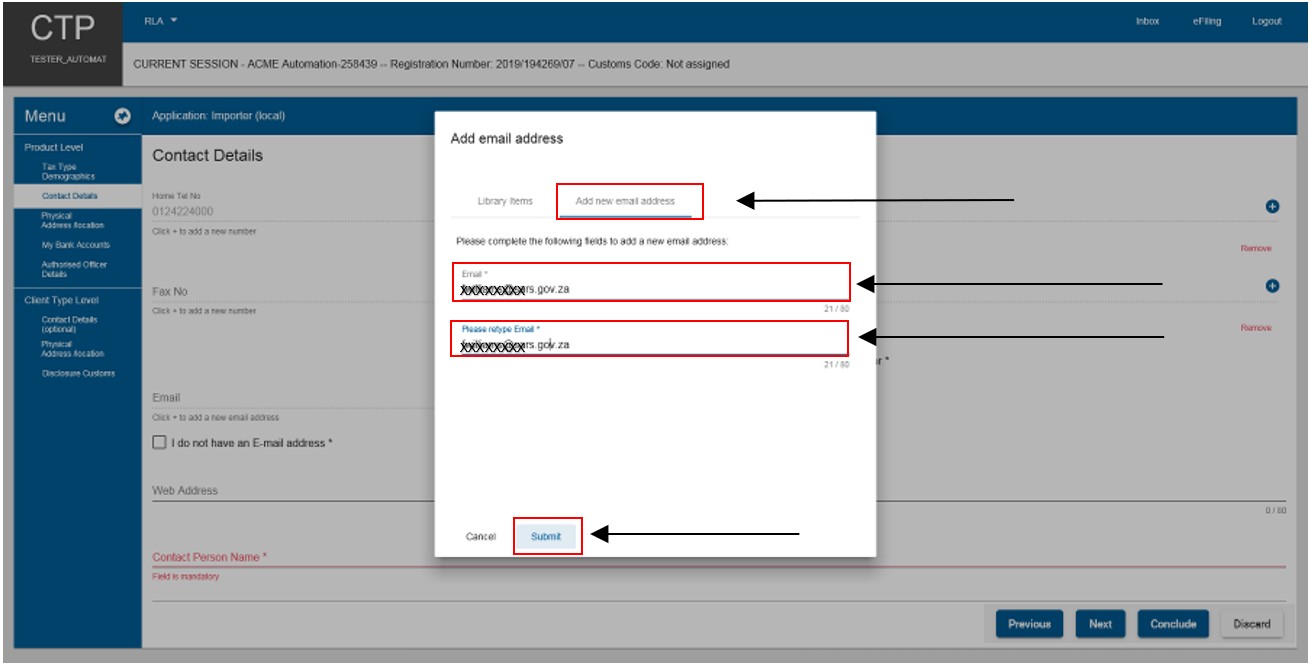
- If the email address to be captured is not displayed under the Library Items:
- The user clicks on Add new email address.
- The system displays the Add email address window.
- The user captures the email address twice to avoid capturing errors. If captured:
- Correctly, the user clicks on Submit; or
- Incorrectly, the user clicks on Cancel and recaptures the correct email address.
- If the email address to be captured is not displayed under the Library Items:
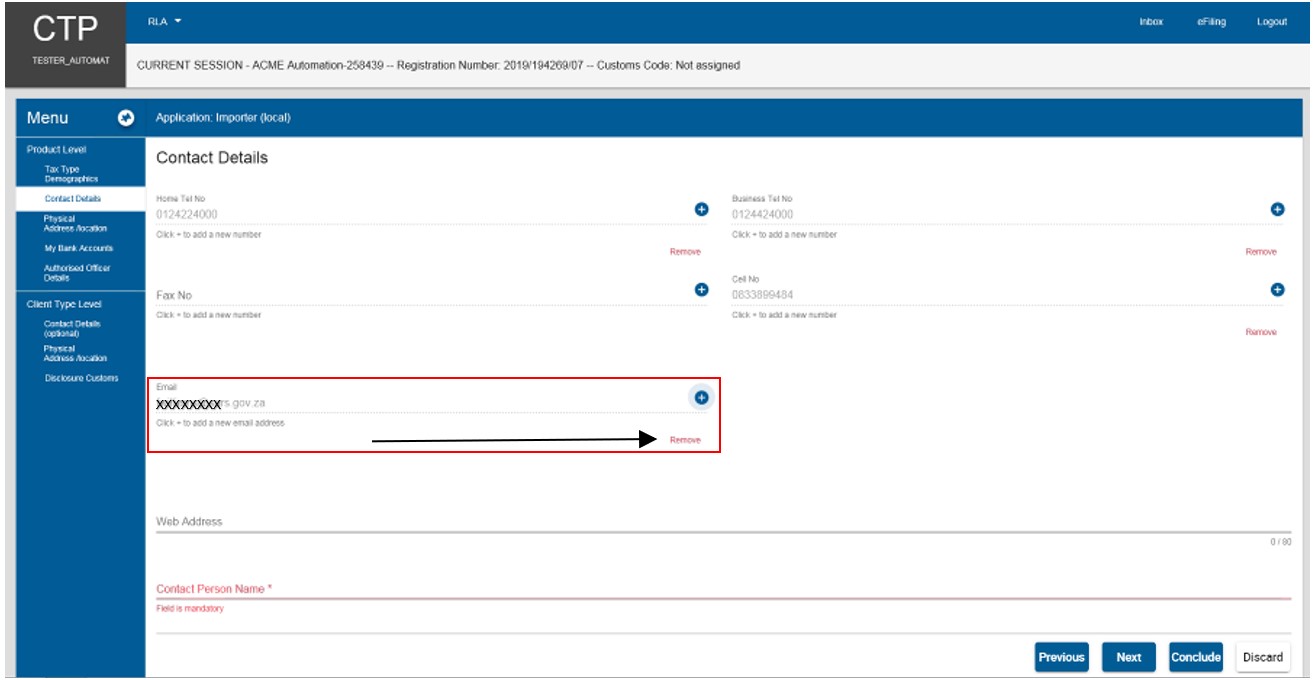
- After submitting the add email address the system:
- Returns to the main Contact Details page; and
- Displays the email address added.
- After submitting the add email address the system:
- If captured incorrectly the user clicks on Remover and recaptures his/her email address.
- The web address details are optional, the application will not be rejected if not provided.
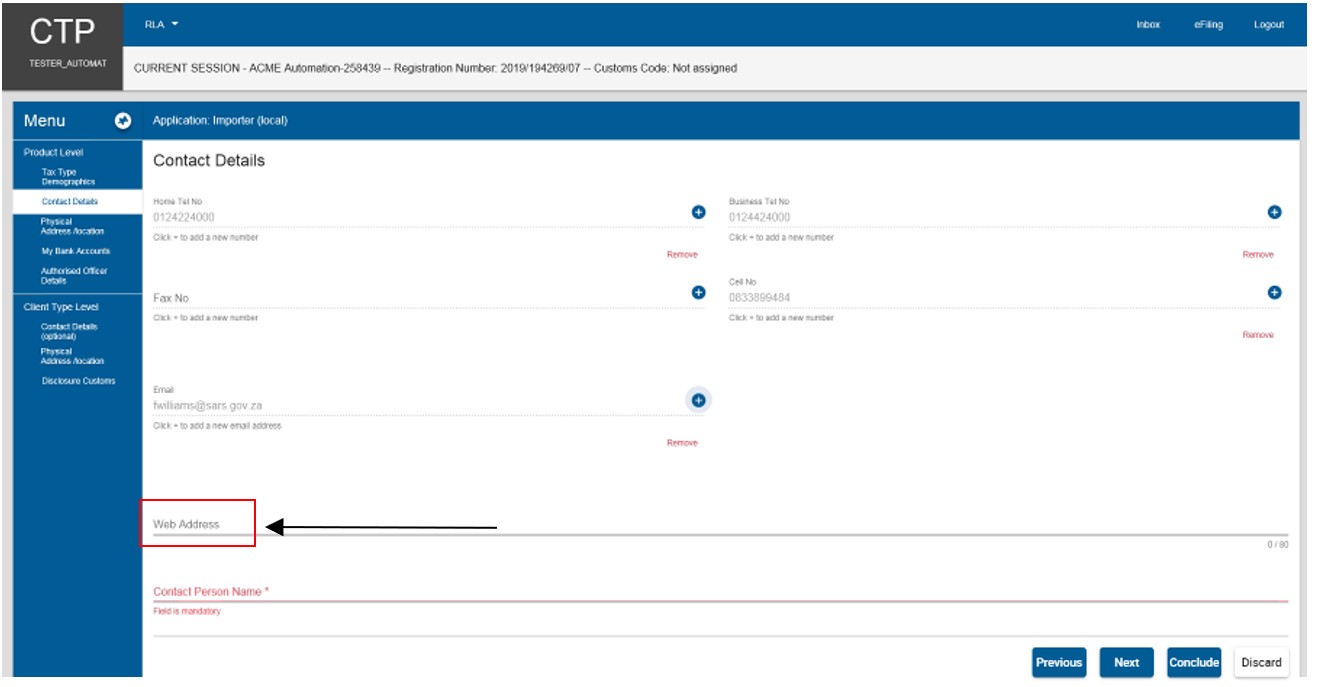
- The Contact Person Name is mandatory. The user:
- Clicks on Contact Person Name.
- Captures the contact person’s name.

- Clicks on the:
- Next button to progress to the next field which is Physical Address / Location under Product Level; or
- Physical Address / Location link in the Menu.
- Clicks on the:
- The contact details captured by the user is automatically saved.
- If the user clicks on the Conclude button by mistake, the system displays an error message. refer to paragraph here) below to resolve the error.
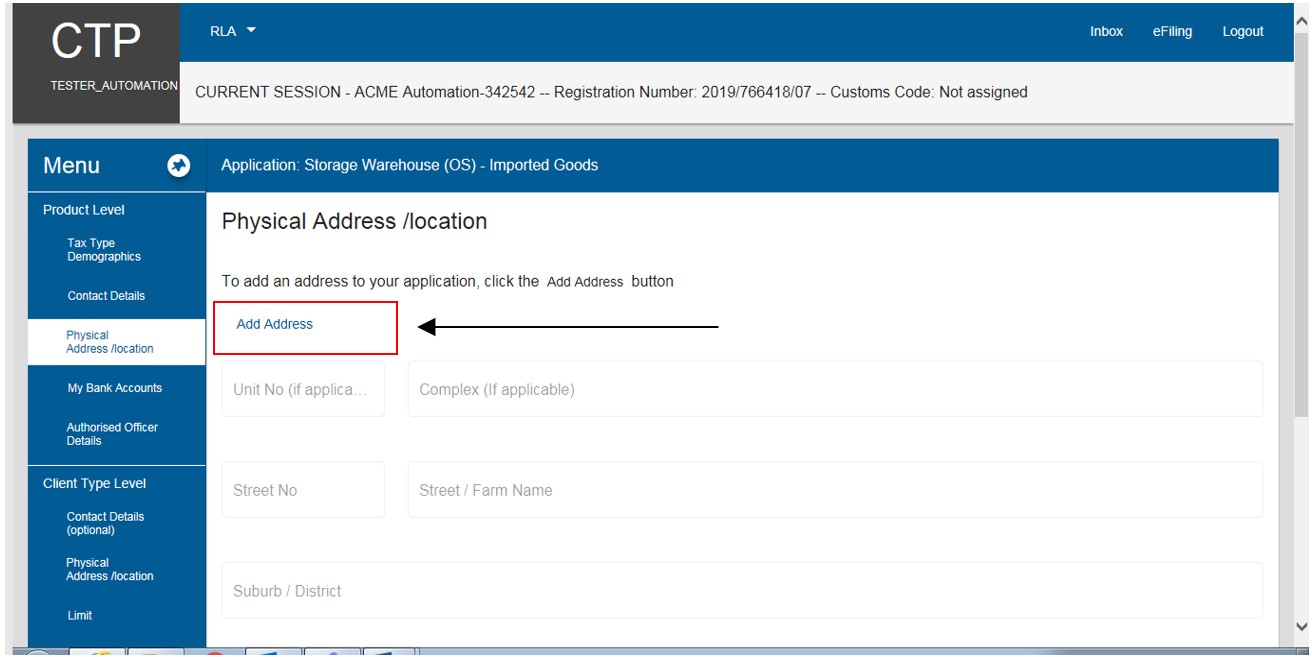
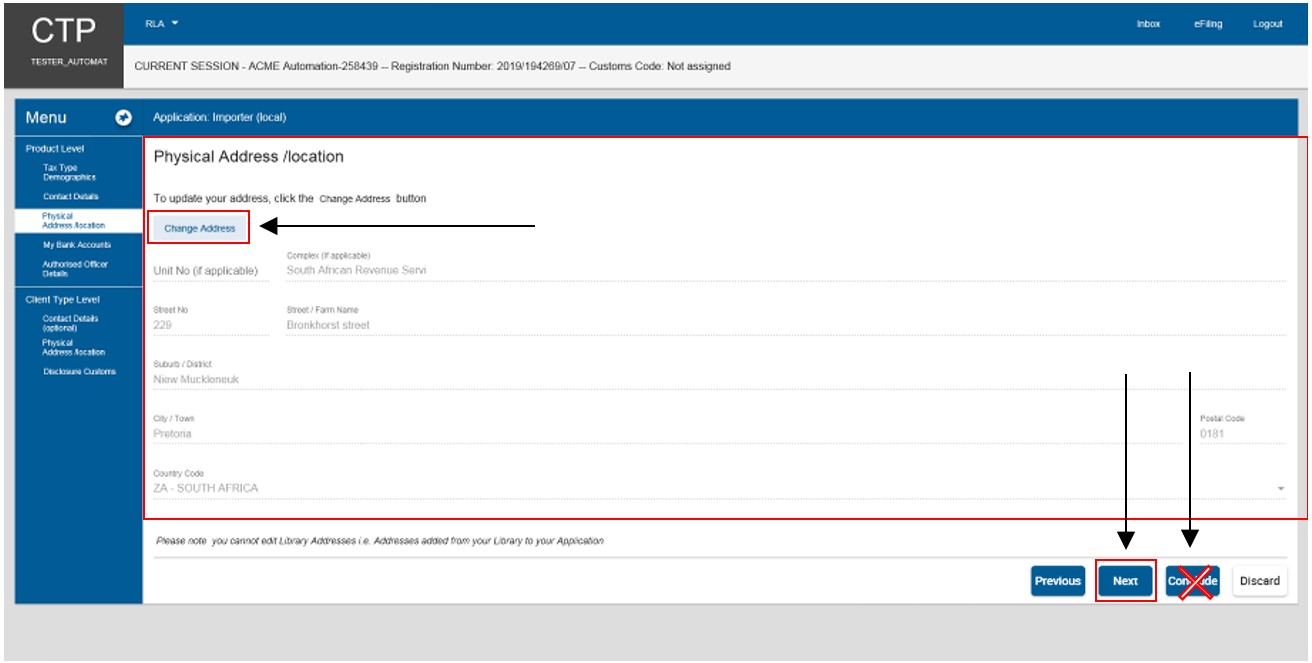
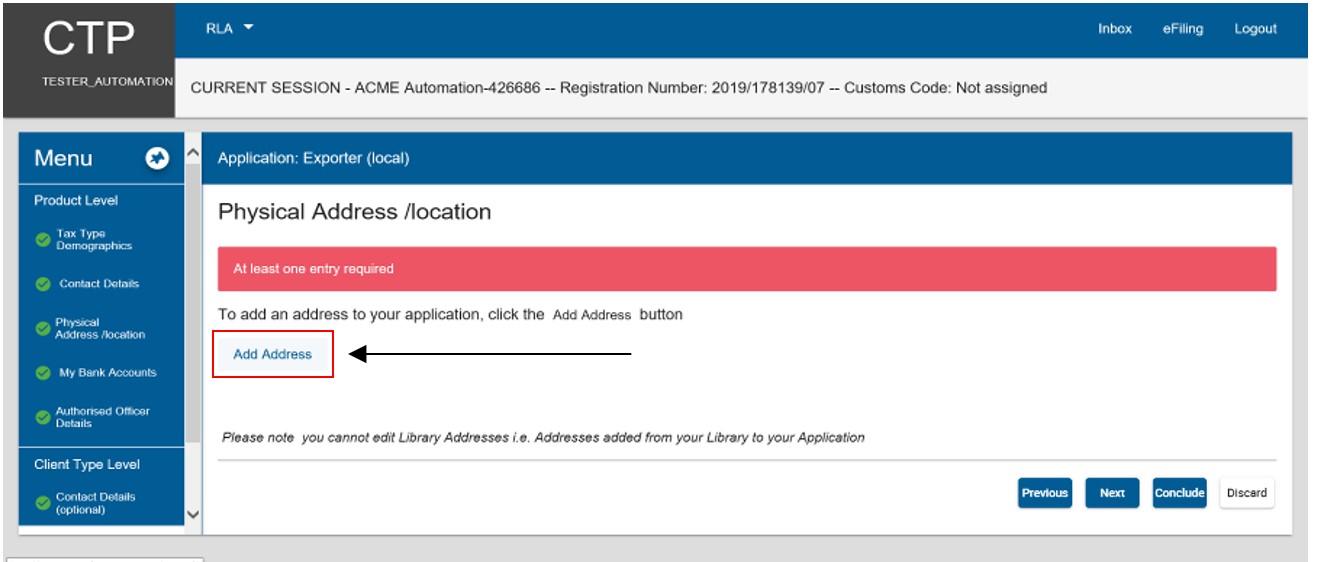
- If no physical address is displayed on the main Physical Address / Location page or the user must add another Physical Address / Location he/she must click on Add address to display the Add address capture window.
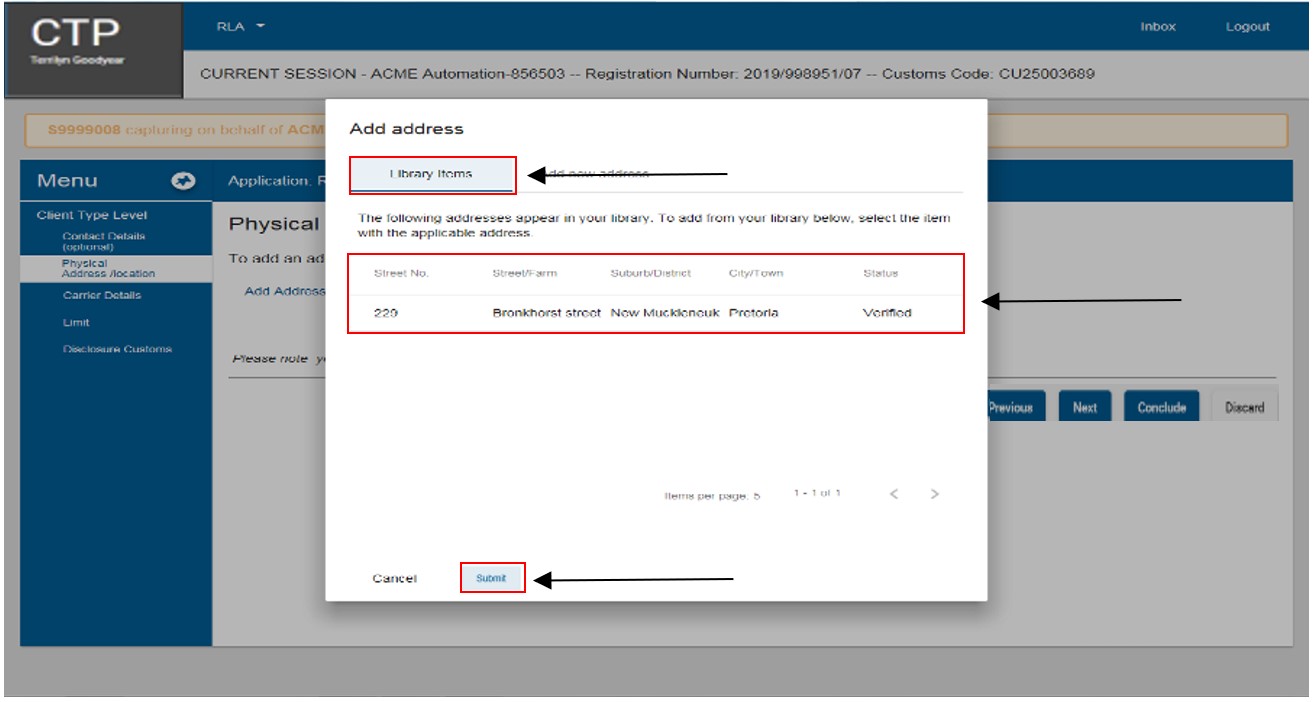
- If the physical address / location details is displayed under the Library items, the user selects the applicable physical address / location and submits the selected information. If the status of the selected Library item is:
- Verified, the user will not be required to upload the supporting
- Unverified, the user is required to upload supporting documents for verification purposes as prescribed in Uploading of Required Supporting Documents.
- if the physical address / location is not displayed under the Library Items, the user:
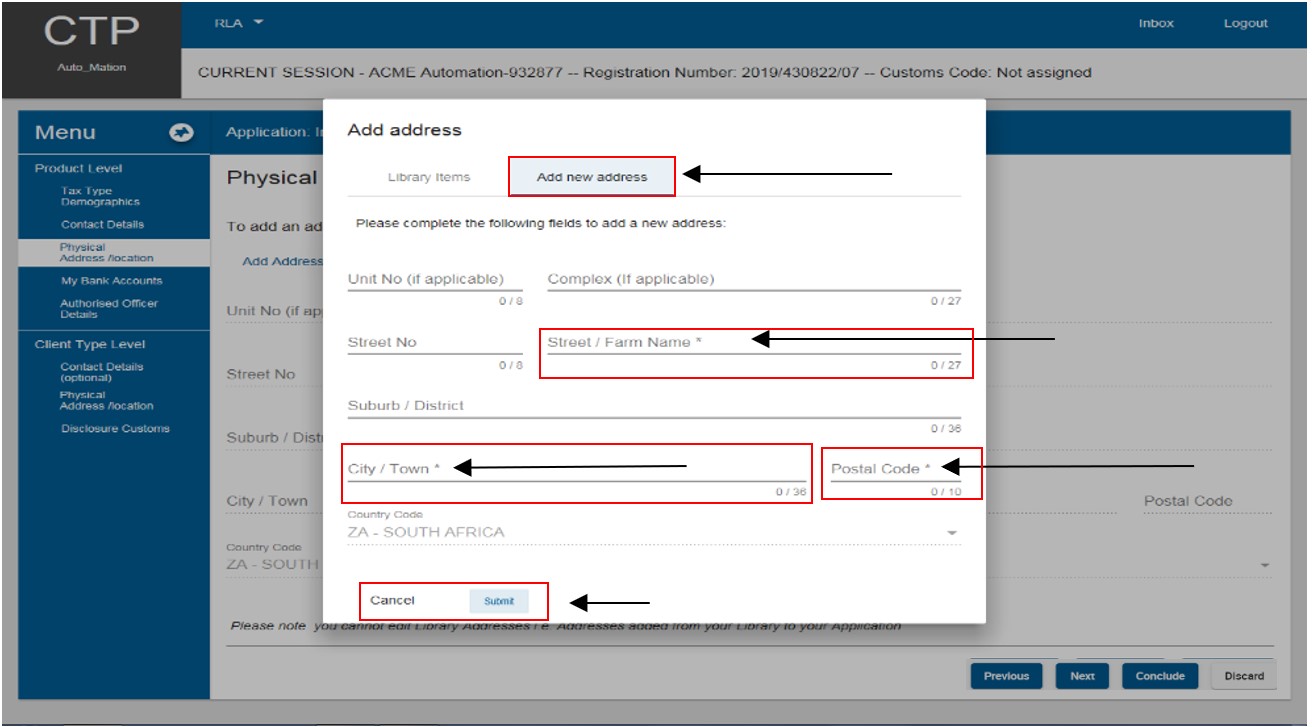
- Clicks Add new address to display the Add Address capture window.
- Captures the following mandatory information:
- The Street / Farm Name;
- The City / Town; and
- The Postal code; and
- Selects the Country code ZA – SOUTH AFRICA.
- The fields Unit no, complex, Street No, Suburb / District are optional.
- If the above mandatory information is captured:
- Correctly, the user clicks on Submit; or
- Incorrectly, the user clicks on Cancel to recapture the physical address / location mandatory information.
- After submitting the added physical address the system:
- Returns to the main Physical Address / location page; and
- Displays the physical address added.
- If captured:
- Incorrect, the user clicks on Change Address and recaptures his/her physical address.
- Correctly:
- The user clicks on the Next button to progress to the next field which is My Bank Accounts under Product Level; or
- The user clicks on the My Bank Accounts link in the Menu; and
- The physical address details captured by the user is automatically saved.
- If the user clicks on the Conclude button by mistake, the system displays an error message, refer to paragraph here) below to resolve the error.
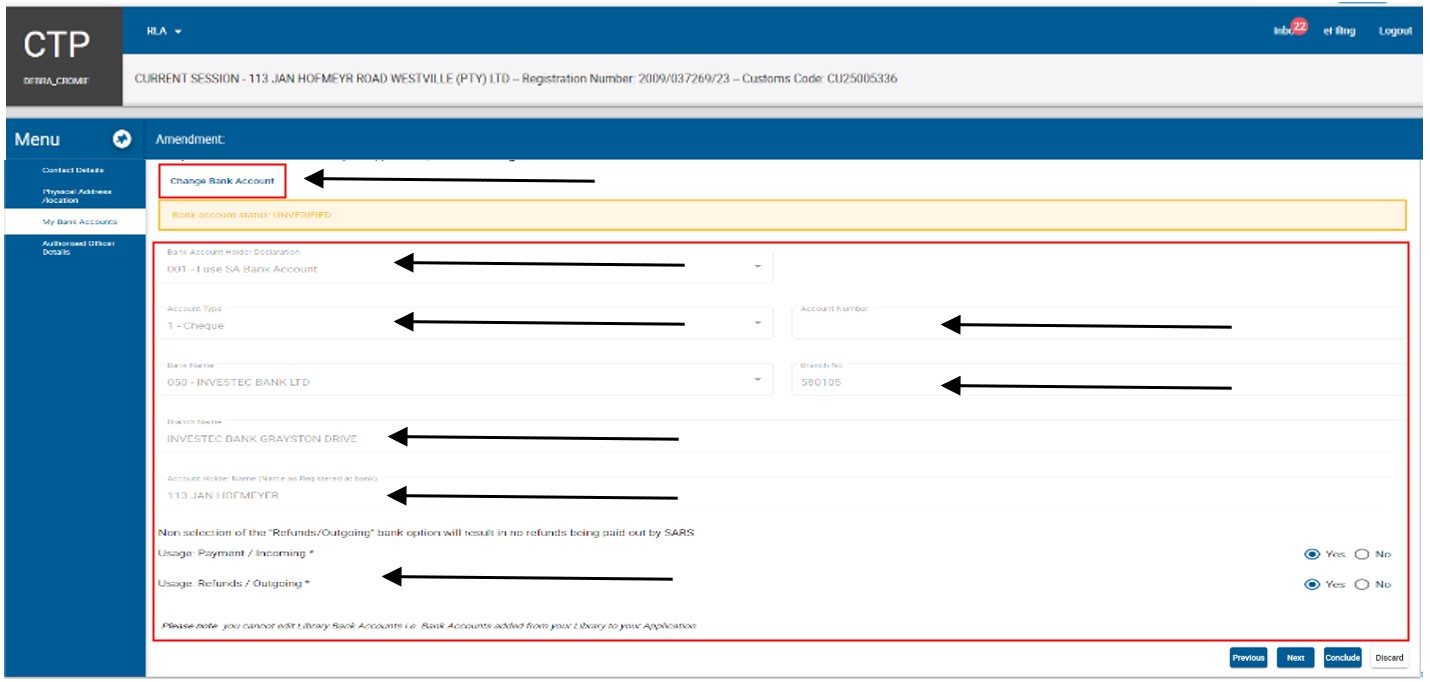
- The user must provide SARS with a valid South African bank account to effect payments.
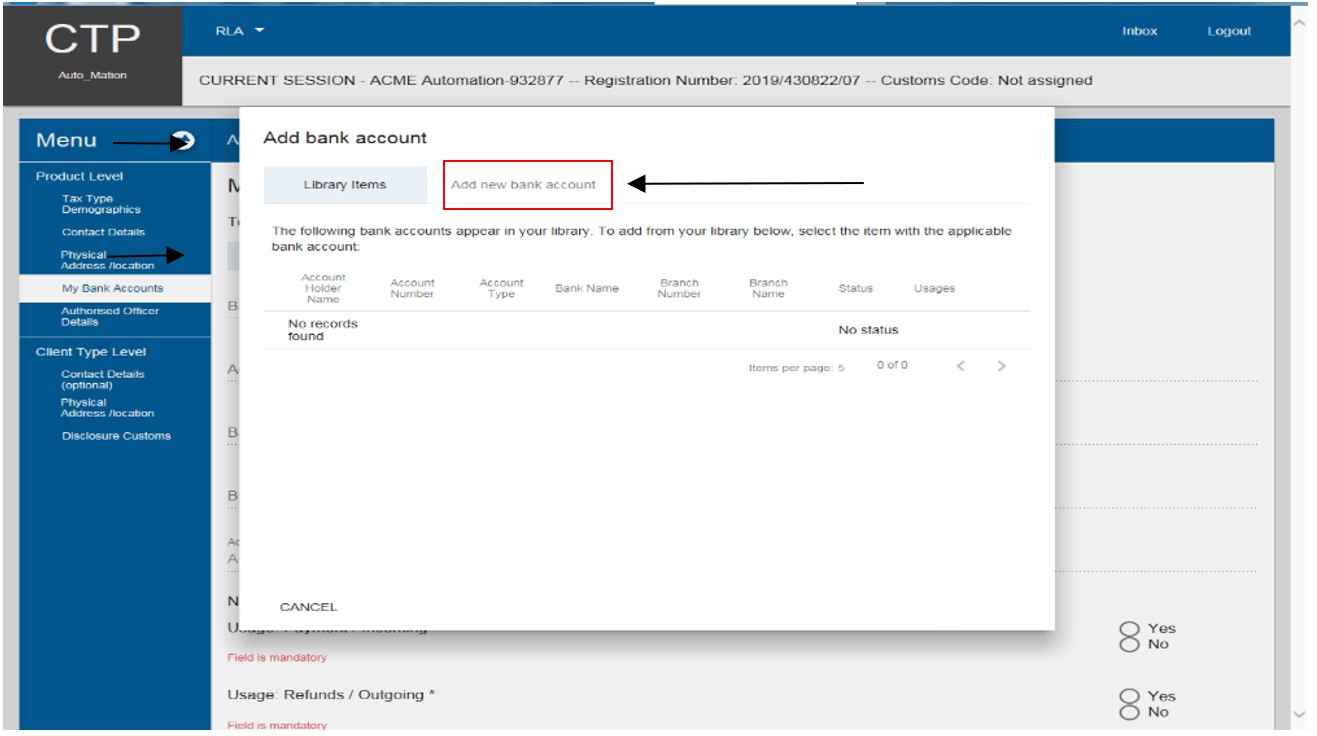
- If no banking details are reflected on the My Bank Accounts page or a different bank account must be added. The user clicks on Add Bank Account to display the Add bank account capture window.
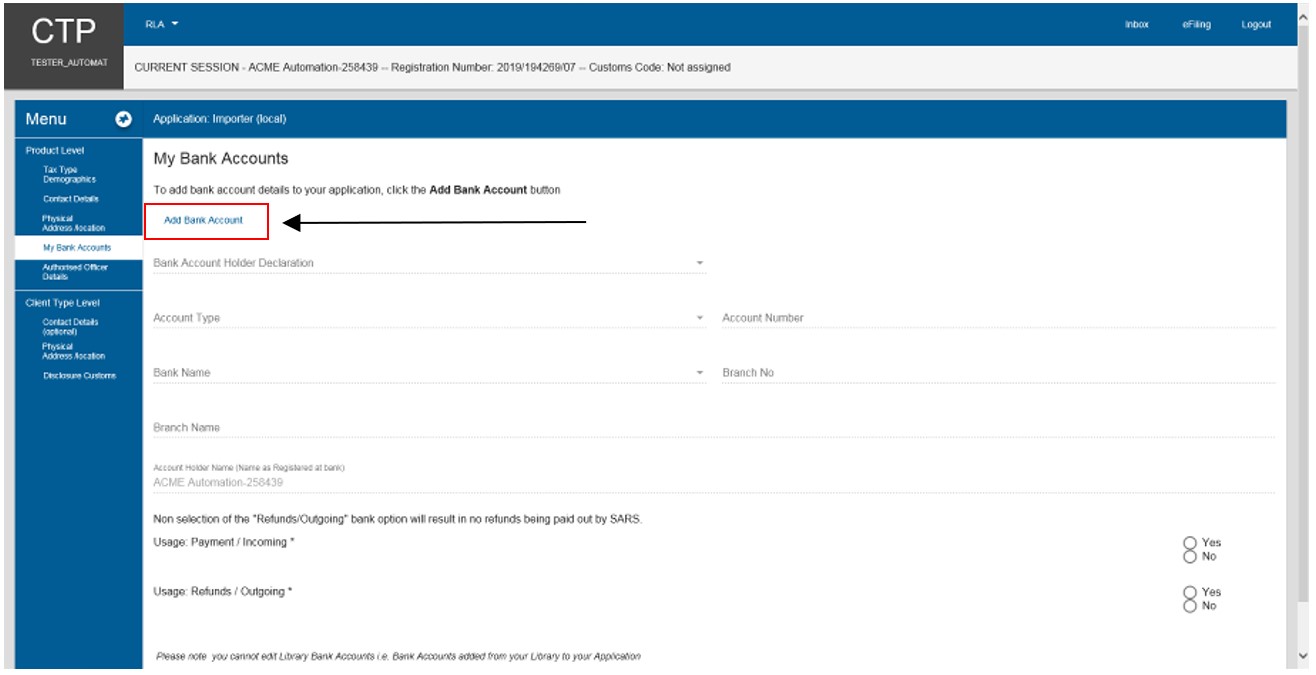
- If the bank account details are displayed under the Library items, the user selects it and then submits the selected information.
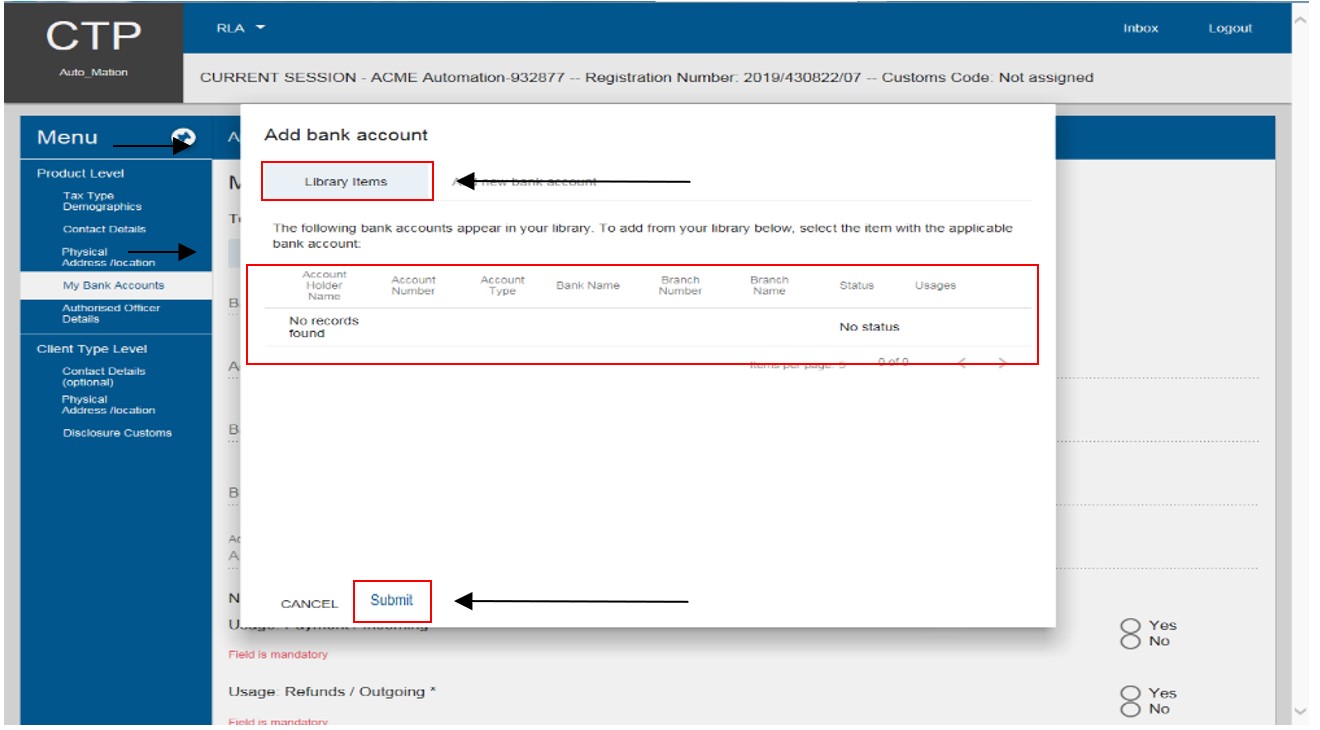
- If the bank account details are not displayed under the Library Items, the user clicks on Add new bank account.
- The user captures the following mandatory information:
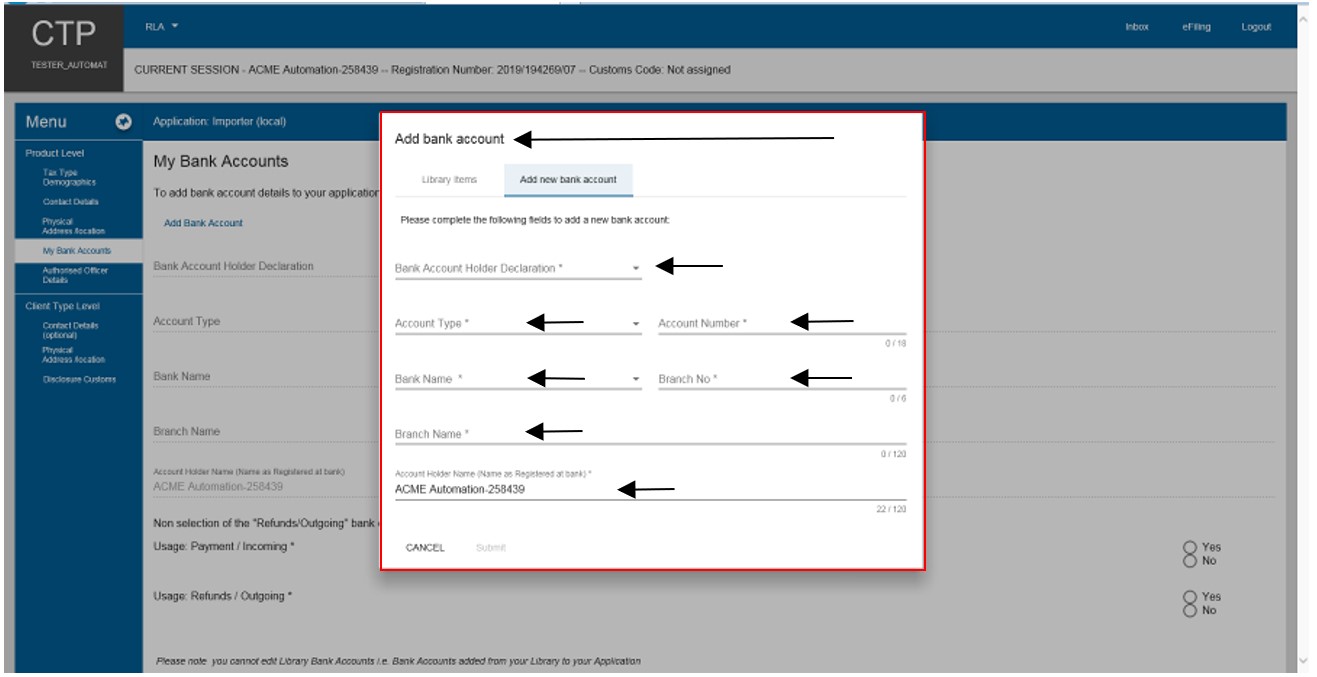

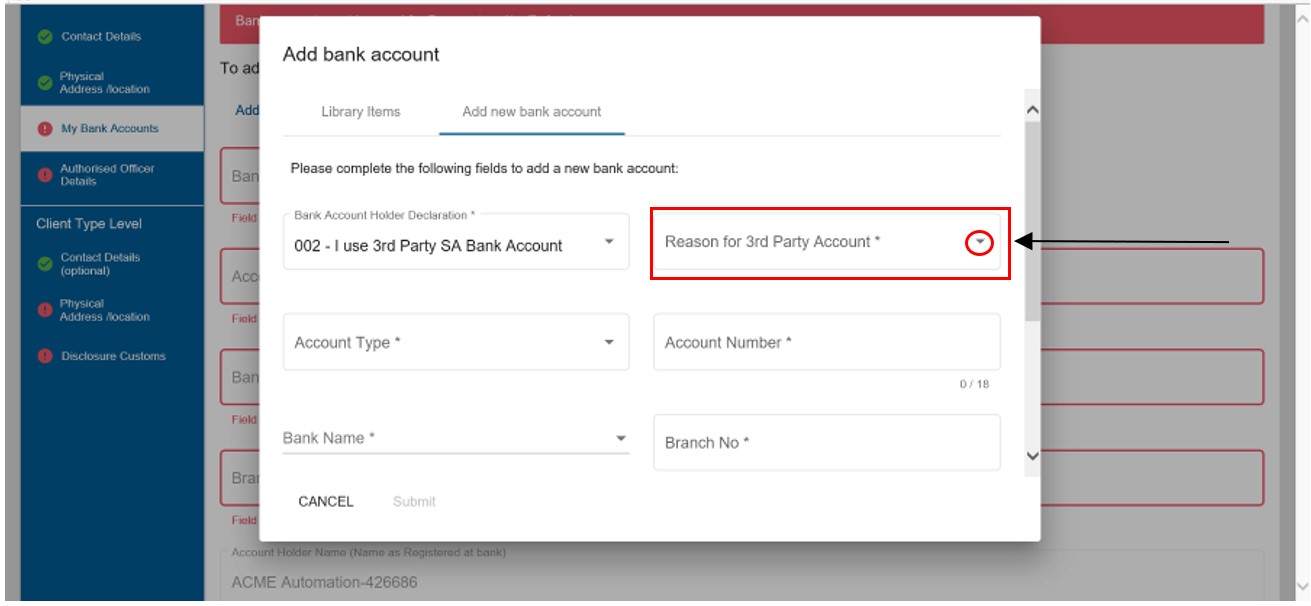
- I use 3rd Party SA Bank Account. The user must provide the reason(s) for using a 3rd party SA bank account.
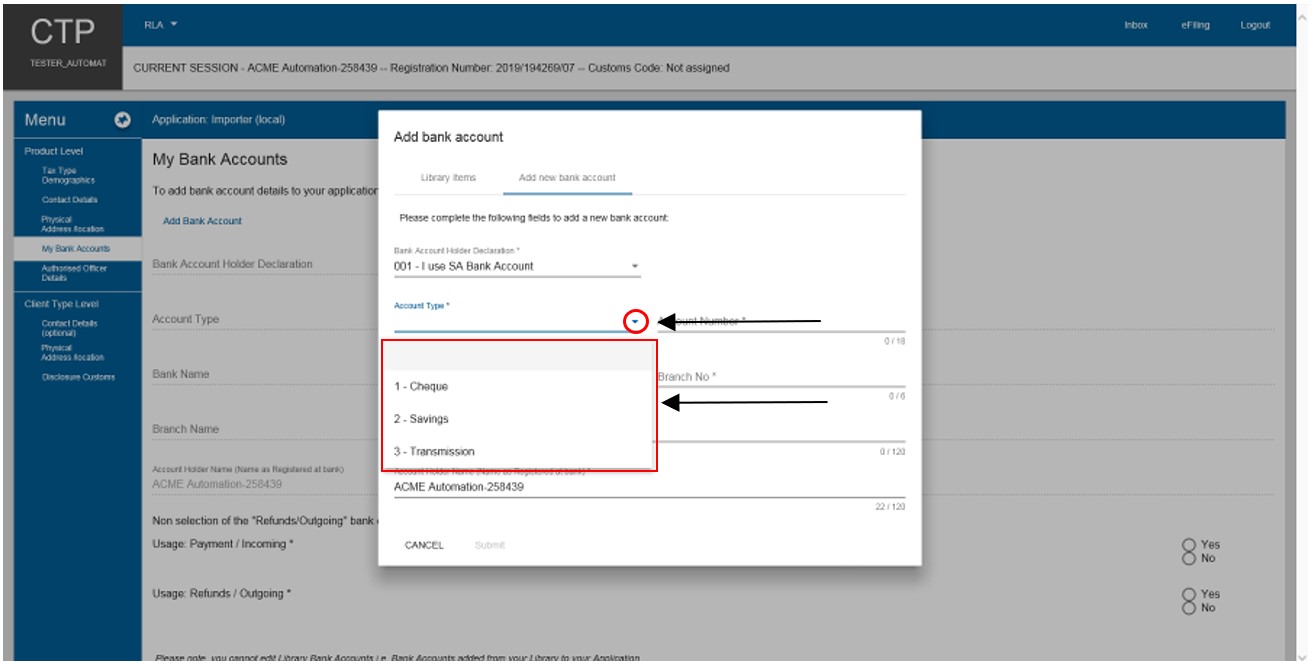
- Account type – The user clicks on the Account Type dropdown arrow and selects the applicable account type.
- Account Number – The user clicks on Account number and captures the account number in the field provided under Account number.
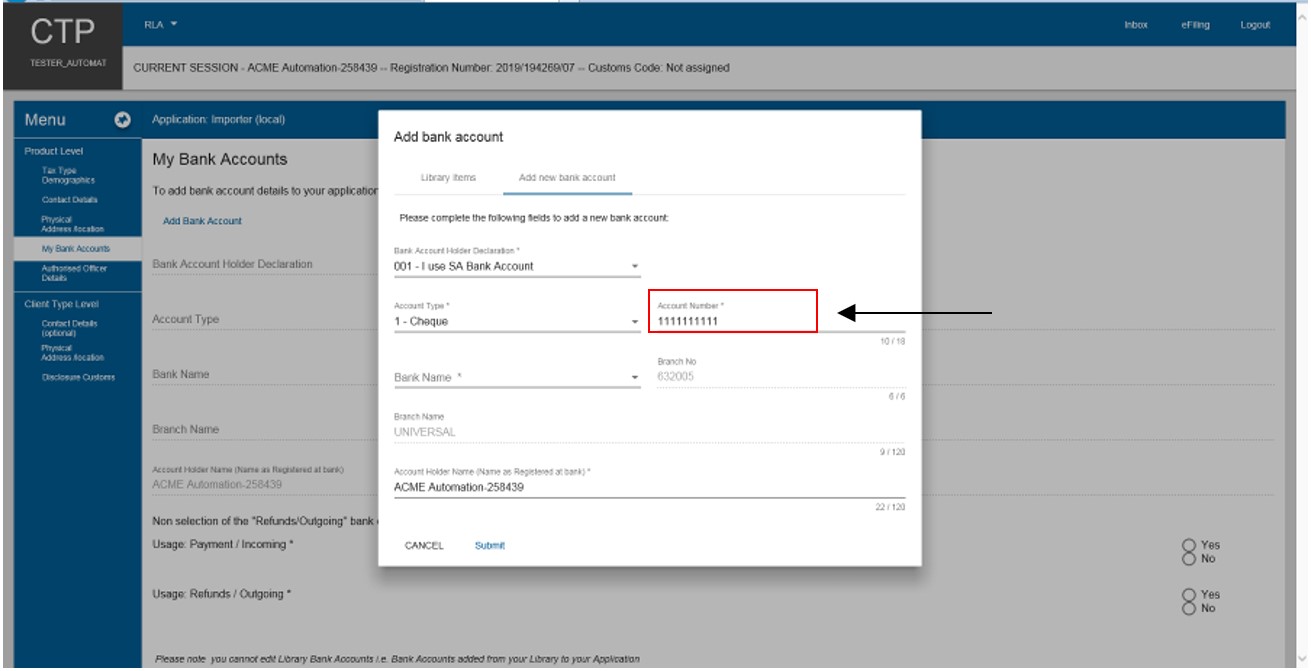
- The system populates:
- The Branch Number; and
- The Branch Name.
- The system populates the Account Holder Name field. The user clicks on:
- Cancel if any of the mandatory bank details have been incorrectly captured and recaptures the required mandatory bank account details; or
- Submit if correct.
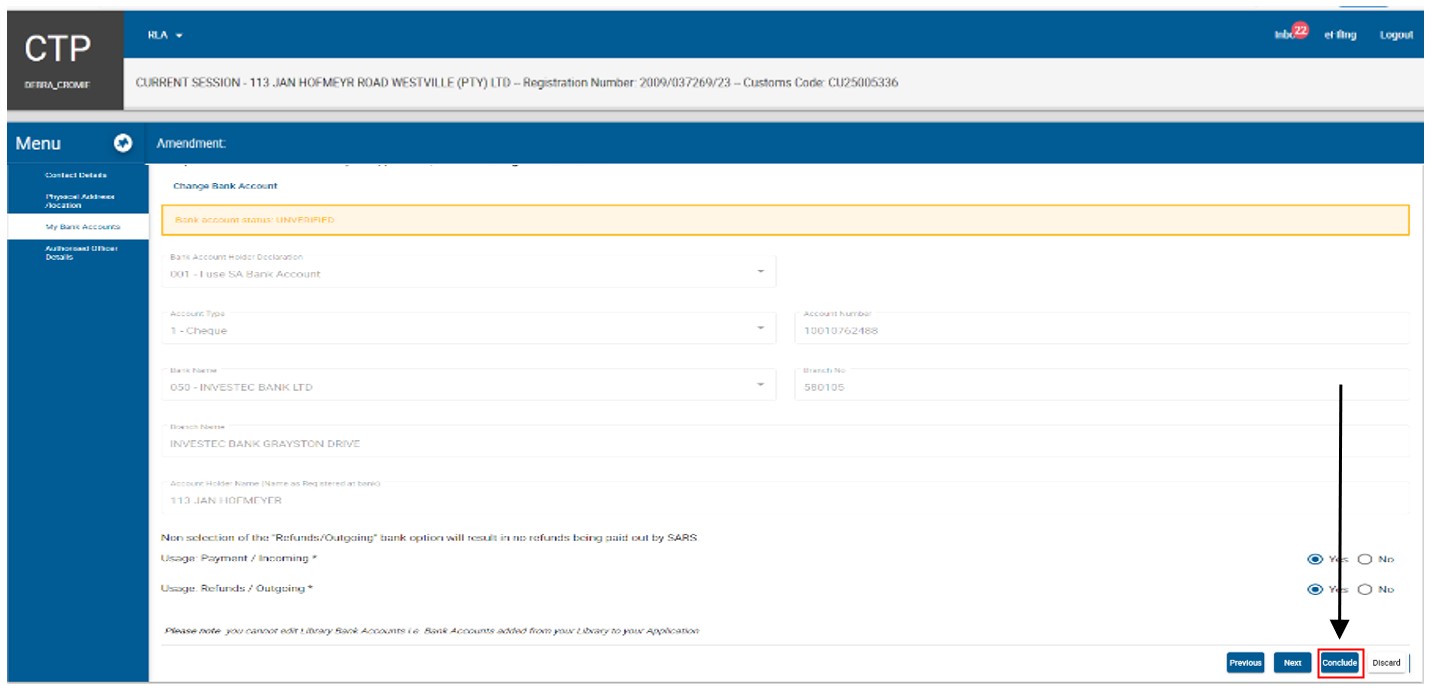
- The bank details captured by the user are automatically saved. The system returns to the main My Bank Accounts page and displays a message that the bank account status is unverified. The user is required to upload the required bank account documents for validation purposes, refer to Uploading of Required Supporting Documents.
- If any of the bank details are incorrect, the user must select the option Change Bank Account and recapture the mandatory bank account details as prescribed from Bank Account Holder Declaration to Bank name paragraph above.
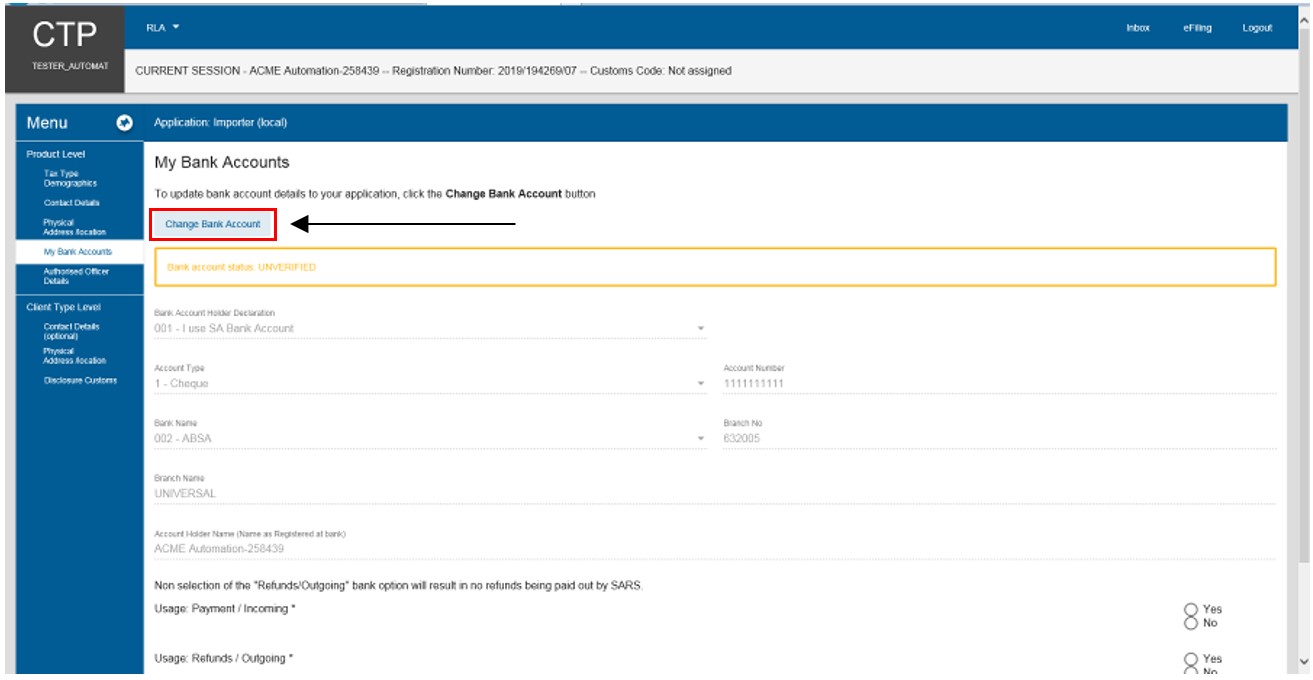
- After the user confirmed that the bank details are correctly captured:
- The user must select the radio button Yes if he/she wishes to use this bank account to:
- Make payments – Payment / Incoming; and / or
- Receive refunds – Refund / Outgoing.
- The user must select the radio button Yes if he/she wishes to use this bank account to:
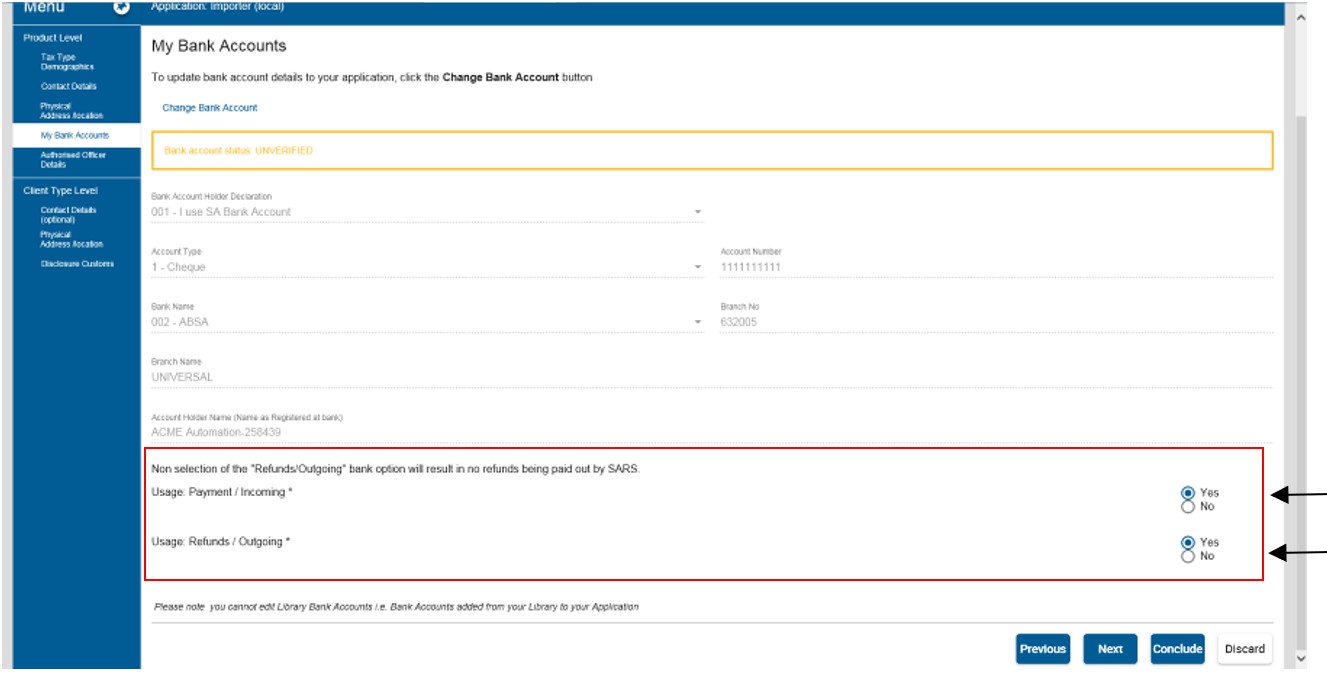
- The user clicks on:
- The Next button to progress to the Authorised Officer details under Product Level; or
- The Authorised Officer details link in the Menu; and
- The bank account details captured by the user are automatically saved.
- The user clicks on:

- If the user clicks on the Conclude button by mistake, the system displays an error message, refer to paragraph here) below to resolve the error.
Authorised Officer Details (mandatory if a company)
The following details authorised officer details must be captured, see Rule 59A.01.
- Name of authorised officer;
- ID type and number;
- Designation of capacity;
- Citizenship;
- The authorised officer’s contact details, see the process prescribed in Contact details.
- The authorised officer’s physical address, see the process prescribed in Physical Adress /Location

- The user clicks on the:
- Next button to progress to the Client Type level.
- Conclude button by mistake, the system displays an error message, refer to paragraph here) below to resolve the error.
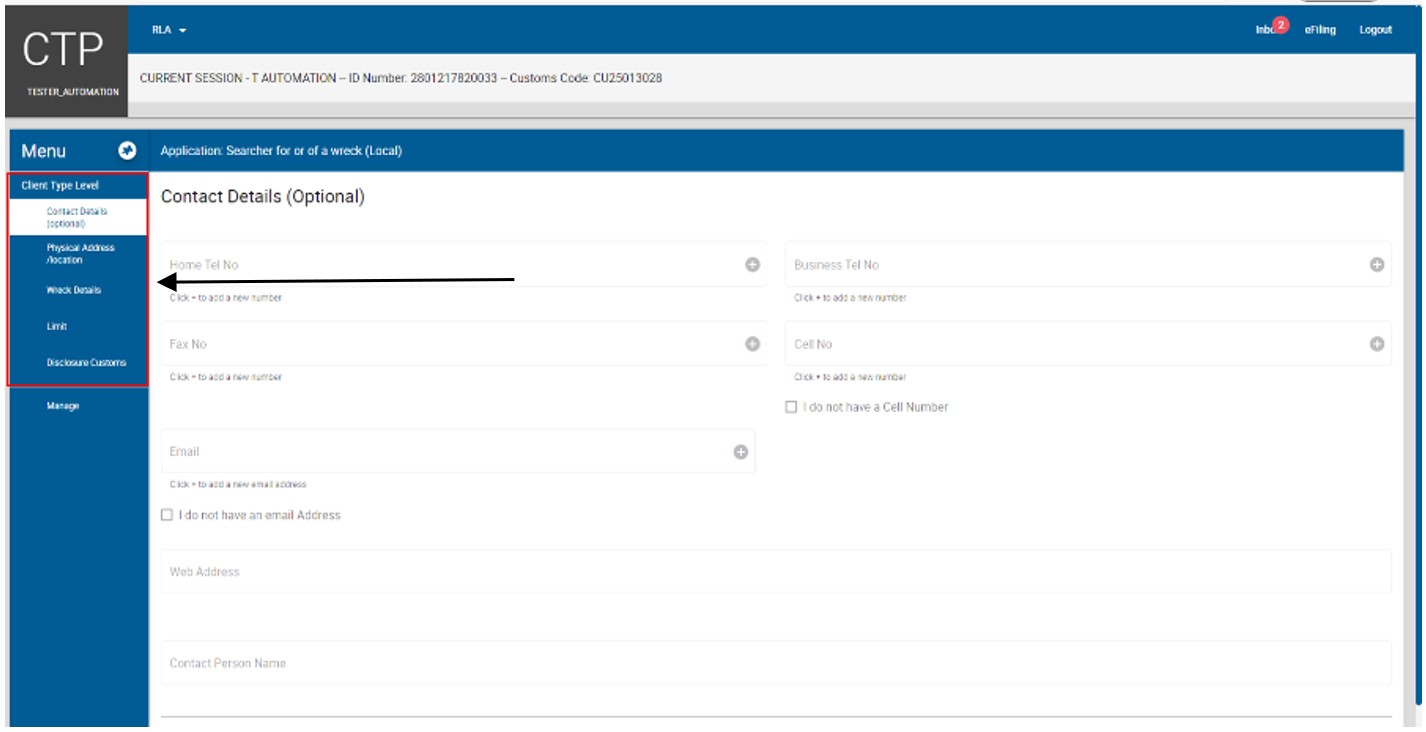
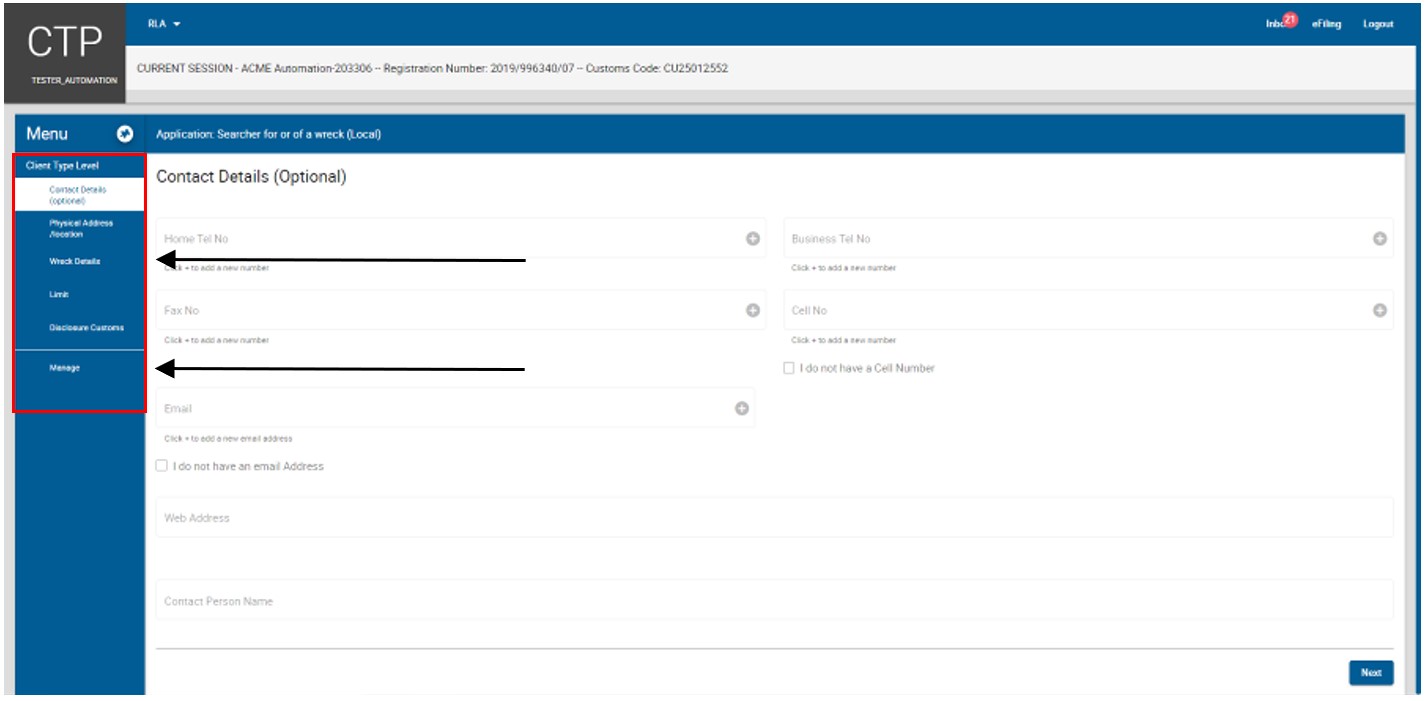
- The client type level contact details are optional except for cell phone number, email address or contact person.
- If the cell phone number, email address or the contact person of the client type is different from the product level, the user must capture the new details as described in Contact details above.
- In order to add the applicant’s physical address / location, the user follows the process prescribed in Physical Adress/Location above.
- After the user captured the physical address / location he/she must answer the following questions:
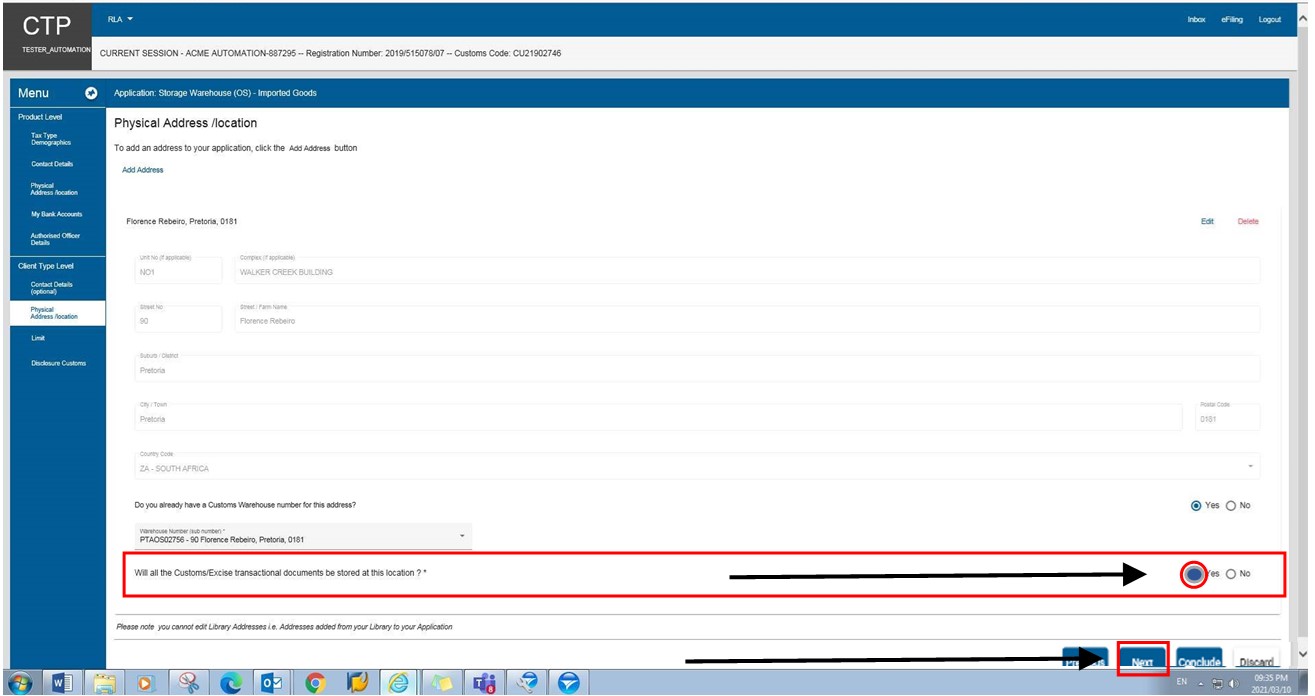
- In the case of a warehouse client: Do you already have a Customs Warehouse number for this address?
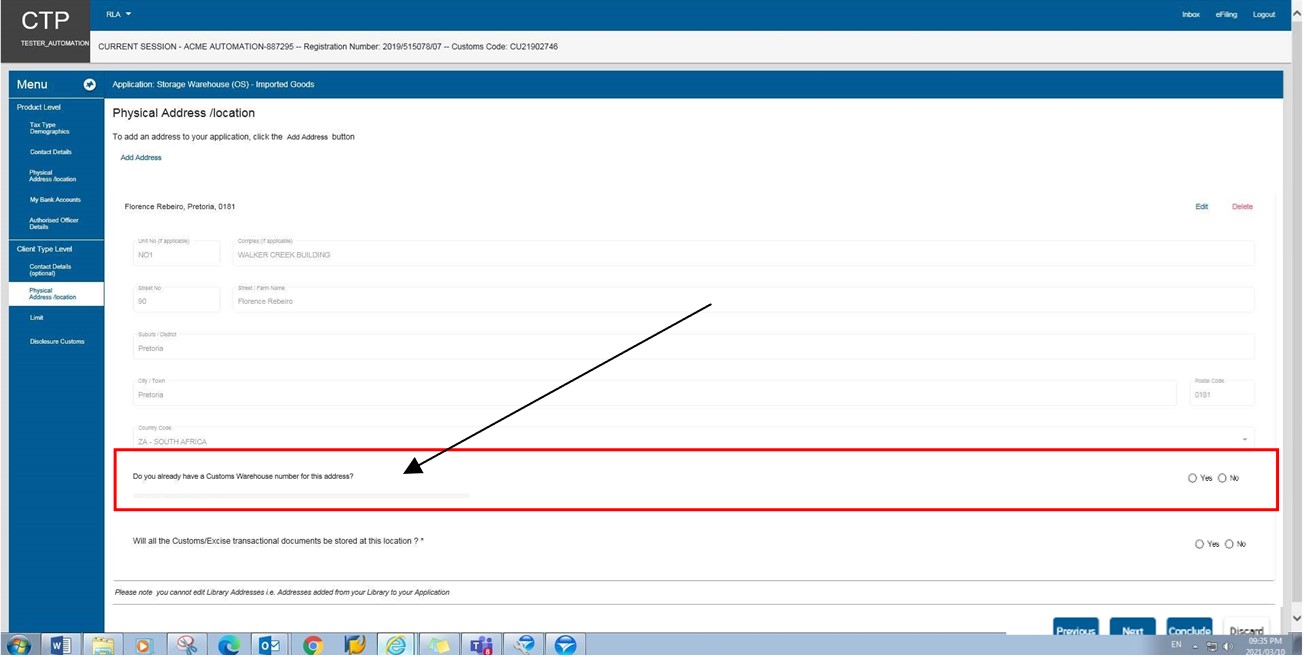
- The user clicks on the appropriate radio button.
- If No is selected the system displays a message that the warehouse number will be allocated on approval.
- If Yes is selected:
- The system displays the Warehouse Number (sub number) dropdown box.
- The user clicks on the dropdown arrow.
- The system displays a list of all the warehouse(s) already licensed by the applicant. If the applicant does not have any warehouse licensed in his/her name, no details of the licensed warehouse will be displayed in the dropdown list.
- The user clicks on the applicable licensed warehouse in order to select it.
- Will all the Customs/Excise transactional documents be stored at this location?
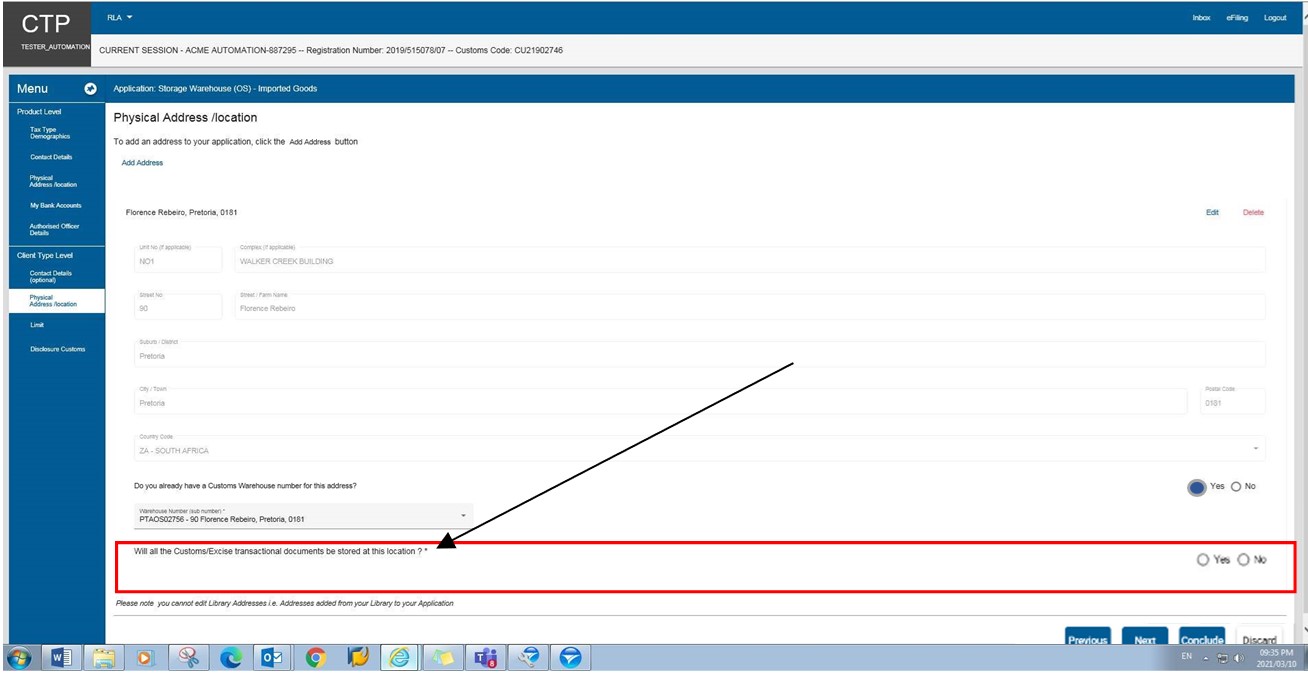
- The user clicks on the appropriate radio button.
- If Yes, the user clicks on the Next button to progress to the next field or clicks on the link in the RLA Menu.
- If No:
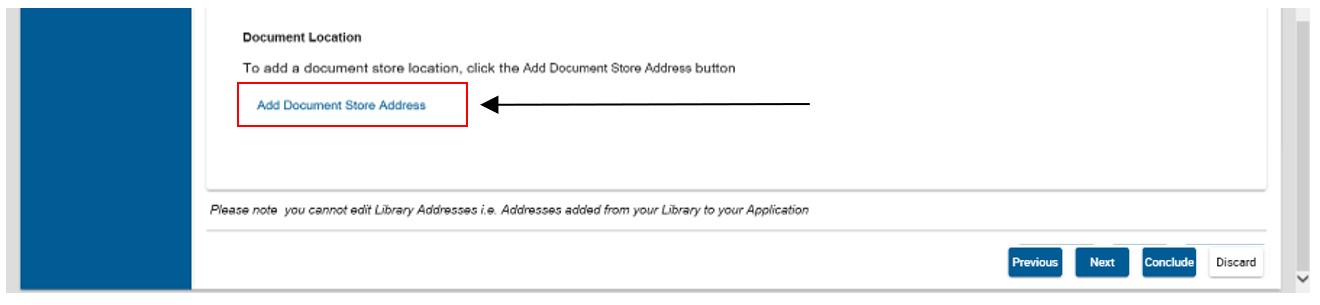
- The system displays the option Add Documents Store Address.
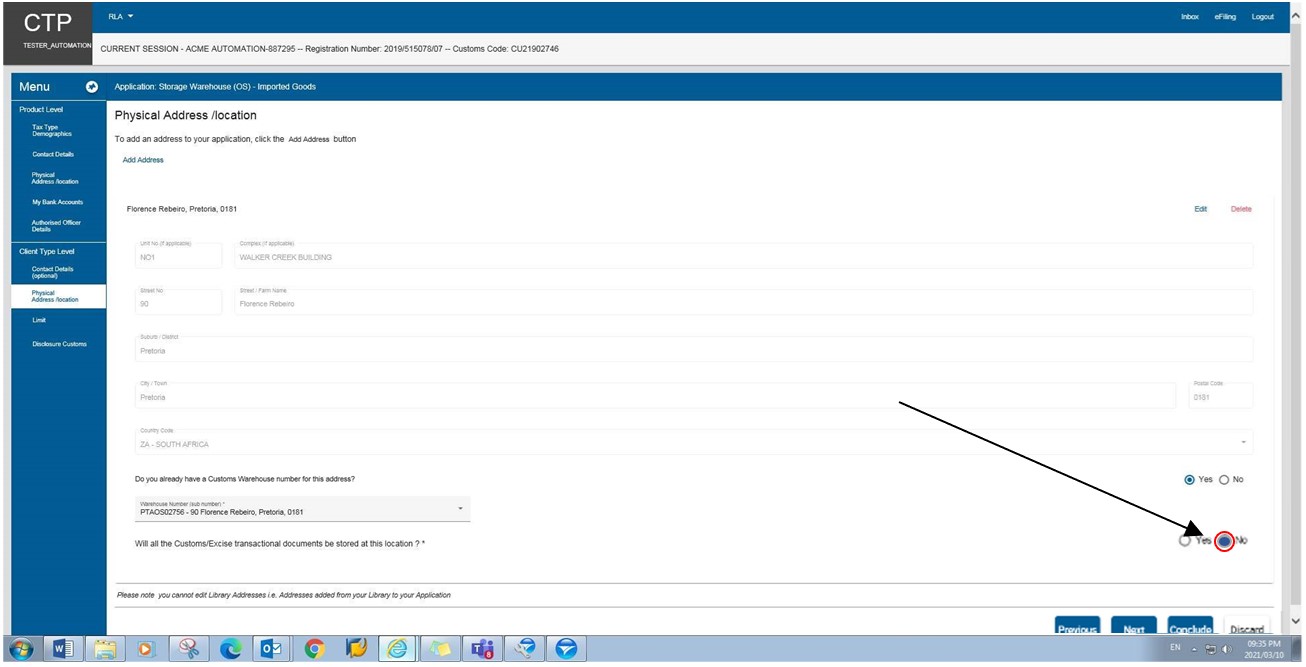
- The user clicks on Add Documents store Address and captures the physical address / location as described in physical address / location above.
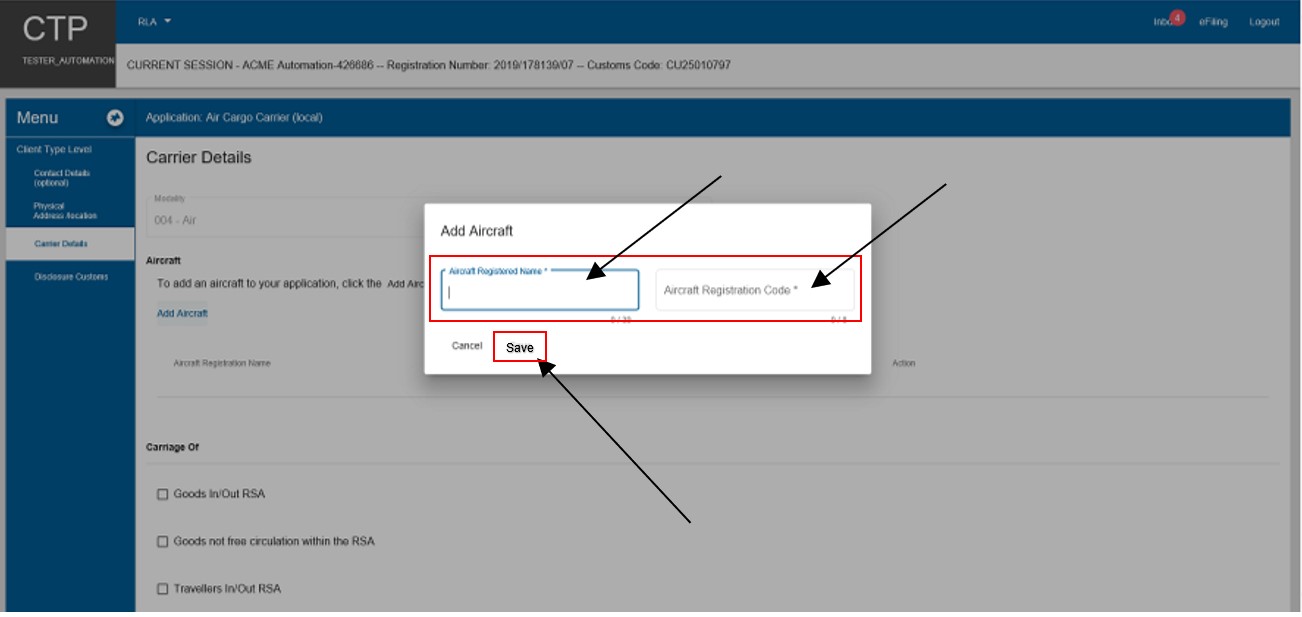
Carrier details
- This field must be completed by users required to register for the submission of cargo reports in terms of Section 8 and described in paragraph 2.1 e) of SC-CF-19.
- Air cargo carriers
- The user clicks on Add Aircraft.
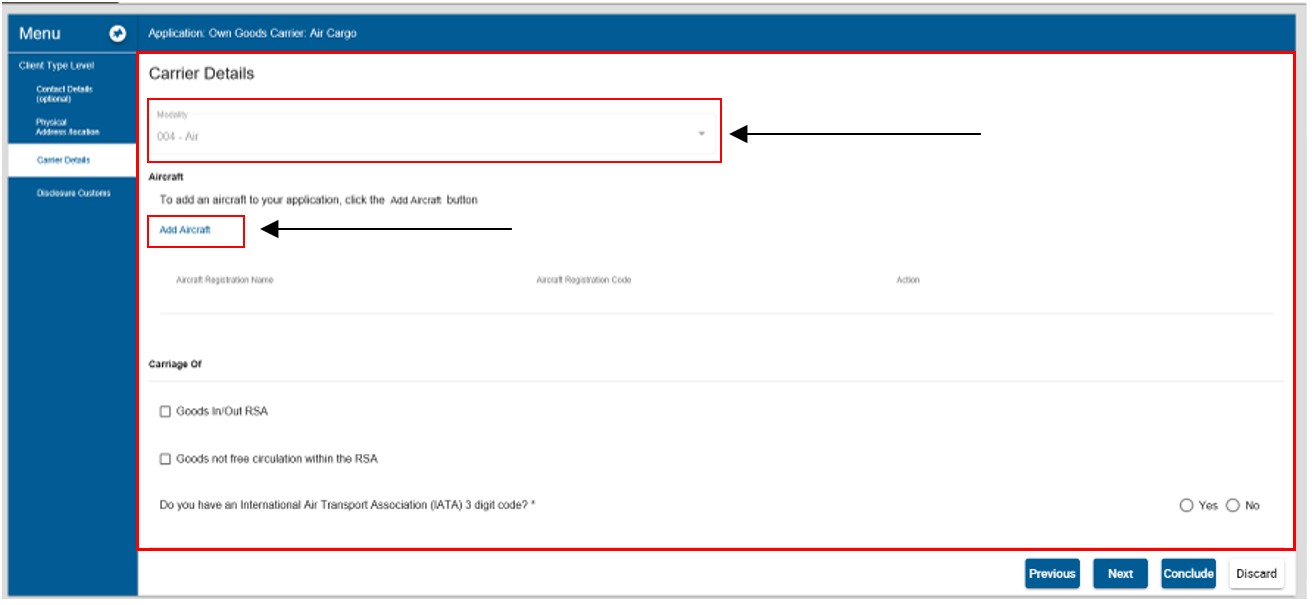
- The system displays the Add Aircraft capture window.
- The user captures the Aircraft Registration Name and the Aircraft Registration Code.
- The user clicks on Save
- If the aircraft details are:
- Incorrectly captured, the user must select delete under active in order to recapture the aircraft details.
- Correctly captured the user must indicate whether he/she will be carrying:
- Goods in/out of South Africa;
- Goods not in free circulation within South Africa; and / or
- Travellers in/out of South Africa. This option will not be displayed if the applicant applies for own goods carried via air.
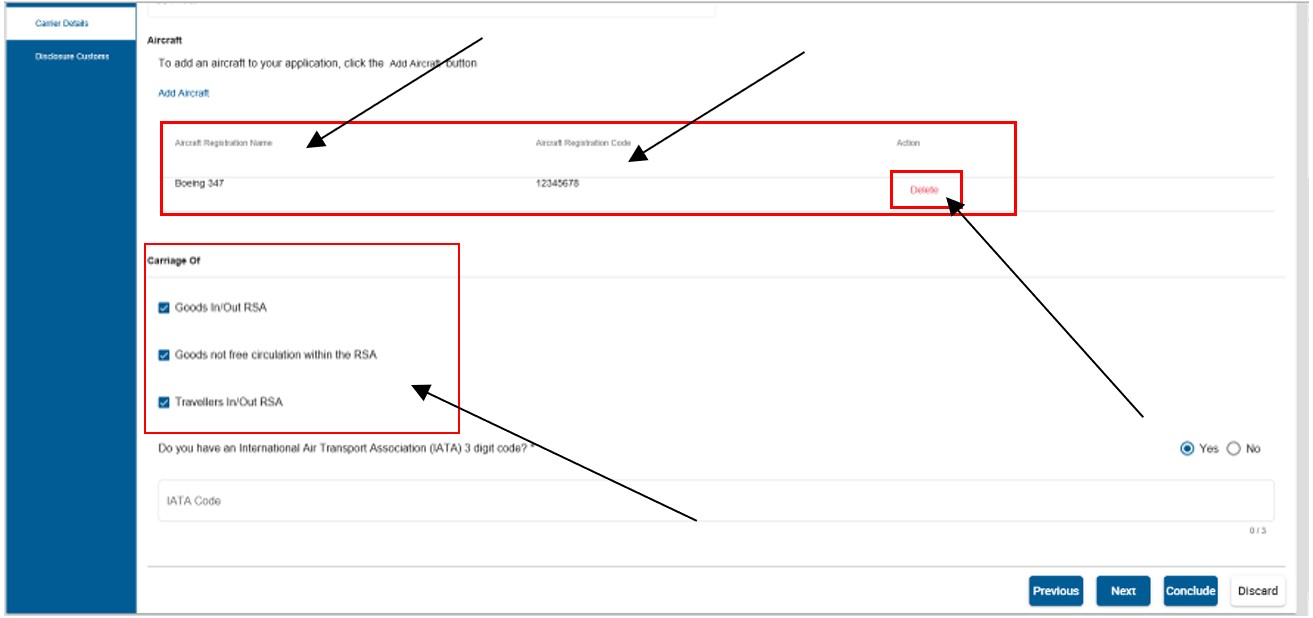
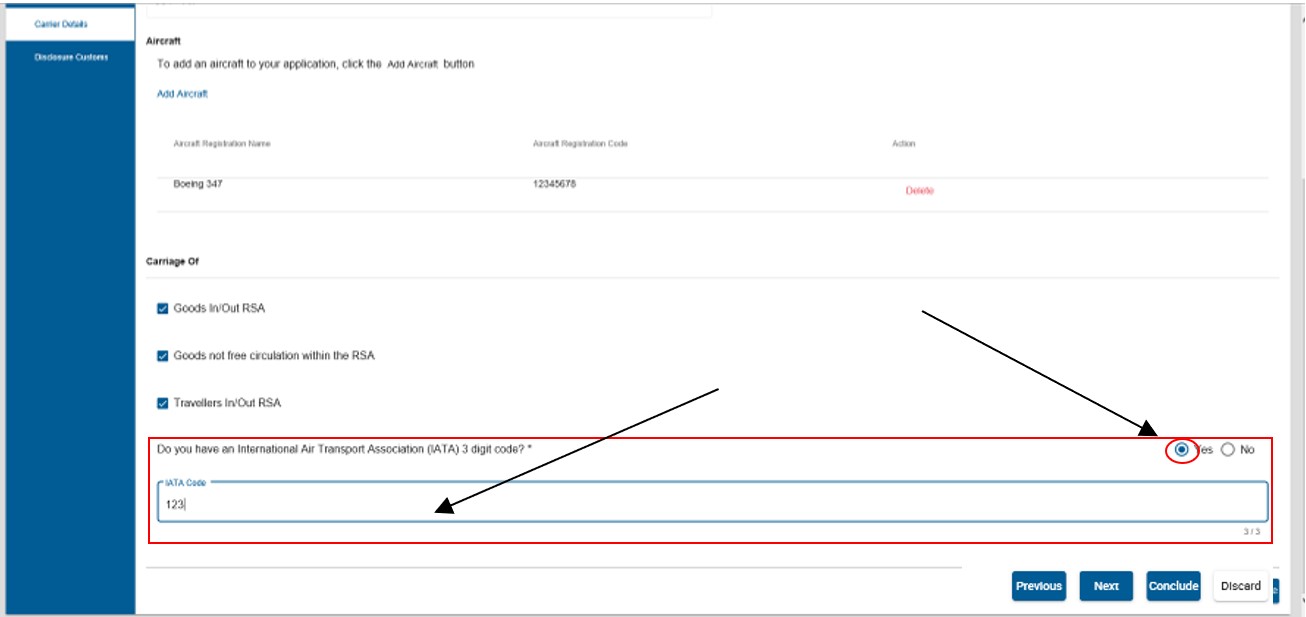
- The user must indicate if he/she has an International Air Transport Association (IATA) code by selecting the correct radio button:
- If Yes:
- The user captures the 3 digit IATA code.
- The same IATA code may be used for multiple registered aircrafts link to one (1) air carrier.
- The system validates the IATA code captured to ensure it is not linked to another active air carrier.
- The application will be rejected, if the IATA code is already being used by another active air carrier.
- If the system cannot find the IATA code captured, the user must upload the Registration of Cargo Carrier Code document as an additional supporting document as prescribed in Uploading of Required Supporting Document(s)
- If Yes:
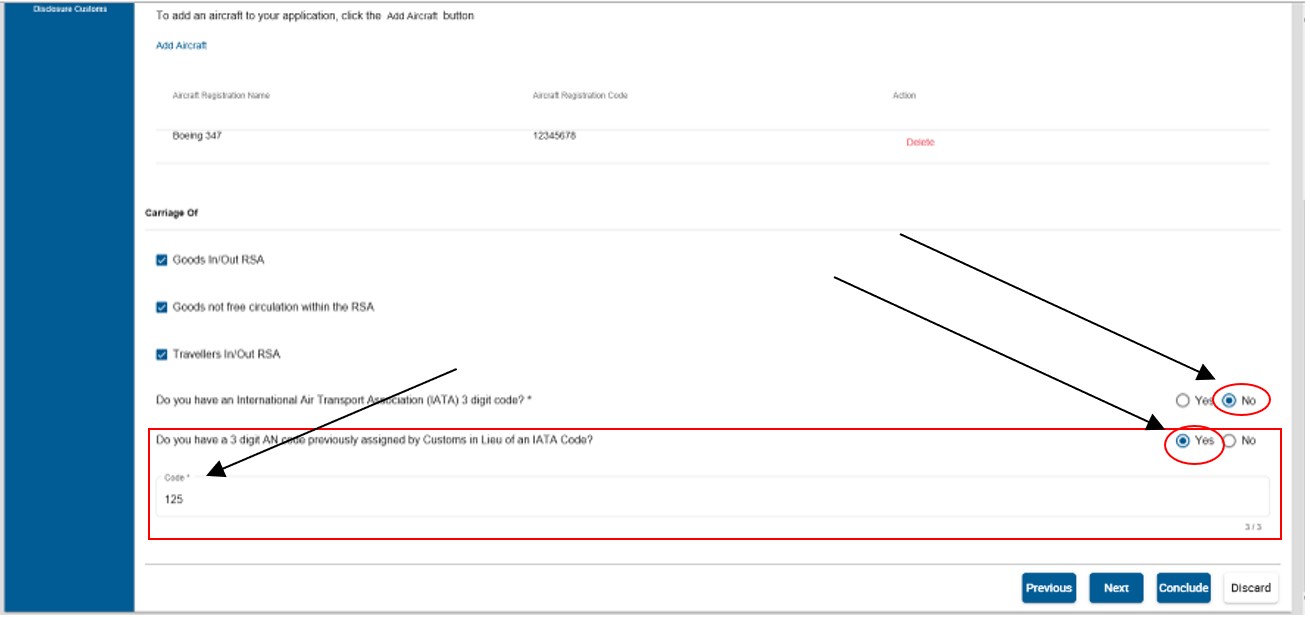
- If No, the user must indicate on the radio button whether a three (3) digit AN code was previously assigned by Customs in lieu of an IATA code:
- If Yes, the user must capture the assigned AN code. The system validates the AN code captured to ensure it is not linked to another active air carrier. The application will be rejected, if already being used by another active air carrier.
- If No, the user will be required to upload the Registration of Cargo Carrier Code document as an additional supporting document as prescribed in Uploading of Required Supporting Document(s).
- If No, the user must indicate on the radio button whether a three (3) digit AN code was previously assigned by Customs in lieu of an IATA code:
- The user clicks on the Next button and continues with the process prescribed in Disclosure Customs Questionnaire.
- Rail cargo carriers
- The user must indicate whether he/she will be carrying:
- Goods in/out of South Africa;
- Goods not in free circulation within South Africa; and / or
- Travellers in/out of South Africa. This option will not display if the user applies for own goods carried via rail.
- The user must indicate whether he/she will be carrying:
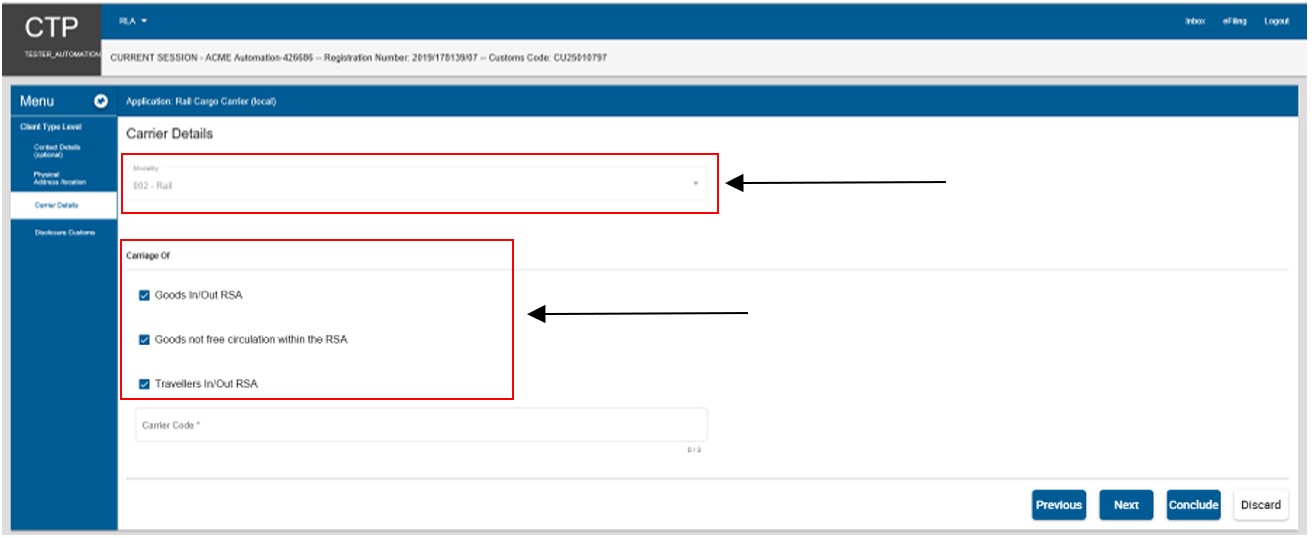
- The user captures the rail carrier code.
- The system validates the rail carrier code captured to ensure it is not linked to another active rail carrier.
- If the system cannot find the rail carrier code, the user must upload the Registration of Cargo Carrier Code document as an additional supporting document as prescribed in Uploading of Required Supporting Document(s).
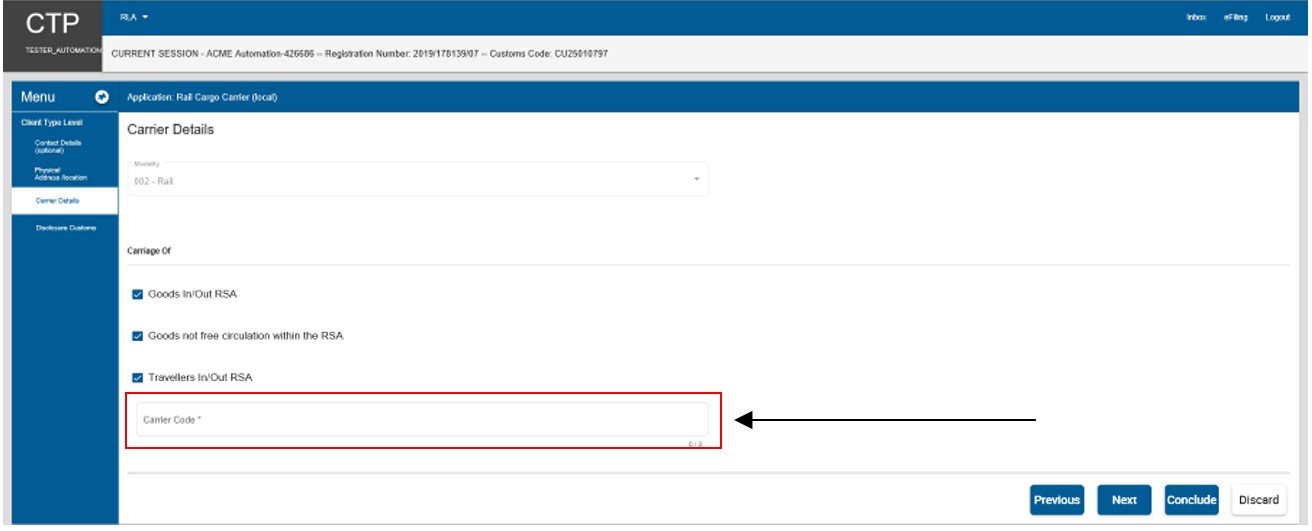
- The user clicks on the Next button and continues with the process prescribed in Disclosure Customs Questionnaire
- Road carriers – The user must indicate whether he/she will be carrying:
- Goods in/out of South Africa;
- Goods not in free circulation within South Africa; and / or
- Travellers in/out of South Africa. This option will not display if the user applies for own goods carried via road.
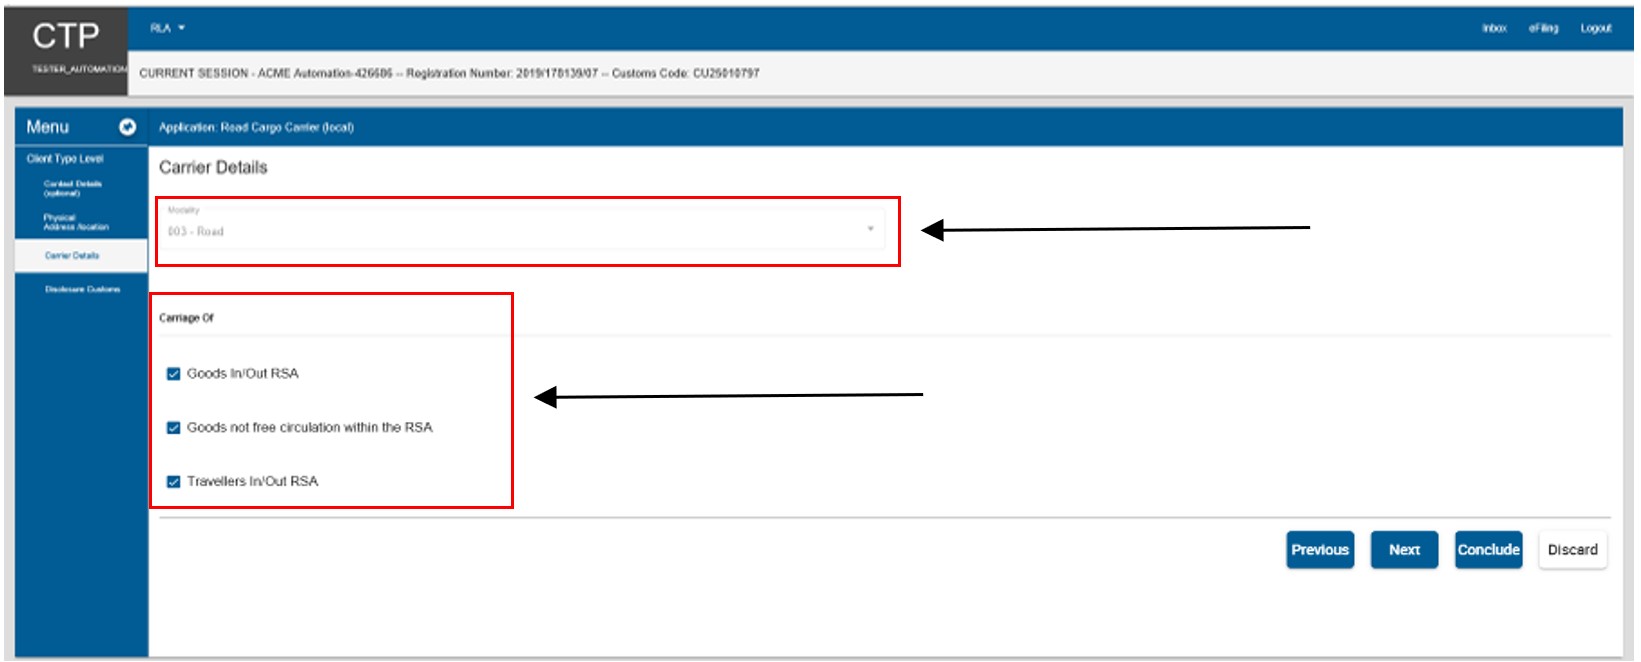
- The user clicks on the Next button and continues with the process prescribed in Disclosure Customs Questionnaire.
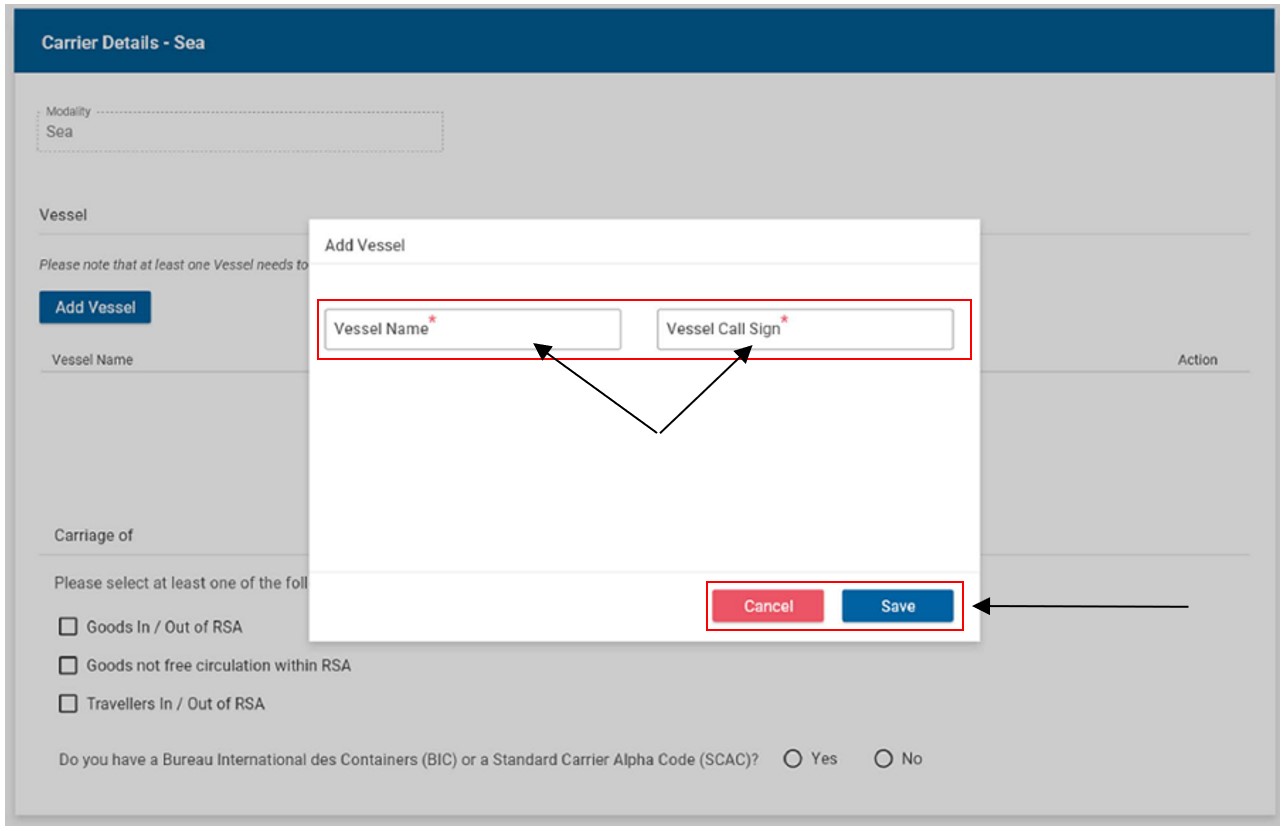
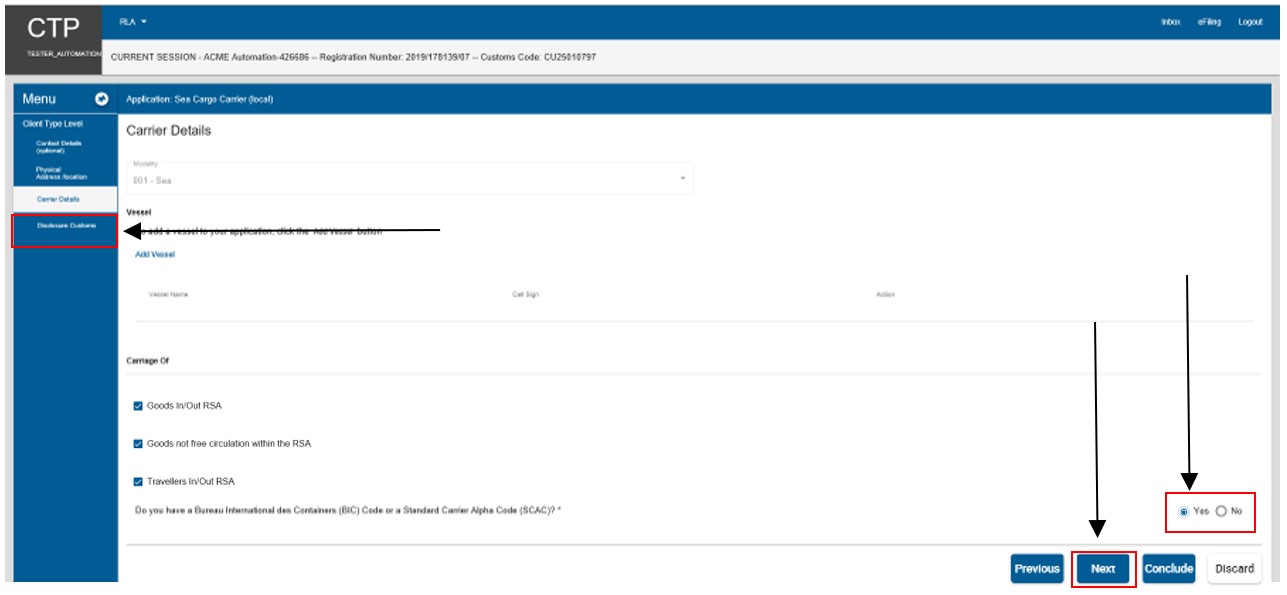
- Sea carriers
- The user clicks on Add Vessel.
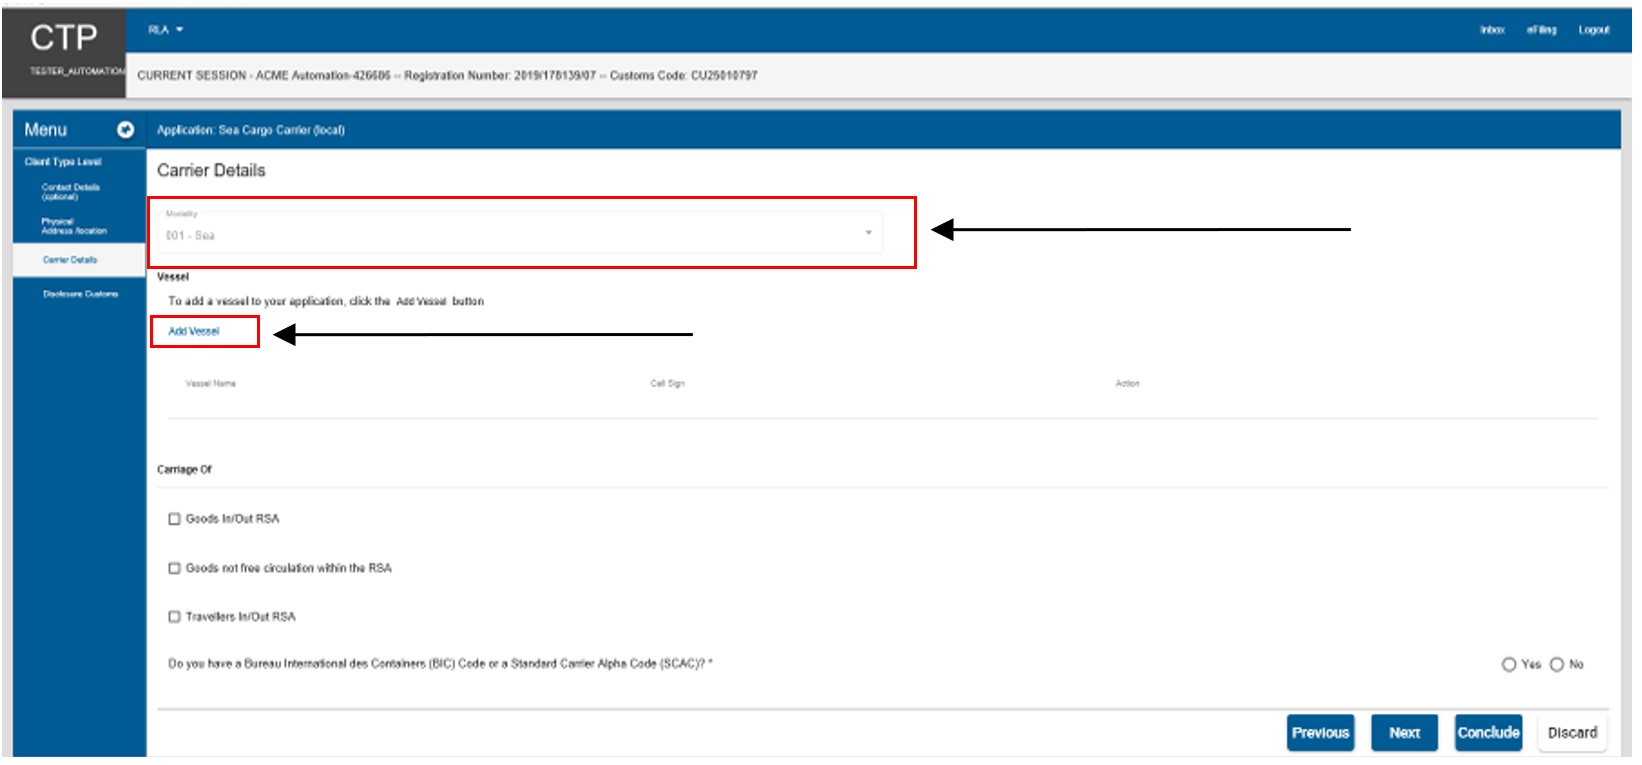
- The system displays the Add Vessel capture window.
- The user captures the Vessel Name and Vessel Call sign. If:
- Correct, the user clicks on Save.
- Incorrect, the user clicks on Cancel and recaptures the required details.
- The user must indicate whether he/she will be carrying:
- Goods in/out of South Africa;
- Goods not in free circulation within South Africa; and / or
- Travellers in/out of South Africa. This option will not display if the user applies for own goods carried via sea.
- The user must indicate whether he/she will be carrying:
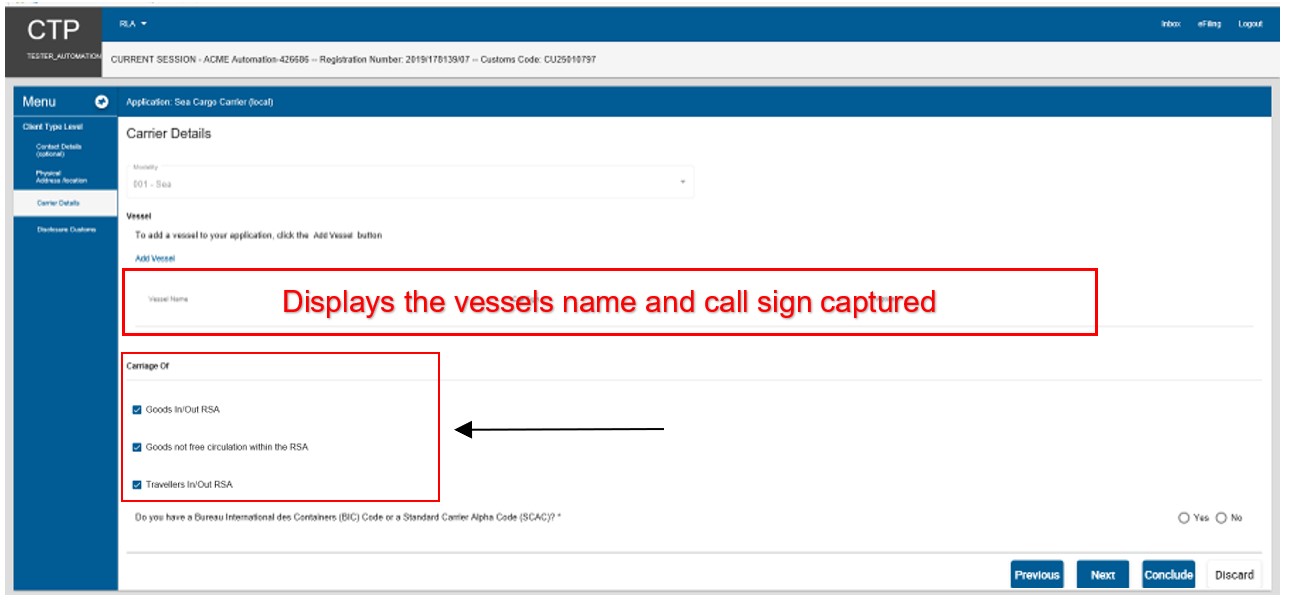
- The user must indicate if he/she has a Bureau International des Containers (BIC) code and / or a Standard Carrier Alpha Code (SCAC) by selecting the correct radio button:
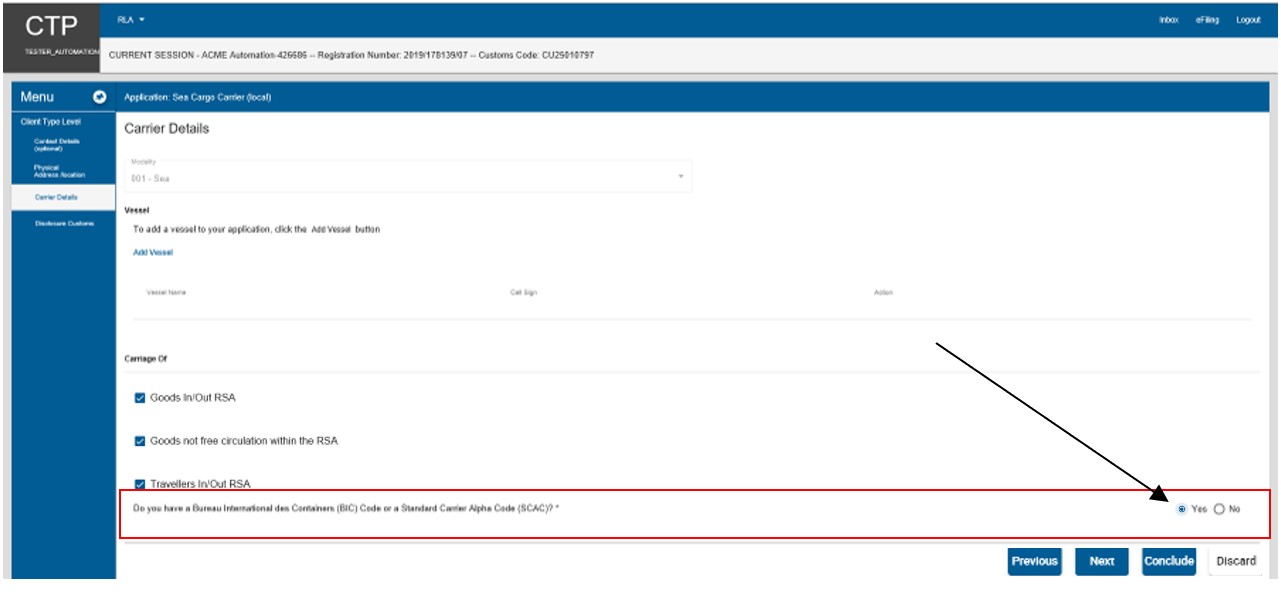
- If Yes:
- The user captures the BIC and / or SCAC code(s).
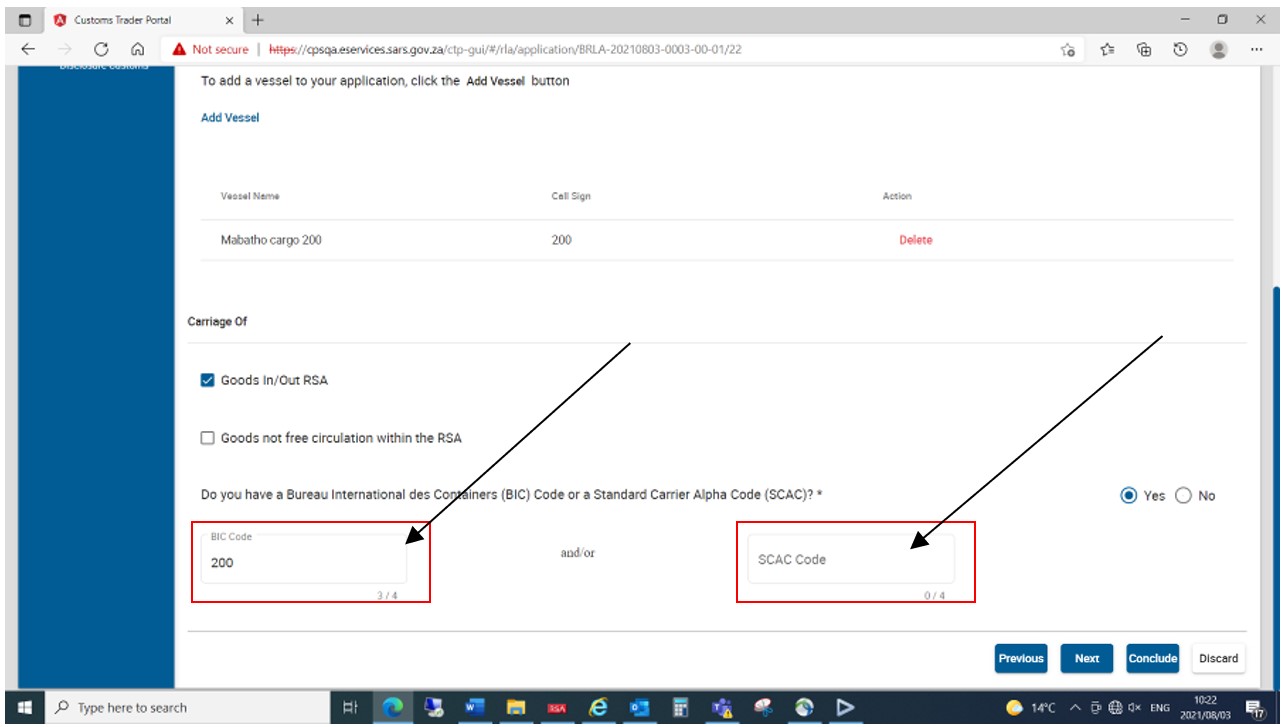
- The same BIC and / or SCAC code(s) may be used for multiple registered vessels linked to one (1) sea carrier.
- The system validates the BIC and / or SCAC code captured to ensure it is not linked to another active sea carrier.
- The application will be rejected if the BIC and / or SCAC code(s) is already being used by another active sea carrier.
- If the system cannot find the BIC and / or SCAC code(s) captured, the user must upload the Registration of Cargo Carrier Code document as an additional supporting document as prescribed in Uploading of Required Supporting Document(s).
- If the user does not have a BIC and / or SCAC code(s), a code will be assigned by SARS to the sea carrier after the application has been approved.
- The user clicks on the:
- Next button; or
- Disclosure Customs link under Menu and continue with Disclosure Customs Questionnaire below.
Terminal details
- This field must be completed by Transit Shed and Container terminal Operators required to register for the submission of cargo reports in terms of Section 8 and described in paragraph 1 e) of SC-CF-19.
- The user captures the two (2) digit facility code allocated by Customs as listed in SC-CF-19-A02 and clicks on Search. If not in possession of a facility code, the user is required to register his/her facility with Customs as prescribed in paragraph 2.3.18 (Transit shed) or 2.3.5 (Container Terminal) in SC-CF-19.

- The system populates the name of the Transit Shed or Container terminal operator as listed in SC-CF-19-A02.

- If incorrect, the user clicks on clear and returns to paragraph here)above.
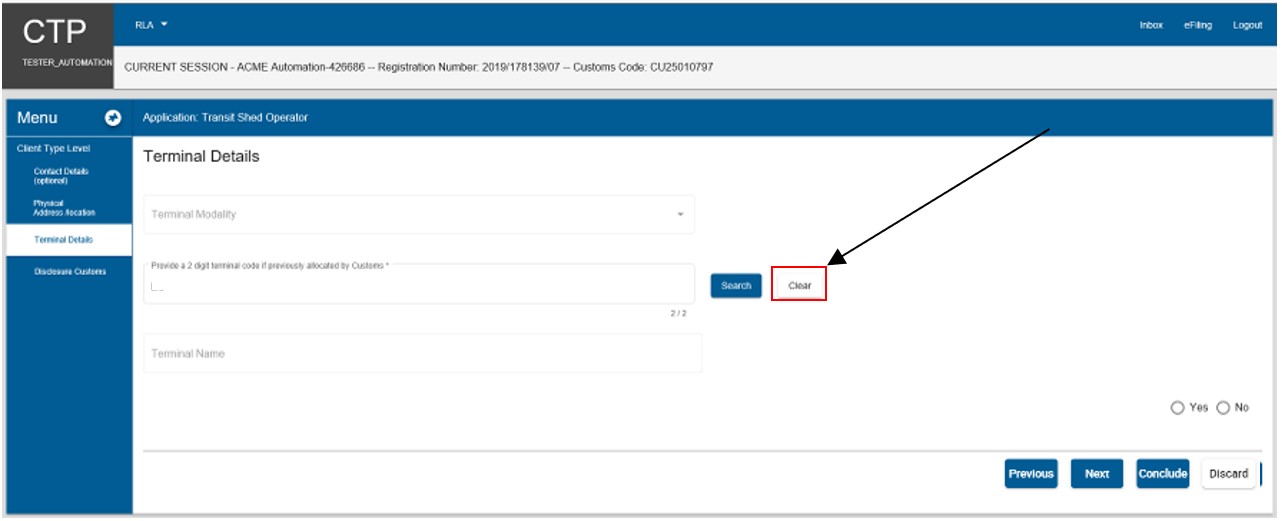
- If correct the user must progress to the next field which is Disclosure Customs (refer to Disclosure Customs Questionnaire) by clicking on the:
- Next button; or
- Disclosure Customs link under Menu and continue with the process prescribed in Disclosure Customs Questionnaire below.
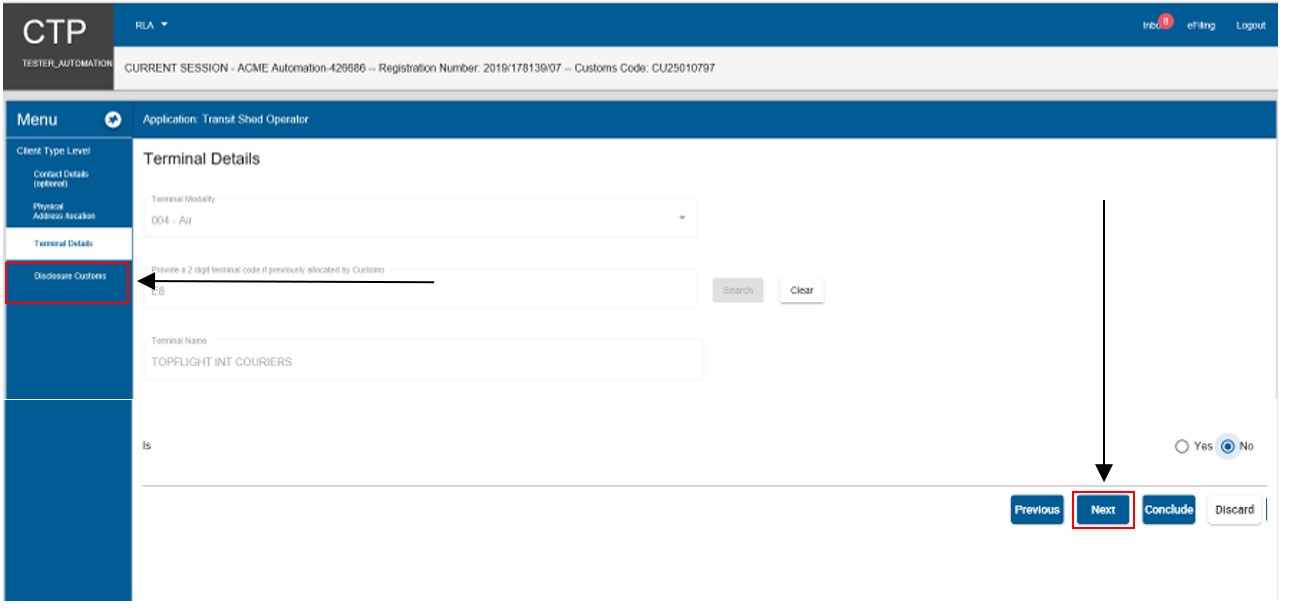
- The details captured by the user is automatically saved.
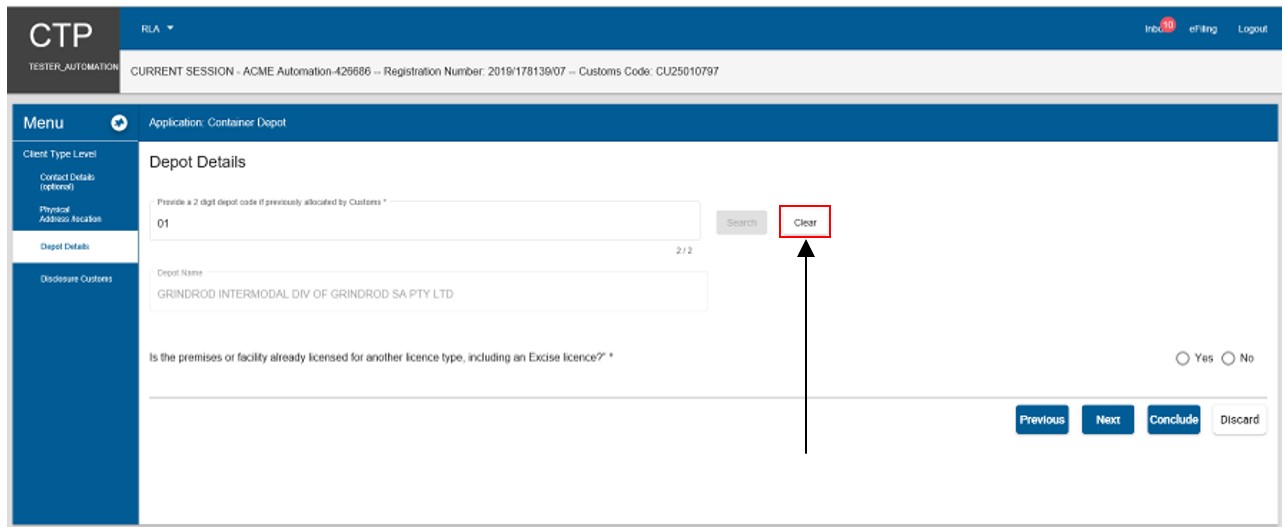
Depot details
- This field must be completed by clients required to:
- License as a:
- Container depot; or
- Degrouping depot.
- Register for the submission of cargo reports in terms of Section 8 and prescribed in paragraph 2.1 e) of SC-CF-19:
- Container depot operator;
- Degrouping depot operator; or
- Wharf operator reporter.
- License as a:
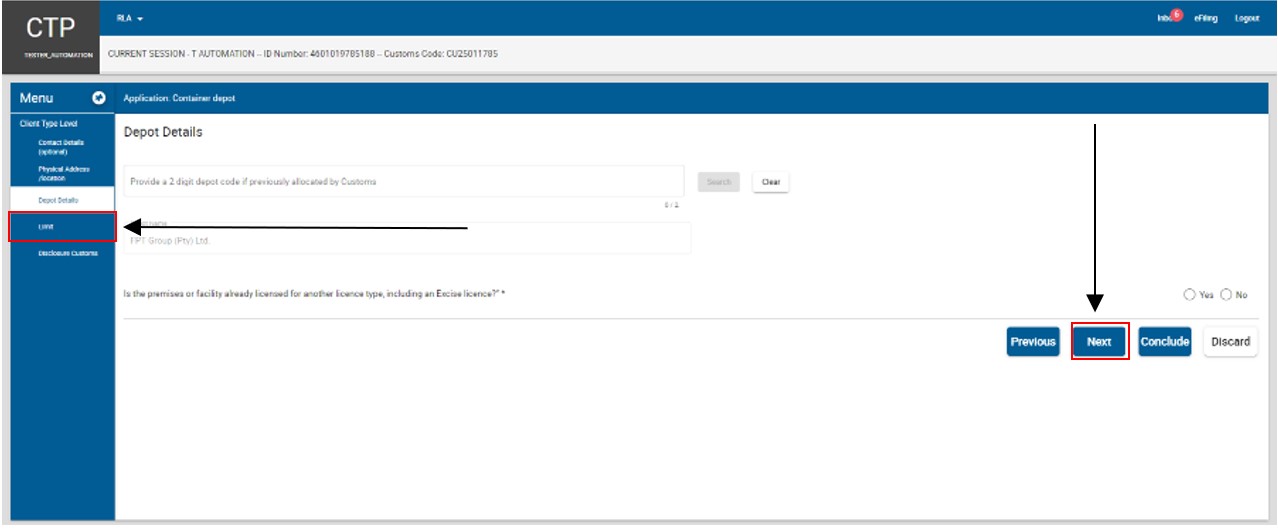
- When a depot premises mentioned in License as a) above must be licensed, the user:
- Captures the CIPC registered name in the field Depot Name; and
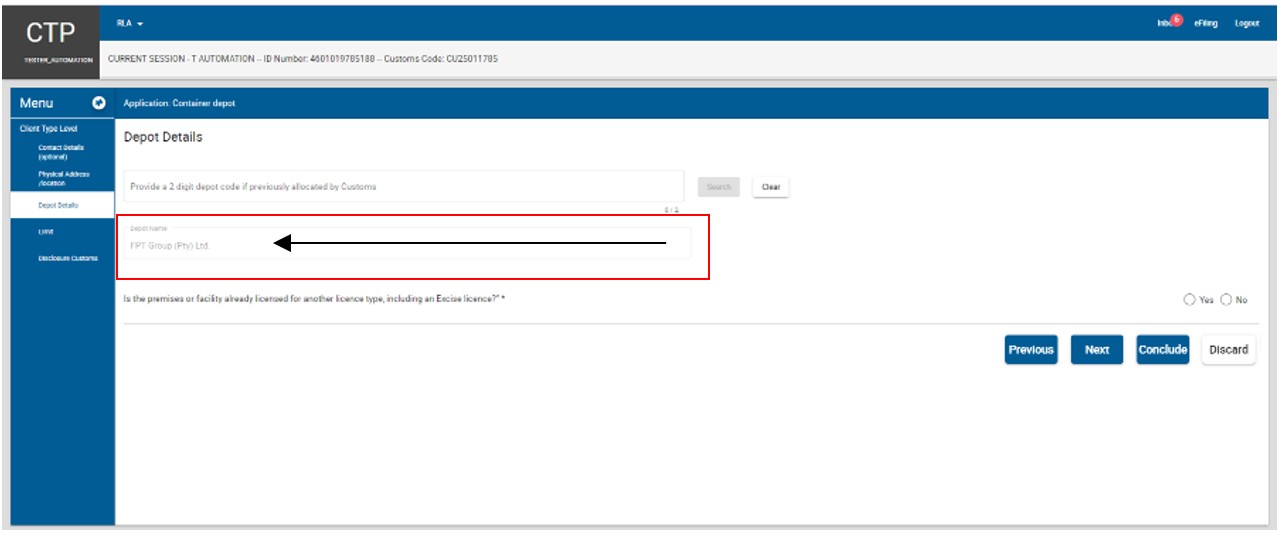
- Indicates if the premises or facility is already licensed for another Customs or Excise client type by selecting the correct radio button.
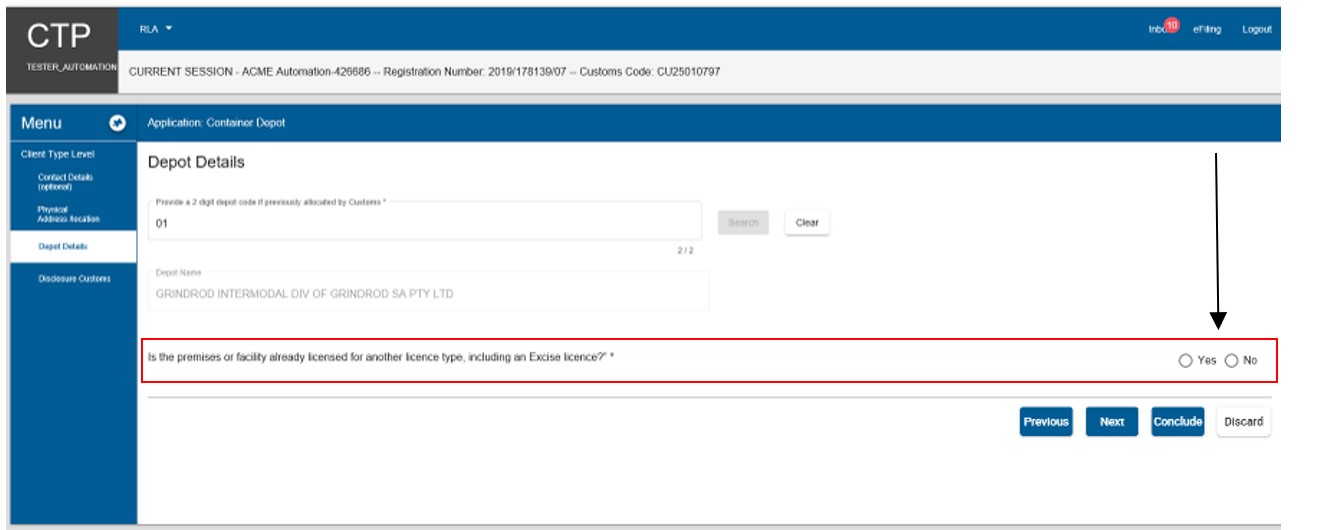
- In order to progress to the next field which is Limit (refer to Limit field), the user clicks on the:
- Next button; or
- Limit link under Menu.
- In order to progress to the next field which is Limit (refer to Limit field), the user clicks on the:
- When the user registers in terms of paragraph here above:
- The user must capture the two (2) digit facility code allocated by Customs as listed in SC-CF-19-A02 and click on Search.
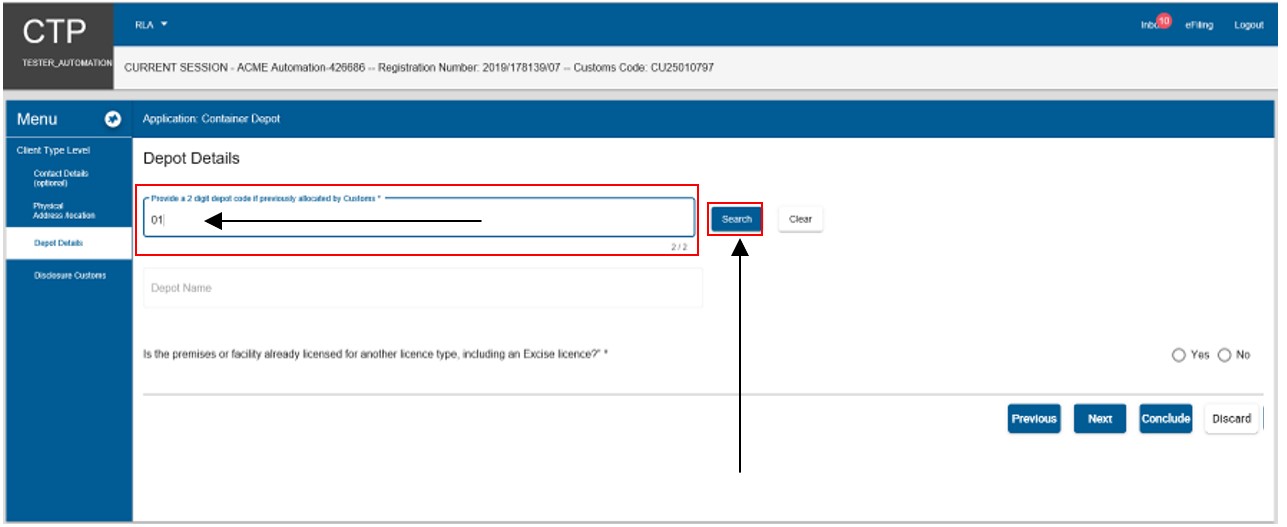
- The system populates the name of the depot operator as listed in SC-CF-19-A02.
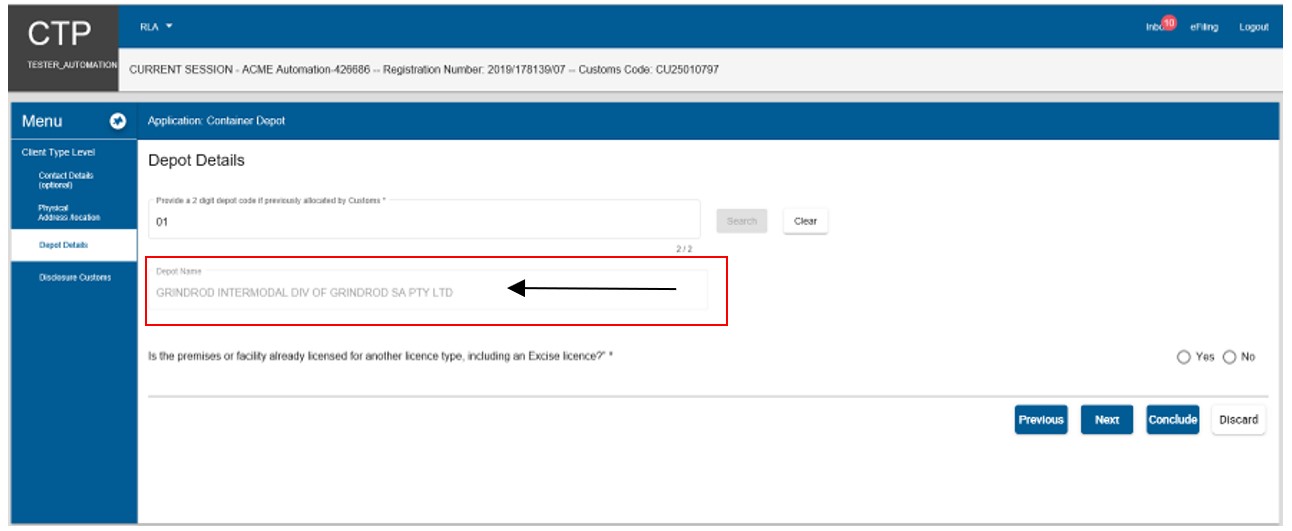
- If incorrect, the user clicks on clear and returns to paragraph here) above
- If correct the user must continue with the process prescribed paragraph Disclosure Customs Questionnaire below by progressing to the next field which is Disclosure Customs (Disclosure Customs Questionnaire) by clicking on the:
- Next button; or
- Disclosure Customs link.
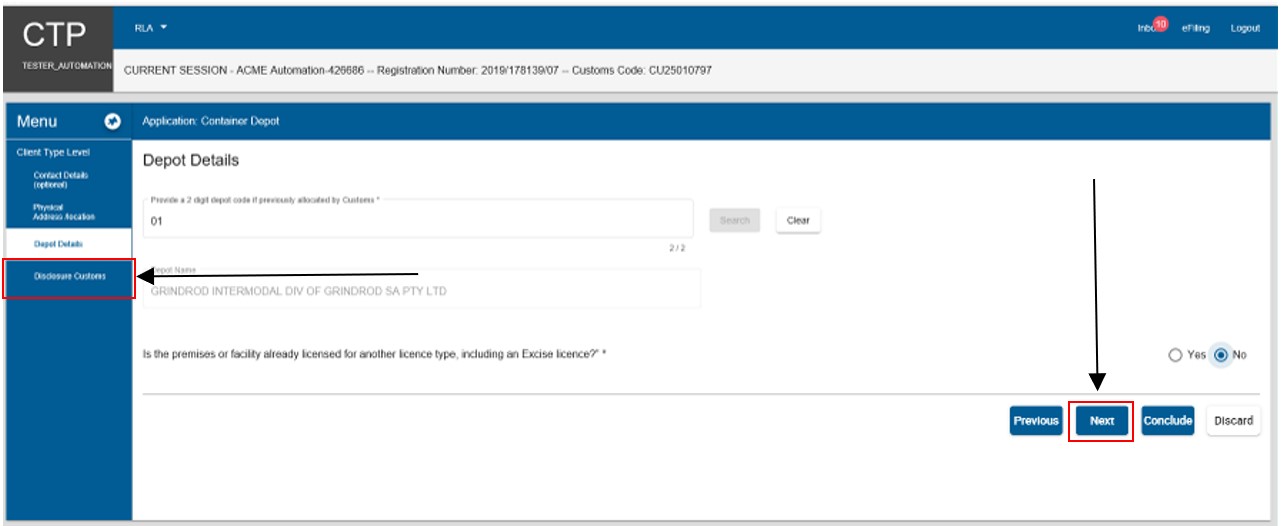
- The depot details captured by the user is automatically saved once the user clicks on the Next button or the applicable link under Menu.
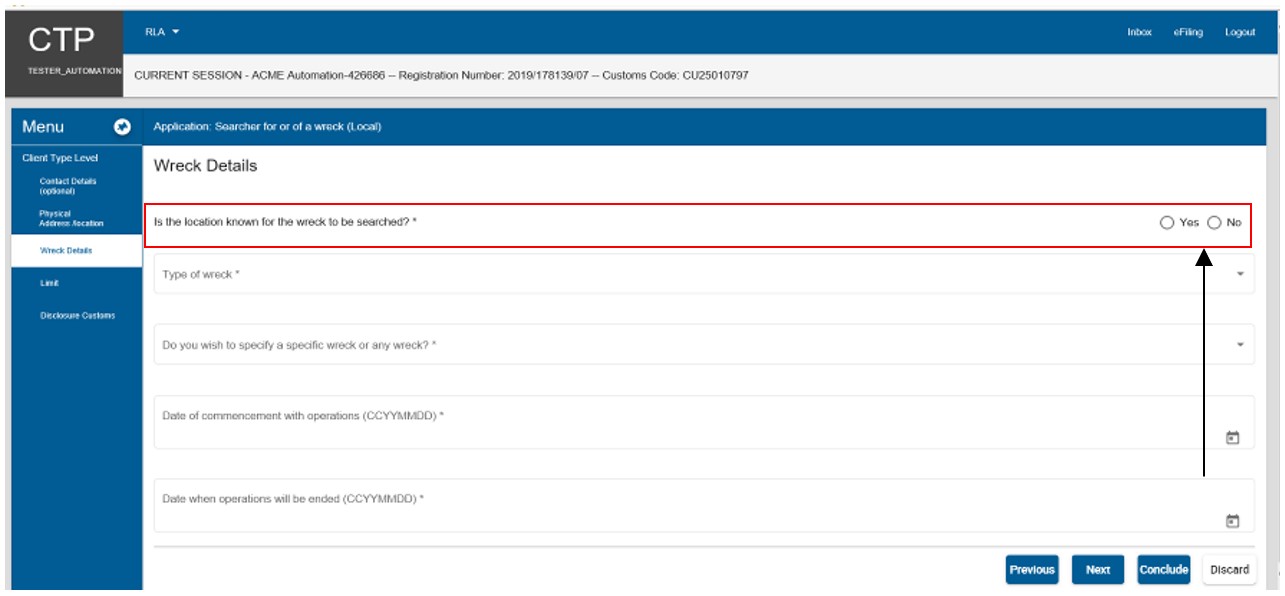
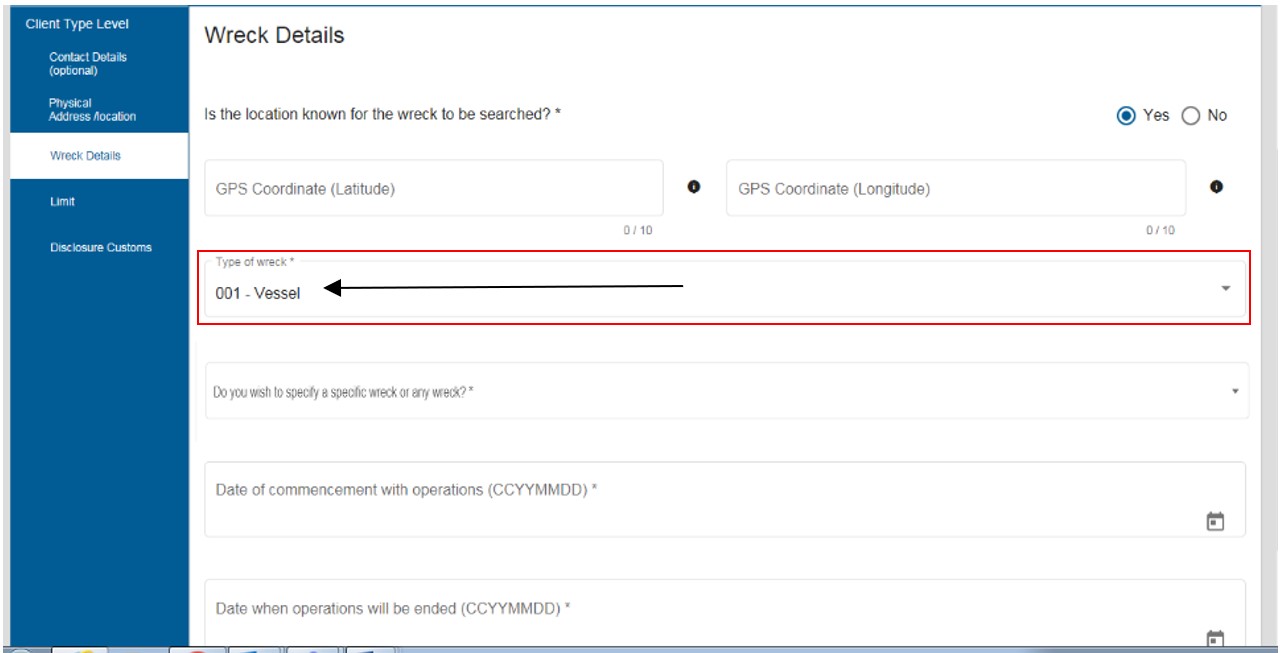
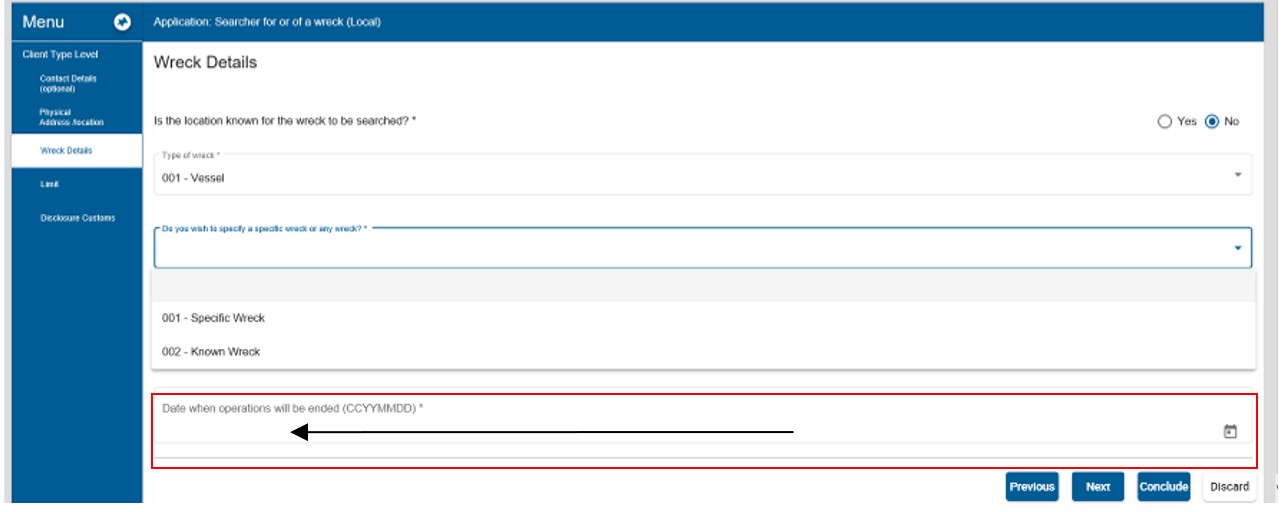
Wrecks details
- This field must be completed by persons who wish to search any abandoned wreck or search for an abandoned wreck.
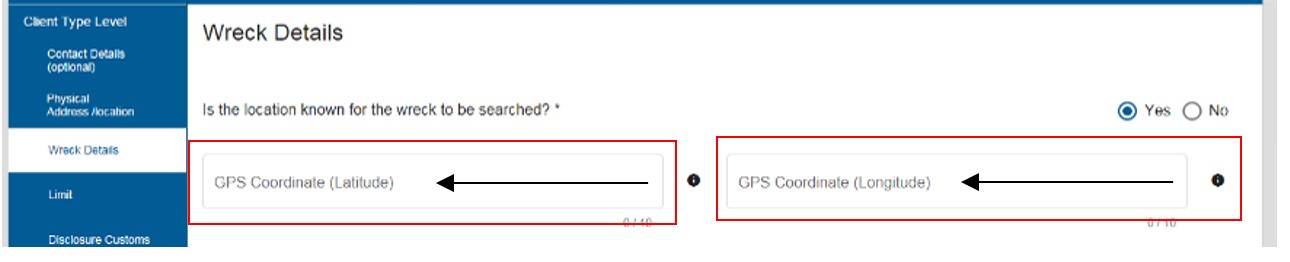
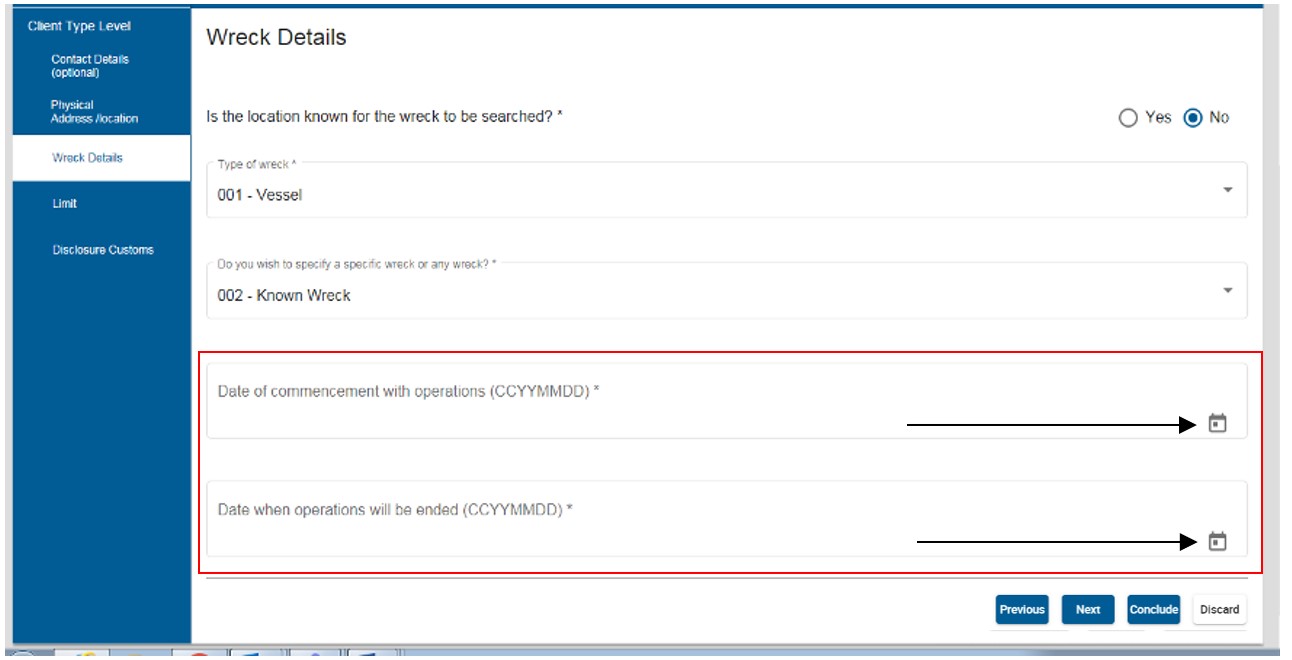
- The user must provide the location of the wreck by selecting the radio button:
- Yes, if known; or
- No, if unknown.
- If Yes, the user captures the latitude and longitude (GPS coordinates) using the following format (+/- DDD.dddd).
- The user clicks on the Type of wreck dropdown arrow.

- The system displays the types of wrecks. Only one (1) can be selected per application and the user clicks on the type of wreck to be searched.
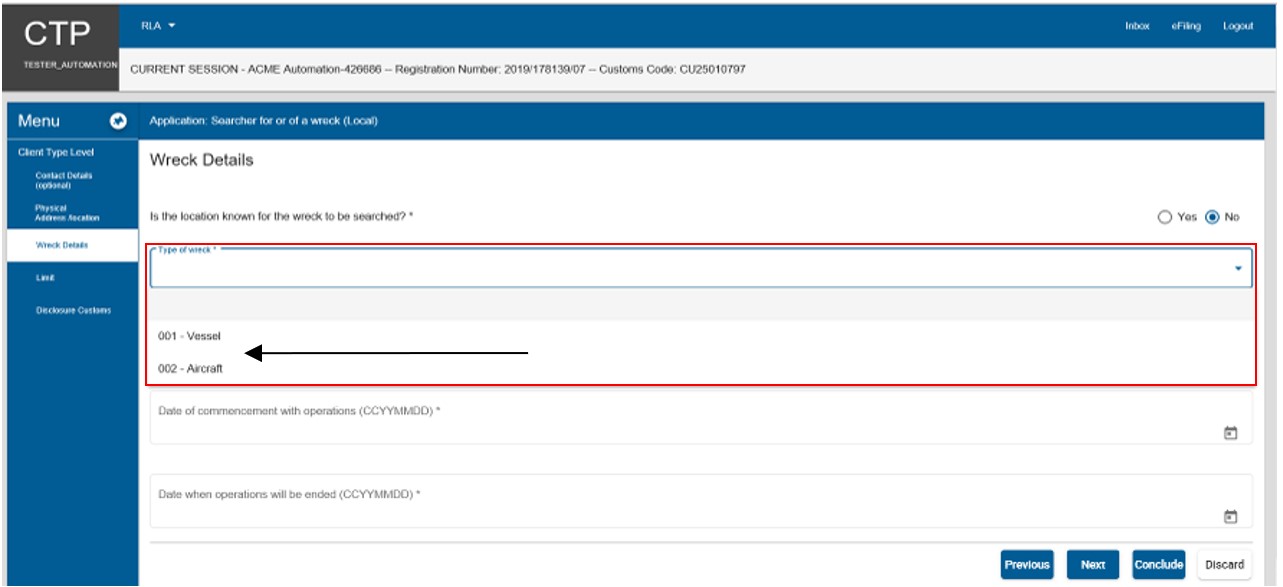
- The system displays the selected wreck to be searched.
- The user must indicate if he/she will be searching for a specific wreck or any wreck by clicking on the dropdown arrow and choosing between the two (2) options. Only one (1) option can be selected.
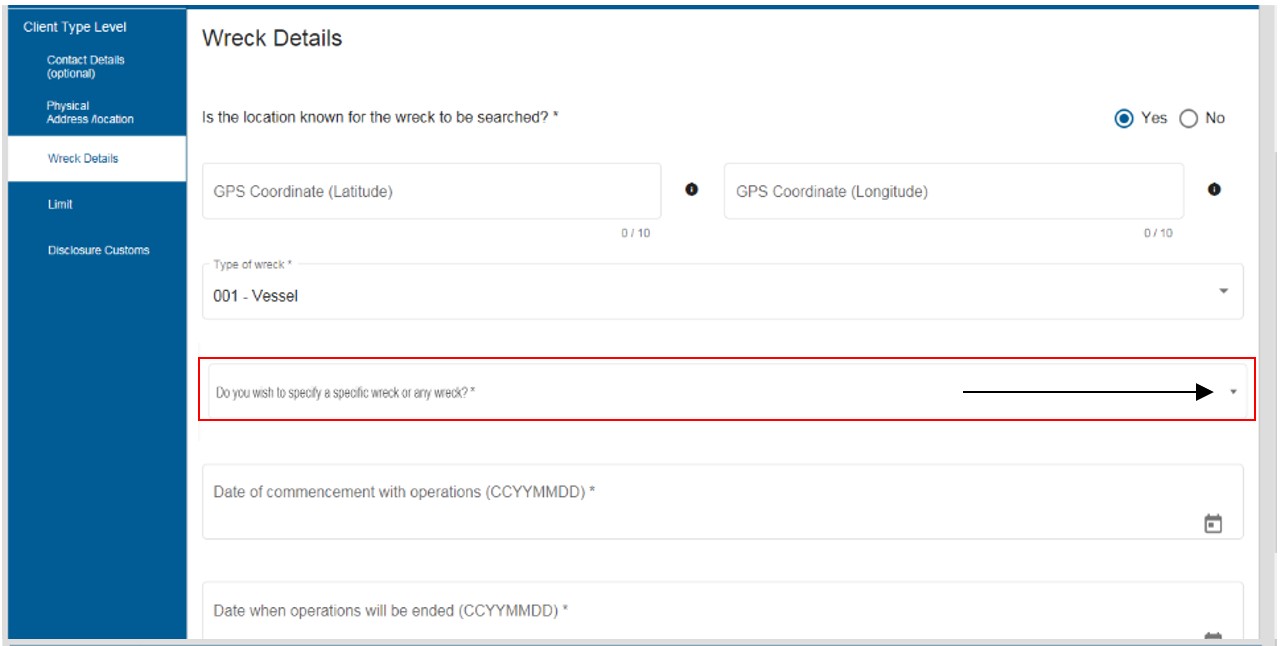
- The system displays the option selected by the user.
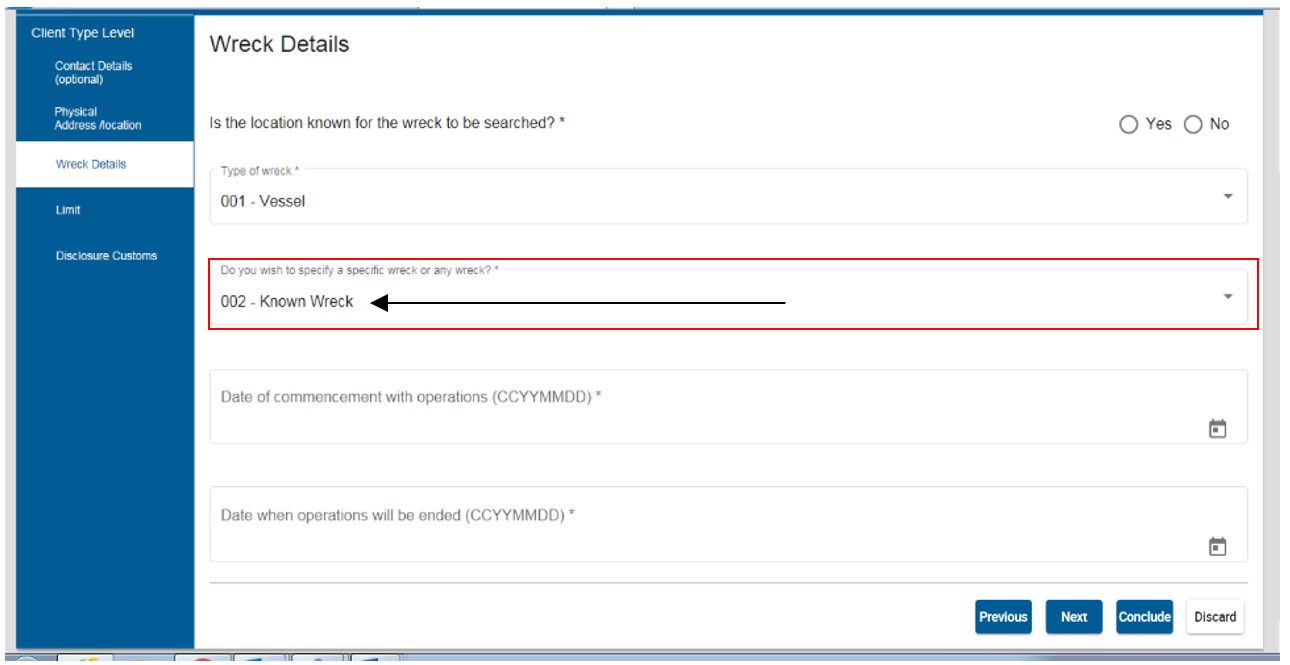
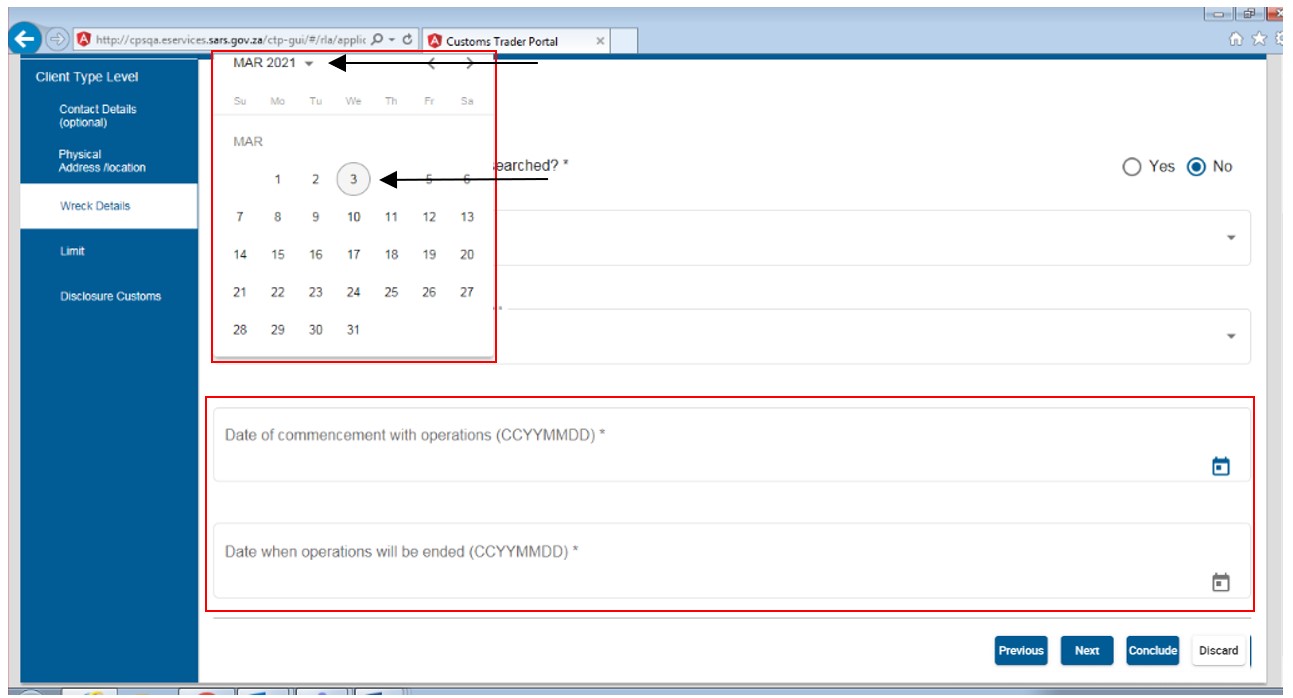
- The user is required to provide the date by clicking the applicable calendar icon:
- When the operation will commence; and
- When the operation will end.
- The system displays the calendar. The user selects the year, month and the date on the calendar which relates to the:
- Date of commencement with operations; and
- Date when the operations will end.
- In order to progress to the next field which is Limit (refer to Limit field), the user clicks on the:
- Next button; or
- Limit link under Menu.
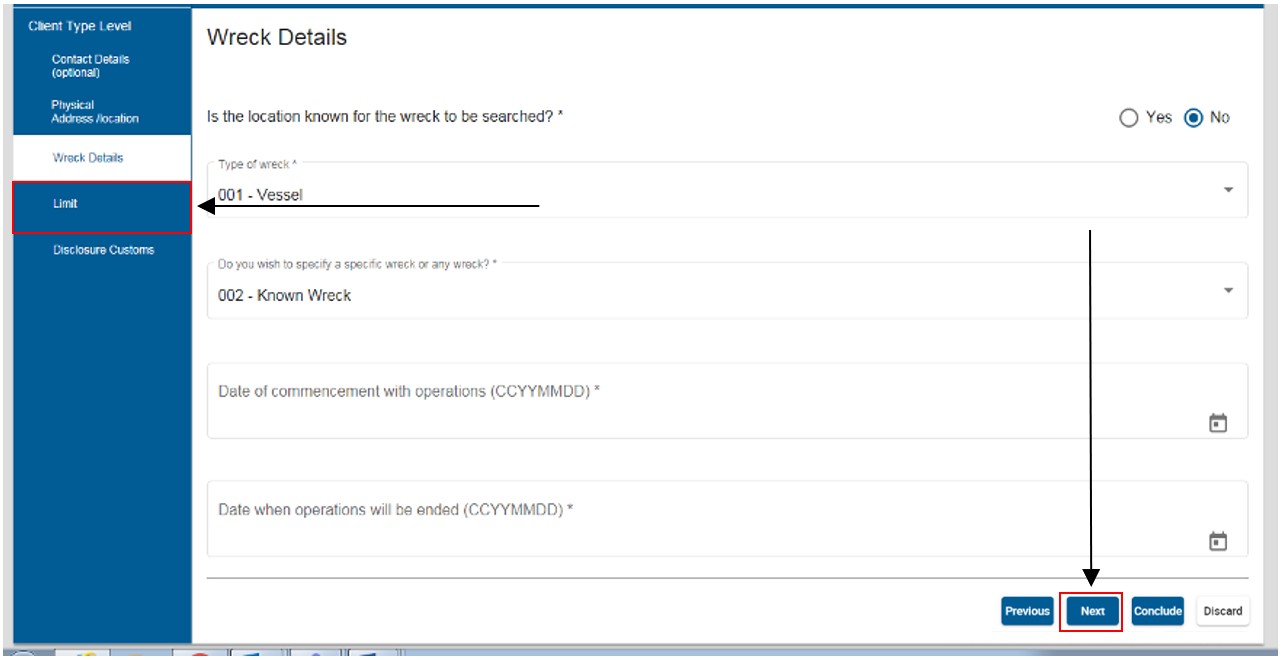
- The details captured by the user are automatically saved.
- This field must be completed by users who are required to provide the standard amount of surety as prescribed in paragraph 2.3 in SC-SE-05. The field will not appear in cases where surety is not required.
- The user must capture the amount of duties and taxes separately. The amounts must be rounded to the nearest Rand amount.
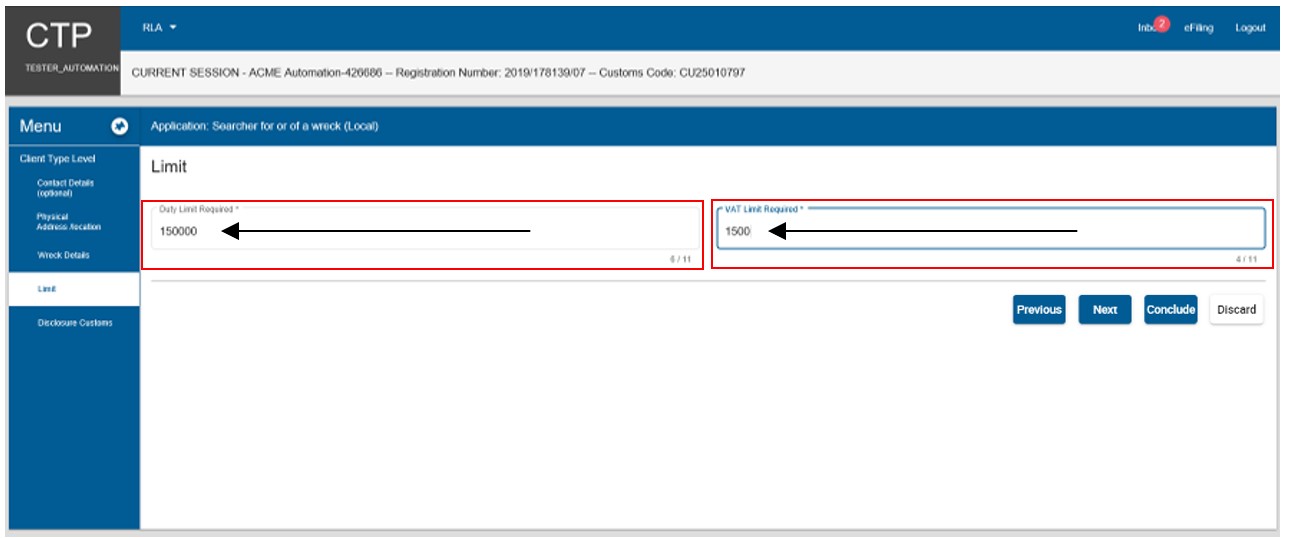
- In order to progress to the next field which is Disclosure Customs, the user clicks on the:
- Next button; or
- Disclosure Customs link under Menu and continue with the process prescribed Disclosure Customs Questionnaire below
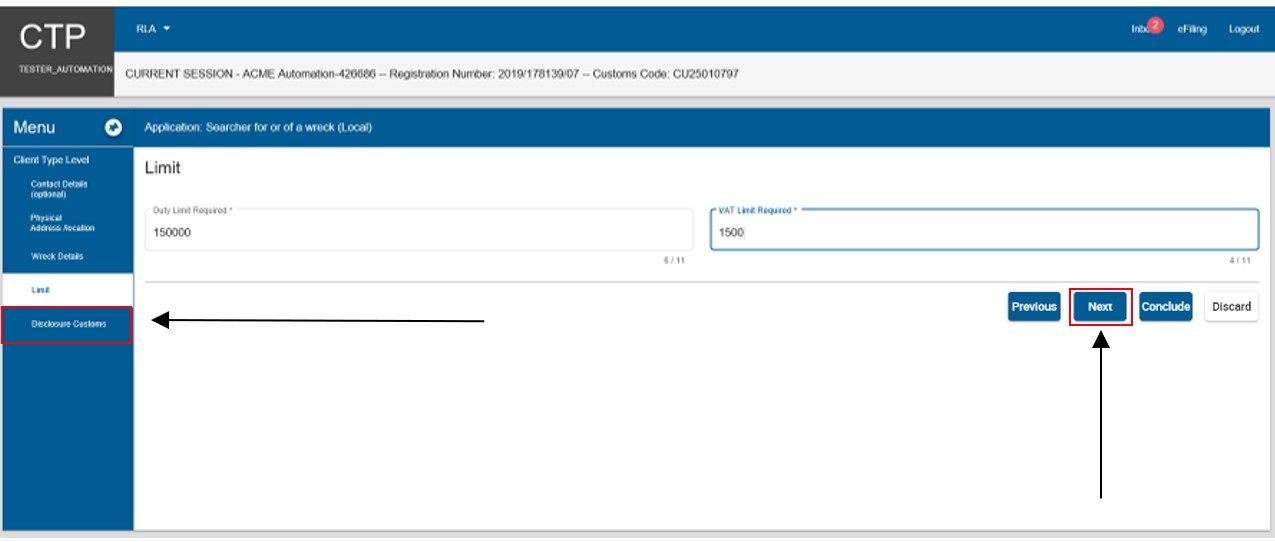
- The details captured by the user are automatically saved.
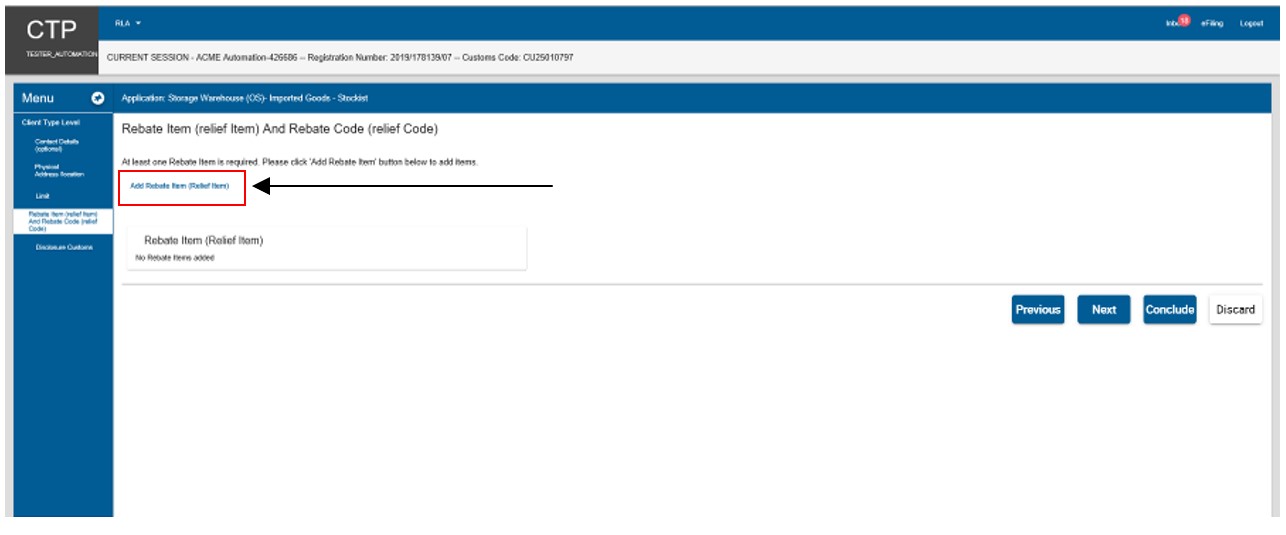
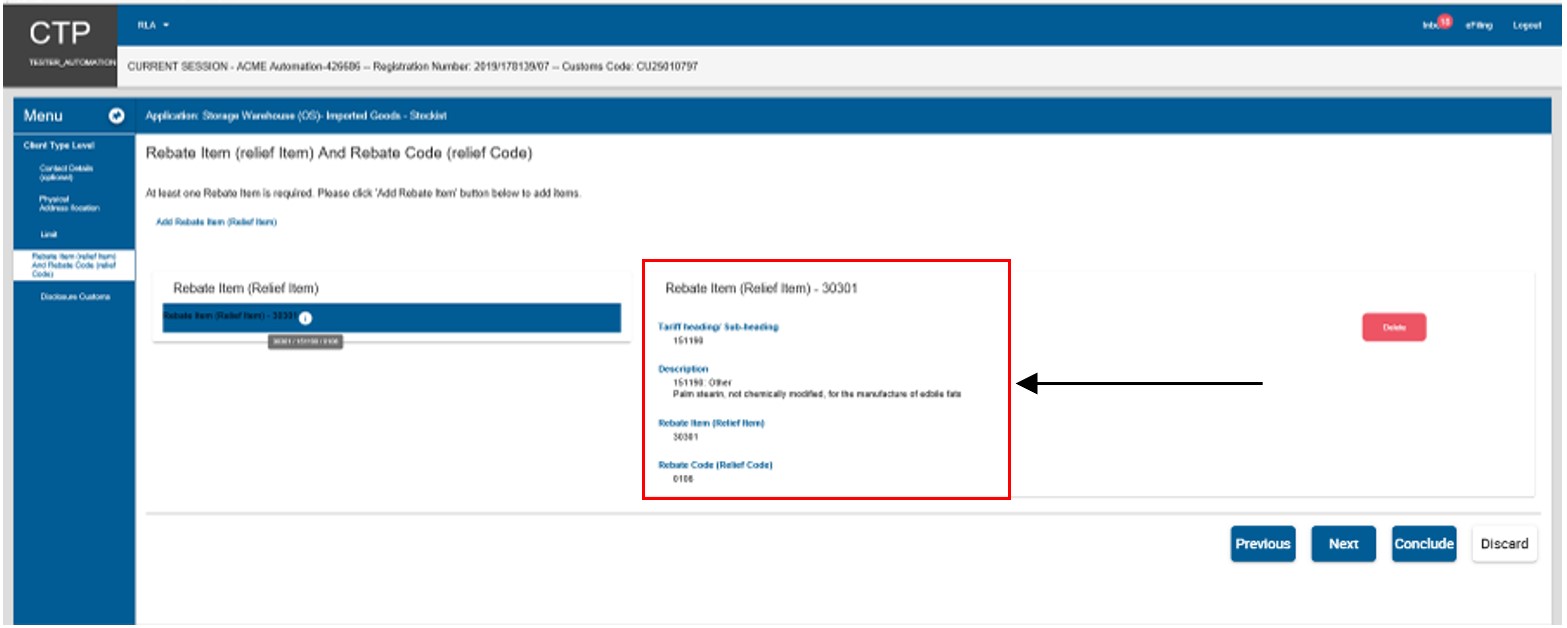
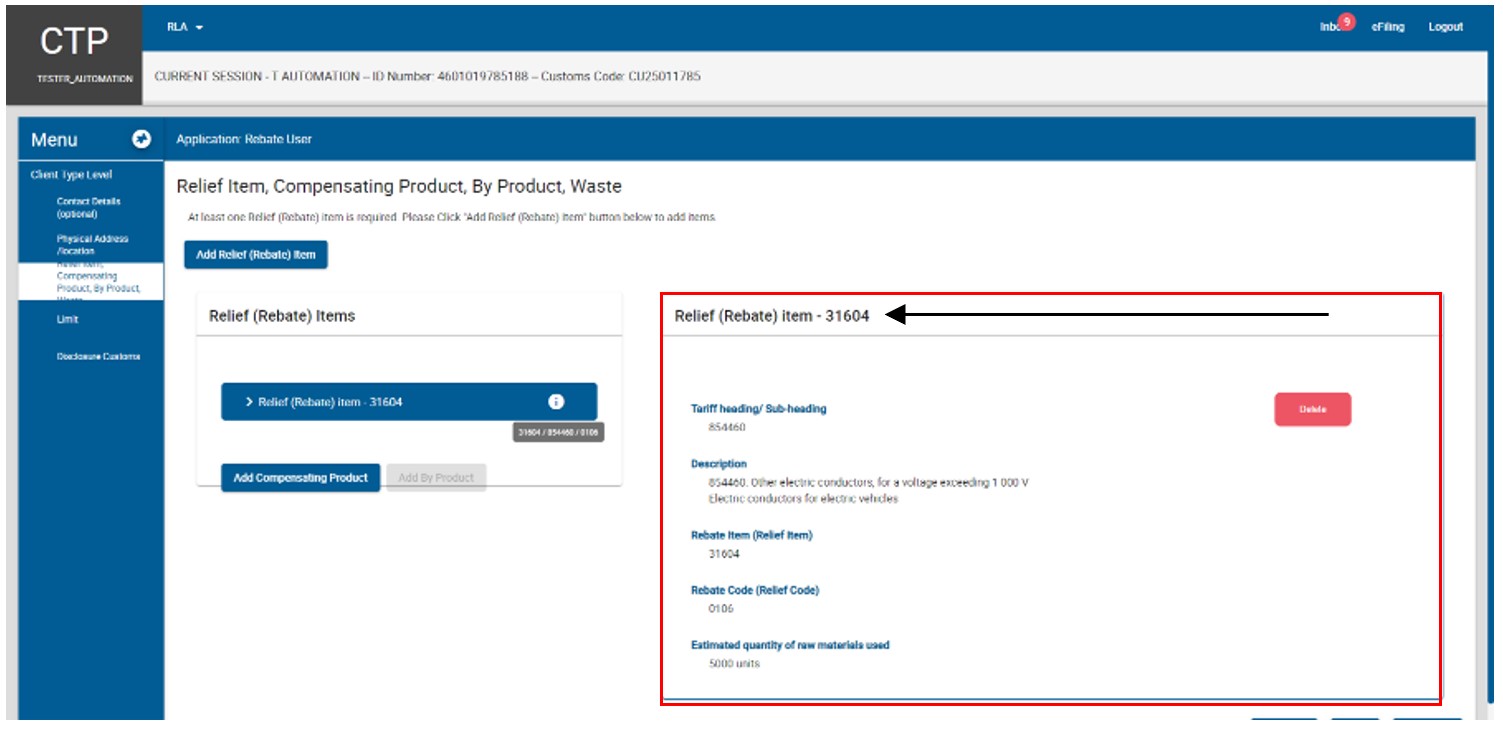
Rebate Item (Relief Item) and Rebate Code (Relief Code)
- This field is applicable when a user applies for the licensing of a:
- Customs storage warehouses (including CCA Enterprise storage warehouses); or
- CCA Enterprise manufacturing warehouses.
- The user must describe the goods that will be stored or manufactured in the warehouse as well as the tariff heading(s) / items(s) and rebate item(s) (if applicable).
- The user is required to Add the Rebate item (Relief item) details. This field is mandatory if the user applies for the licensing of a CCA Enterprise manufacturing warehouse.
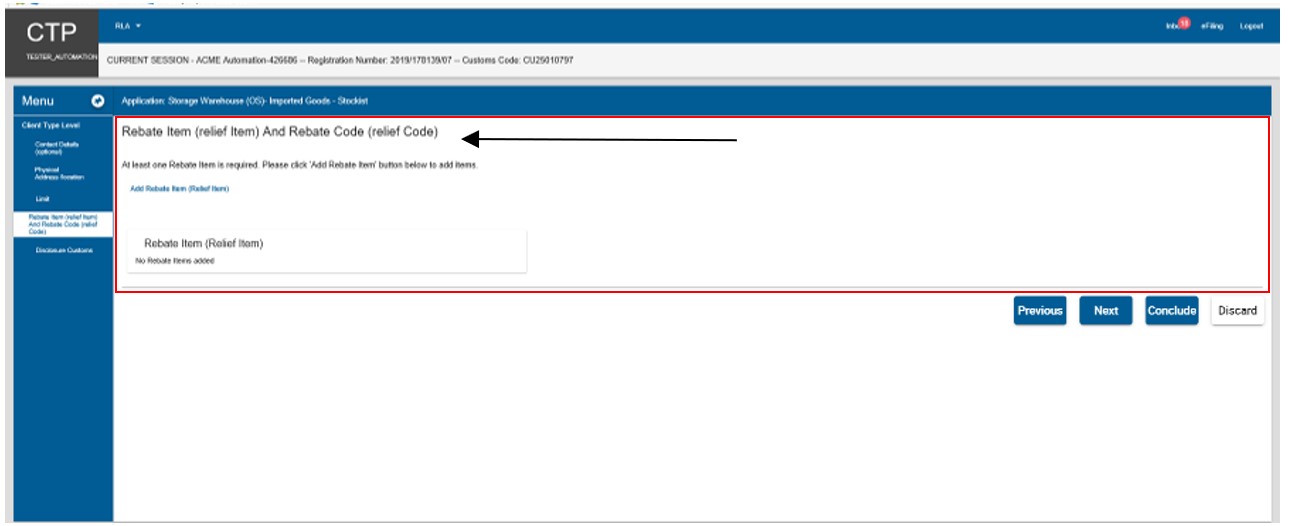
- The system displays a message to the user that no rebate item(s) have been added.
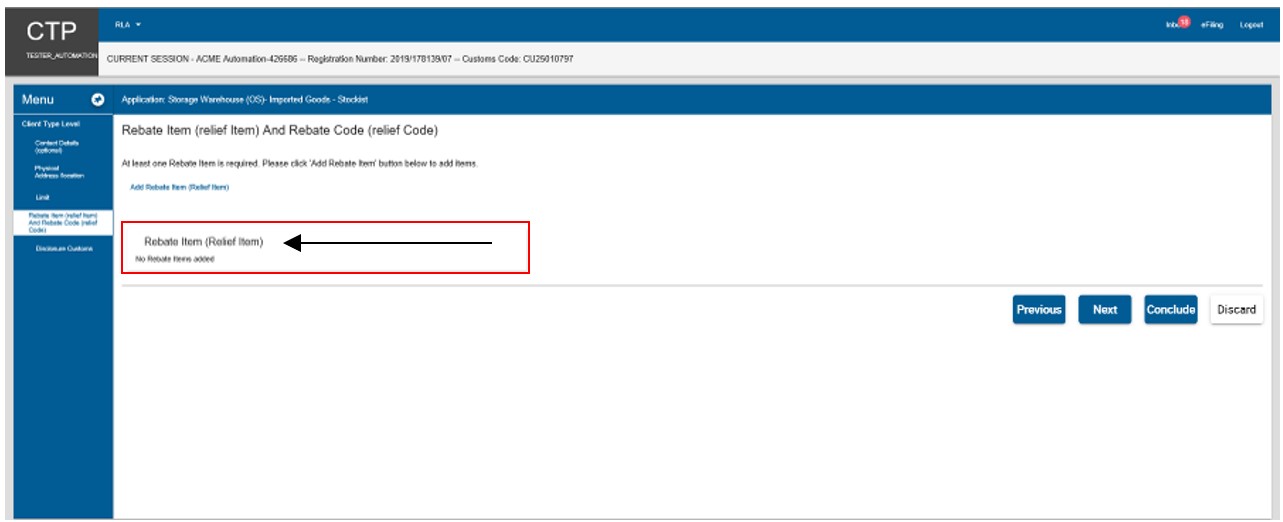
- In order to add a rebate item, the user clicks on Add Rebate item (Relief item).
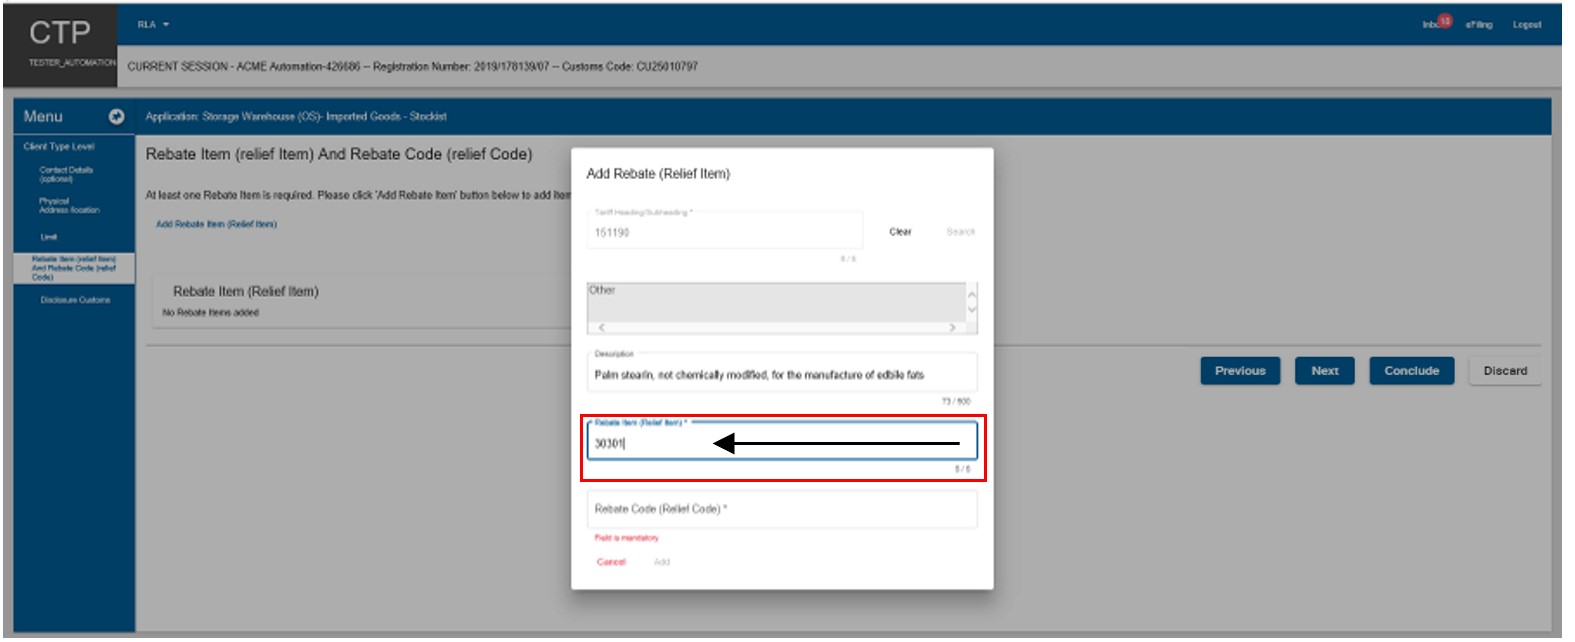
- The system displays the Add Rebate (Relief Item) capture window and the user captures the applicable tariff heading or subheading that describes the goods that will be stored in the warehouse.

- After the user captured the tariff heading or subheading of the items that will be stored in the warehouse, the user clicks on Search.
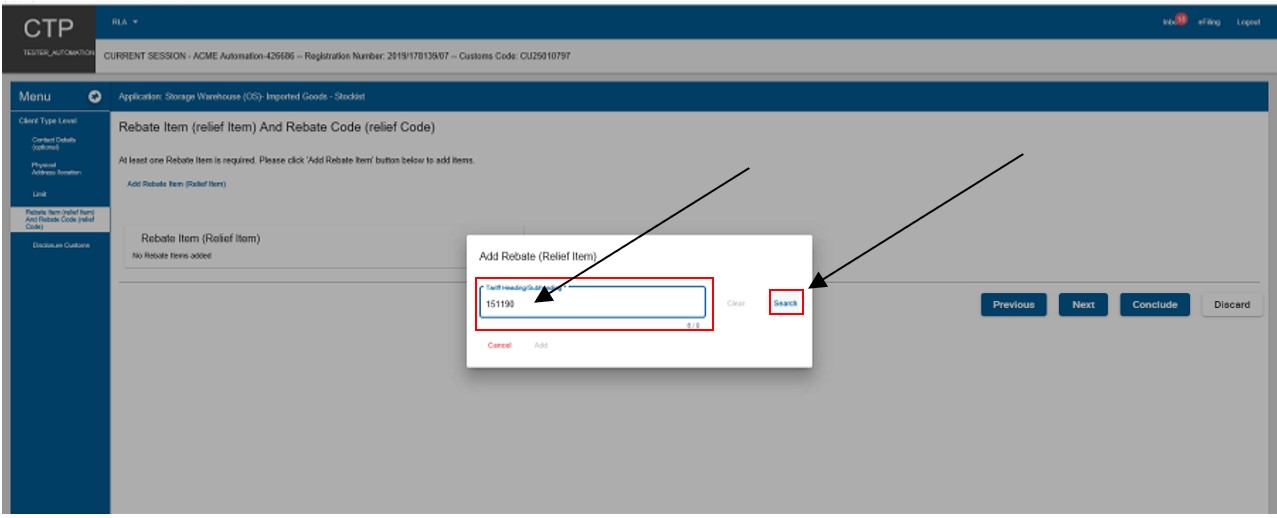
- The system displays the description of the goods that will be stored in the warehouse once licensed.
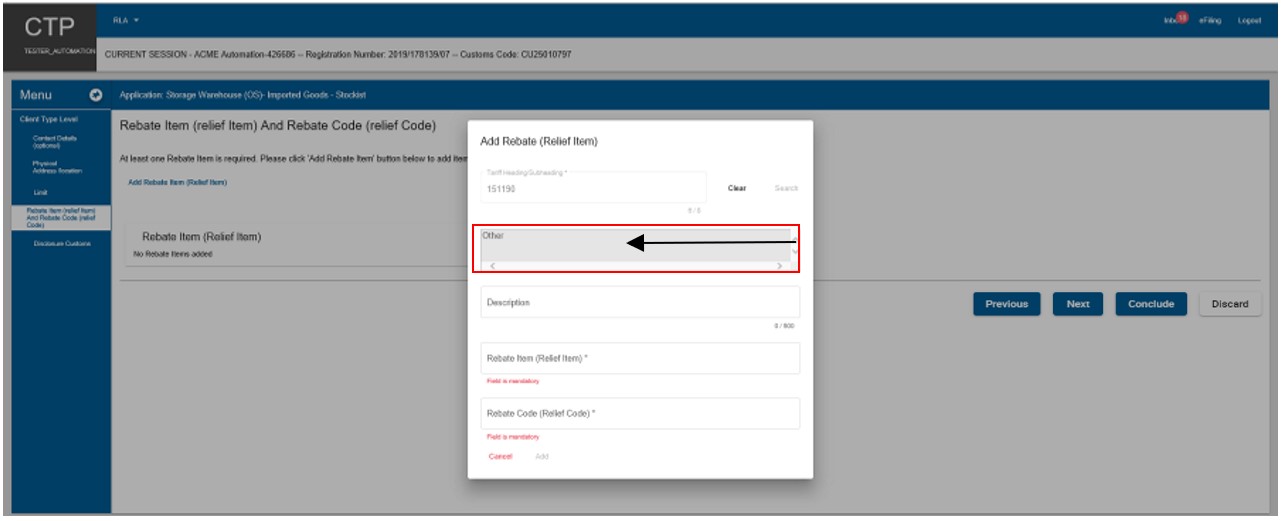
- The user clicks on the Description text box and captures the tariff heading description mentioned under the applicable rebate item.
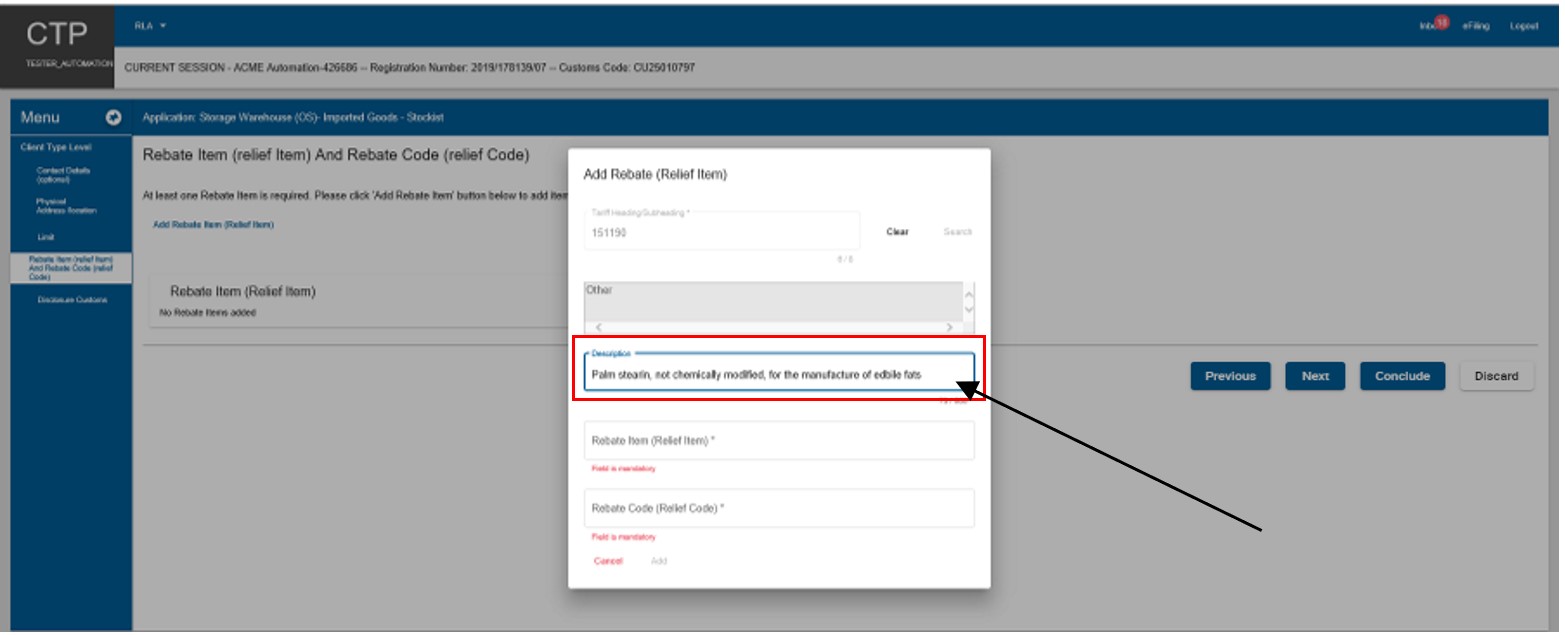
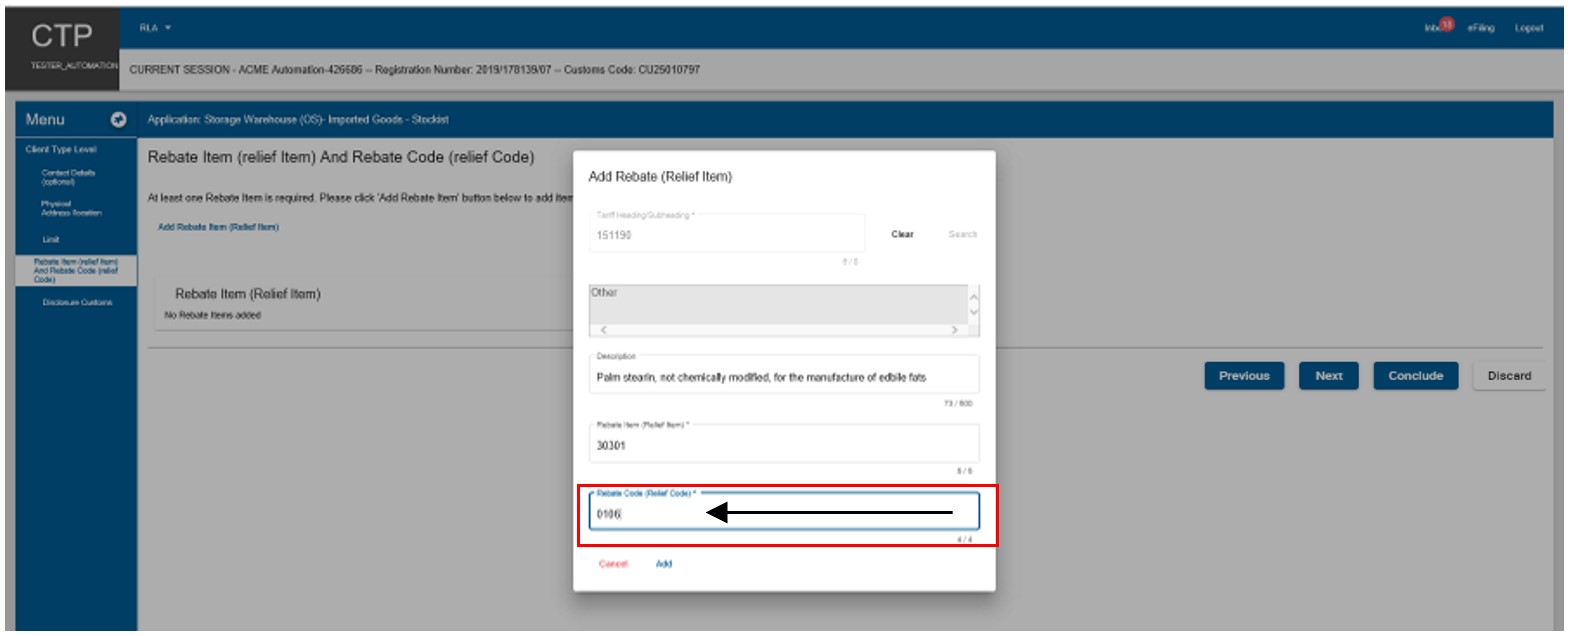
- The user clicks on the Rebate Item (Relief Item) text field and captures the rebate item.
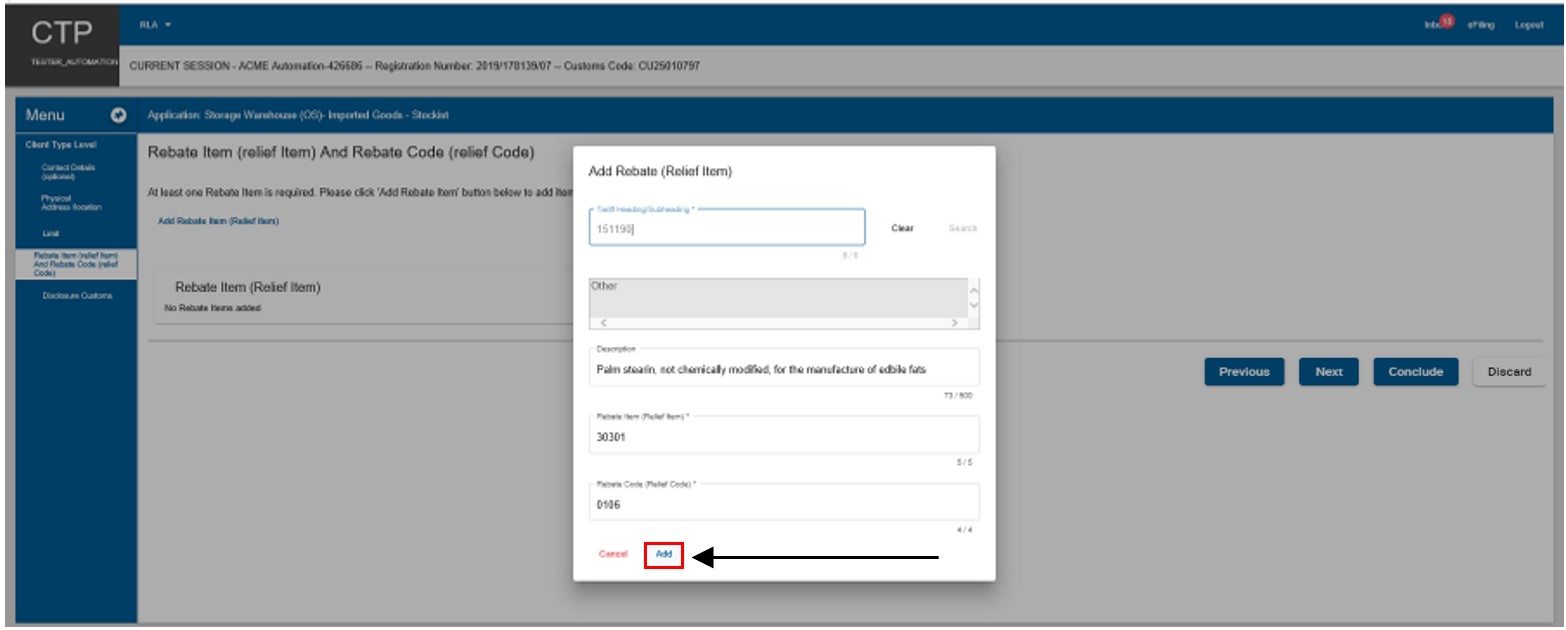
- The user clicks on the Rebate Code (Relief code) text field and captures the applicable rebate code as mentioned in the Schedules to the Act.
- The user clicks on the Add option to save the information captured.
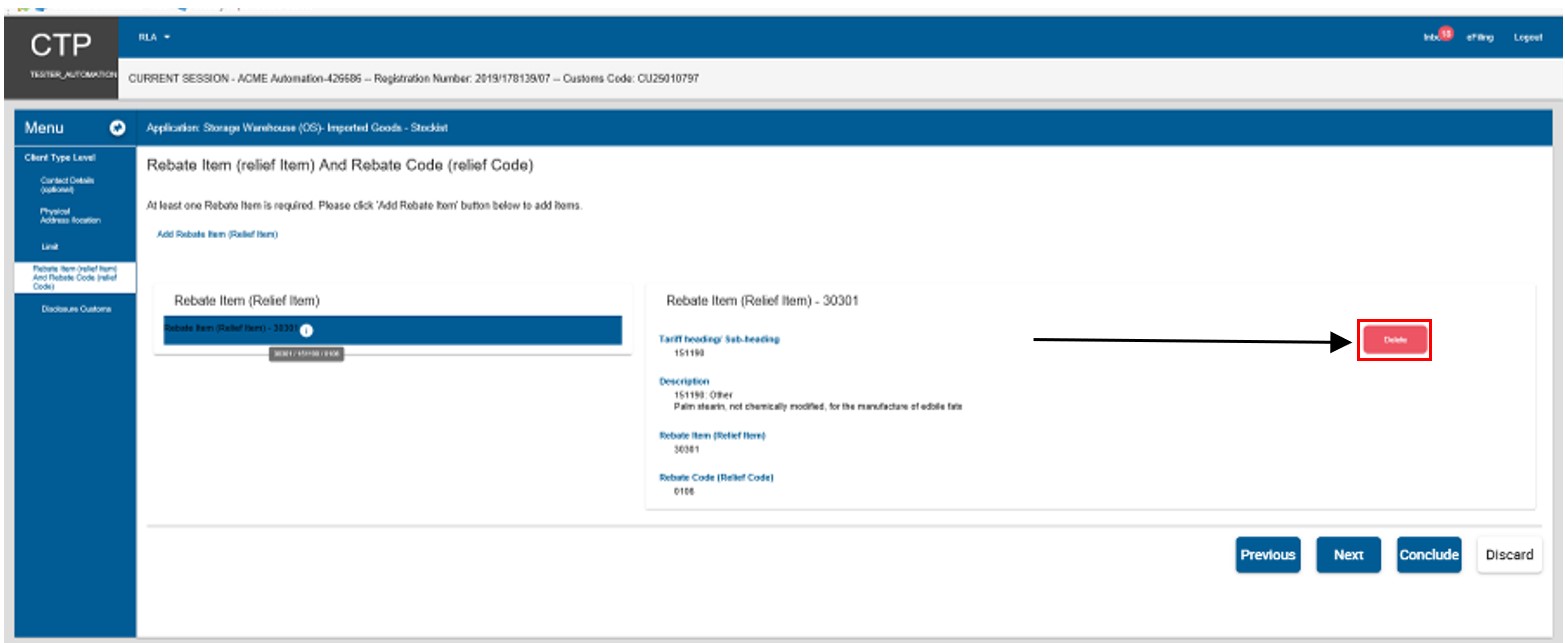
- The system displays the details captured on the Rebate Item (Relief Item) and Rebate Code (Relief Code) page.
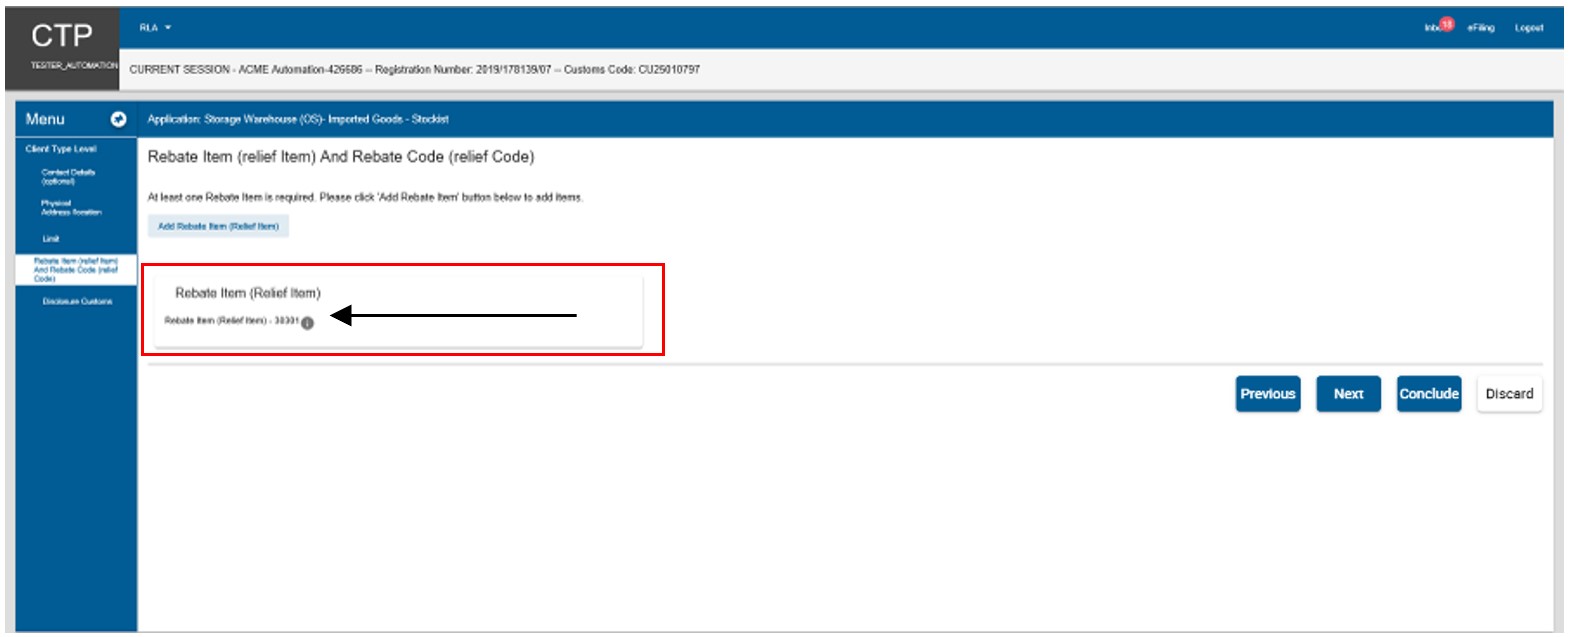
- If the user wishes to view the information captured, he/she clicks on the “i” icon in order to display the rebate item, rebate code, tariff heading / subheading and the description of the goods that will be stored in warehouse.

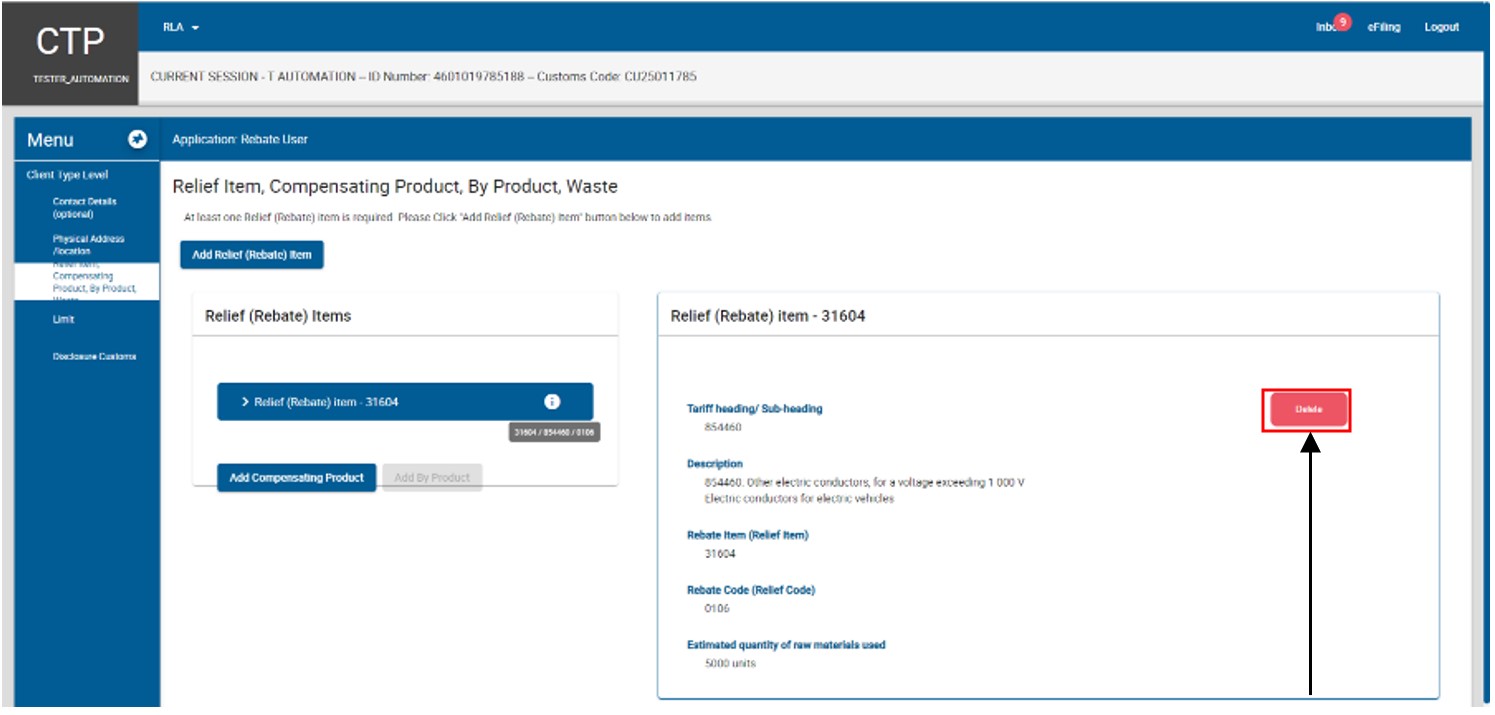
- If the rebate item and / or code details have been incorrectly captured, the user clicks on the Delete button to recapture the information as prescribed in the Rebate Item (Relief item) and Rebate Code(Relief code)
- In order to add more tariff headings, subheadings, rebate items and / or rebate codes the user clicks on Add Rebate Item (Relief Item) and follows Rebate Item (Relief Item) and Rebate code (Relief Code)
- In order to progress to the next field, the user clicks on the:
- Next button; or
- Disclosure Customs link and continue with the process prescribed Disclosure Customs Questionnaire below; or
- CCA Number link prescribed in CCA number below.
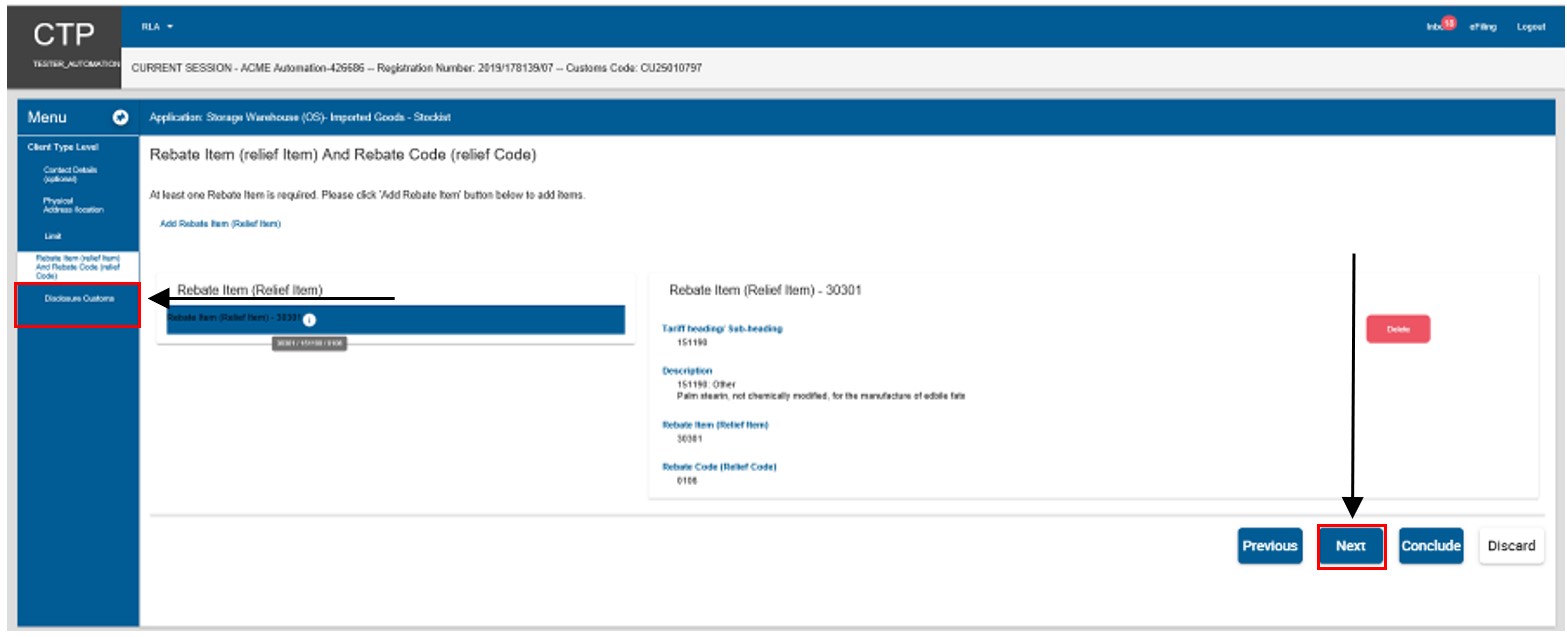
- The rebate item and code (relief item or code) captured by the user is automatically saved.
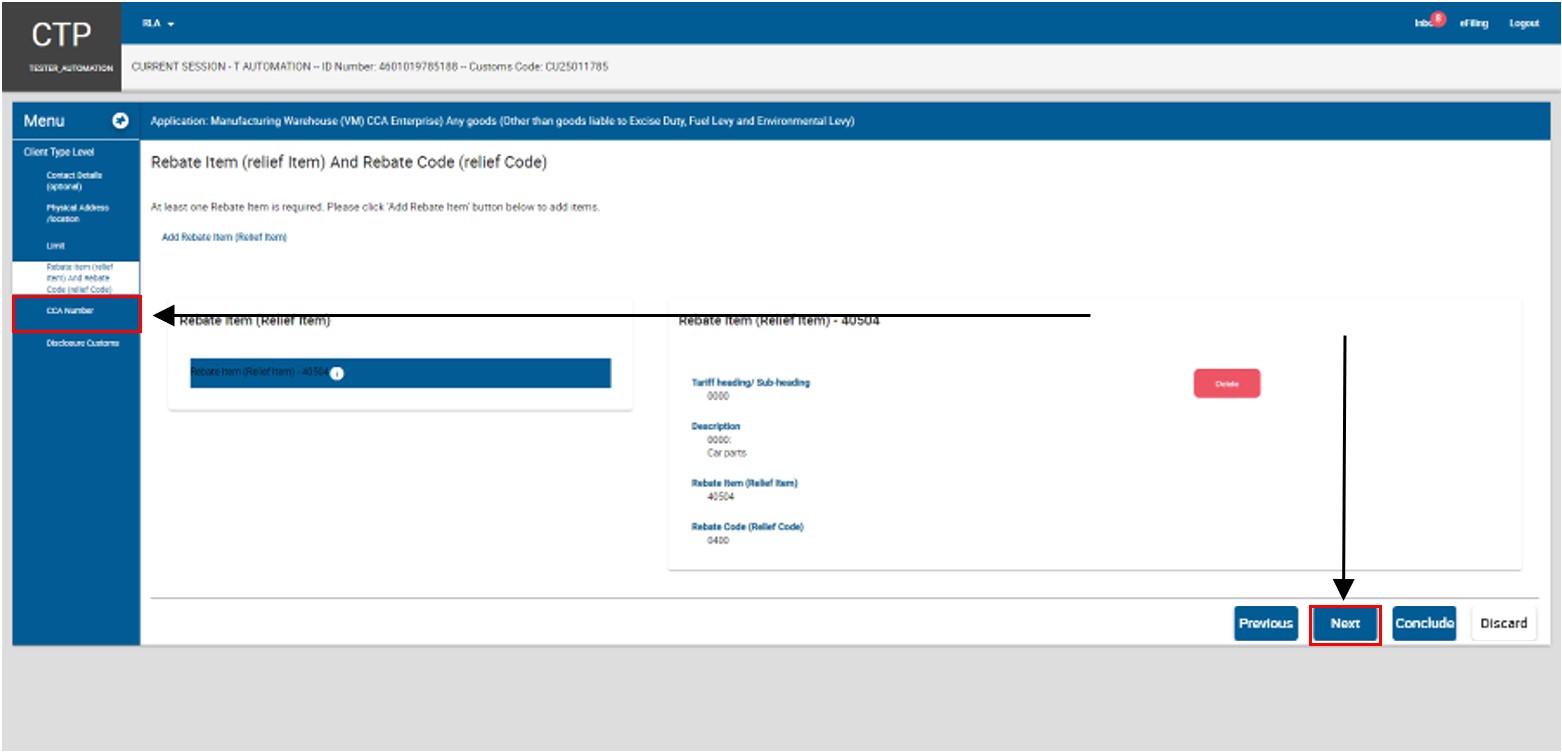
- This field will only be displayed under Menu when the user (CCA Enterprise) wishes to license a premises as a:
- Storage warehouse; or
- Manufacturing warehouse that will be permanently located in a CCA situated in an SEZ.
- Once the relevant rebate item(s) and rebate code(s) has been captured by the user as prescribed in Rebate Item (Relief Item)and Rebate Code (Relief code) above, the user must capture the CCA details by clicking on the
- Next button; or
- CCA Number link under the Menu.
- The system displays the CCA Number capture window.
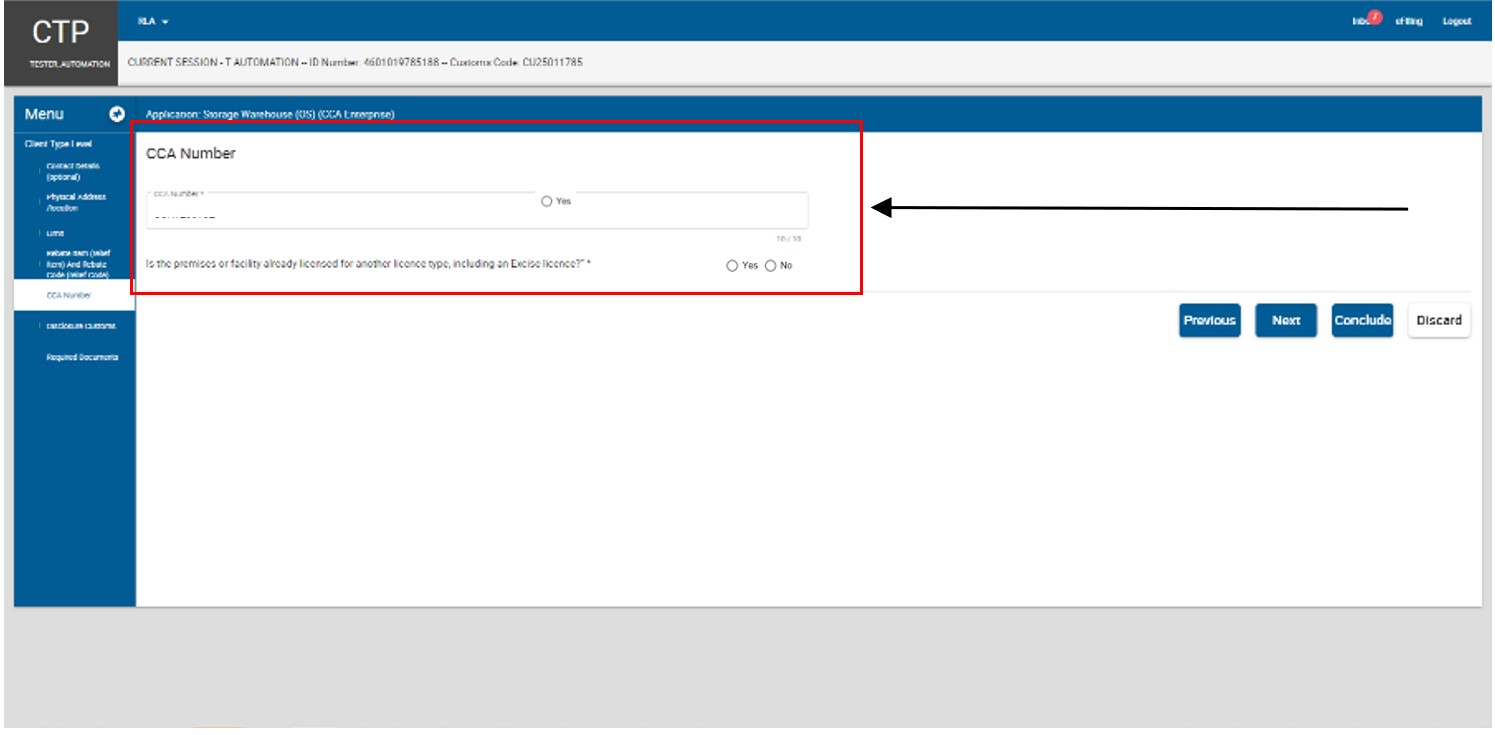
- The user captures the CCA number. If an inactive CCA number is captured, the system displays a message No Active CCA Number found for User.
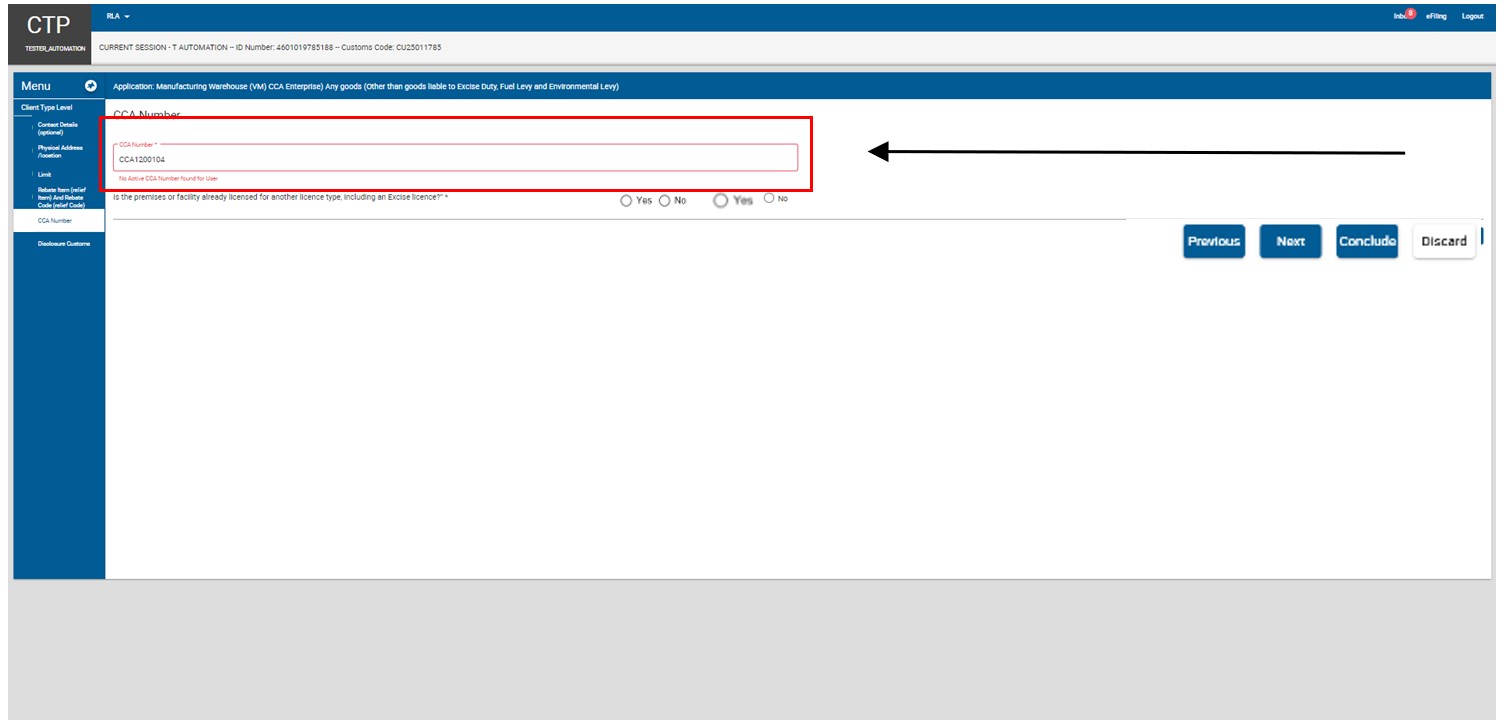
- The user must indicate if the premises or facility is already licensed for another Customs or Excise client type by selecting the correct radio button.

- In order to progress to the next field which is Disclosure Customs (refer to Disclosure Customs Questionnaire), the user clicks on the:
- Next button; or
- Disclosure Customs link under Menu and continue with Disclosure Customs Questionnaire
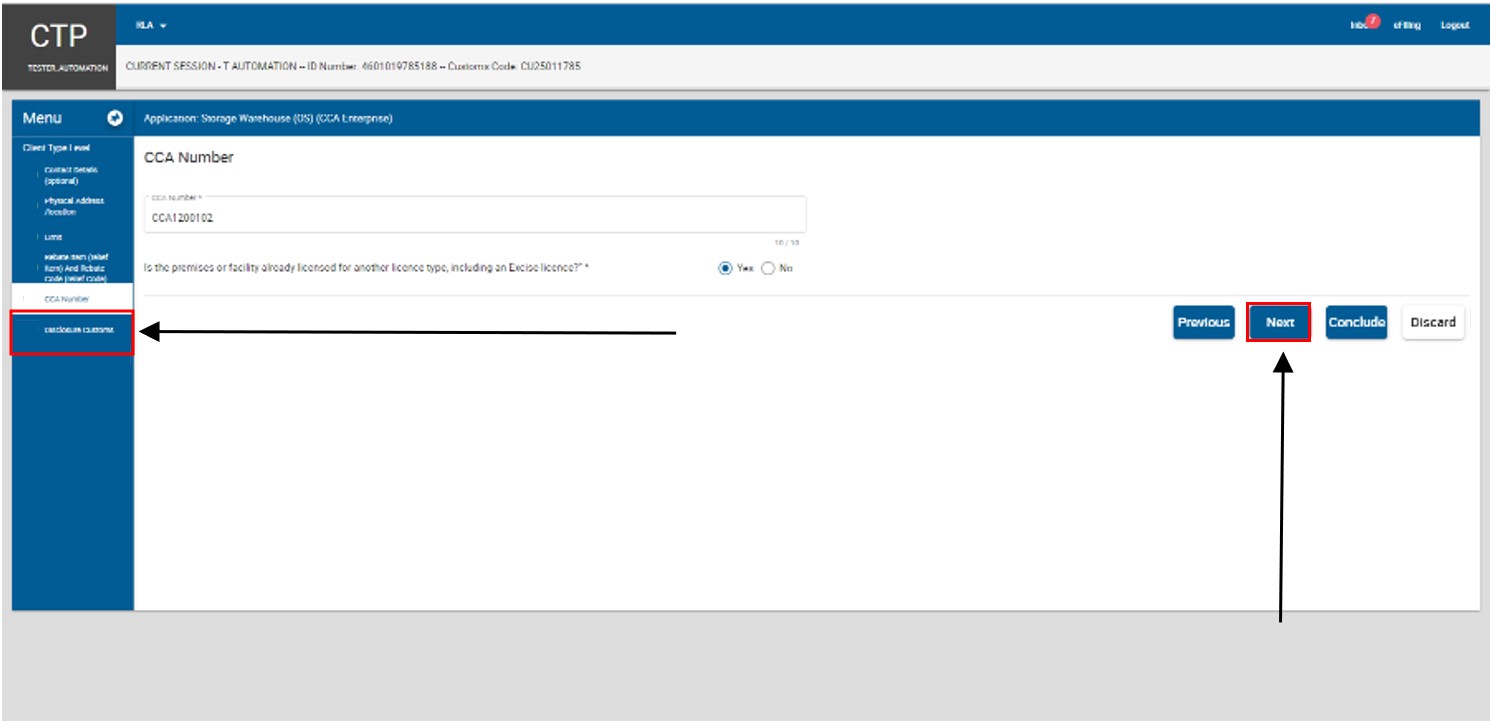
- The CCA number captured by the user is automatically saved
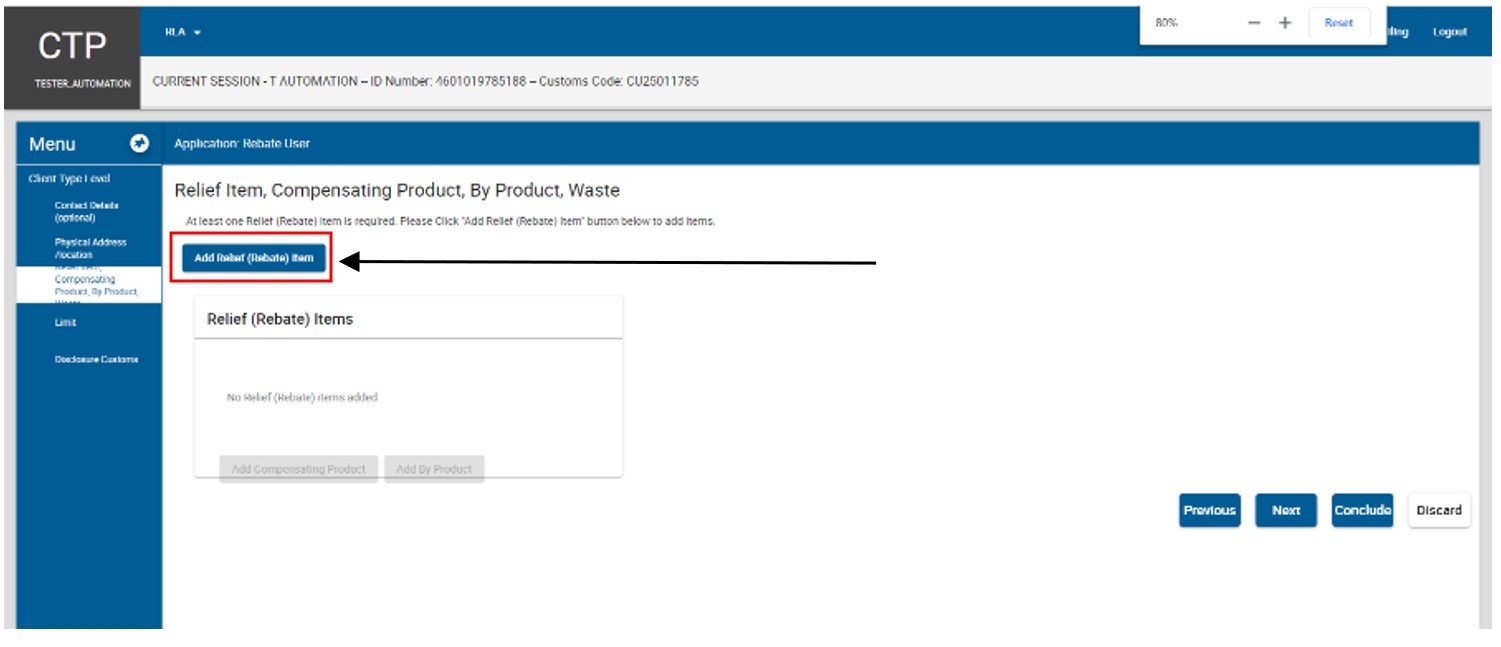
Rebate (Relief) Item, Compensating Product, By Product and Waste
- This field must be completed by users required to register as a rebate user as described in paragraph 2.3.13 in SC-CF-19.
- In order to add a Rebate (Relief) item, the user clicks on Add the Rebate (Relief) item button on the Relief item, Compensating Product, By Product, Waste page.
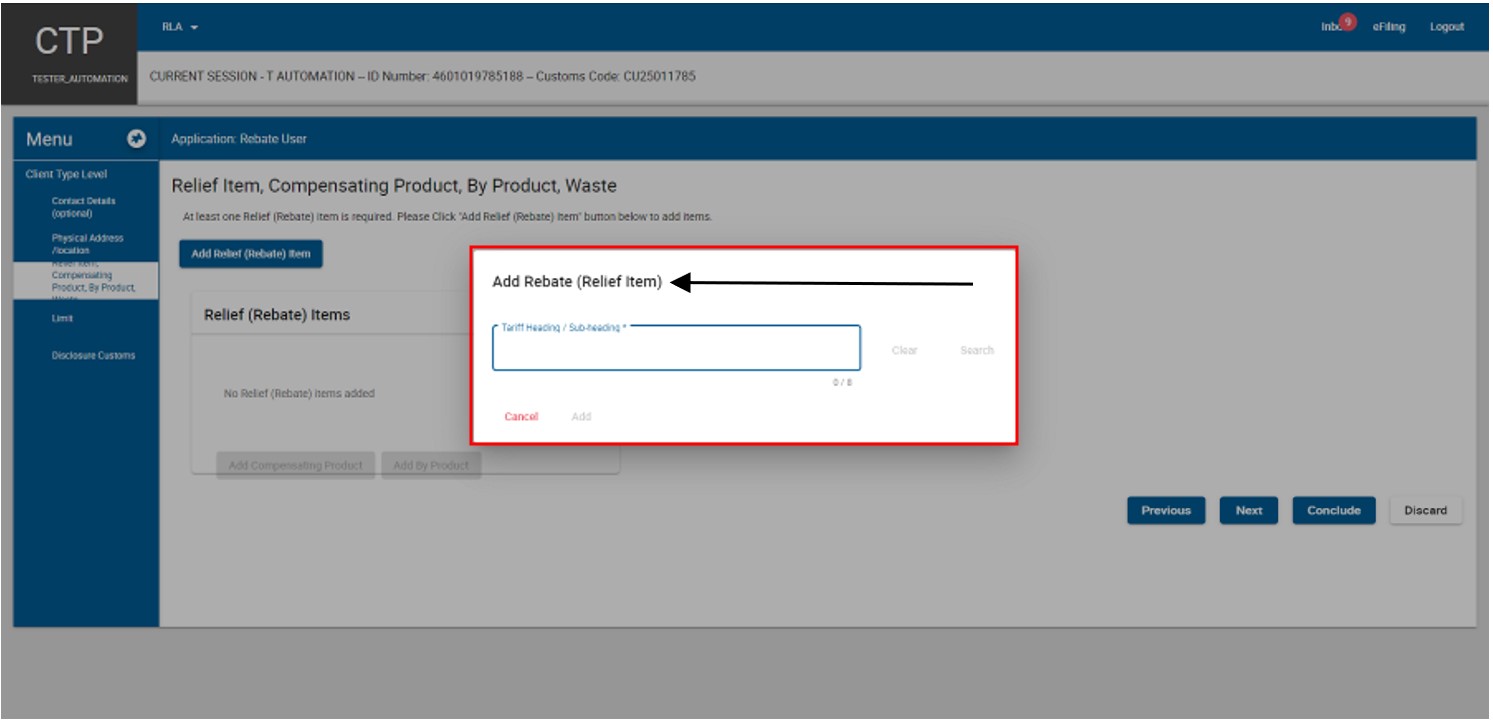
- The user:
- Captures the applicable tariff heading or subheading that describes the raw material(s) that will be used in the production or manufacturing process; and
- Clicks on Search.
- The user:
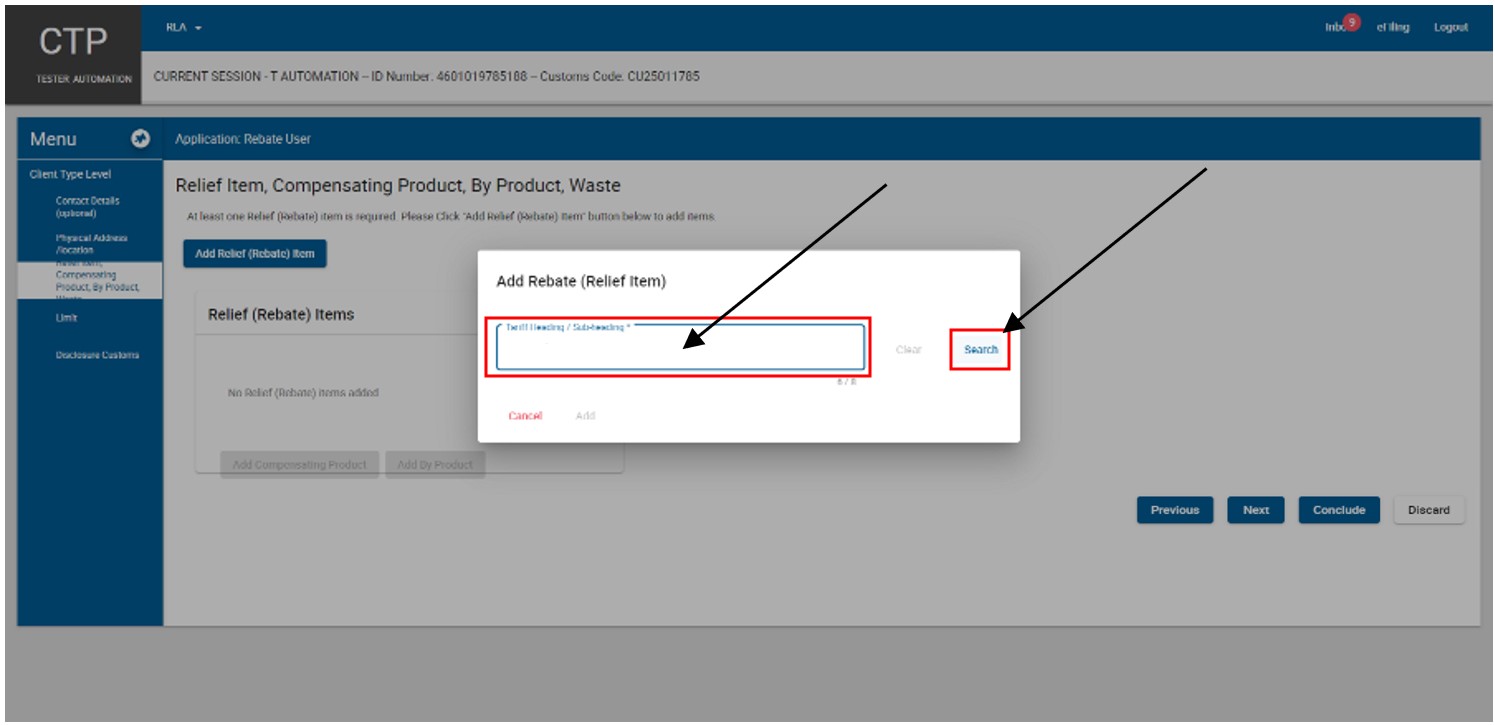
- The system displays the tariff heading / subheading and the description of the raw material(s) that will be used.
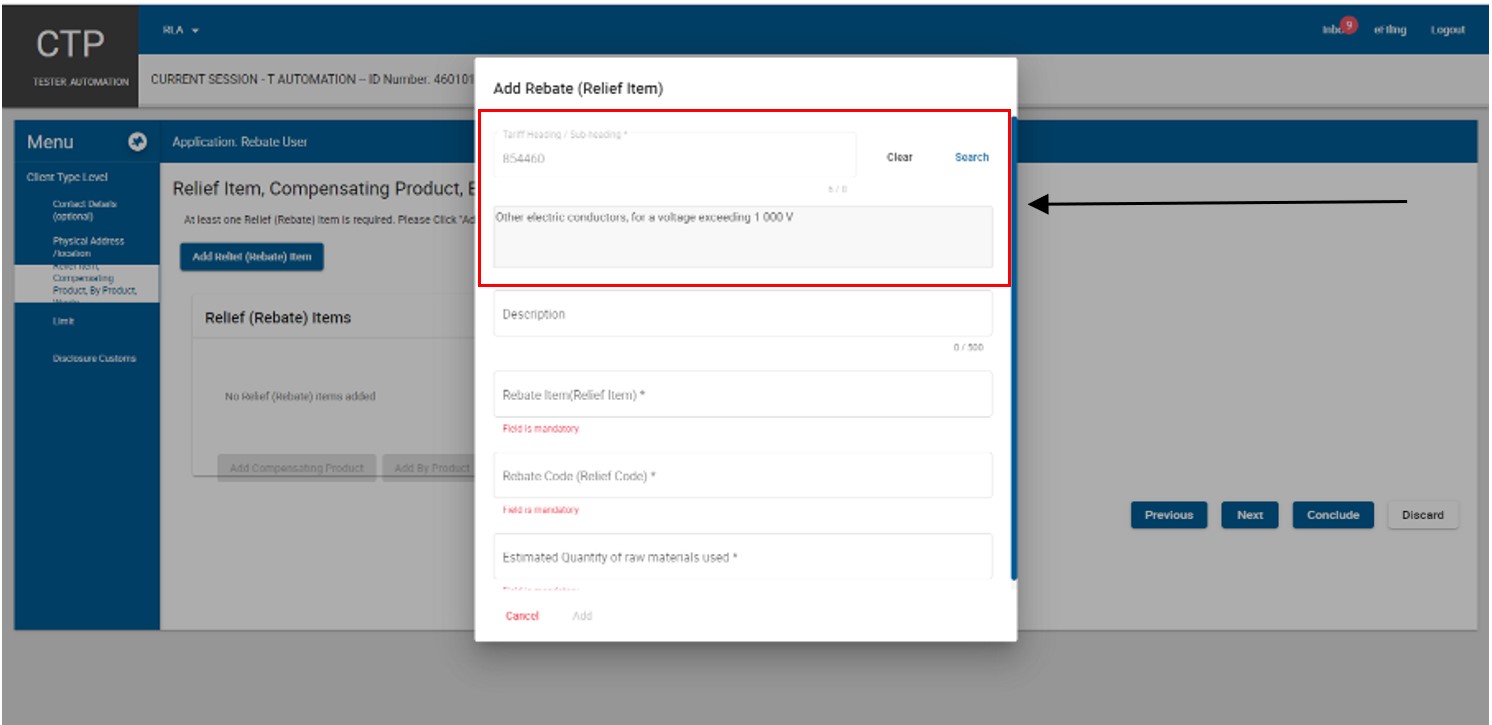
- If incorrect, the user clicks on clear and recaptures the tariff heading or subheading as prescribed in paragraph here)

- If correct:
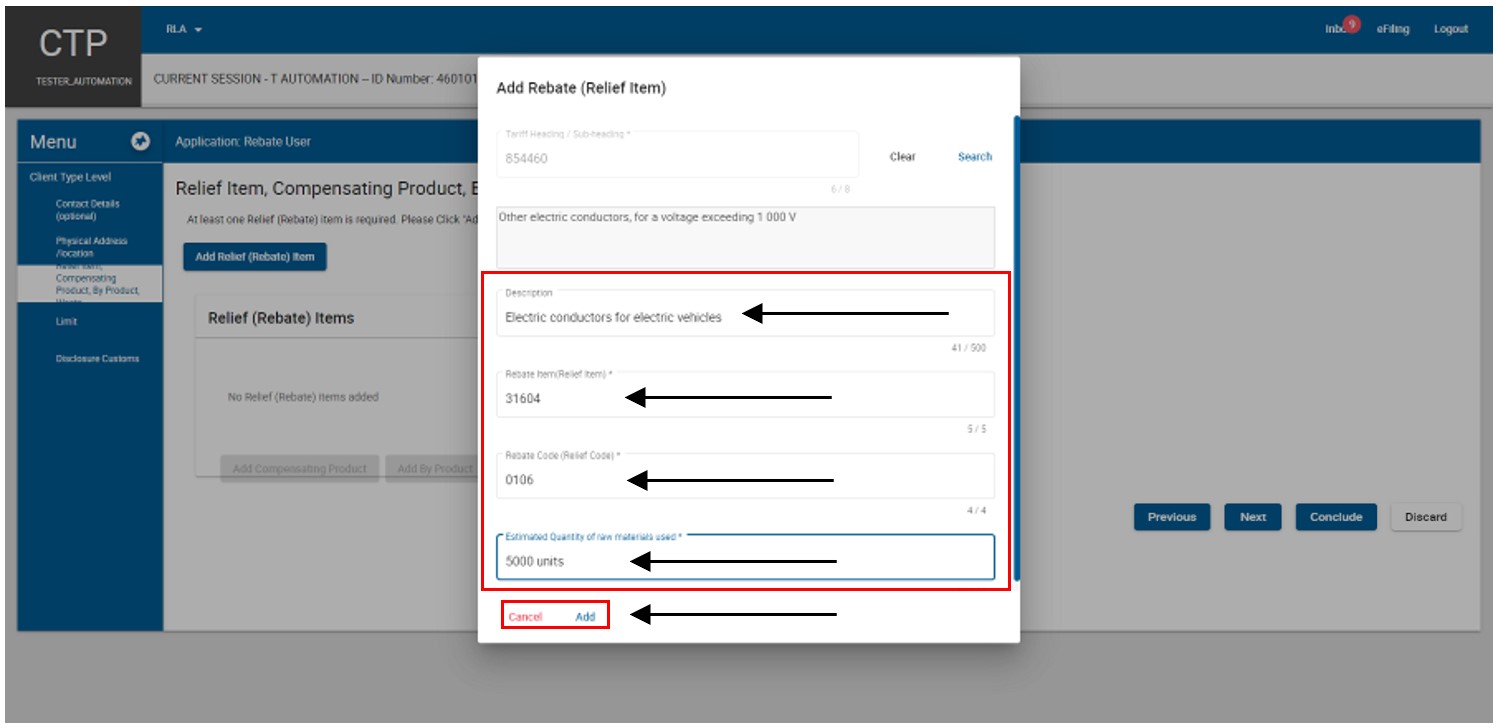
- The user captures:
- The description of the raw material(s) that will be used – this field is optional;
- Rebate Item (Relief item) – this field is mandatory;
- Rebate Code (Relief code) – this field is mandatory; and
- Estimated Quality of raw material to be user per annum – this field is mandatory; and
- The user clicks on:
- Add if correct; or
- Cancel if incorrect and recaptures the required information prescribed in paragraph here) above
- The user captures:
- The information captured is automatically saved and displayed on the Relief item, Compensating Product, By Product, Waste page.
- If any of the Rebate (Relief) item details have been incorrectly captured, the user:
- Clicks on the Delete button; and
- Recaptures the information as prescribed in paragraph here)above
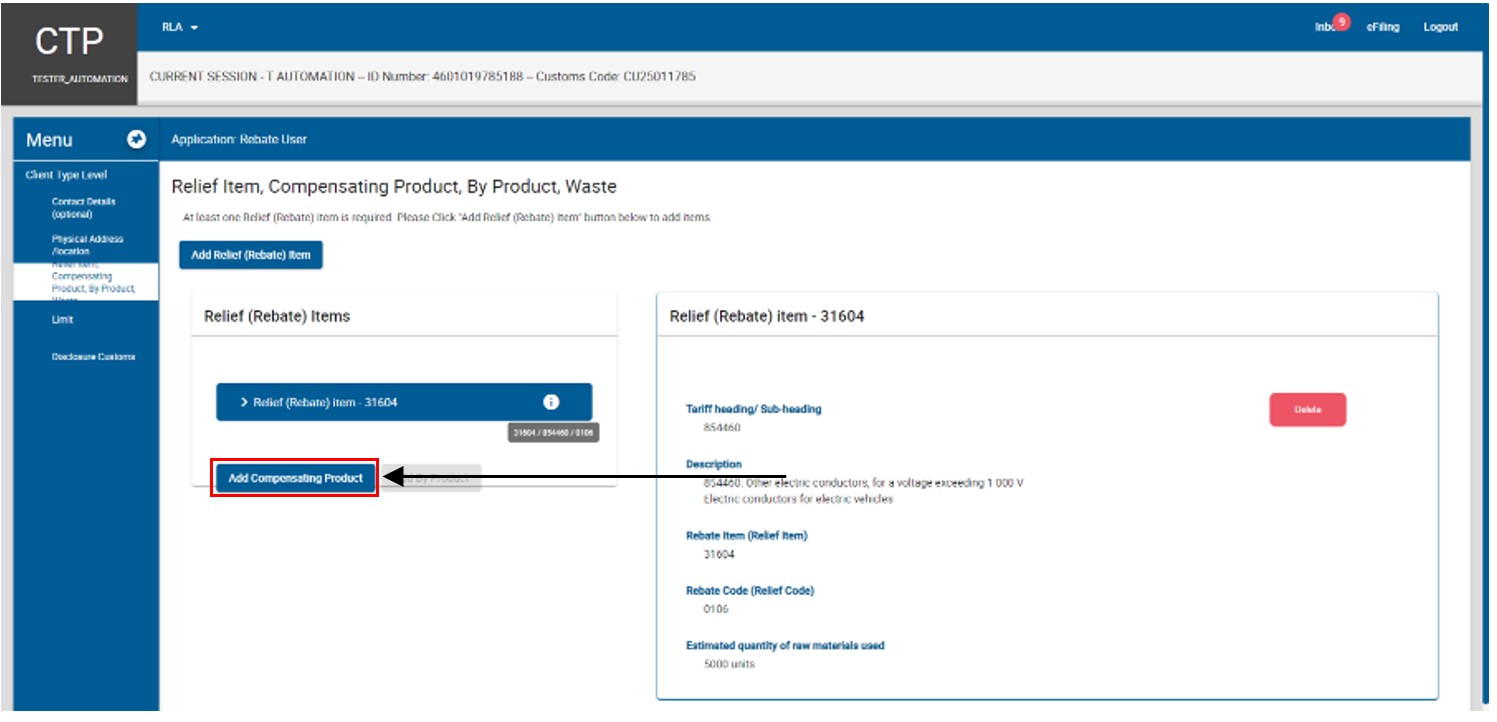
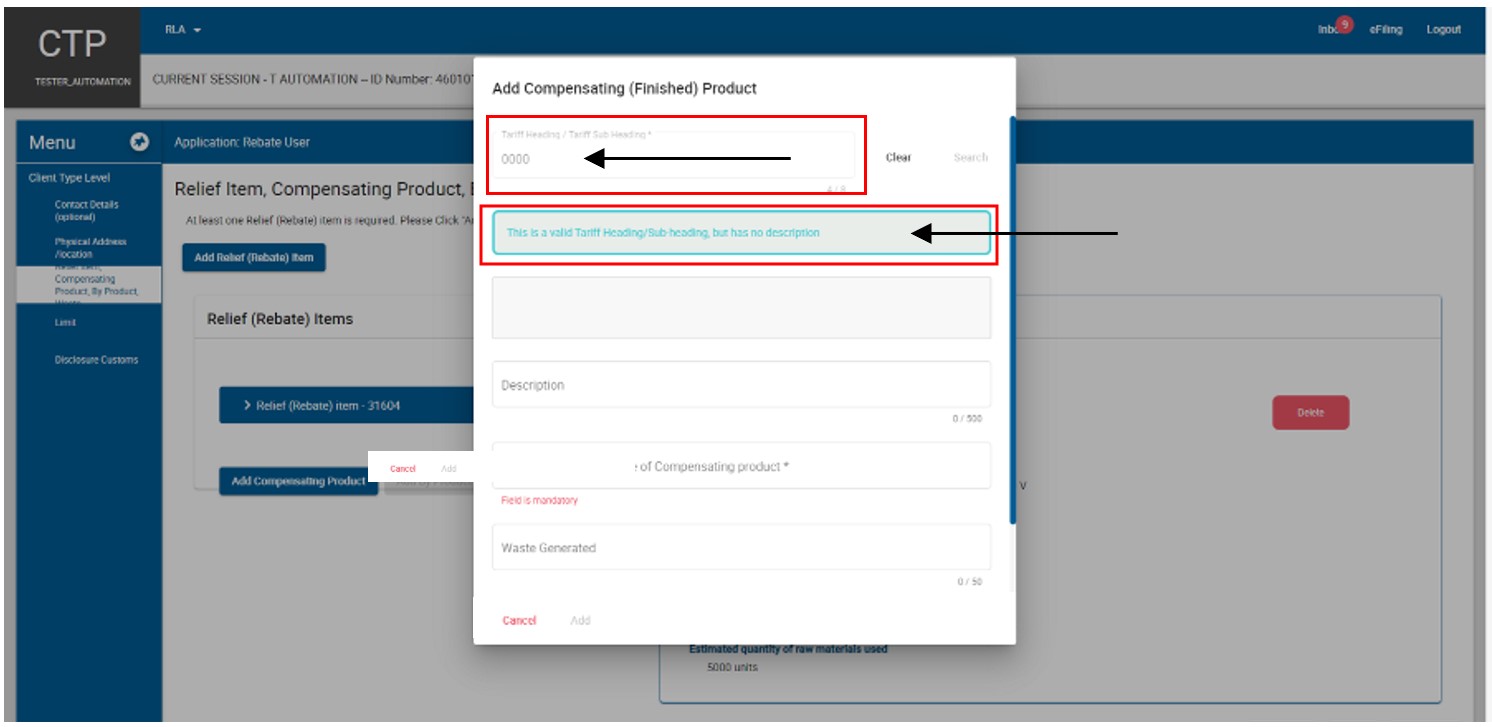
- The system displays the Add Compensating (Finished) Product capture window.
- The user:
- Clicks in the tariff heading / subheading text box;
- Captures the tariff heading of the compensating (finished) product; and
- Clicks on Search.
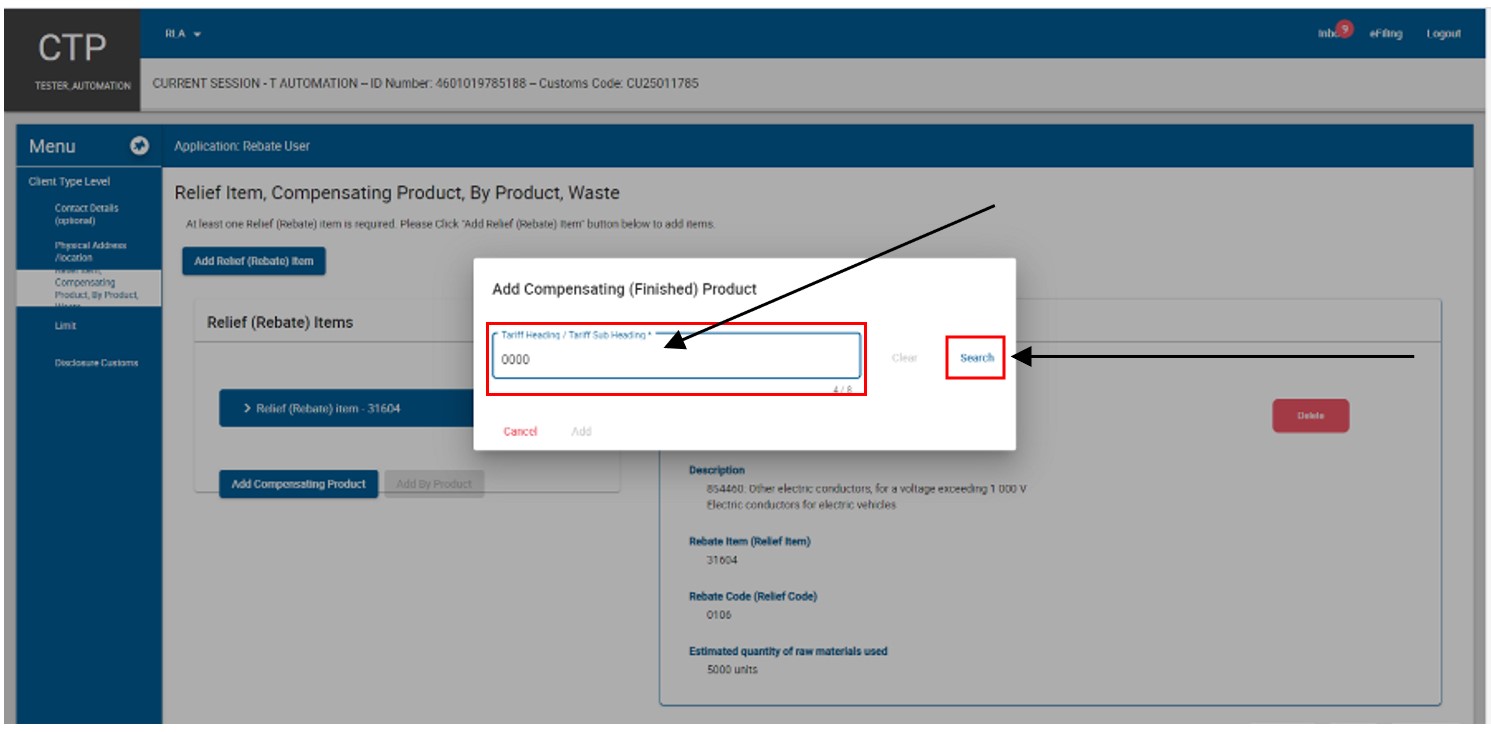
- The system displays the description of the compensating (finished) product.
- The user must capture the tariff heading and/or subheading of the compensating (finished) product as specified in Schedule 1 Part 1.
- If the tariff heading or subheading of the compensating (finished) product has been incorrectly captured, the user:
- Clicks on clear; and
- Recaptures the tariff heading or subheading of the compensating (finished) product as prescribed in paragraph here)
- If the tariff heading or subheading of the compensating (finished) product has been incorrectly captured, the user:
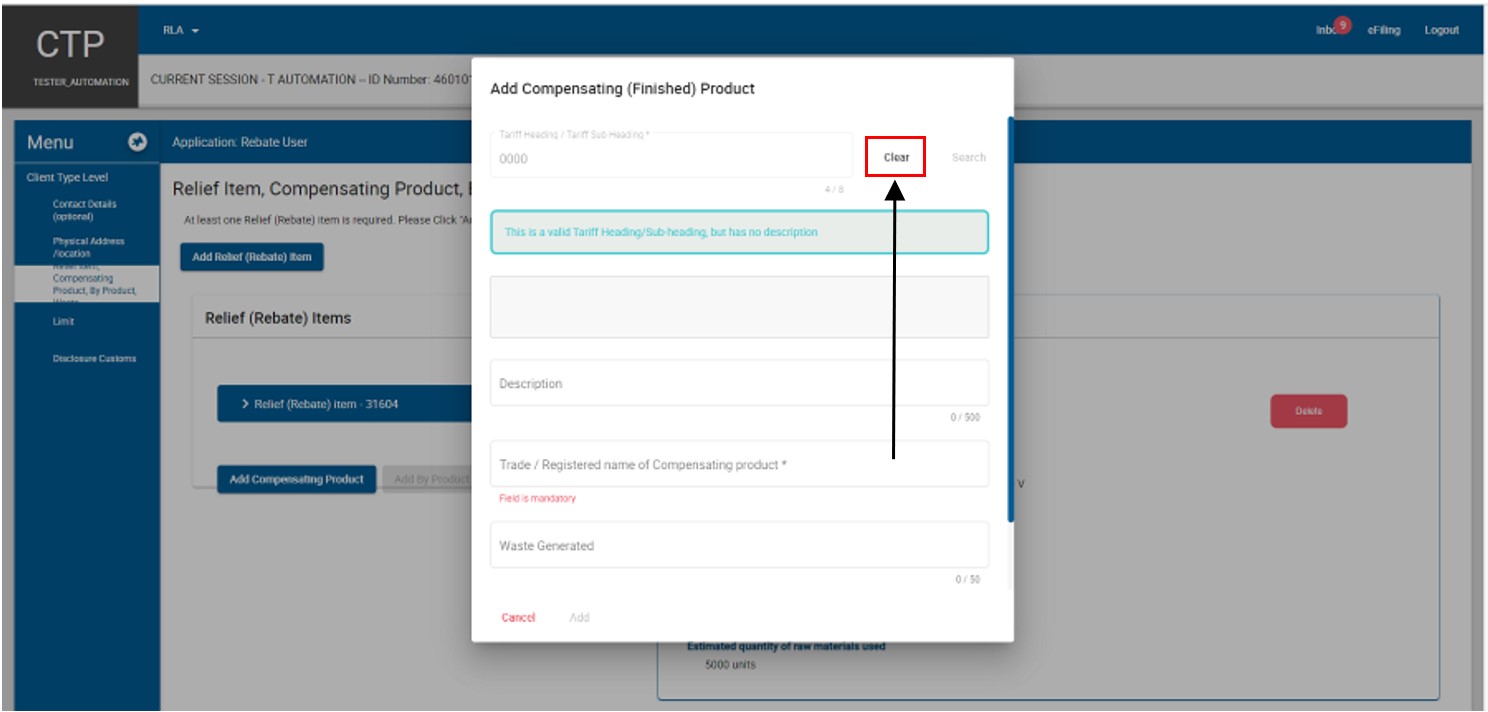
- If the tariff heading or subheading of the compensating (finished) product is correct:
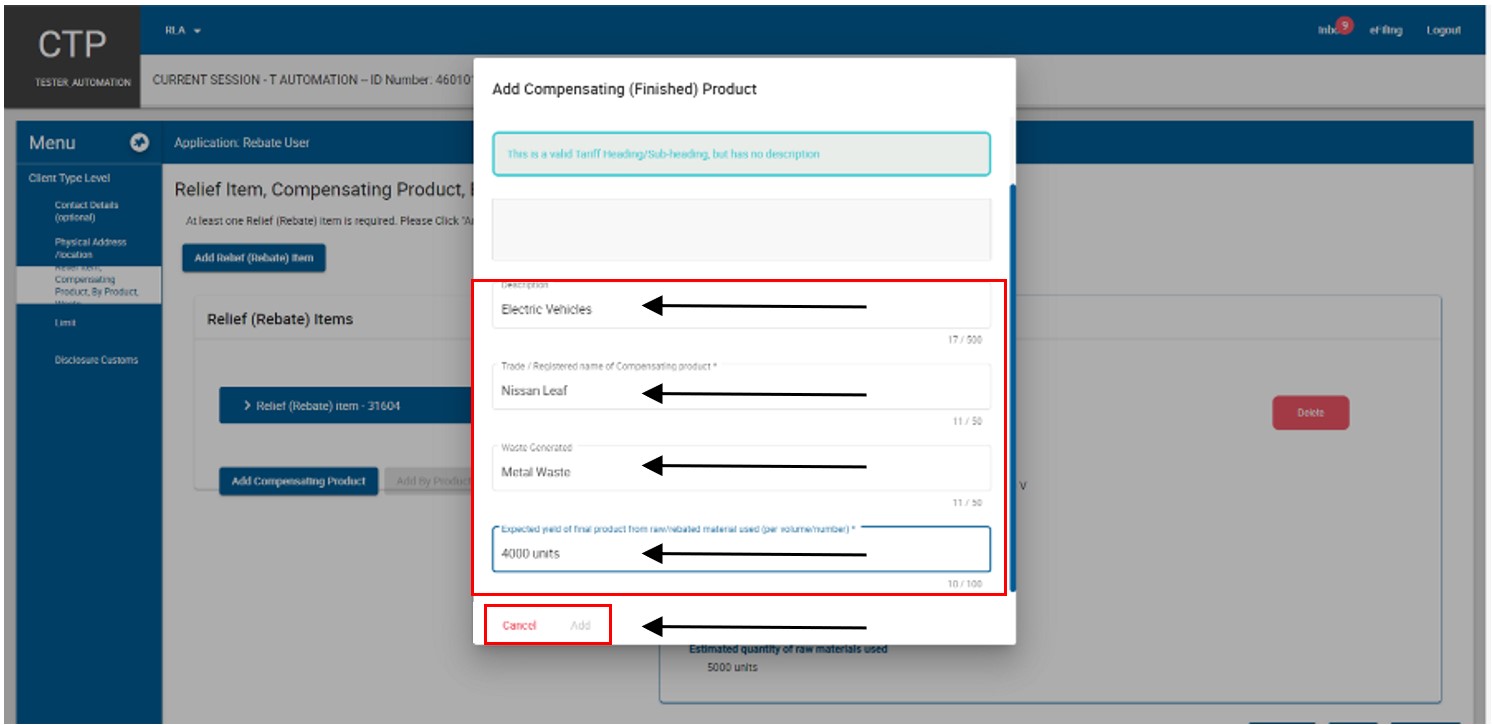
- The user captures:
- The description of the compensating (finished) product – this field is optional;
- The Trade / Registered Name of Compensating Product – this field is mandatory; and
- The expected yield of the final product obtained from the raw or rebated material used (per volume or number) – this field is mandatory; and
- The user captures:
- If the tariff heading or subheading of the compensating (finished) product is correct:
- The user clicks on:
- Add if correct, or
- Cancel if incorrect and recaptures the required information as prescribed in paragraph here)
- The user clicks on:
- The compensating (finished) product information captured is automatically saved and displayed on the Relief item, Compensating Product, By Product, Waste page.
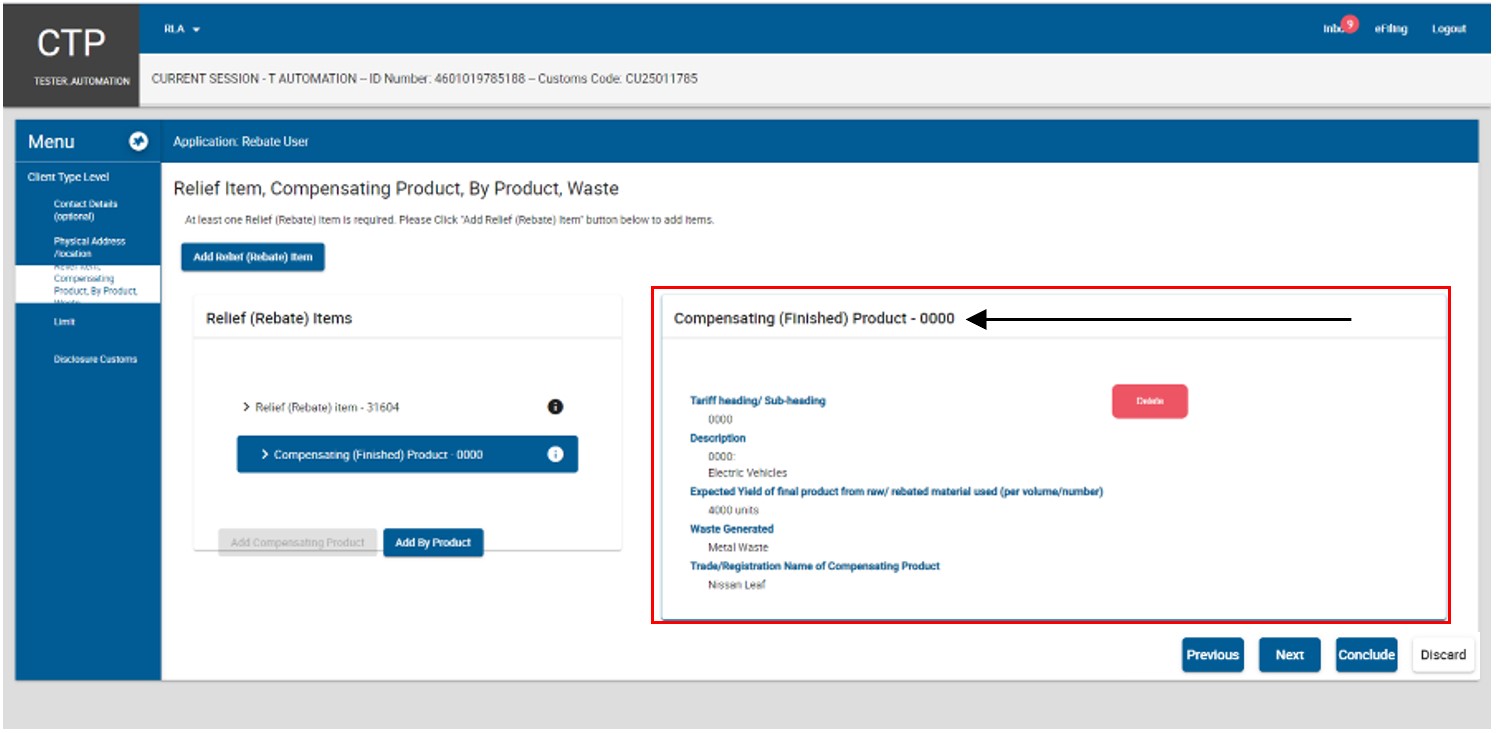
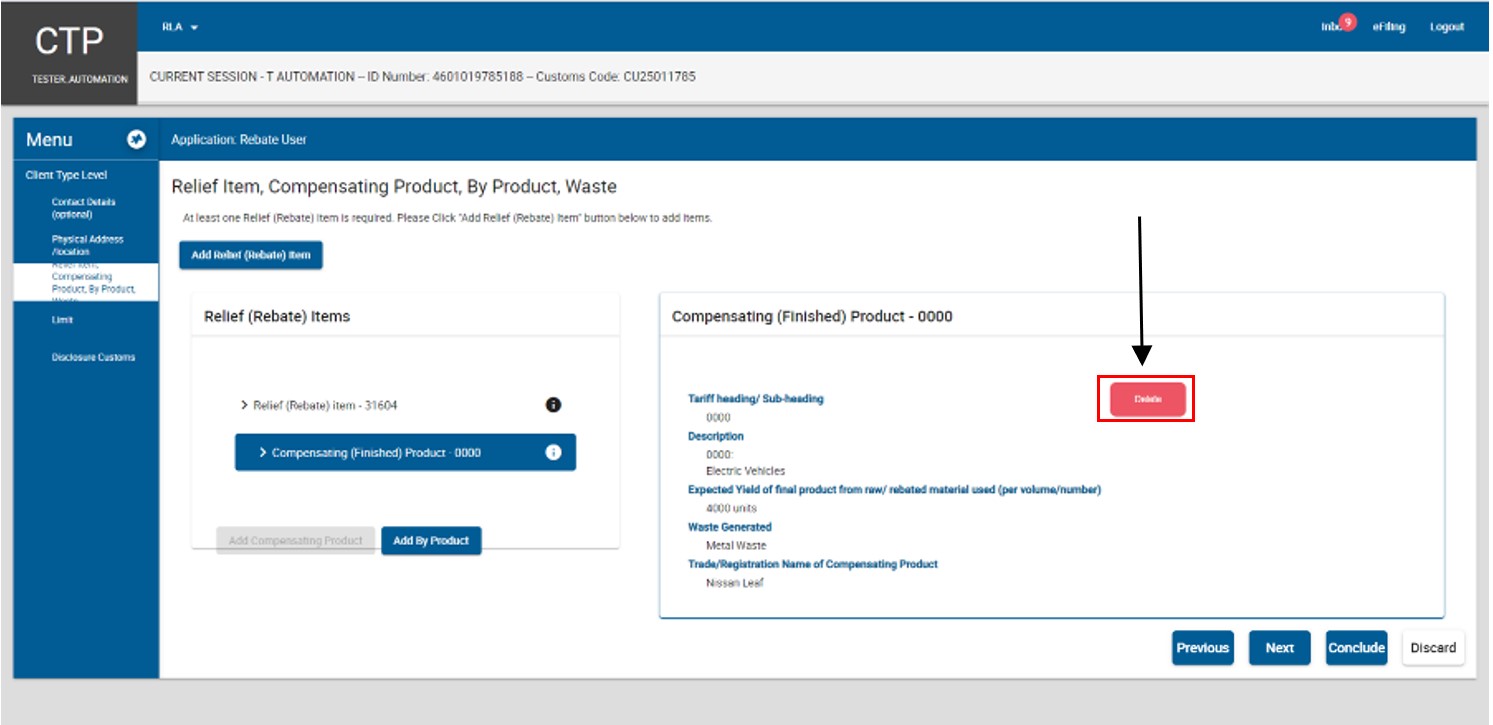
- If the compensating (finished) product details are incorrect, the user:
- Clicks on the Delete button; and
- Recaptures the mandatory information as prescribed in paragraph here)
- If the compensating (finished) product details are correct, the user clicks on the Add By Product button.
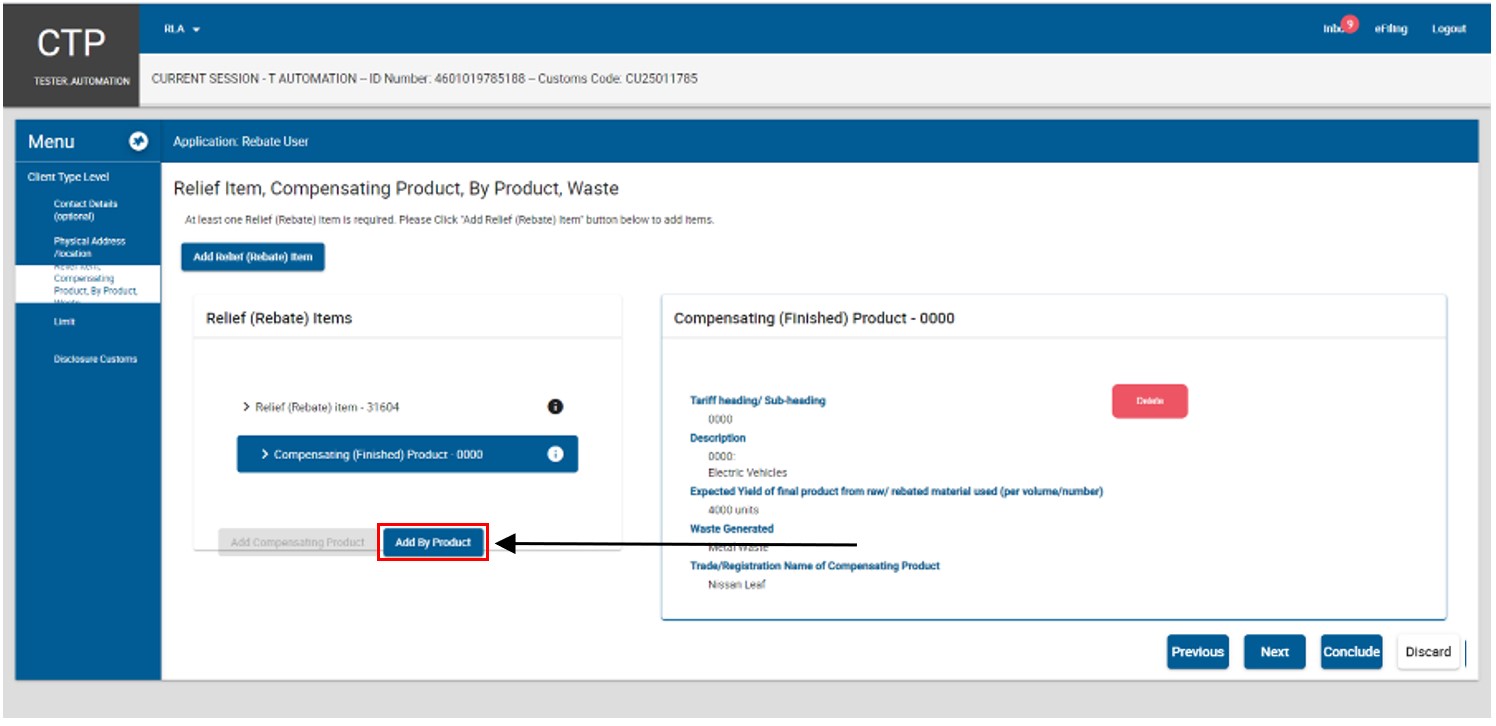
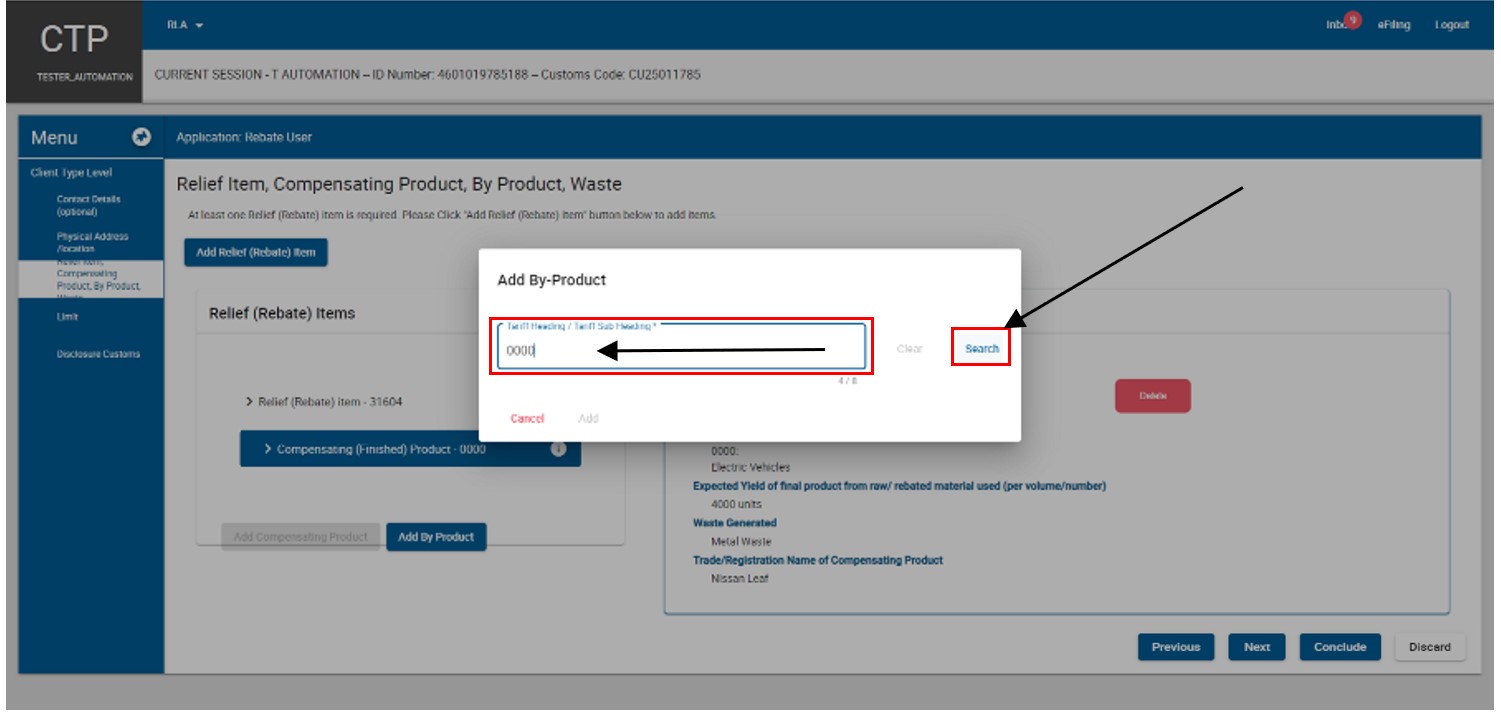
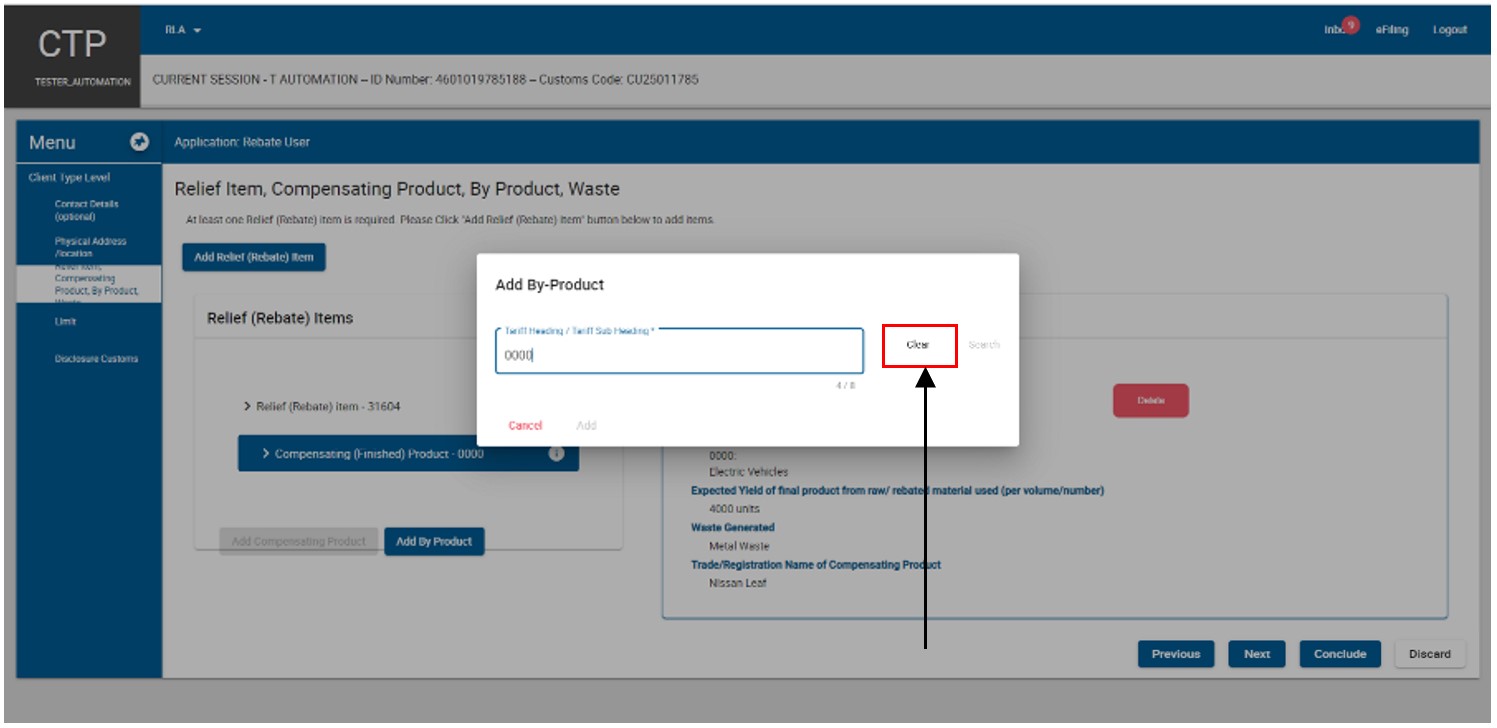
- The system displays the Add By Product capture window. The user:
- Clicks in the tariff heading or subheading text box;
- Captures the tariff heading of the by product; and
- Clicks on Search.
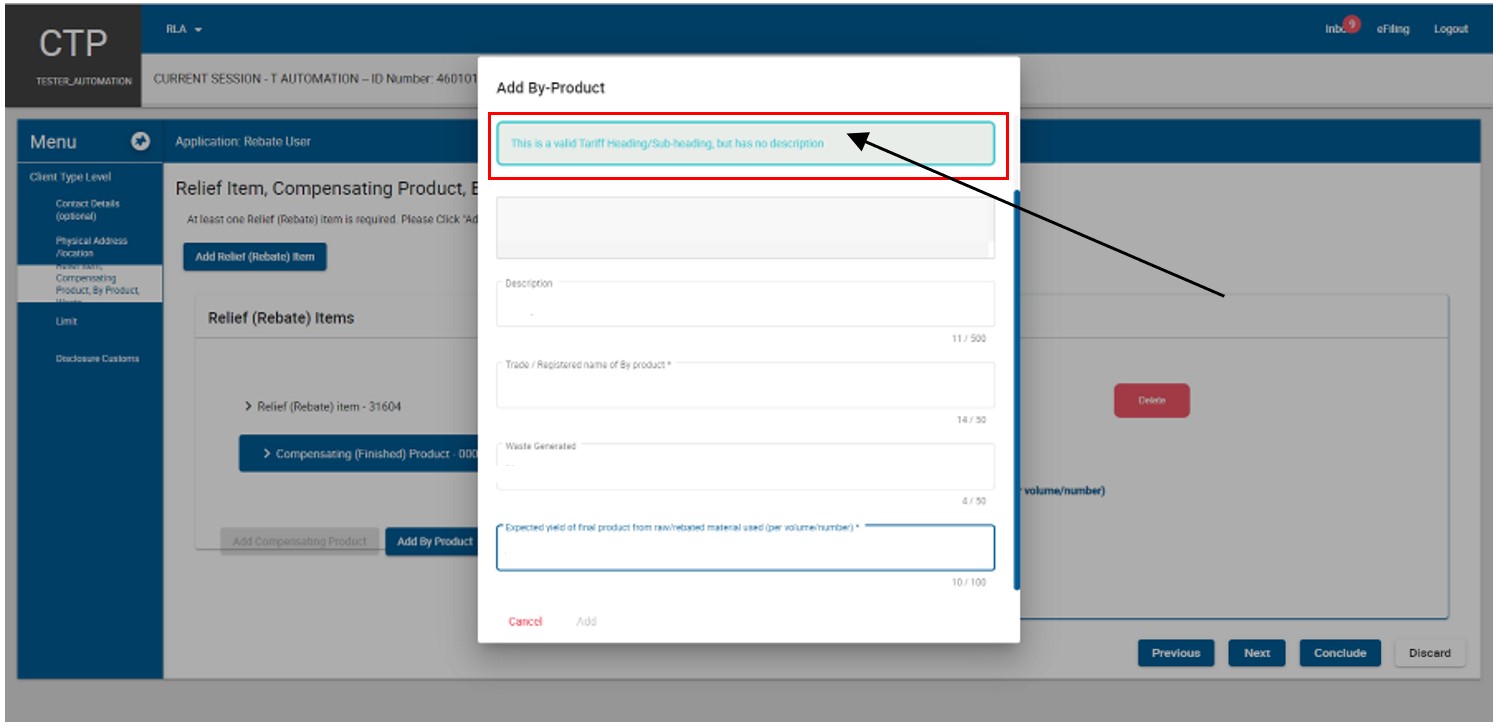
- The system displays the description of the by product.
- The user must capture the tariff heading and/or subheading of the by product as specified in Schedule 1 Part 1.
- If the tariff heading or subheading of the by product has been incorrectly captured, the user:
- Clicks on clear; and
- Recaptures the tariff heading or subheading as prescribed in paragraph here) above.
- If the tariff heading or subheading of the by product has been incorrectly captured, the user:
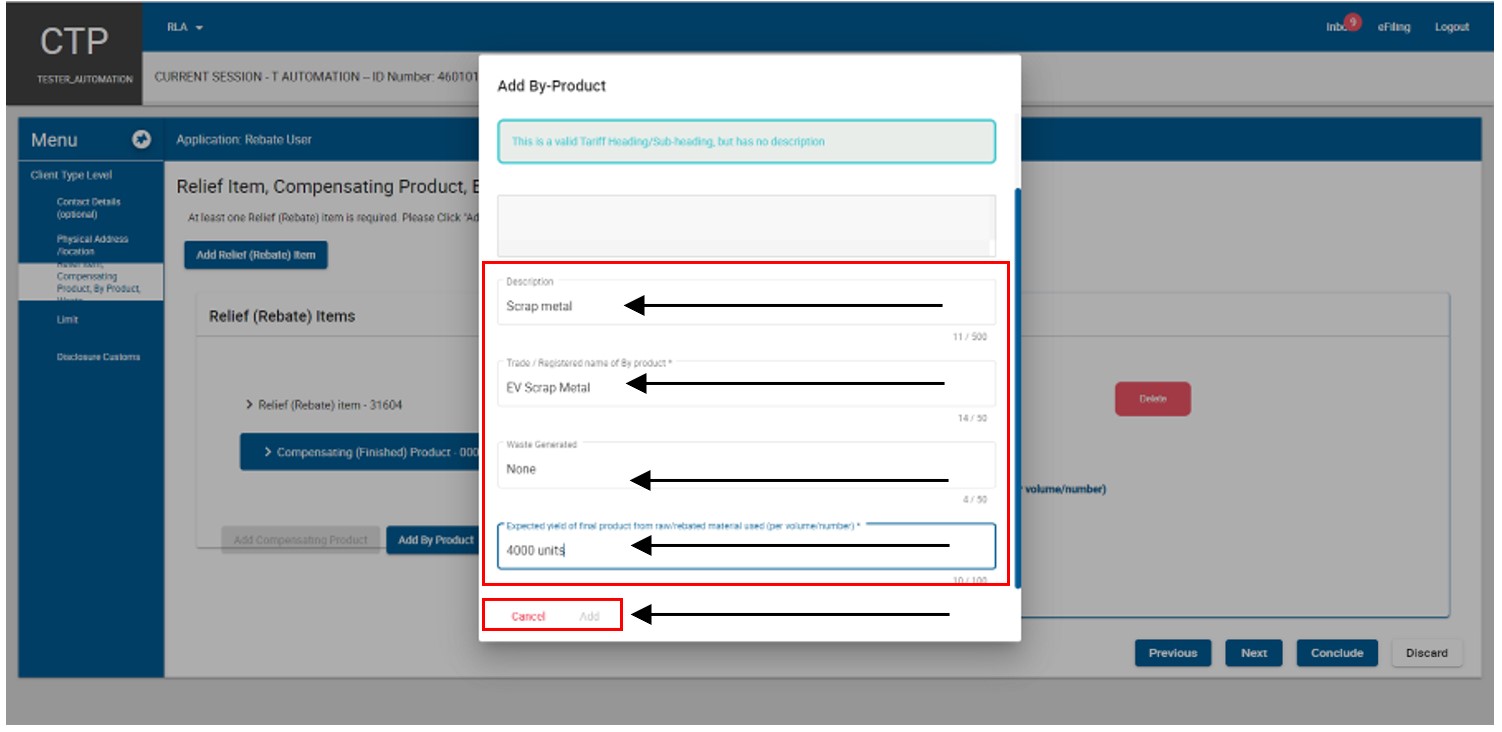
If the tariff heading or subheading of the by product is correct:
- The description of the by product – this field is optional;
- The trade or registered name of the by product – this field is mandatory;
- The waste generated – this field is optional; and
- The expected yield of the final product from the raw or rebated material used (per volume or number) – this field is mandatory; and
The user clicks on:
- Add if correct; or
- Cancel if incorrect and recaptures the required information as prescribed in paragraph here)
- The information captured is automatically saved and displayed on the Relief item, Compensating Product, By Product, Waste page.
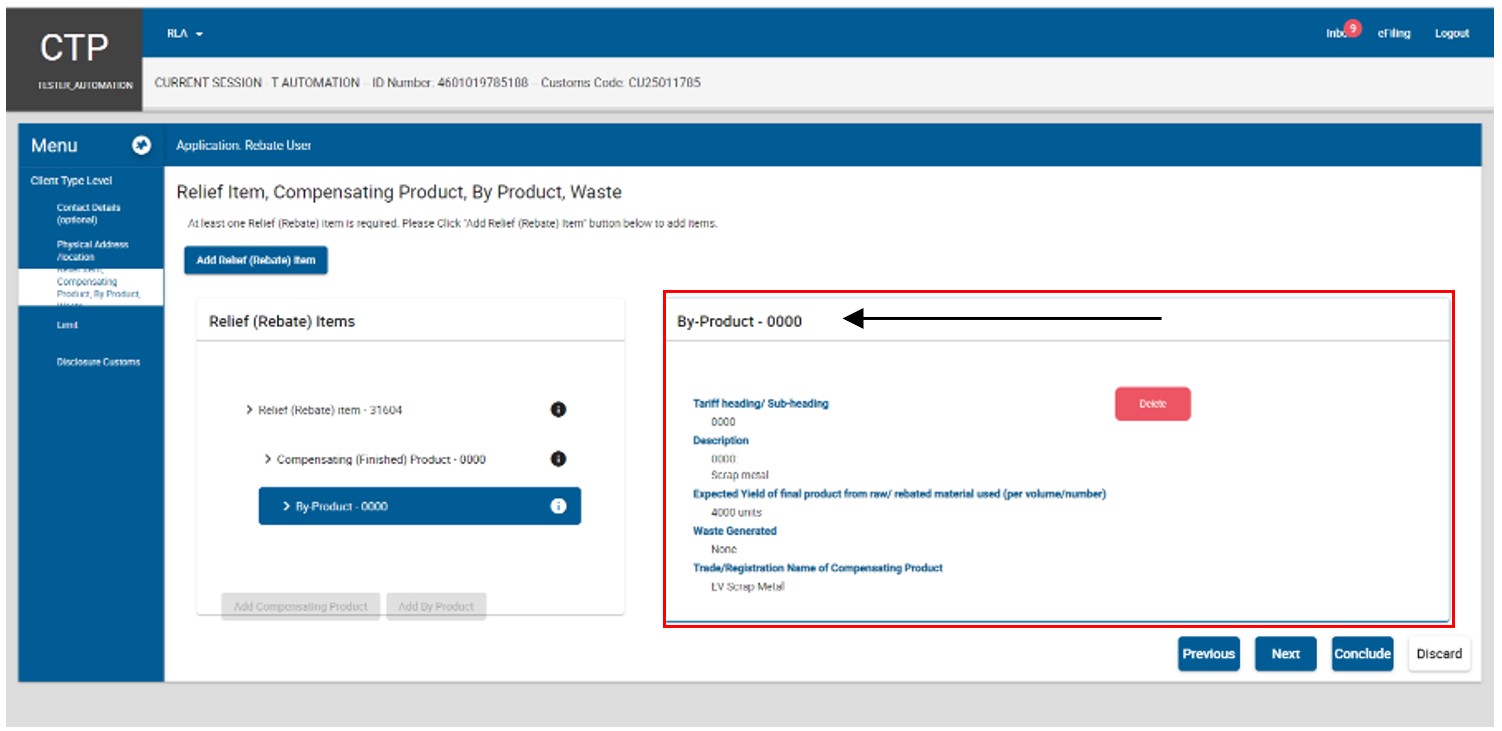
- If the by-product details are incorrect, the user:
- Clicks on the Delete button; and
- Recaptures the by product’s information as prescribed in paragraph here) above.

- If the user must:
- Add another rebate item, the user clicks on the Add Relief (Rebate) Item and continues with the process prescribed in paragraph here) above; or
- Progress to the next field which is Limit (refer to Limit field below) by clicking on the:
- Next button; or
- Limit link under Menu and continues with Limit field above.

- The details captured by the user are automatically saved.
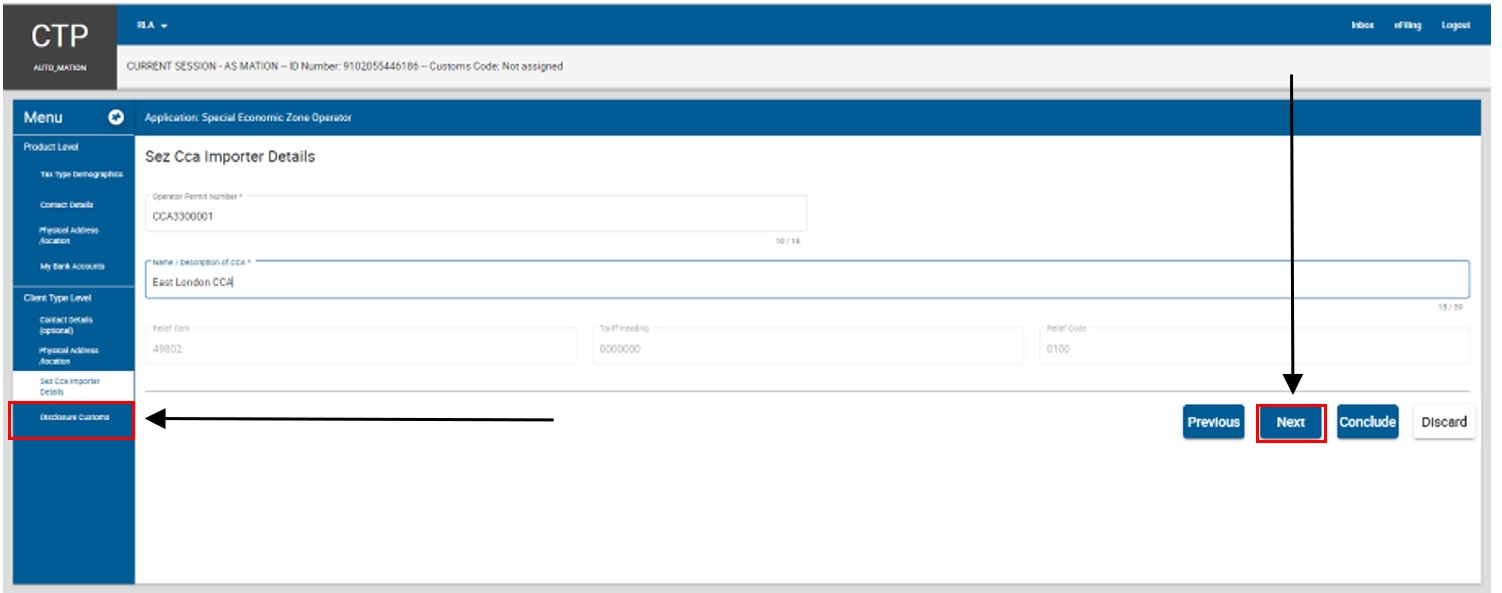
SEZ CCA Importer details
- This field is completed by users to whom Special Economic Zone (SEZ) operators’ permits have been issued by the Department of Trade and Industry
- The user captures:
- The SEZ operator’s permit number; and
- Name or the description of the Customs Control Areas (CCAs) located within the SEZ from where CCA enterprises will be conducting their business.
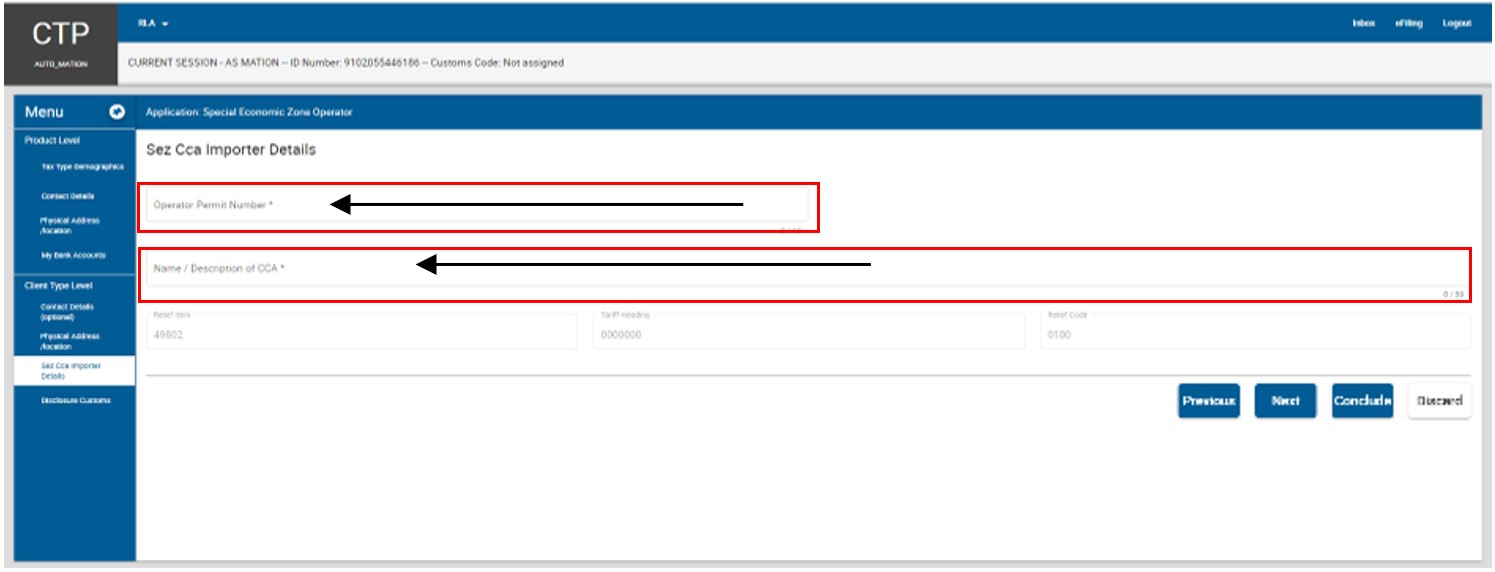
- The system populates the rebate item 498.02, tariff heading and rebate code from Schedule 4.
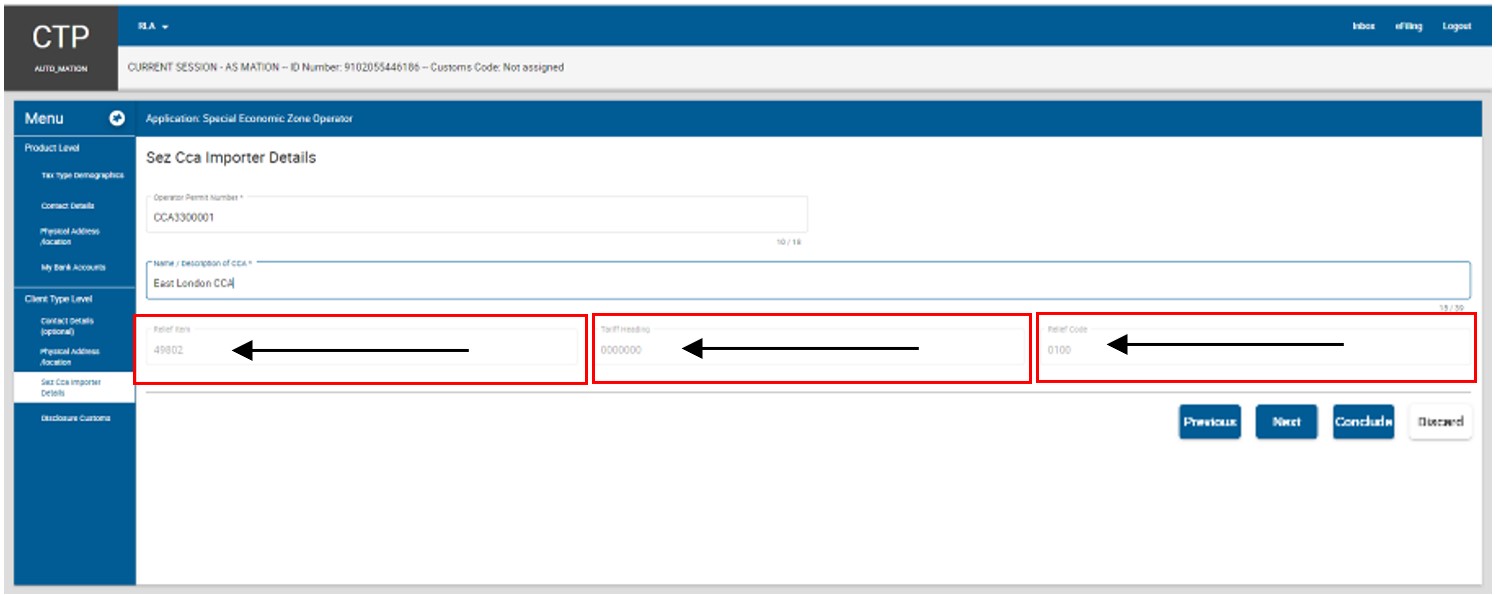
- The user clicks on the:
- Disclosure Customs link under Menu; or
- Next button and continues with the process prescribed in Disclosure Customs Questionnaire below
Accreditation
Selection of the client type Authorised Economic Operator
- A user logs in on eFiling as prescribed in paragraph Log in to eFiling and Change portfolio type and taxpayer details on eFiling. To submit an application for Accreditation he/she must click on New Application under the RLA Registration menu.
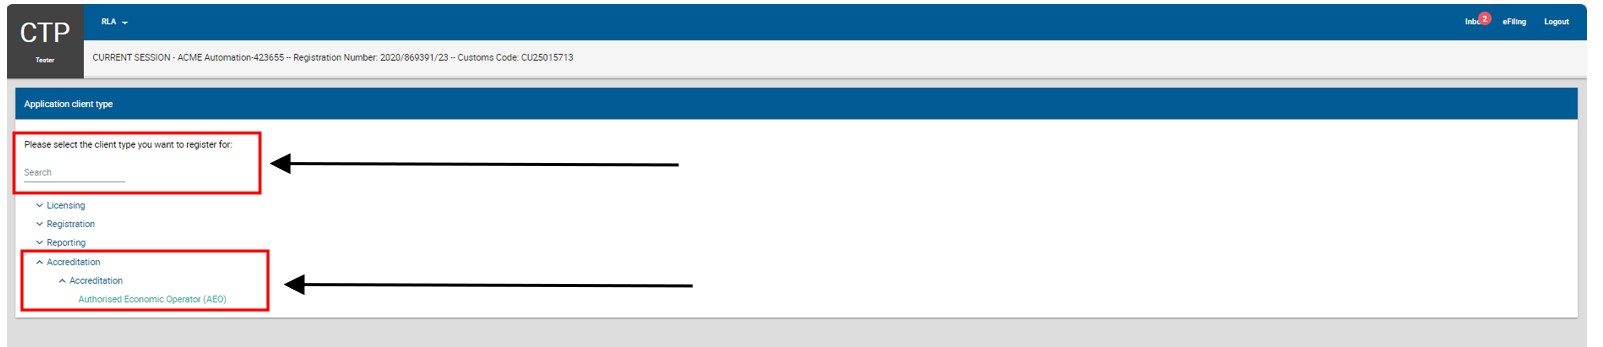
- The system displays the Applicant client type screen and the user:
- Clicks on the dropdown arrow next to the category Accreditation; or
- Captures Authorised Economic Operator in the search field.
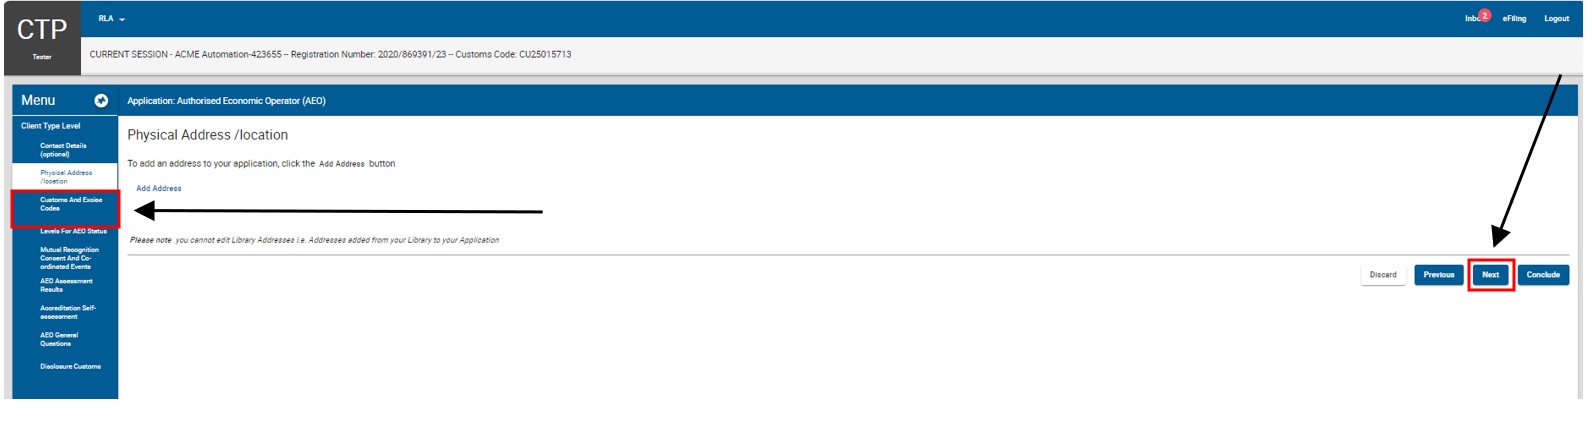
Contact and Physical address/location
The system displays the Authorised Economic Operator (AEO) electronic application form.
- The user:
- Captures the client’s:
- Contact details as described in Contact details and
- Physical address/Location as described in Physical Address/Location and
- Clicks on the:
- Next button to progress to the next field which is Customs and Excise Codes; or
- Customs and Excise Codes link under Menu.
- Captures the client’s:
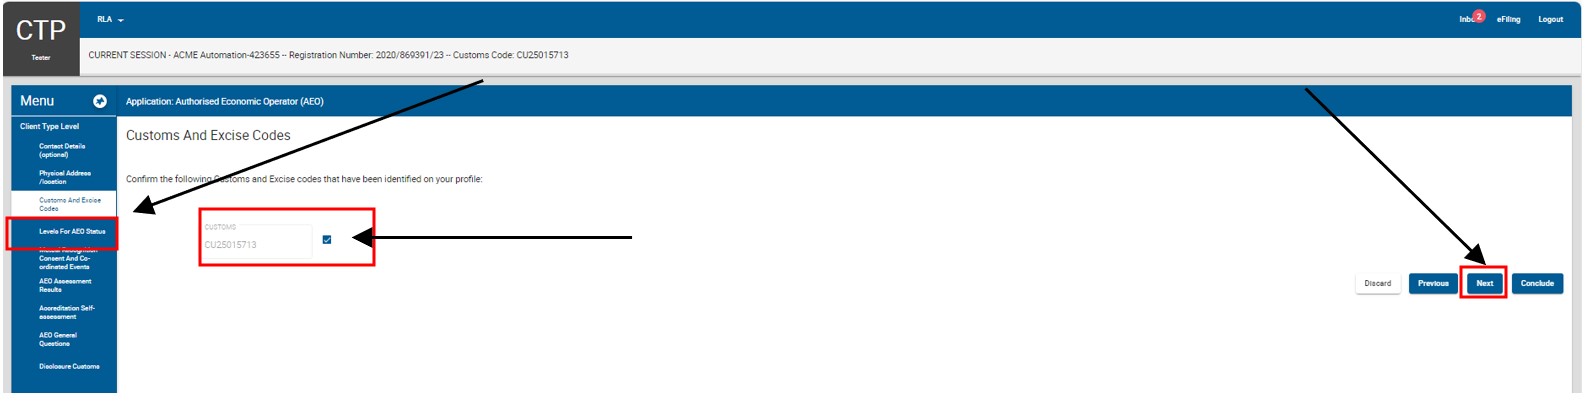
Customs and Excise code(s)
- The system displays all the active Customs and Excise client code(s) of the applicant.
- The user:
- Ticks the tick box(es) next to each Customs and Excise code(s) to confirm that the codes belong to the applicant; and
- Clicks on the:
- Next button to progress to the next field which is Level for AEO Status; or
- AEO Status link under Menu.
AEO Status Level
- The system displays the AEO status Level dropdown box:
- The user clicks on the dropdown arrow.
- The system displays the two (2) levels of accreditation as prescribed in SC-CF-07
- Level 1 AEO Compliance; and
- Level 2 AEO Security.
- The user:
- Selects the level of accreditation status being applied for. Only one (1) can be selected.
- Clicks on the:
- Next button to progress to the next field which is Mutual Recognition Consent and Co-ordinated Events; or
- Mutual Recognition Concept and Co-ordinated Events link under Menu.
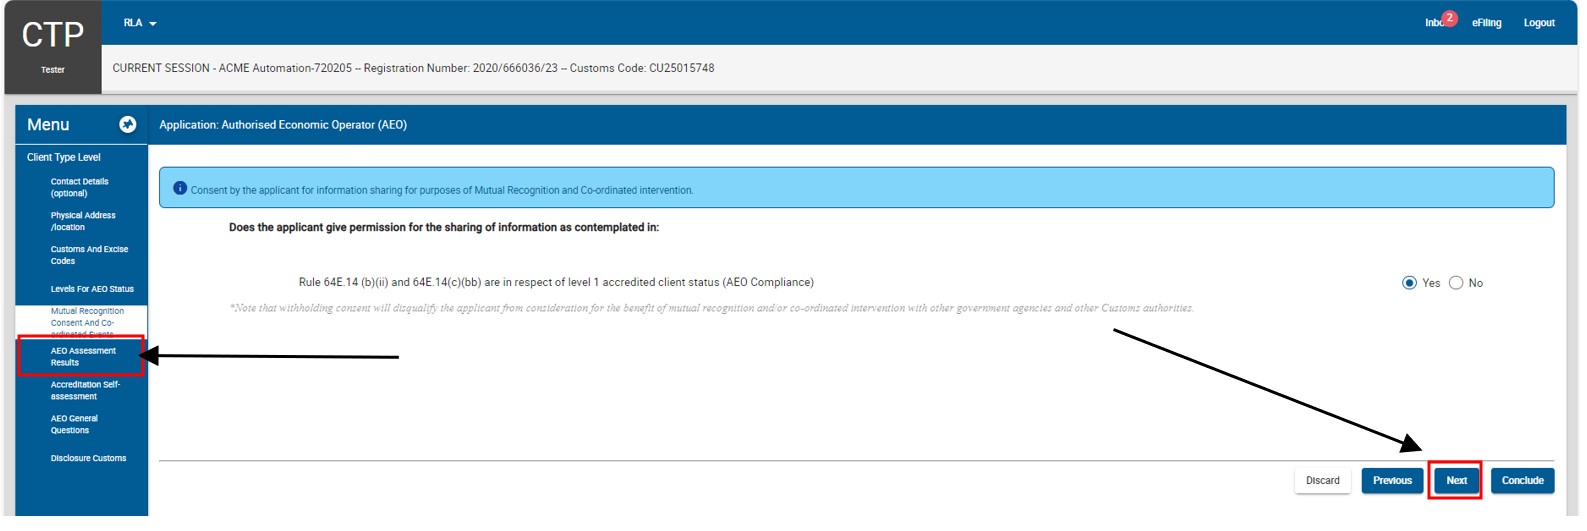
Mutual Recognition and co-ordinated event
- The system displays the mutual recognition consent and co-ordinated events page.
- The user must:
- Indicate whether the applicant gives his/her consent that his/her information may be shared with officers or officials of other Customs authorities or government agencies for:
- Mutual recognition; and
- Co-ordinated interventions undertaken or required to mitigate compliance risks in respect of the applicant’s goods.
- Selecting the radio button:
- Yes, if consent is given; or
- No, if consent is not given.
- Indicate whether the applicant gives his/her consent that his/her information may be shared with officers or officials of other Customs authorities or government agencies for:
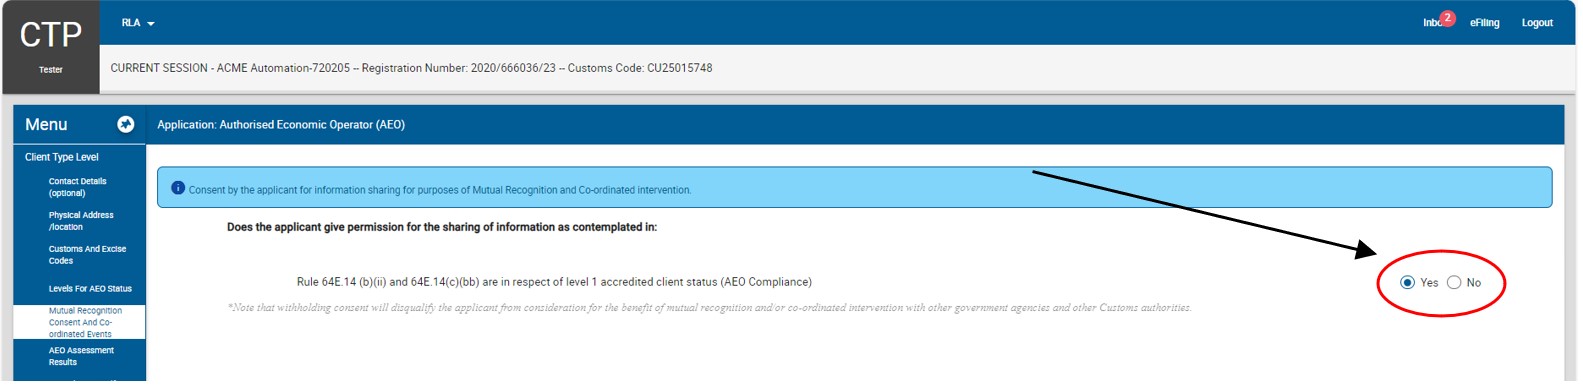
- The user clicks on the:
- Next button to progress to the next field which is AEO Assessment Results;
- AEO Assessment Results link under Menu.
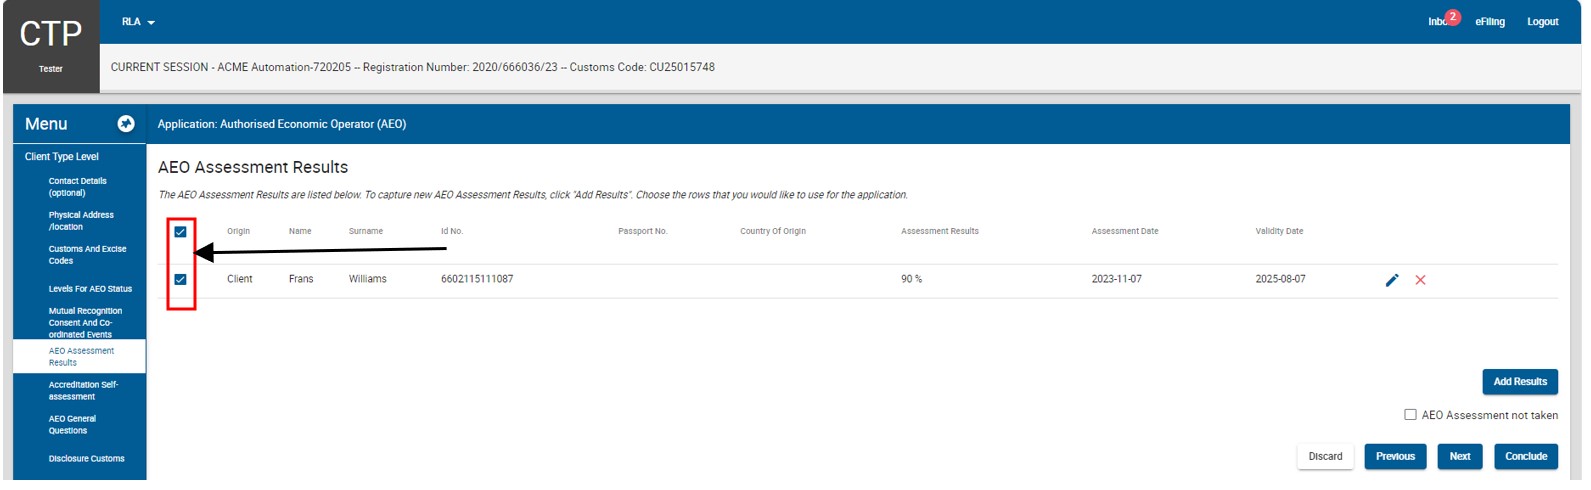
AEO Assessment Results
- The system automatically retrieves sufficient knowledge results of employees that are linked to the applicant and who have completed the assessment through eFiling as prescribed in SC-CF-37
- If multiple results are displayed in the AEO results table the user must deselect the person(s) no longer responsible for administering the accredited clients requirements.
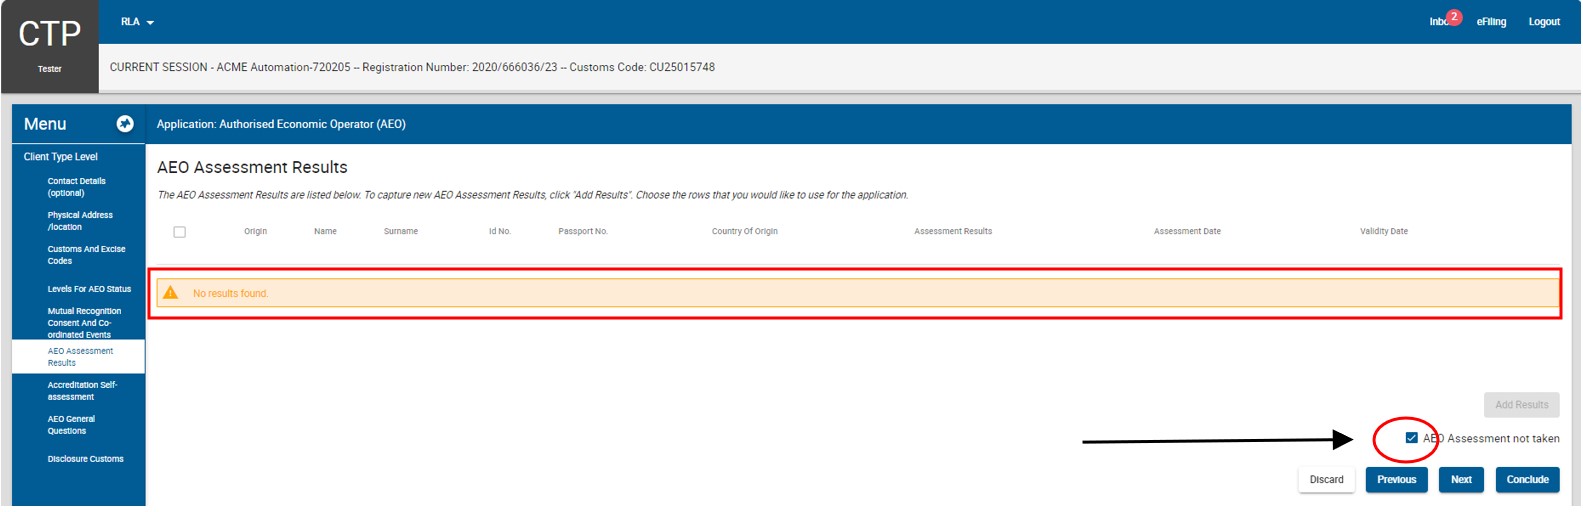
- If no data exists in the AEO Assessment System (SC-CF-37) for the applicant:
- The system displays a message that no results were found and if:
- No AEO assessment test has been taken the user must select the AEO assessment not taken tick box.
- The system displays a message that no results were found and if:
- The nominated person(s) does have a valid accreditation competency assessment certificate the user must:
- Click on the Add Results button [only a maximum of ten (10) can be added].
- The nominated person(s) does have a valid accreditation competency assessment certificate the user must:
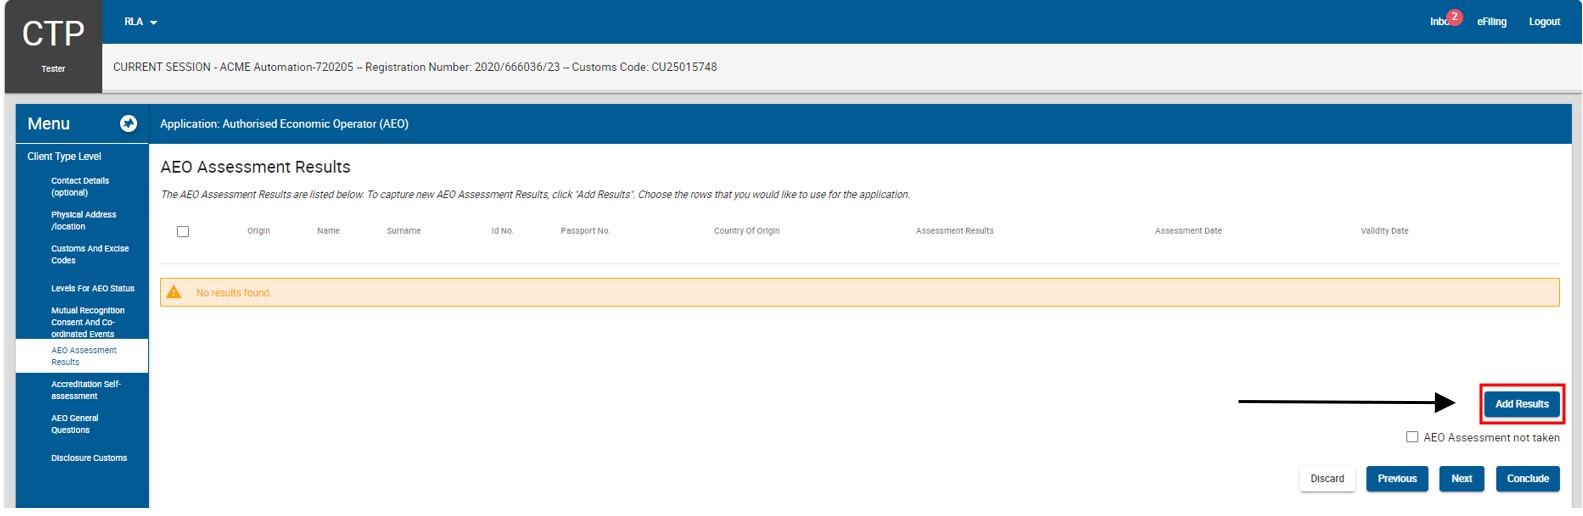
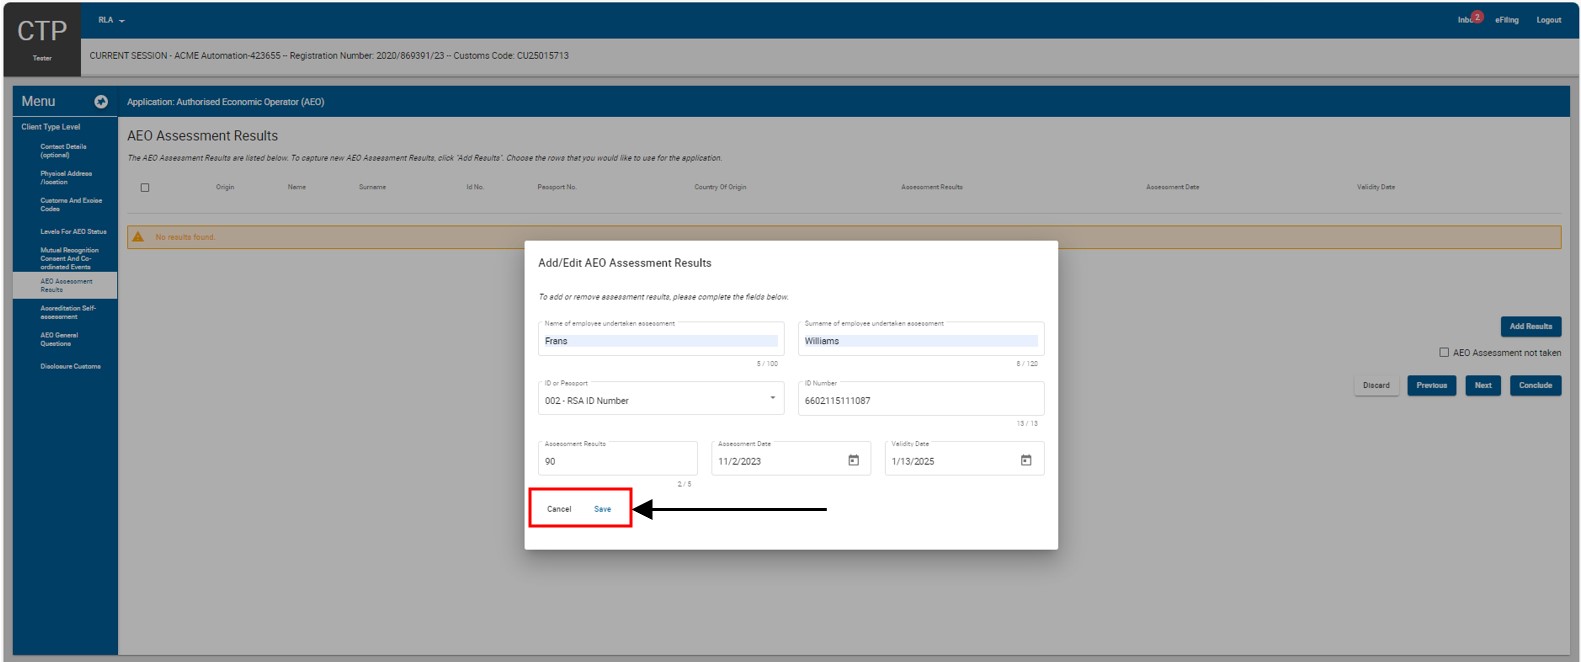
- Capture the details of the person(s) that administers the applicant’s accredited client requirements namely: Name, Surname, Identity (ID) or passport number, Assessment results, the date of assessment and the validity date.
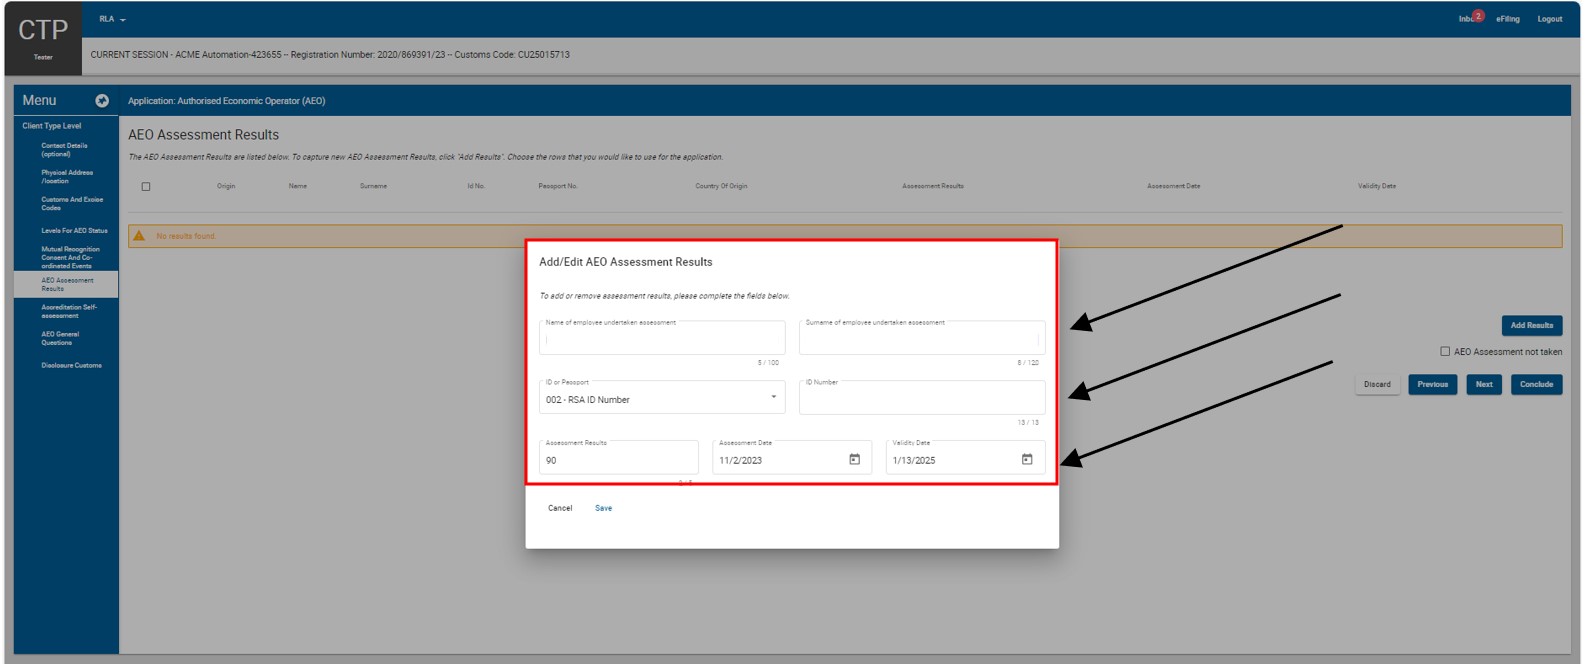
- The captured information is:
- Incorrect, the user clicks on Cancel and recaptures the required information; or
- Correct, the user clicks on Save to save the captured information.
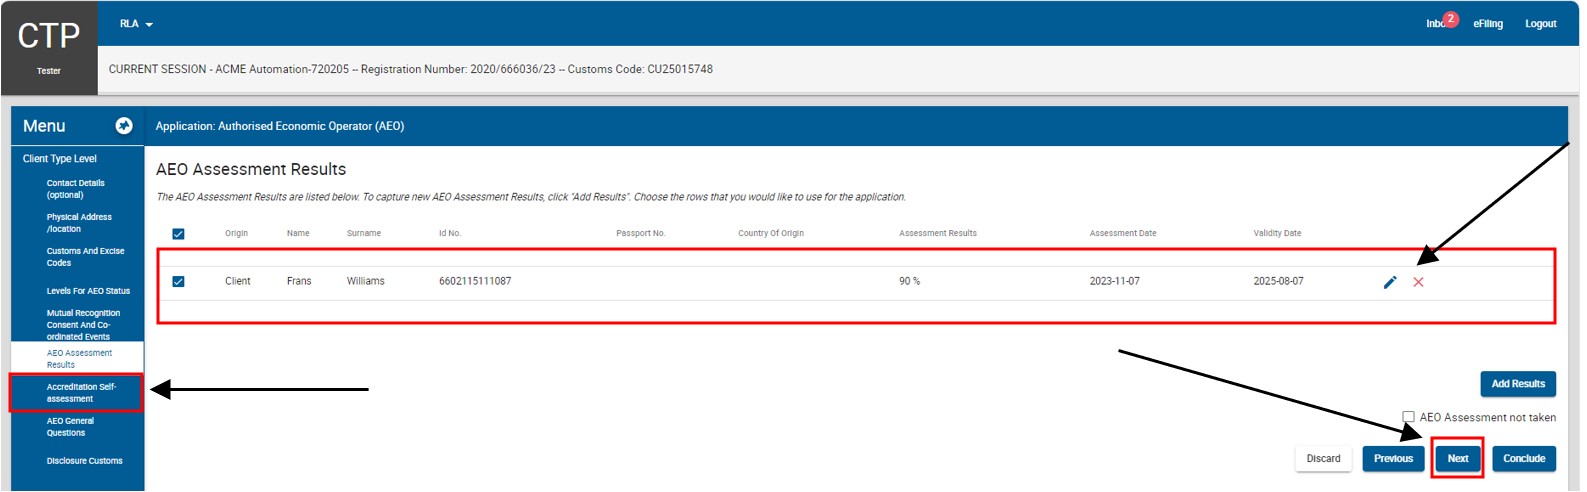
- The system displays the AEO assessment details captured and the user:
- Is able to edit or delete any AEO assessment results captured by selecting the Edit or Delete icon.
- Clicks on the:
- Next button to progress to the next field which is the Accreditation Self-Assessment; or
- Accreditation Self-Assessment link under Menu.
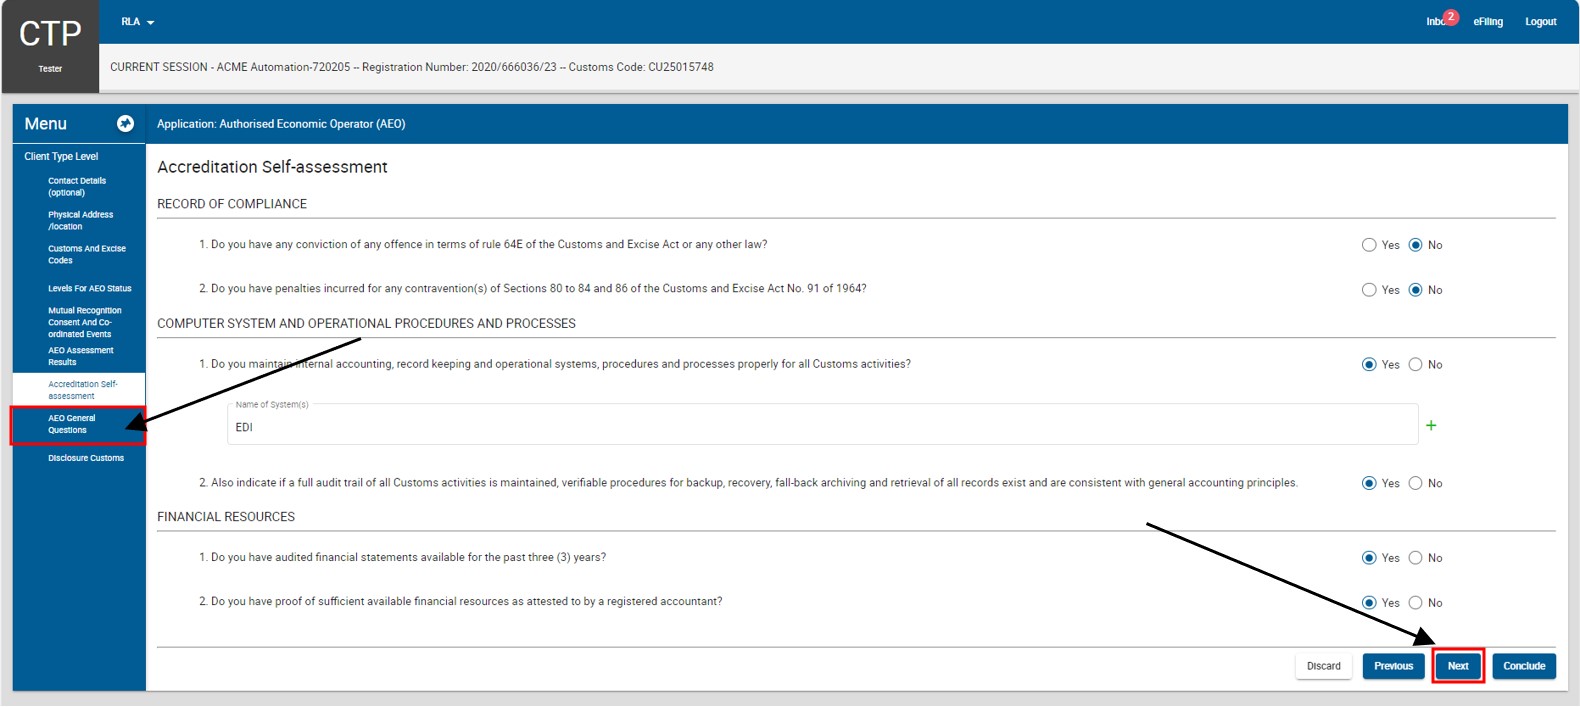
Accreditation Self-Assessment
- The system displays the Accreditation Self-Assessment mandatory questionnaire.
- The user must answer all the questions listed by selecting either Yes or No. The questionnaire is divided into three (3) sections:
- Record of compliance;
- Computer system and operational procedures and processes – if the applicant does maintain internal accounting, record keeping and operational system procedures and processes the user must supply the name of the computer system(s) used up to a maximum of ten (10) systems; and
- Financial resources.
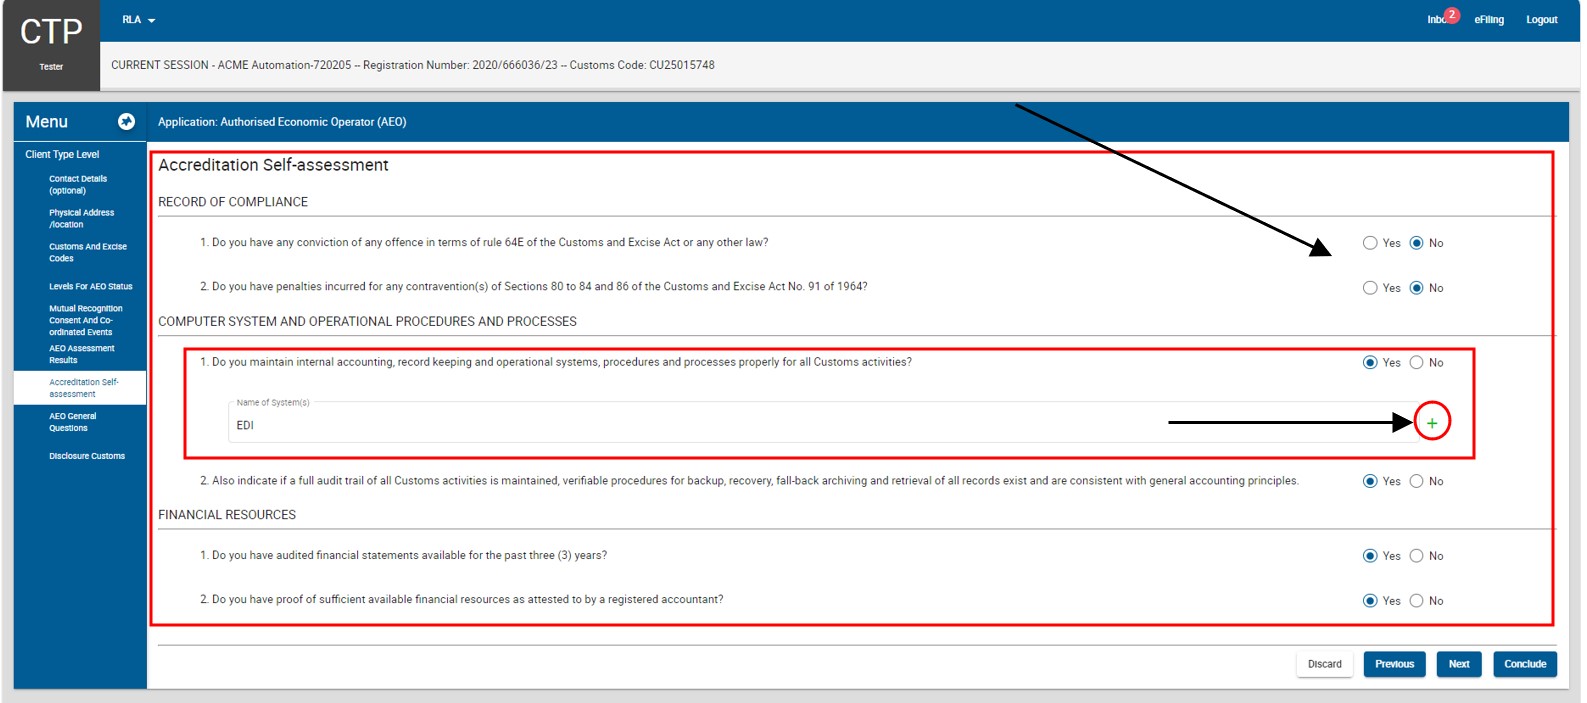
- The user clicks on the:
- Next button to progress to the next field which is the AEO General Questions; or
- AEO General Questions link under Menu.
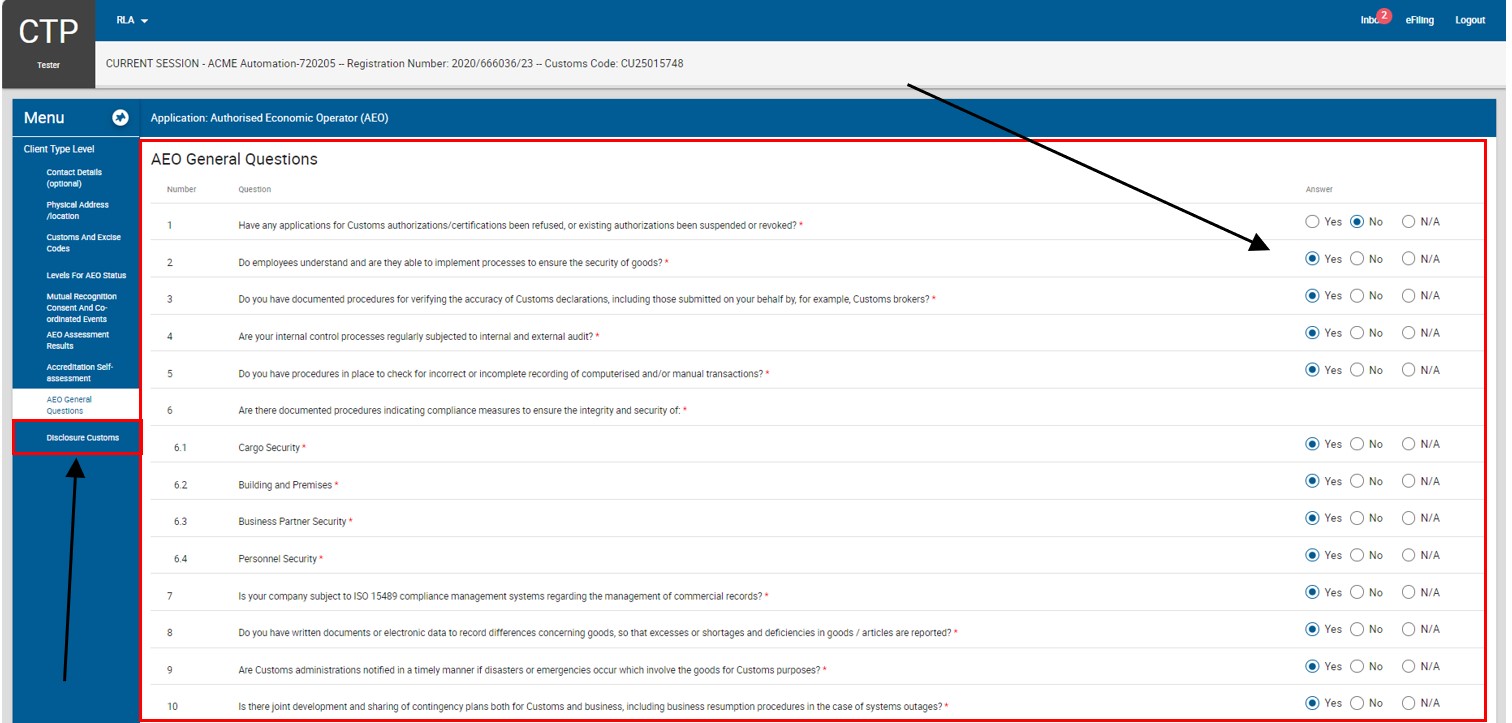
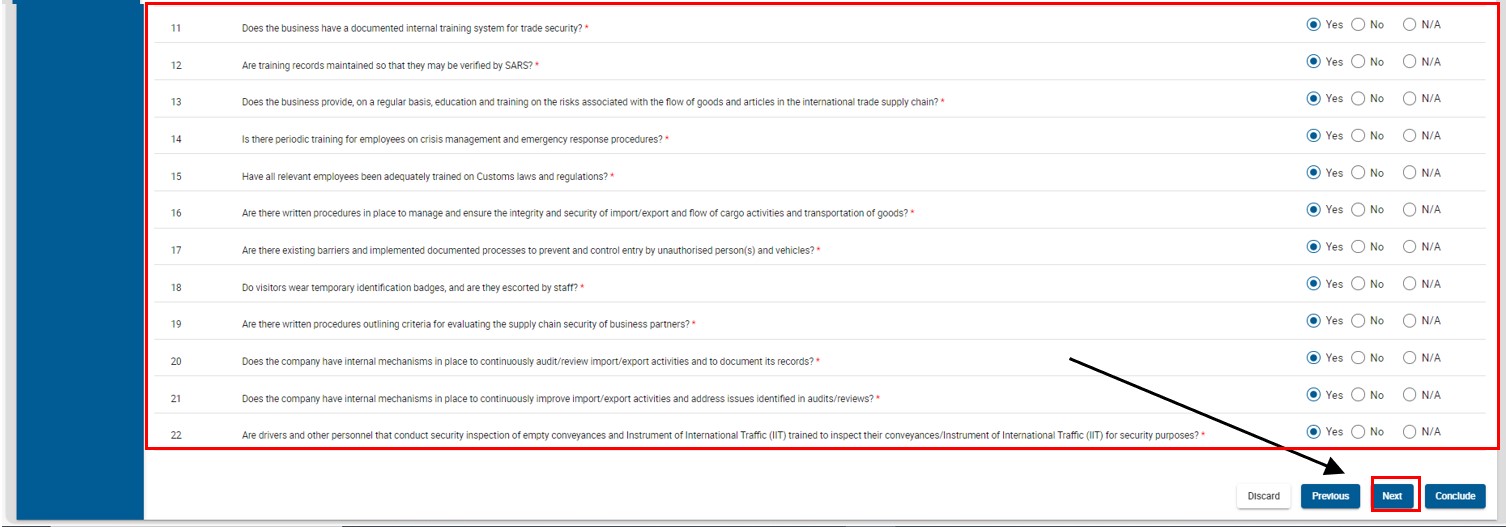
AEO General Questions
- The system displays the AEO General Questions.
- The user must answer only the questions that relate to the AEO level applied for by selecting either Yes, No or N/A (not applicable) as prescribed in SC-CF-07.
- The user clicks on the:
- Next button to progress to the next field which is the Disclosure Customs page; or
- Disclosure Customs link under the Menu.
- The system displays the Disclosure Customs page and the user continues with the process prescribed in Disclosure Customs Questionnaire below.
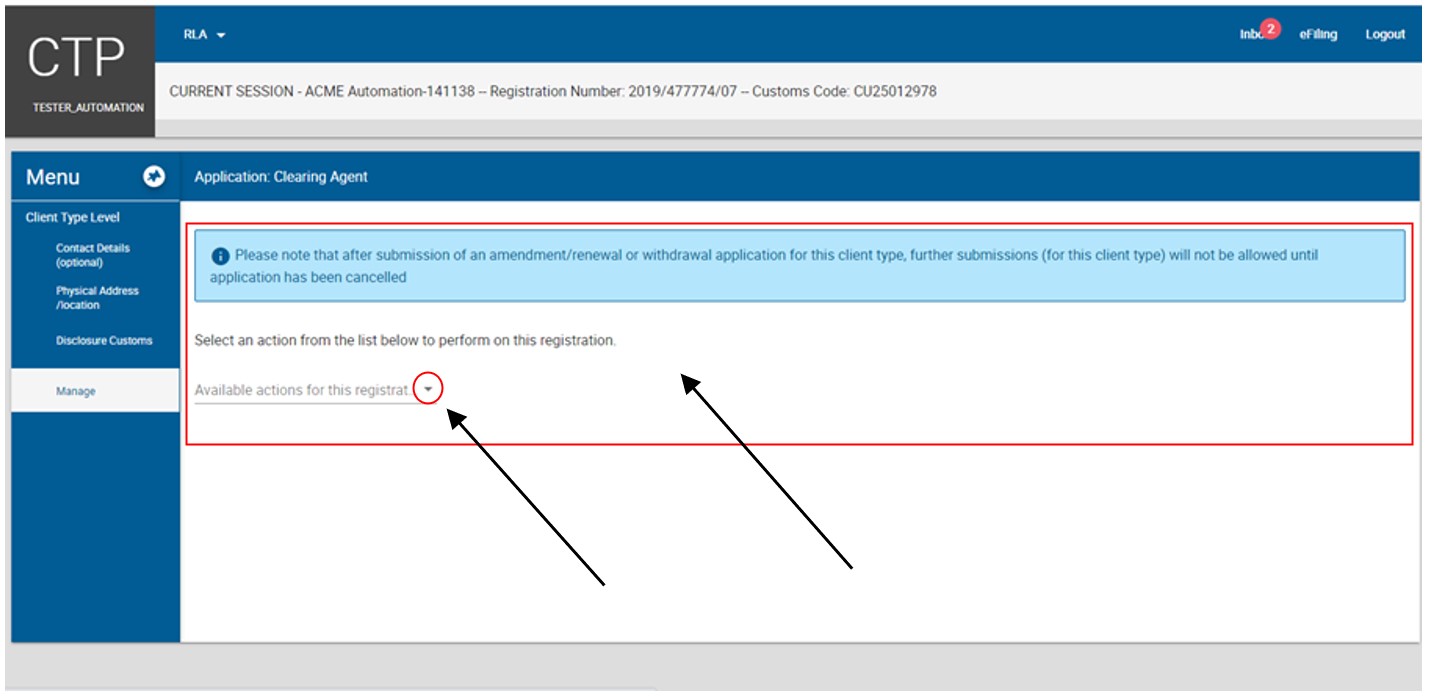
Manage – Amend, Withdraw or Renew
- The requirements in terms of the amendment of existing information, the cancelation of existing clients or renewal of client’s licences are described in SC-CF-19.
- Under the field Manage a user can:
- Amend:
- Product details as prescribed in Product level details above; or
- Existing RLA client details as prescribed in Contact details or Physical Adress/Location above.
- The mutual recognition and co-ordinated event consent status provided at the time of application as indicated in Mutual Recognition and Co-ordinated event above.
- Withdraw or cancel:
- Any registered or licensed RLA client. The client’s AEO accreditation status will automatically be withdrawn or cancelled.
- His/her product only once all the client types registered or licensed have been withdrawn or cancelled.
- Renew his/her licence as prescribed in Schedule 8.
- Amend:
- The amendment of the client product level details
- In order to amend the client’s product details the user clicks on the product details under Products on the RLA dashboard after he/she logged in to eFiling as prescribed in Log in eFiling to change portfolio type and taxpayer details on eFiling above.
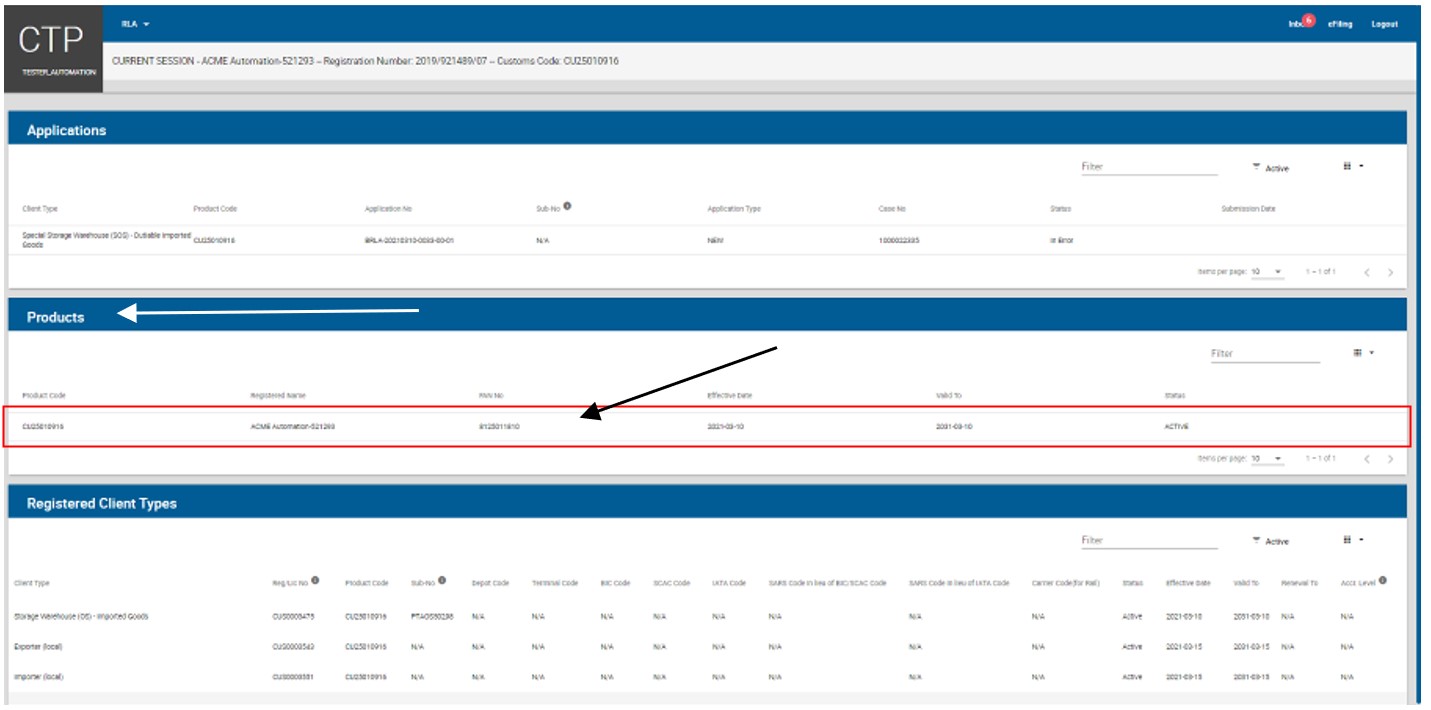
- The system displays the Client Type Level page (refer to Product level details)
- The user clicks on the Manage link under Menu.
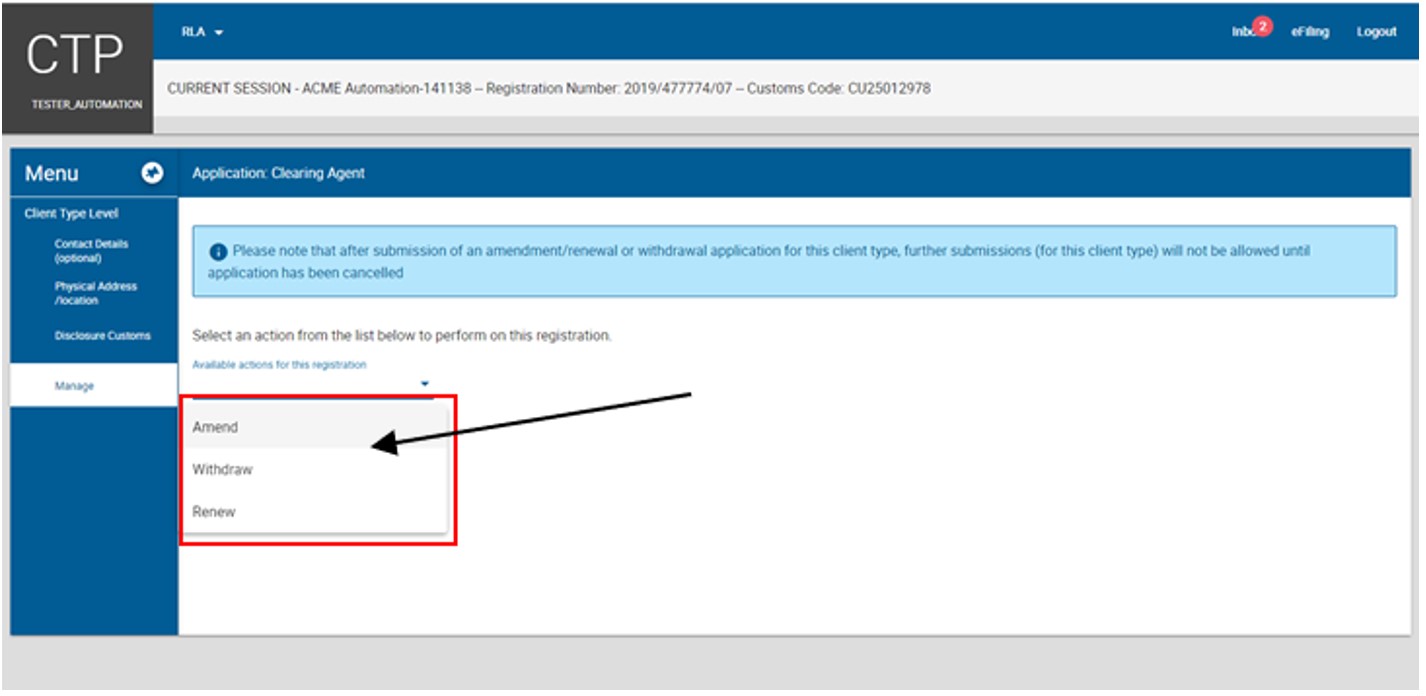
- This system displays the Manage page and the user clicks on the dropdown arrow.
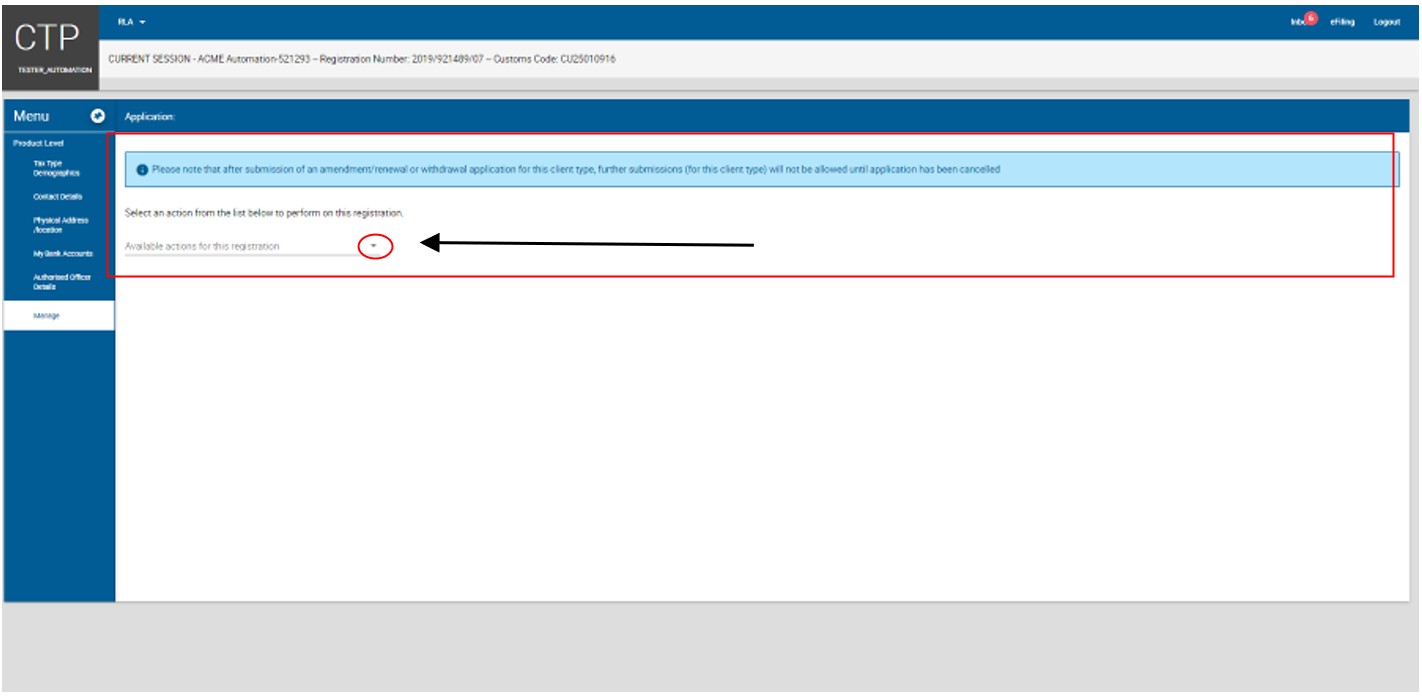
- The system displays the dropdown list of actions. The action withdraw or renew will not display as only amend is applicable. A client’s Procuct will automatically be withdrawn by the system when the client’s last active client type has been withdrawn.
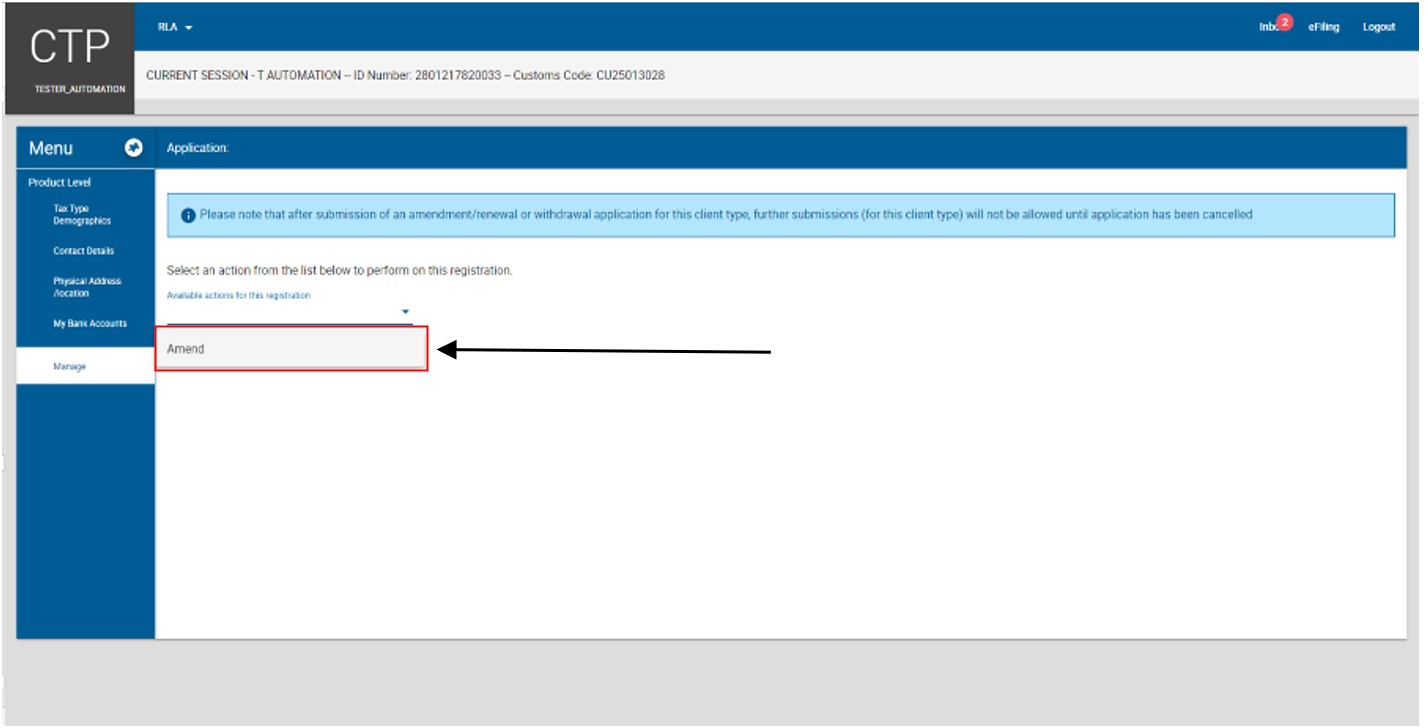
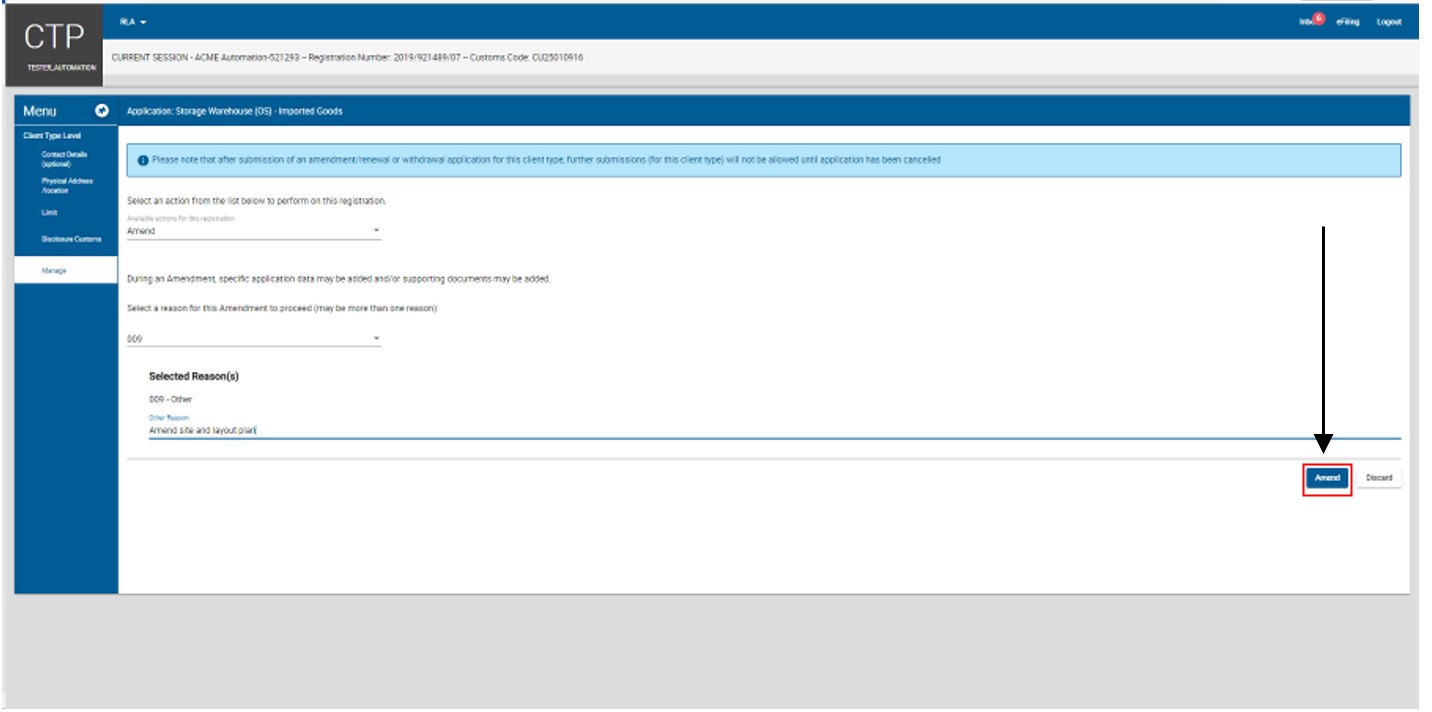
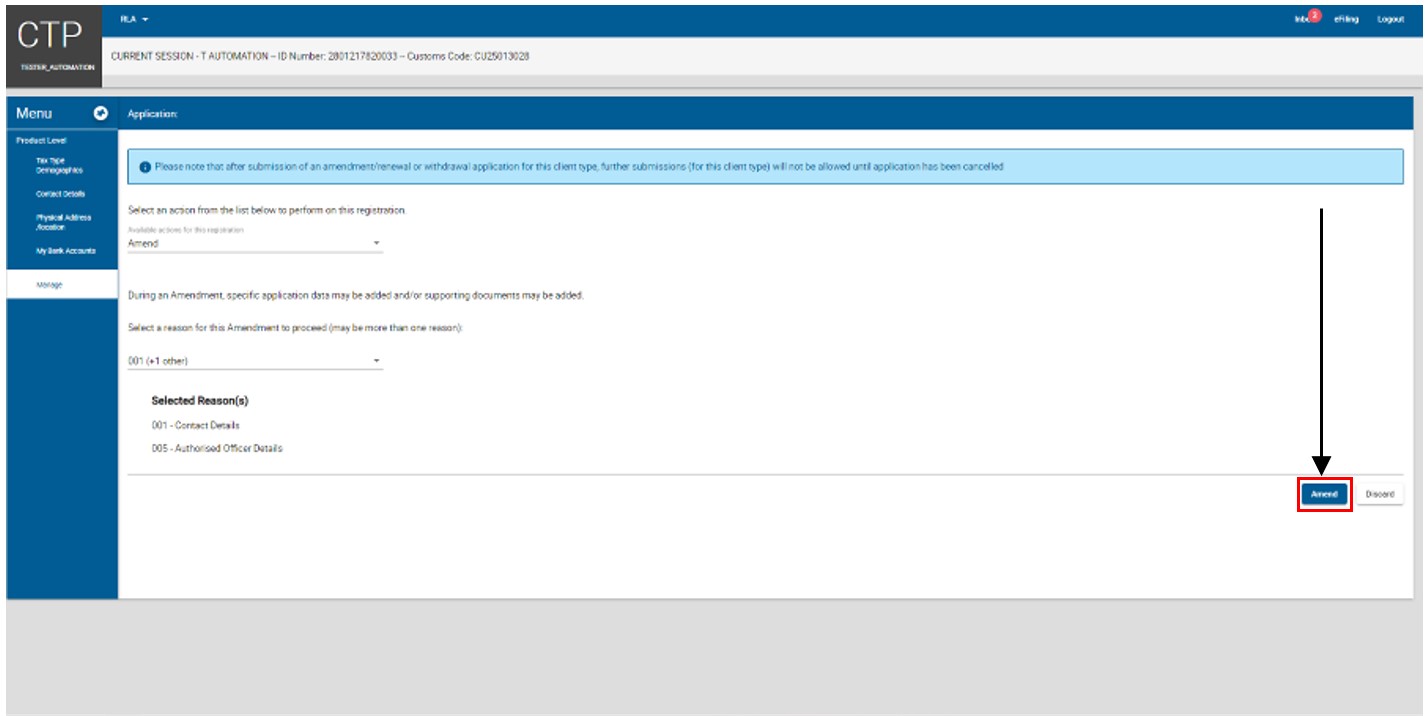
- After selecting the applicabe action from the dropdown list the user clicks on the Select Reason(s) dropdown arrow.
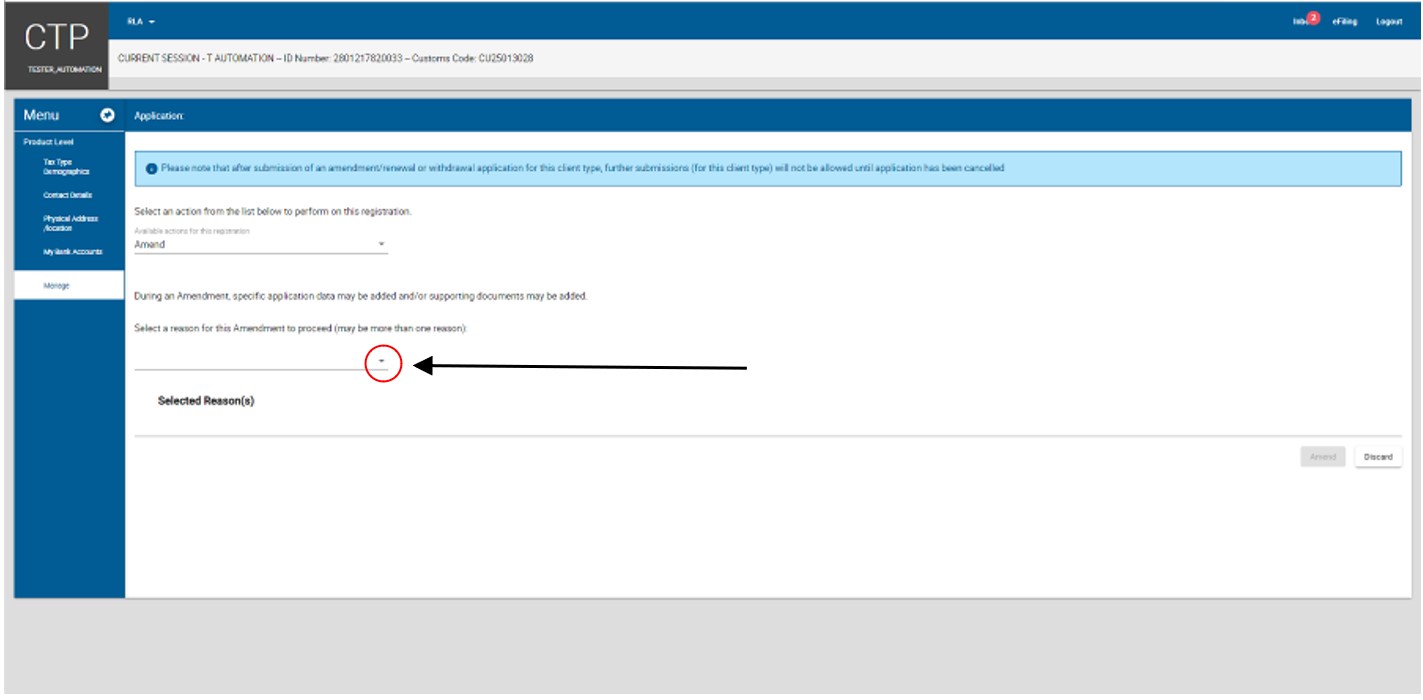
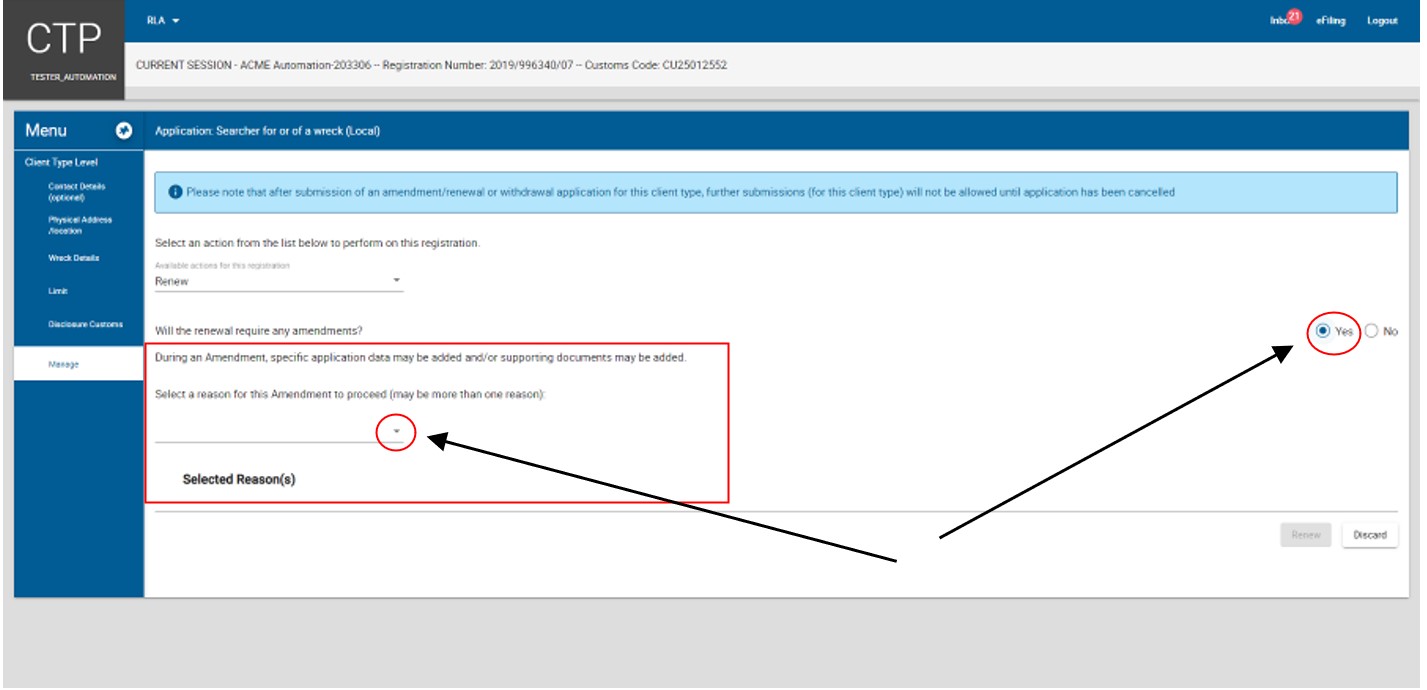
- The system displays a dropdown list of the reason(s) for amendment
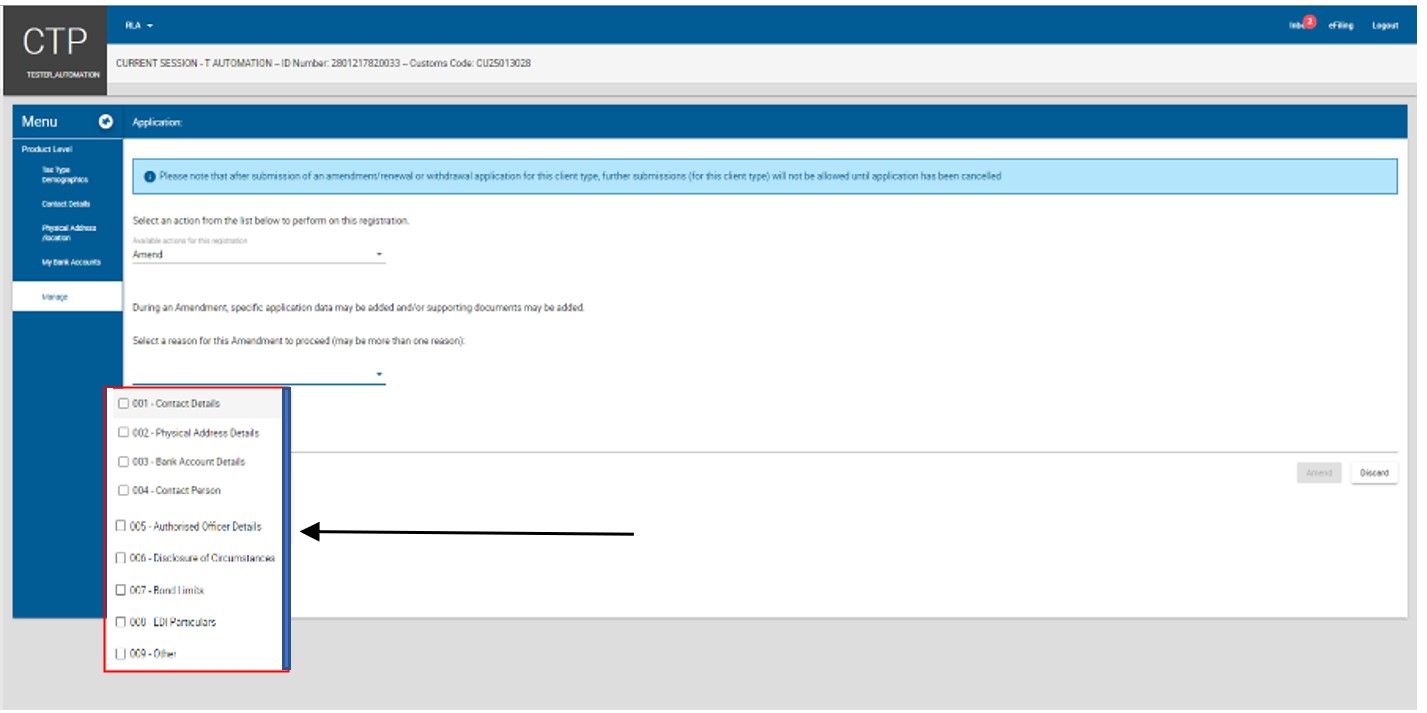
- If the reason for amendment is not listed in the dropdown box:
- The user selects the box Other.
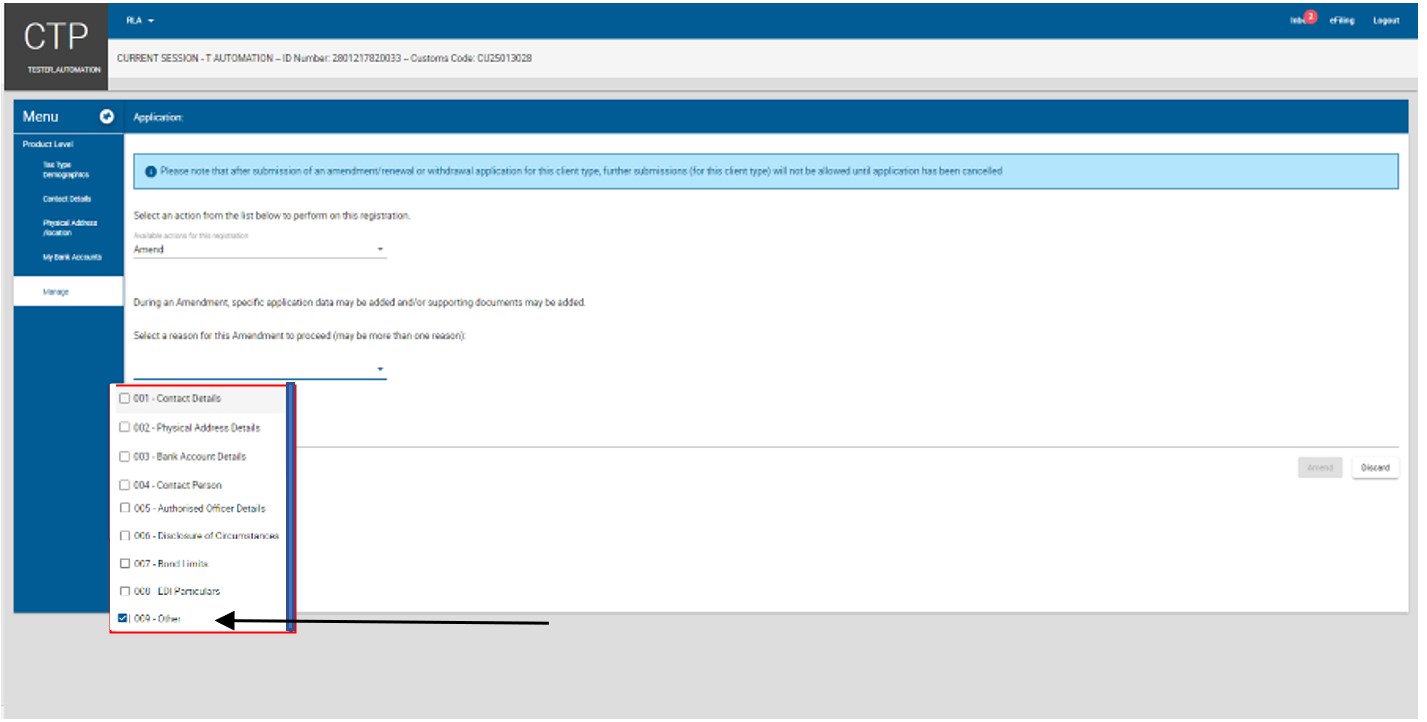
- The system populates the reason Other and the user captures his/her reason for amendment.
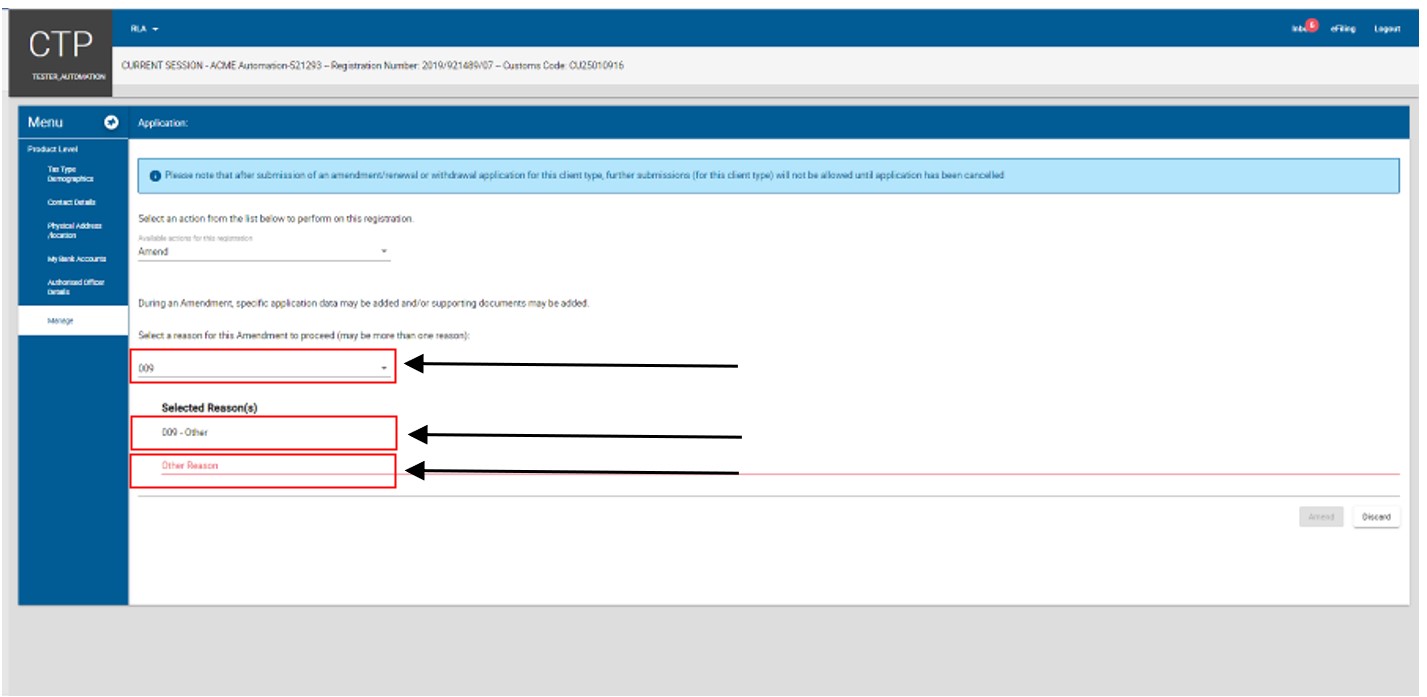
The system activates the Amend button and the user continues with the process prescribed in paragraph here)
- If the reason for amendment is listed in the dropdown box:
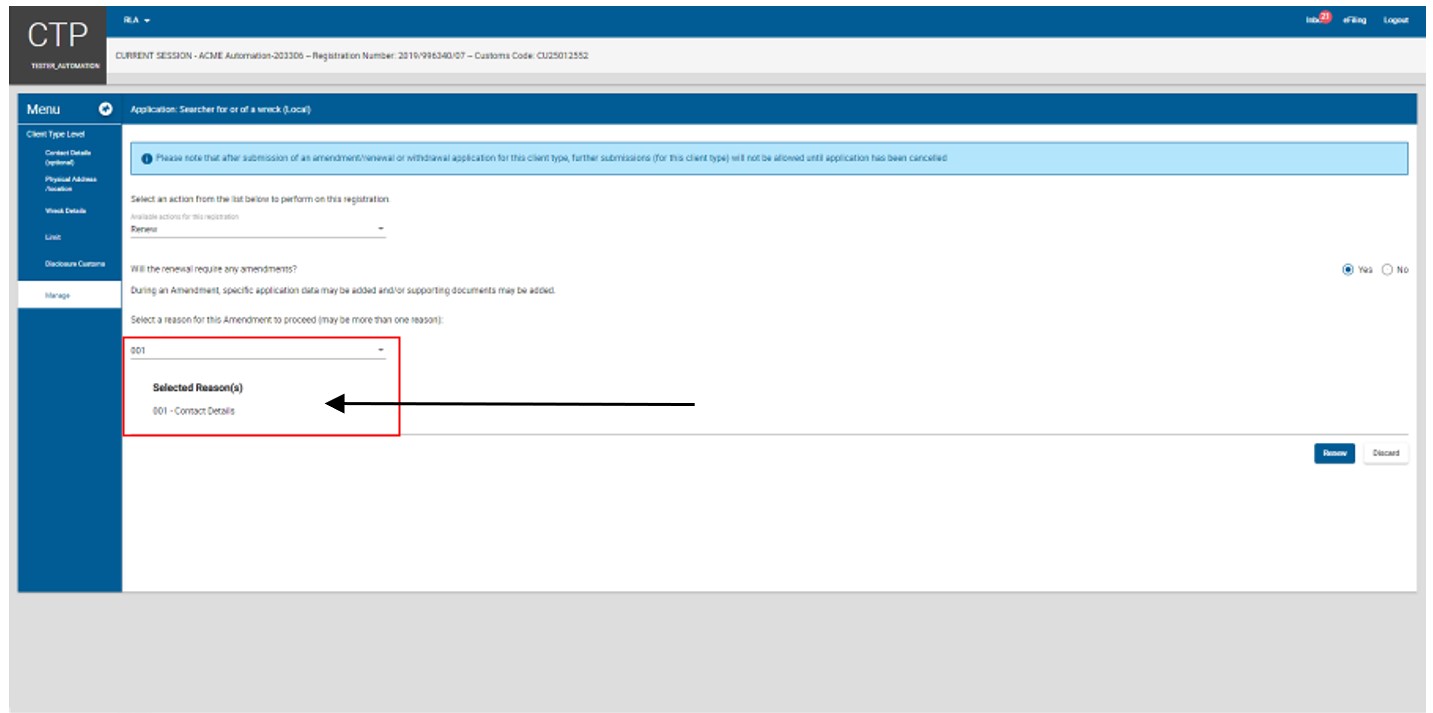
- The user selects the box next to the reason(s) for amendment.
- The system populates the selected reason(s) for amendment under Selected Reason(s).
- The system displays the Product Level page and the user clicks on the applicable field to be amended.
- The system displays the existing details captured. The user clicks on the Change option and follows the process prescribed in Product level details in order to capture the amended details.
- The user clicks on the Conclude button.
- The system displays the Summary page, displaying the amended changes in green and the previously captured details in red.
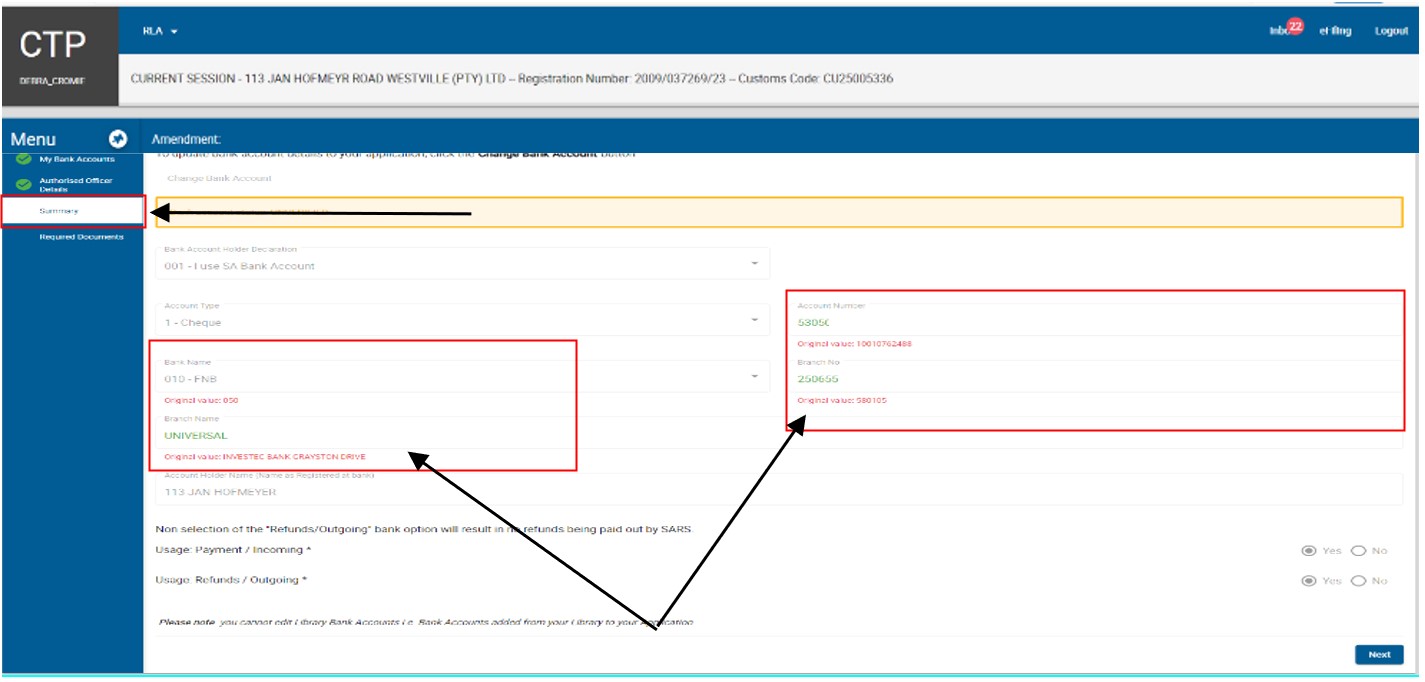
- In order to progress to the next field after viewing the amendments or changes, the user clicks on:
- The Required Documents (see uploading of Required supporting Documents) link under Menu; or
- The Next button.

- The user continues with the processes prescribed in uploading of Required Supporting Documents and Declaration below.
- The amendment of the client level details
- The user clicks on the applicable client type under Registered Client Types on the RLA dashboard after he/she logged in to eFiling as prescribed in log in to eFiling to change portfolio type and taxpayer details on eFiling
- The system displays the Client Type Level page (see paragraph here).
- The user clicks on the Manage link under Menu.
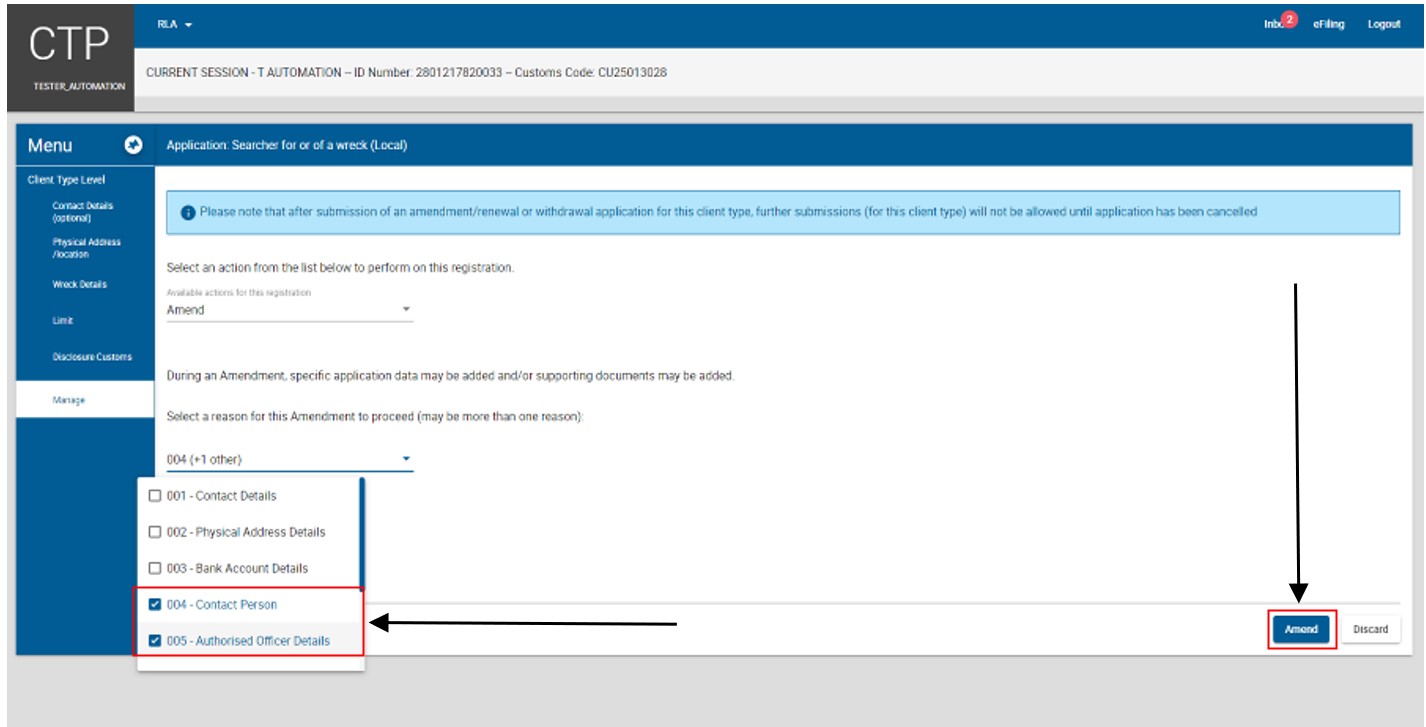
- This system displays the Manage page and the user clicks on the dropdown arrow.
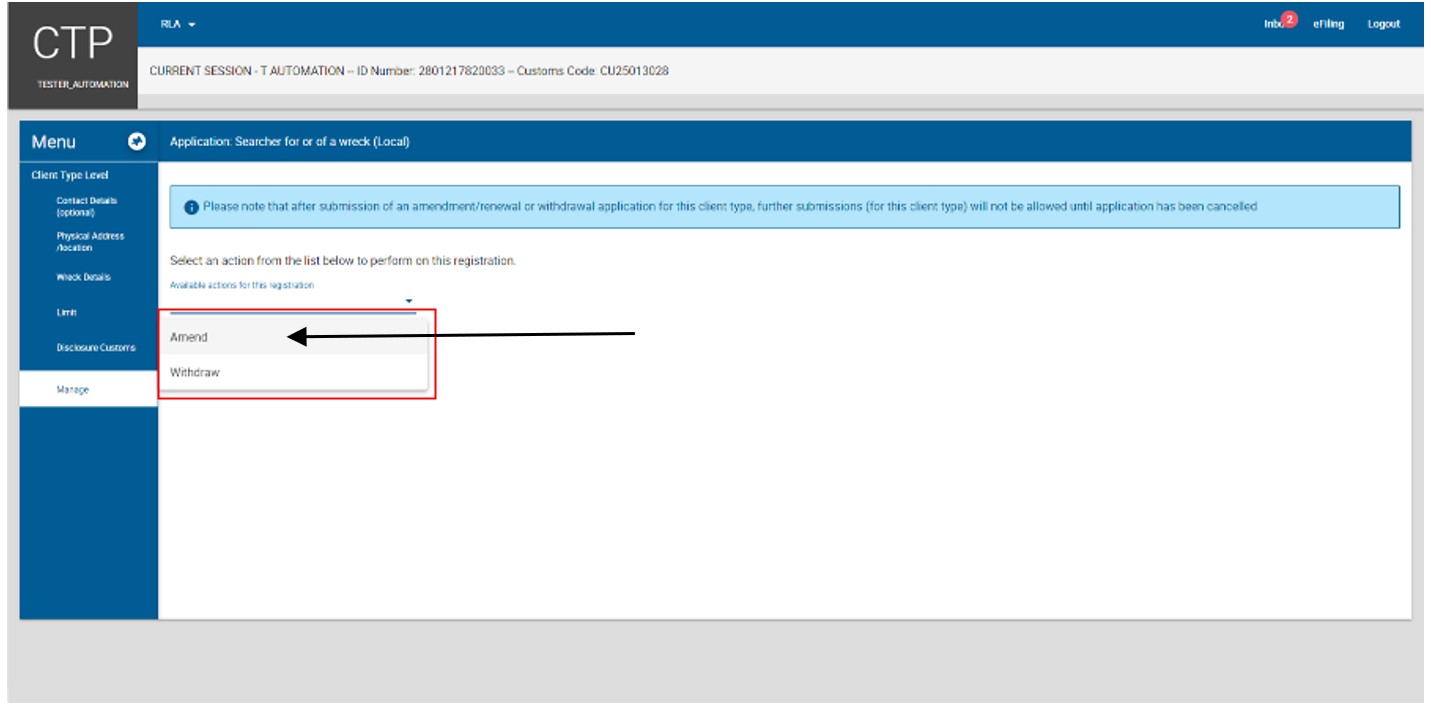
- This system displays the available actions for this registraiton and the user clicks on the Amend action.
- The system displays:
- The action Amend under the Available action for this registration field;
- A message to the user to select a reason for this amendment; and
- The Selected Reason(s) dropdown arrow.
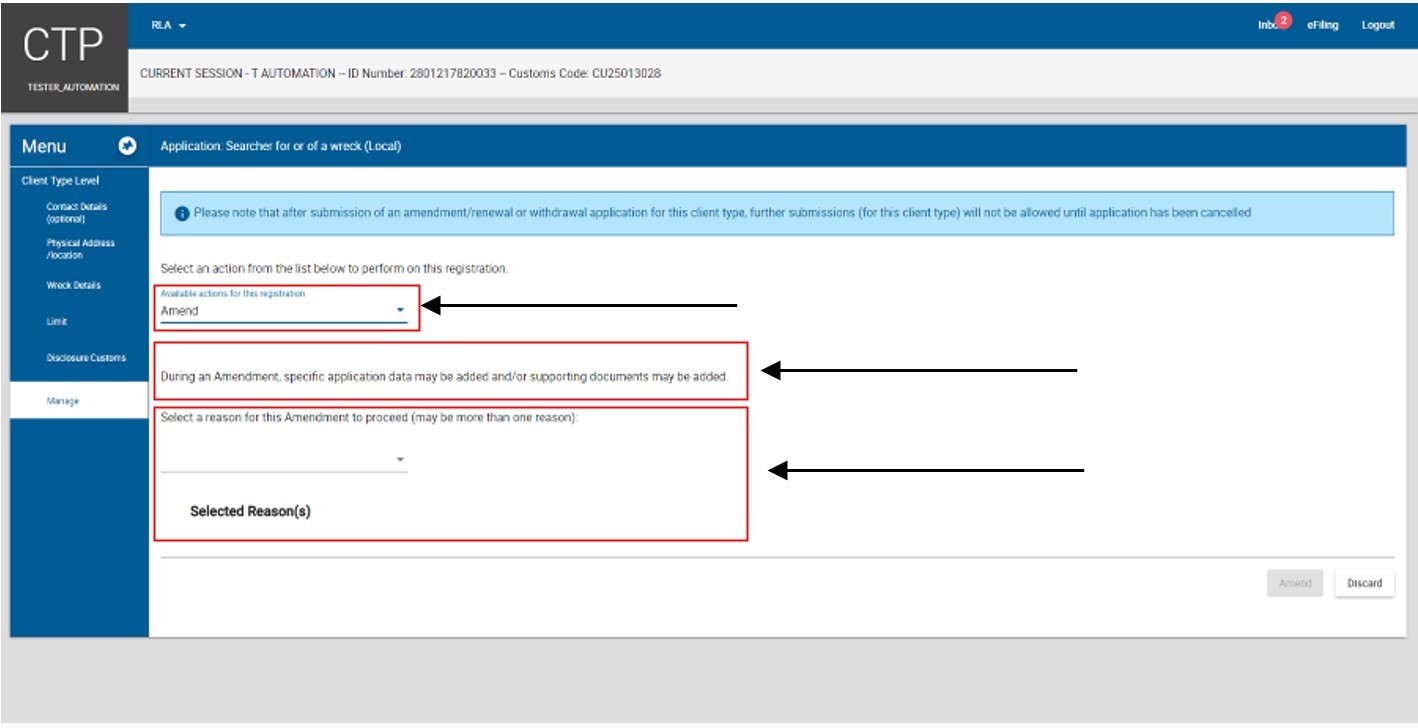
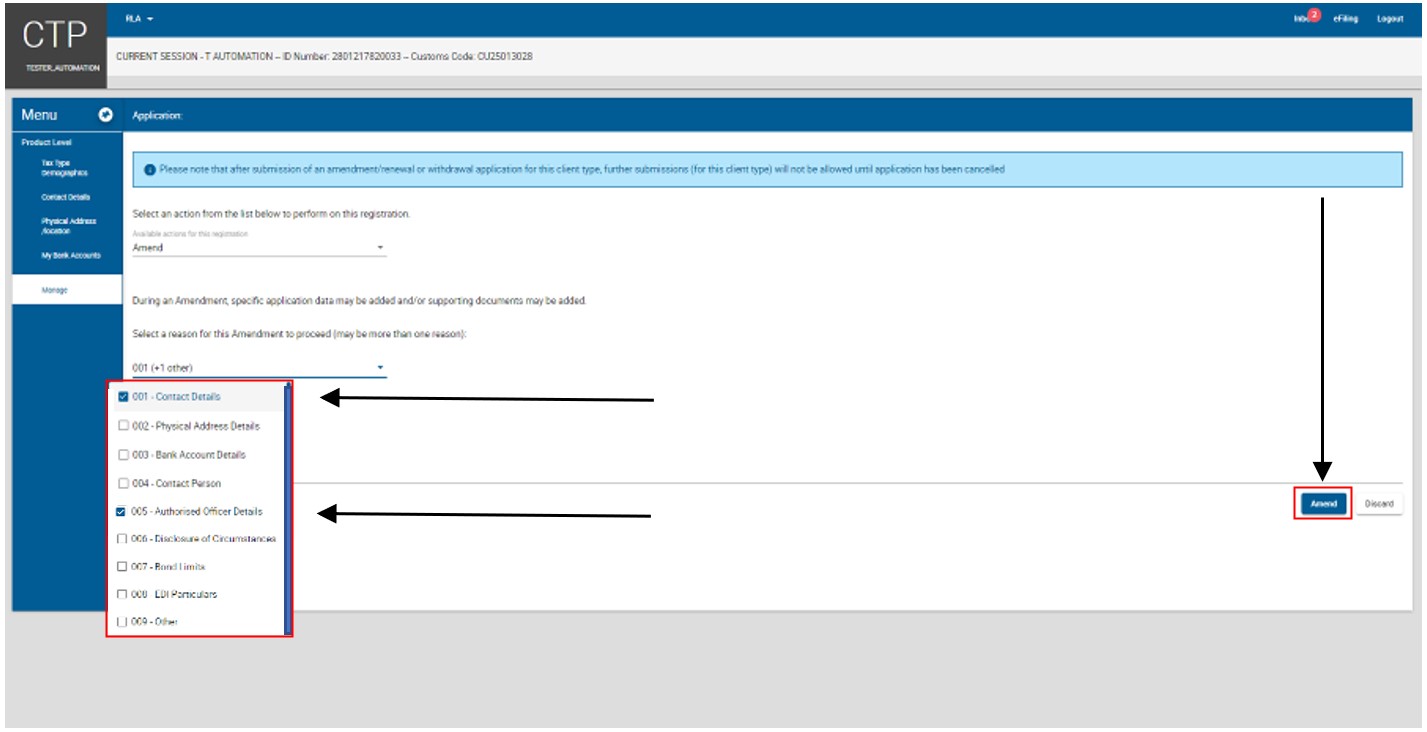
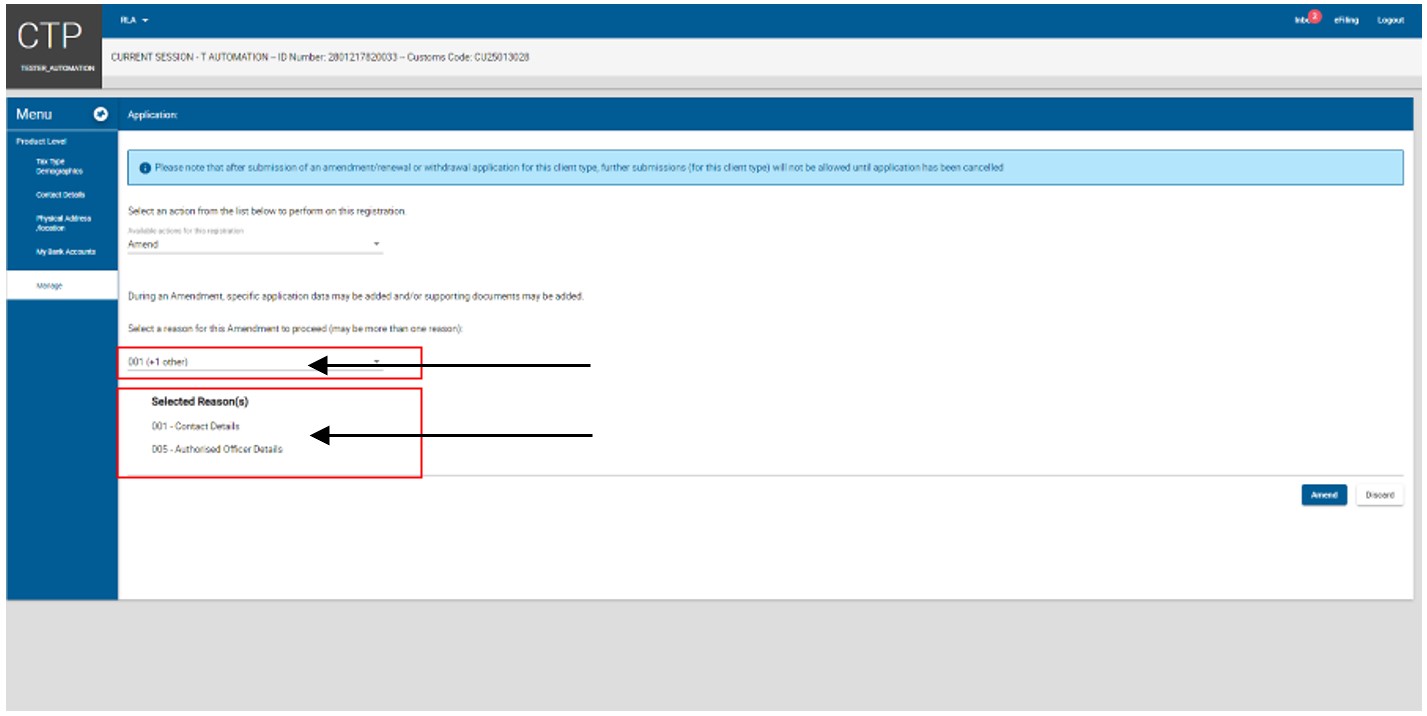
- The user clicks on the Select Reason(s) dropdown arrow and the system displays a list of the reason(s) for amendment.
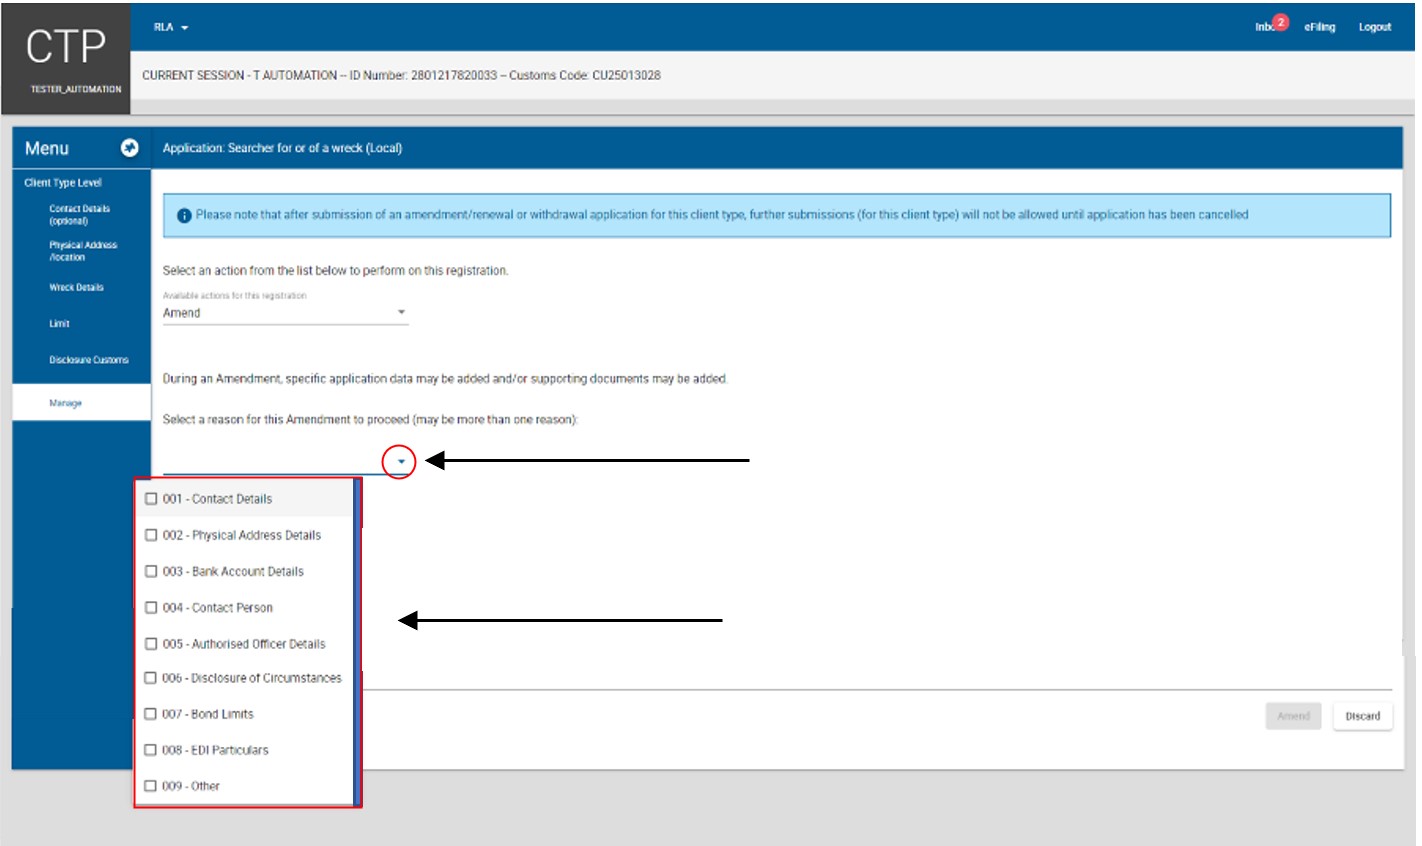
- The user:
- Selects the applicable box(es) [more than one (1) reason may be selected]; and
- Clicks on the Amend button.
- The system displays the reason(s) for amendment selected by the user under Selected Reason(s) field.
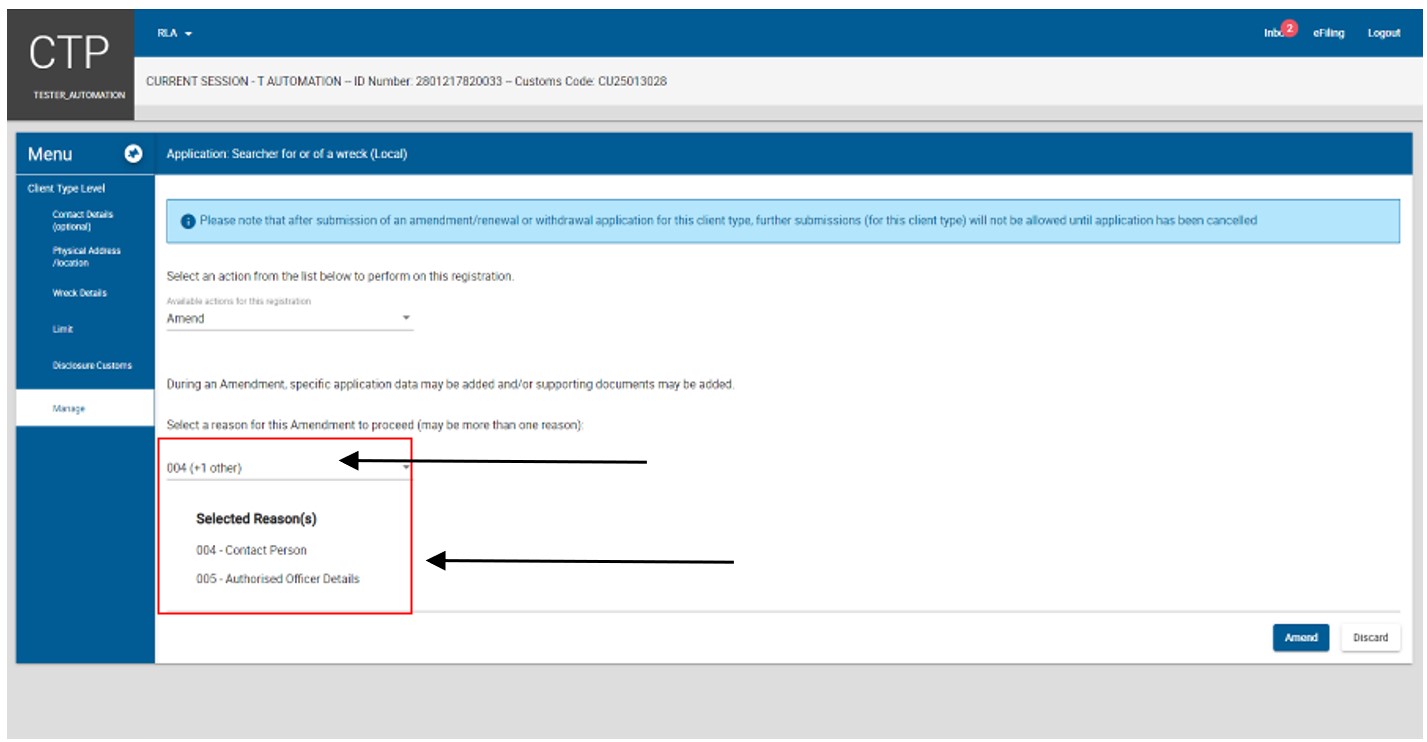
- If the user selected the incorrect reason(s) for amendment he/she:
- Clicks on the Select reason(s) dropdown arrow;
- Unselects the incorrect reason(s) for amendment box(es); and
- Reselects the correct reason as described in paragraph here)
- If the user selected the correct reason(s) for amendment he/she clicks on the Amend button.
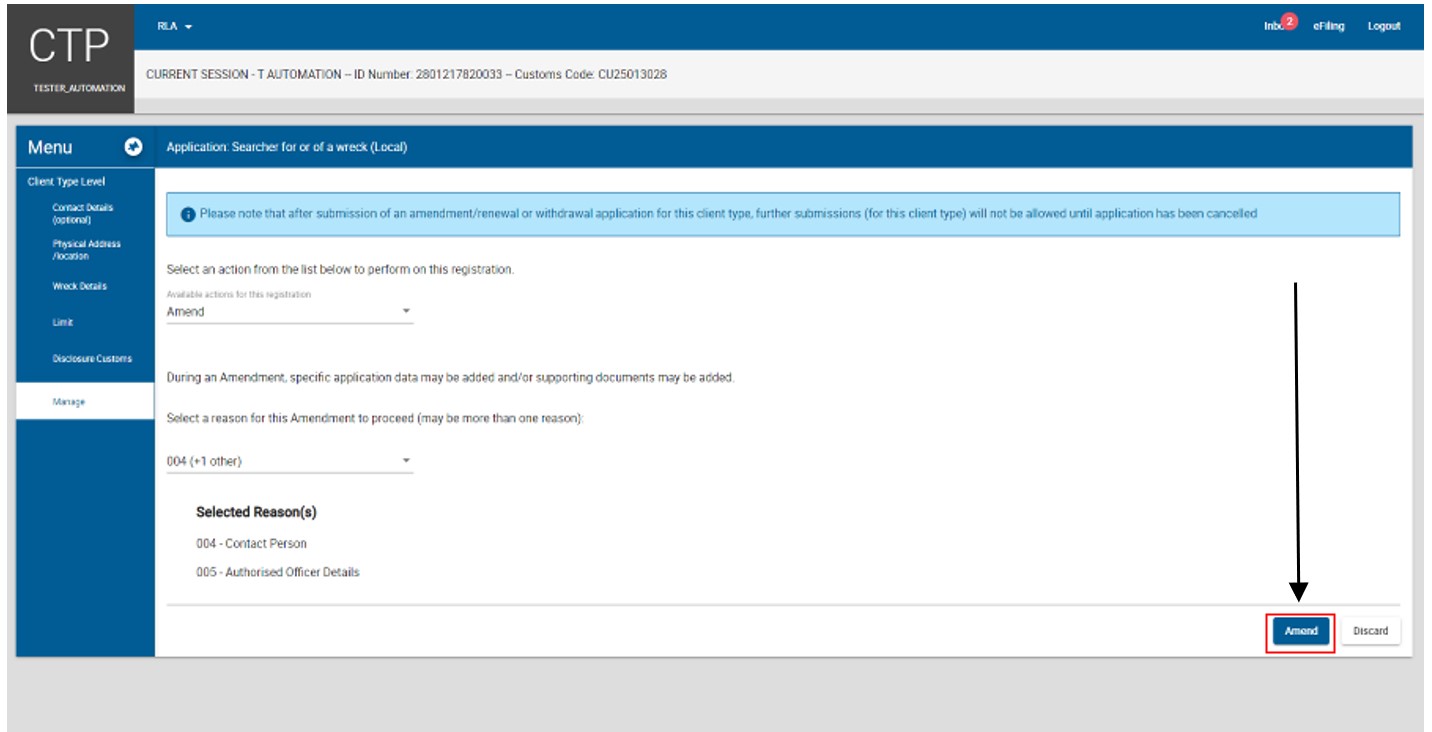
- The system displays the Client Type Level page.

- The user clicks on the applicable link under Menu, changes or adds the required details as prescribed in client type level above and if:
- Not in agreement with the amendment(s) the user continues with the process prescribed in Discarding of Application; or
- In agreement with the amendment(s) the user continues with the process prescribed in Disclosure Customs Questionnaire
- After the user completed the Disclosure Customs questionnaire prescribed in Disclosure Customs Questionnaire below the system displays the Summary field page indicating the changes or amendments on the page:
- Green indicates the amended details captured by the user; and
- Red indicates the original details captured by the user at the time of application.
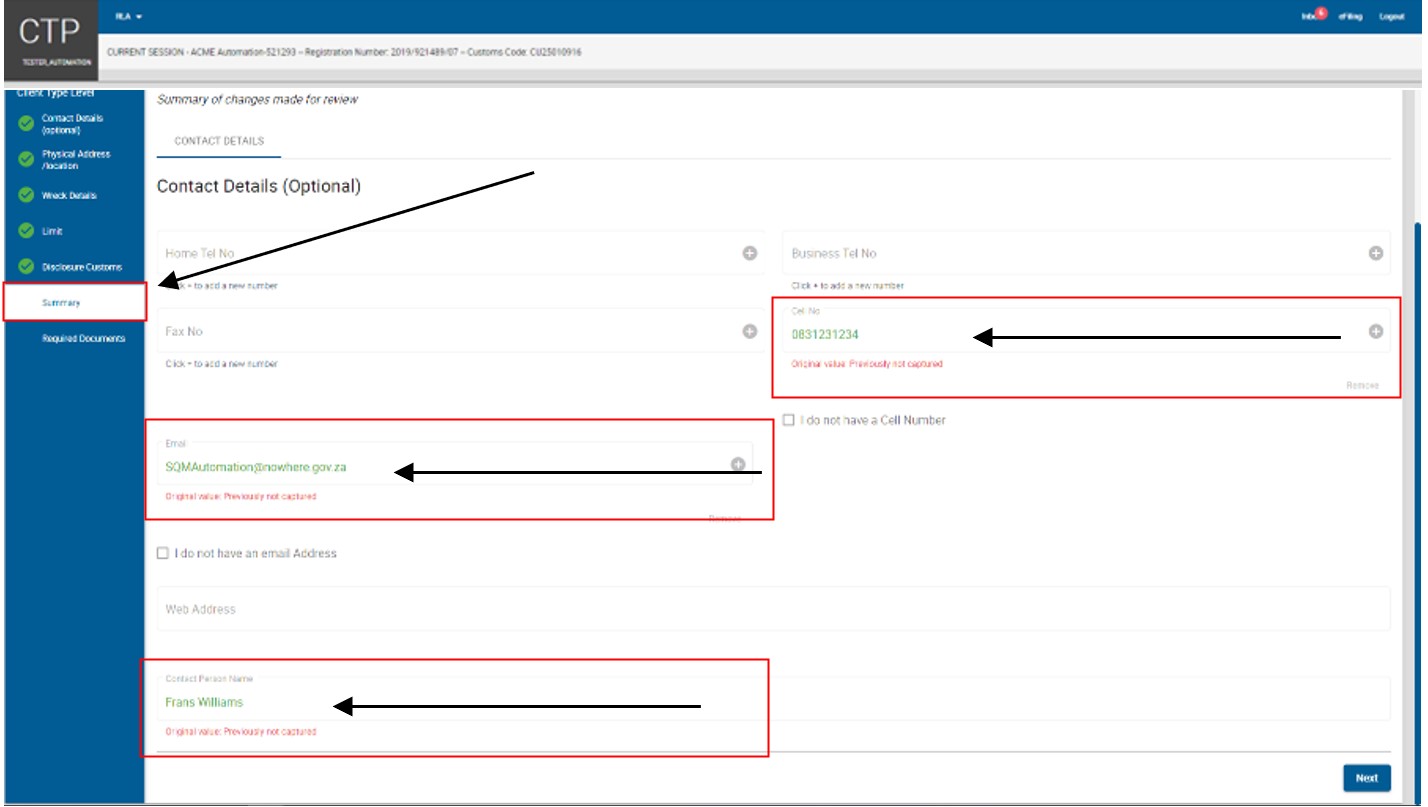
- After viewing the amendments or changes, the user must progress to the next field which is Required Documents by clicking on the:
- Next button; or
- Required Documents link under Menu and continue with uploading of Required Supporting Documents below.
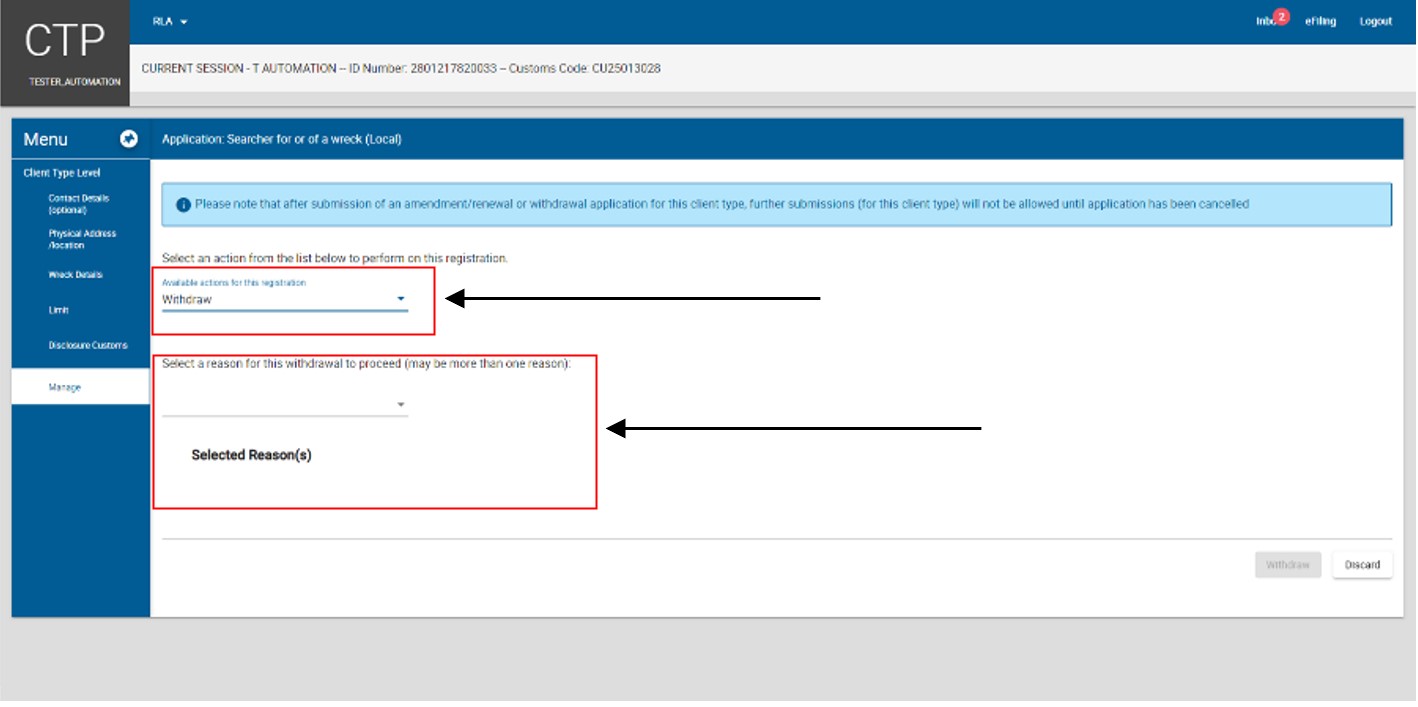
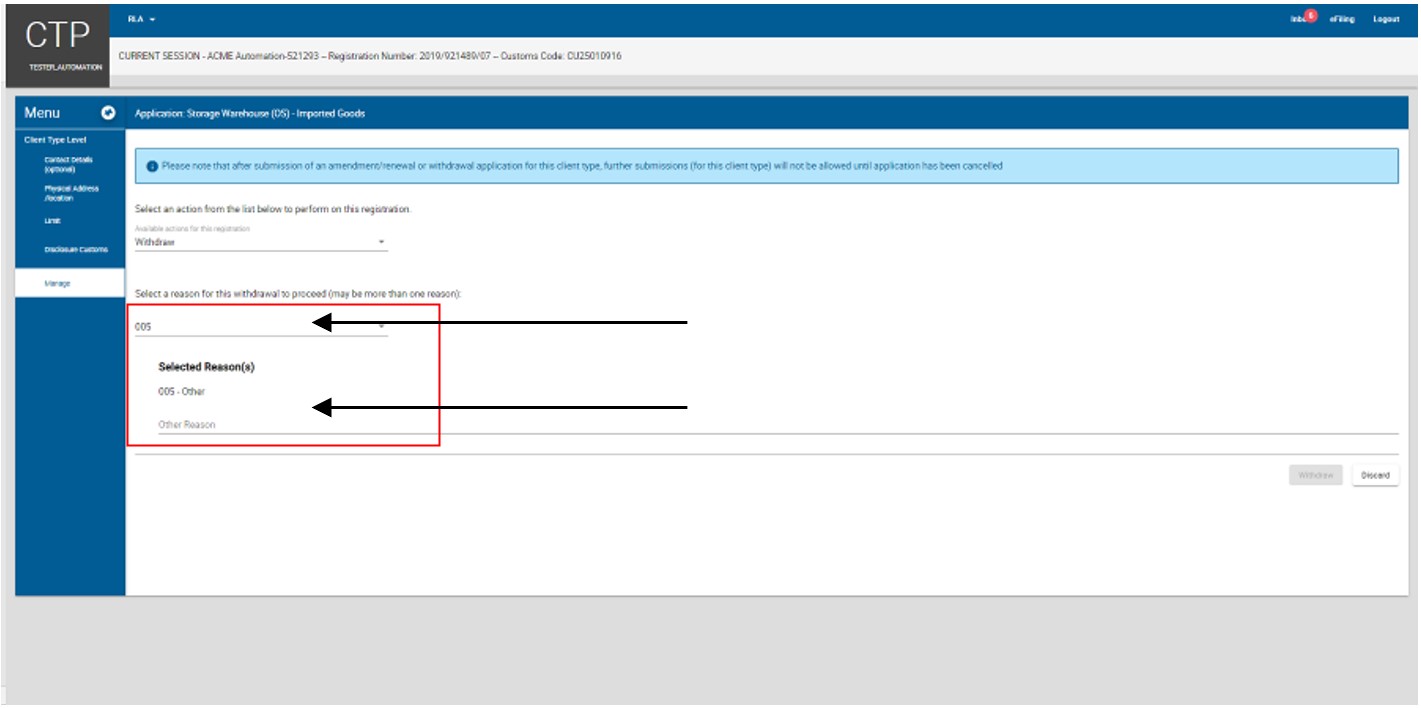
- Withdrawal of existing RLA client
- An applicant will only be able to withdraw an active client type listed under Registered Client Types.
- The applicant must log in to eFiling as prescribed in Login to eFiling to change Portfolio type and taxpayer details on eFiling
- The user clicks on the client type to be withdrawn under Registered Client type on the RLA dashboard
- The system displays the Client Type Level page.

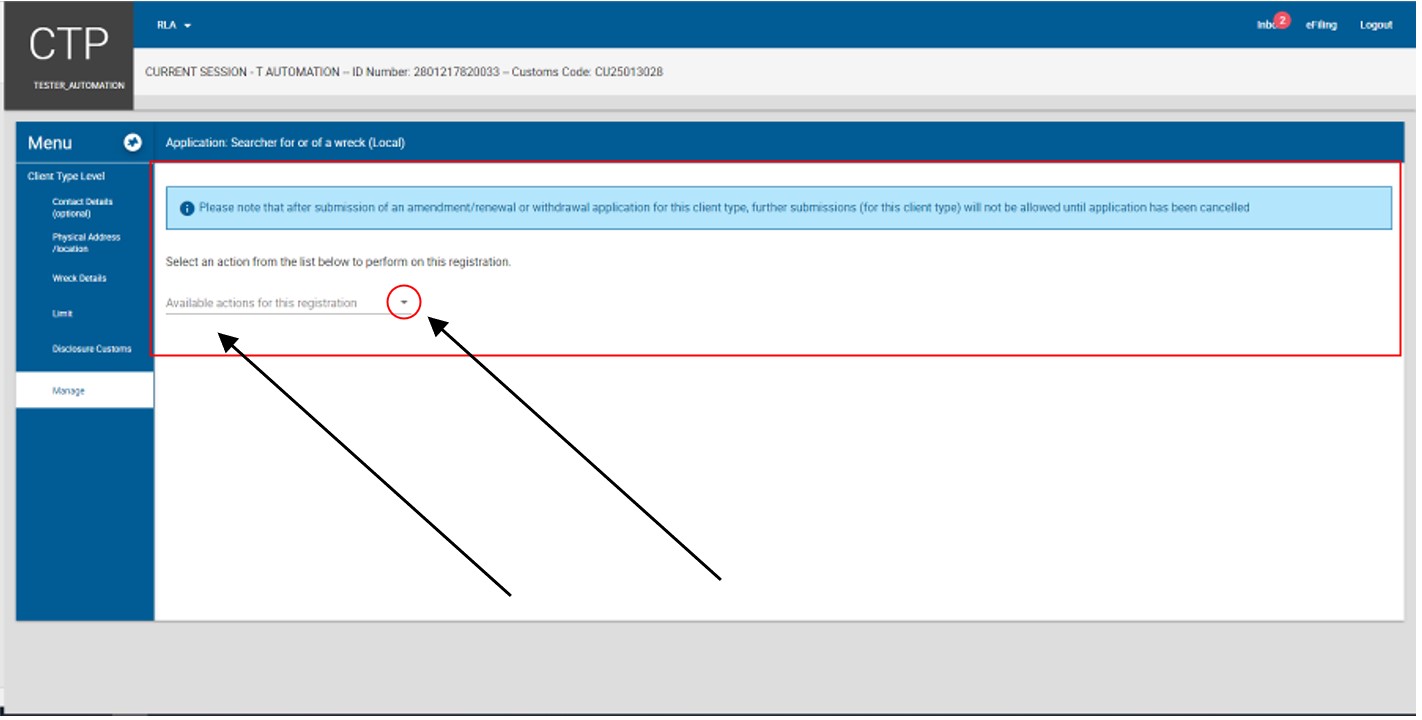
- The user clicks on the Manage link under Menu and the system displays the Manage page.
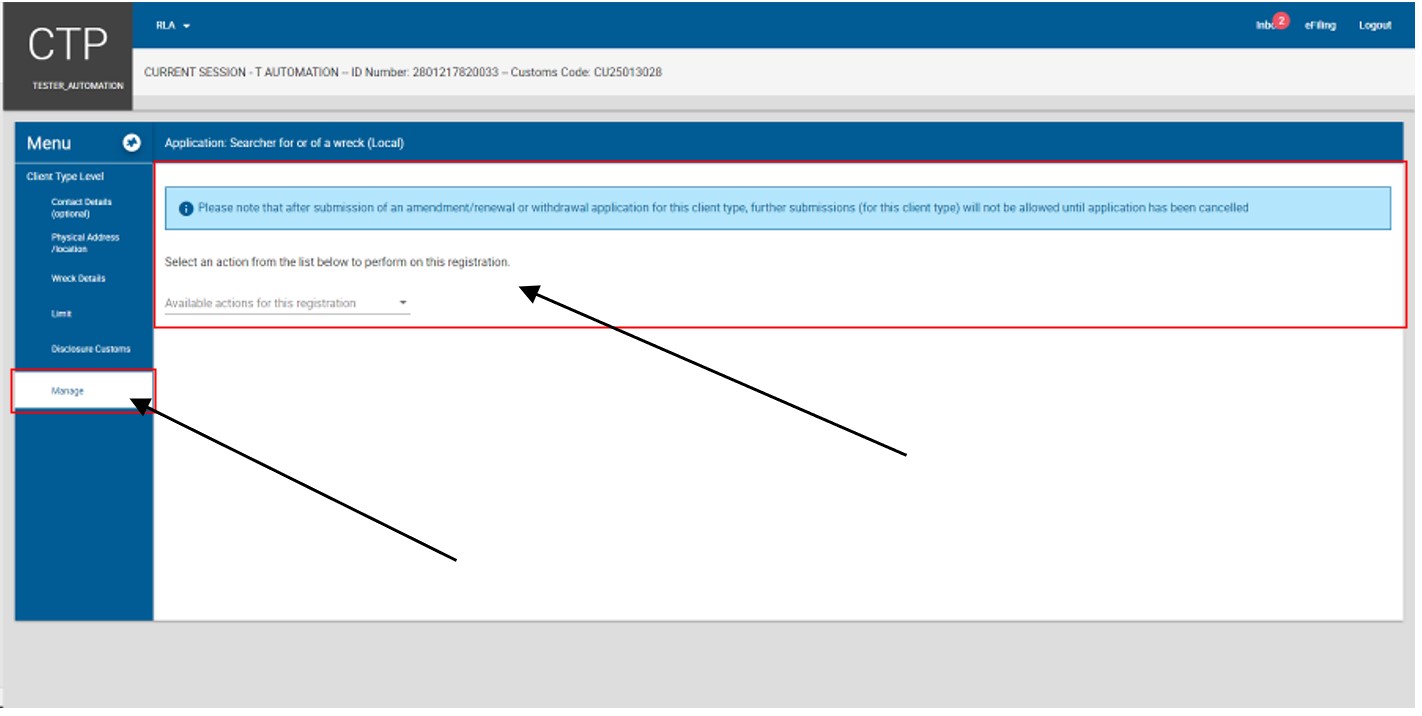
- The user clicks on the Available actions for this registration dropdown arrow.
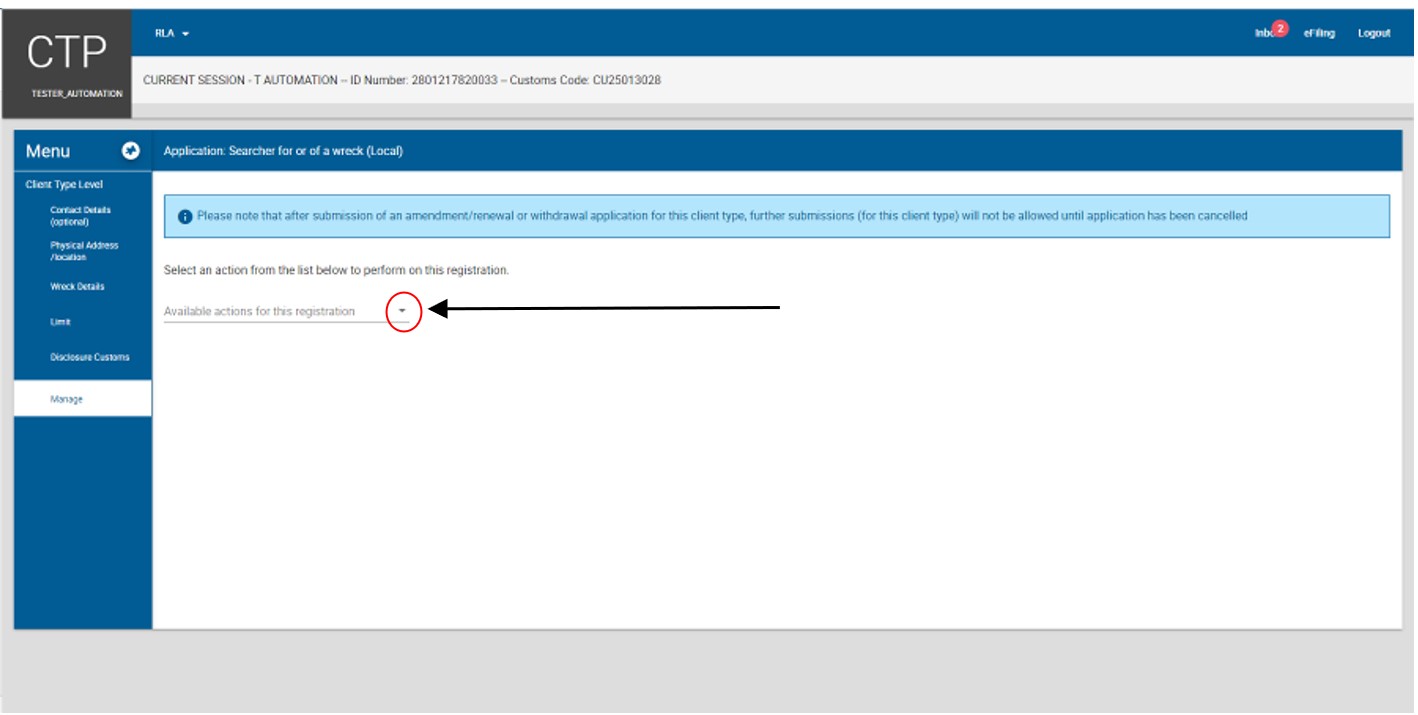
- The system displays a dropdown box with the available actions for this registraiton and the user clicks on the Withdraw action.

- The system:
- Populates the action Withdraw under the Available action for this registration field;
- Displays:
- A message to the user to select a reason for the withdrawal request; and
- The Selected Reason(s) dropdown arrow.
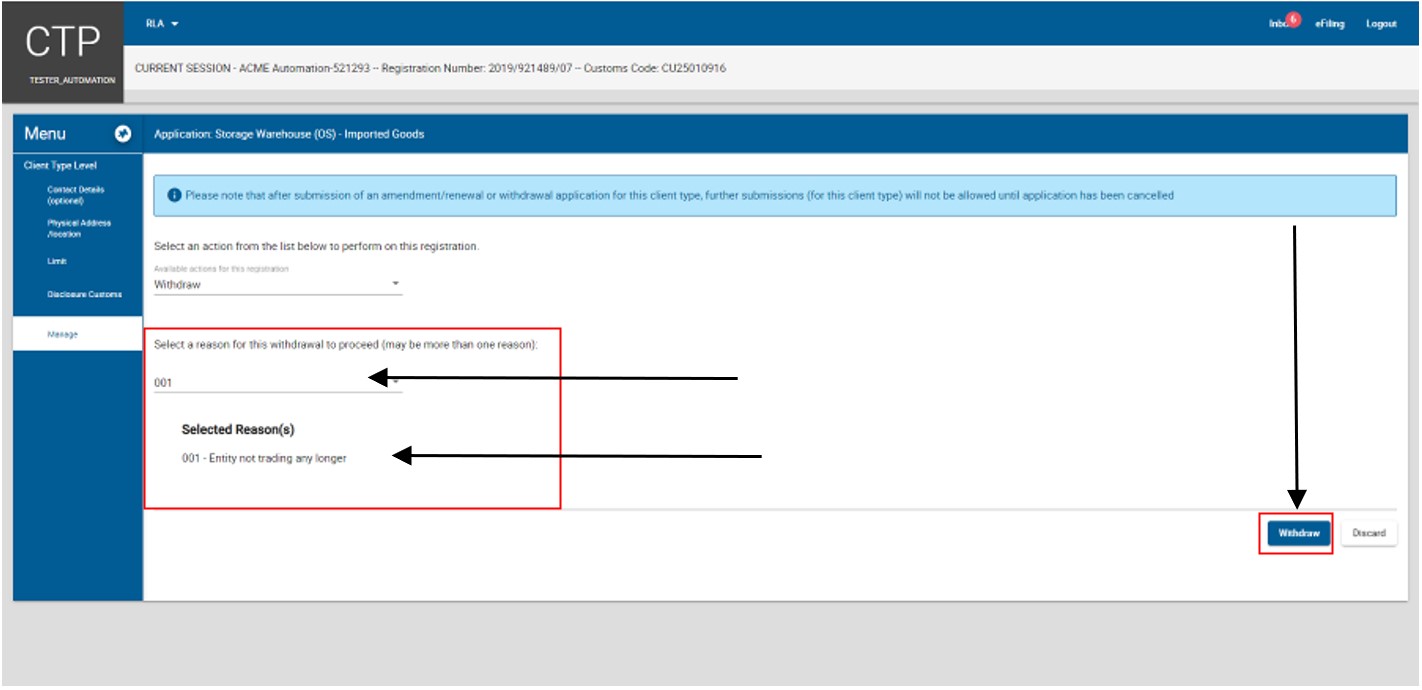
- The user clicks on the Select Reason(s) dropdown arrow.
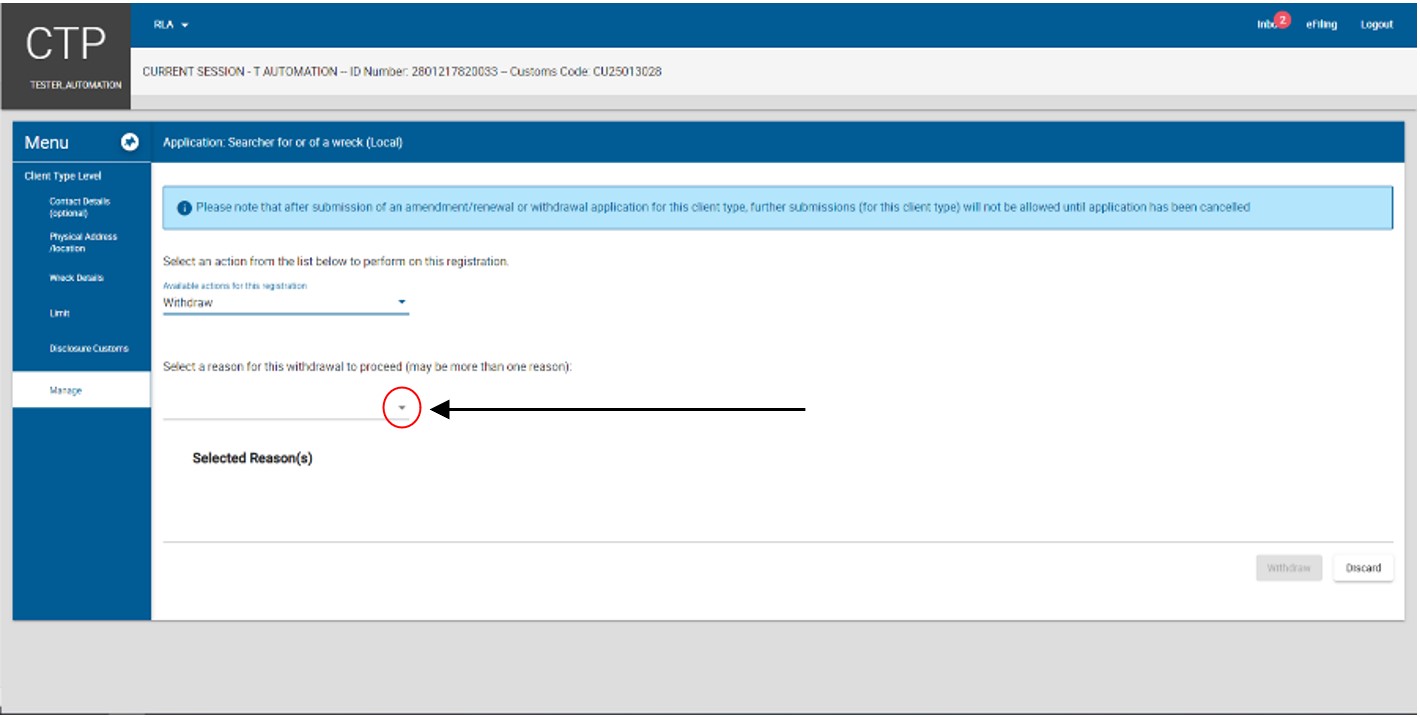
- The system displays a dropdown box with the reason(s) for withdrawal.
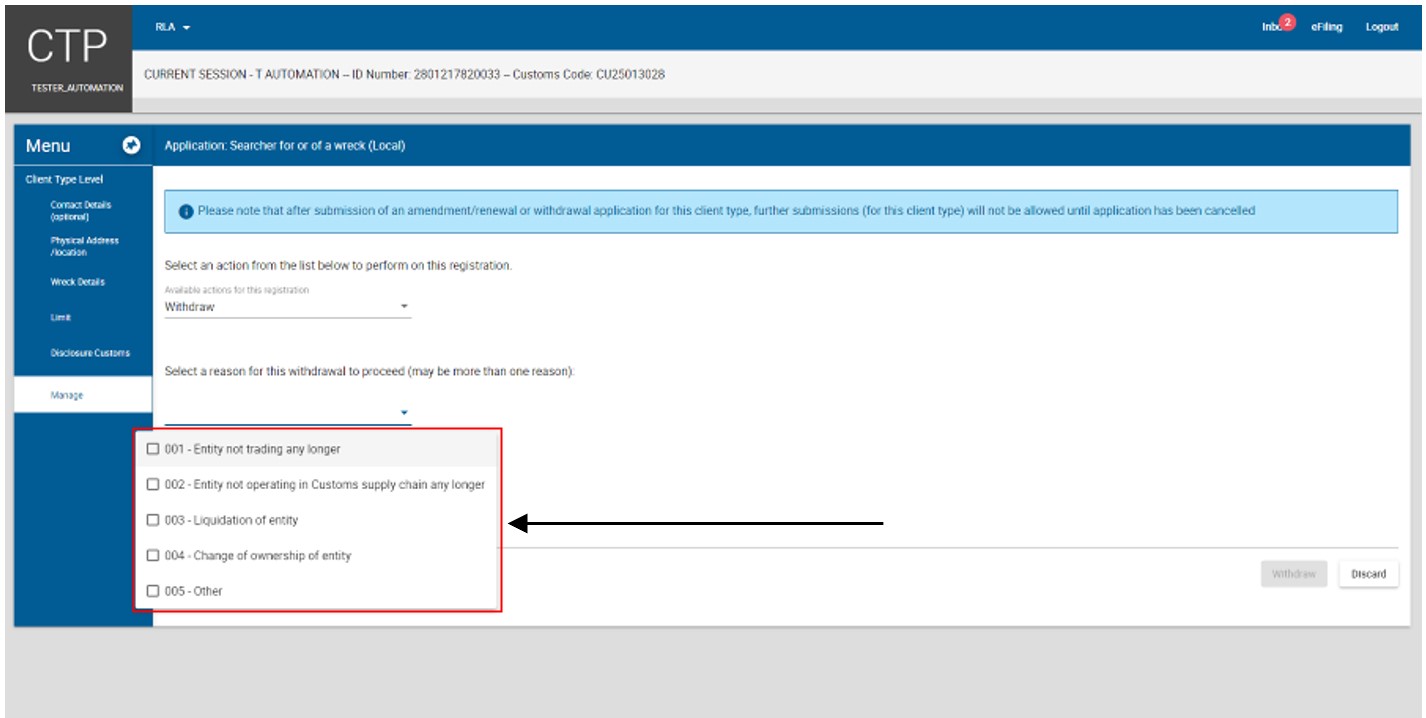
- If the reason for withdrawal is not listed in the dropdown box:
- The user selects Other.
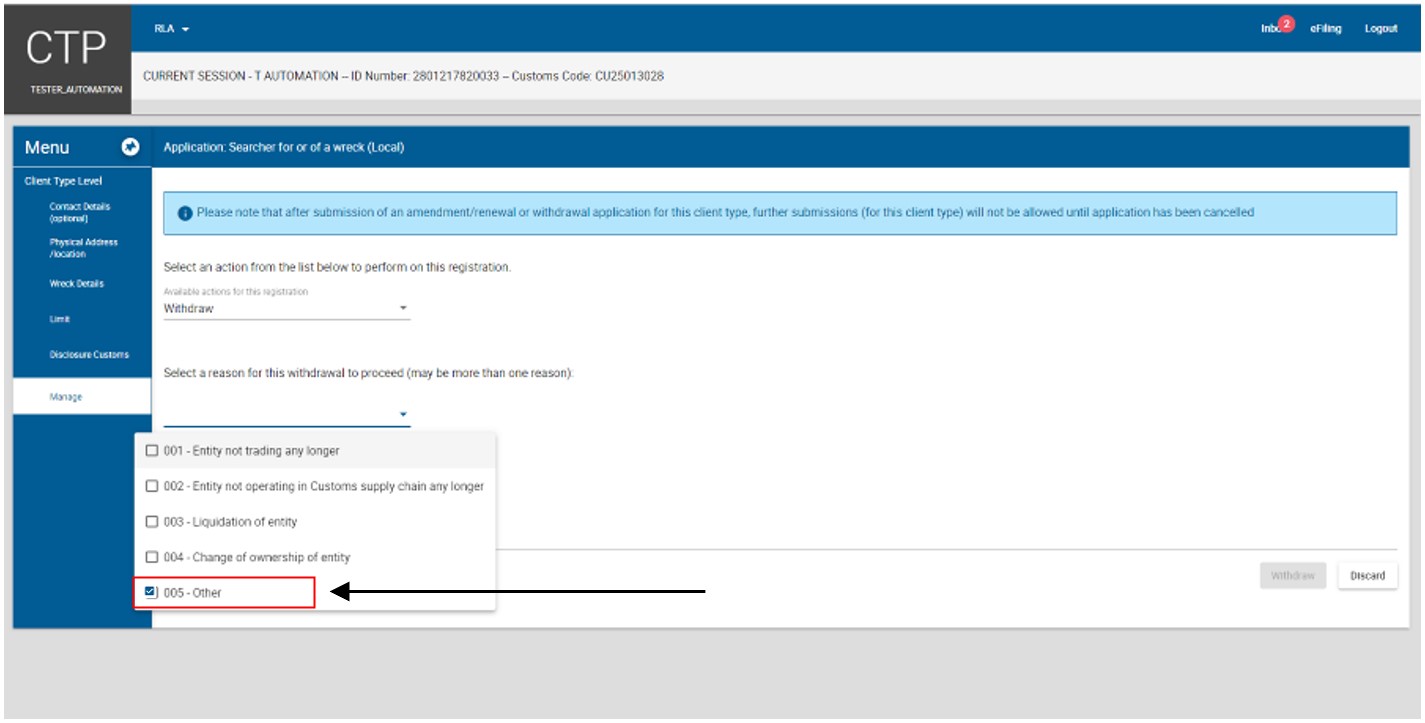
- The system displays the reason for withdrawal Other under Selected Reason(s) and the user captures his/her reason for withdrawal in the free text field.
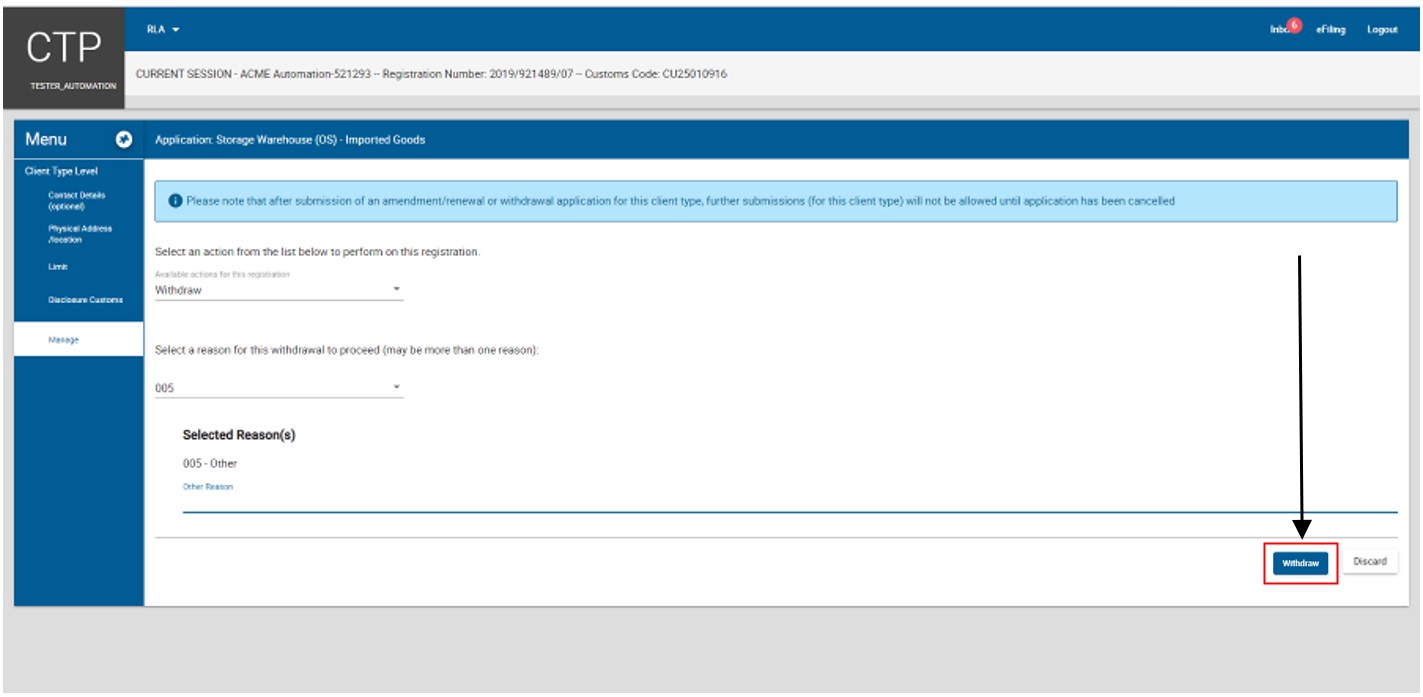
- The system activates the Withdraw button and the user continues with the process prescribed in paragraph here)
- If the reason for withdrawal is listed in the dropdown box:
- The user selects the box(es) next to the reason(s) for withdrawal.
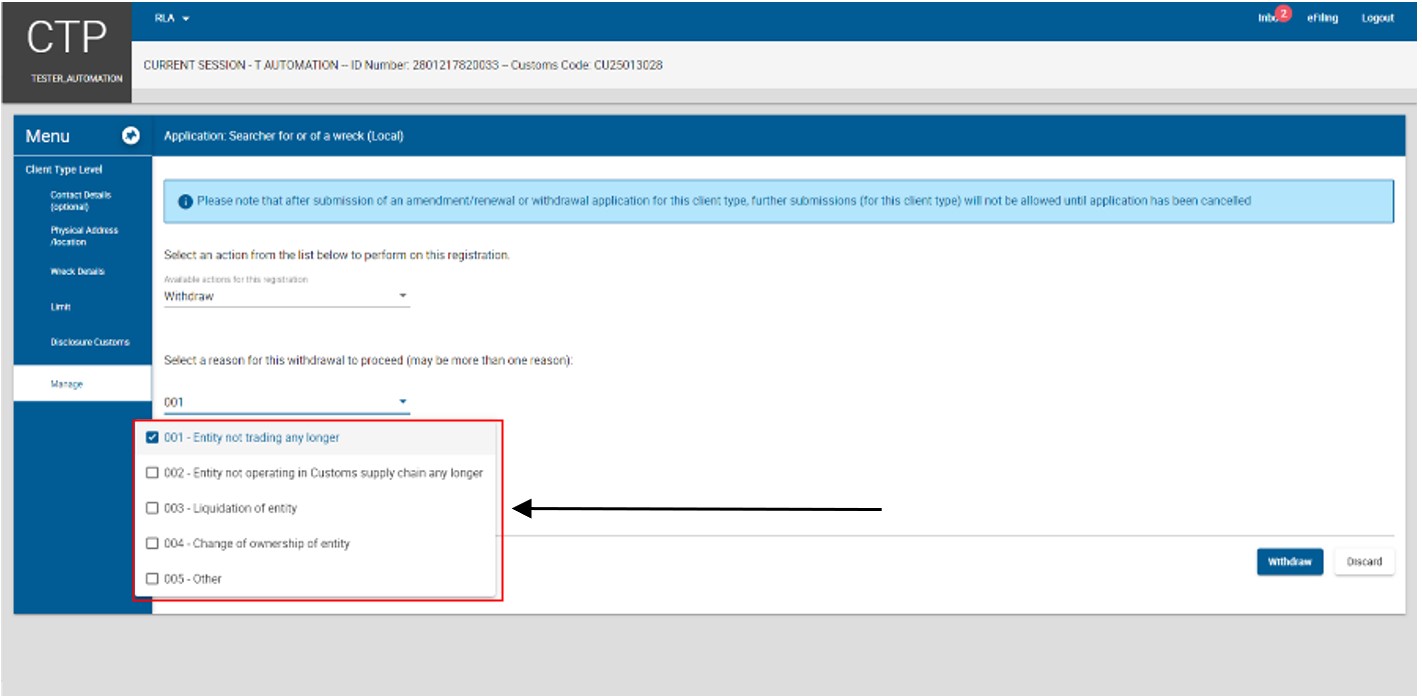
- The system displays the selected reason for withdrawal under Selected Reason(s) and the user clicks on the Withdraw button.
- The user continues with the proceses prescribed in Disclosure Customs Questionnaire to Declaration
- Upon submission of the withdrawal request, the client’s registration or licence status is immediately changed to pending withdrawal to prevent the client from processing any new transactions.
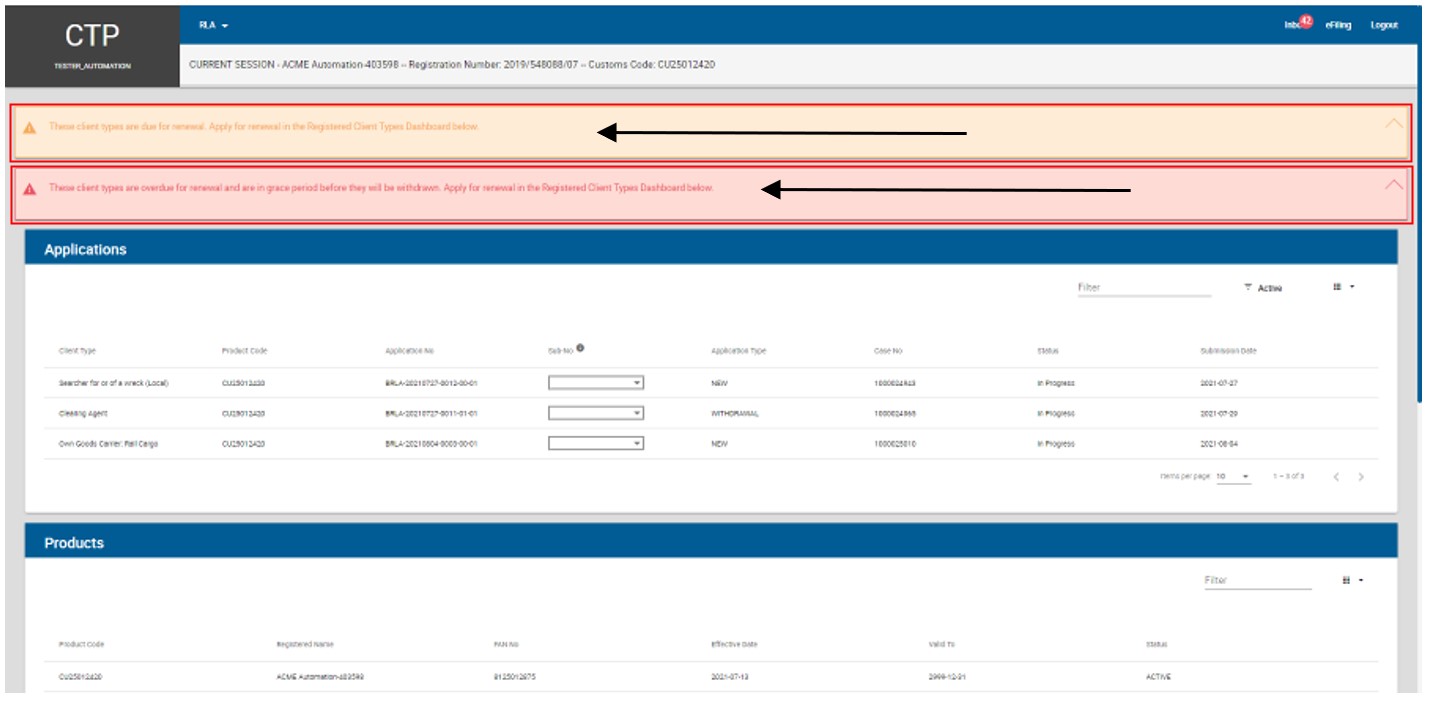
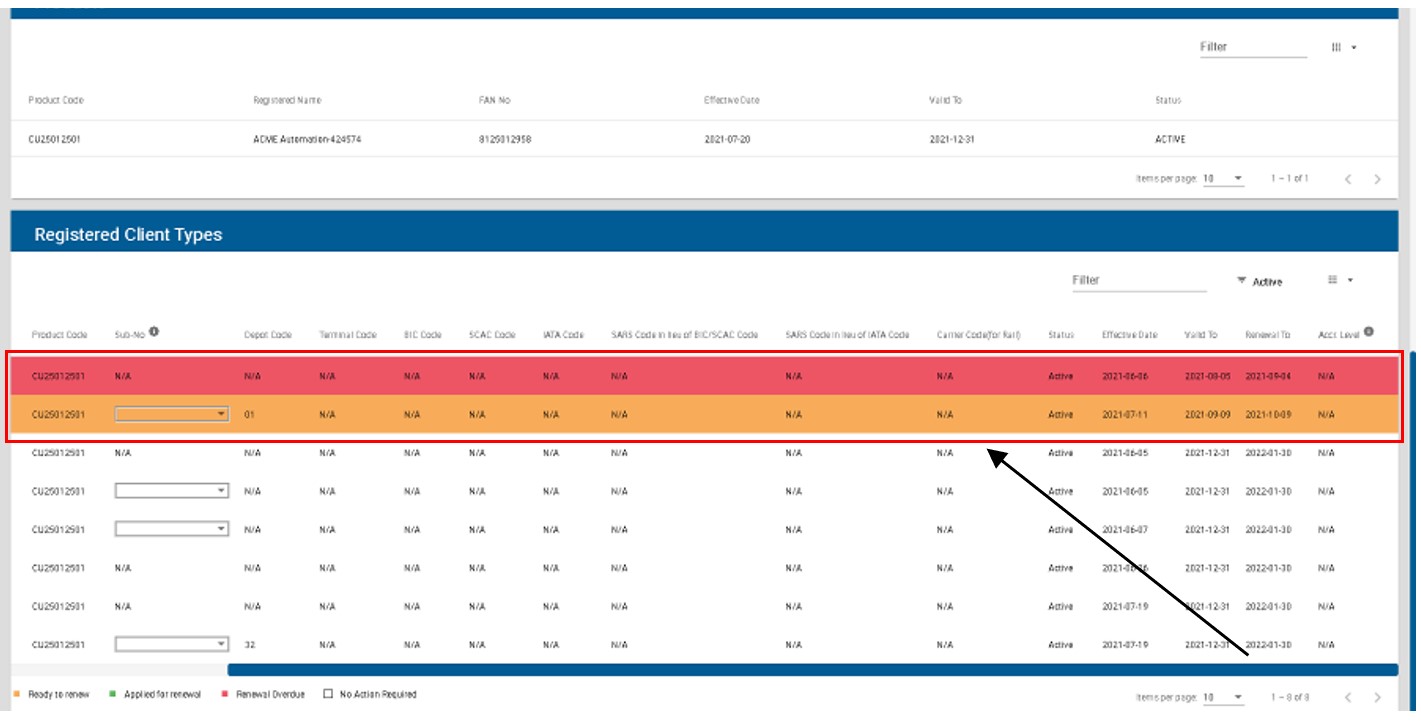
- Renewal of existing RLA client’s licence:
- After he/she logged in to eFiling as prescribed in Log in to eFiling to change portfolio type and taxpayer details on eFiling above, the system displays the following warning messages if the client’s licence(s) is:
- Due for renewal (orange) – this message is displayed thirty (30) calendar days before the client’s licence expires; or
- Overdue for renewal (red) – this message is displayed when the client failed to renew his/her licence before his/her licence expired. If the client fails to submit his/her renewal application within the validity period, the system will change the client’s status from Active to suspended.
- After he/she logged in to eFiling as prescribed in Log in to eFiling to change portfolio type and taxpayer details on eFiling above, the system displays the following warning messages if the client’s licence(s) is:
- The user clicks on the client type under Registered Client Types.
- The system displays the Client Type Level page, and the user clicks on the Manage link under Menu.
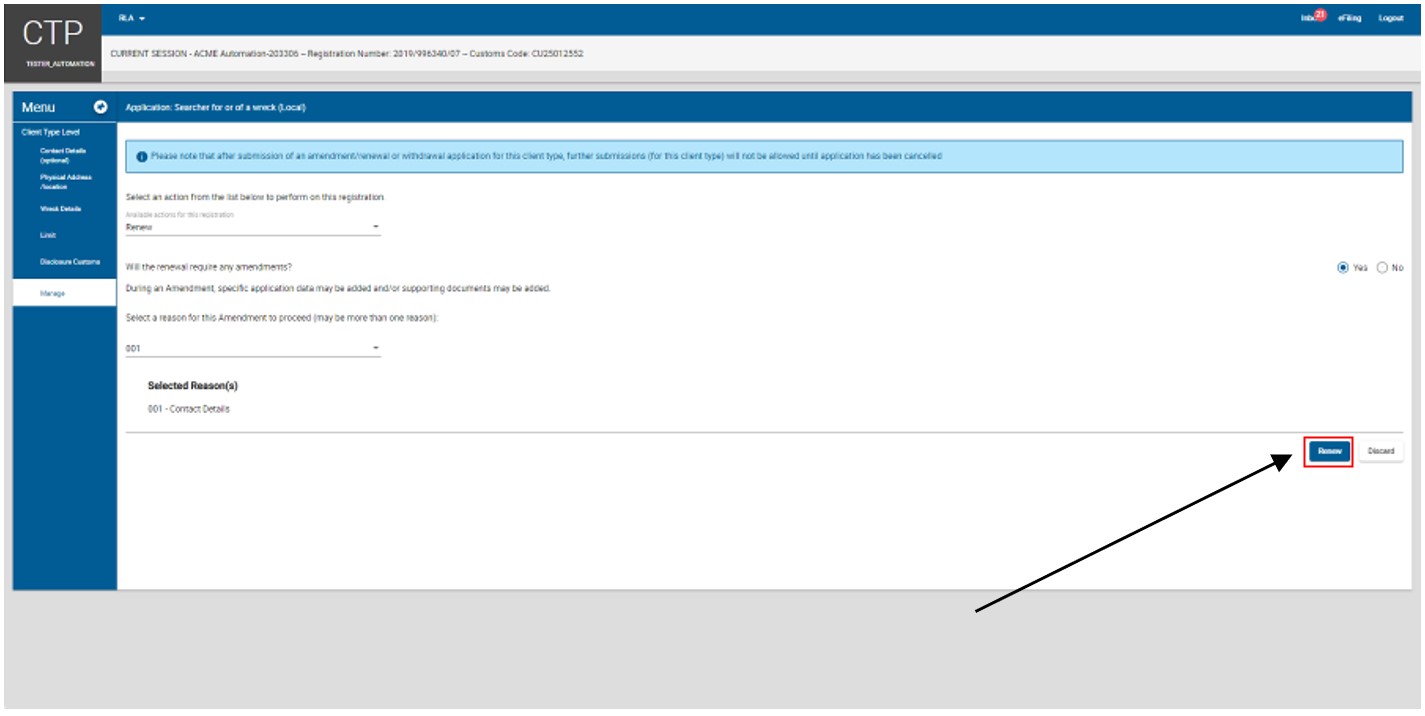
- The system displays the Manage page and the user clicks on the dropdown arrow.
- The system displays the available actions for this registration dropdown list and the user clicks on Renew.
- The system:
- Displays the action Renew selected by the user under the Available action for this registration field; and
- Asks whether an amendment is required.
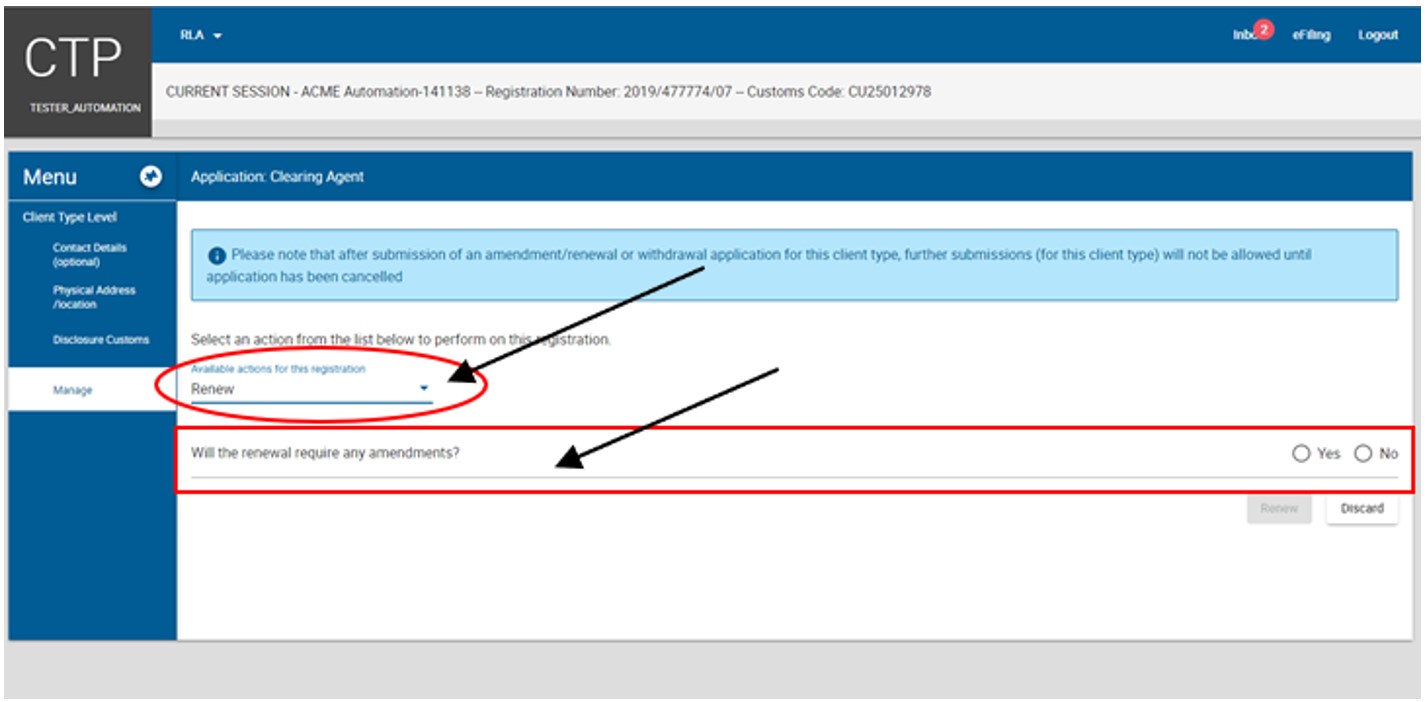
- If an amendment is required:
- The user selects the radio button Yes.
- The system displays the Select Reason(s) for amendment dropdown arrow.
- The user continues with the processes as prescribed in paragraph here) to The system displays the reason(s) for amendment selected by the user under Selected Reason(s) field.
- above in order to select the applicable reason(s) for amendment.
- The user clicks on the Renew button.
- The system displays the Client Type Level page. The user continues with the processes prescribed in paragraph here to paragraph here
- If no amendment is required:
- The user:
- Selects the radio button No; and
- Clicks on the Renew button.
- The user:
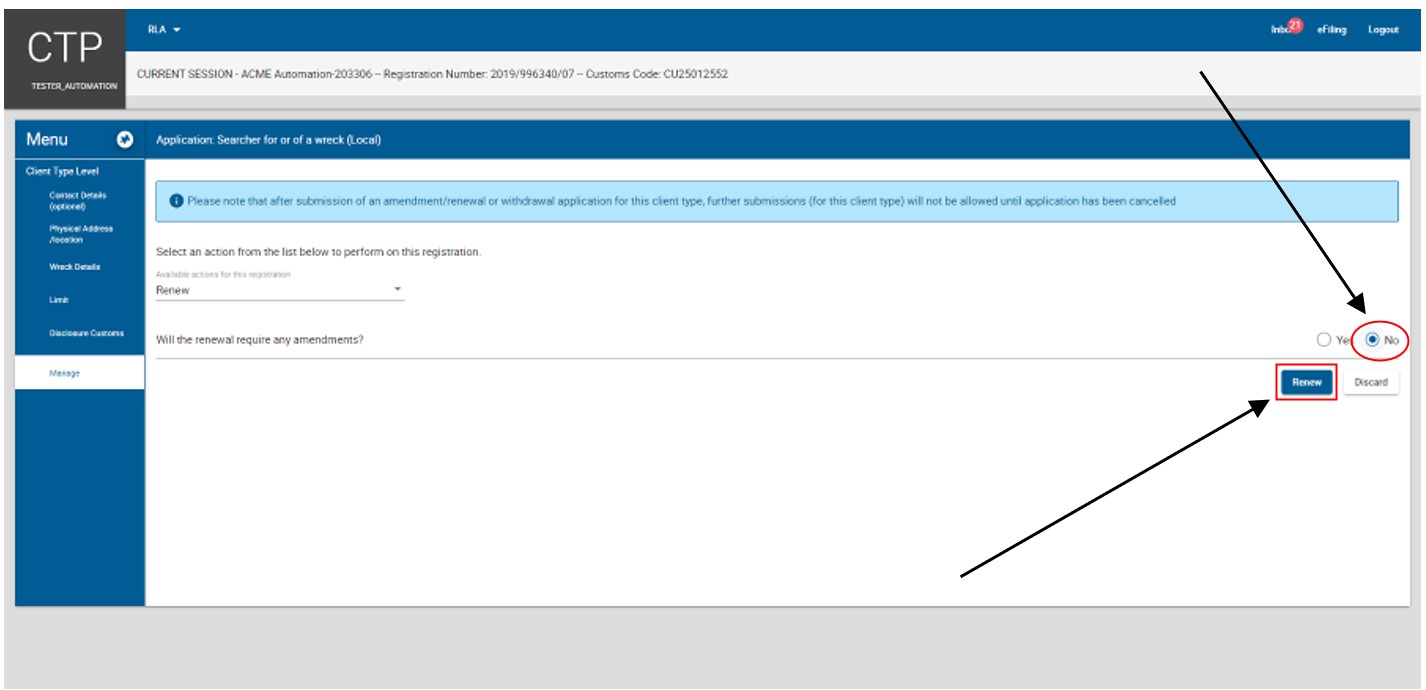
- The system displays the Disclosure Customs page, and the user continues with the process prescribed in Disclosure Customs Questionnaire below
Discarding of Application
- A user can at any time during the capturing process of his/her application click on the Discard button.
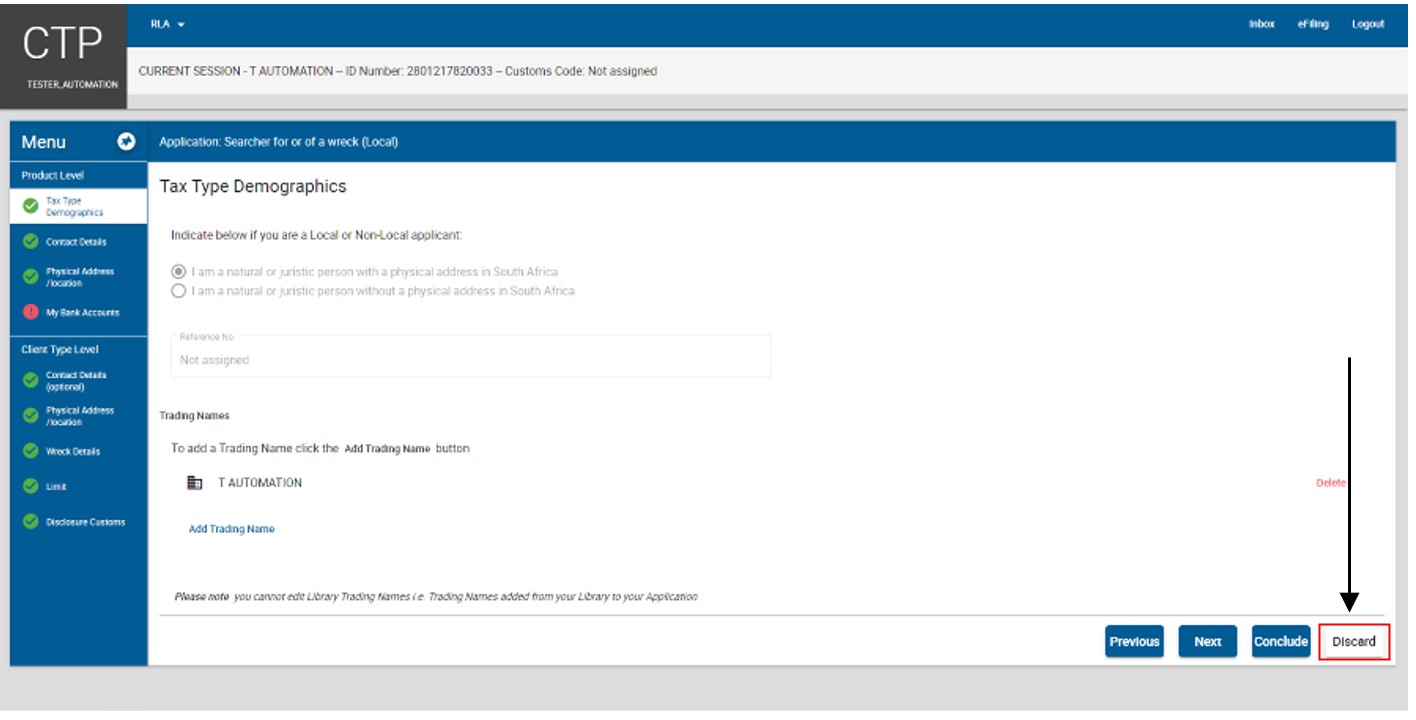
- The system displays a message that the user is about to discard the application and that all the information captured will be lost.
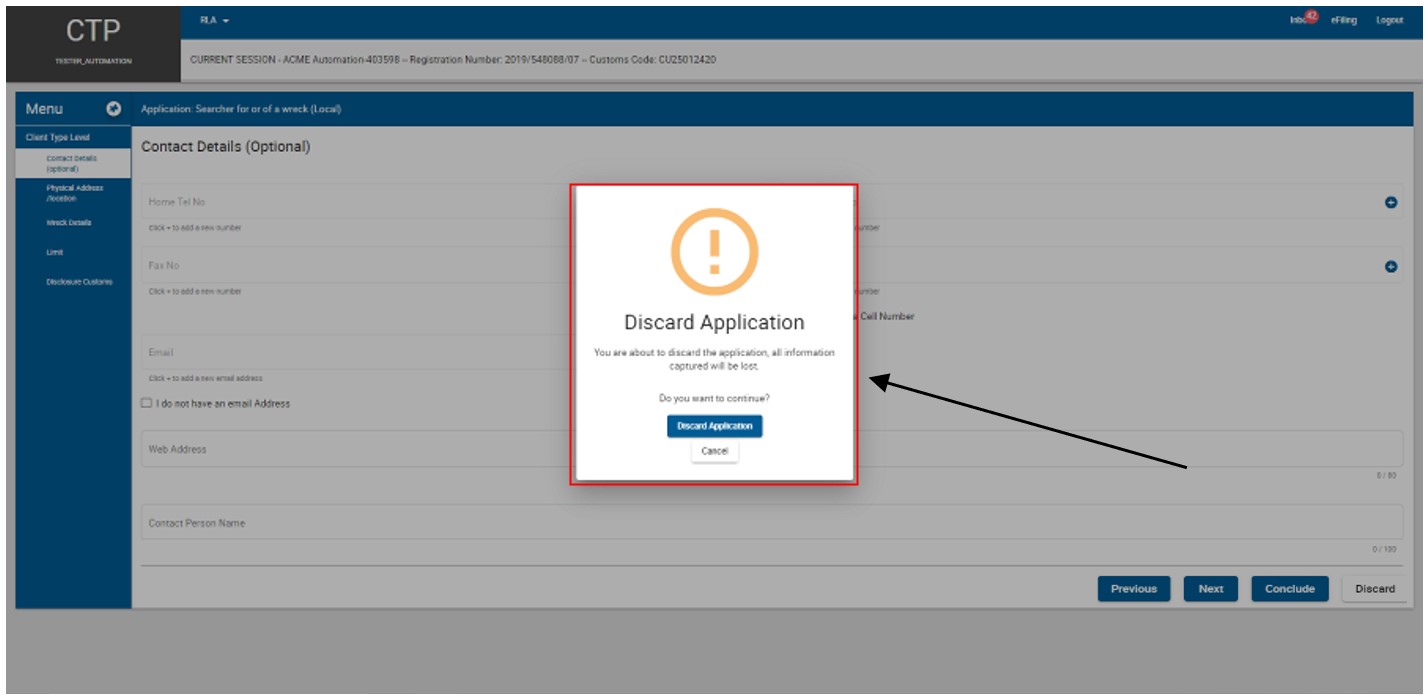
- The user can:
- Continue the current application by clicking on the Cancel button; or
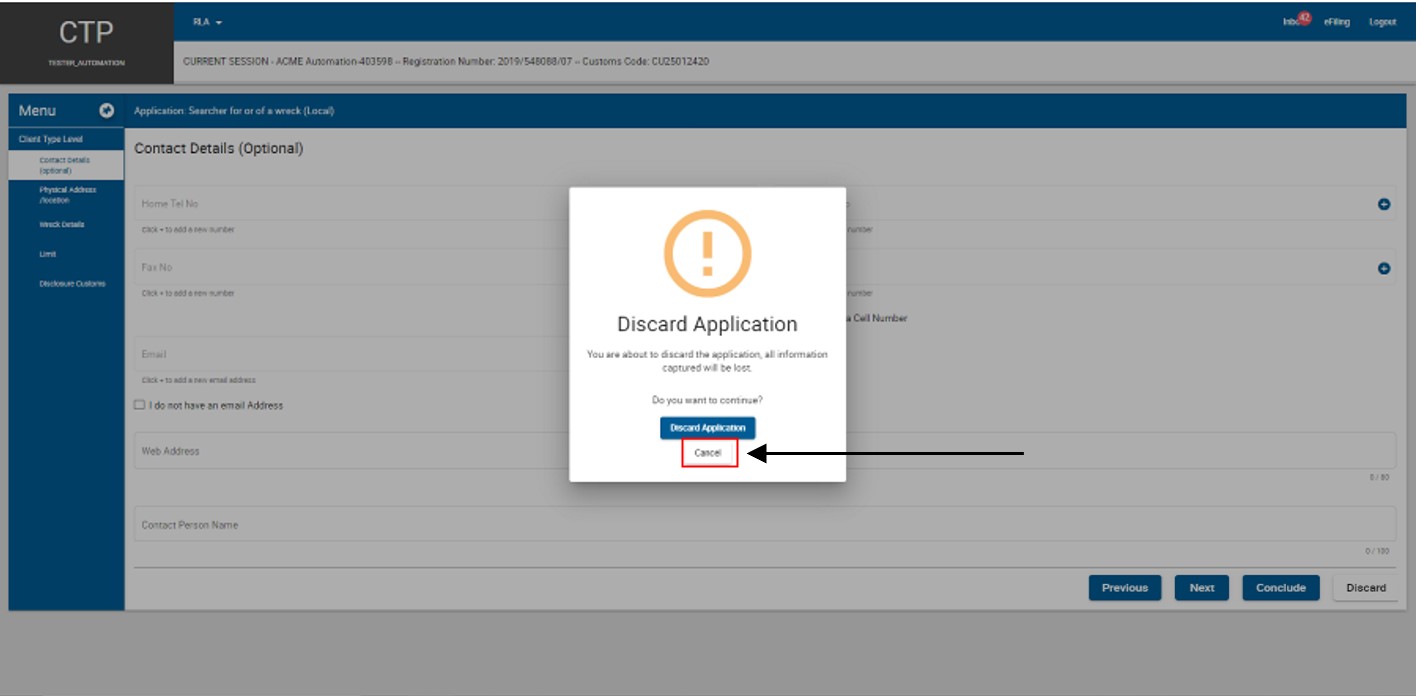
- Discard the current application by clicking on Discard button and the system returns to the user’s RLA Dashboard, refer to Client type level above.

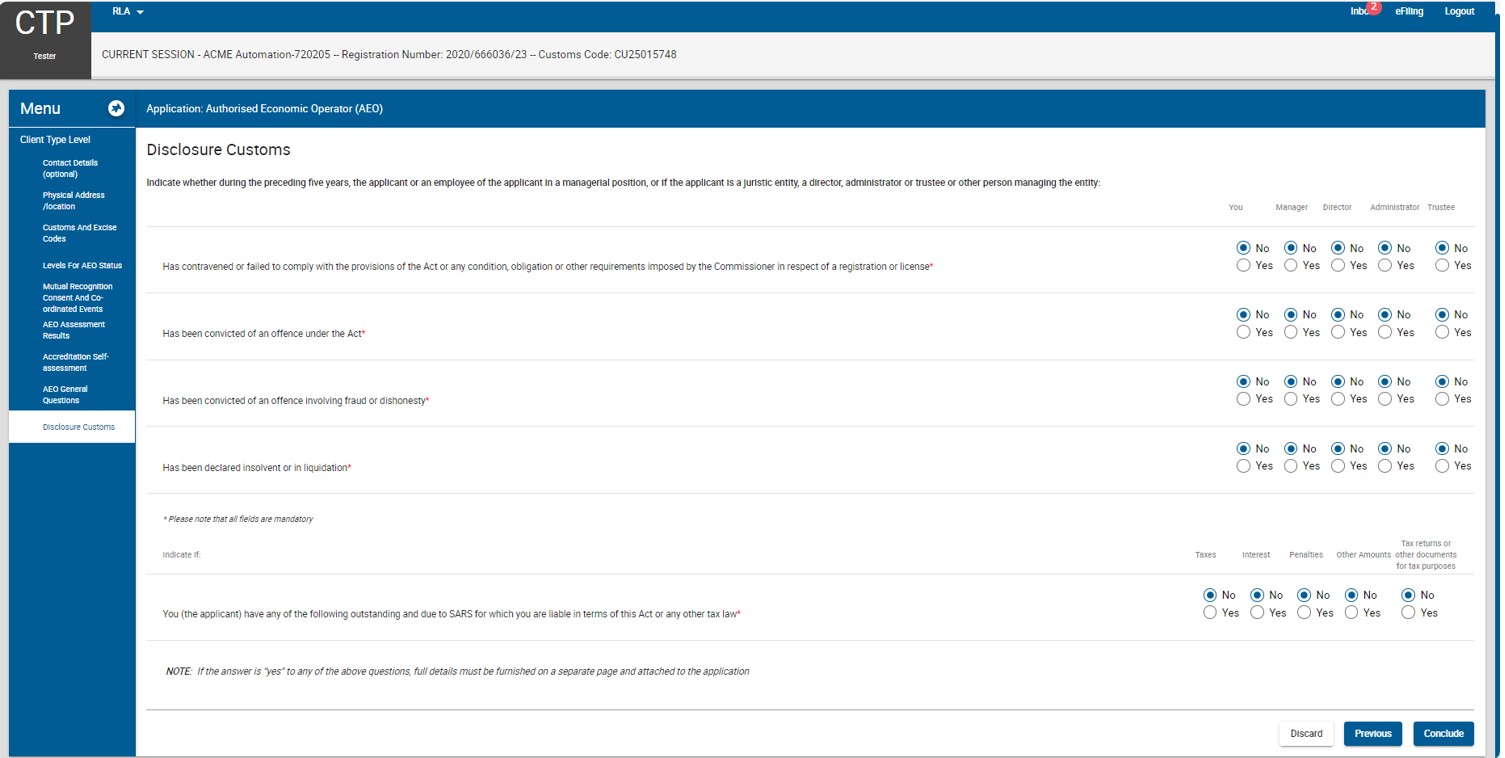
Disclosure Customs Questionnaire
- The user must answer all the questions [prescribed in paragraph 2.9 a) of SC-CF-19] listed under Disclosure Customs by selecting either Yes or No.
- If any of the questions do not pertain to the applicant, the user must select No
- If any of the answers to the question(s) is Yes. The user must furnish a motivation on a separate page that contains all the details. This motivation must then be uploaded at the end of the RLA application process, with all the other required (supporting) documents, refer to Uploading of Required Supporting Documents
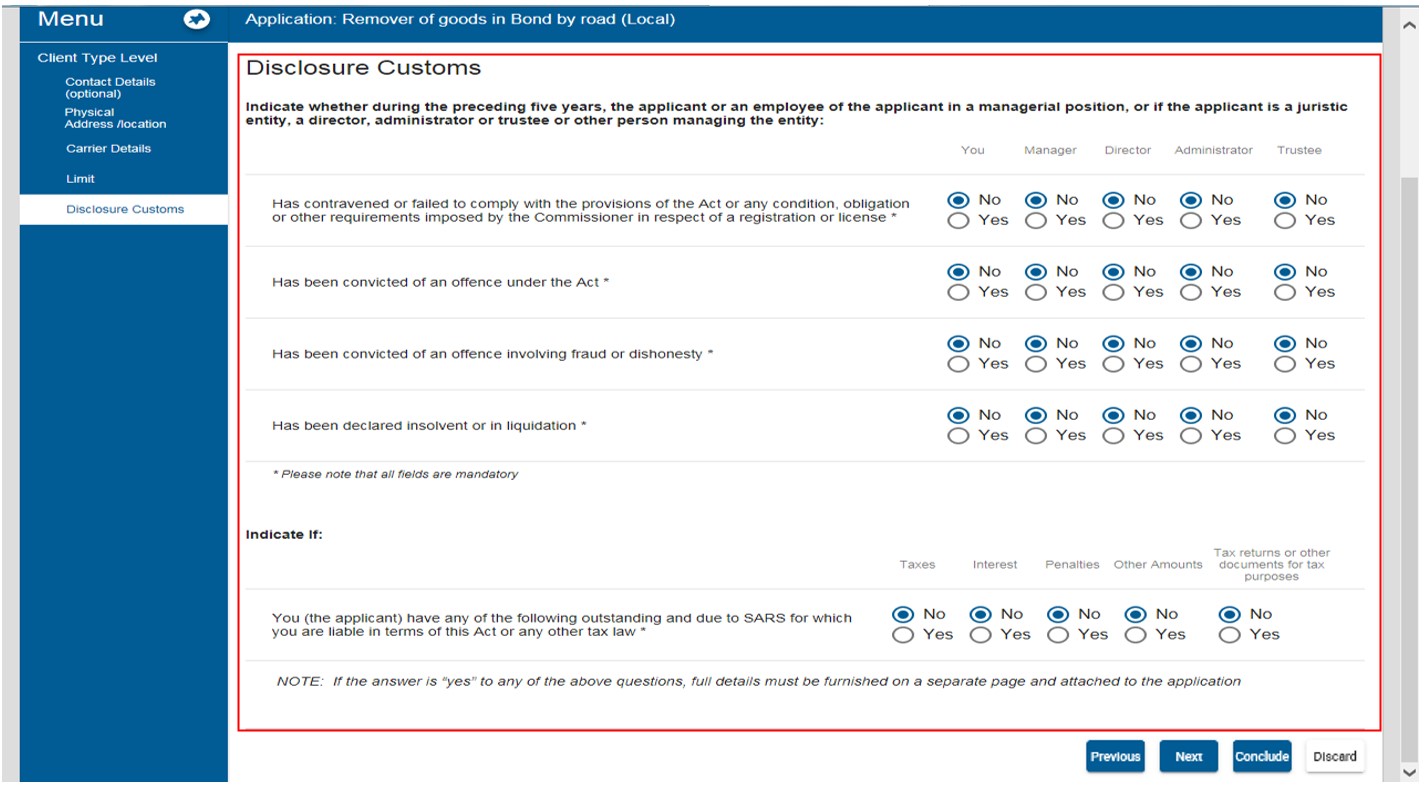
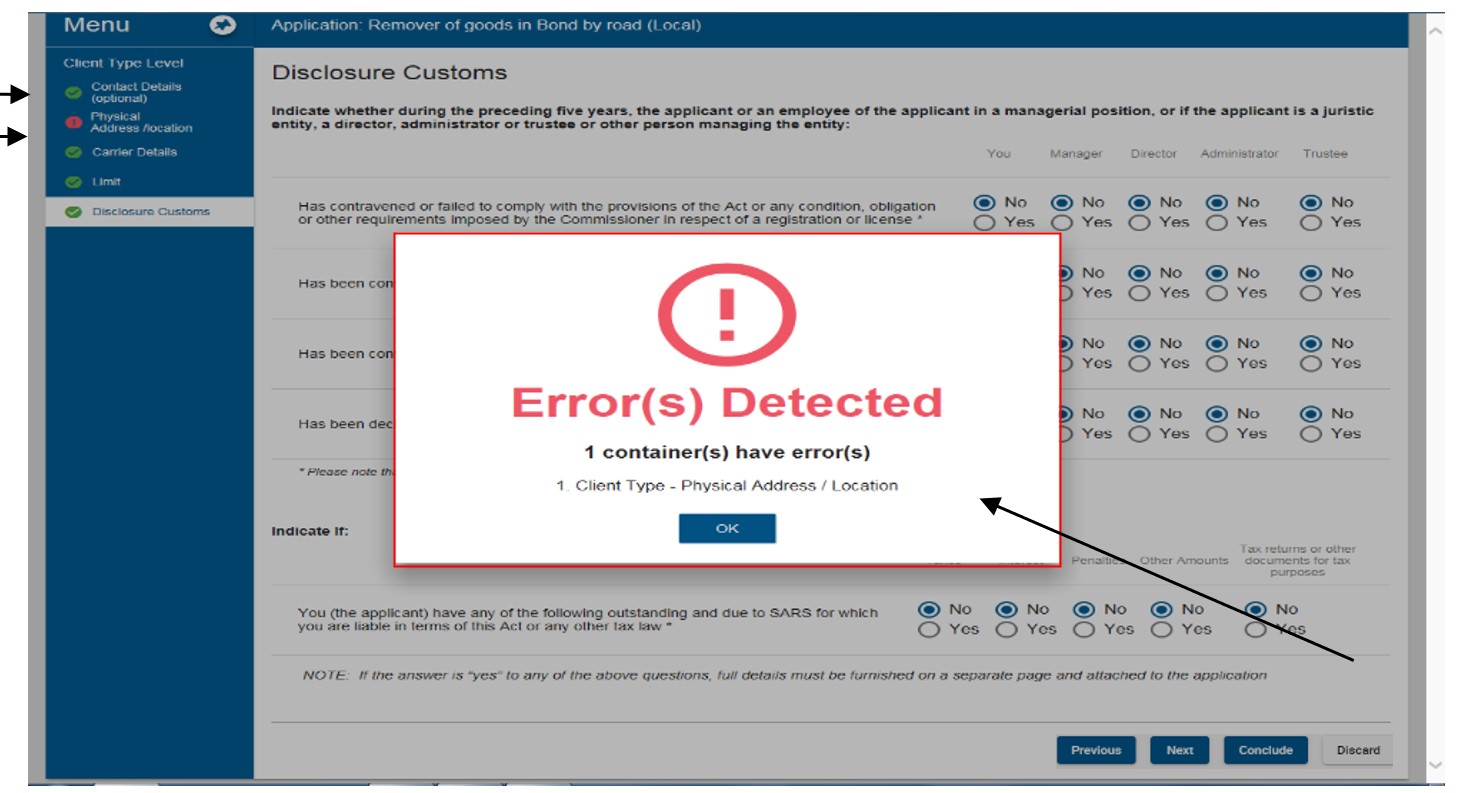
- Once all the questions have been answered, the user clicks the Conclude button. The system validates all the details captured under each field.
- The system will after all the details captured has been verified, indicate next to each field whether the details captured is correct or incorrect.
If incorrect:
- The system displays an error message.
- The user clicks on the Ok button; and
- The system displays an “
 ” next to the field incorrect in red; and
If correct, the system displays a “![]() “ in green next to each field.
“ in green next to each field.
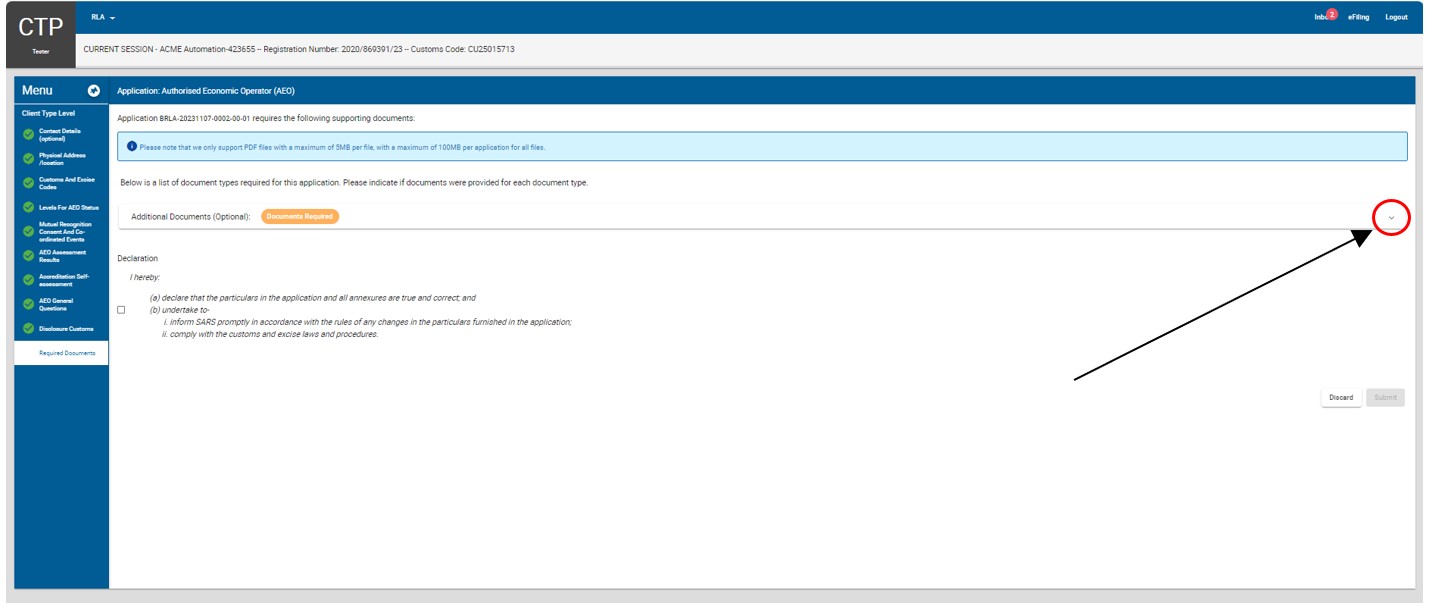
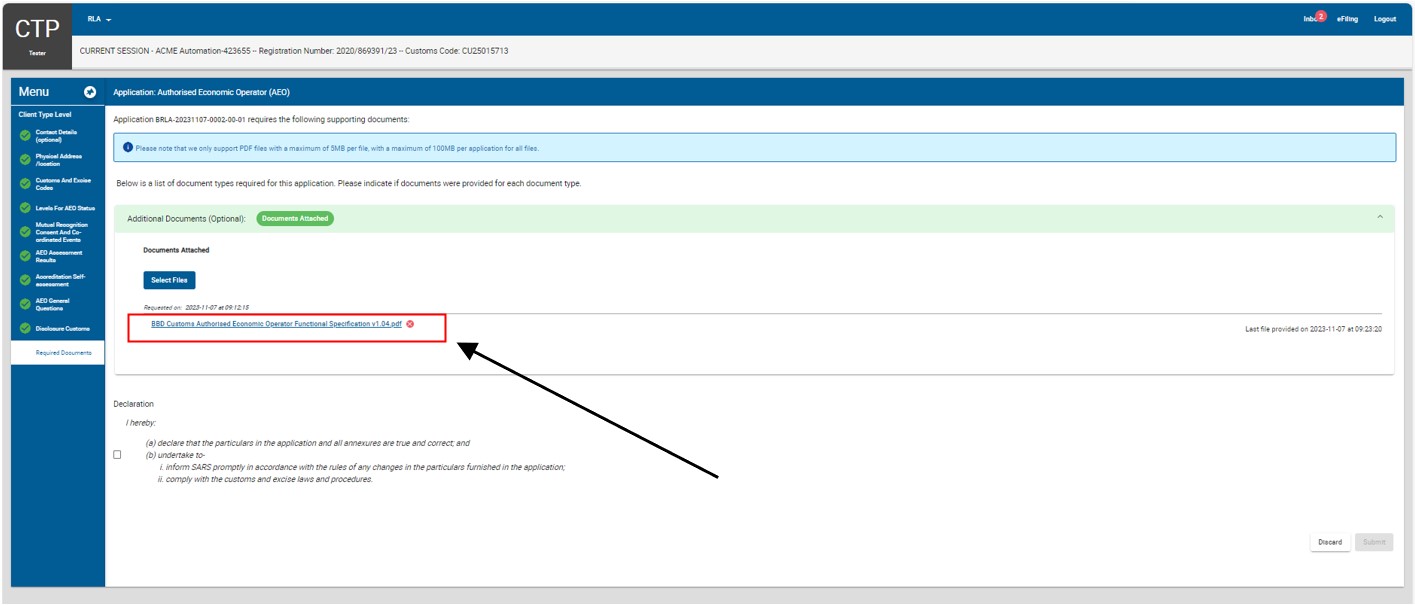
Uploading of required supporting document(s)
- Once the system has concluded that all the details captured is valid and correct, the system displays the list of required (supporting) document that must be uploaded.
- All required documents to be uploaded must be in PDF format and certified as a copy of the original, if so required in terms of the Rules to the Act. The required documents must be uploaded within seven (7) calendar days. Failure to upload the required documents within seven (7) calendar days will result in the application being removed automatically and a new application must be submitted.
- The user clicks on the dropdown arrow under each required document to be provided.
- The system displays a message to attach the document(s) for this application. The user clicks on the Select Files button
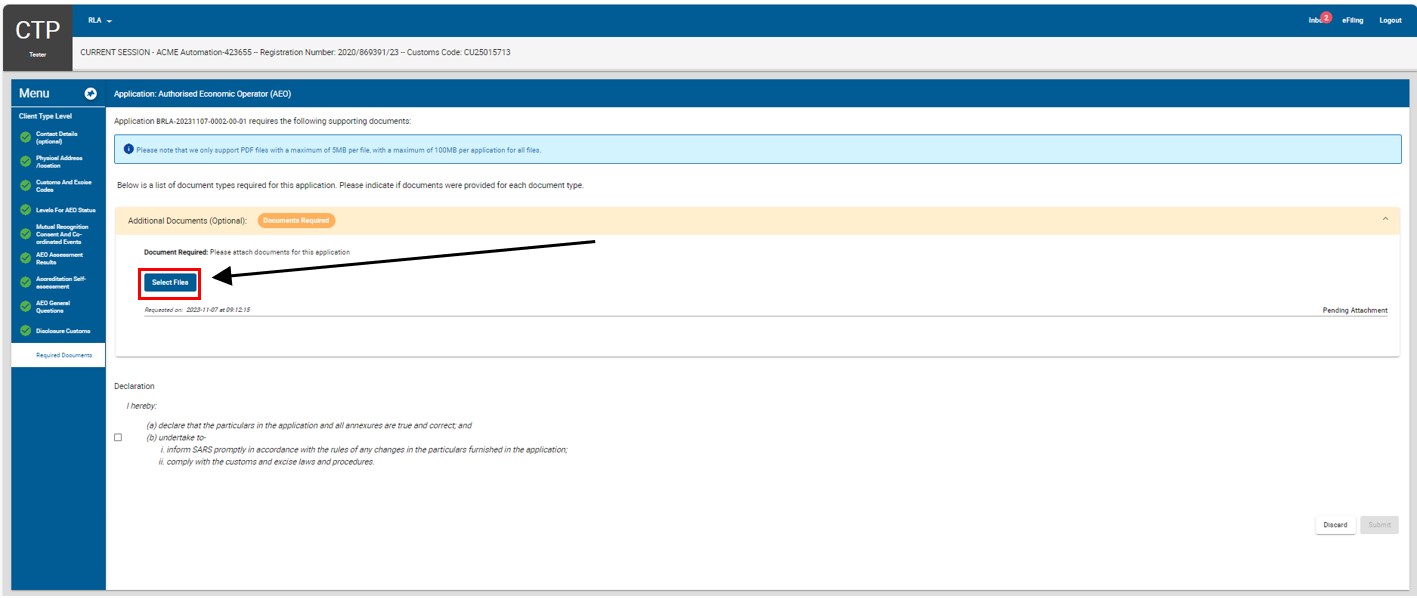
- The Choose File to Upload screen will pop up.
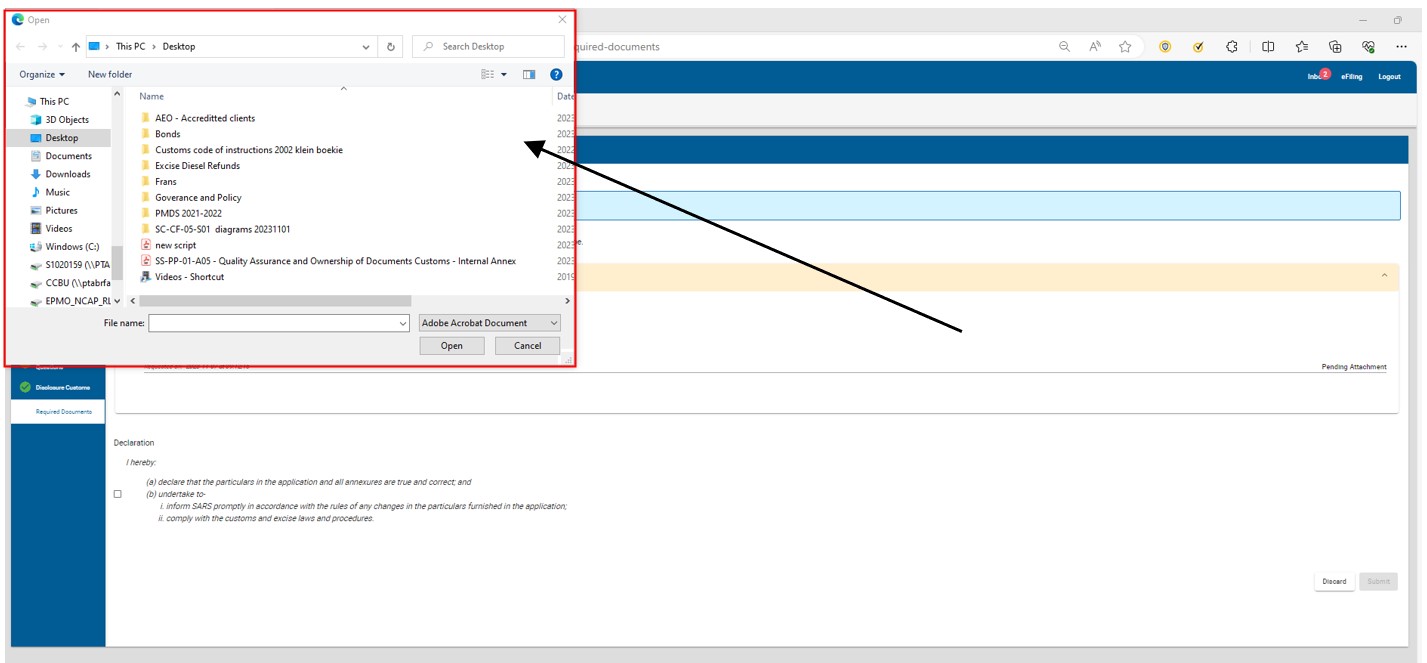
- The user selects the requried document(s) to be uploaded and clicks the Open button. The document(s) will then be attached to the user’s application.
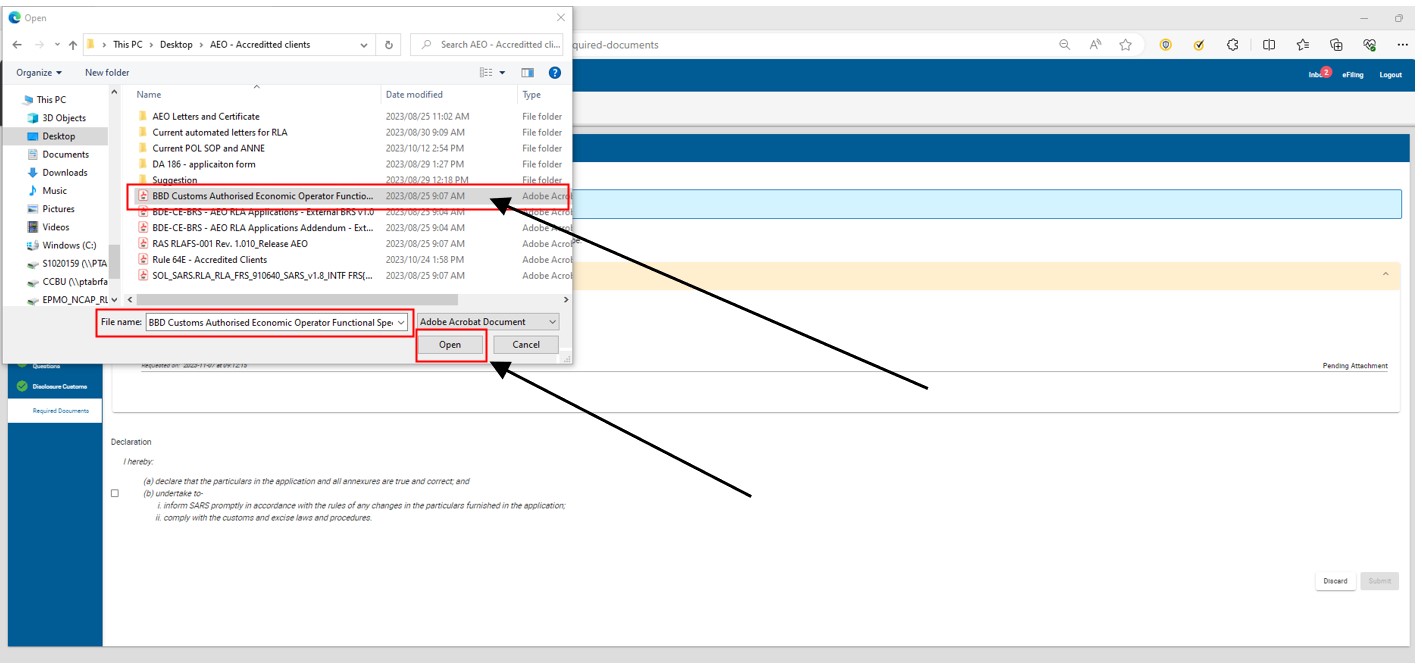
- The required document(s) is then uploaded to the application case. The same processes mentioned in the above paragraph The user clicks on the dropdown arrow under each required document to be provided.
- to The user selects the requried document(s) to be uploaded and clicks the Open button. The document(s) will then be attached to the user’s application.)] must be followed until all the required (supporting) document(s) have been successfully uploaded to the RLA or AEO application case.
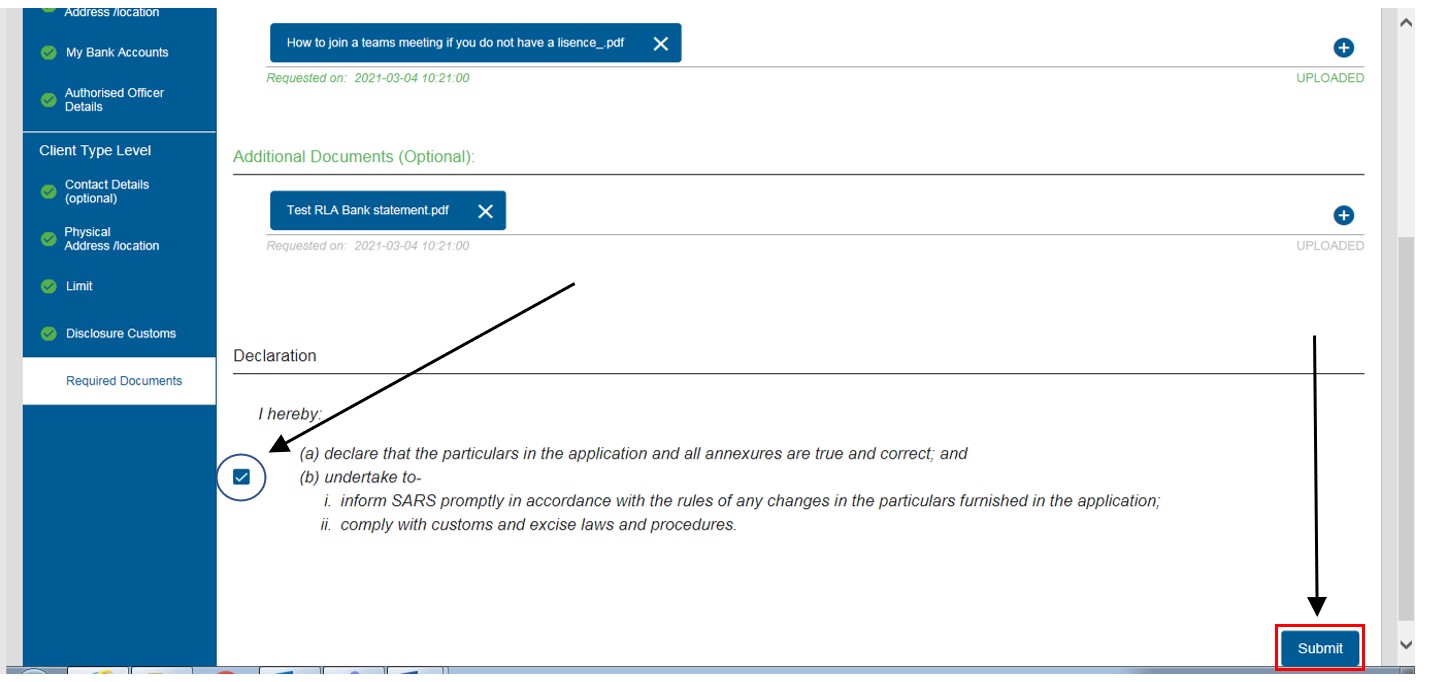
Declaration
This field is mandatory the user must once all the required (supporting) document(s) has been successfully uploaded:
- Select the declaration box; and
- Click on the Submit button to submit his/her RLA application to Customs for processing.
The system displays:
- A message that his/her RLA application have been submitted successfully;
- The RLA application’s reference number; and
- Case number.
The user clicks on the Ok button to close his/her RLA application case.
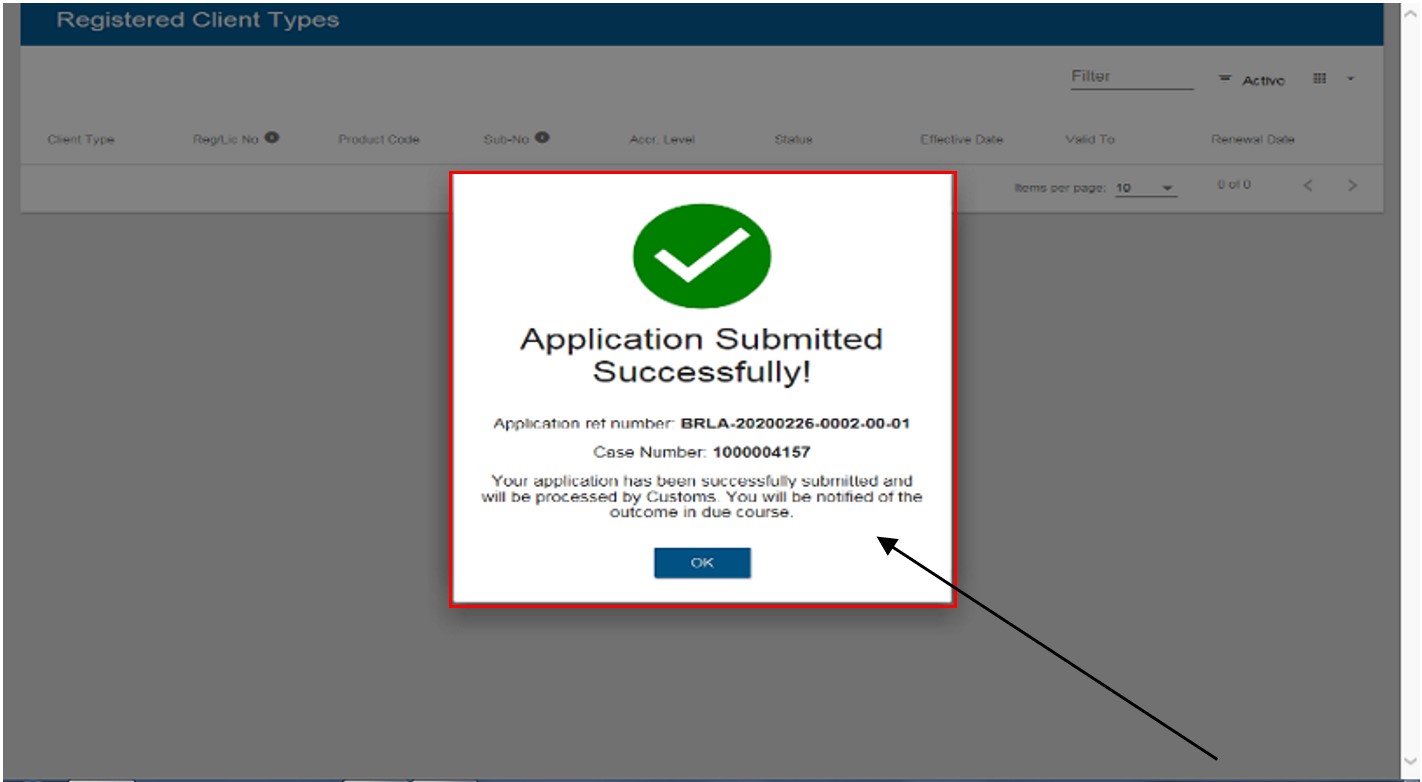
The system:
- Forwards a notification to the user via SMS or email Acknowledgement of submission of Application the notification includes the RLA application case number; and
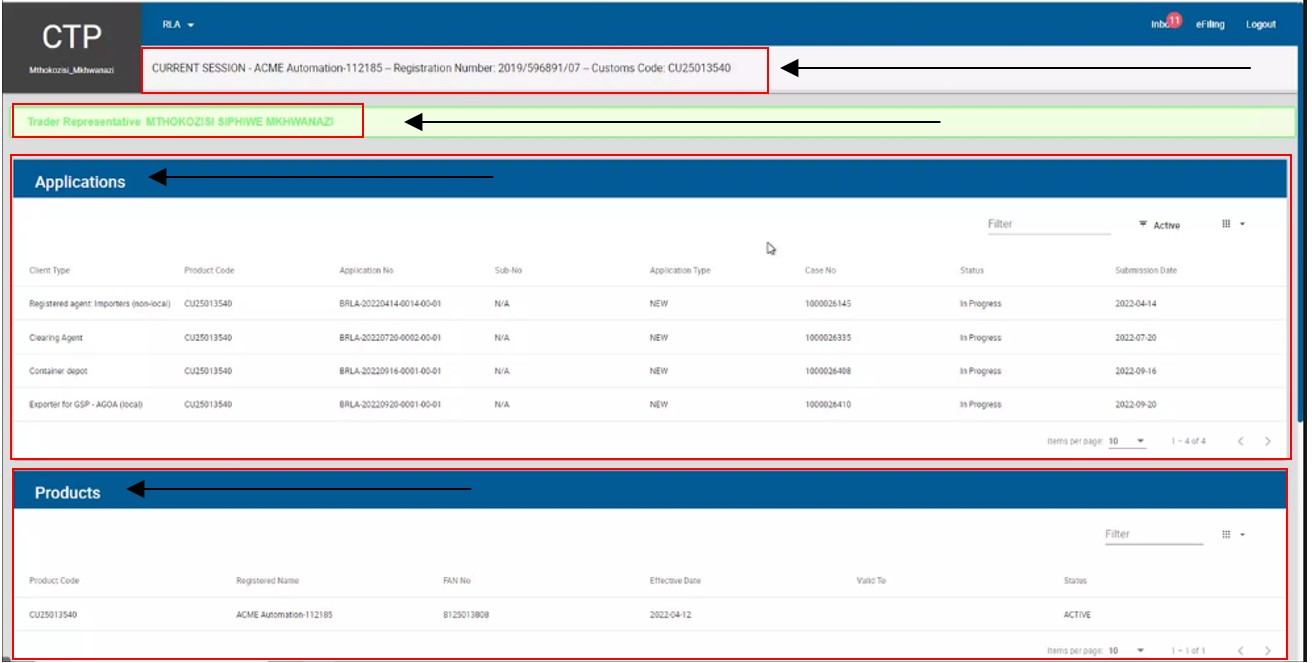
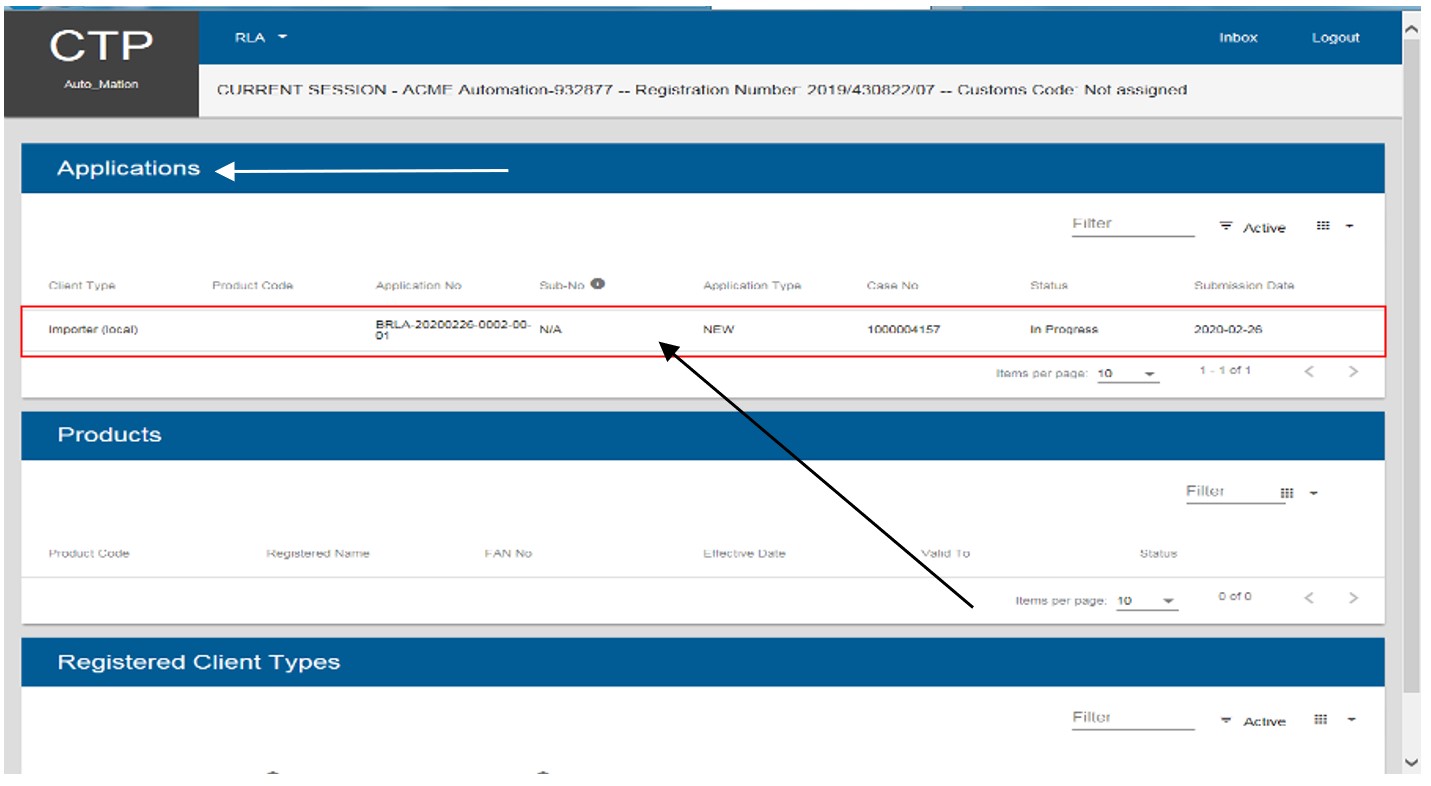
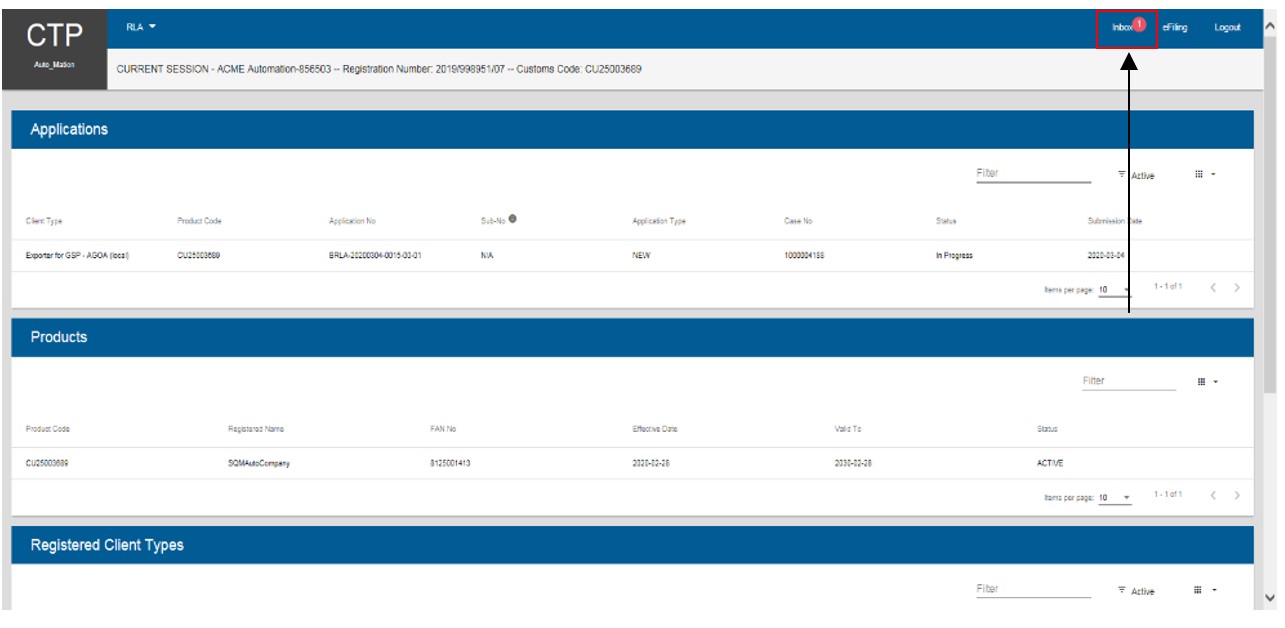
- Returns to the RLA Dashboard and displays:
- The case under Application; and
- Case status e.g. in Progress.
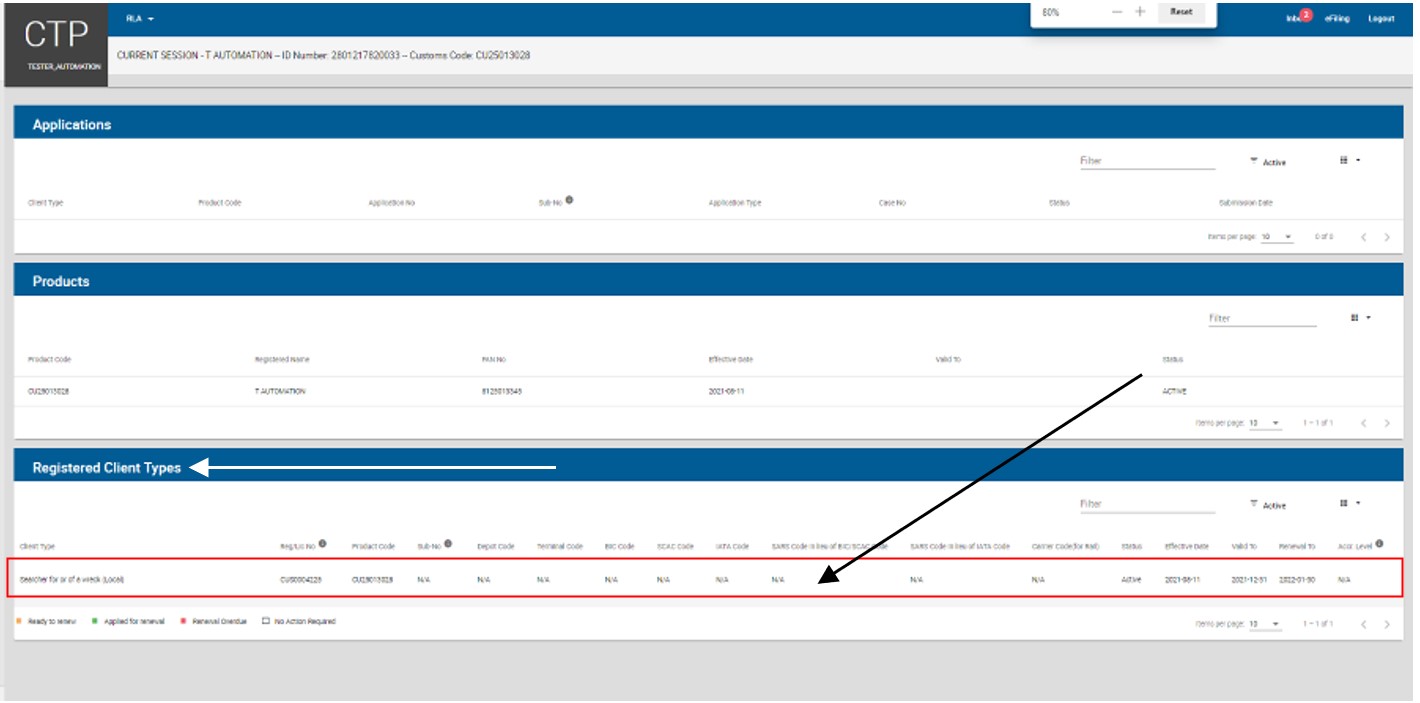
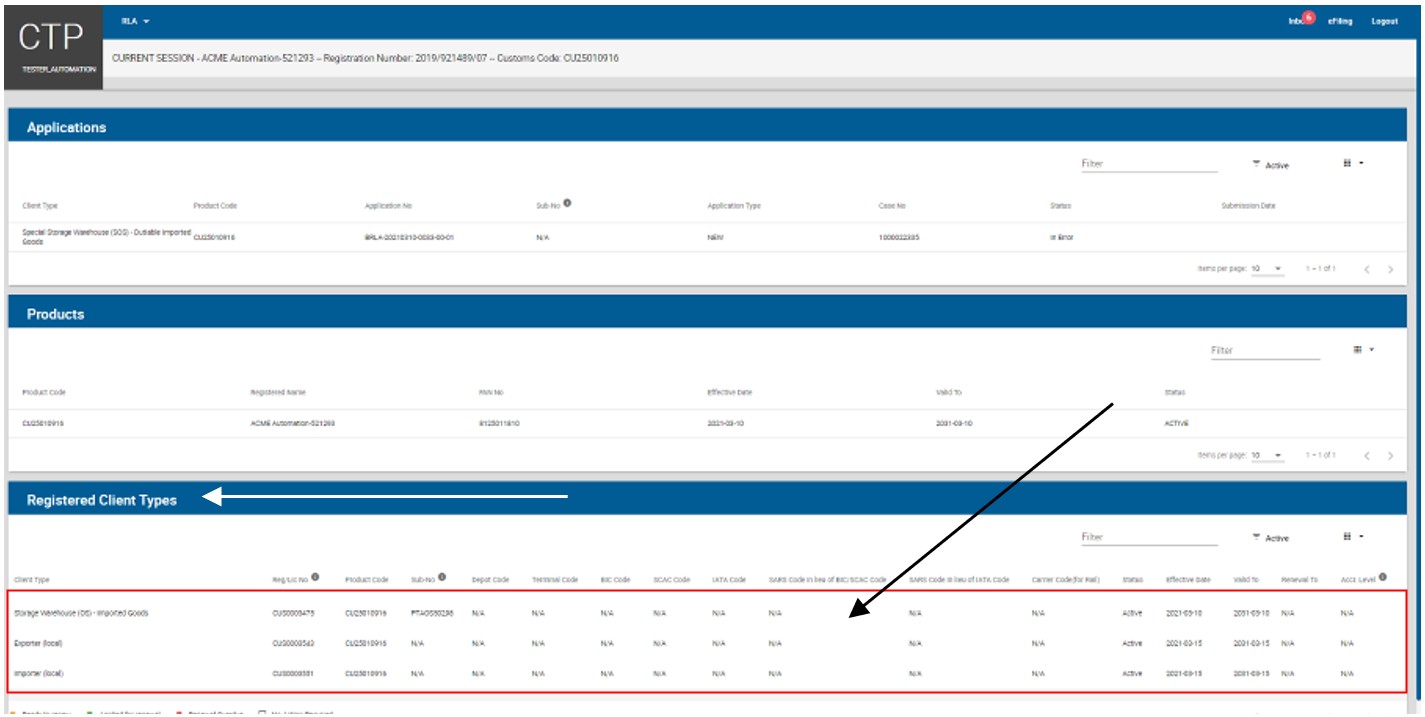
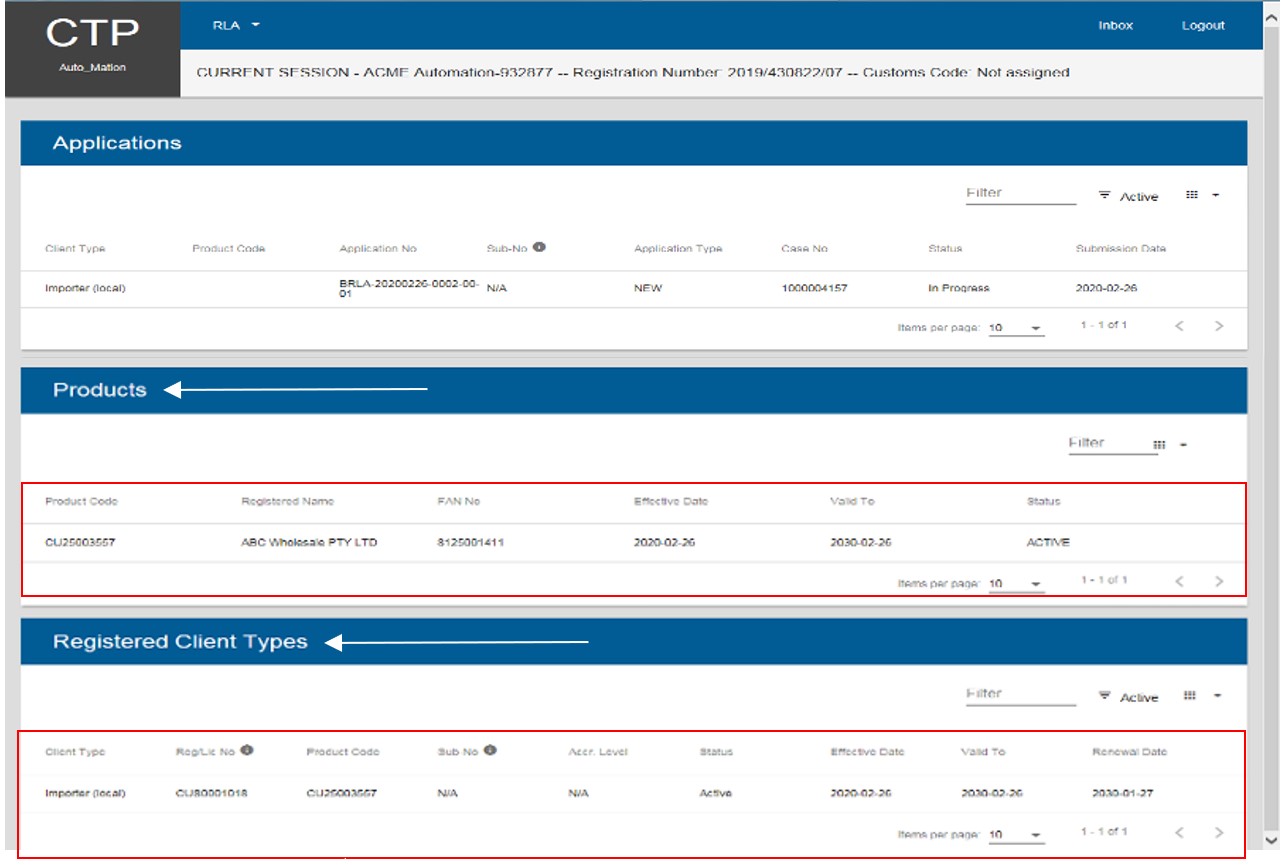
- The user will be able to register / license another client type provided the first application has been finalised. If the first application has been approved, the system will display the client type registered or licensed under Registered Client Types and Customs Product level details.
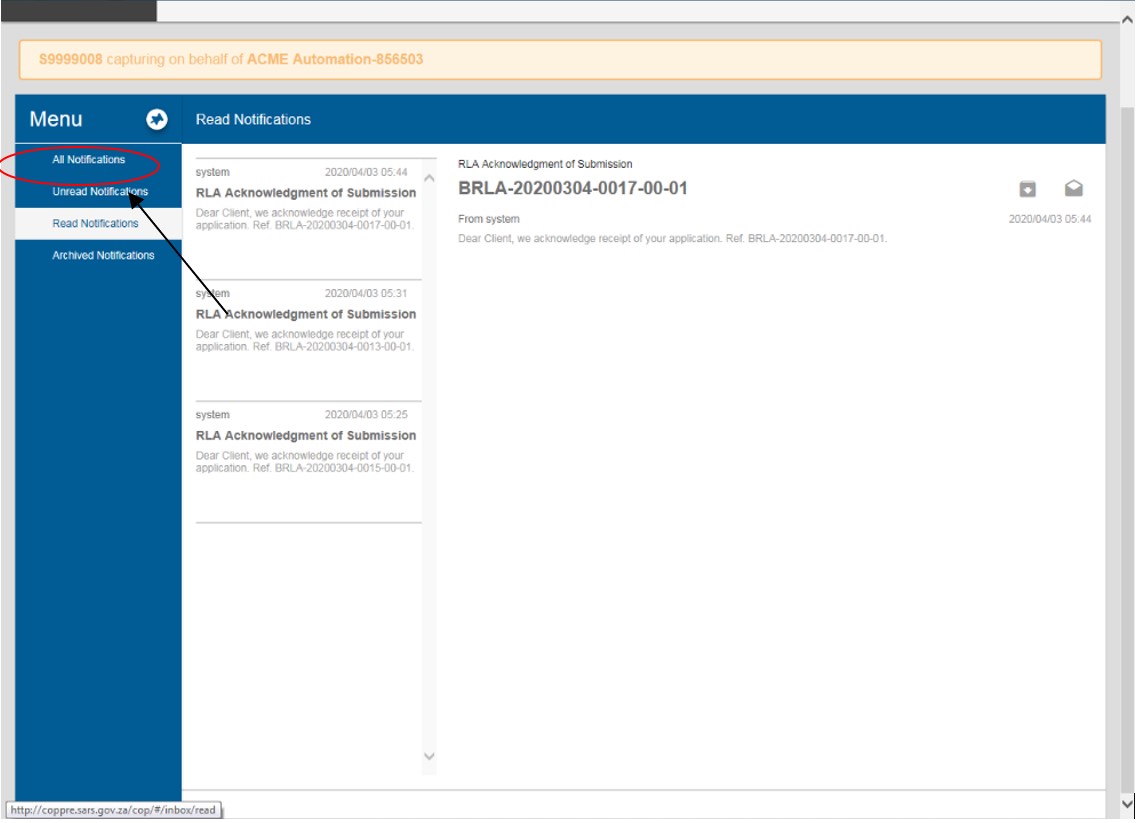
Inbox on the RLA dashboard
Viewing of notification issued
- Various notifications are sent to clients via SMS and email to inform them that there is new correspondence available in relation to applications that have been submitted. These notifications are visible in the Inbox on the client’s RLA dashboard.
- The user follows the procedure prescribed in Access RLA functionality to access the client’s RLA Dashboard and clicks on the Inbox link in the top Menu to navigate to the Inbox. The number that is displayed in red next to the Inbox link on the user’s RLA dashboard indicates the number of unread messages.
The system displays the RLA Inbox.
When clicking on a specific notification, the subject and notes for the notification is displayed as well as a:
- Link to view the attached PDF letter; or
- Hyperlink to the appropriate page for example in the case where the user is requested to upload supporting documents.
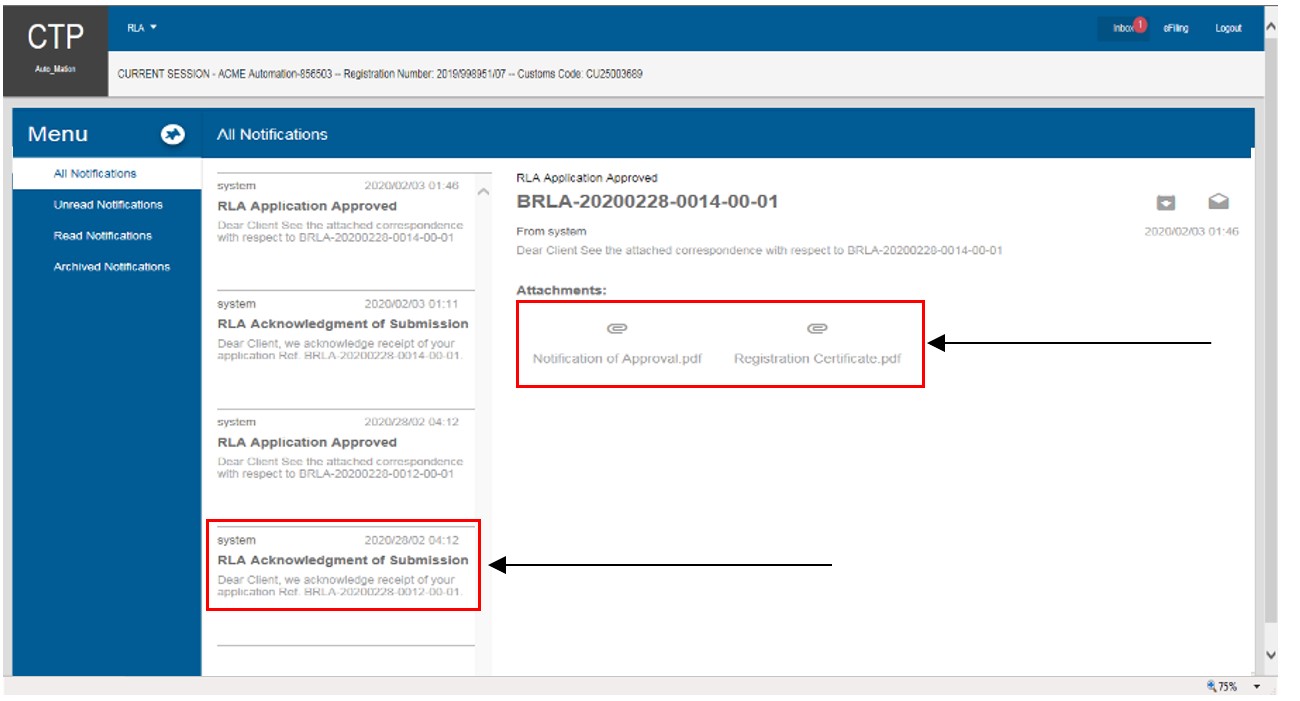
- Alternatively, the notification of approval and registration certificate may be downloaded directly from the dashboard.

In order to view, save or print an attachment:
- The user clicks on the attachment icon.
- The system asks if you want to Open or Save the attachment.
- The user clicks on the:
- Open button to view or print the attachment: or
- Save button to save the attachment to his/her computer.

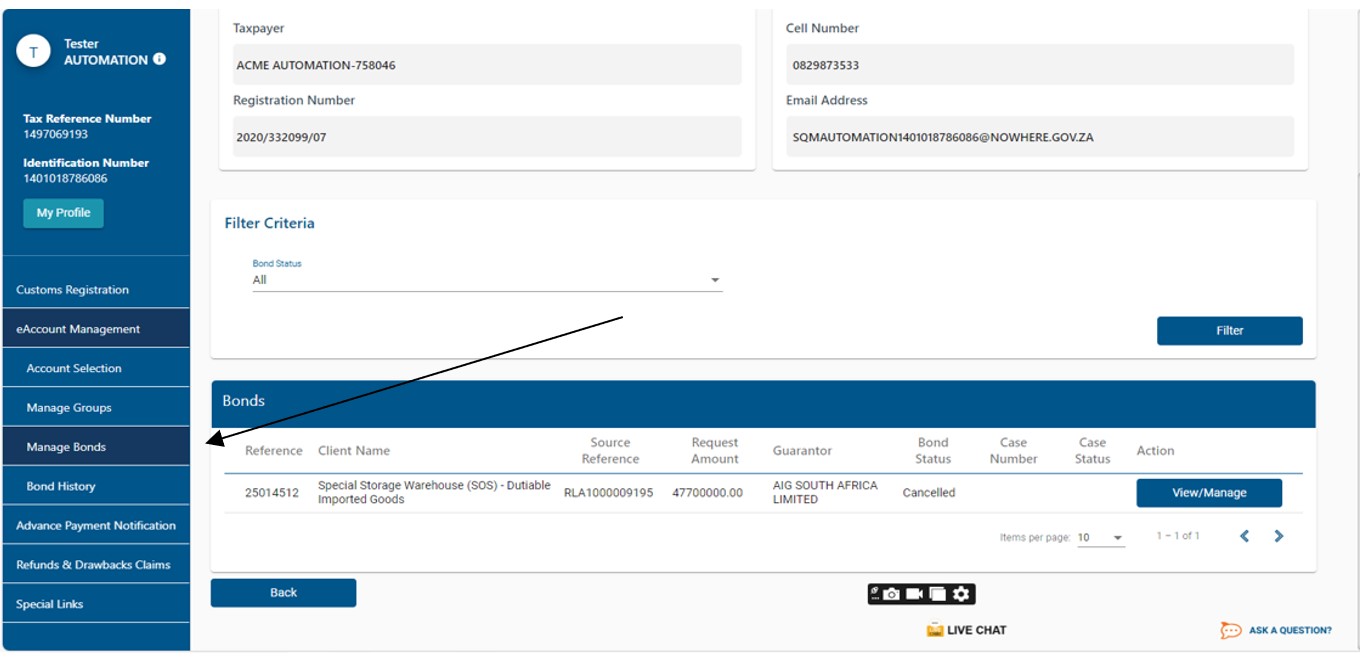
Viewing of bond history
In order to view the bond history, the user access the RLA Dashboard, then clicks on the eAccounts Management tab. The Inbox menu will open and the user can then navigate to the Inbox.
- The Manage bond tab will be displayed and all the bonds belonging to the user will be listed on the user’s RLA dashboard.
Archiving of Notification
- After the user has viewed, printed or saved the attached notification:
- The user clicks on the Archive Notification icon;
- The system:
- Moves the notification from the All Notifications folder to the Archived Notifications folder; and
- Updates the number of unread messages displayed in red next to the Inbox link.
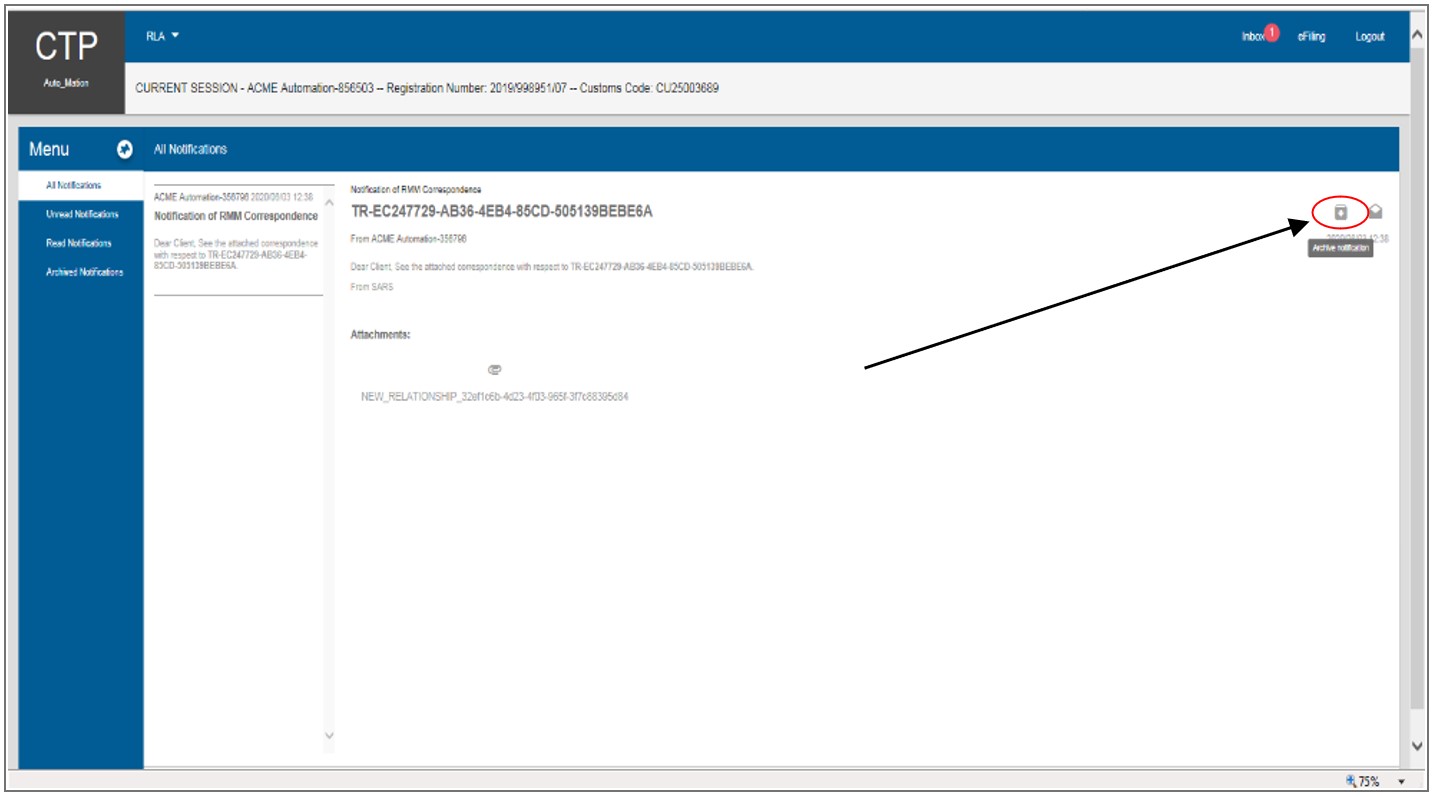
- The system displays a message that the notification has been successfully archived.

Mark notification as read or unread
The user can also move notifications from the Read Notifications folder to the Unread Notifications folder by clicking on the Read/Unread icon.
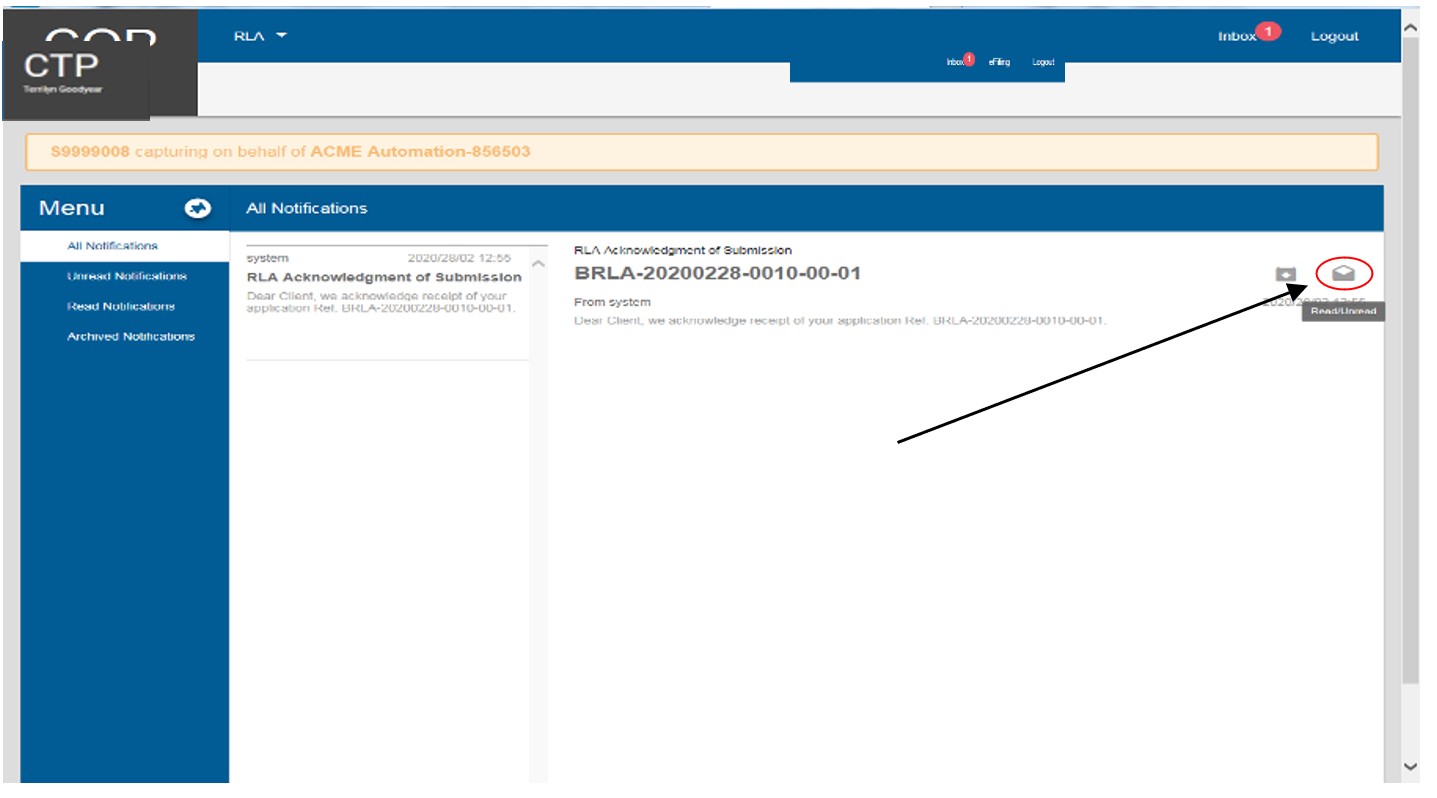
- The system indicates that the message is marked as read.
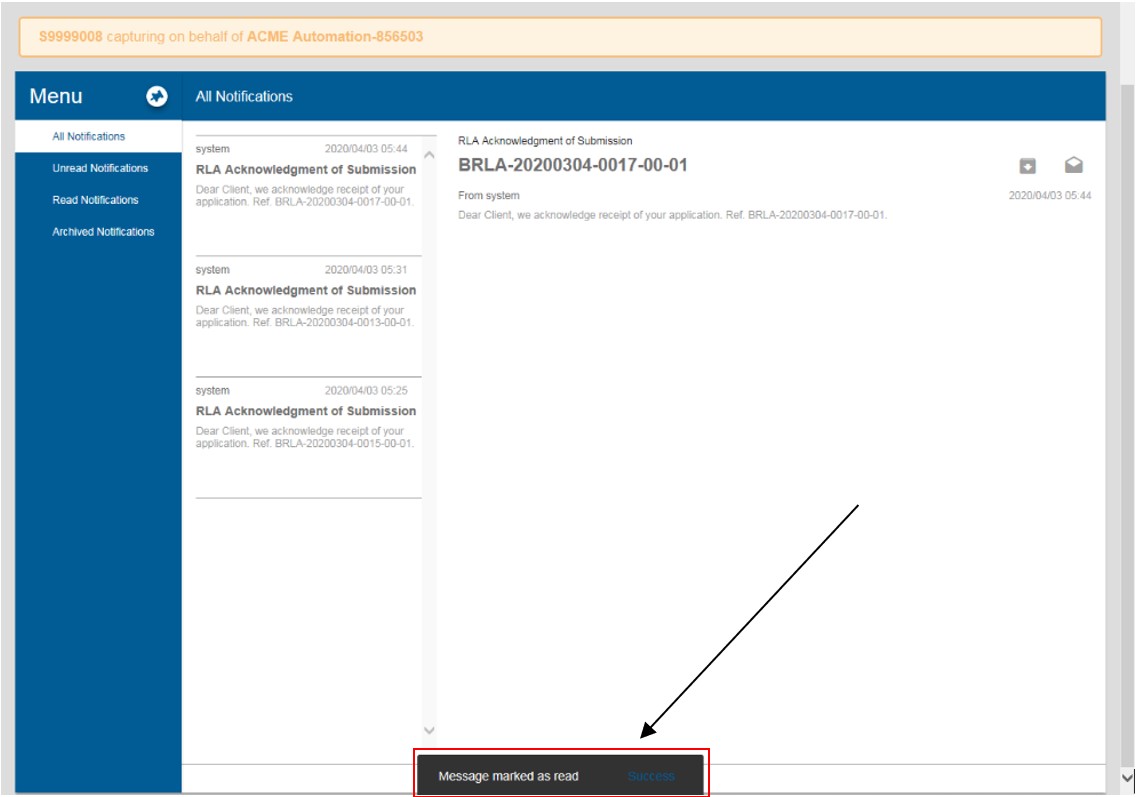
- The system moves the message from the All Notifications folder to the Read Notifications folder.
Definitions, acronyms and abbreviations
The definitions, acronyms and abbreviations can be accessed here – Glossary webpage.
Legal disclaimer: In the event of conflict or inconsistency between this webpage and the PDF version of the guide, the latter shall prevail.