
Summary
eFiling users have access to a wide range of account maintenance functionalities including the ability to request statements of accounts.
Excise accounts are paid using a variety of methods and post-payment account maintenance are easily achievable.
eAccount Management
Account Overview and Statements
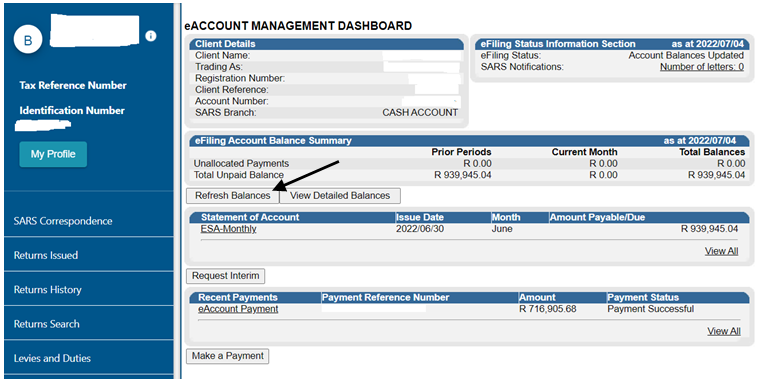
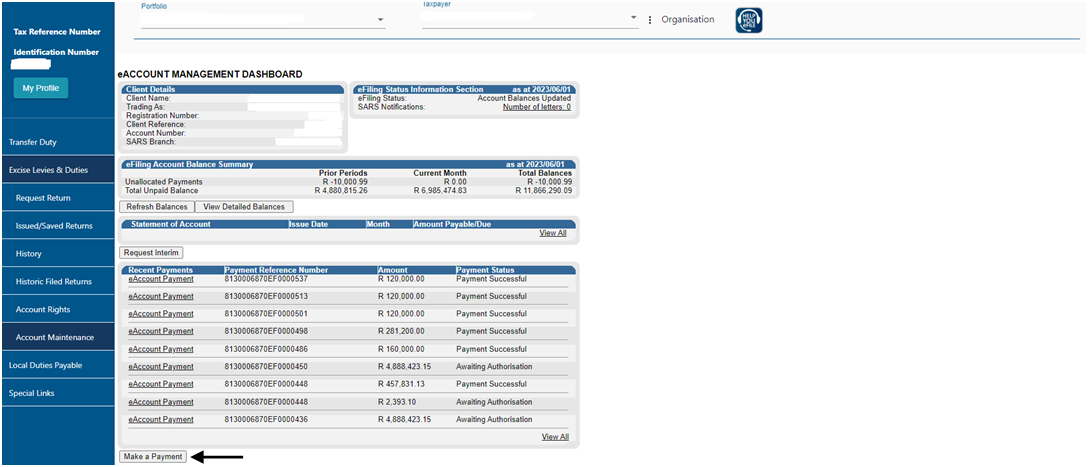
- The eAccount Management Dashboard provides an overview of a specific account as well as the tools to manage the account effectively. The Dashboard includes Excise Statement of Account and detailed account balance functionalities.
- The Account Balance Summary highlights the total account balance and any unallocated payments.
- The total balance on account may consist of both unpaid declarations and unallocated payments. These unallocated payments arise due to an incorrect PRN specified which prevents the system from automatically allocating the payment. These unallocated payments need to be allocated by the user. Payment allocation serves to receipt the payment against declarations thus marking them off as paid/settled.
- Monthly Statements of Accounts are made available for each calendar month. The latest issued Statement of Account will be displayed on the Dashboard for ease of use.
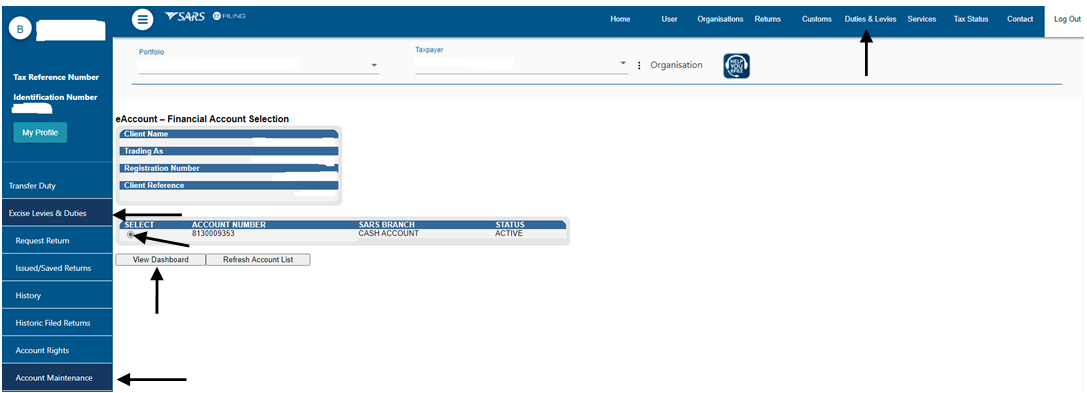
How to access the eAccount Management Dashboard
To access the Dashboard once logged onto the eFiling website, the user must:
- Click on Duties & Levies;
- Click on Excise Levies & Duties;
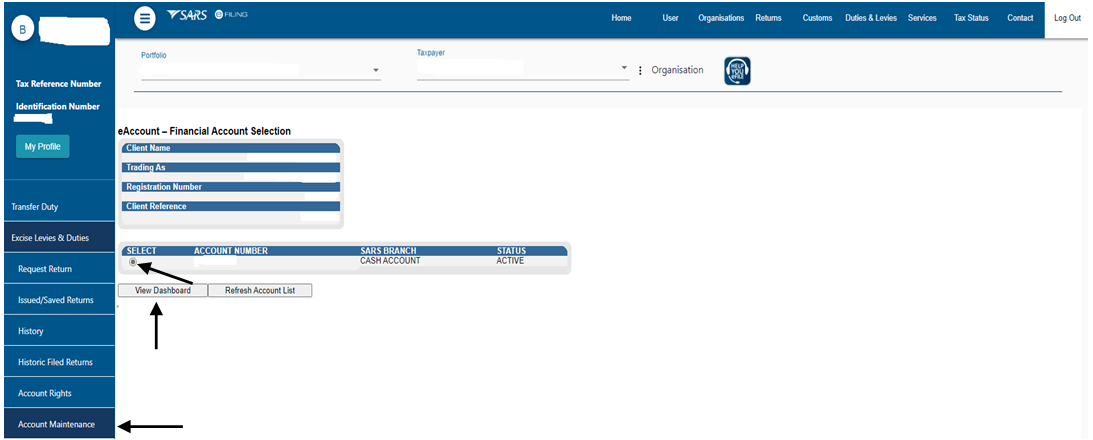
- Click on Account Maintenance;
- Select the Select option; and
- Click on View Dashboard.
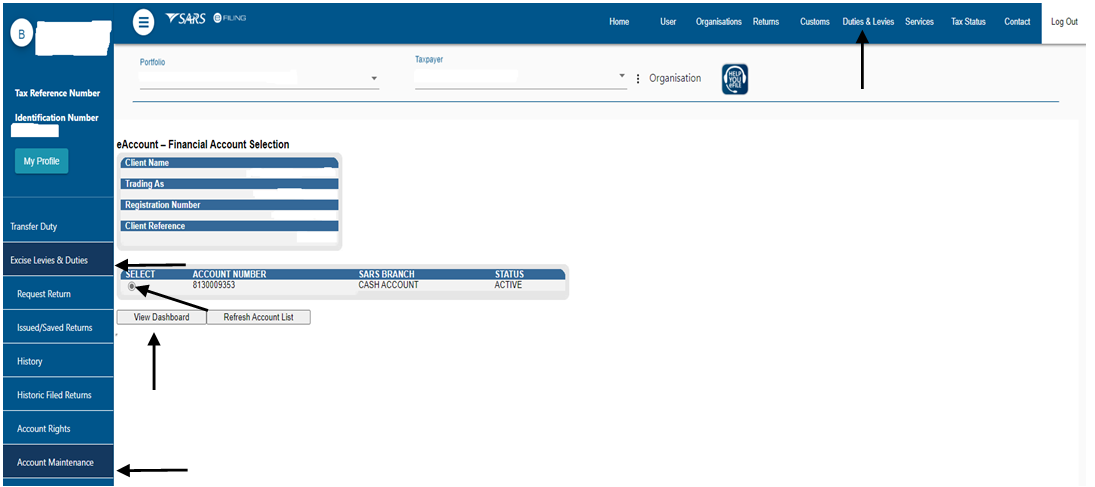
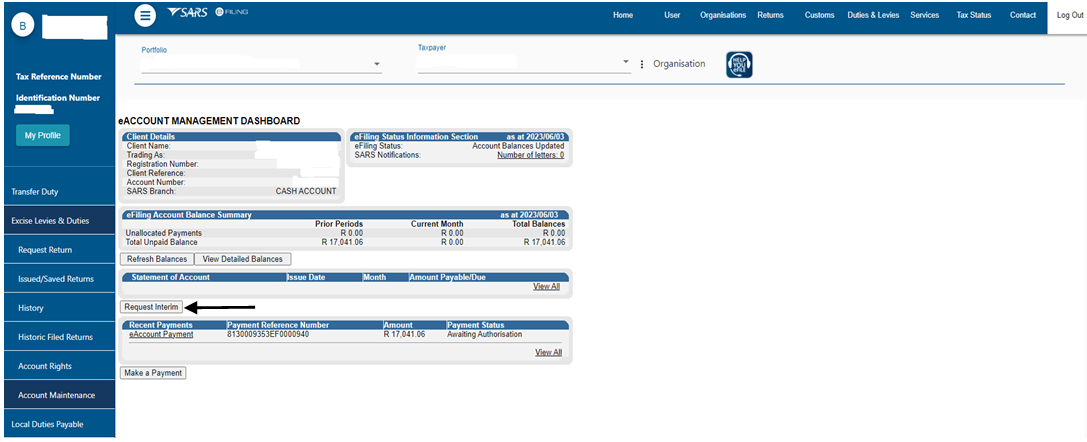
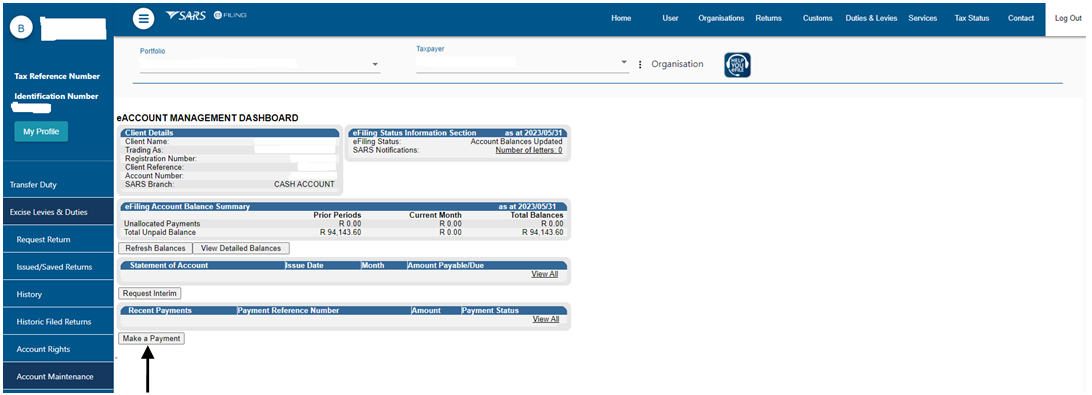
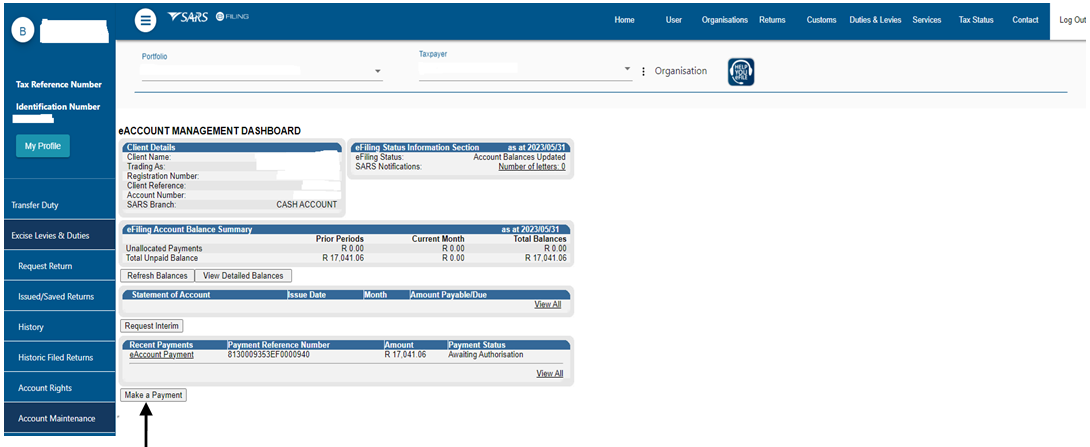
The eAccount Management Dashboard screen will now be displayed. It will display the client’s account details, status-related information, and a summary of the account balance. The user will also be able to select and view a Statement of Account, view historic transactions, or make and view payments history. To view their most recent account balances, the user must click on Refresh Balances. This will allow the user to view the most recent balances payable or to be refunded in real time.
How to View Detailed Account Balances
- The detailed account balances section provides a summary of transactions per processing date groupings, as well as a total balance. Transactions processed before the current month will display under Prior Periods, while transactions processed in the current month will display under Current Month. The unpaid balances are split between each different declaration and transaction type grouping.
- To view the detailed account balances, the user must click on View Detailed Balances.
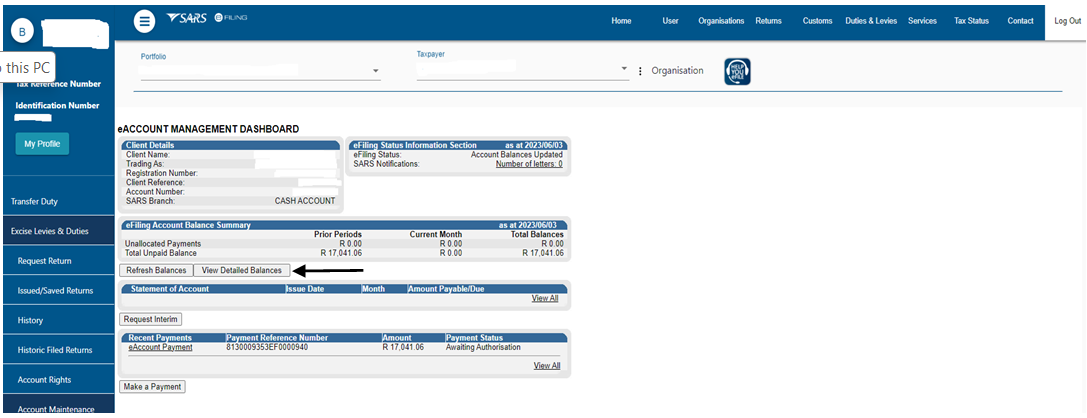
- The eFiling Account Balance Summary Section will highlight the following:
- Unpaid balances if any, which are required to be paid by specific due dates; and
- Unallocated payments or credits if any, which need to be allocated to utilise the payment against declarations.
- To return to the Account Maintenance Dashboard, the user must click on Back to Dashboard.

How to Request a Statement of Account
This functionality will allow the user to view statements and request specific statements.
The user will have two types of statements available to choose from, namely:
- Monthly Statement of Account: It is issued at the end of the accounting period. Each financial account will have its own statement and as this is a request for payment/settlement, this statement includes a PRN specific to the payable statement balance. The user may select the monthly statement and make payment. All unallocated payments must be allocated for full payment of the SOA to ensure that the full account is settled, and all declarations paid.
- Interim Statement of Account: It includes all transactions after the last monthly statement, is generated only on request by the client. This statement does not have a PRN and cannot be selected for payment.
To view the Monthly Statement of Account, from the eAccount Management Dashboard, the user must:
- Click on the applicable ESA Monthly hyperlink under the Statement of Account sub-header.
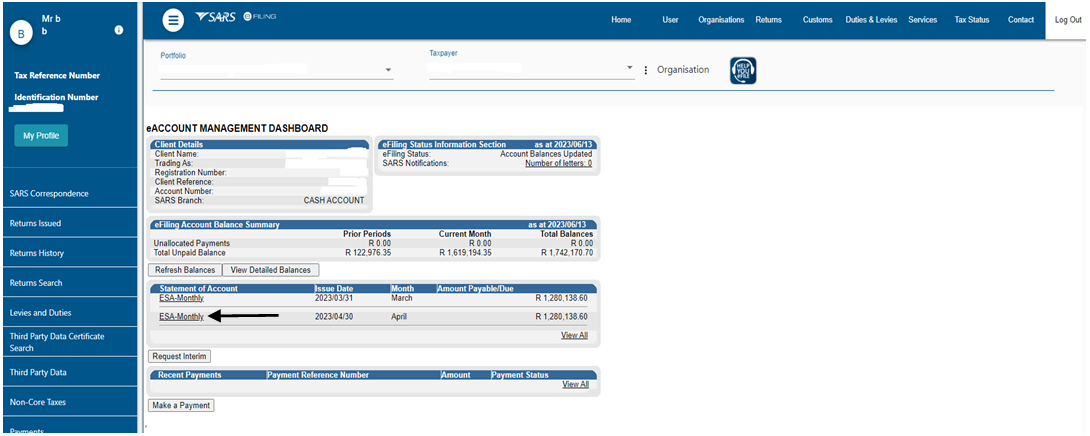
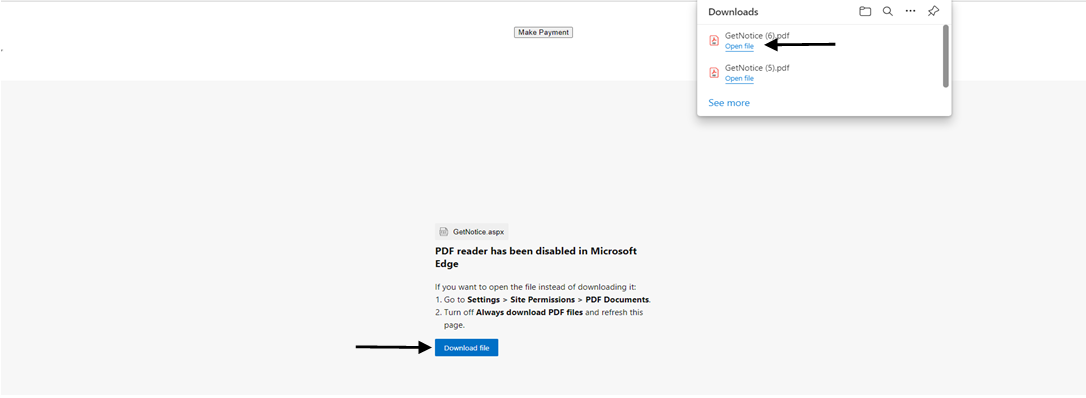
- Click on Download File.
- Click on Open File under Downloads once the file has downloaded successfully.
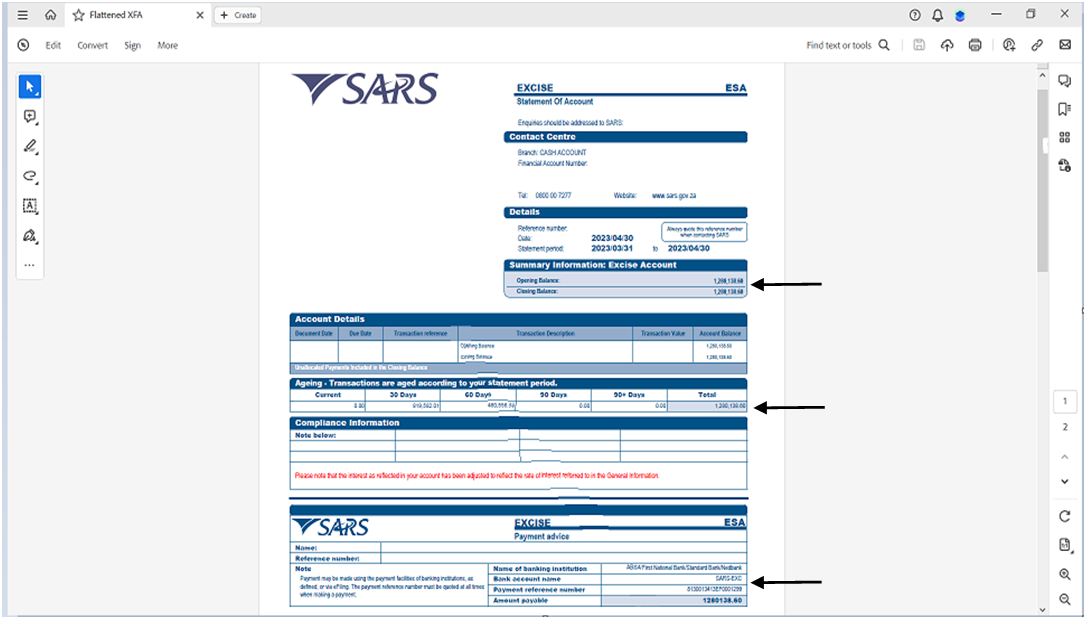
The Statement of Account is now displayed and will provide the client with the following information:
- A summary of opening balance;
- A summary of closing balance due;
- An age analysis providing a breakdown of transactions making up the closing balance;
- Payment details;
- SARS’ bank details as well as the PRN; and
- Amount payable.
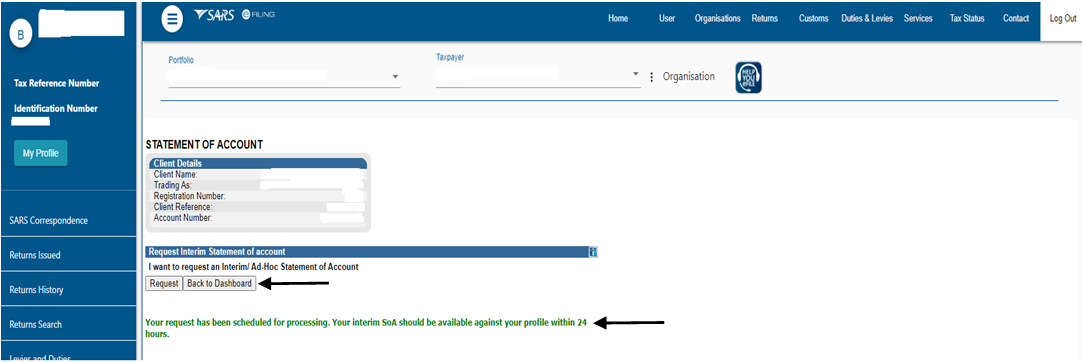
To view the Interim Statement of Account, from the eAccount Management Dashboard, the user must:
- Click on Request Interim.
- Click on Request.
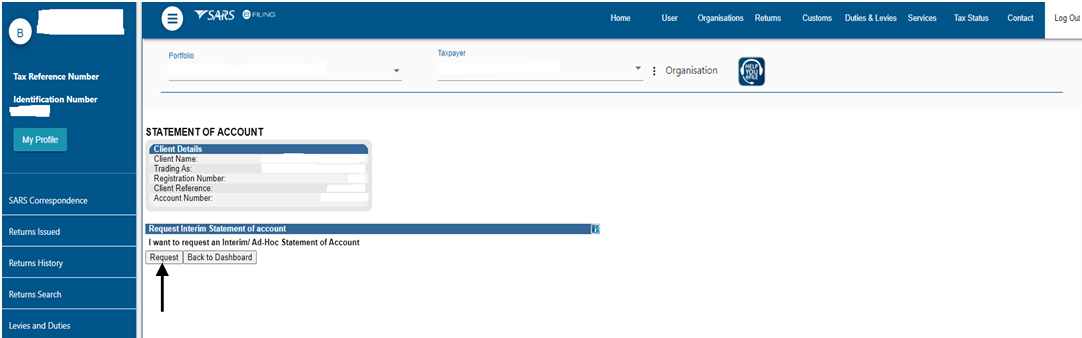
The request for an Interim Statement of Account is acknowledged and will be available to view within 24 hours of the request. To return to the Dashboard, click on Back to Dashboard.
The requested Interim Statement of Account, once available, will appear on the Statement of Account page. The user must click on the ESA-Interim hyperlink to view the statement.
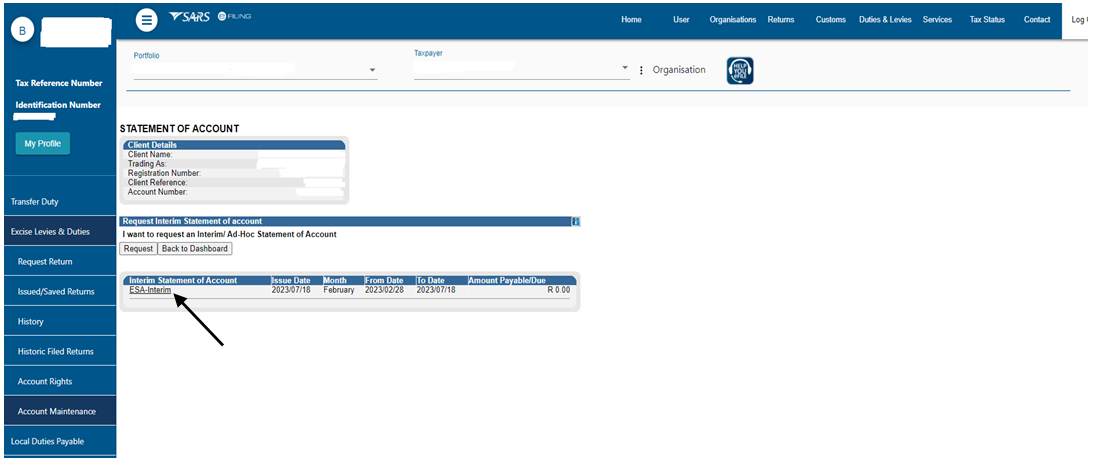
The user must then follow the same procedure as in ‘How to Request a Statement of Account’ above to download and view the Interim Statement of Account.
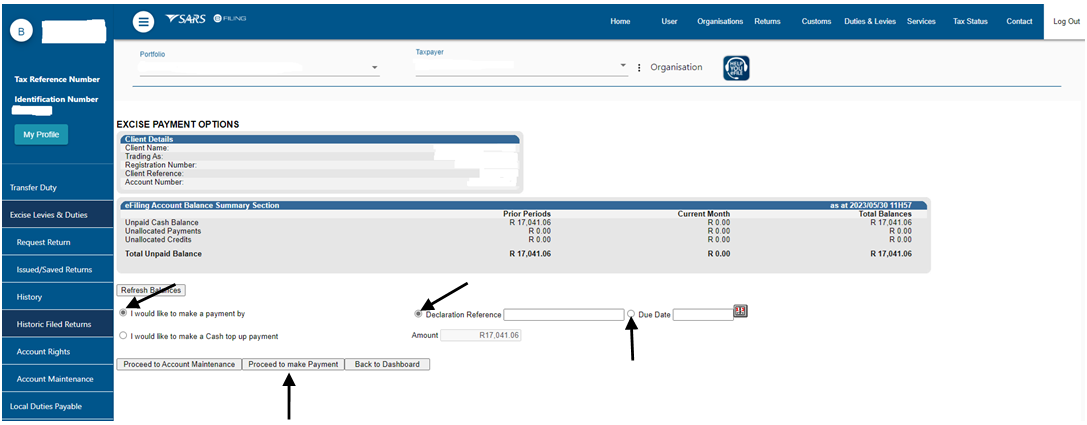
How to pay your account
If the user wants to make payment on their accounts, they have several options at their disposal to do so. Once payment is made, it will result in automated allocation of payments.
If you have any unallocated payments or credits, this section will also give you access to the ‘Account Maintenance’ tab where allocation of unallocated payments can be made.
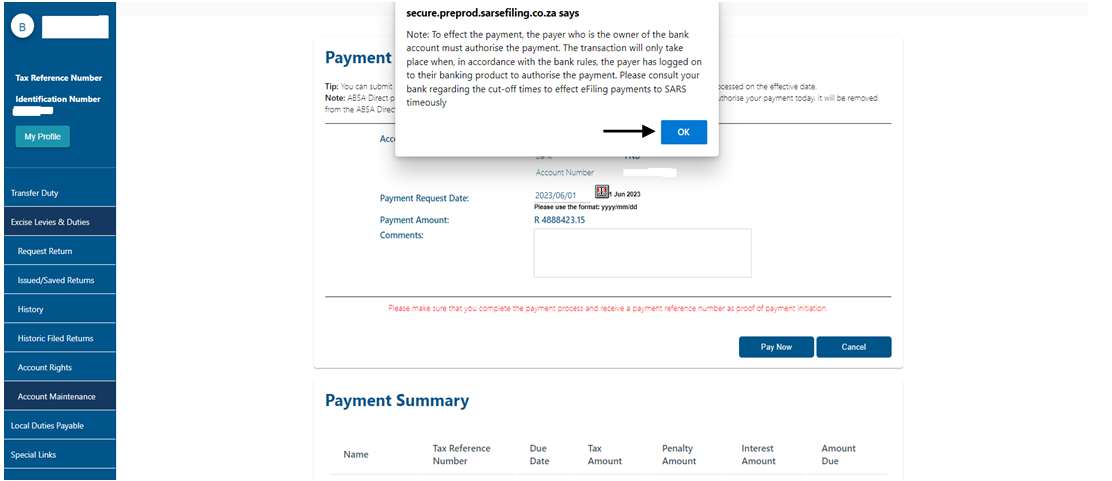
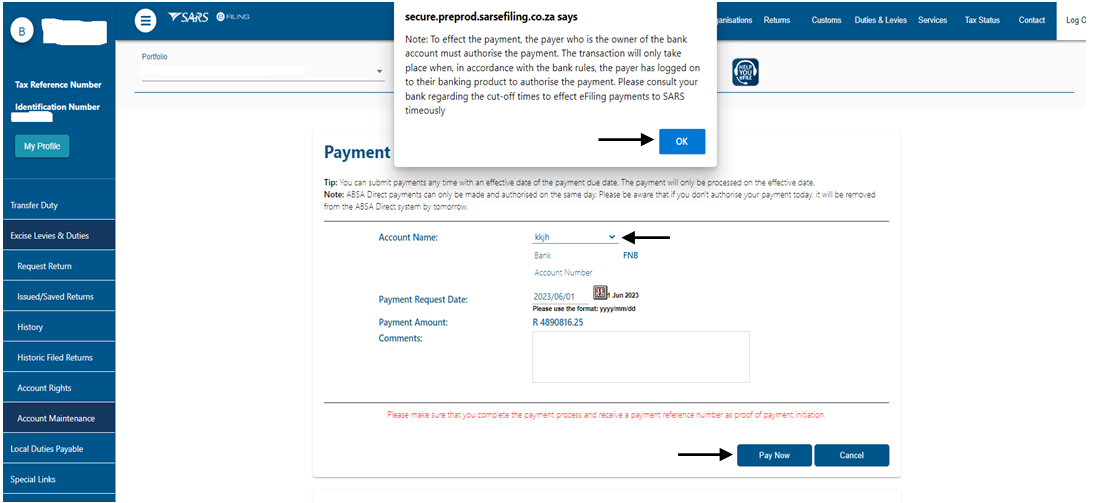
Excise payments can only be made if the selected bank account linked to eFiling is set up for a ‘Credit Push’ payment. This means you need to approve every payment made on eFiling on your bank’s online service. Any payment made via eFiling is only finalised at the point of approval by the bank and allocation to the declarations paid will follow thereafter.
The selection options for payment and account maintenance are the same to identify the declarations and grouping of declarations, but a monthly SOA can only be paid in full, and any unallocated payment must be allocated for related declarations to be paid.
The selection options are as follows:
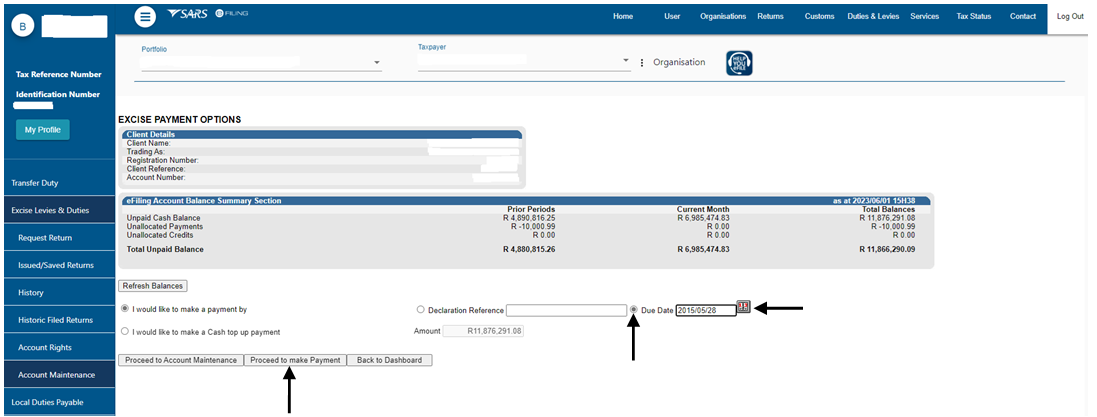
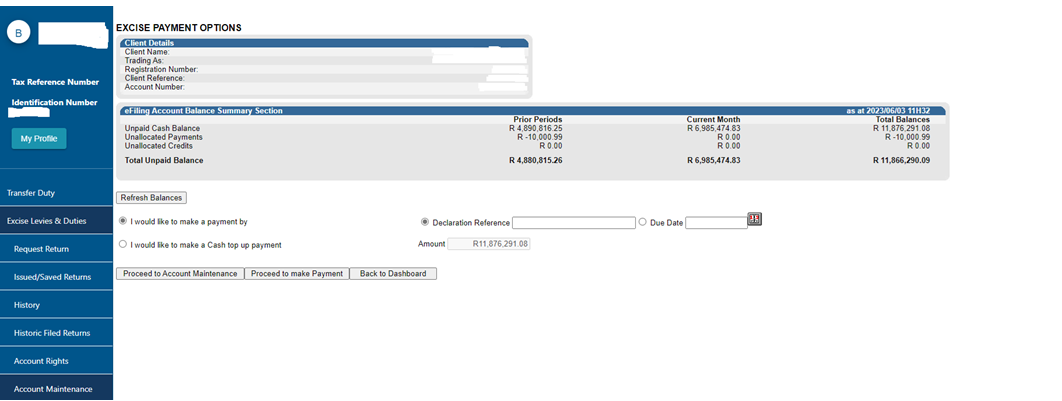
- Individual declarations under “I would like to make a payment” by:
- Declaration Reference: Request a specific declaration reference or Excise Reference Number (ERN) and only pay or perform account maintenance on this declaration. Only the specific ERN will be displayed if unpaid or a part thereof that is unpaid.
- Due Date: Request a list of declarations by due date. This option will return a list of all declarations and the trader may select specific declarations from the list for payment or to perform account maintenance. As with Declaration Reference option, only the ERN’s will be displayed if unpaid or a part thereof that is unpaid. Client to type the due date as seen on the excise declaration.
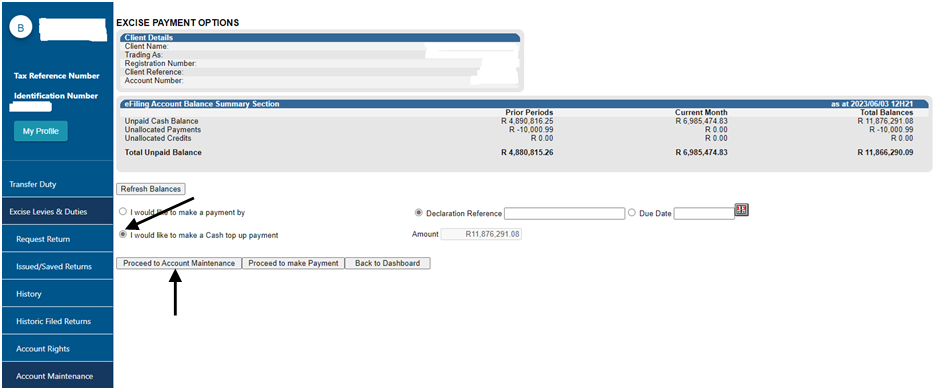
- I would like to make a Cash top up payment: This option will use the ‘Unpaid Cash Balance’ as an indication of the total value which can be paid or against which account maintenance will be performed. If any Top-up grouping option is selected, the amount displayed as the payable value can be edited on the next screen if payment needs to be made. However, in the event of account maintenance, the allocation will be done against the full value. It will be done from the oldest unpaid declaration to the most recent and no editing is available.
- When making payment or allocating a credit, please note the following rules:
- Each ERN is linked to a specific declaration or grouping of declarations. The first ten (10) digits of the ERN represent your financial account number.
- Any excess payment that remains after clearing all declarations that relate to the ERN will remain on the account as an unallocated credit.
- Where there is an underpayment, the payment will first allocate to all declarations that are linked to the ERN. The payment will allocate to the oldest unpaid declaration first. Remaining declarations will remain on the account as unpaid.
- If a ‘Top-Up’ payment is selected, payment will be allocated to the oldest transaction in the group, i.e., if payments are made for Top-up, the payment will allocate to the oldest unpaid declaration.
- When paying a ‘Top-up’, the client may edit the payment value.
The standard eFiling payment process is used after selecting the transaction or grouping for payment; therefore, multiple declarations can be selected as single payments. These payments are all saved to the list of items, which will be paid, and a final single payment instruction for all items can be made. The final payment is only effected after approval on the client’s bank online solution.
To access the Dashboard from where payments can be made, the user must:
- Click on Duties & Levies.
- Click on Excise Levies & Duties.
- Click on Account Maintenance.
- Click on the Select option, and
- Click on View Dashboard.

- Click on Make a Payment.
- Select any of the three Excise payment methods.
- Then click on Proceed to make Payment.
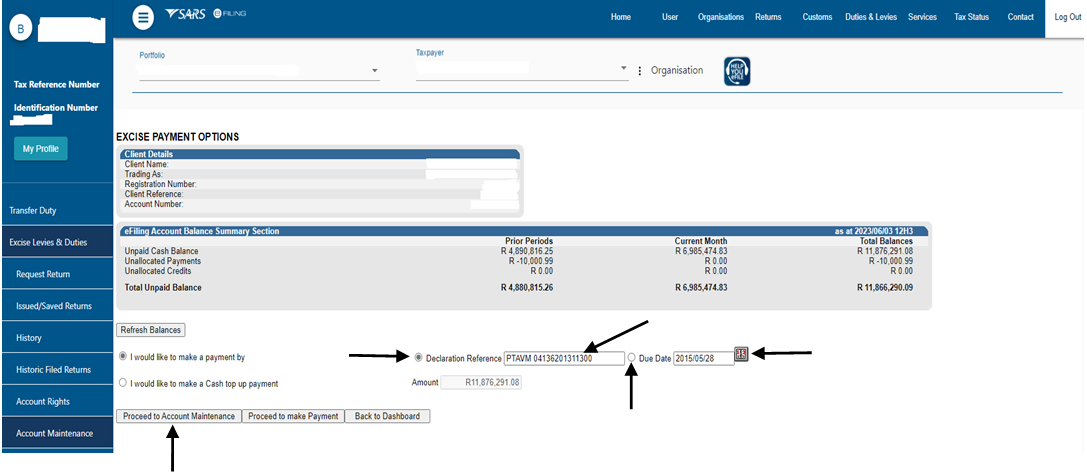
Payment by Declaration Reference
Before selecting this payment option, the user must first source the Excise Reference Number (ERN) from the declaration that they want to effect payment for. To source the ERN, the user must:
- Click on Duties & Levies.
- Click on Excise Levies & Duties.
- Click on History.
- Click on the applicable Industry and subsequent return Open hyperlink.
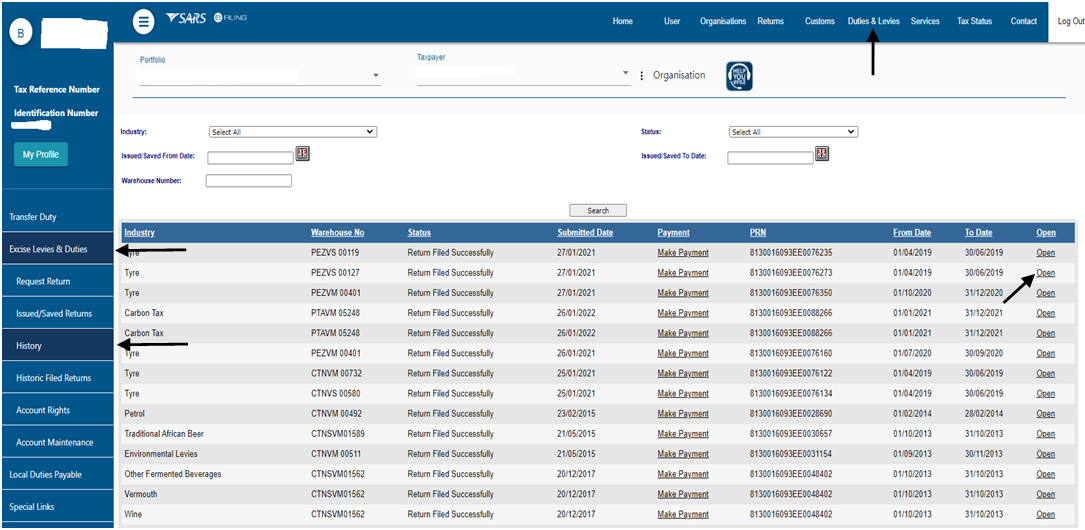
- Click on the Industry hyperlink.
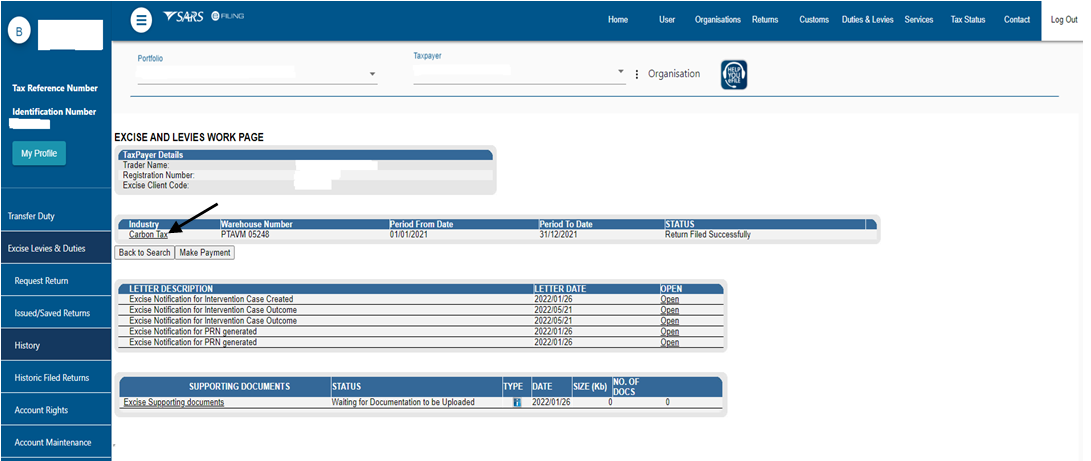
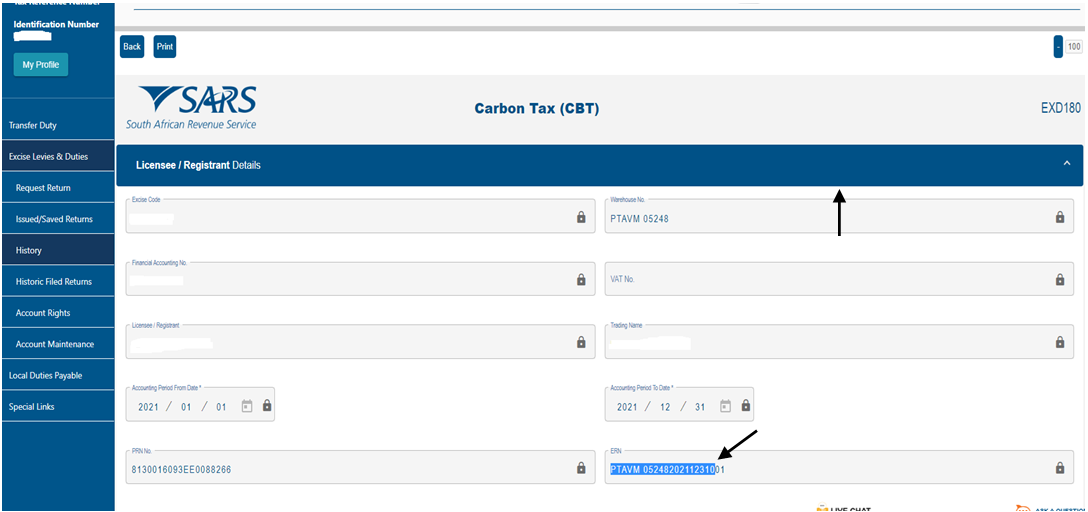
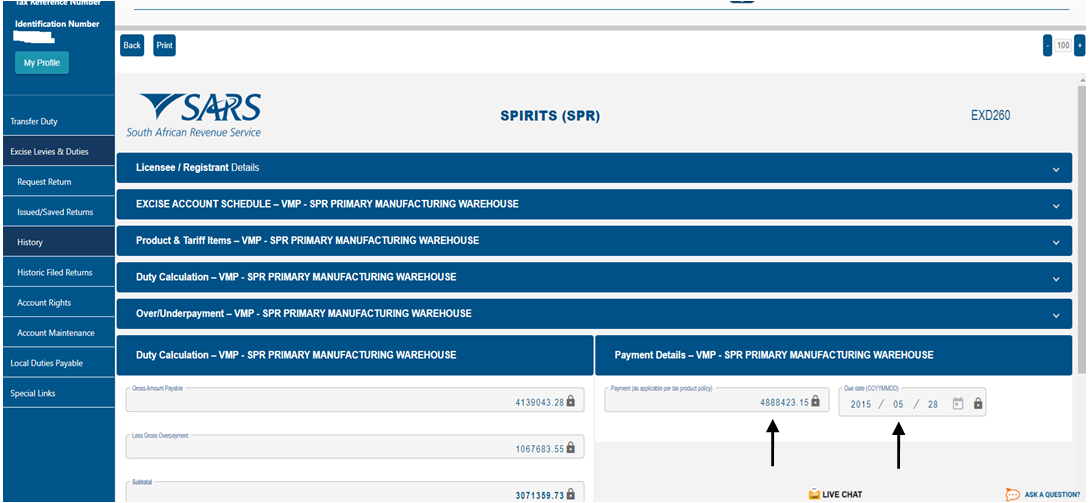
- Expand the Licensee/Registrant Details header.
- Copy the ERN from the return omitting the last two digits.
- Note: An error will occur if:
- the last two digits of the ERN are included if the warehouse type letters are not inserted in capital letters or if no space is observed between the warehouse type and the rest of the ERN.
To resume with the payment process, the user must:
- Click on Excise Levies & Duties.
- Click on Account Maintenance.
- Select the Select option.
- Click on View Dashboard.

- Click on Make a Payment.
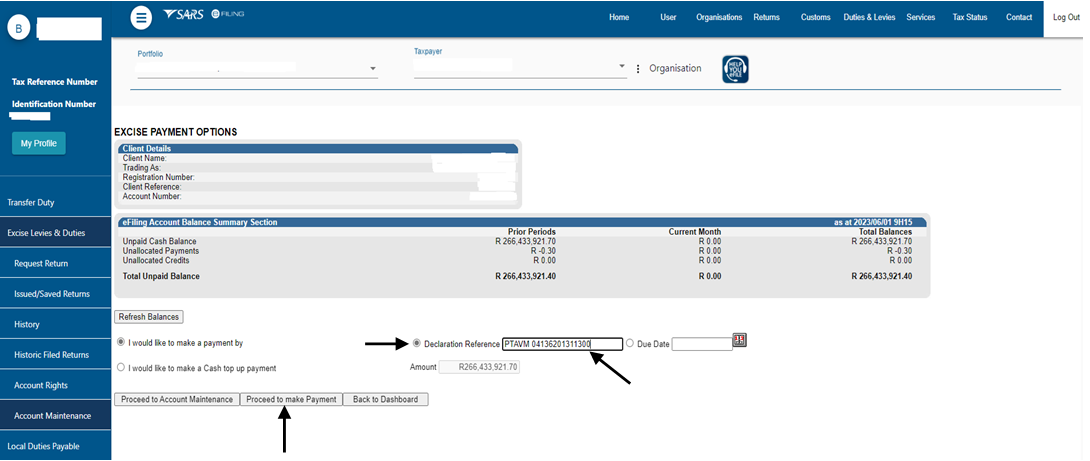
- Select the payment by activating the Declaration Reference option.
- Insert the ERN sourced from the declaration to be paid.
- Click on Proceed to make Payment.
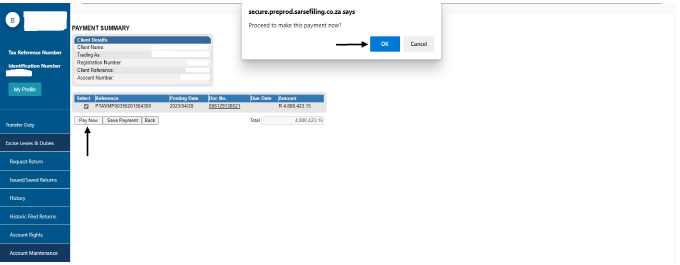
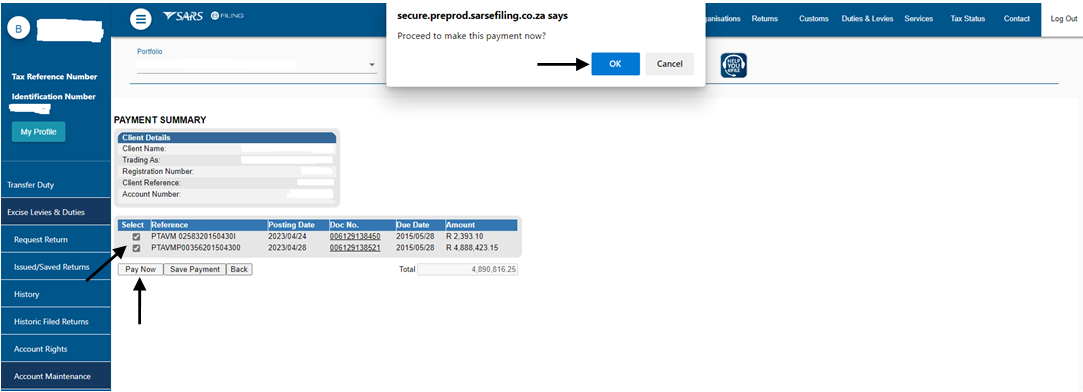
- Click on Pay Now.
- Click on OK.
- Select the applicable Account Name from the drop-down list.
- Click on Pay Now.
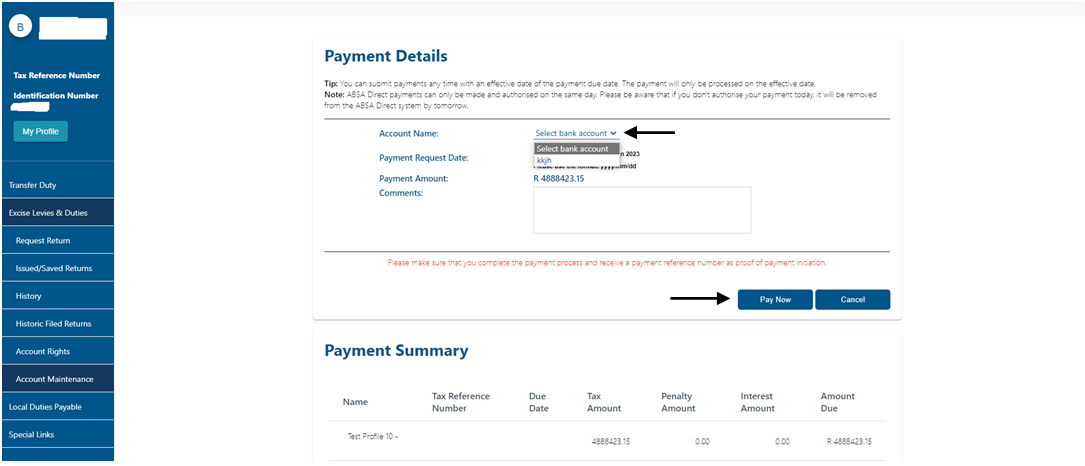
- Click on OK.
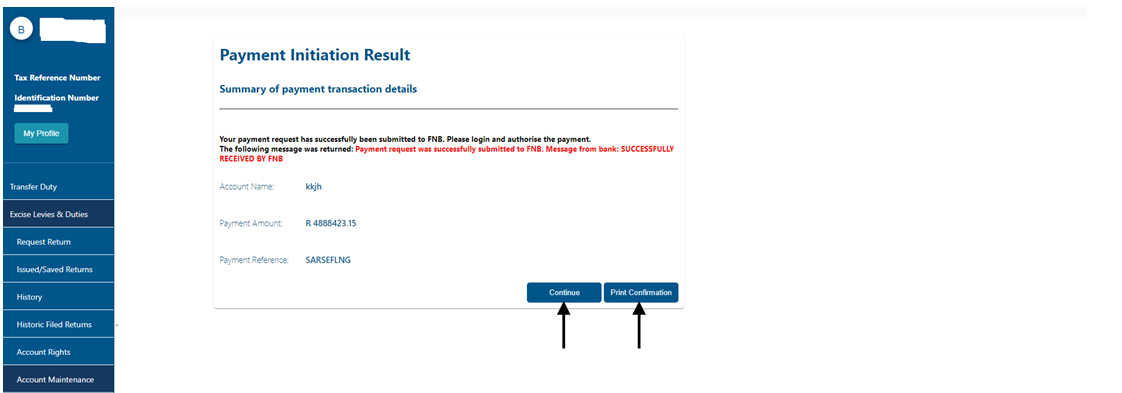
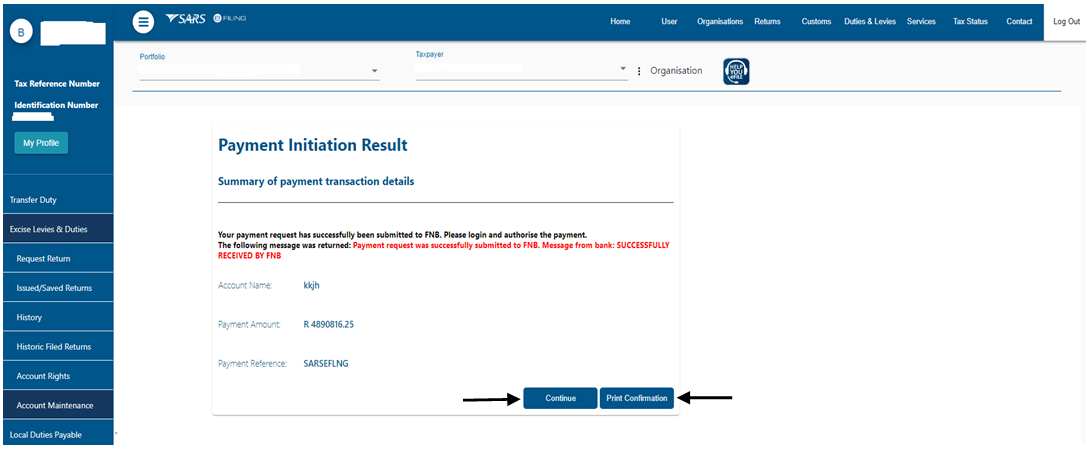
To finalise the process, the user must:
- Click on Continue, or
- Click on Print Confirmation to print the proof that payment has been initiated, and
- Access their designated bank account to release the payment.
Payment by Due Date
This payment option is used where a single declaration has multiple payment due dates, and a payment must be made per due date.
To establish the due date for specific returns, the user must:
- Click on Duties & Levies.
- Click on Excise Levies & Duties.
- Click on History.
- Click on the applicable declaration Open hyperlink. The user can also search through the selection by Industry, issued date, status, and warehouse number to locate the specific return.
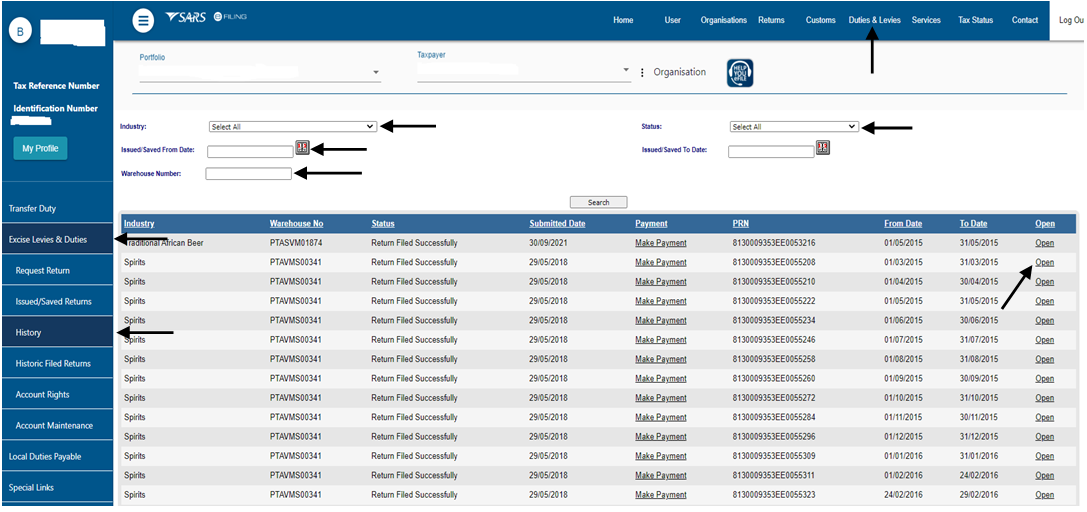
- Click on the Industry hyperlink.
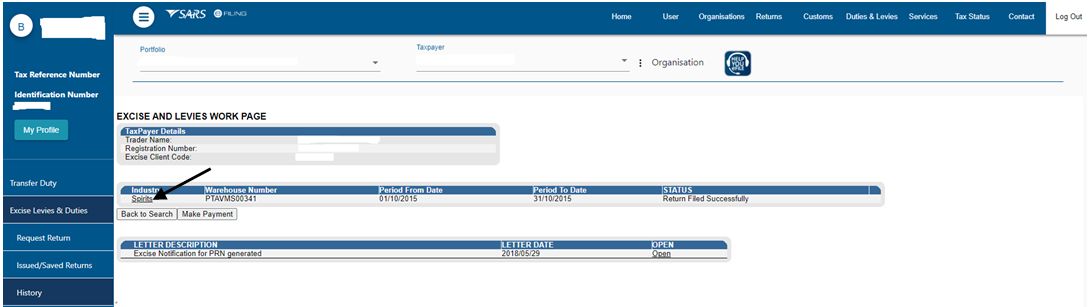
- Take note of the return’s Due Date and amount that needs to be paid.
- Click on Account Maintenance.
- Select the Select option.
- Click on View Dashboard.
- Click on Make a Payment.
- Select the Due Date option;
- To capture the due date, as identified in vi) above, the user can;
- Manually insert the date using the CCYY/MM/DD format; or
- Click on the Calendar icon next to the Due Date field and select the date; and
- Click on Proceed to make Payment.
All payments that is due on the selected due date will be listed on the Payment Summary page. Clients are allowed to select and deselect any of the declarations listed.
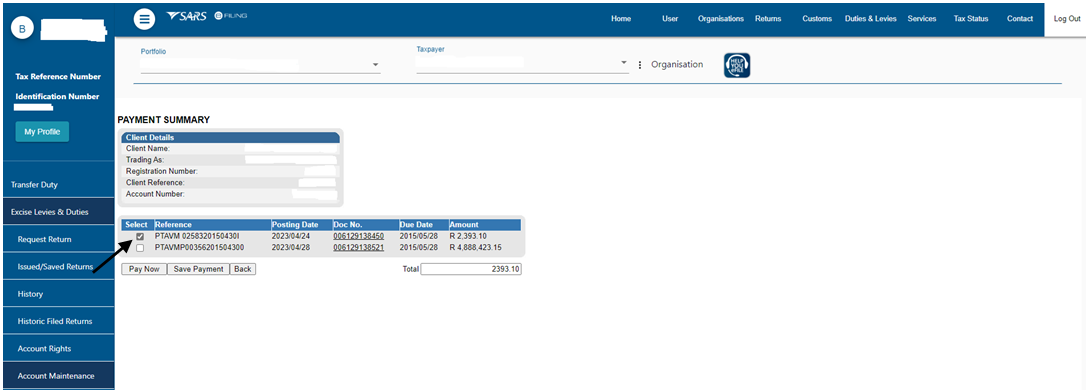
The user can save payments to pay at a later stage. To start this process, the user must:
- Select the declaration to be saved for later payment.
- Click on Save Payment.
- Click on OK.
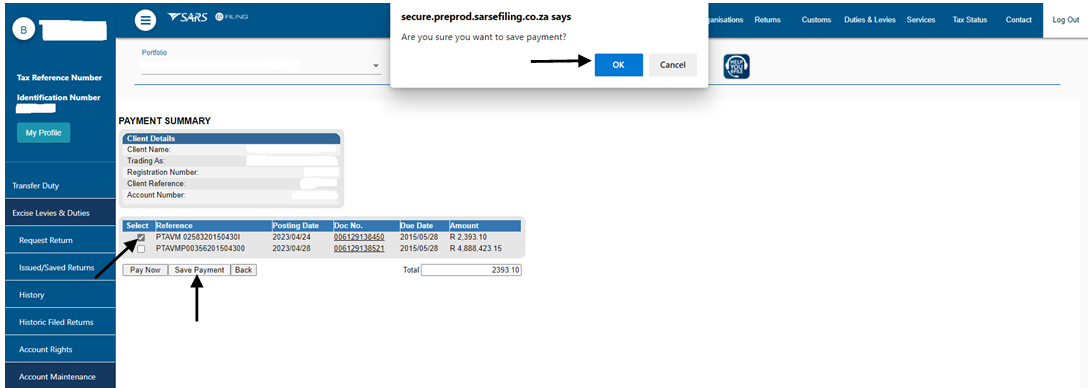
A message on the Excise Payment Options landing page will provide confirmation that the selected payment has been saved successfully for future finalisation.

To resume with payment, the user must:
- Select the declaration(s) to be paid.
- Click on Pay Now.
- Click on OK.
- Select the applicable bank account via drop-down list.
- Click on Pay Now.
- Click on OK.
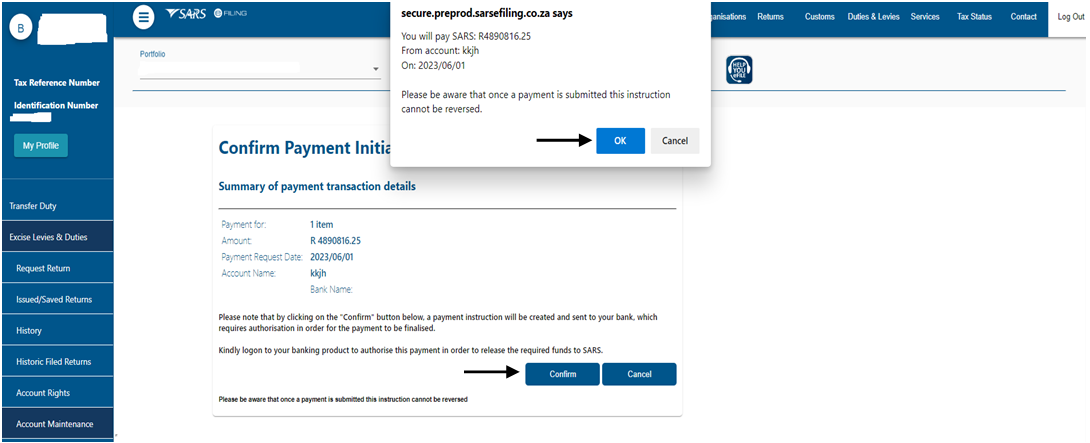
- Click on Confirm.
- Click on OK.
To finalise the process, the user must:
- Click on Continue, or
- Click on Print Confirmation to print as proof that payment has been initiated, and
- Access their designated bank account to release the payment.
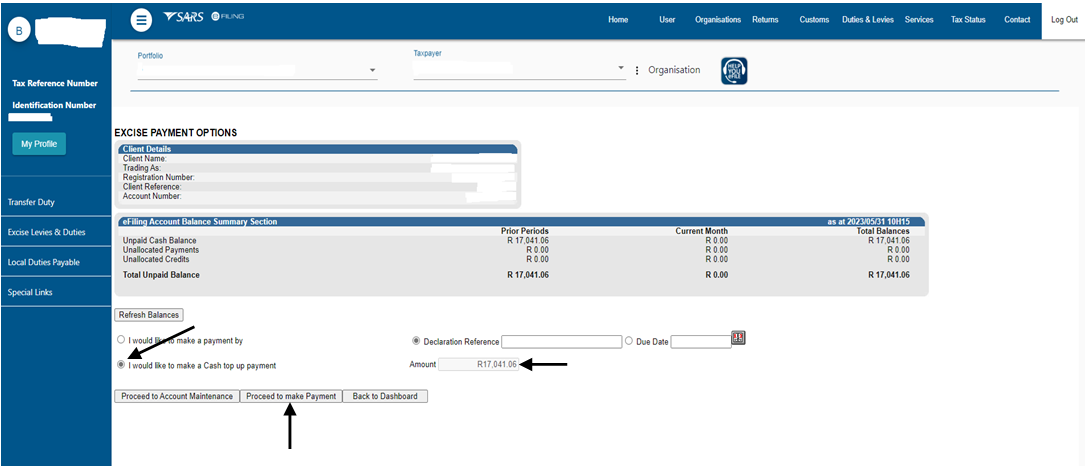
Cash Top Up Payments
If the user would like to make a top-up payment towards the oldest unpaid declaration, they must:
- Select the I would like to make a Cash top up payment option.
- The amount is pre-populated with the total unpaid balance for all outstanding transactions.
- This total value is assisting the user in identifying the maximum amount that can be paid.
- If there are no amount outstanding against the client’s Financial Accounting Number (FAN), this top-up option won’t be available for selection. The option will be greyed out or deactivated.
- Click on Proceed to make Payment.
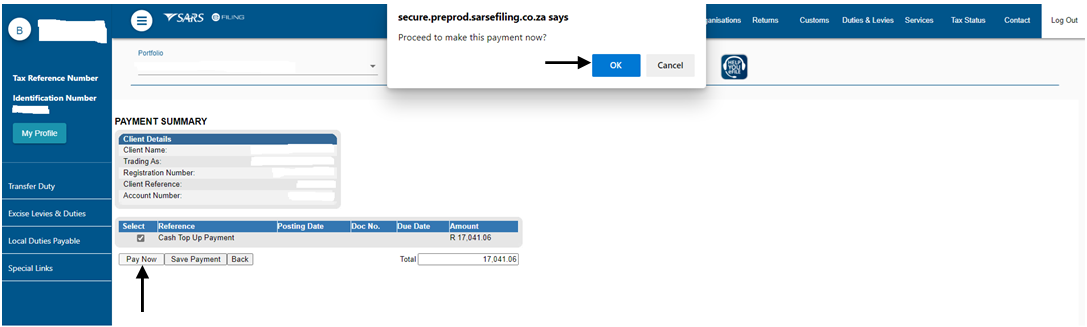
- Click on Pay Now.
- Click on OK.
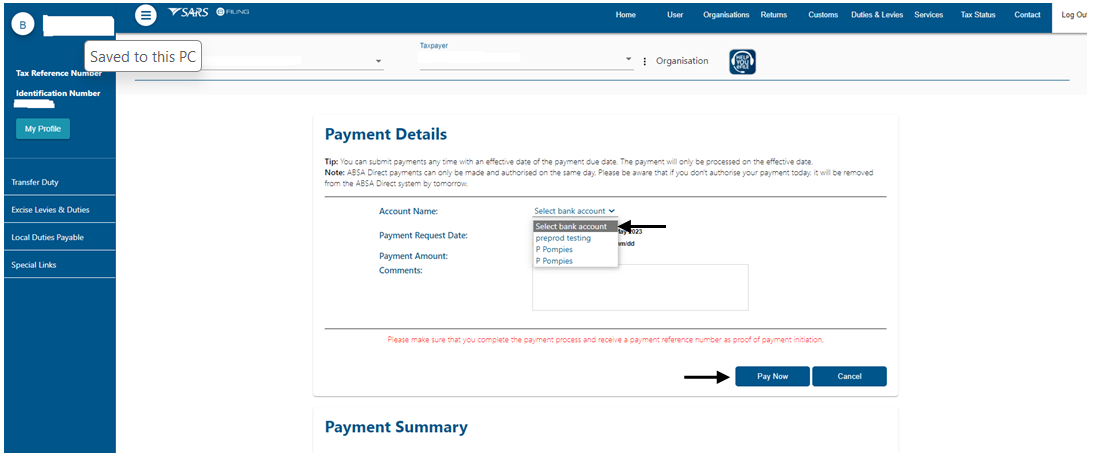
- Select the applicable account from the Account Name drop-down list.
- Click on Pay Now.
- Click on OK.

- Click on Confirm.
- Click on OK.

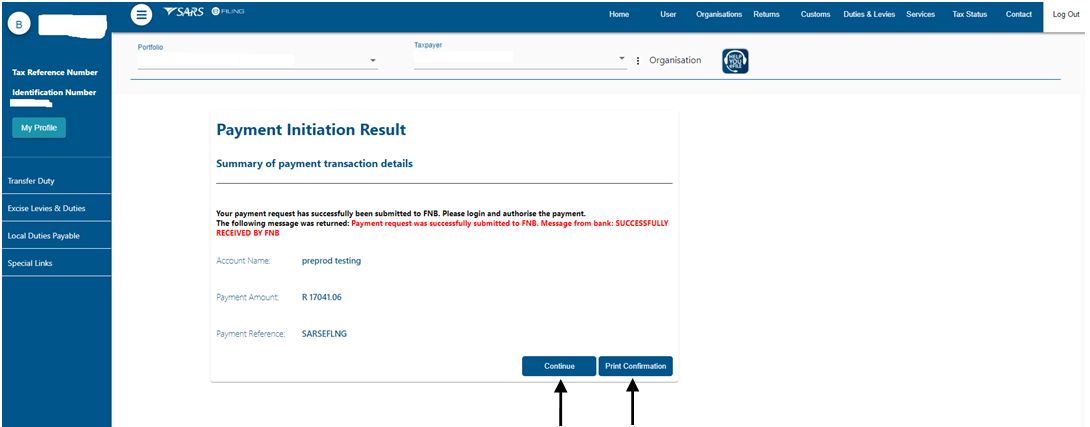
To finalise the process, the user must:
- Click on Continue, or
- Click on Print Confirmation as evidence that payment has been initiated, and
- Access the designated bank account to approve and release the payment.
Account Maintenance
- Clients will use this functionality to resolve unallocated payments or credits that are highlighted in the Balance Summary section of the dashboard.
- As part of the payment function from the dashboard, clients can allocate unallocated payments and credits to specific declarations or against the Cash top-up option.
- The selection options to identify declarations or the Cash top-up options are the same as for when payments are made. Please refer to the explanation of the options under the Payments section.
- Clients cannot undo allocations and therefore need to make sure that selections and allocations are done accurately. Similarly, the selected unallocated payment must be carefully selected to ensure that the payment date precedes the due date of the declarations selected to reduce any possible penalties or interest.
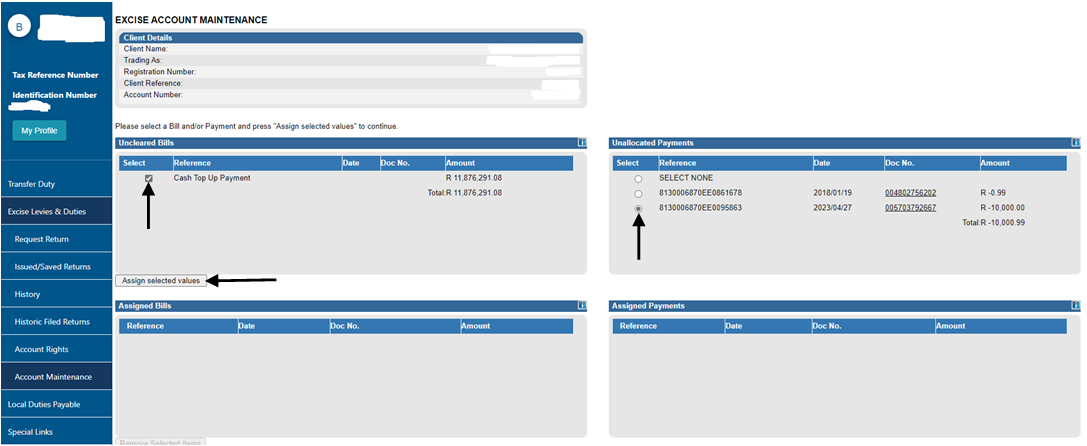
- The Account Maintenance screen will display the requested declaration/s or top-up option under the Uncleared Bills section and the available unallocated payments and credits will display under the Unallocated Payments section.
- An allocation can only be performed by selecting a single unallocated payment at a time, but multiple unpaid declarations may be selected under the Uncleared Bills. If the trader decides that no allocation should be made and the Uncleared Bills should rather be paid, select “SELECT NONE” under the Unallocated Payments and the Make Payment option will appear.
- To access the Account Maintenance landing page, the user must:
- Click on Duties & Levies.
- Click on Excise Duties & Levies.
- Click on Account Maintenance.
- Select the Select option.
- Click on View Dashboard.
- Click on Make a Payment.
- Account maintenance or payment can be captured on the Excise Payment Options landing page.
Account Maintenance by Declaration Reference and Due Date
If the user want to perform account maintenance using the declarations or due date, from the Excise Payment Options landing page, they must:
- Select the Declaration Reference option for account maintenance by declaration reference; and
- Insert the ERN sourced from the return to be paid as described in paragraph ‘Payment by Declaration Reference’; or
- Select the Due Date option for account maintenance by due date; and
- Insert the due date as described in paragraph ‘Payment by Due Date’; and
- Click on Proceed to Account Maintenance.
The requested ERN will be displayed under Uncleared Bills and needs to be selected and assigned to a payment under Unallocated Payments. Once the correct declaration(s) and payment has been selected, click on button Assign selected values.
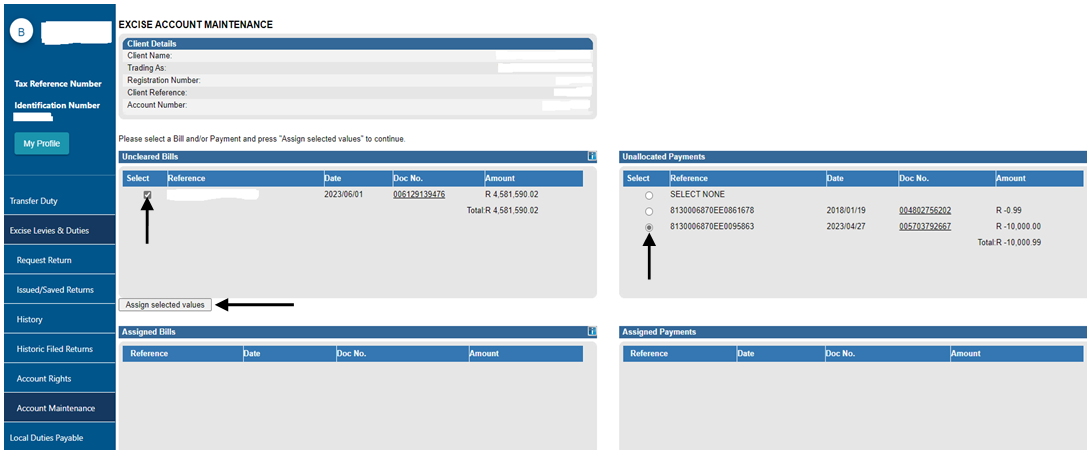
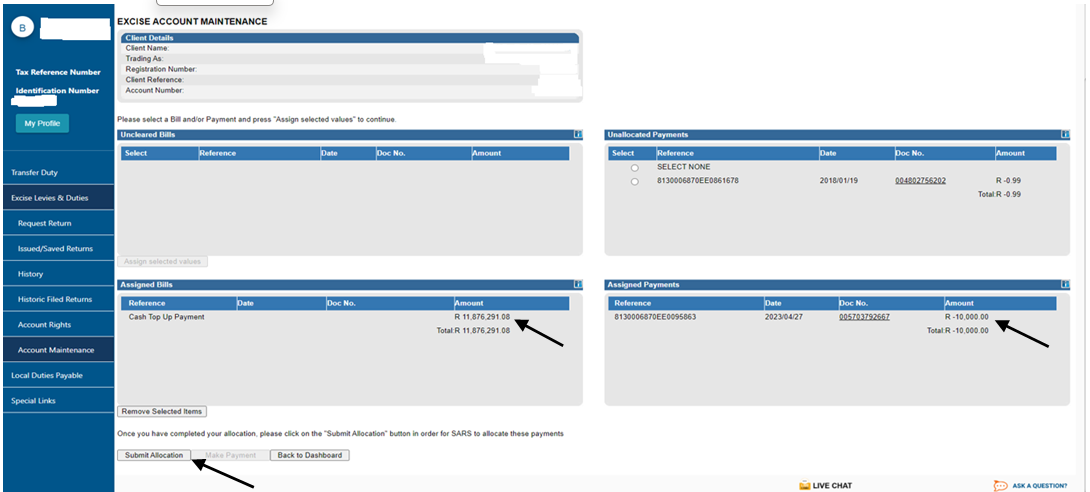
The selection will then be displayed in the Assigned Bills and Assigned Payments sections. If the allocation is correct, click on Submit Allocation.
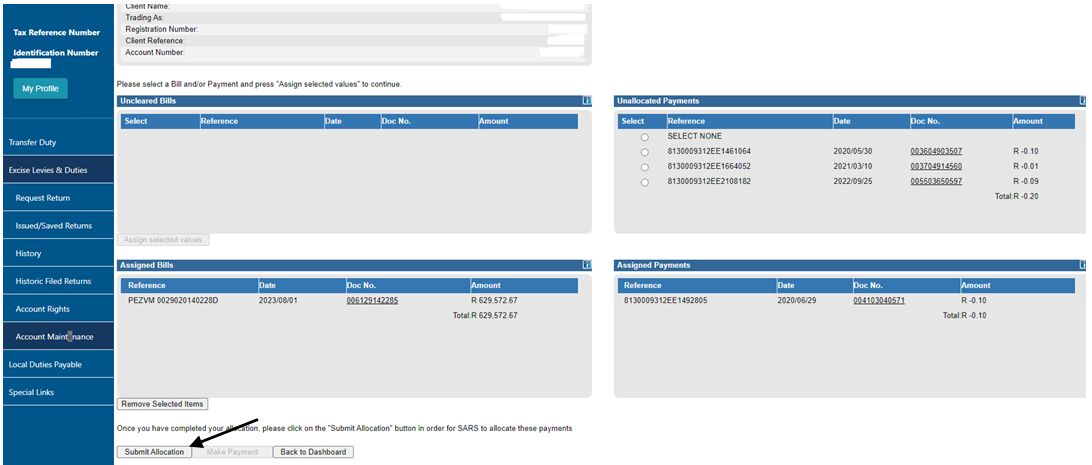
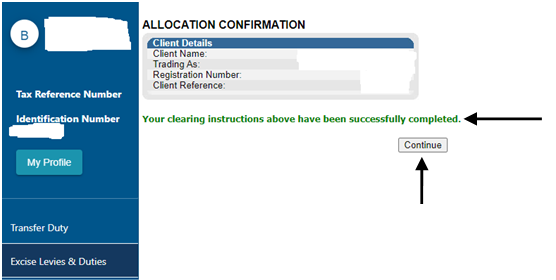
A message will display on completion and the account balances will be updated with the allocation. Click on Continue to finalise.
Account Maintenance by Cash Top Up
This option is only available if the selected account has a positive balance. The balance can be utlised when performing account maintenance.
To commence with account maintenance, from the Excise Payment Options landing page, the user must:
- Select the I would like to make a Cash top up payment option.
- Click on Proceed to Account Maintenance.
The requested Cash Top Up payment will be displayed under Uncleared Bills. It should be selected and assigned to a payment under Unallocated Payments. Once the correct declaration(s) and payment has been selected, click on Assign selected values.
The selection will then be displayed in the Assigned Bills and Assigned Payments sections. If the allocation is correct, click on Submit Allocation.
A successful completion message will display in green and the account balances will be updated with the payment allocation in real time. Click on Continue to confirm the payment allocation.

Definitions, acronyms and abbreviations
The definitions, acronyms and abbreviations can be accessed here – Glossary webpage.
Legal disclaimer: In the event of conflict or inconsistency between this webpage and the PDF version of the guide, the latter shall prevail.