
Summary
In pursuit of improving the tax ecosystem, one of SARS strategic objectives is to work with and through stakeholders, to ensure simplicity in their tax compliance responsibilities. Considering that, this webpage seeks to describe how taxpayers’ and organisations/entities can manage their submission of third-party data to SARS.
The webpage unpacks the overall process of user adoption regarding the use of eFiling, detailing the process involved during registration and activation of third-party data tax types (e.g. IT3). This is to ultimately ensure that SARS issues the taxpayer or organisation, their tax return (e.g IT3-01) during tax seasons for submission. Additionally, the guide unpacks how registered representatives can add administrators to their organisation eFiling profile, so that tax administrators can administer the tax responsibilities of their organisation/entity. Lastly the enrolment process is unpacked of the organisation and the tax administrators for the submission of the IT3 third-party data.
Background
The submission of IT3 third-party data by taxpayers and third-party entities, forms part of the SARS third-party data reporting process. SARS third-party data systems receive and process information as per appropriate legislation, Government Gazette and External BRS documents aligned to international best tax practices.
The following legislation portions of the Tax Administration Act, relate to the request for certificate information:
- Section 26 – This covers Third-Party Data Reporting
- Section 18A of the Income Tax Act, 1962, as amended – This covers all approved entities.
- Section 30(10) of the Income Tax Act, 1962, as amended – This covers the PBO’s.
Consequently, the submission of IT3 third-party data or certificates bi-annually follows a legislative requirement. Taxpayers and Third Parties are required by law to submit third-party information or data to SARS.
Listed below are the Third-Party data types that should be submitted to SARS:
- IT3(b) – Income from Investments, Property Rights, Royalties and/or. Withholding Tax on Interest
- IT3(c) – Certificate of income in respect of the disposal of unit trust or other financial instruments.
- IT3(e) – Income from Purchases / Sales / Shipments of Livestock / Produce / Timber / Ores /Minerals / Precious Stones or bonuses Paid / Accrued to Members of Co-Operative Companies. or Societies
- IT3(s) – Tax Free Investment
- IT3(d) – Deductions on donations
- IT3(f) – Insurance
- IT3(f) – Medical
- IT3(t) – Trust income, and
- WHD-Dividends Tax.
Who is Required to Submit Third Party Data
The following persons are required to submit third-party data in terms of section 26 of the Tax Administration Act, 2011:
- Banks regulated by the Registrar of Banks in terms of the Banks Act, 1990, or the Mutual Banks Act, 1993.
- Co-operative Banks regulated by the Co-operative Banks Development Agency in terms of the Co-operative Banks Act, 2007.
- The South African Postbank Limited (Postbank) regulated in terms of the South African Postbank Limited Act, 2010.
- Financial institutions regulated by the executive officer, deputy executive officer or board, as defined in the Financial Services Board Act, 1990, whether in terms of that Act or any other Act (including a “financial institution” as defined in the Financial Services Board Act, 1990, other than an institution described in paragraph (a)(i) of the definition).
- Companies listed on the JSE, and connected persons in relation to the companies, that issue bonds, debentures, or similar financial instruments
- State-owned companies, as defined in section 1 of the Companies Act, 2008, that issue bonds, debentures, or similar financial instruments.
- Organs of state, as defined in section 239 of the Constitution of the Republic of South Africa, 1996, that issue bonds or similar financial instruments.
- Any person (including a co-operative as defined in section 1 of the Income Tax Act, 1962) who purchases any livestock, produce, timber, ore, mineral or precious stones from a primary producer other than on a retail basis.
- Any medical scheme registered under section 24(1) of the Medical Schemes Act, 1998.
- Any person, who for their own account carries on the business as an estate agent as defined in the Estate Agency Affairs Act, 1976, and who pays to, or receives on behalf of, a third party, any amount in respect of an investment, interest, or the rental of property; and
- Any person, who for their own account practices as an attorney as defined in section 1 of the Attorneys Act, 1979, and who pays to or receives on behalf of a third party any amount in respect of an investment, interest, or the rental of property.
- A person liable to pay withholding tax on interest in terms of section 50F (2) of the Income Tax Act, and
- A person referred to in paragraph 2 of the Regulations issued in terms of section 12T (8) of the Income Tax Act, and who issued a financial instrument or policy in respect of a tax free investment.
Likewise, section 18A requires that Entities who received donations and issued receipts to Donors are to report those receipts to SARS. This implies that where a receipt was issued, it should be reported to SARS. The following are some of the section 18A entities required to submit information to SARS:
- Government (e.g., Gauteng Department of Health)
- Government Institutions (e.g., Public Schools)
- Public Benefit Organisations (e.g., Welfare, Health Care, Land & Housing etc.)
- United Nations Agencies (e.g., UN Children’s Fund, UN Development Program, etc.)
Entities are to apply and get approval for Section 18A. Although certain section 18A entities will be specified in the appropriate Gazette to make data submission, a value or volume threshold may be applied for data submissions. Furthermore, where entities didn’t receive any donations, a “Nil reporting declaration” is required.
Lastly regarding the IT3(t) (Trust), Taxpayers or their Representatives are to supply information as per government Gazette. These include on the amounts vested to the beneficiary of a Trust.
Requirements for a Successful Submission
To submit the Third-Party Data file/returns successfully, taxpayers/entities must submit their data on the applicable platform and declare by validating the summary of their submitted data. eFiling registered submitting entities submit data to SARS by utilising one of the following platforms, which is dependent on the size of the data.
- eFiling for IT3-01 form (max of 20 Certificates).
- Note that for IT3(d) a max of 50 Certificates can be submitted.
- HTTPS for medium sized data, or
- Connect Direct for bulk data.
Manual completions are done via the completion and submission of the IT3-01 form. Electronic or data file submissions are structured and uploaded as described on the file specifications detailed in the External BRS. Upon successful structuring of the file, the file should then be submitted via the HTTPS or Connect Direct platforms.
To ensure that the data is received and processed by SARS, submitting entities representatives are required to validate the activation of the IT3 submission functionality on eFiling. Additionally, they are to review their submitted data on the pre-populated IT3-02 return and once reviewed and in agreement with the summary data, they are to declare by submitting the IT3-02 return to SARS via eFiling..
How to Report to SARS
- Submitting entities and taxpayers are required to register for the use of eFiling. Once registered, eFiling should be utilised to report periodically to SARS as per government gazette and external BRS specifications.
- Provision of reporting is provided by SARS via the following submission channels.
- Capture the IT3-01 return information via SARS eFiling
- Upload via HTTPS
- Upload via Connect Direct
Note the following when reporting IT3(d) information:
|
Enable eFiling users for Third-Party Data Submission
- eFiling has pre-requisites for a successful third-party data submission. One of those prerequisites is that, apart from registering to make use of eFiling or submitting the data, various eFiling users should be invited and enrolled for a successful submission. This section will briefly describe the processes required when submitting third-party data. Ultimately, the last process, which is inviting the technical user, is paramount, as he or she will be responsible for the submission of the third-party data for the organisation or entity.
- The diagram below details the steps to activate eFiling users required for a successful third-party data submission:
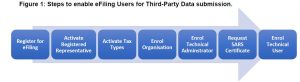
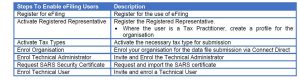
Figure 1 above describes the following steps.
Step 1
- Ensure that you are registered for the use of eFiling.
- On the condition that you are already a registered eFiler, do not register again. However, do note the registration process and ensure all the necessary registration requirements are met.
Step 2
- Determine your role, whether you are a tax practitioner or a registered representative.
- If you are a registered representative
- Add an organisational portfolio to your eFiling profile and register as the registered representative of your organization.
- Do note that the registered representative is as per the Tax Administration Act such as the Public Officer, or where the organization is a trust, the trustee is the registered representative etc.
- On the condition that you have already registered the representative do not register again
- If you are a registered representative
- If you are a Tax Practitioner
- Add a tax practitioner portfolio to your eFiling profile and register the applicable organisation on the tax practitioner portfolio.
- If you are a Tax Practitioner
Step 3
- The registered representative/ tax practitioner once successfully activated to the profile, should activate the necessary tax type for submission on eFiling.
- Do note that this process is done once.
Step 4
- Once the tax type has been successfully activated on the profile, the registered representative/ tax practitioner should then enrol the organization on the eFiling profile
Step 5
- Once the organization has been successfully enrolled on the profile, the registered representative/tax practitioner should then invite and enrol the Tax Administrator to their eFiling profile.
- Do note that the Tax Administrator can be any other individual apart from the registered representative/tax practitioner.
Step 6
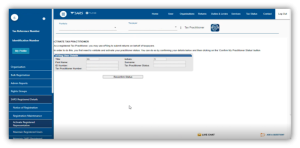
- Once the Tax Administrator has been successfully enrolled on the eFiling profile, the Tax Administrator should then request a certificate from SARS via eFiling.
Step 7
- Once the SARS certificate has been issued by SARS, the Tax Administrator should import the SARS certificate on their browser.
- Once the SARS certificate has been downloaded, the Tax Administrator should then invite and enrol the Technical User/s to their profile.
- Do note that the Technical User/s should be another individual either than the Tax administrator or the Registered Representative/Tax Practitioner.
- Multiple Technical Users can be added to the eFiling profile.
Note the following:
|
eFiling Registration
- eFiling is a digital platform which allows users to comply in their various tax responsibilities. Taxpayers’ or entities are required to register on eFiling in relation to the completion and submission of IT3 third-party data. Thus, proper registration is of importance to ensure compliance of third-party data responsibilities for an individual taxpayer or organisation.
- When registering on eFiling for tax administration purposes, users are given an option of selecting various profiles. The selection of eFiling profiles is based on the capacity in which users are transacting with SARS regarding their tax responsibilities. The following eFiling profiles are available:
Individual
- This profile is created for individual taxpayers to fulfil their tax responsibilities in their own capacity. This profile is also applicable to individuals who are to submit their donations deductions to name a few.
Organisation
- This profile is created for organisations/entities to fulfil their tax submissions and compliance responsibilities to SARS. Organisations that make 3rd -Party data submissions include attorneys, banks, companies listed on the JSE, Co-operatives and persons purchasing from primary producers, Co-operative Banks, Estate agents, financial institutions, medical schemes, organs of state, Postbank, and State-owned companies.
Tax practitioner
- This profile is created for registered tax practitioners to make tax submission and other tax related queries on behalf of their clients. Do note that the tax practitioner profile allows them to submit third-party data on behalf of their clients.
For more information on eFiling registration, kindly refer to the eFiling registration guide available on the SARS website.
How to register for the use of eFIling
- To register for the use of eFiling, kindly refer to the registration guides available on the SARS website: www.sars.gov.za
- Do note that once you are registered and login, the following screen will be displayed.
How to add a portfolio
- Once you have registered the entity successfully, proceed as follows to add a portfolio:
To create a portfolio of your organisation
- Login to your eFiling profile
- Click on Profile Management.
- The Profile Management page will be displayed.
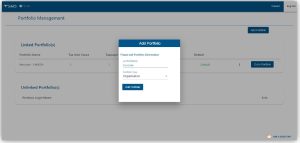
- Click on Add Portfolio and the following screen will be displayed:
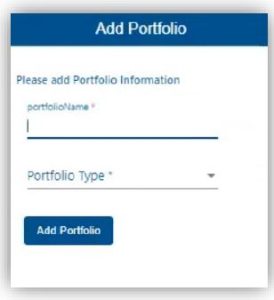
- Complete the Portfolio Name.
- Select from the drop-down list, the Portfolio Type
- Individual
- Select if portfolio is for an individual taxpayer.
- Organisation
- Select if portfolio is for an organisation/entity.
- Tax practitioner
- Select if portfolio is for a tax practitioner.
- Individual
- When you have made the applicable selection, the following screen will be displayed.
- Click on Add Portfolio
- Once you have selected and completed the portfolio, the following pop-up message will be displayed.
- Note the message and click on Ok.
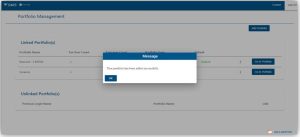
- Do note that your portfolio will be listed on the Portfolio Management Page.
- Note that the Portfolio Type that you created will be displayed on this page.
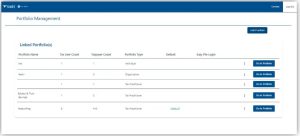
- To access your Portfolio, click on Go to Profile
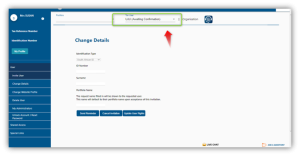
Activate a Registered Representative
How to activate a Registered Representative
- To activate a Registered Representative, proceed as follows:
- Select Organisation on the main menu.
- Select SARS Registered Details
- Select Activate Registered Representative
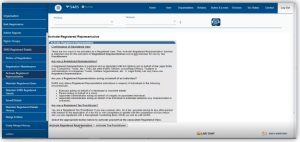
- The Activate Registered Representative page will be displayed.

- Click on Activate Registered Representative
- The Registered Representative page will be displayed.

- To be activated as a Registered Representative
- Click on Activate New Registered Representative
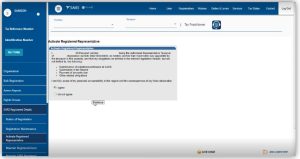
- Do note the terms and conditions of being the Registered Representative of the organisation.
- Once you agree, Select I agree and click on Continue.
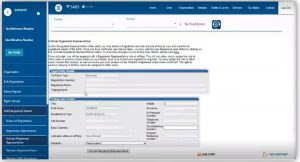
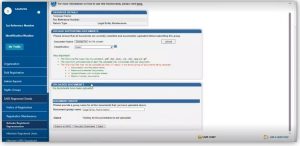
- Your information will be displayed as part of the legal entity details.
- Complete the following.
- Tax reference Number.
- Select the appropriate capacity you are being registered as, on Capacity.
- Complete the following.
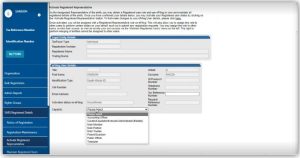
- Once selected, click on Activate Registered Representative
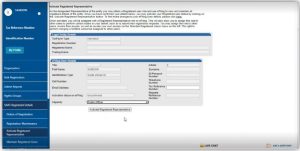
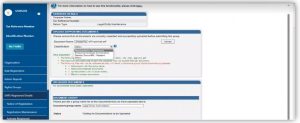
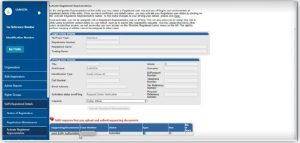
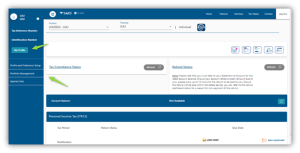
- The following screen will be displayed.
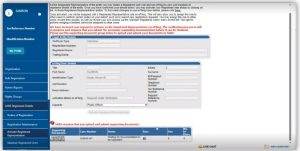
- Do note that this screen requires you to upload supporting documentation to finalise the registration process.
- Note that the user may also submit the required supporting documents via the SARS Online Query System (SOQS)
- On how to submit via the SOQS, please refer to the SARS website www.sars.gov.za.
- To upload supporting documents, click on the hyperlink Legal Entity Authorisation
- The following screen will be displayed.
- Click on Choose File
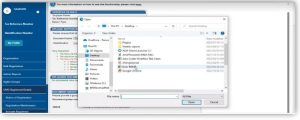
- Select the Classification of the uploaded document from the drop-down list.
- Once selected, click on Upload
- The document will be uploaded and displayed on the screen below Uploaded documents.
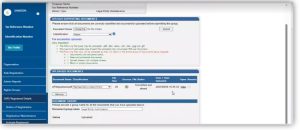
- Once all the supporting documents have been uploaded, click on Submit to SARS
- Do note that the Status of the legal Entity will change to display “Submitted.”
How to activate a Tax Practitioner
- Where you are a tax practitioner activate by proceeding as follows:
- Select Organisation on the main menu.
- Select SARS Registered Details
- Select Activate Registered Representative
- The Activate Registered Representative page will be displayed.
- Click on Activate Tax Practitioner and the following screen will be displayed.
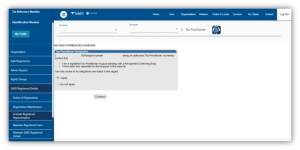
- Take note of the declaration and when in agreement, click on I agree
- Click on Continue
- Click on Reconfirm Status
Do note that once your eFiling profile has included the organisation, proceed as per Registered Representative of the organisation |
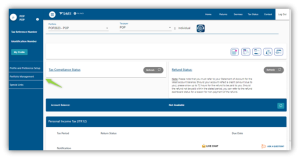
Active Third-Party Tax Type
How to activate IT3 or various third-party tax types
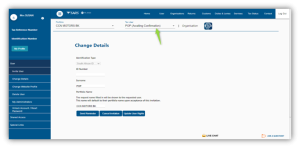
- Once the above sections have been done, you can now activate your IT3 tax type. IT3 activation simply means that you are notifying SARS to issue you a return during the year of assessment for the submission of the return. SARS in turn will issue you a return during the tax seasons.
- This section details the process involved to activate the IT3 tax-type so that the taxpayer and organisation may submit their IT3 third-party data/certificates to SARS. Additionally, the guide also details what to take note of to ensure that the IT3 activation is processed accurately on eFiling.
- To activate IT3 tax type proceed as follows:
- Login to your profile
- Proceed as follows:
- Select Organisation
- Select Tax Types
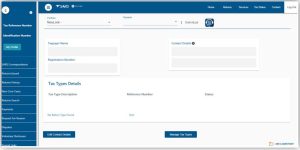
- Select Manage Tax Type
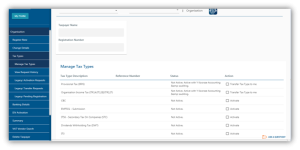
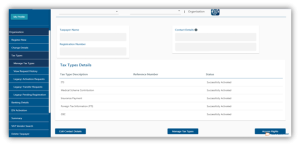
- Note that the Status of IT3 is Not Active
- Proceed by clicking on the check box Activate for the tax type description IT3.
- Select other tax types to activate by clicking on the Activate check box.
- Once all have been selected, click on Submit.
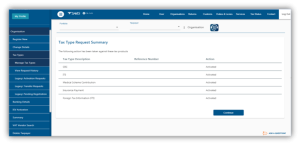
- Do note that the screen will display that the IT3 has been activated.
- Click on Continue
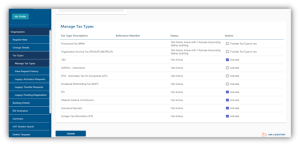
How to activate a tax type if it does not appear as an option
- eFiling issues tax types based on the user registration. The IT3 tax type should appear as part of the organisational profile. In incidents where an individual wants to submit their IT3(d) and IT3 tax type is not listed on Manage tax types on eFiling individual profile, they should proceed as follows:
- Add an organisational portfolio into the eFiling profile. Refer to the section on how to add an organisation portfolio.
- Once added, activate the IT3 return as follows:
- Select Organisation
- Select Tax types.
- Select Manage Tax types.
- The Manage Tax Types page will be displayed.
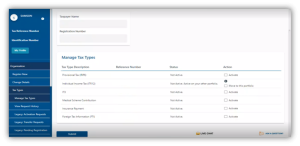
- To activate the IT3 tax type:
- Select IT3 as the Tax Type Description, by clicking on the Activate check box.
- Once selected, click on Submit
- Do note that the Status will change to display Activated.
- To activate the IT3 tax type:
- Access and complete the IT3-01 return as per external guide available on the SARS website.
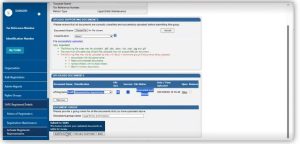
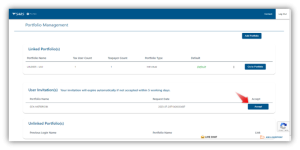
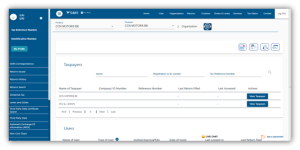
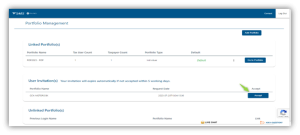
Enrolling an Organization
How to enrol an Organisation
- To enrol the organisation, the Business Administrator must be logged into eFiling at sarsefiling.co.za.
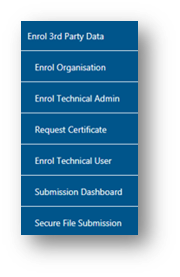
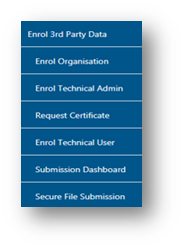
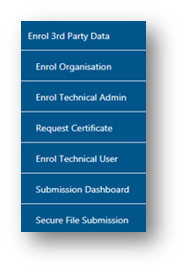
- Once logged into eFiling and on the Organisations work page, click Services on the top menu bar. From the side menu options, select Enrol 3rd Party Data.
- Under the Enrol 3rd Party Data option the following sub-menus are available:
- Select Enrol Organisation
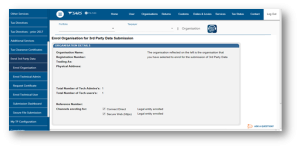
- The following screen, containing the organisations details will now appear.
- Select the applicable channel to enrol for.
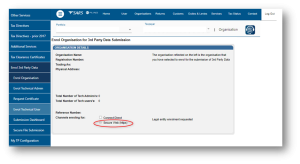
Note: If the Income Tax, PAYE or VAT Reference number for the company is not pre- populated on the textbox, enter the Tax number on the textbox before you proceed to the next step. |
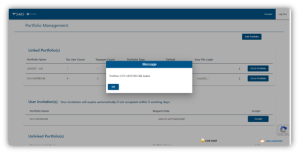
- Click Enrol Organisation to retrieve the organisations details.
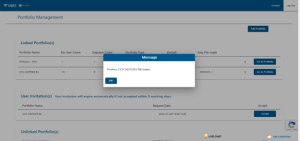
- A pop-up message will be displayed. The message confirms whether the user wants to enrol the organisation for third-party data submission. Click Ok to proceed.

- The screen below will be displayed
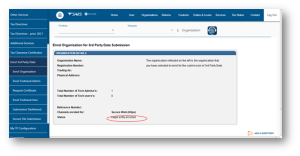
- Once an organisation has been enrolled the Status will be Legal Entity Enrolled, then the Business Administrator will be able to enrol the Technical Administrator(s).
Note the following:
|
- The status will initially read as Legal Enrolment Requested. The status will later change to Legal Entity Enrolled. The organisation can only enrol a technical administrator if their status reads Legal Entity Enrolled.
- Do note that the status will only change once the user has refreshed the screen and SARS has confirmed the enrolment.
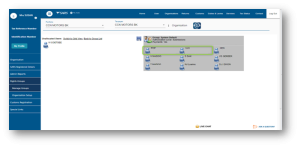
Enrolling Technical Administrators
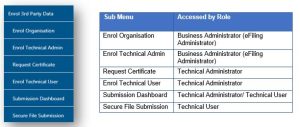
eFiling Users
- The following three users allocated in the enrolment and submission of 3rd party data to SARS, are essential, to manage 3rd party data submission.
- Business Administrator – This user is the same as the current eFiling full administrator. The role of this user is to enrol the legal entity/organisation that will be submitting data to SARS and the Technical Administrator. The taxpayer is not required to allocate new eFiling administrators for the purposes of 3rd party data submissions if one already exists.
- Technical Administrator – The role of this user is to request the security certificate and to enrol technical users. If the taxpayer decides to change the Technical Administrator, a new Technical Administrator must be added before the existing one can be removed. There must always be at least one Technical Administrator for each enrolled organisation.
- Technical User – The role of this user is to submit the data files to SARS via the Direct Data Flow channel. An organisation can have multiple Technical Administrators and Technical Users in order to allocate work according to the organisation’s requirements. The technical user must be a different person from the technical administrator.
- This section will list the various types of administrators and how to add them to your organisation profile on eFiling.
Business Administrator
Business Administrator can also be called the Registered Representative or the Tax Practitioner. This individual is the administrator with full administration rights on the eFiling profile. Business Administrators are responsible for inviting the Tax Administer to their profile. Additionally, the role of the business administrator is to enrol the organisation and the Technical Administrators.
Important to note: eFiling recognises the user who enrols the organisation successfully, as the Business Administrator of the organisation. This implies that he/she (the Business Administrator) cannot be enrolled as a Technical Administrator or a Technical User. |
Enrolling a Technical Administrator
How to invite a Technical Administrator
- To add a Technical Administrator, the Business Administrator is to invite the user to the organisation profile. This section will highlight how the Business Administrator invites a Technical Administrator to an organisation portfolio.
- To invite the Technical Administrator, proceed as follows:
- Login to your eFiling organisation profile
- On the menu option, select User.
- On the left menu option.
- Click on User
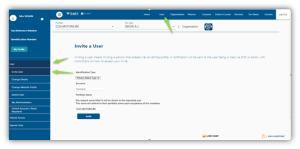
- Click on Invite User
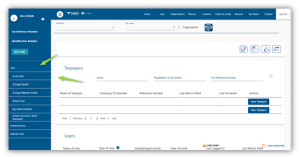
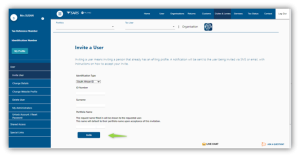
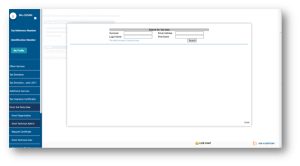
- On the Invite a user page, complete the following information of the Technical Administrator
- Complete their ID Number
- Complete their Surname.
- Complete the applicable Portfolio Name
- Click on Invite
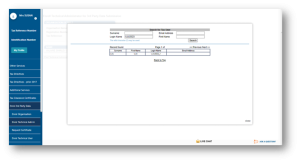
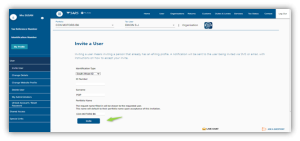
- The following screen will be displayed.
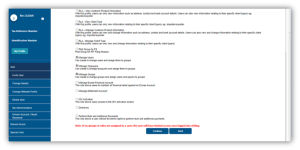
- Select the following options by clicking on the applicable check box.
- Manage Users
- Manage Taxpayers
- Manage Groups
- Once selected, click on Continue.
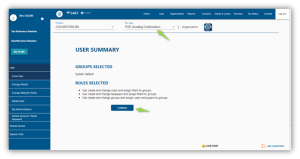
- The User Summary page will be displayed.
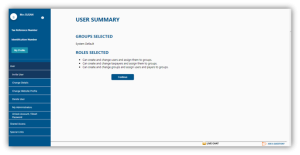
- Do note the information of the roles selected,
- Once noted, click on Continue
- Note that the status of the invited eFiling User (technical administrator) will change to be “Awaiting Confirmation”.
- This implies that the invitation has been successfully sent through to the Technical Administrator invited and he/she should login to their eFiling profile and accept the invitation.
- Notify and request the invited eFiling User (Technical Administrator) to accept the invitation on their eFiling profile.
How a Technical Administrator accepts an invitation.
- Request the Technical Administrator to login on his/her eFiling profile.
- Once the Technical Administrator has logged in, the following screen will be displayed.
- Click on My Profile
- Click on Portfolio Management
- The Portfolio Management page will be displayed.
- Click on Accept
- The OTP page will be displayed.
- Complete the OTP

- Once verification is successful, the Technical Administrator will be linked to the organisation portfolio.
- Do note the pop-up message indicating that the Technical Administrator has been linked to the organisation successfully.
- Once noted, click on Ok.
- Note that the linked organisation profile will be displayed on the eFiling Landing page of the Technical Administrator eFiling profile.
- To view the profile linked, click on View Taxpayer.
How to view an invited Technical Administrator
- Business Administrators are to login to eFiling.
- As part of the menu option
- Select Rights Groups
- Select Manage Groups
- The invited Technical Administers will be displayed on the far right of the screen.
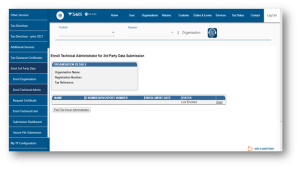
How to enrol a Technical Administrator
- eFiling administrator enrolments allows the invited/ added tax administrators to function on the organisational profile. This section will demonstrate how to enrol a technical administrator and technical user for tax administration purposes of the organisational profile.
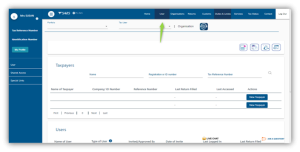
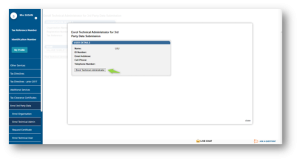
- To enrol a Technical Administrator, select Enrol Technical Admin from the side menu options, on your Organisations work page under the Enrol 3rd Party Data menu.
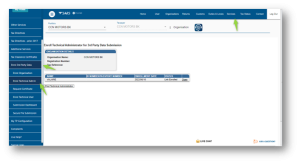
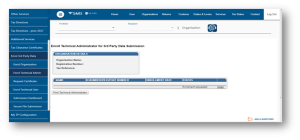
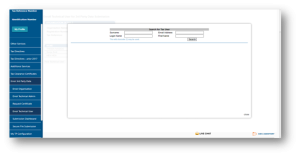
- Click Find Technical Administrator to search and select a Technical Administrator.
- Complete the information required and click on Search. The user can complete one of the fields and click on search. If no values are entered in the above fields, click on Search and all the registered eFiling users for the relevant organisation will be displayed.
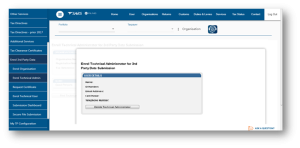
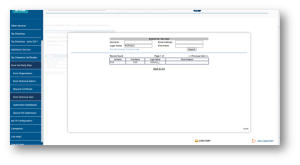
- The screen with the user’s details will be displayed. Select the user to be enrolled as the Technical Administrator.
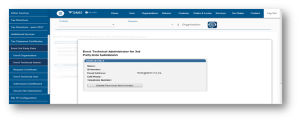
- The screen with the details of the selected user will be displayed as confirmation. Select Enrol Technical Administrator, to submit the request.
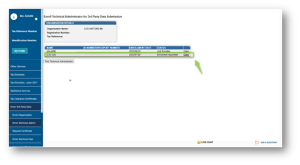
- By selecting the Enrol Technical Administrator button you will be redirected to the grid page.
- In the Status column, the status Enrolment Requested indicates that SARS is still processing the enrolment. The status Link Enrolled will be displayed once the enrolment of the user as the Technical Administrator has been confirmed.
- To replace one Technical Administrator with another Technical Administrator, the first enrolled Technical Administrator must have a status Link Enrolled. The Business Administrator must then enrol a new Technical Administrator. Click Find Technical Administrator and once a new Technical Administrator has been enrolled, the other Technical Administrator can be deleted.
How to view details of a Technical Administrator
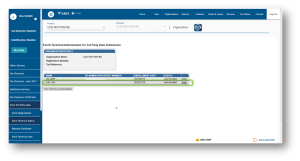
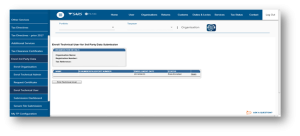
- To view all the Technical Administrators, click Enrol Technical Admin.
- All the Technical Administrators with the associated status with regard to their enrolment and activation will be displayed. Click Open next to a Technical Administrator to view the details of that particular Technical Administrator.
- Details of the Technical Administrator will now open.
How to delete a Technical Administrator
- To delete a Technical Administrator, click Open next to the Technical Administrator that should be removed.
- Click Delete Technical Administrator to remove the Technical Administrator.
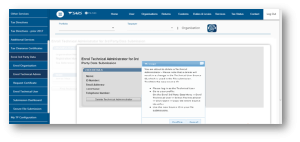
- You will be prompted to confirm that the user must be deleted. If you select confirm, the Technical Administrator will be deleted. To cancel the deletion, select Cancel.
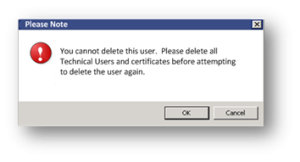
- If you attempt to delete the only enrolled Technical Administrator without having deleted all the Technical Users first, this message will be displayed.
Requesting the SARS Security Certificate
- It is important to note that before a successful submission, third-party data entities should request a security certificate from SARS. The security certificate is only valid for 12 months from the date it was issued.
- The Technical Administrator requests SARS security on behalf of the entity. Additionally, the Technical Administrator should have been enrolled successfully to request the security certificate from SARS. This security certificate is required for the submission of data via the Connect: Direct channel.
- To request the security certificate from SARS, kindly refer to the following guides.
GEN-ENR-01-G02 – Guide for the Submission of third-party data using the HTTPS Channel – External Guide
GEN-ENR-01-G01 – Guide for the submission of third-party data using the connect direct channel – External Guide
Enrolling Technical Users
How to invite Technical Users
- Technical users are invited by the Technical Administrator. The Technical Administrator should first request the SARS certificate for the submission of data. The Technical Administrator should then invite the technical user and ultimately add and enrol the technical user.
- Once the Technical Administrator has been successfully added to the organisation profile by the Business Administrator, he/she can invite many technical users to the eFiling organisation portfolio. This section will describe to the Technical Administrators how he/she can invite and add Technical User(s) to the organisational profile.
- To invite the Technical User to the Business admin profile, proceed as follows:
- The Technical Administrator is to login to eFiling.
- Once on the Landing page, select the following
- User – displayed on the main menu.
- User – displayed on the left menu.
- Invite User – displayed on the left menu.
- The Invite a user page will be displayed.
- Complete the Technical User details.
- Once completed, click on Invite
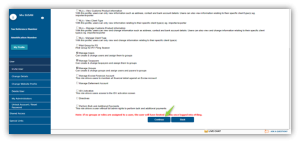
- Click on Continue.
- Do note that the Status of the invited eFiling user will be Awaiting confirmation.
- Notify the Technical User to Accept the invitation sent through on the eFiling profile.
- Note the roles the technical User can do, on Roles Selected
- To continue, click on Continue.
- Do note that the Status of the invited eFiling user will be Awaiting confirmation.
- Do note that the Technical Administrator can either.
- Send a reminder.
- Cancel an invitation.
- Update user rights
How a Technical User accepts an invitation.
- The invited technical User should login to their eFiling profile.
- On the Landing page click on My Portfolio
- Select Portfolio Management – on the left menu option.
- The Portfolio Management page will be displayed.
- To accept the invitation, click on Accept.
- The OTP page will be displayed requesting you to complete the OTP.
- Complete the OTP PIN

- The following screen will be displayed indicating that the Portfolio has been successfully linked.
How to enrol a Technical User
- Technical Administrators are to enrol the Technical User. The Technical Administrator can enrol the Technical User as follows:
- Login as a Technical Administrator profile (the technical administrator to login on eFiling)
- Navigate on eFiling as follows:
- Click on Services – on the main menu.
- Select Enrol 3rd party Data – on the left menu.
- Click on Find Technical User
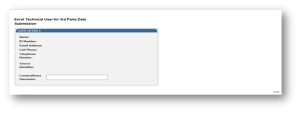
- Complete the following details of the Technical User
- Complete the Surname
- Complete the Email Address
- Complete the First Name
- Complete the Login Name
- Once completed, click on Search
- Tap on the applicable Technical User.
- The Technical Administrator is to create and complete the Secure Web Username for the Technical User
- Complete the Secure Web Username
- Once completed, click on Enrol Technical User
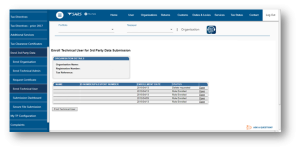
- The Enrol Technical User for 3rd party data submission page will be displayed.
- Note that the Status is Enrolment requested.
- This implies that the Technical User has been issued and will receive their username and password via his/her eFiling security details.
- Note that the Status is Enrolment requested.
- The Technical Administrator is to advise the Technical User to login to HTTPS.
- Where the login details has not been sent through to the Technical User, kindly notify SARS via the following email address: [email protected]
How to view the details of a Technical User
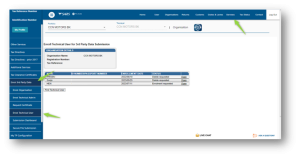
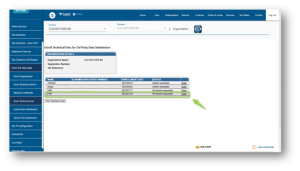
- To view all the Technical Users, click Enrol Technical User
- All the Technical Users will be displayed on the screen. To view the details of a specific Technical User:
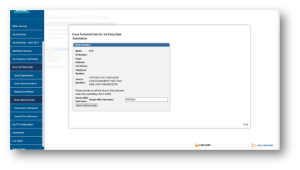
- Click Open next to the relevant user.
- Details of the Technical User will be displayed.
- The Source Identifier field must be used in all files submitted by that Technical User on the Direct Data Flow Channel using the Secure File gateway technology
How to delete a Technical User
- Click Open next to the Technical User that is to be removed on the Enrol Technical User for 3rd Party Data Submission page.
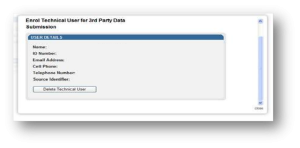
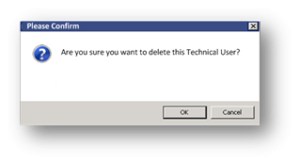
- Click Delete Technical User to remove the Technical User.
- You will be prompted to confirm if the Technical User should be deleted.
- Select OK, to delete the Technical User.
- To cancel, select Cancel
- On the Status column, the status Delete Requested indicates that the request to delete the user as a Technical User has been submitted to SARS. The status User Deleted will be displayed once the enrolment of the Technical User has been cancelled on the SARS systems.
- The deleted Technical Users will not be displayed on the screen.
Definitions, acronyms and abbreviations
The definitions, acronyms and abbreviations can be accessed via the following link: Glossary webpage.
Legal disclaimer: In the event of conflict or inconsistency between this webpage and the PDF version of the guide, the latter shall prevail.