
Summary
The SARS MobiApp is one of our digital service platforms that allows you to engage with SARS from anywhere and at any time. What is more, this platform allows you to interact and transact conveniently by making use of your smart phone. This guide will demonstrate how you can register for Personal Income Tax (PIT) or register for making use of the SARS MobiApp in your tax compliance responsibilities.
Introduction
Registration is one of the key aspects of tax compliance that every South African individual who earns or profits from some sort of income should adhere to. Registration for income tax allows you to engage with SARS effortlessly regarding your tax compliance responsibilities – particularly when making use of our digital service channels.
The Income Tax Act No. 58 of 1962 details that you are liable for tax levied on all income and profit received (which could include individuals, companies, and trusts). Thus, another complying requirement for individuals is to file/submit their Income Tax (ITR12) return every financial year. Submitting or filing your income tax ITR12 return cannot occur when the registration process of your Personal Income Tax (PIT) has not been finalised. Being registered on the SARS MobiApp allows you to receive your Income tax returns for submission during applicable tax seasons amongst others.
Prerequisites for using the SARS MobiApp
Consider the following for effective use of the SARS MobiApp:
- The SARS MobiApp caters only for individual taxpayers and registered tax practitioners.
- Registered tax practitioners who have linked their client’s profile will have full access to it.
- You must have downloaded the SARS MobiApp on your smart device.
- Ensure that your downloaded SARS MobiApp is always up to date.
- Ensure your device has the latest iOS/Android Operating System Software.
- Your device must have data or connected to a functioning Wi-Fi system.
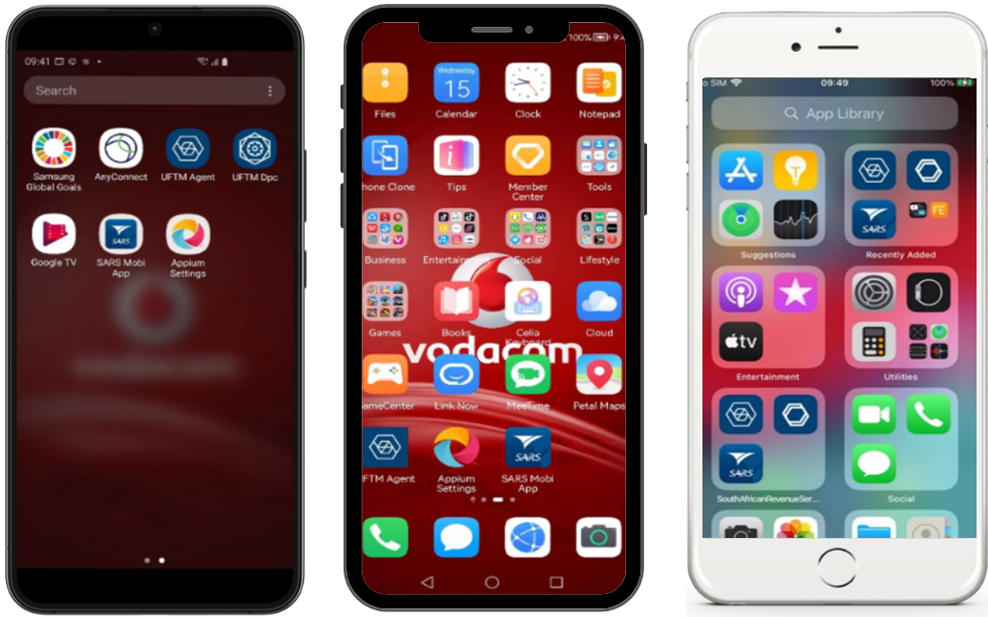
Downloading the SARS MobiApp
You can easily install the SARS MobiApp from the App Store, Google Play Store, or the Huawei App Gallery.
The following operating systems versions are required for your smart phone/device to enable the downloading of the SARS MobiApp:
- Android – Version 5.0 or Higher
- Huawei – Version 5.0 or Higher
- iOS – Version 10 or Higher
To Download:
- Tap on the Google Play Store/Huawei App Gallery/Apple App Store to open the store.
- Type “SARS MobiApp” into the Search box displayed. Once the SARS MobiApp appears as part of the search results, download it to your device.
- Download and install the App as per requirements of your device. When the installation is complete, the SARS MobiApp icon will be displayed on your mobile device’s home screen.
Once downloaded, please ensure that your SARS MobiApp is always up to date. |
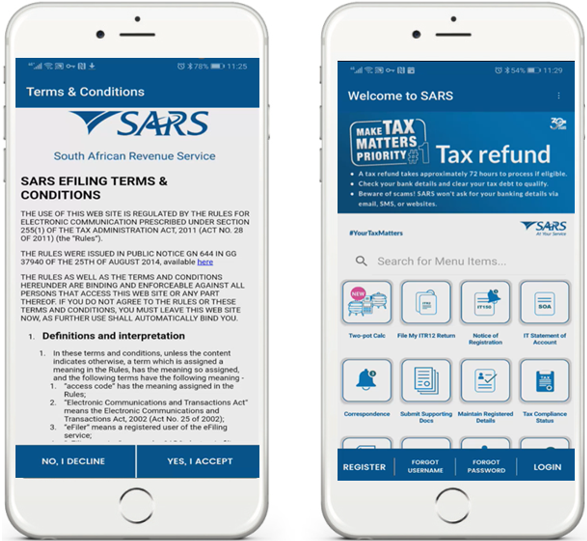
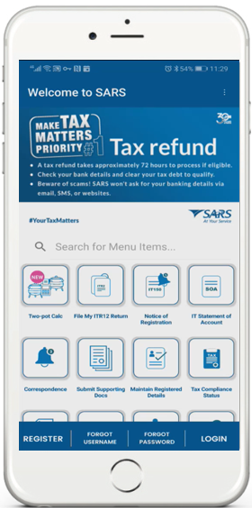
Once you have downloaded the SARS MobiApp, you will be presented with the Terms and Conditions page. Carefully read all the terms and conditions, and if you agree tap on ‘Yes I Accept’, displayed at the bottom of the screen.
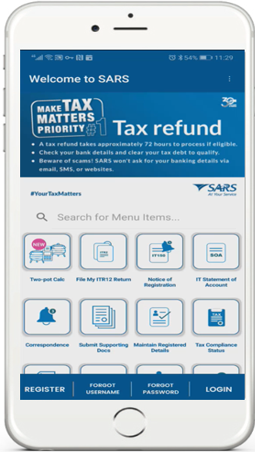
Once selected, the SARS MobiApp Home page will be displayed.
Registration
Do note that you may be requested to be biometrically authenticated or referred to the SARS Branch Office. |
How Individuals can Register for Personal Income Tax (PIT)
This section is applicable to individuals who wish to register for Personal Income Tax (PIT) with SARS. This will result in being issued with a Tax Reference Number (TRN) and Notice of Registration.
To Register:
- Tap on the Register icon displayed on the bottom of the SARS MobiApp Home screen.
This will direct you to the Register screens.
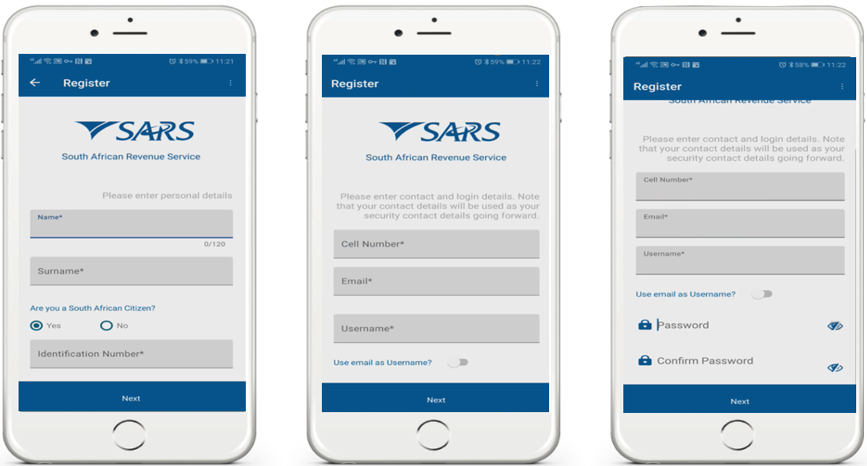
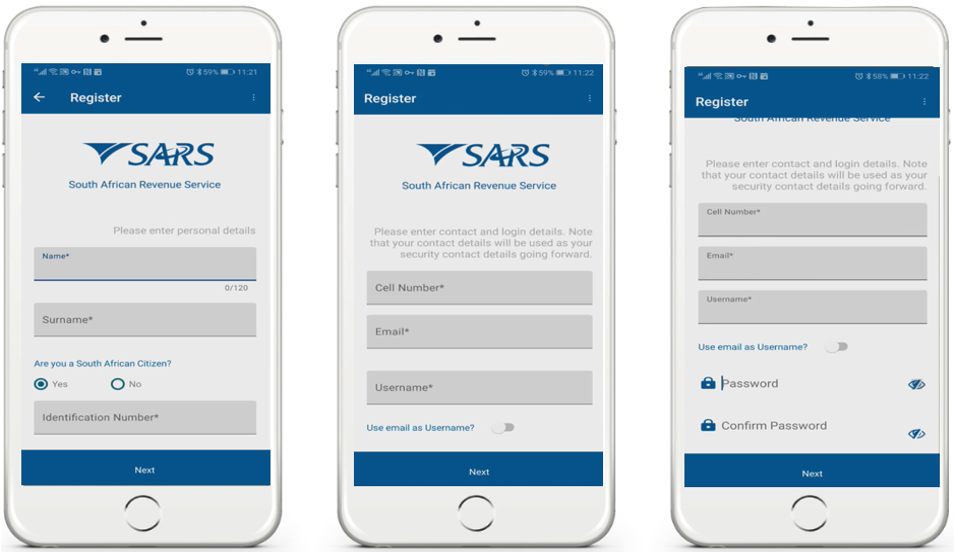
- Tap on the required demographic information as displayed on your device.
- Complete the personal information required.
- Once completed, tap on Next.
Take note and safe keep your username and password |
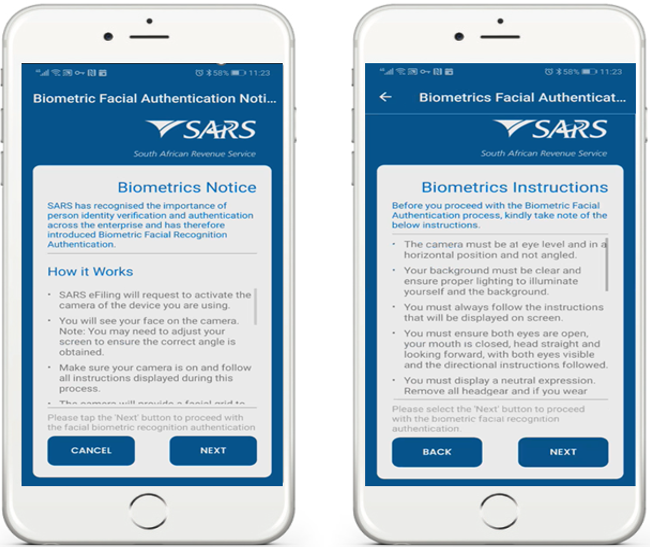
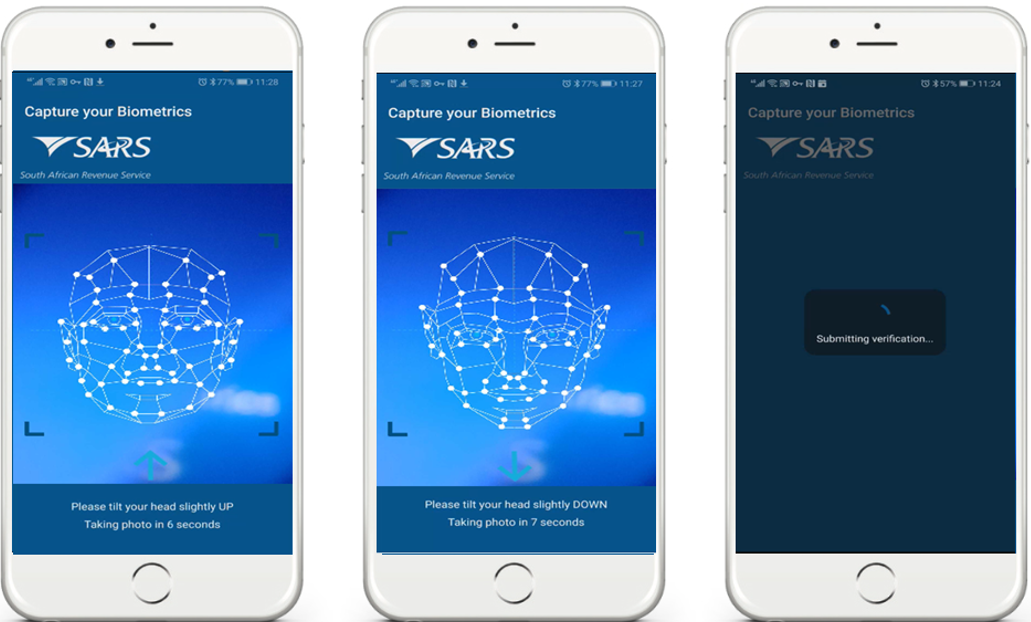
Once all the required information is completed accurately, the following Biometrics Notice screen followed by the Biometrics Instructions screen might be displayed.
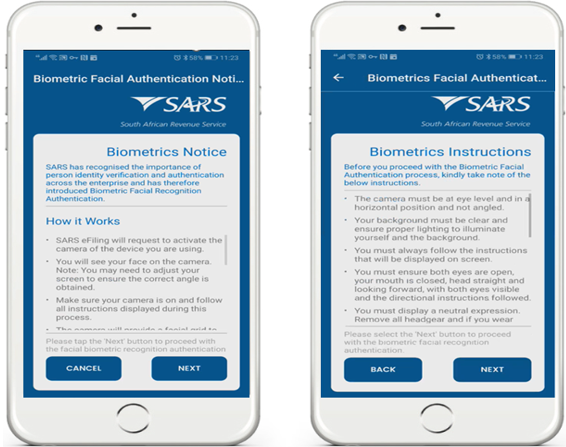
Take note of how the Biometric Facial Authentication works,
- Tap on Next.
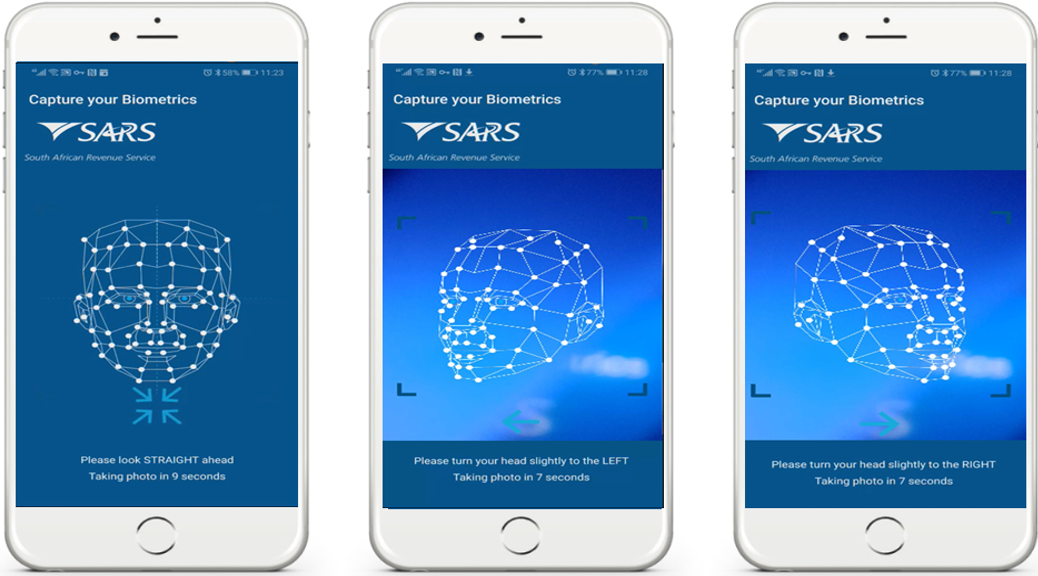
Your device will commence to capture your Biometric Facial ID,
- Follow the screen prompts as displayed on your device.

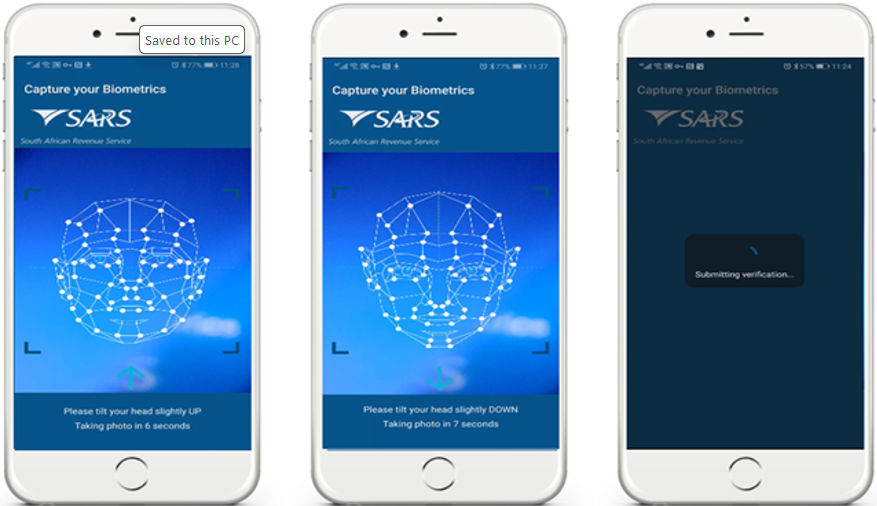
Do note the following:
|
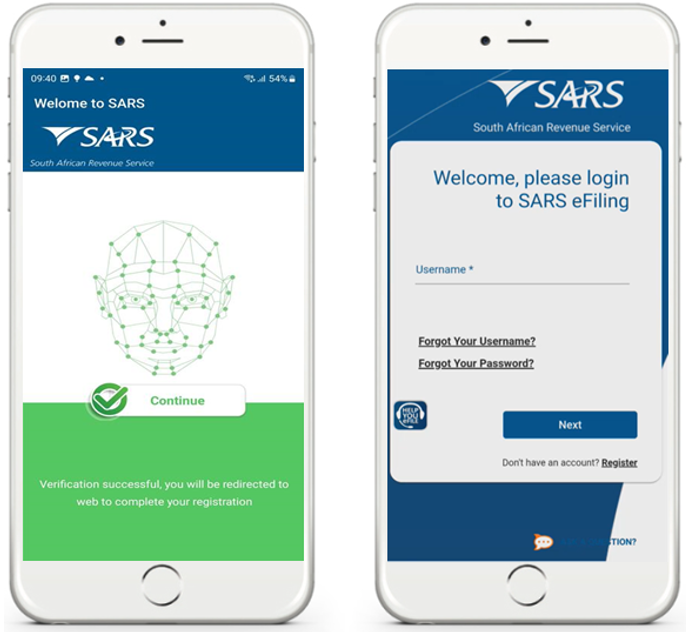
Once the biometric ID has been successfully captured, the following screen will be displayed on your device.
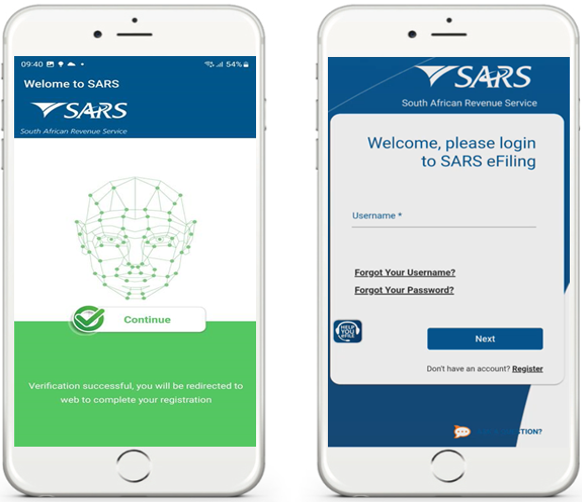
- Take note of the message and tap on Continue.
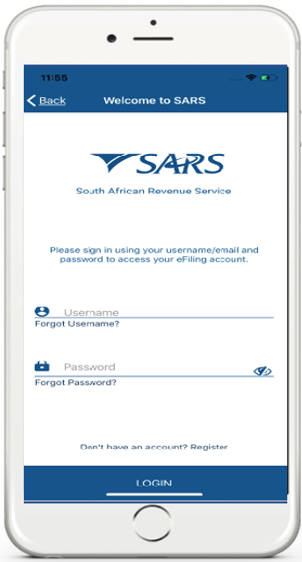
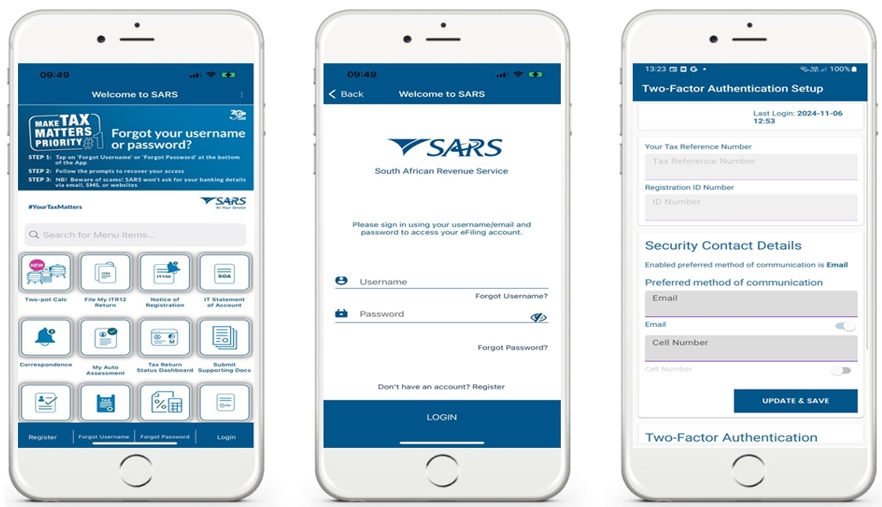
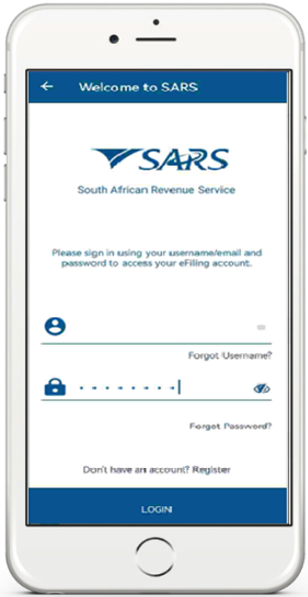
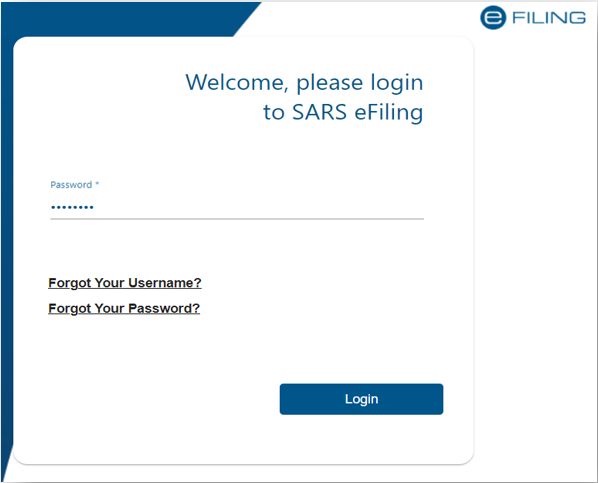
The user will then be required to login.
- Login by completing your username and password.
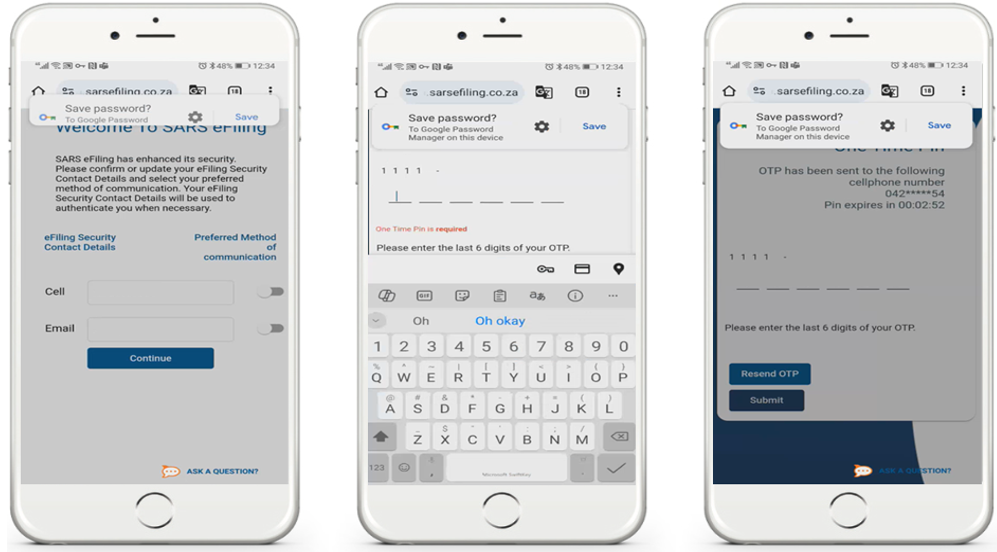
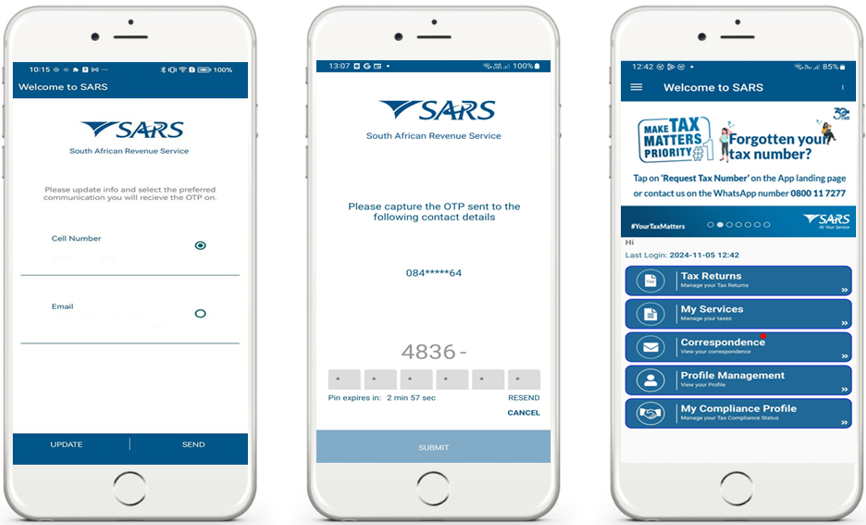
Once you have logged in, the screen displayed will require the user to confirm and select their preferred method of communication for eFiling security purposes.
- Select by tapping on
 for either Cell Number or Email.
 - Tap on Continue.

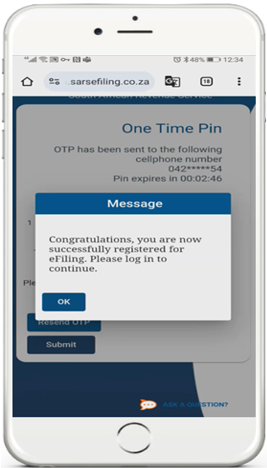
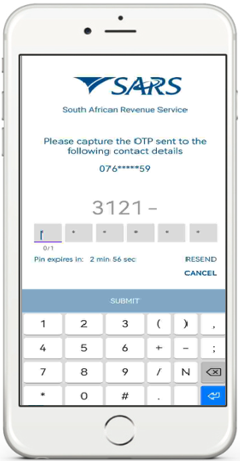
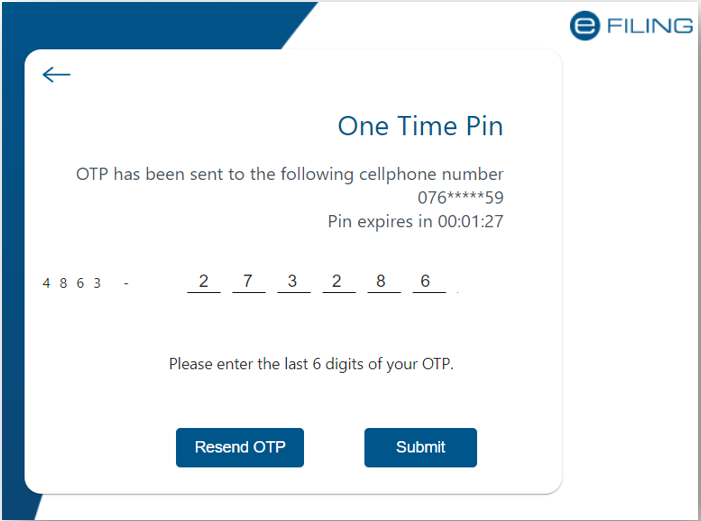
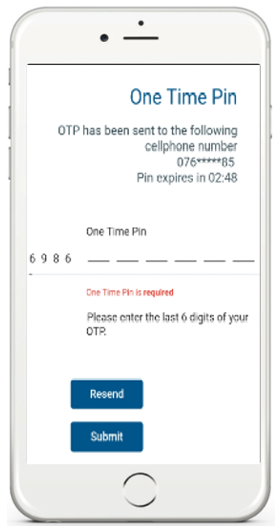
The One Time Pin (OTP) screen will be displayed which requires you to complete the last 6 digits of your OTP sent through your preferred method of communication.
- Complete the OTP and tap on Submit.
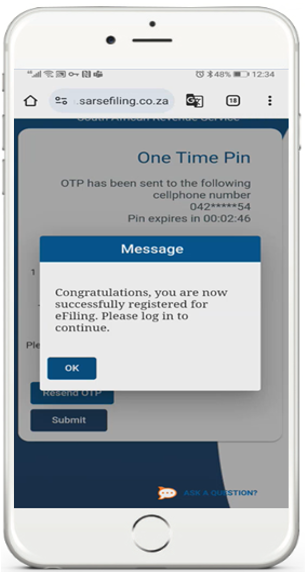
Where the OTP completed is correct, a message will be displayed indicating you are now registered for eFiling.
- Once successfully registered, login to the SARS MobiApp
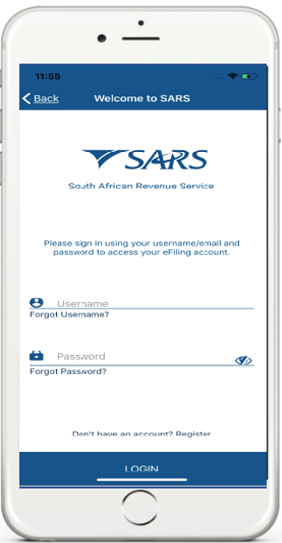
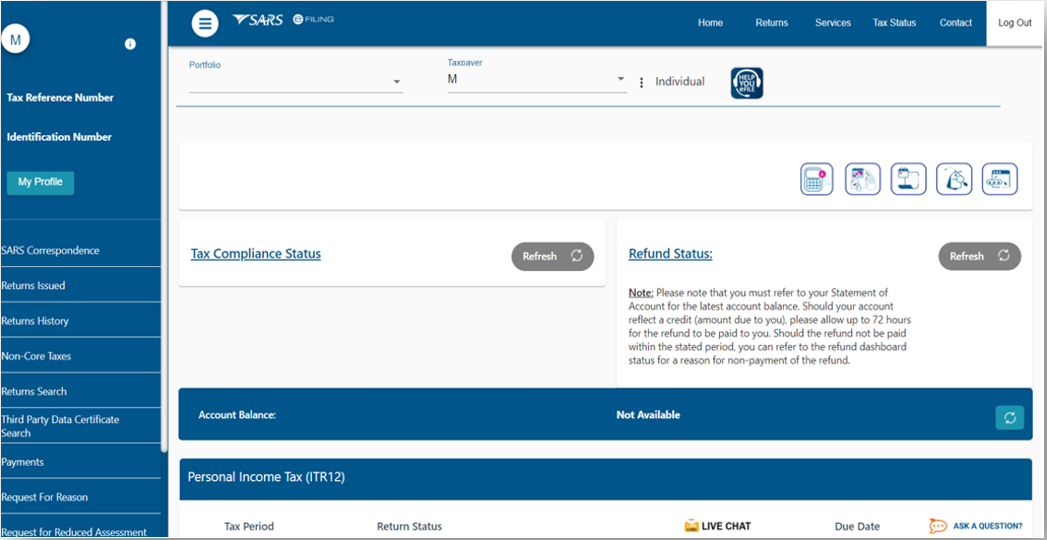
- The Welcome screen will be displayed.
On the Welcome screen.
|  |
Once you have logged in, you will be presented with the Terms and Conditions of using eFiling. | 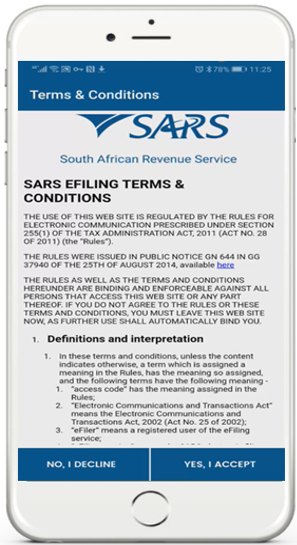 |
Once you have noted and agree with the SARS eFiling Terms and Conditions,
- Tap on YES, I ACCEPT.
Note that all new registrants will have their newly created PIT number displayed on the Link Tax Type screen. |
You are now required to link your new PIT number to your eFiling profile.
- This is done by activating your Income Tax Return (ITR12) on your profile.
To activate your Income Tax Return (ITR12).
- Tap on Link.
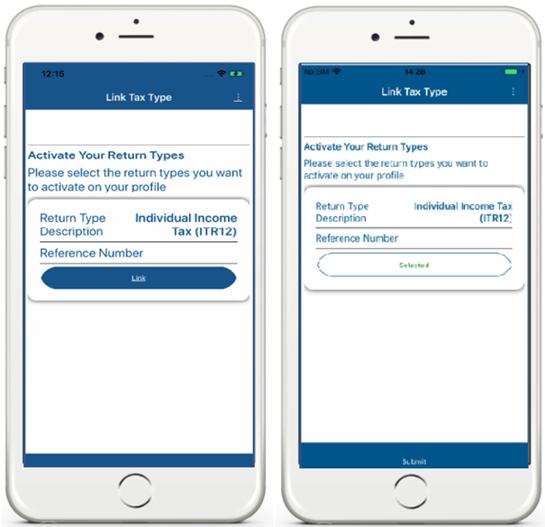
Once you have been activated for the submission of the Individual Income Tax Return (ITR12),
- Tap on Submit.
How to Register for the use of the SARS MobiApp
This section caters for users who are already registered for income tax with SARS, however, wants to register for the use of the SARS MobiApp. The SARS MobiApp and eFiling are interrelated. This implies that, upon a successful registration on the MobiApp, you will be able to use the username and password to access eFiling as well.
To register for the use of the SARS MobiApp, proceed as follows:
- Tap on the Register button displayed at the bottom of the SARS MobiApp Home screen,
- Tap on Register.
Once the Register button is selected, the user will be directed to the Register screens.
- Tap on the required demographic information and complete the personal details required.
- Ensure that you complete your SARS registered details.
- Once all fields have been completed, tap on Next.
Take note of the username and password for future reference. |
Once all the required information is completed accurately, the following Biometrics Notice screen followed by the Biometrics Instructions screen might be displayed.
Take note on how the Biometric Facial Authentication works,
- Tap on Next.
Your device will commence to capture your Biometric Facial ID,
- Follow the prompts as displayed on your device.
Do note the following:
|
Once the biometric ID has been successfully captured, the following screen will be displayed on your device.
- Take note of the message and tap on Continue.
The user will then be redirected to the eFiling webpage and required to login.
- Login by completing your username and password.
Once you have logged in, the screen displayed will require the user to confirm and select their preferred method of communication for eFiling security purposes.
- Select by tapping on for either Cell Number or Email.
- Tap on Continue.
The One Time Pin (OTP) screen will be displayed which requires you to complete the last 6 digits of your OTP sent through your preferred method of communication.
- Complete the OTP and tap on Submit.
- Where the OTP captured is correct, a message will be displayed indicating you are now registered for eFiling.
Note the following regarding the completion of your registration:
|
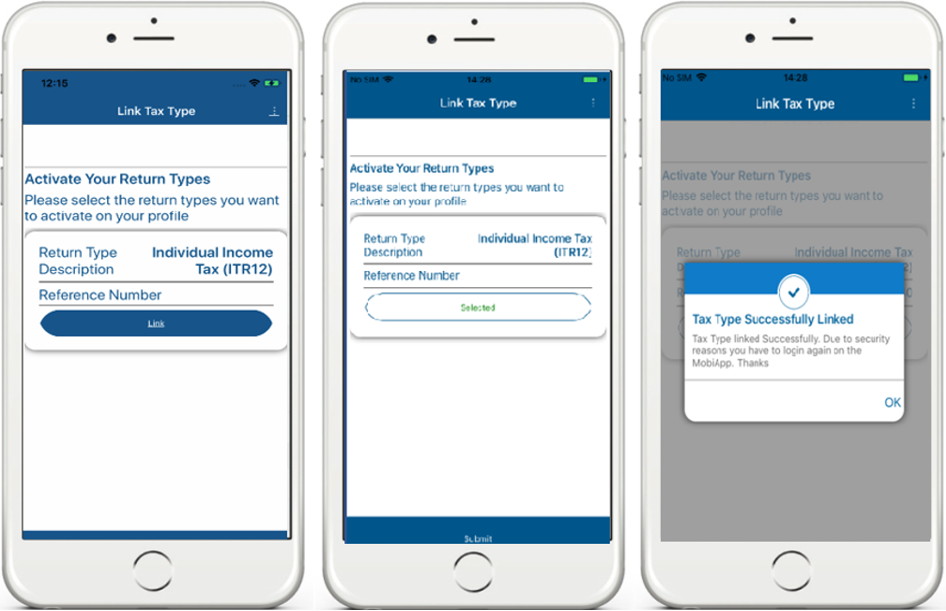
- Activate your Income Tax Return (ITR12) by tapping on Link.
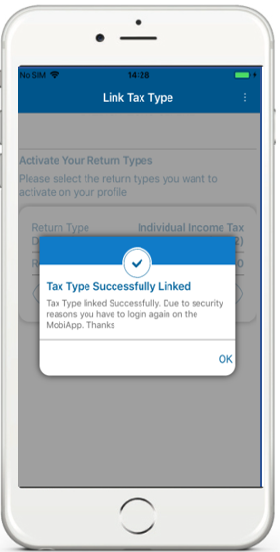
- Select Individual Income Tax (ITR12).
- Note the pop-up message displayed.
- Tap on OK.
Once you have been activated for the submission of the Individual Income Tax Return (ITR12),
- Tap on Submit.
How to Link your Tax Practitioner to your Profile
Where you have shared access with a Tax Practitioner, your device will display three access rights buttons for each tax type:
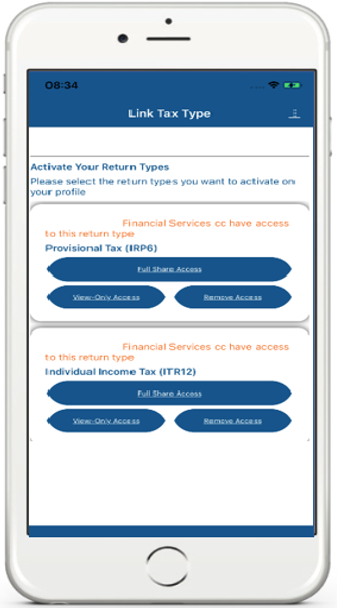
The following service icons are for the following use:
 View-Only Access – This is used to view the return; however, you will not be able to submit your return.
Note that the MobiApp caters for a user with full shared access only. Users with view-only access will need to log onto SARS eFiling. |
 Full Share Access – This is used to have the same access as your Tax Practitioner.
 Remove Access – The functionality allows the user to revoke the Tax Practitioner’s access completely.
How to Respond to Error Notifications
Updating of Security Contact Details
When registering for the use of eFiling with SARS, always ensure that all completed security contact details are accurate and correct. Additionally, when required to upload mandatory supporting documents to complete your eFiling registration process, always ensure that the documentation is correct and not duplicated.
Where SARS detects information such as the cell number or email address completed already exist, as it forms part of an existing eFiling account, one of the following error messages will be displayed:

- Respond by taking note of the message and clicking on OK.
- Proceed by completing the appropriate contact details.
However, following various failed attempts when completing the security contact details or uploading supporting documentation, book an appointment to visit one of our SARS Branch’s to finalise your eFiling registration.
Capturing your Image During Registration
When capturing your image for registration purposes, always ensure that your smart phone camera settings is functional. Additionally, follow the prompts displayed on your device and ensure that you are in an environment where your image can be captured accurately.
Where your image was incorrectly captured, the following error message will be displayed.
|
|
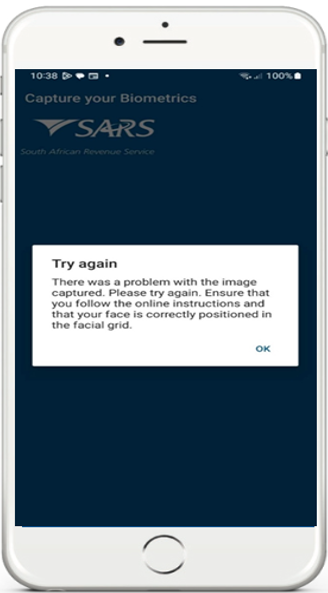
After multiple failed attempts of capturing your image, the following error message will be displayed.
|  |
Completing Incorrect Password Criteria
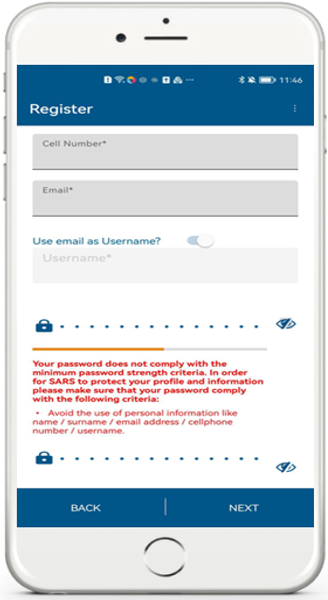
When completing your new password for the use of logging into your profile, always ensure that the created password contains the minimum listed password criteria.
Where the created password does not contain the minimum listed criteria, the following error message will be displayed: | 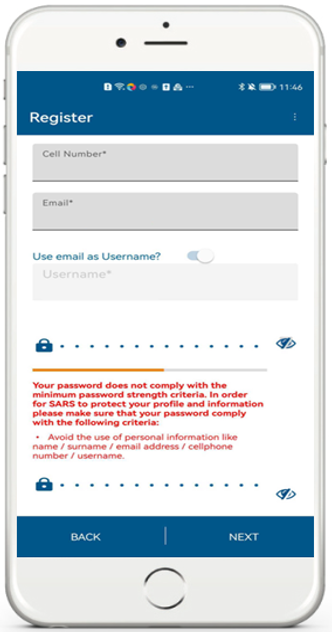 |
Respond by taking note of the minimum password criteria requirements and create a password which contains the required criteria.
How to Upload Supporting Documents for Registration Purposes
During the registration process, where SARS was not able to verify you, supporting documents will be required to be uploaded to finalise your registration.
When supporting documents are required, the Register page will be displaying the following screen.
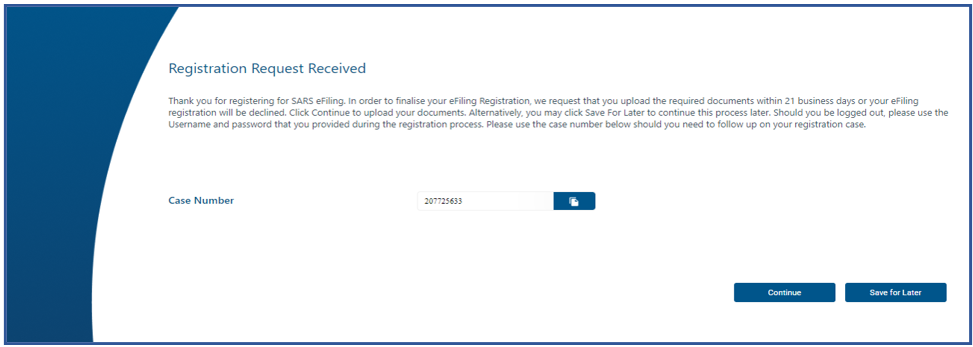
- Click on Continue.
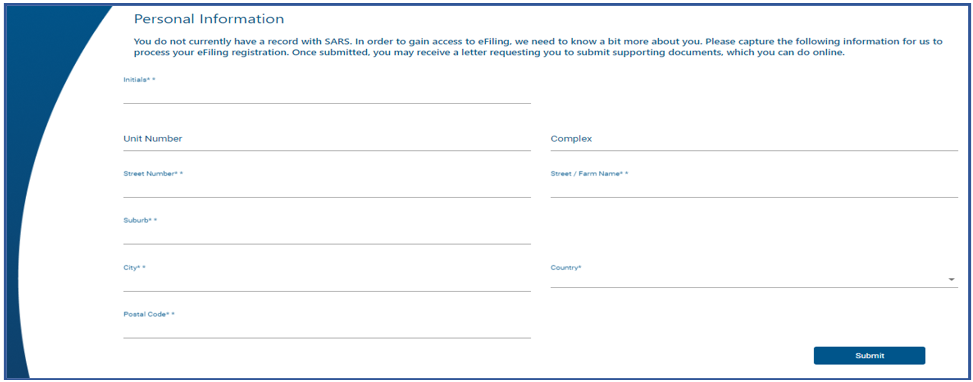
- Complete all the mandatory fields.
- Once completed, click on Submit
- Complete all the mandatory fields.
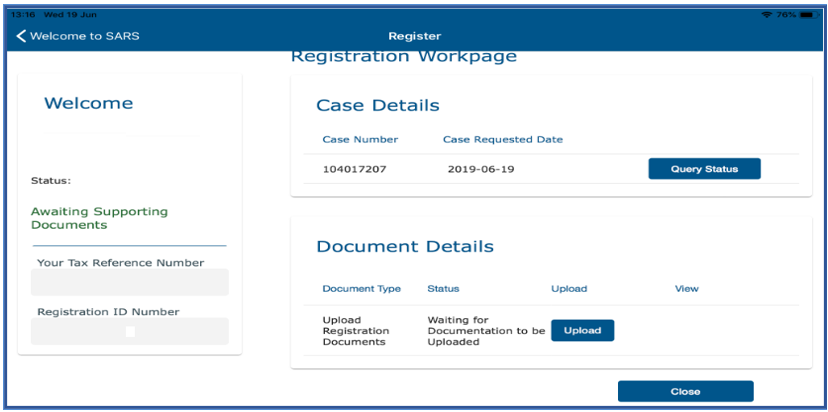
- To submit supporting documents, Tap on Upload
- This will route you to the Upload Documents Page. Continue to upload the required document(s) by selecting the applicable selections on your device.
- Take note of the documents that must be submitted, as they will be listed on the correspondence letter received and listed on the Upload Documents Page.
When the document has been uploaded, the Upload Status of the applicable document will change to ‘Converted and stored.’

The icons displayed are for the following use.
| To view the uploaded document. |
| To remove/delete the uploaded document. |
Note the following:
|
- Once all the documents have been uploaded tap on Submit.
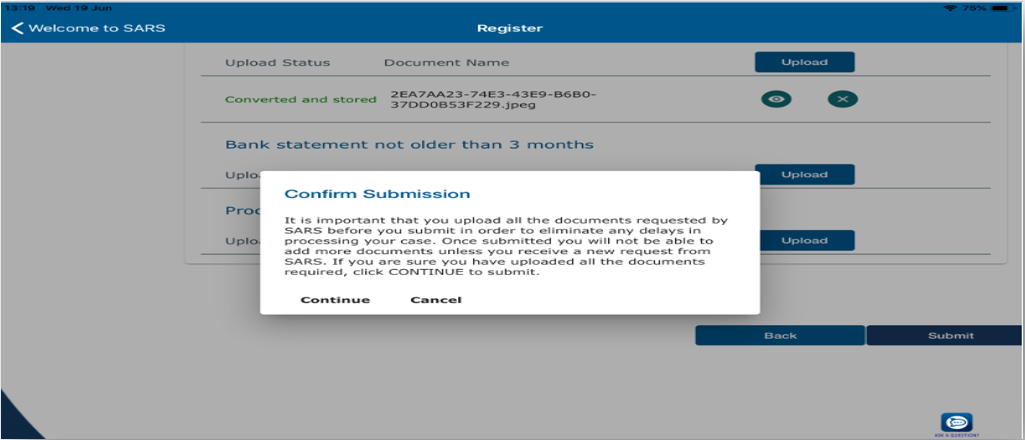
- A pop-up message will be displayed. Take note of the confirmation and if you agree, tap on Continue.
- This will result in the documents Status changing to Submitted on the Registration Work page.
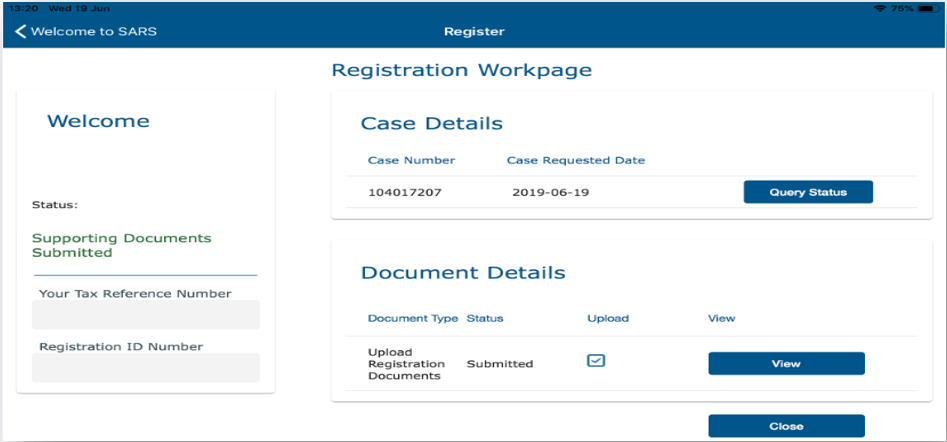
Note that after you have submitted your supporting documents, SARS will process and validate them before your registration is finalised. Following various failed attempts when uploading supporting documents, upload the documents via the SARS Online Query System (SOQS) available on the SARS website. Alternatively, book an appointment to visit one of our SARS Branches to finalise your eFiling registration. |
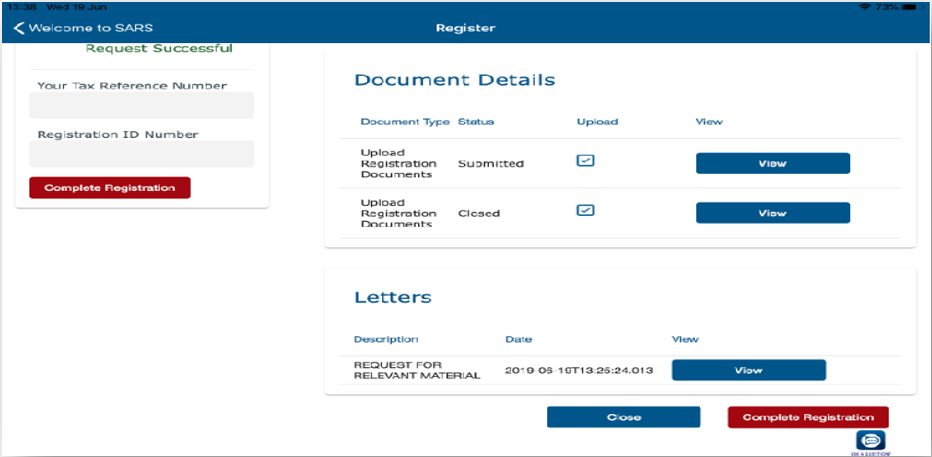
- Once your documents have been validated, the Complete Registration button will be displayed on your Registration Work page.
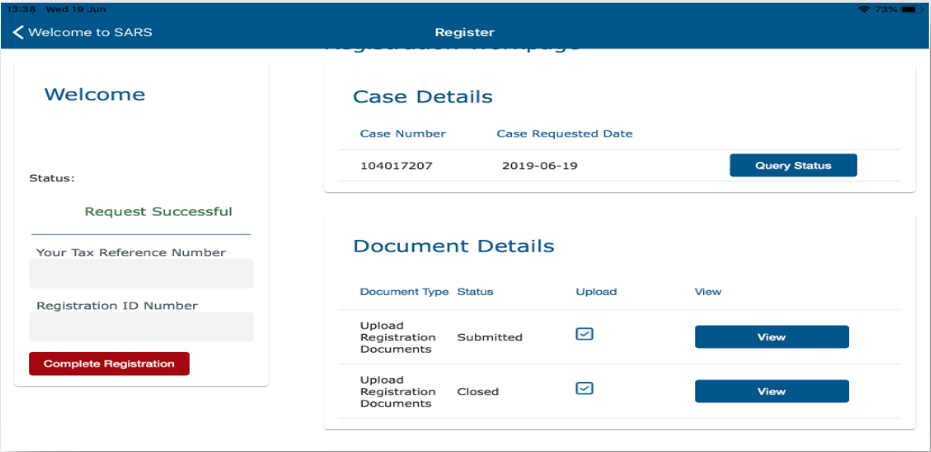
- Tap on Complete Registration

Once tapped, you will be prompted to select your preferred method of communication for eFiling security purposes.
- Select by tapping on
 for either Cell Number or Email.
 - Tap on Continue


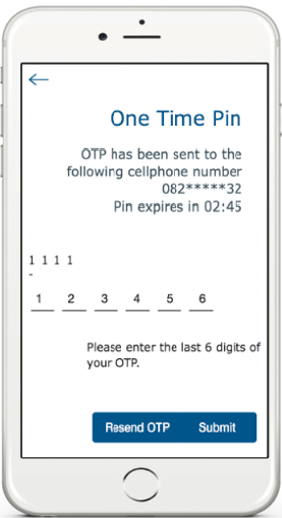
The One Time Pin (OTP) will be displayed and requires you to complete the last 6 digits of your OTP sent through your preferred method of communication.
- Complete the OTP and tap on Submit. If the OTP completed is correct, a message will be displayed indicating you are now registered for eFiling.
Upon completion of your registration, you are now required to login to the MobiApp by making use of your Username and Password.
On the Welcome screen
- Complete your Username and Password.
- Once completed, tap on Login.
Login and Authentication
How to Enrol your Device
Enrolment involves registering your device for authentication purposes. There are two methods you can select for authentication purposes, these include two-factor and passwordless authentication. Two-factor or passwordless login are not the same. Therefore, one or the other should be selected, as both cannot be enabled at the same time.
Two factor authentication involves options of either receiving a one-time notification for logging in to your eFiling or your MobiApp profile. On the other hand, passwordless authentication involves you logging into your profile without the use of a password. Both these authentication methods require you to enrol your device.
Do note that where the two-factor authentication has been selected, enrolment will not be required for one time pin option, however, will be required where you have selected the “eFiling Mobile App Authentication” method option. |
To enrol your smart device for authentication purposes, follow the steps below:
- Login to your eFiling profile from your mobile device
- Click on My Profile
- Click on Profile and Preference Setup
- Scroll down and select either Two-Factor Authentication or Passwordless Login
- Select eFiling Mobile App Authentication.
- The eFiling Enrol Device button will be displayed.
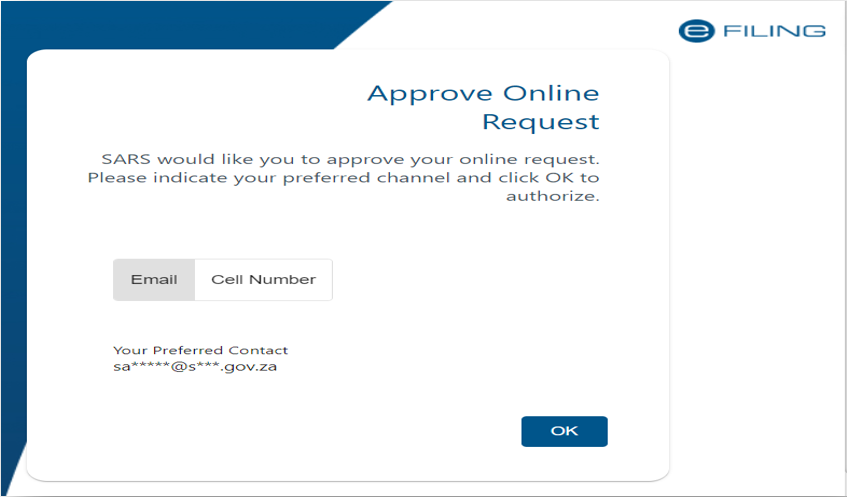
- Approve Online Request: Indicate your preferred channel.
- Select either Email or Cell Number
- Click on OK
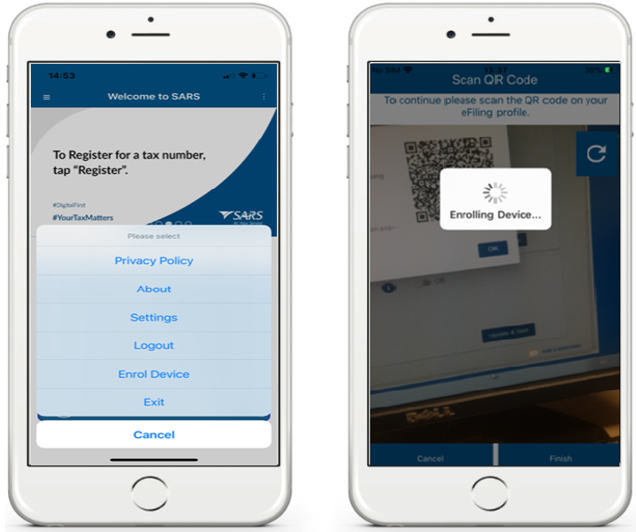
- Click on the Enrol Device button.
- The scan QR Code pop-up message will be displayed with guiding steps.
- Read and follow the steps as listed in the pop-up message.
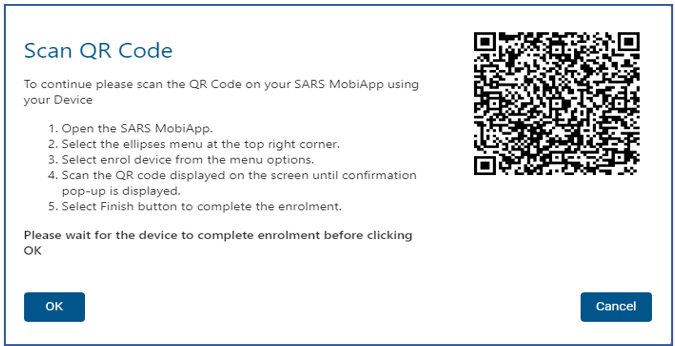
Note that the “OK” button on this pop-up should only be selected after you have followed steps below to scan the QR Code. |
How to scan the QR Code from your smart device
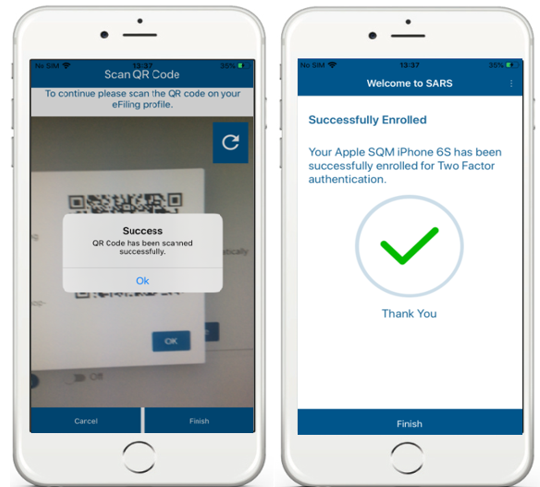
|  |
|  |
A confirmation pop-up message will be displayed indicating that your device has been successfully enrolled.
- Click on OK on the message and on Finish at the bottom of the screen.
NOTE: Do not close the QR Code on eFiling before completing the enrolment of your device. |
Return to your eFiling profile and select OK on the pop-up message.
You will be routed to an authorisation screen, where you will be prompted to select your preferred method of communication. The One-Time-Pin (OTP) will be delivered through your preferred method of communication to finalise your device enrolment process.
Note that to make use of these services, your smart device must:
If your internet connection is interrupted, the following message may appear on your smart device: “Please check your network connection and try again”. |
How to Set up your Device for Biometric Authentication
Where you wish to login on the SARS MobiApp by either using your mobile Face ID, Fingerprint or Password, you can do so by setting up the Biometric Authentication function available on the SARS MobiApp.
To set up Biometric authentication proceed as follows:
- Login to your profile. Note that the Landing page will be displayed.
- Tap on the vertical ellipsis
 displayed on the top right side of your device. This will list various service options.
 - Select the Settings service option.
This will display the Settings screen.

If your Mobile device allows you to enable Biometric authentication, select ‘Biometric Authentication.’
- Once selected, tap on SUBMIT.
If your phone has Face ID as part of its settings, you will be prompted to allow SARS MobiApp to use Face ID.
- Tap on Ok
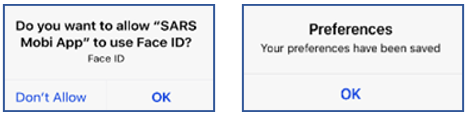
The preferences will be saved on your device.
- Tap on Ok
Note that this function is dependent on the settings of your device. Ensure that you have enabled either fingerprint or Face ID as part of your device settings. |
Two Factor Authentication
Two-factor authentication (2FA) implies that you will access your eFiling profile with your username and password. Right after, a push notification will be sent through to your security contact details on your smart device to finalise authentication.
Do note that for security purposes, all SARS MobiApp users must enable the two-factor authentication method on their device. |
Where the two-factor authentication method has not been enabled on your mobile device, upon you successfully logging in to your profile, the Two-Factor Authentication Setup screen will be displayed. Proceed to enable your preferred two-factor authentication method as described in the sections below.
How to Select your Prefeered Method of Communicaton
Your preferred method of communication is to finalise your device enrolment process, which will be your selected way in which SARS will notify you when your profile is being accessed on eFiling or the SARS MobiApp. The method of communication includes your contact details namely your email and cell number. This is to ensure that you receive notification whenever your profile is opened.
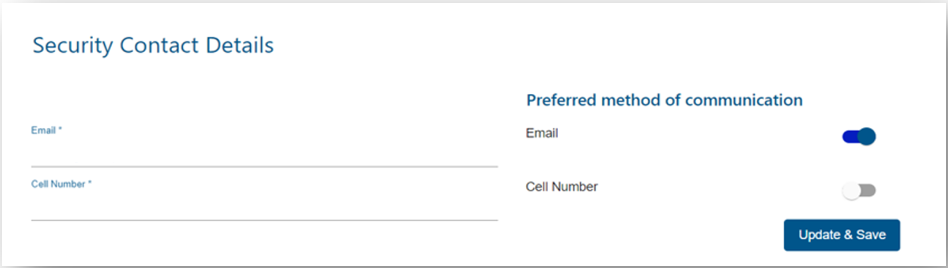
On the Two-Factor Authentication Setup screen the defaulted preferred method of communication (email/cell) will be presented.
- To select/change your desired method of communication (email/cell), select the applicable one by tapping on the
 besides the selection of an email or cell number.
 - To update your desired method of communication (email/cell), tap on the fields and complete the updated email/cell.
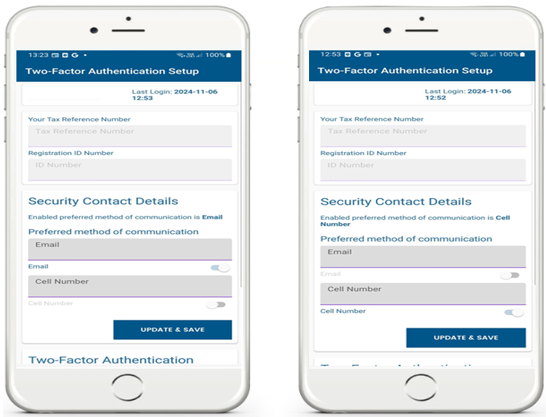
Once you have made the selection, tap on UPDATE &SAVE.
Note your selected method of communication will be displayed as enabled below “Security Contact Details” heading |
- An OTP will be sent through to validate your selection
- Complete the OTP sent through.
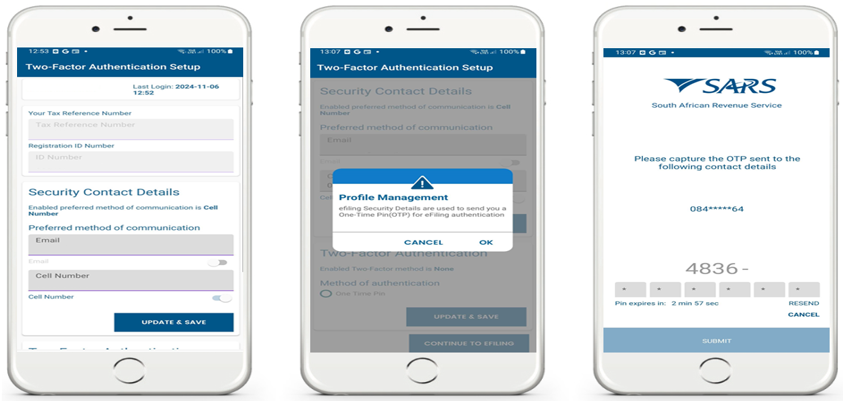
Once the correct OTP was sent through and completed, the following screen will be displayed to notify that your profile information has been updated.
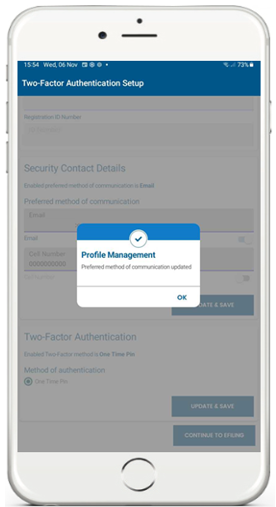
Do note that you can update your contact security details on the Profile Management tab on the Landing page. |
How to enable Two Factor Authentication via the SARS MobiApp
On the Two-Factor Authentication Setup screen, note that there will be none for Method of authentication.
- Tap on the One-Time-Pin radio button
- Tap on UPDATE & SAVE
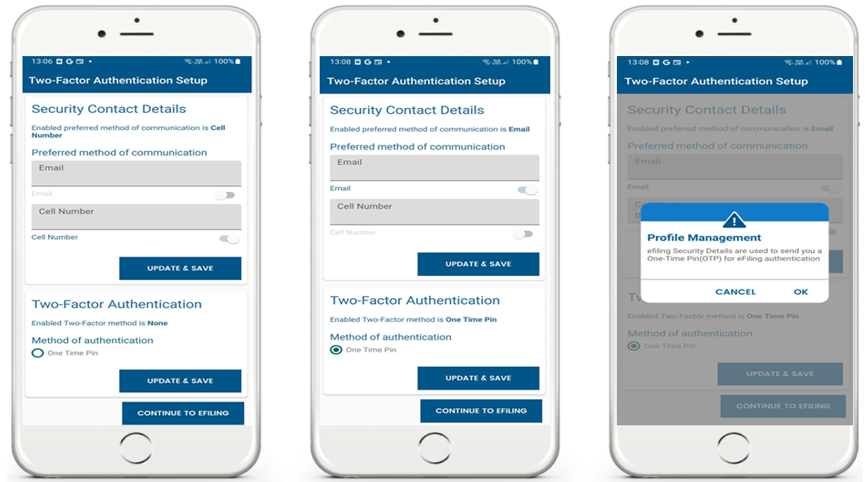
A message will be displayed indicating that an OTP will be sent through for your attention.
- Tap on OK.
Complete the OTP sent through.
- Once the OTP has been completed, tab on Submit
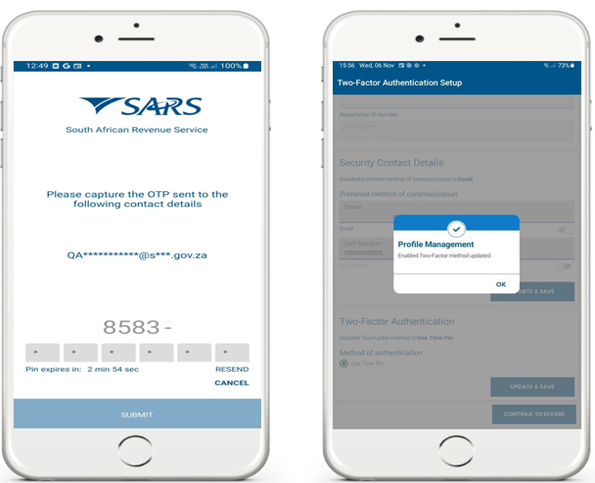
The Two-Factor Authentication method will be enabled.
How to Enable Two Factor Authentication from your eFiling Profile
To enable the two-factor authentication from your eFiling profile proceed as follows:
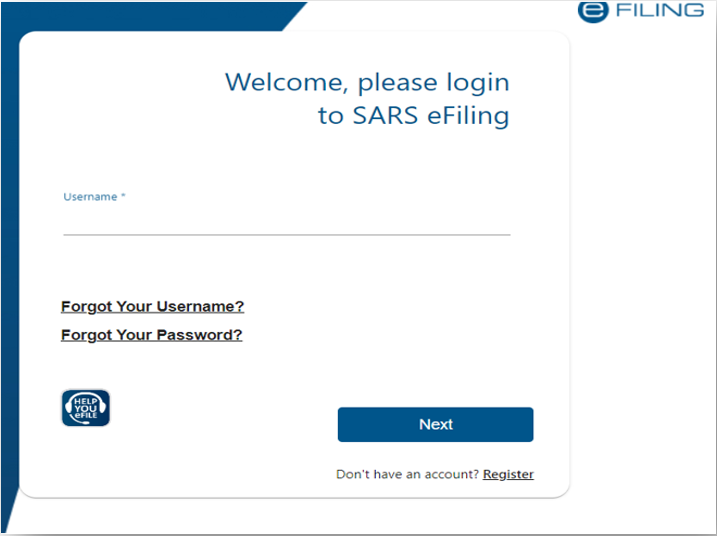
- Log into your eFiling profile on the website.
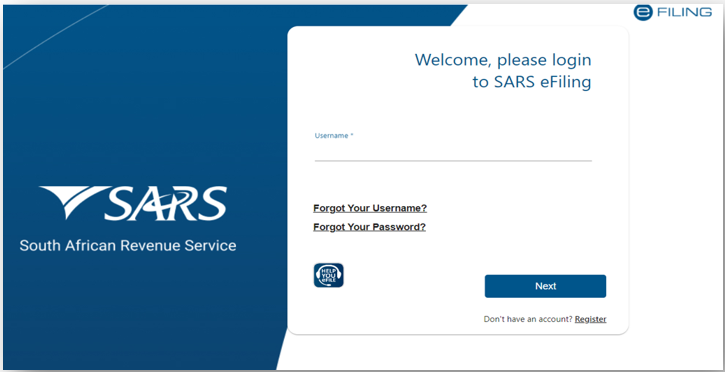
Once you have successfully logged in, click on the ellipsis icon ![]() displayed at the top of the screen.
displayed at the top of the screen.
- From the menu list displayed, select Profile Settings
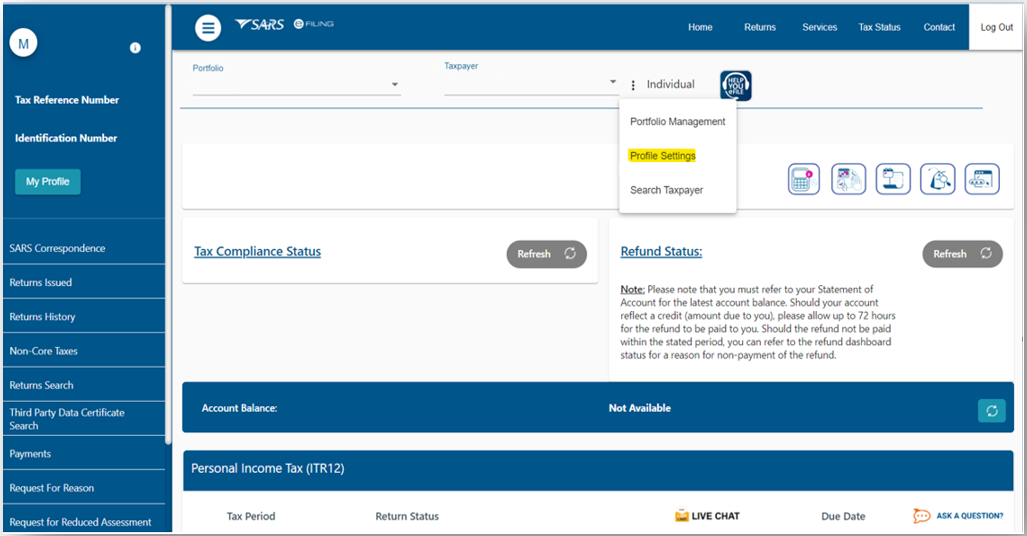
Note that the Two-Factor Authentication option will be displayed and turned off.
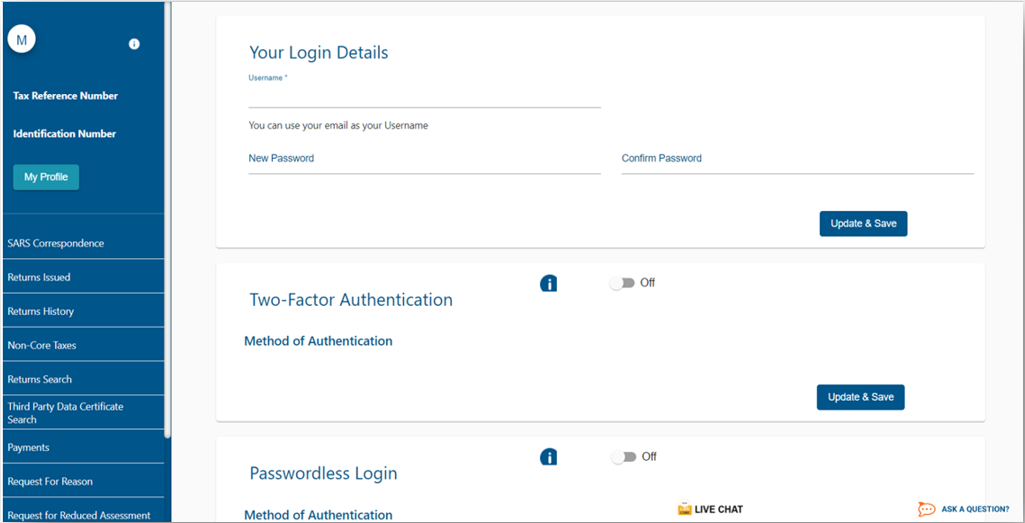
- Turn on Two-Factor Authentication by clicking

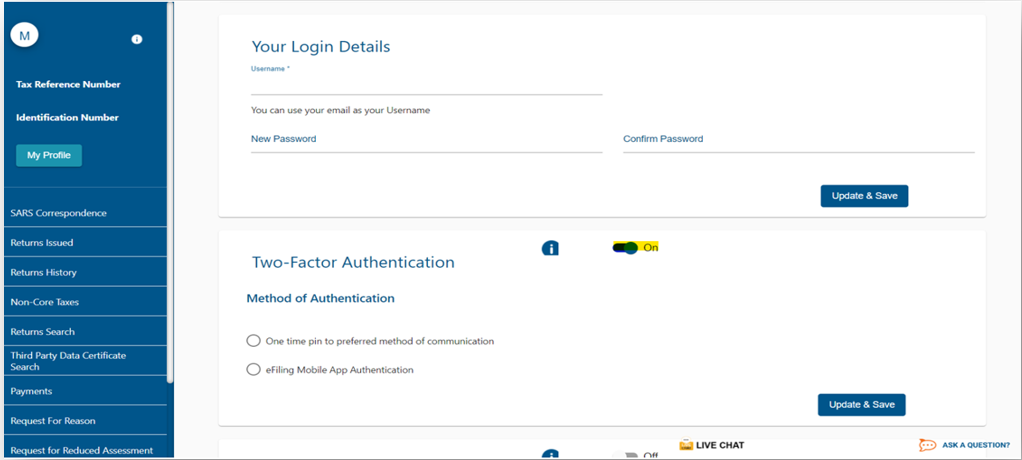
Note that this will display the method of authentication.
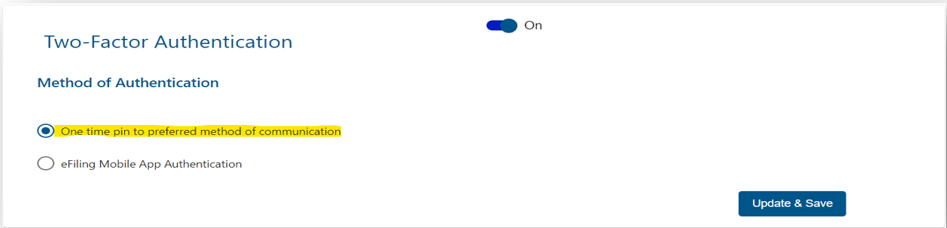
- Select – One time pin to preferred method of communication.
- Click on Update & Save
- Complete the Security Contact Details and select the preferred method of communication.
Do note that the OTP will be sent to the completed Security Contact Details
- Click on Update & Save
- Click on OK
- Enter the OTP sent to the security contact details completed earlier.
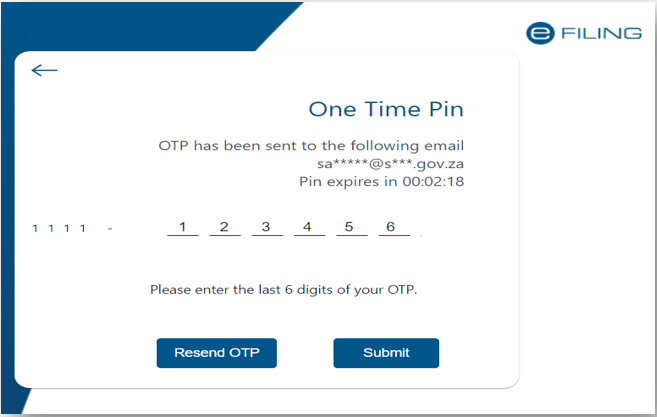
- Click on Submit
Note that you can request the OTP to be resent where the Pin timer has expired.
- To do so, click on Resend OTP
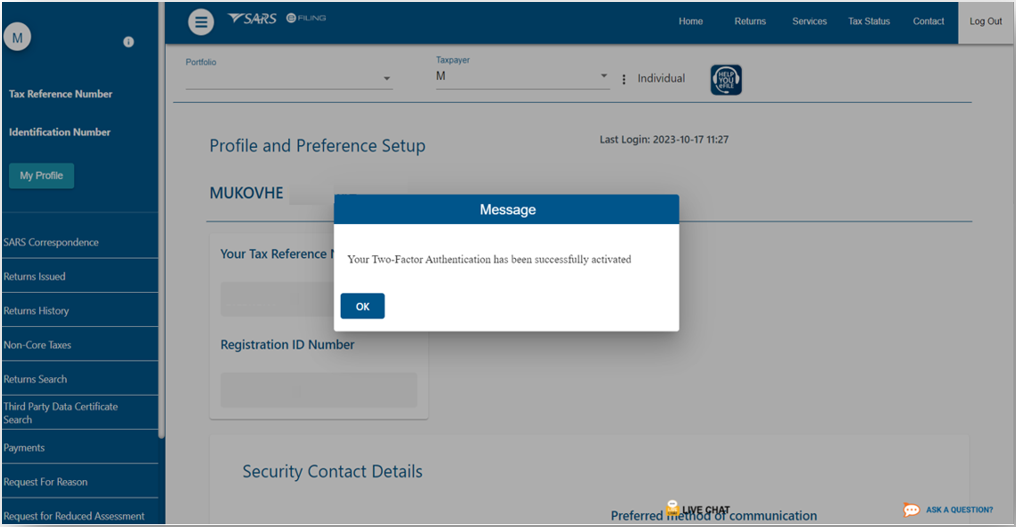
Two-Factor Authentication has been successfully activated.
- Login to the SARS MobiApp
Note that an OTP will be required.
- Complete the OTP sent through to your cell phone number.
- Once you have successfully completed the OTP, you will be logged into your SARS MobiApp profile.
To finalise the enabling process, you have to go back to eFiling.
- Login to your eFiling profile
Once you have entered your eFiling Password, the OTP will be required.
- To enable and finalise the 2FA, complete the OTP sent through to your security contact details.
- Once completed, click on Submit.
Once the OTP has been successfully completed, you will be logged into your eFiling profile.
How to Use Two Factor Authentication
To login to your eFiling profile via the SARS MobiApp, proceed as follows:
- Tap on Login.
- Capture your Username and Password.

Once successfully completed, you will be requested to capture the OTP sent to the contact details displayed.
- Complete the OTP sent through.
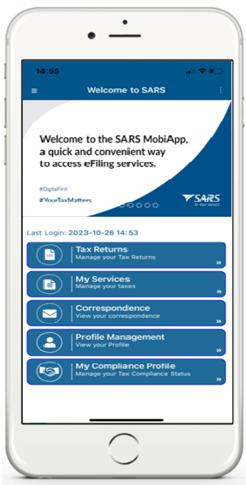
Once the OTP is successfully completed, you will be routed to the Landing page of your SARS MobiApp.
Passwordless Login
Your smart device can be used for authentication to access your eFiling profile.
- Passwordless authentication implies that you will access your eFiling profile with your username. A push notification will be sent to your smart device.
Note that to make use of these services, your smart device must:
|
If your internet connection is interrupted, the following message may appear on your smart device: “Please check your network connection and try again”.
How to Enable Passwordless Login
To enable passwordless login on your device, follow the steps below:
- Login to your eFiling profile from your mobile device
- Click on My Profile
- Click on Profile and Preference Setup
- Scroll down and select either Two-Factor Authentication or Passwordless Login
- Select eFiling Mobile App Authentication.
- The eFiling Enrol Device button will be displayed.
- Approve Online Request: Indicate your preferred channel.
- Select either Email or Cell Number
- Click on OK
- Click on the Enrol Device button.
- The scan QR Code pop-up message will be displayed with guiding steps.
- Read and follow the steps as listed in the pop-up message.

Note that the “OK” button on this pop-up should only be selected after you have followed steps below to scan the QR Code. |
How to scan the QR Code from your smart device
| |
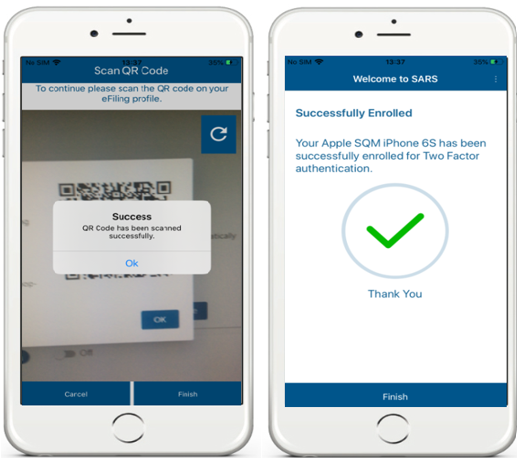
- Select Enrol Device. The Scan QR Code screen will be displayed with your device camera activated.
- Scan the QR code by focusing your device’s camera on the marked square of the pop-up message on your eFiling profile.
A confirmation pop-up message will be displayed indicating that your device has been successfully enrolled.
- Click on OK on the message and on Finish at the bottom of the screen.
NOTE: Do not close the QR Code on eFiling before completing the enrolment of your device. |
- Return to your eFiling profile and select OK on the pop-up message.
You will be routed to an authorisation screen, where you will be prompted to select your preferred method of communication. The One-Time-Pin (OTP) will be delivered through your preferred method of communication to finalise your device enrolment process.
How to use Passwordless Login
To login to your eFiling profile via the SARS MobiApp, proceed as follows:
Note: The smart device you intend to use for login authentication should have already been enrolled on your eFiling profile. |
- Capture your username on your eFiling profile.
- The system will validate the type of authentication you have chosen, Two-Factor Authentication or Passwordless Authentication. (You will be required to capture your password if you chose Two-Factor Authentication.).
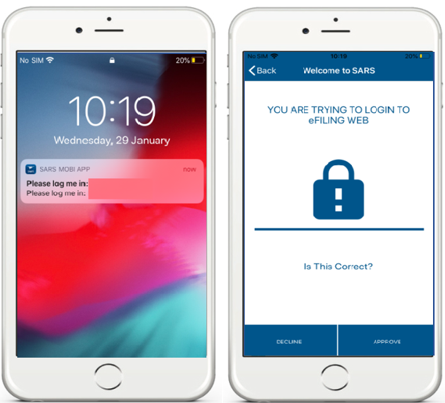
A message will be sent to the device linked to your eFiling profile. The message will pop-up on your SARS MobiApp, indicating that you are trying to login to eFiling.
- Tap on the message; the Welcome to SARS screen will be displayed.
- Tap on Approve to validate that you are accessing your eFiling profile.
- Tap on DECLINE-to-decline access to your eFiling profile.
The following screen options will be displayed on your smart device as per your option choice.
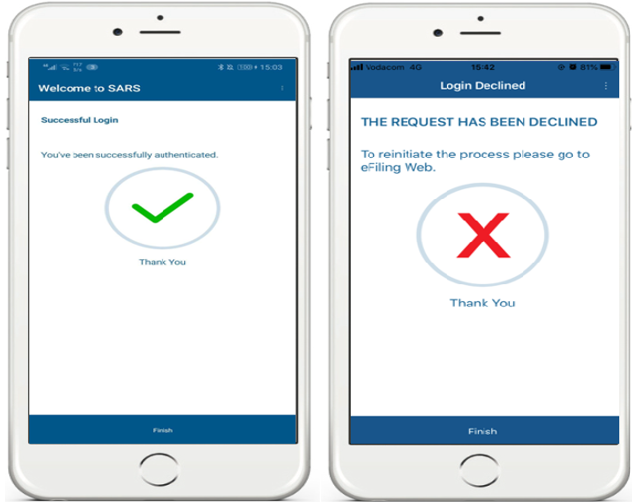
- To confirm your selection, tap on Finish.
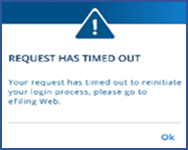
Where you have not responded to the request in time, the following pop-up screen will be displayed on your smart device.
- Take note of the message and tap on OK.
Forgot Username
If you have forgotten your username, tap on Forgot Username.
This will display the Forgot Username screen. Complete the required details as requested on your device. Once completed,
| 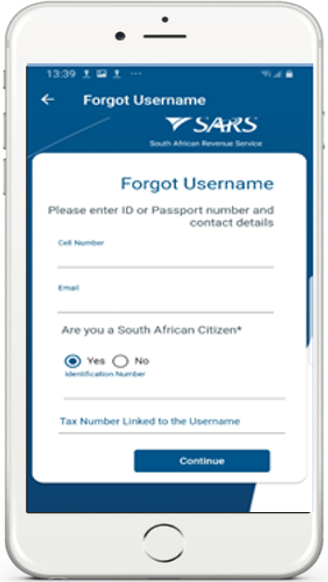 |
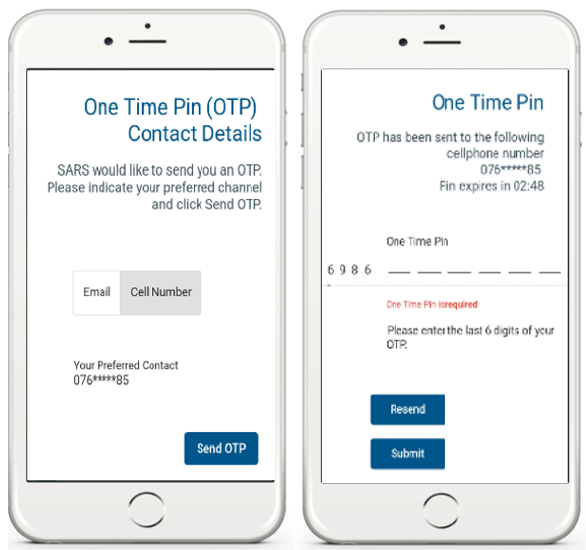
This will direct you to the OTP Contact Details screen. Select your preferred channel and tap on Send OTP. An OTP will be sent through to your selected channel.
Your device will prompt you to complete the OTP sent through. Complete the OTP as requested and tap on Submit. Note that the OTP expires after a set period. Tap on ‘Resend’ to resend the OTP, if the displayed time has expired.
Once completed, you will be presented with your username. Note the screen will prompt you to complete your new password. If you do not want to change your password, close the screen.
If you want to change your password, complete your new password on the fields stipulated before tapping on Submit.
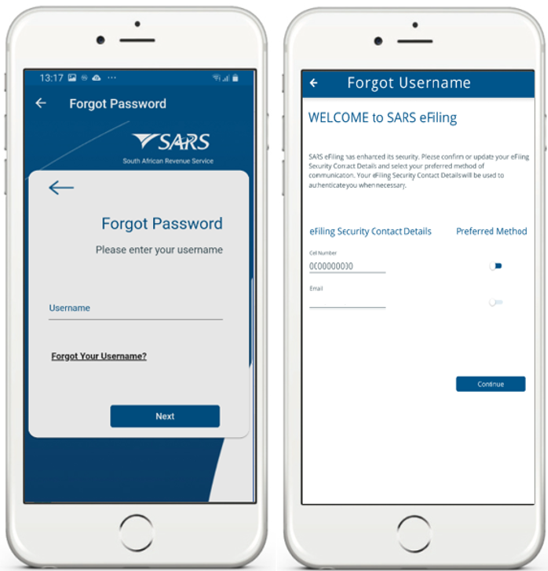
Forgot Password
If you have forgotten your password, tap on Forgot Password. This will display the Forgot Password screen.
This will direct you to the OTP Contact details screen.
|  | |
An OTP will be sent through to your selected channel. Your device will request you to complete the OTP sent though to your preferred channel.
|
| |
Once completed, you will be presented with a screen to complete your new password.
- Complete your new password on the fields stipulated before tapping on Submit.
Do note that where you have completed a password that does not meet the minimum prescribed password criteria strength, the following message will be displayed:
- Respond by completing the password with the minimum criteria prescribed.
- Once submitted, you will receive a message indicating that your password has been successfully changed. Tap on Ok.

For more details on how to reset your password, refer to the eFiling registration external guide, which is available on the SARS website or view the registration video on the SARS YouTube Channel.
Note and safe keep your password for future use. |
How to Request a Notice of Registration
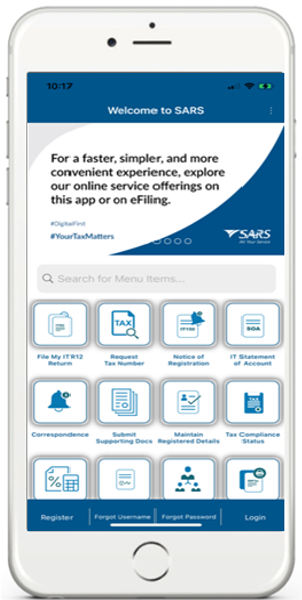
Once logged in on the MobiApp on the landing page, this will display the My Services screen.
- Tap on the Notice of Registration (IT150) option.
On the Notice of Registration, you will also be able to view your Tax Reference Number (TRN).
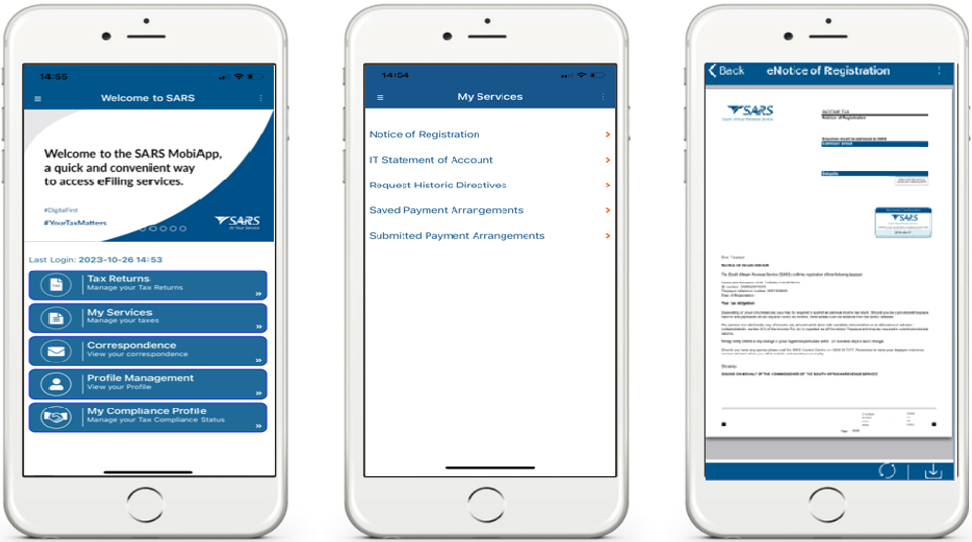
Below the Notice of Registration screen, the following icon is displayed.
To download the document onto your device. |
Definitions, acronyms and abbreviations
The definitions, acronyms and abbreviations can be accessed here – Glossary webpage.
Legal disclaimer: In the event of conflict or inconsistency between this webpage and the PDF version of the guide, the latter shall prevail.