
Summary
The Secure Web: HTTPS third-party data platform is one of the digital platforms that enables taxpayers and entities to submit third-party data to SARS. The submission of third-party data files by third-party entities forms part of the SARS third-party data reporting process. SARS third-party data systems receive and process information as per appropriate legislation, the government gazette, and external BRS documents aligned to international best tax practices.
This webpage describes the process to submit third-party data files to SARS via the Secure Web: HTTPS channel. This includes the various steps required for submission such as the data preparation, enablement of eFiling users, submission of the data/file and finally the declaration of the data file submitted to SARS.
Introduction
The HTTPS third-party data platform is one of the digital platforms that enables taxpayers and entities to submit 3rd party data to SARS. The use of this digital platform forms part of SARS modernisation process to simplify the tax process aligning them with best international practices. The 3rd party data digital channels are:
- Direct Data Flow (by using the Connect: Direct technology)
- Direct Data Flow (by using the Secure Web: HTTPS)
- eFiling – electronic capturing of limited volume submissions
Direct Data Flow (Secure Web: HTTPS) is another channel which can be used to submit a maximum of 50k lines or 10MB volumes of data. This channel reduces the overall administrative burden of large volume data transfer, shorten data processing cycle times, and provide for faster feedback. Taxpayers who want to use the Direct Data Flow channel must have eFiling profiles to enrol for this channel and activate it on eFiling.
Taxpayers choosing to use the Direct Data Flow channel (by using the Secure Web: HTTPS) should be in possession of a certificate to ensure secure file submission. Taxpayers will also be required to declare the accuracy of the data submitted to SARS by authorising the data submission.
Taxpayers will only be able to submit the following listed data types.
- IT3 (b), (c), (d), (e), (s) and (t),
- INS, MED,
- TRN (Tax Reference Number Request),
- Foreign Tax Information (FTI) and CRS.
Third-Party Data File Submission Process
Third-Party data submission process pertains to the following operational segments; registration, activation, enrolment, submission, and the declaration of submitted data. Registration, activation, and enrolment are vital for the use of eFiling, however once successfully completed, submission and declaration are the two operational segments that should be followed during the required periodic third-party data submissions.
Important to note: To reset the password for Secure Web: https, kindly send your query to the following email address: [email protected]. |
Secure Web: HTTPS third-party data file submission process
The third-party data submission process using the Secure Web: HTTPS channel pertains to the following phases, as described in the figure below.
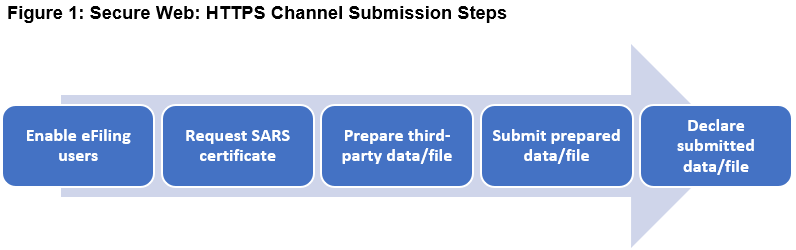
- Enable eFiling users.
- Enrol the organisation and eFiling users for third-party data submission on SARS eFiling.
- For more information on eFiling registration, activation, and enrolment, refer to the following guide.
- GEN-ENR-01-10 – Manage Submission of Third-Party Data – External Guide
- Request SARS certificate
- Request the SARS certificate on eFiling
- Prepare third-party data file.
- Prepare a data file as per specified BRS.
- Submit prepared third-party data file.
- Submit the prepared data file on SARS Production environment using the Secure Web: HTTPS platform.
- Declare submitted third-party data file.
- Declare your submitted third-party data file by submitting the specified declaration return via eFiling to SARS.
Enable eFiling Third-Party Users
- To ensure that data is received and processed by SARS, third-party data submitting entities are required to validate the activation of the third-party data type on eFiling. Additionally, entities are to review the submitted data on the pre-populated return and once reviewed and in agreement with the summary data, they are to declare by submitting the return to SARS via eFiling.
- This section will describe the eFiling users that are required for the necessary administration and submission of third-party data to SARS.
- This section is also detailed on the following external guide:
- GEN-ENR-01-10 – Manage Submission of Third-Party Data – External Guide
eFiling Users required for the submission of third-party data
Non-eFilers wishing to use the Secure Web: https channel should register for eFiling at www.sars.gov.za and follow the guidelines as provided on the page.
To manage third-party data submission, the taxpayer must have the following three types of users allocated in the enrolment and submission of third-party data to SARS:
- Business Administrator – This user is the same as the current eFiling full administrator. The role of this user is to enrol the legal entity/organisation that will be submitting data to SARS and the Technical Administrator. The taxpayer is not required to allocate new eFiling administrators for the purposes of third-party data submissions if one already exists.
- Technical Administrator – The role of this user is to request the security certificate and to enrol technical users. If the taxpayer decides to change the Technical Administrator, a new Technical Administrator must be added before the existing one can be removed. There must always be at least one Technical Administrator for each enrolled organisation.
- Technical User – The role of this user is to submit the data files to SARS via the Direct Data Flow channel. An organisation can have multiple Technical Administrators and Technical Users to allocate work according to the organisation’s requirements. The Technical User must be a different person from the Technical Administrator.
Third-Party data user roles on eFiling
To access the third-party data platform on eFiling, proceed as follows:
- Login on eFiling
- Once logged into eFiling, on your Organisation’s work page, click on Services in the top menu bar.
- From the side menu options, select Enrol 3rd Party Data.

Under the Enrol 3rd Party Data option the following sub-menus are available:
- Do note the menu options and which user role can access the service.
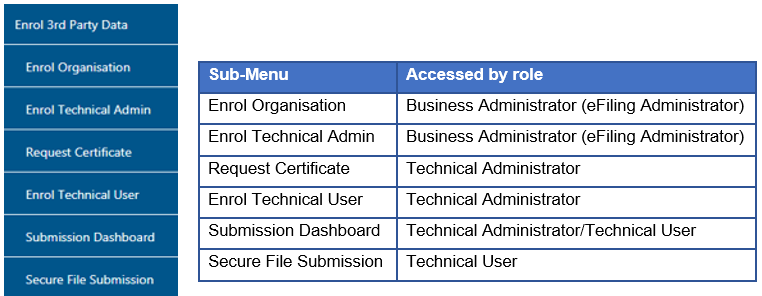
- Also note that the Technical User is responsible for submitting the third-party data file via the Connect: Direct channel to SARS.
Verifications for a Successful Third-Party Data Submission
eFiling has prerequisites for a successful third-party data submission. This section details these and describes how the user can navigate on eFiling to make these verifications.
Where the user has verified that these has not been done for their organisation, kindly refer to the following external guide:
- GEN-ENR-01-10 – Manage Submission of Third-Party Data – External Guide
However, where the user is continuously experiencing problems, kindly notify SARS via the following email address: [email protected]
The Business Administrator has been enrolled
The Business Administrator is the Registered Representative of the organisation.
To activate a Registered Representative, proceed as follows:
- Select Organisation on the main menu.
- Select SARS Registered Details
- Select Activate Registered Representative
The Activate Registered Representative page will be displayed.
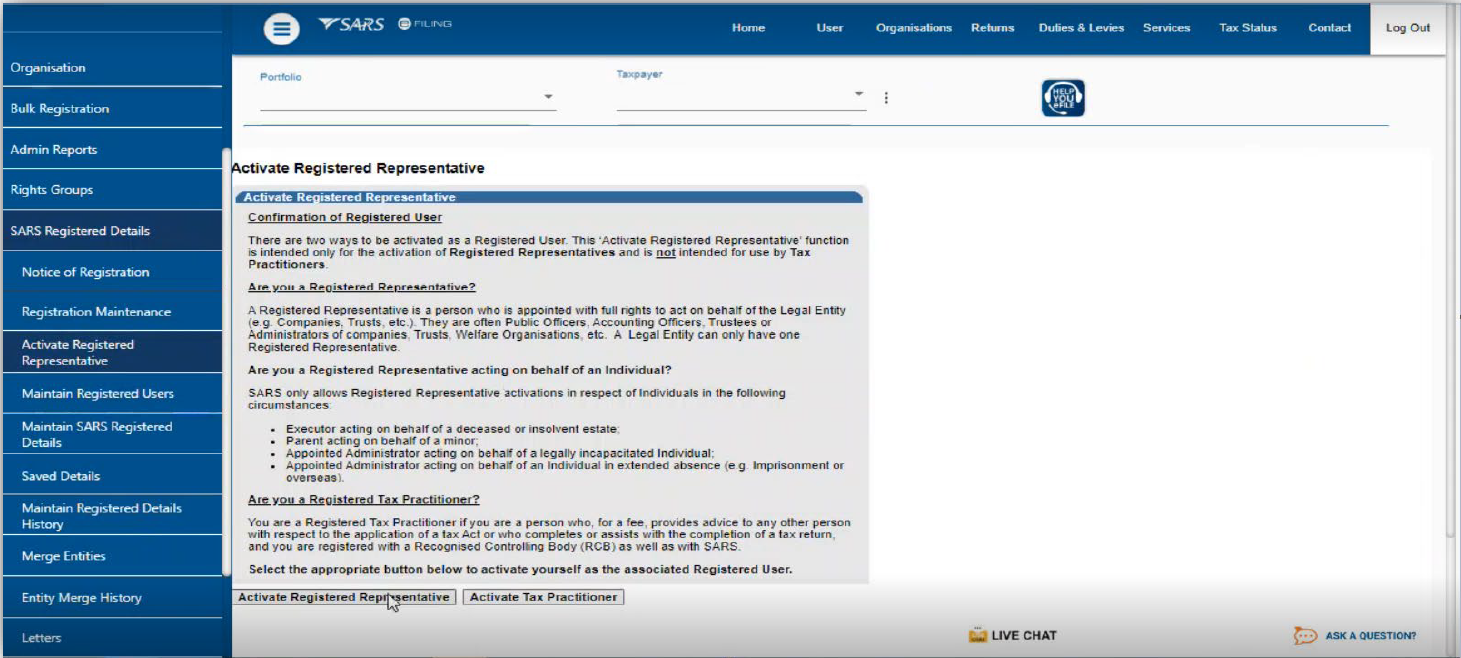
- Click on Activate Registered Representative
The Registered Representative page will be displayed.
- Click on Open to view more details of the registered representative.
Where the organisation has not activated the registered representative, kindly refer to the following guide.
- GEN-ENR-01-10 – Manage Submission of Third-Party Data – External Guide
The organisation has been enrolled for the submission of third-party data via Secure Web: HTTPS
To submit the data file, the third-party entity (organisation) should be enrolled to submit third-party data via the Secure Web: HTTPS.
To validate whether this has been done, proceed as follows:
- Select Services
- Select Enrol 3rd Party Data
- Select Enrol Organisation
The following screen should be displayed.
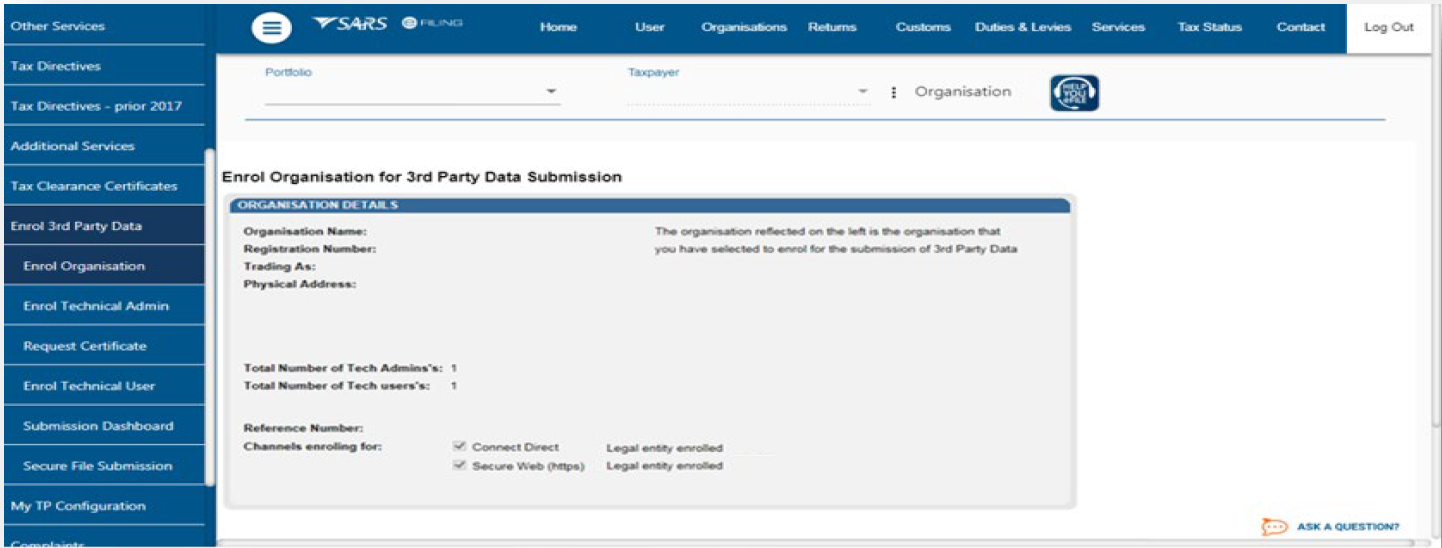
Note that the enrolled channel will be checked. Additionally, where the organization has been successfully enrolled, the status will read as Legal Entity Enrolled.
Where the status reads as Legal Enrolment Requested. This implies that SARS is still validating the enrolment.
| Do note that the organisation can only enrol a Technical Administrator if their status reads Legal Entity Enrolled. |
Where the organisation has not been enrolled successfully (Secure Web: HTTPS channel is not checked on the Enrol Organisation for 3rd Party Data Submission page), enrol the organisation as per external guide:
- GEN-ENR-01-10 – Manage Submission of Third-Party Data – External Guide
The Technical Administrator has been enrolled
The Business Administrator is responsible for enrolling the Technical Administrator.
To validate whether the Technical Administrators have been enrolled successfully, proceed as follows:
- Select Services from the top menu option.
- Select Enrol 3rd Party Data, from the left menu option.
- Select Enrol Technical Admin
The screen below will be displayed. The Enrol Technical Administrator for 3rd Party Data Submission page will display all the Technical Administrators. Additionally, the associated status of the Technical Administrators regarding their enrolment and activation will be displayed.
- Take note of the status of the applicable Technical Administrator. The status should read as “Link Enrolled”.
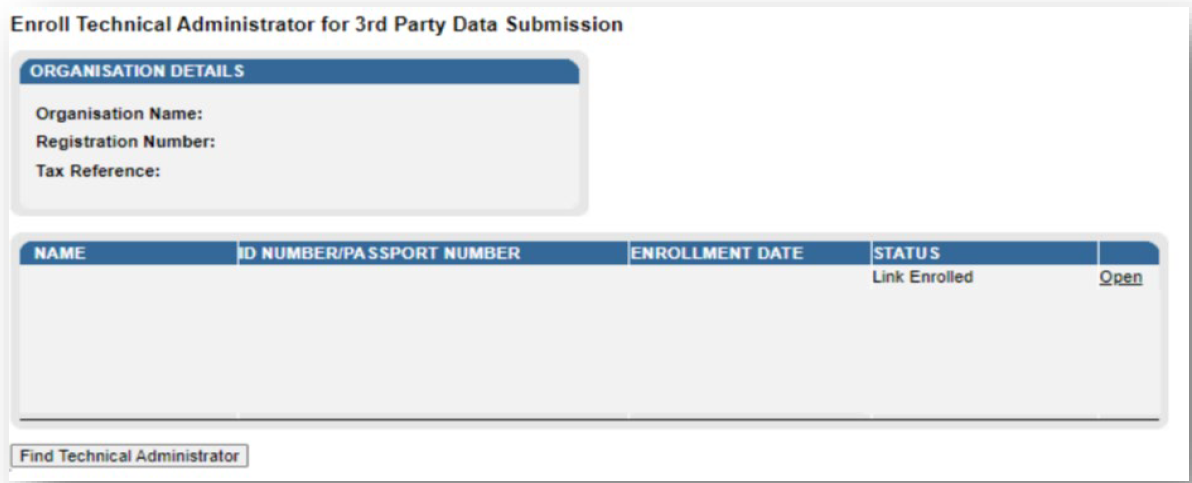
Where the Technical Administrator has not been enrolled or does not appear on the page, refer to the following guide to invite and enrol the Technical Administrator.
- GEN-ENR-01-10 – Manage Submission of Third-Party Data – External Guide
The tax type for submission has been activated
The Business Administrator is responsible for activating the tax type for submission.
To validate whether the tax type has been activated, proceed as follows:
- Login to your profile
- On the left menu
- Select Organisation
- Select Tax Types
- Select Manage Tax Type
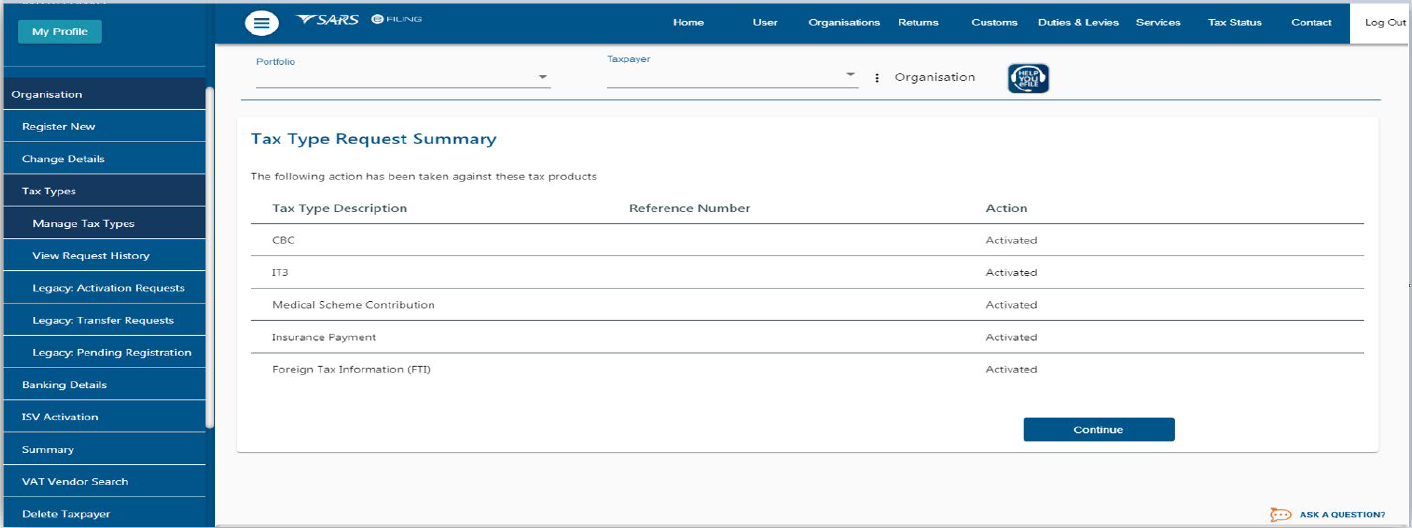
Do note that the screen will display all the activated tax types. Where the desired tax type under for submission is not displayed or under Action is not Activated, proceed to activate the tax type, by referring to the following external guide:
- GEN-ENR-01-10 – Manage Submission of Third-Party Data – External Guide
The Technical User has been enrolled
The Technical Administrator is responsible for enrolling the Technical User
To view all the enrolled Technical Users, proceed as follows:
- Select Services from the top menu option.
- Select Enrol 3rd Party Data, from the left menu option.
- Select Enrol Technical User
The Enroll Technical User screen will be displayed
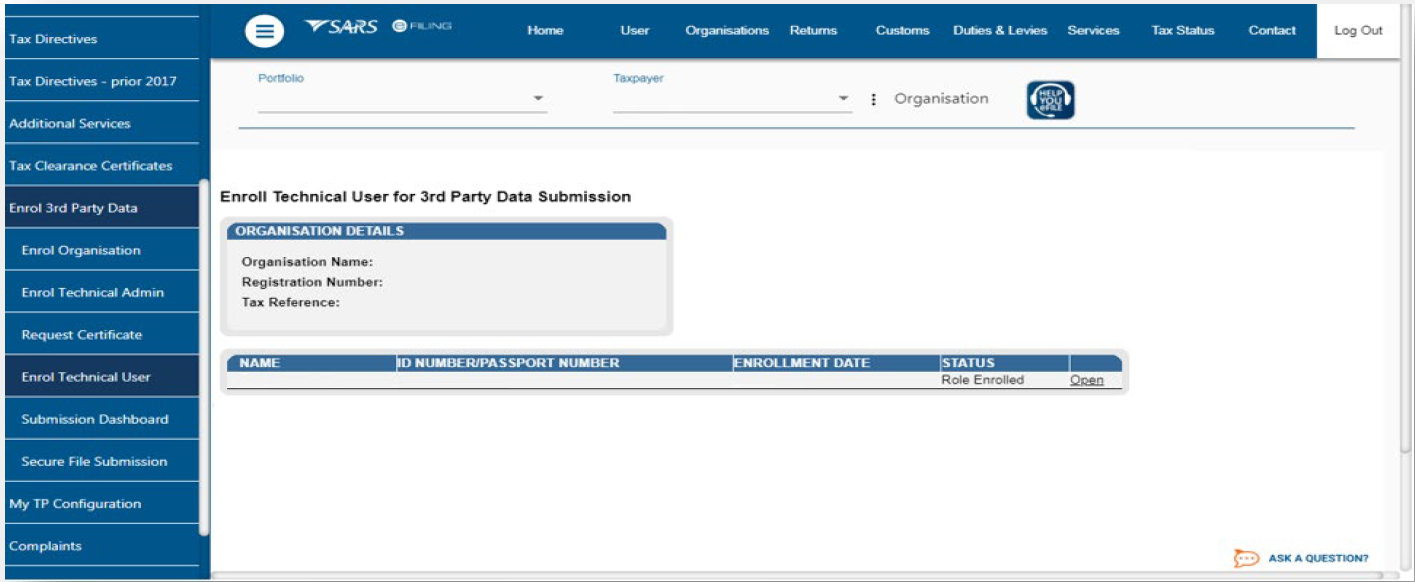
All the Technical Users with the associated status with regard to their enrolment and activation will be displayed on the screen.
- On the STATUS column, the status Role Enrolled should be displayed. Where the status is displaying Role Enrolment Requested, this suggests that SARS is processing the enrolment.
To view the details of a Technical User,
- Click Open next to the relevant user.
Where the Technical User does not appear, or has not been enrolled, proceed to enrol him/her referring to the following guide:
- GEN-ENR-01-10 – Manage Submission of Third-Party Data – External Guide
Request a SARS Security Certificate
It is important to note that before a successful submission, third-party data entities should request a security certificate from SARS. The security certificate is only valid for 12 months from the date it was issued.
How to request a SARS security certificate
The Technical Administrator requests SARS security on behalf of the entity. Additionally, the Technical Administrator should have been enrolled successfully to request the security certificate from SARS. This security certificate is required for the submission of data via the Connect: Direct channel.
To request the security certificate from SARS, the Technical Administrator should proceed as follows:
- Login to eFiling
- Select Services on the main menu.
- On the left menu option
- Select Enrol 3rd Party Data
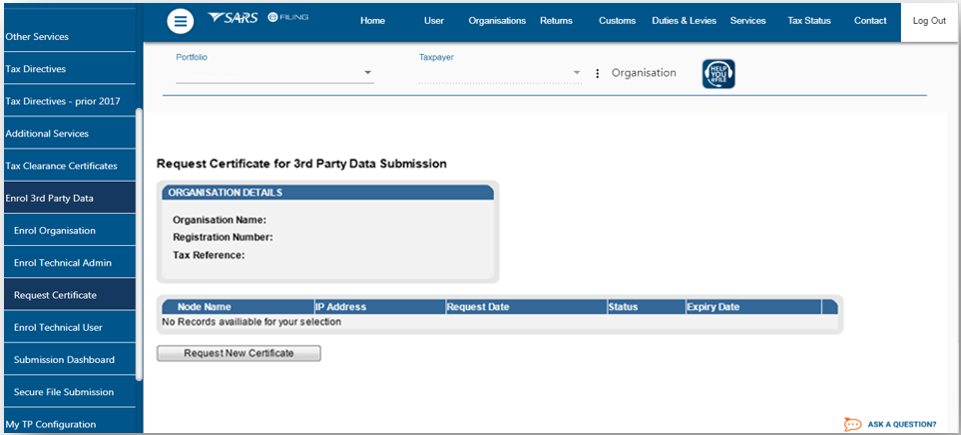
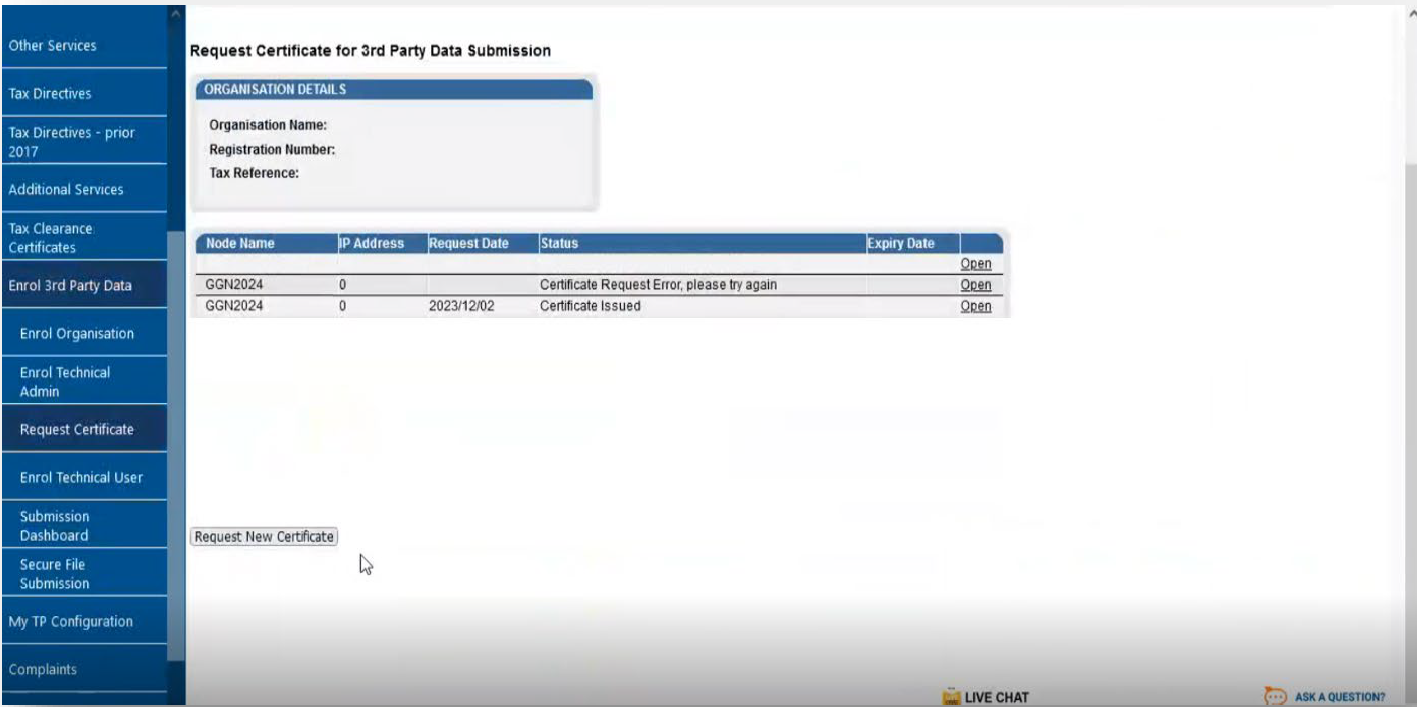
- Select Request Certificate,
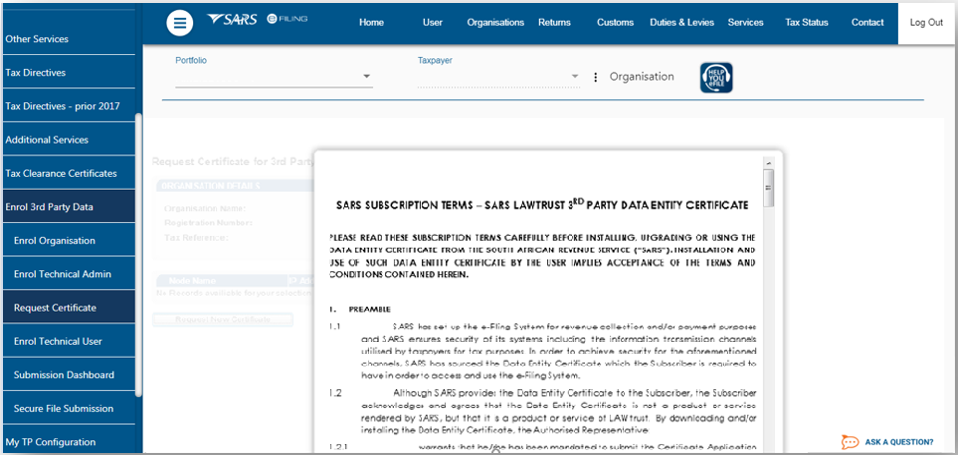
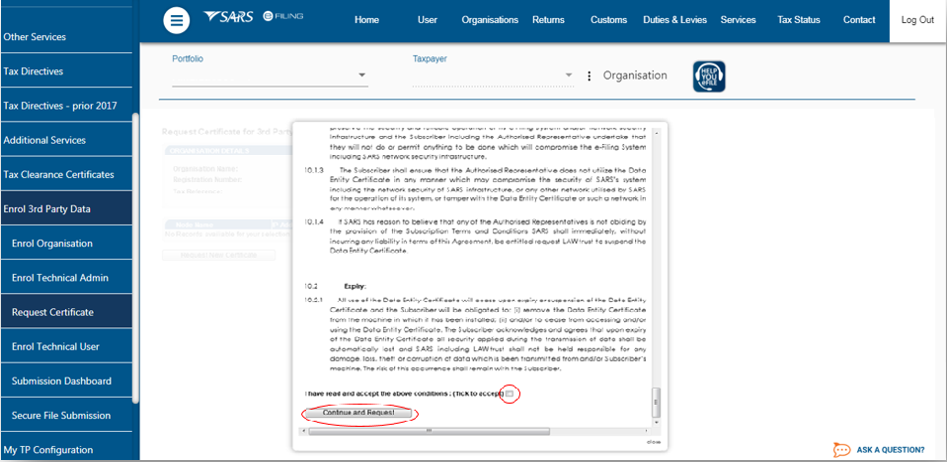
The Request Certificate screen will list all certificates that were issued for that taxpayer. Initially this list will be empty. Click Request New Certificate to start a new certificate request process.
You will be requested to accept the Terms and Conditions (T&C) that govern the use of this service by ticking the box next to I have read and accept the above conditions. Once the terms and conditions have been accepted, click Continue and Request. Please note that unless the terms and conditions are accepted, you will not be able to proceed to the next step.
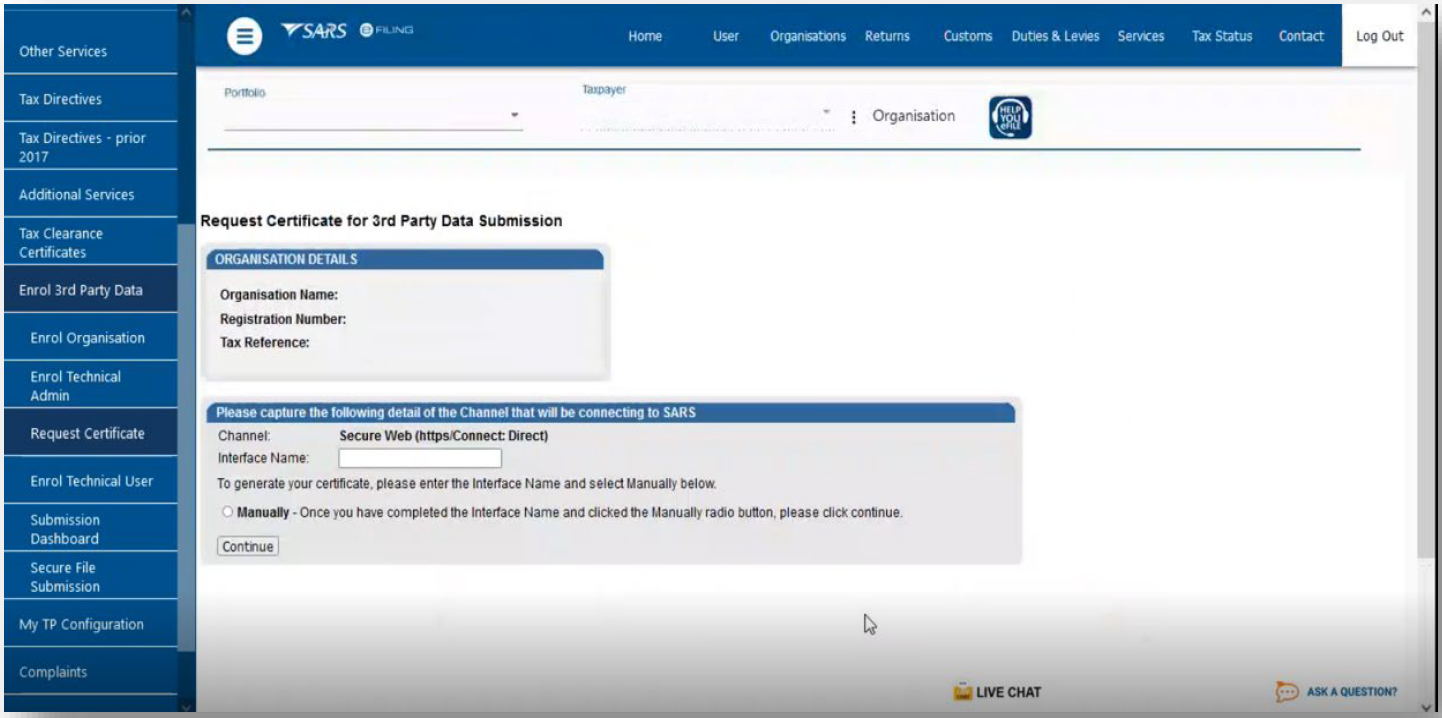
- Capture the Interface Name
- Do note the Interface Name for future reference.
- Select Manually
- Click on Continue
The following screen will be displayed.
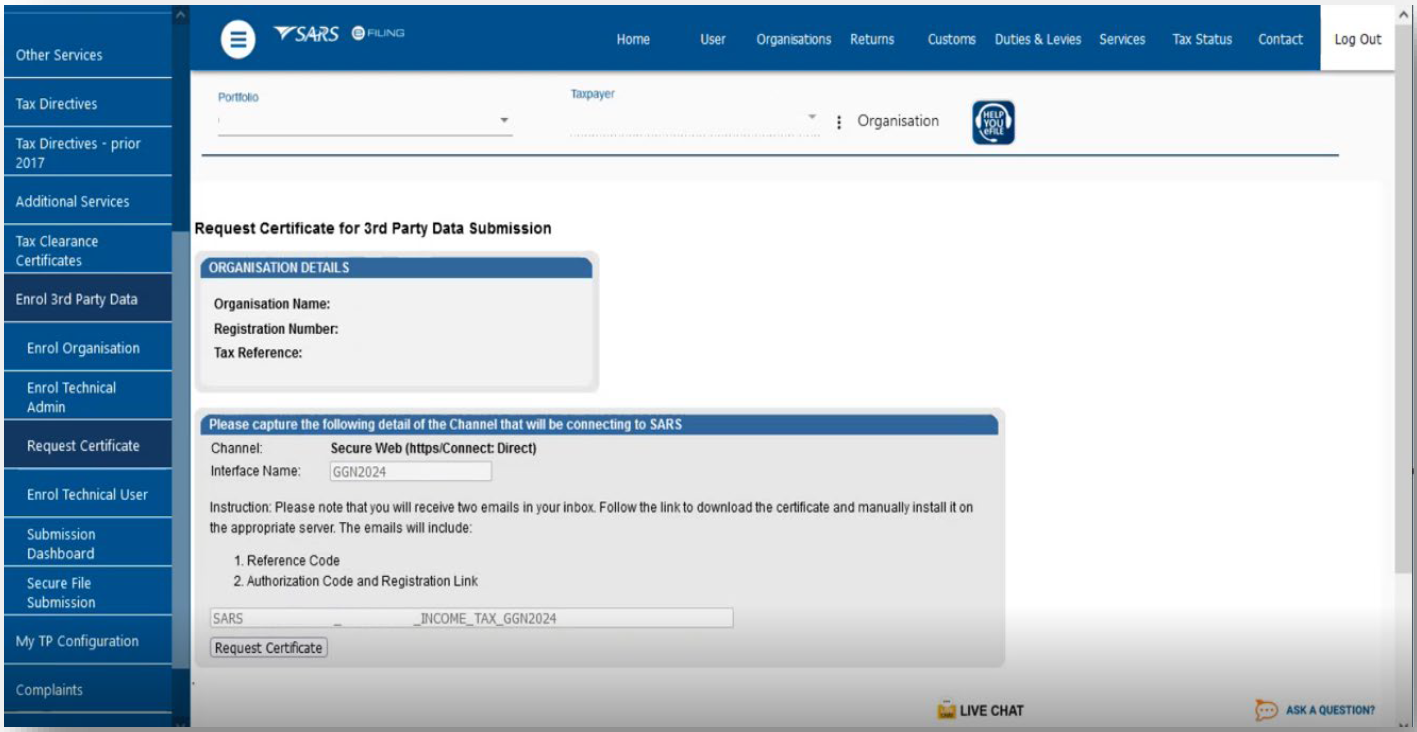
Do note the message displayed on the page.
- The user will receive two emails from SARS. The emails will contain the following:
- Reference Code
- Authorization Code and Registration Link
- Click on Request Certificate
The following pop-up screen will be displayed.

Take note of the message and click on Ok.
Do note that if there is an error in your request, the following message will be displayed.
![]()
To resolve, please try again.
Where the certificate was issued successfully, the following screen will be displayed.
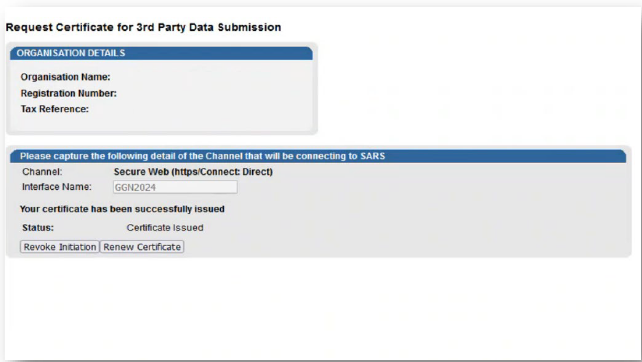
Note the two buttons:
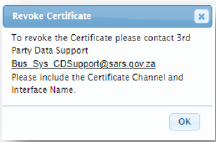
- Revoke Certificate – You have the option to revoke a security certificate. If Revoke Initiation button is clicked, a pop-up message will be displayed informing you to contact the Third-Party Data Support team. There will also be a hyperlink to kick off the email sending ([email protected]) process on the pop-up.
- Renew Certificate – Security certificates are only valid for 12 months from date of issue. The Renew Certificate button will only be available 30 days prior to the expiry date.
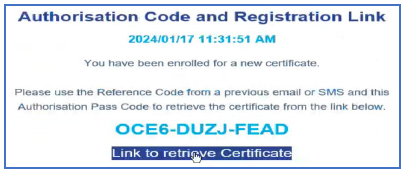
- Proceed to your email to access the Authorisation code and Registration link.
The emails sent through by SARS will be displayed as follows:
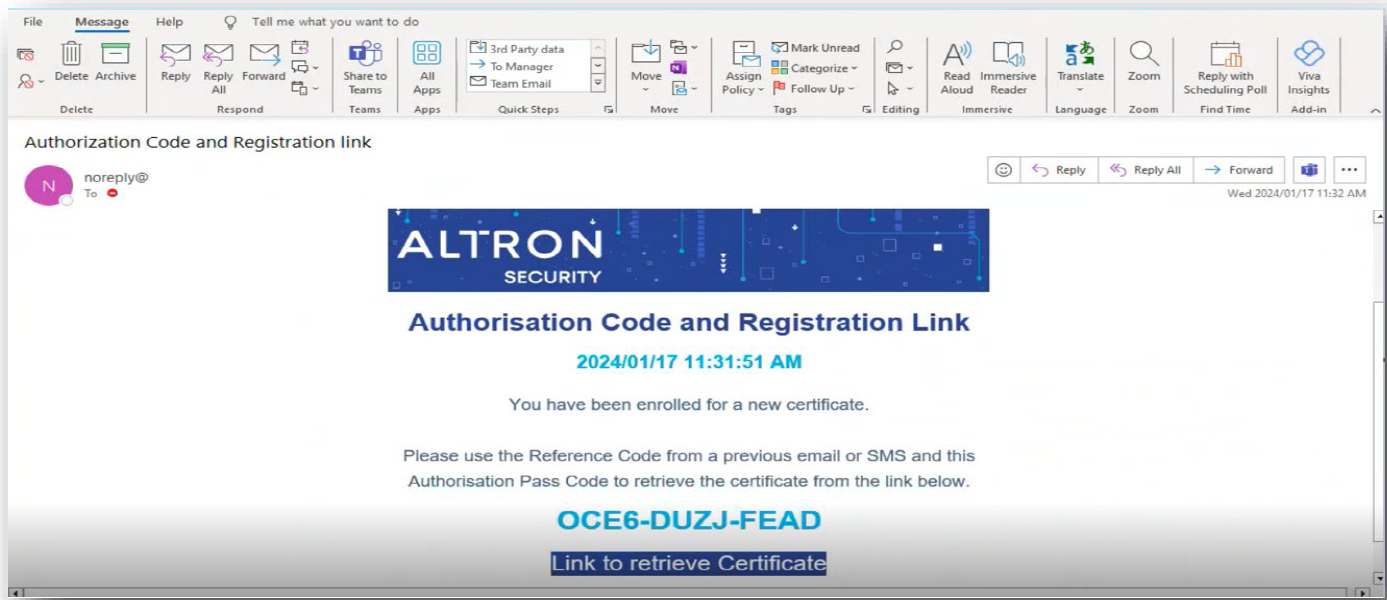
Do note the Authorisation Code and the Certificate Link on the email.

Do note the Reference Code on the email.
Proceed to retrieve the certificate as follows:
- Click on Link to retrieve Certificate from the email sent by SARS.
- The SARS Third Party Data page will be displayed.
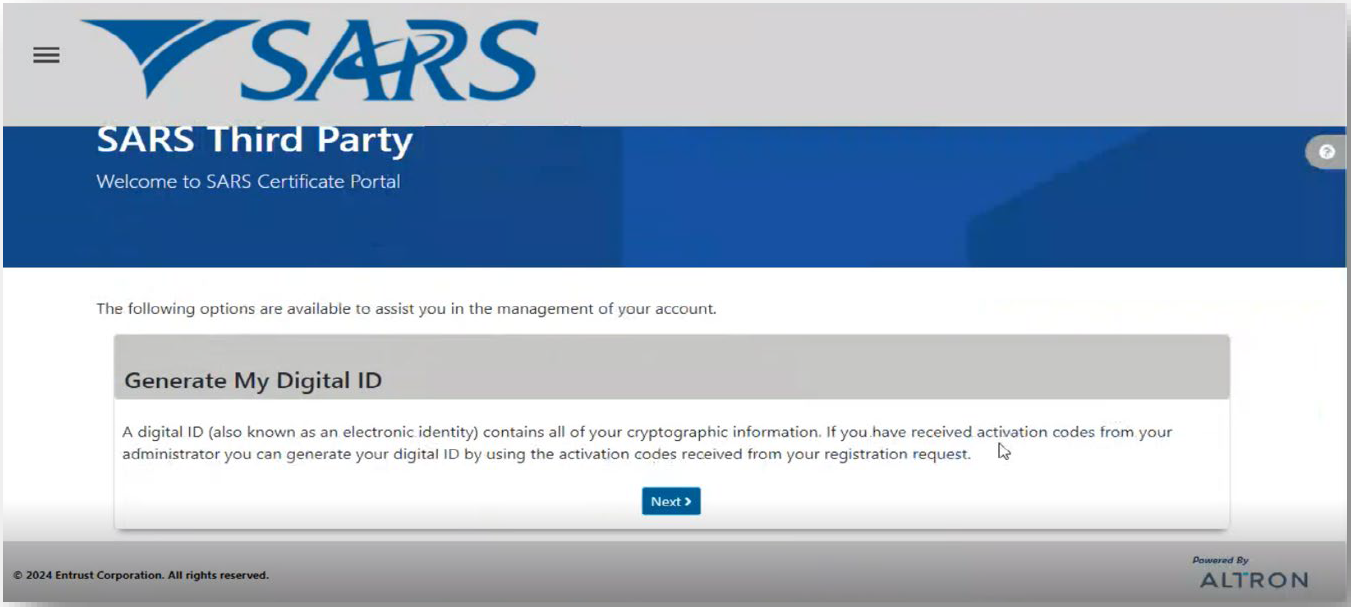
- Click on Next
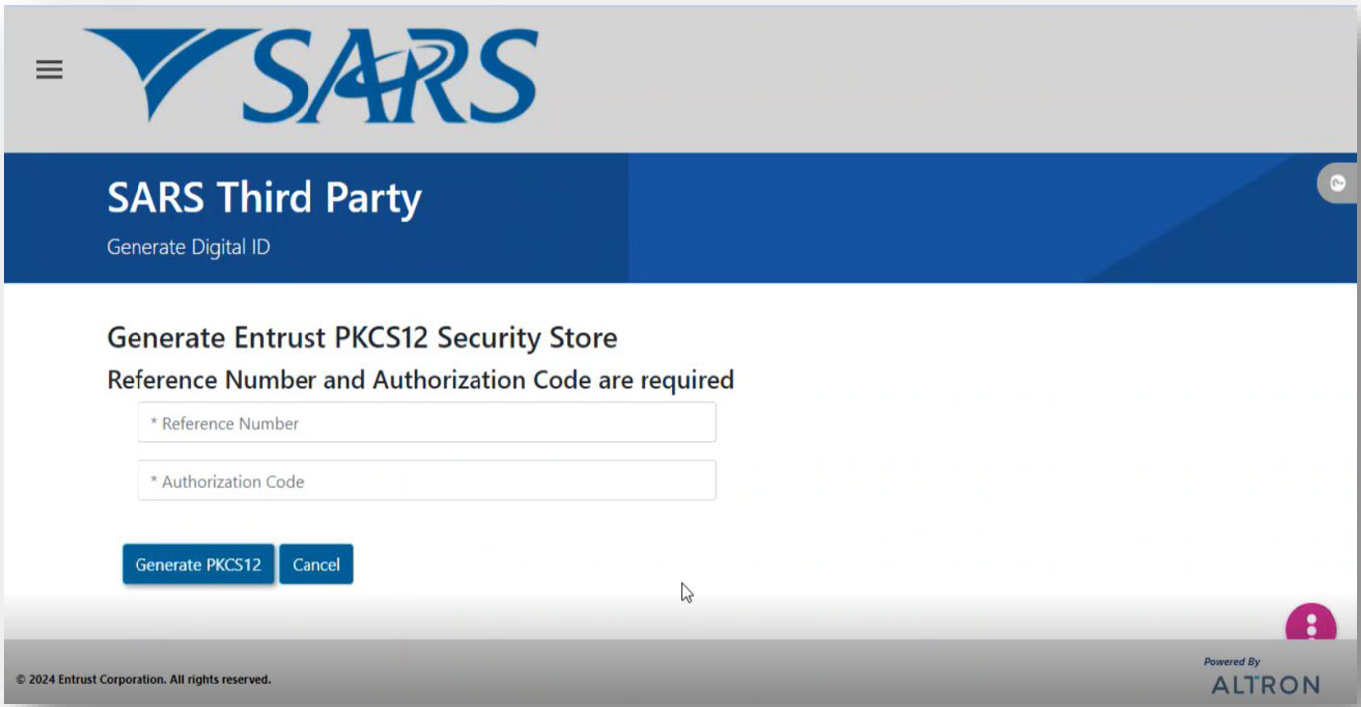
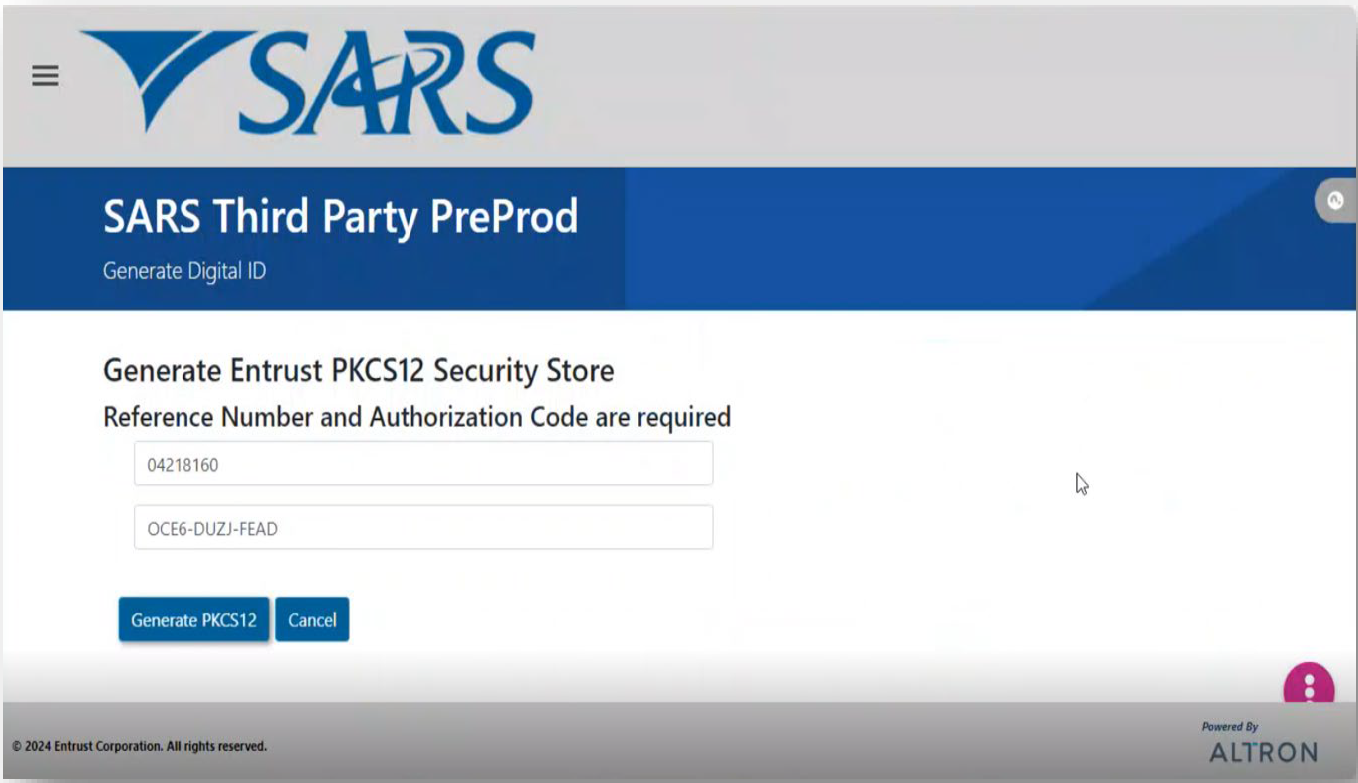
- Complete the Reference Number and Authorization Code sent through via email.
- Click on Generate PKC12
- Once completed the following screen will be displayed.
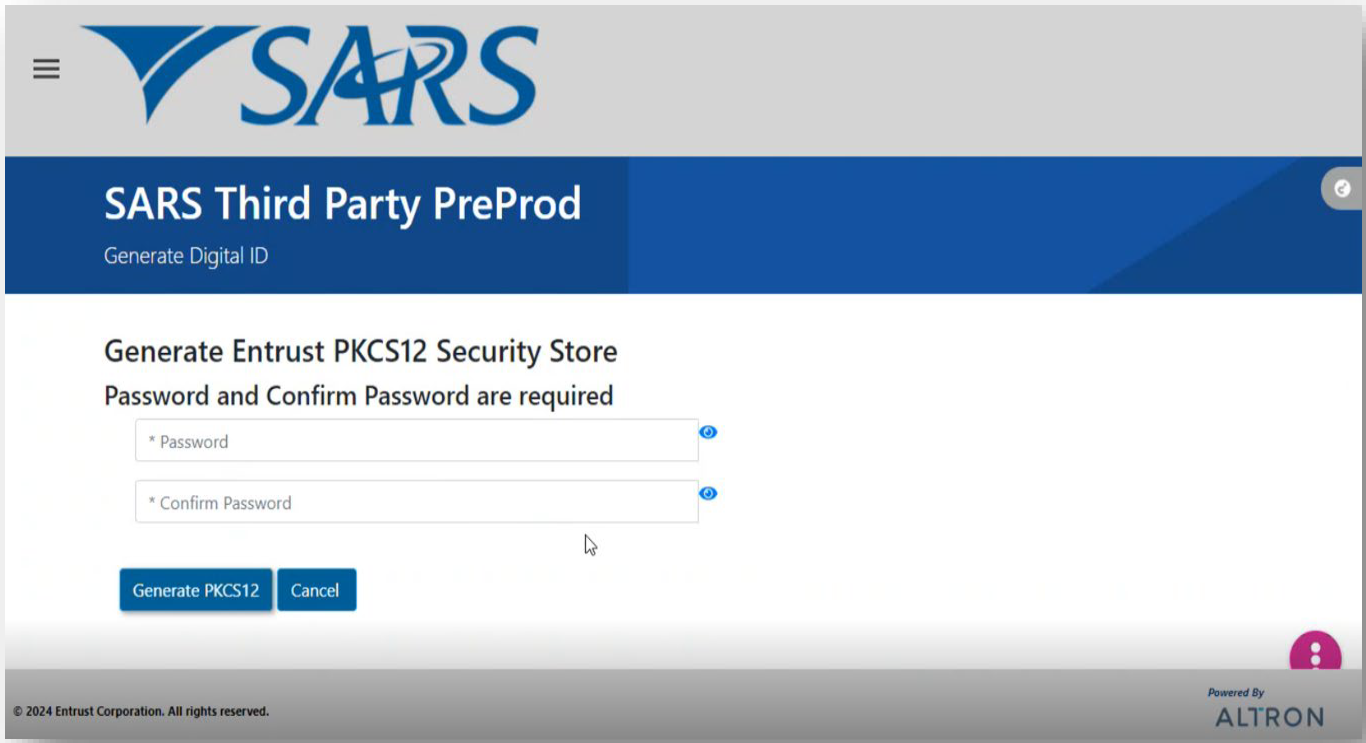
- Complete the Password as requested.
- Once completed, click on Generate PKC12
The following screen will be displayed.
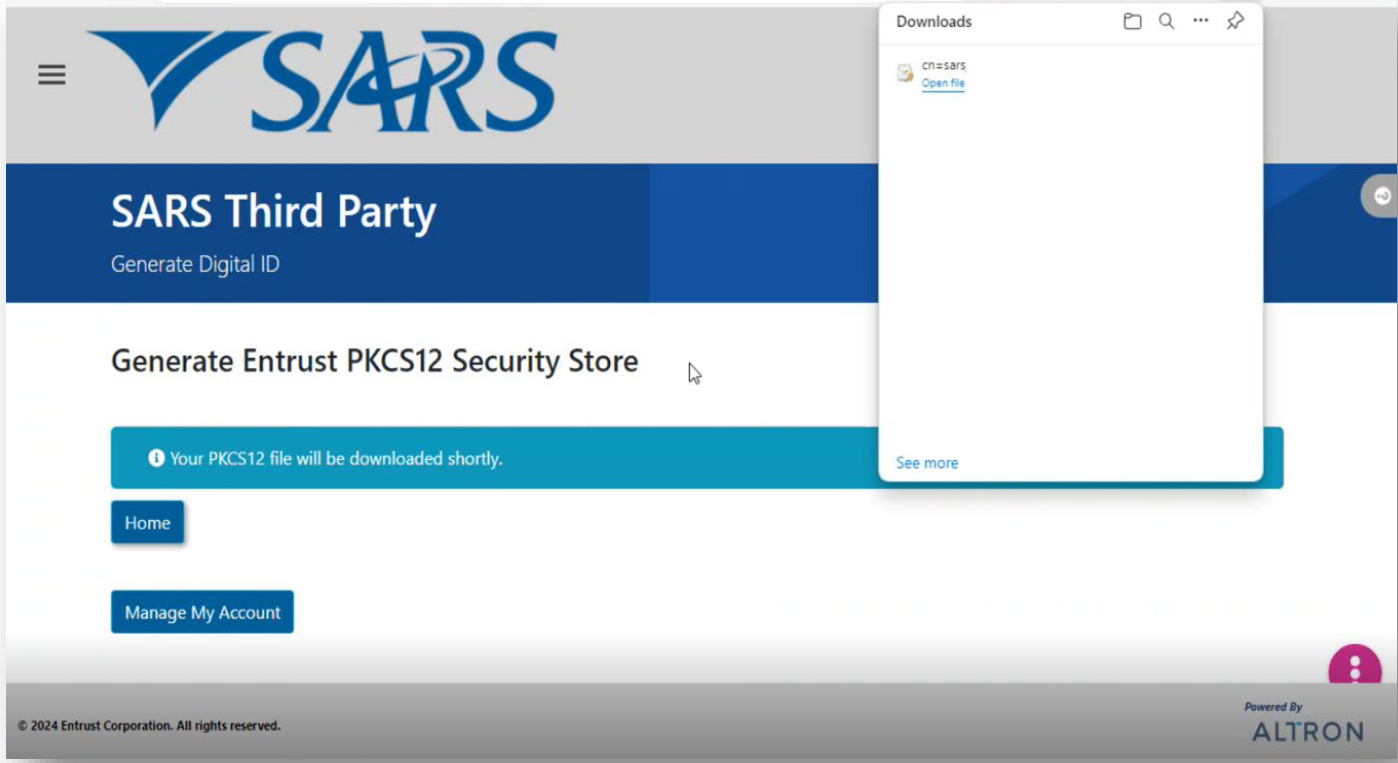
Download the file according to your PC settings.
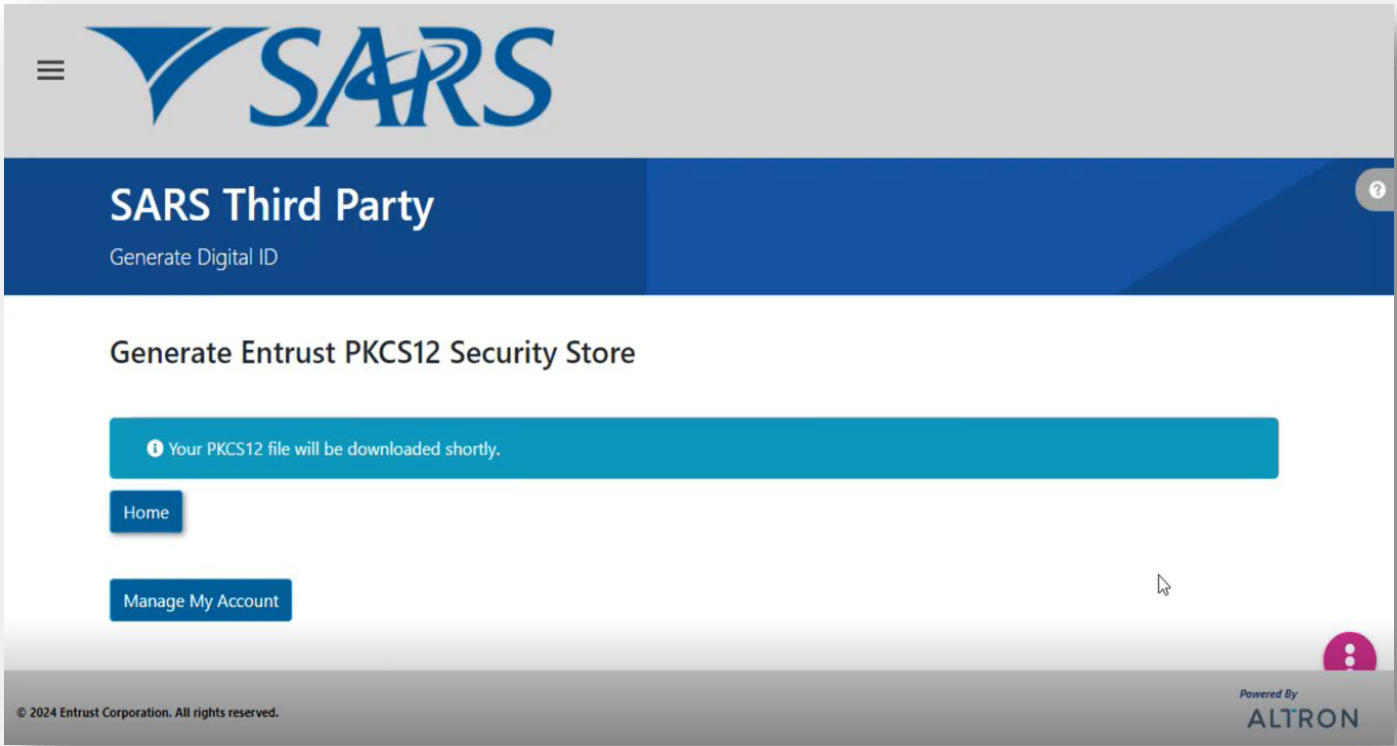
On eFiling the status will display as Certificate Issued.
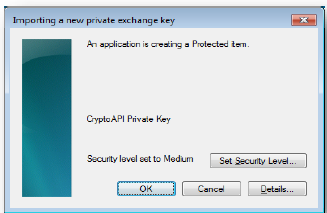
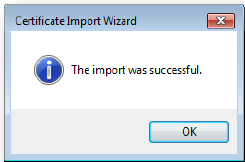
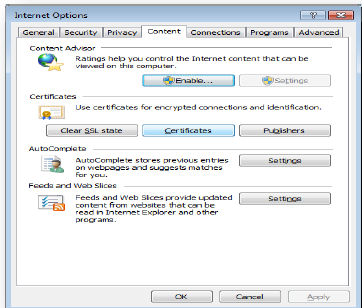
How to import a SARS security certificate
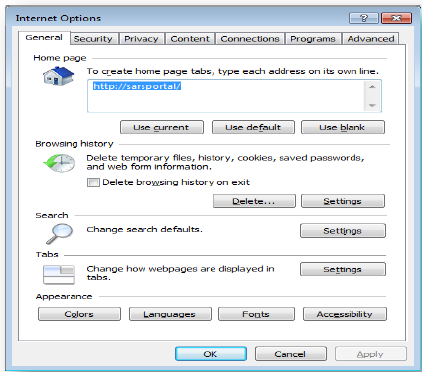
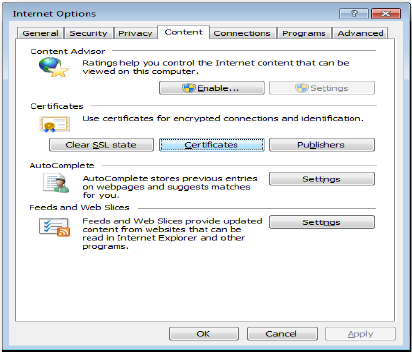
To access Internet Options, on the Windows Search bar, type Internet options and the screen below will be displayed.
- Click on Content
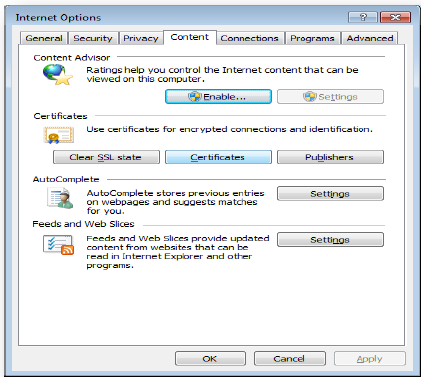
- Click Certificates
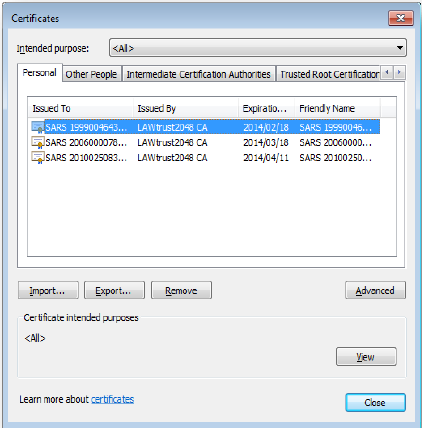
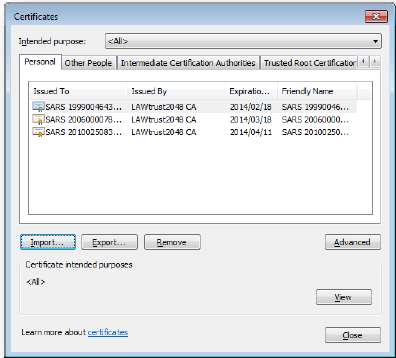
- Select the Certificate and click Import
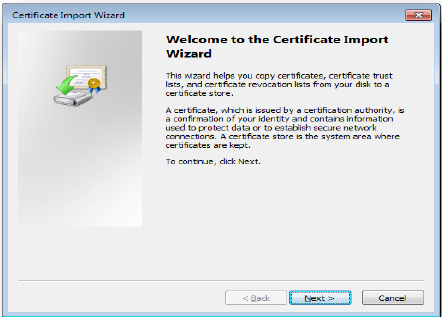
- Click Next.
- Click Browse and search for the path where the certificate is saved.
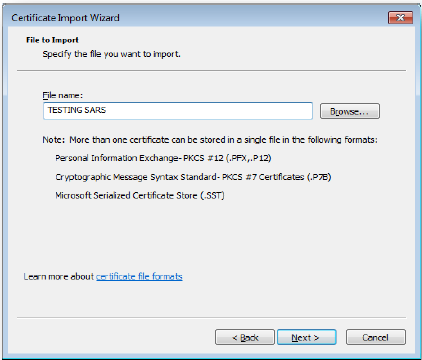
- Click Next.
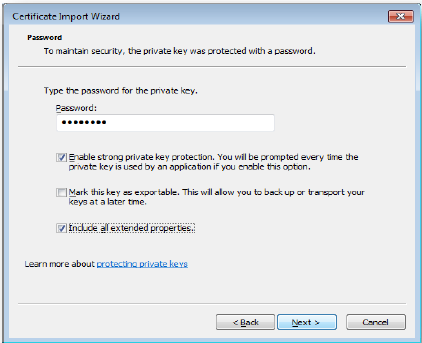
- Enter a password and click Next.
- Select Automatically select the certificate store based on type of certificate.
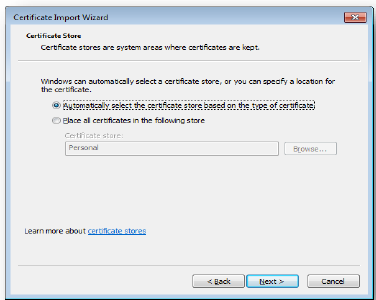
- Click Next.
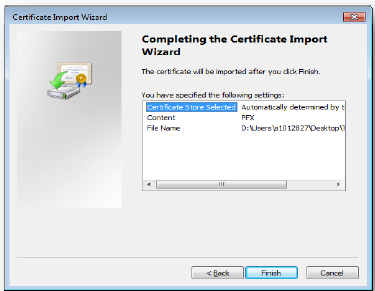
- Click finish.
- Select the import file and click on Import
- Click OK
How to export a SARS security certificate
To access Internet Options, on the Windows Search bar, type Internet options and the screen below will be displayed.
- Select Content
- Select Certificate
- Select the Certificate you want to export.
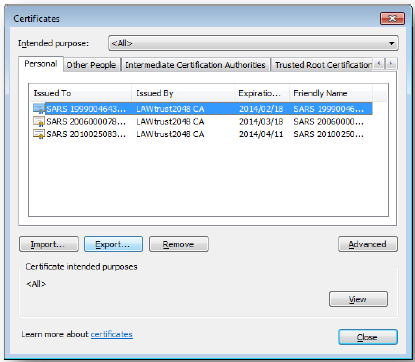
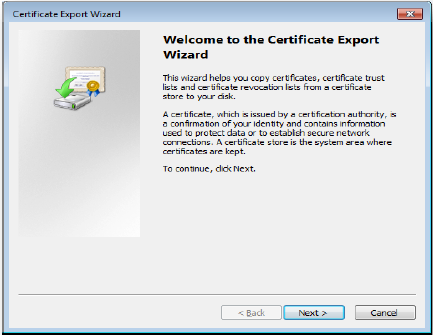
- After you selected the certificate, click Export and then Next.
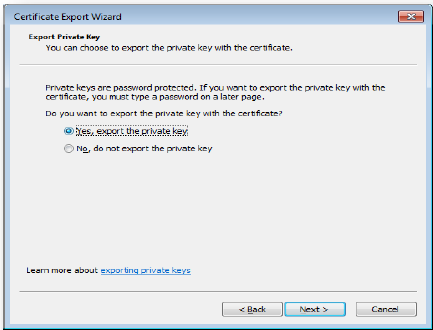
- Click Yes, export the private key and then Next
- Select Personal Information Exchange and click Next
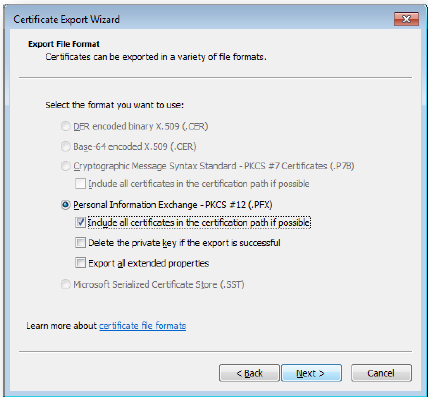
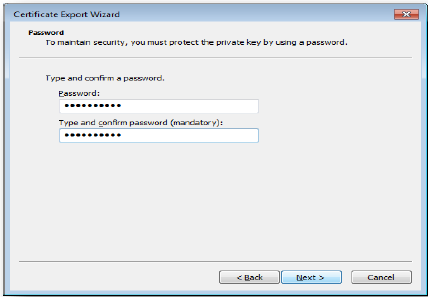
- Select a password for the private key.
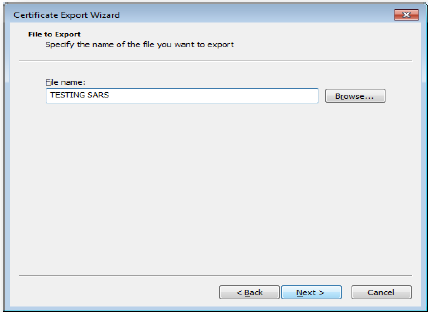
- Enter a file name and click on Next.
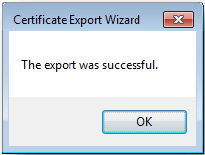
- Click Finish
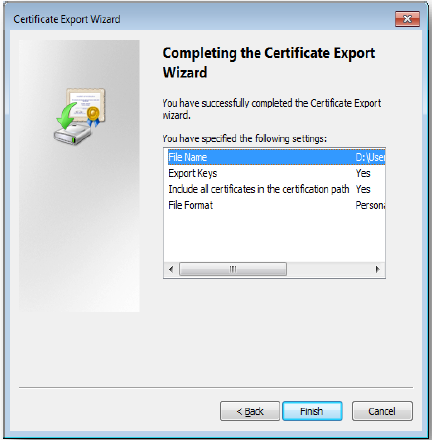
The export was successful.
Prepare Third-Party Data File for Submission
The electronic data file submissions should be structured and uploaded as described on the file specifications detailed in the SARS External Business Requirements Specification (BRS). The SARS External BRS is available on the Third-Party Data Annual Submission Page on the SARS website, www.sars.gov.za. This page details all the external BRS as per data type. Additionally, some submissions on the webpage list the period in which the data type is on the “Trade Testing Go Live” platform and when it is on the “Production Submission Period”.
- Note that when the data type is on Trade Testing this implies that during this period, third-party entities may test the submission process, by submitting test files to SARS. This process will allow entities to query SARS on the submission process thus increasing ease in the use of the SARS platform in submitting data files. Additionally, this is an opportunity for users/entities to test and finalise their completed files on the SARS third-party data platform.
- SARS will notify third-party entities when to engage during this process.
- When the data type is on the Production Submission period it implies that third-party entities should submit their completed data files. Do note that for some data types, submission is annual whilst for others it is bi-annual.
- When possible, ensure that the data file to be submitted has been tested during the pre-prod process of the data type. The dates for these are also available on the SARS website.
When preparing the third-party data file, do note the following:
- Submit the data file as per relevant SARS External BRS.
- The fields and records required by SARS for the completion of the data file, are as per appropriate legislation, Government Gazette, thus kindly ensure that all the data required such as the tax reference number is completed.
- Where third-party entities do not have the tax reference number of clients, kindly request for bulk tax reference number via the following email address: [email protected]. On the subject line note to SARS that you are requesting bulk tax reference numbers.
Lastly when applying changes and resubmitting your third-party data file, do note that, data will be prepopulated in instances where the data file was submitted and declared. Additionally, once the data file is submitted again, the system usually takes 24-48 hours to reflect the updated /changes made on the data.
Submit Third-Party Data File
- SARS encourages entities to submit their third-party data as soon as they are ready. Additionally, SARS places great emphasis on receiving complete, correct and quality data submissions the first time around. If an amendment is required regarding a submission, please alert SARS as soon as possible and make the necessary corrections timeously.
- SARS also encourages entities to test their completed prepared files in the test environment. This will give the entities an opportunity to engage with SARS and receive feedback regarding file preparations. Once the data files have been prepared and completed as per the SARS External BRS, kindly submit the file to SARS via the Secure Web: HTTPS platform. The data file should be submitted during the specified periods as per applicable Gazette.
- Lastly, do note that the Technical User should submit the data on behalf of the entity. Additionally, when having challenges during this period, engage with the SARS Third-Party data support team via the following email address. [email protected].
How to Submit Third-Party Data Files to SARS
To access the Secure File Submission, Click on Services on the top menu, and then click Enrol 3rd Party Data on side menu.
- Select Secure File Submission from the side menu.
Note that port 60600 (Login page) and 60666 (password resend) should be enabled on the network. The entities’ IT department should be able to assist with opening the ports.
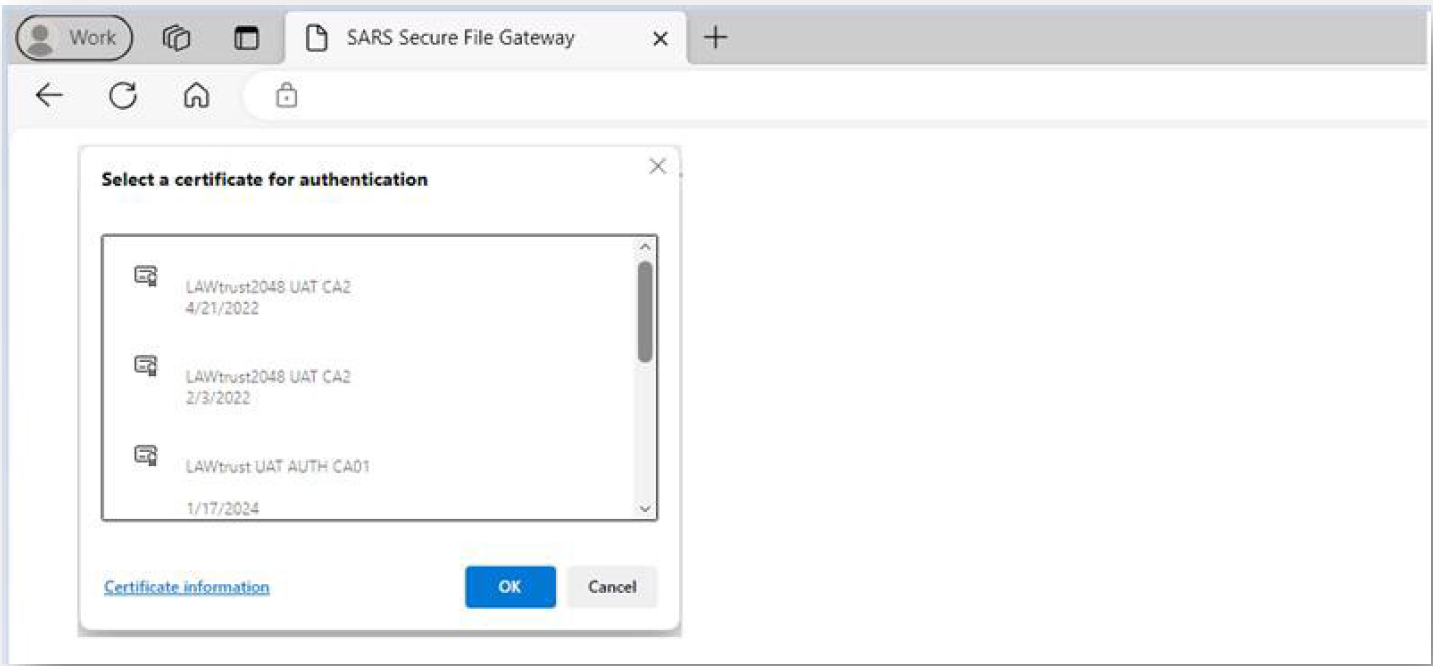
A list of certificates ready for submission will be displayed. Select the imported certificate.
The entity will be routed to the Secure File Gateway site
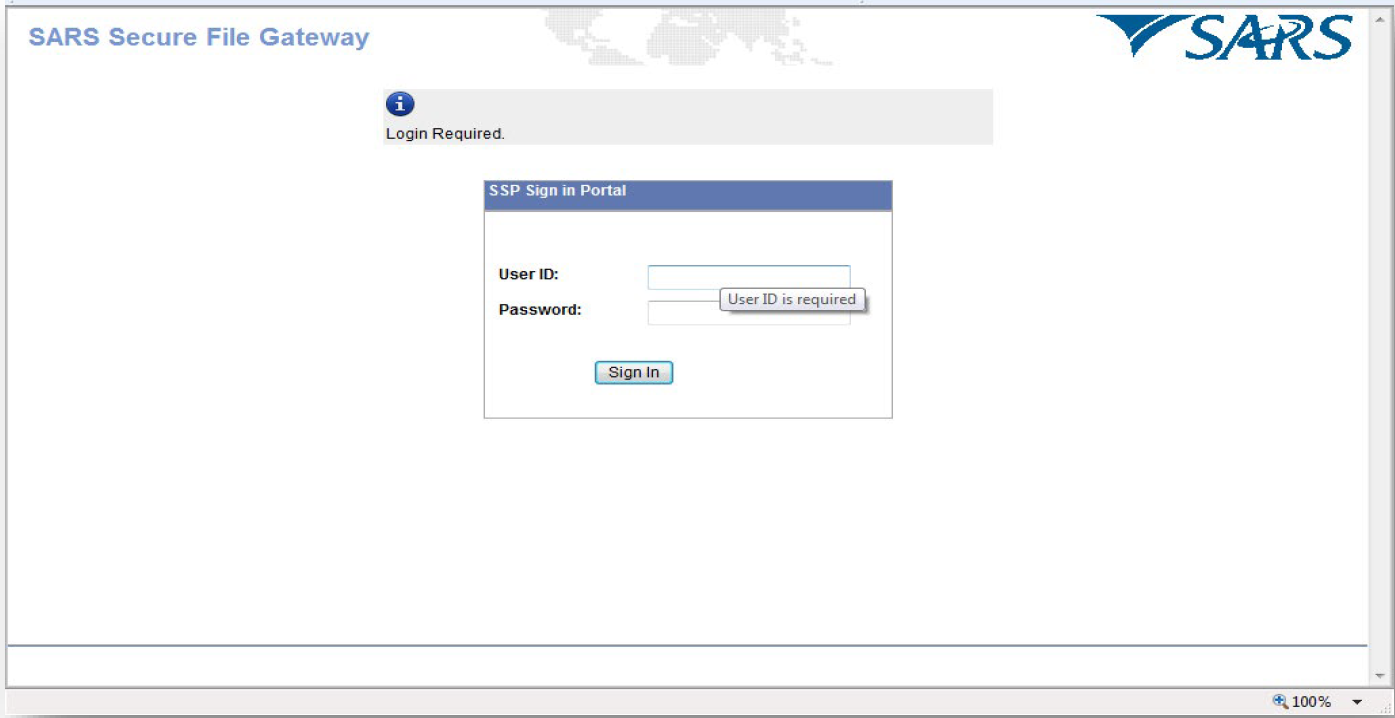
- Enter the user ID and password as provided to a Technical User as per sms received from SARS.
- Click on the Submission tab.
- From the Mailbox Path’ drop-down box you should always select “/” only, then select Browse to attach file to be submitted to SARS.
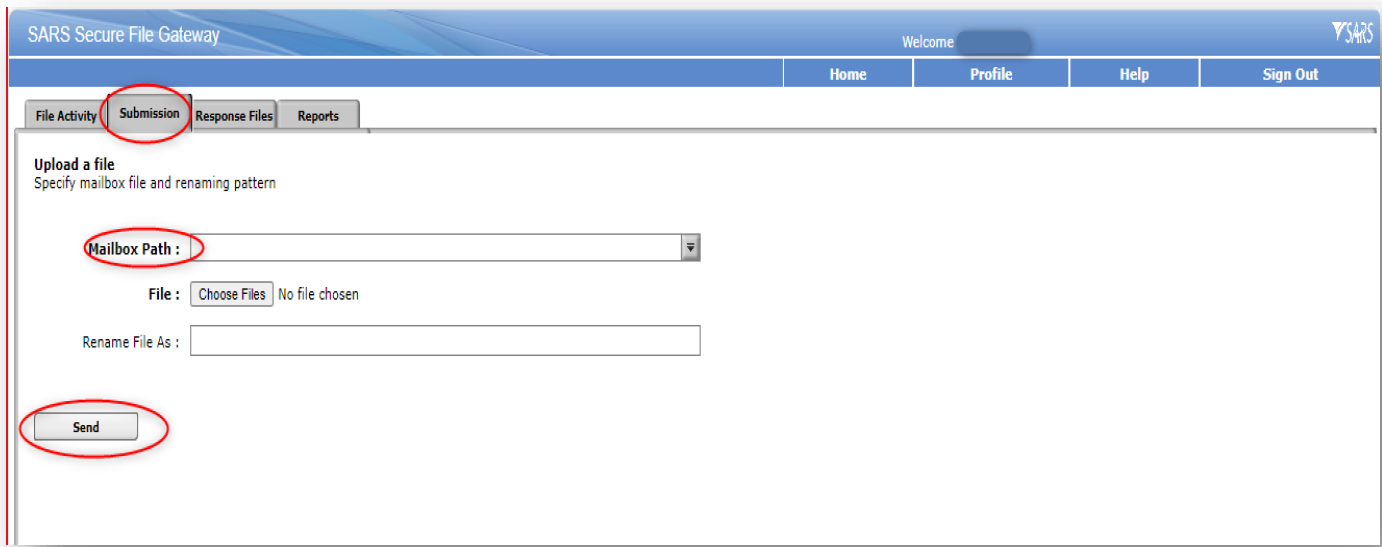
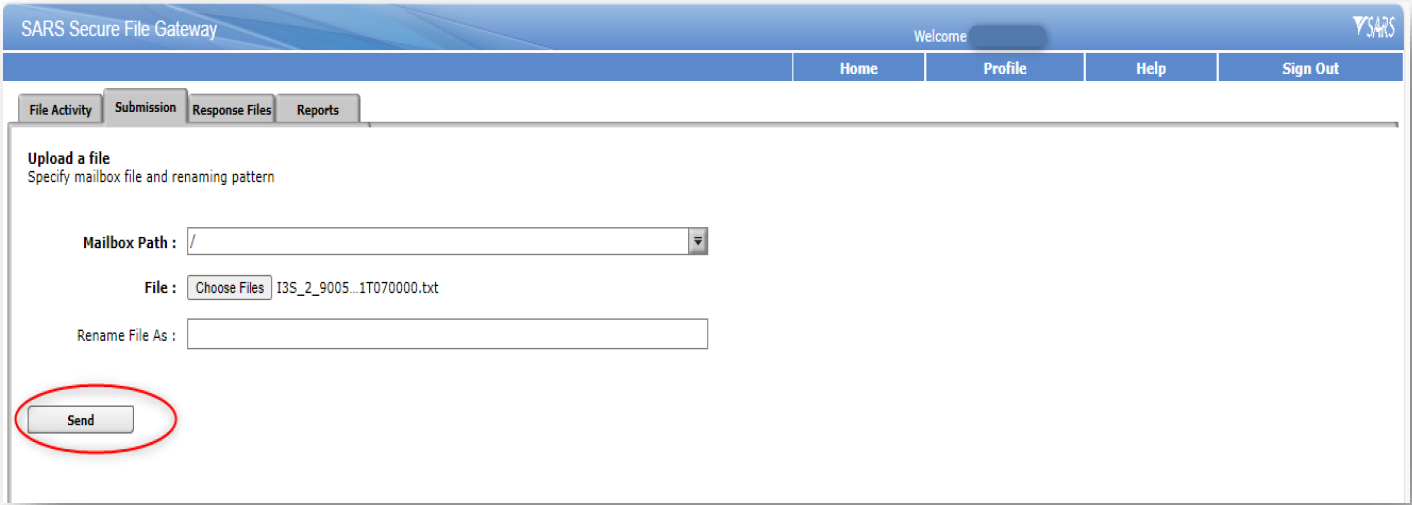
- Select Send button to submit the file to SARS.
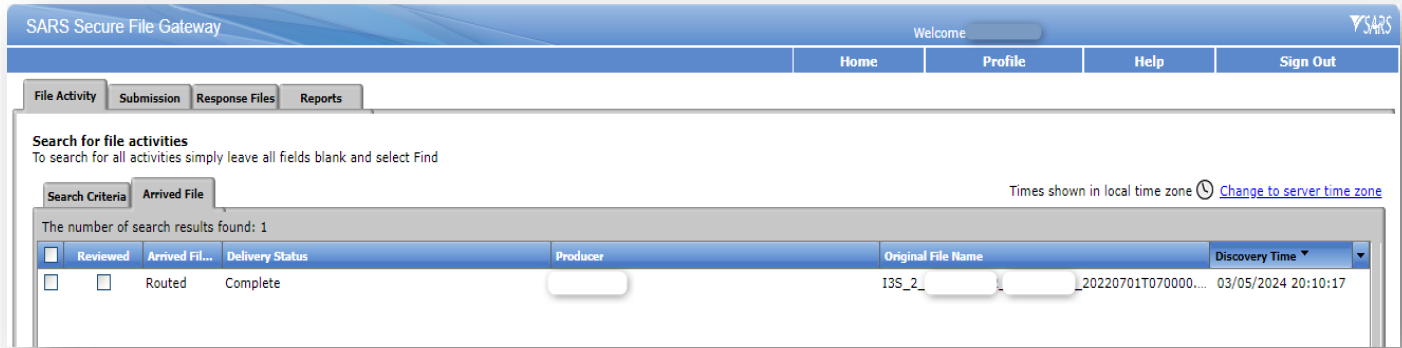
The status should be displayed as “Routed”.
- This indicates that the file was send to SARS successfully.
- Click on the Response Files tab to view statuses of other files submitted to SARS via this channel. Depending on the size of the file a response file will be send from SARS within few minutes.
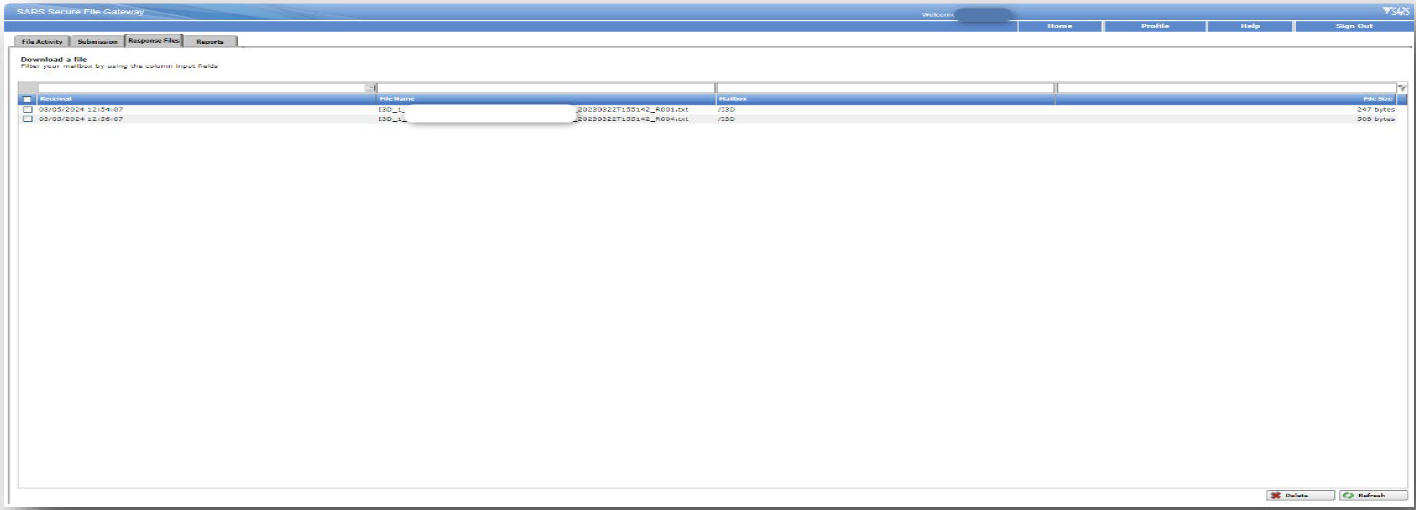
Note: Save the file immediately before opening it because once it has been opened it is going to be moved from the list/mailbox. Submitted files can be viewed by using the submission dashboard.
Also do note that users are not able to reset the Secure Web: https password.
- To reset the Secure Web: https password, kindly request to reset from SARS via the following email address: [email protected].
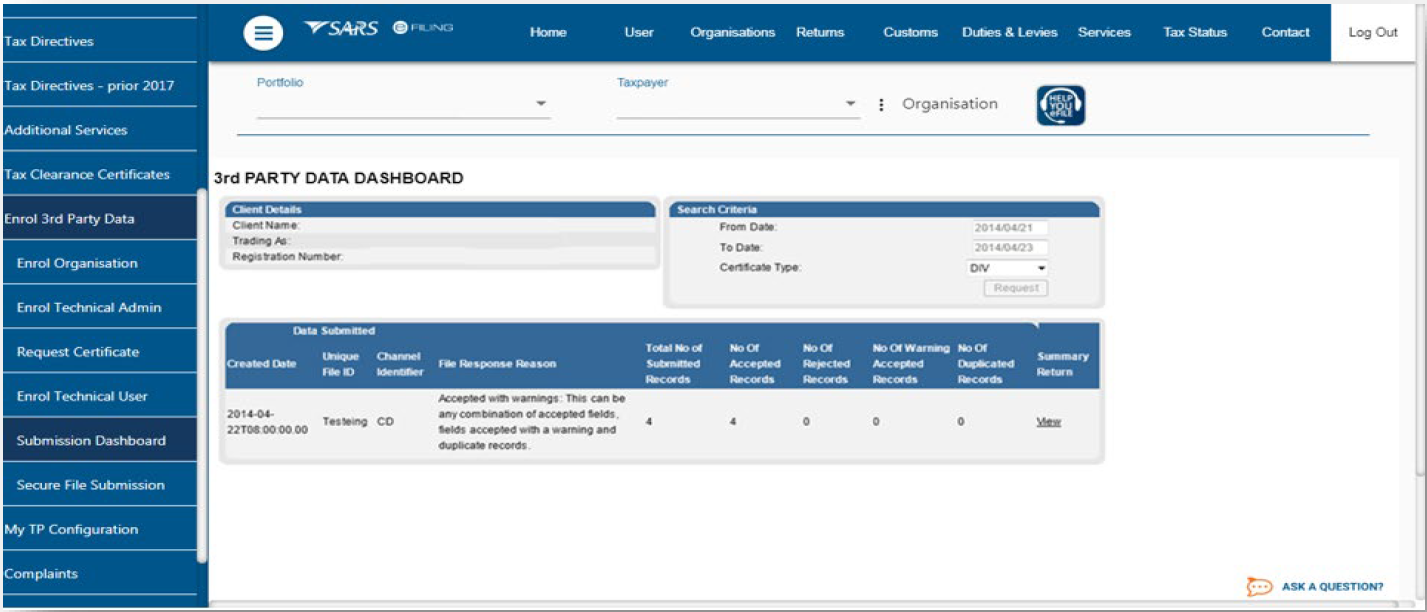
Submission Dashboard
The user must be logged in as a Technical Administrator or Technical User in order to view the Submission Dashboard. The submission dashboard is used to view the submitted data.
To view the Submission Dashboard,
- Go to Services on the top menu,
- Click Enrol 3rd Party Data on side menu.
- Select Submission Dashboard from the side menu.
The following screen will be displayed:
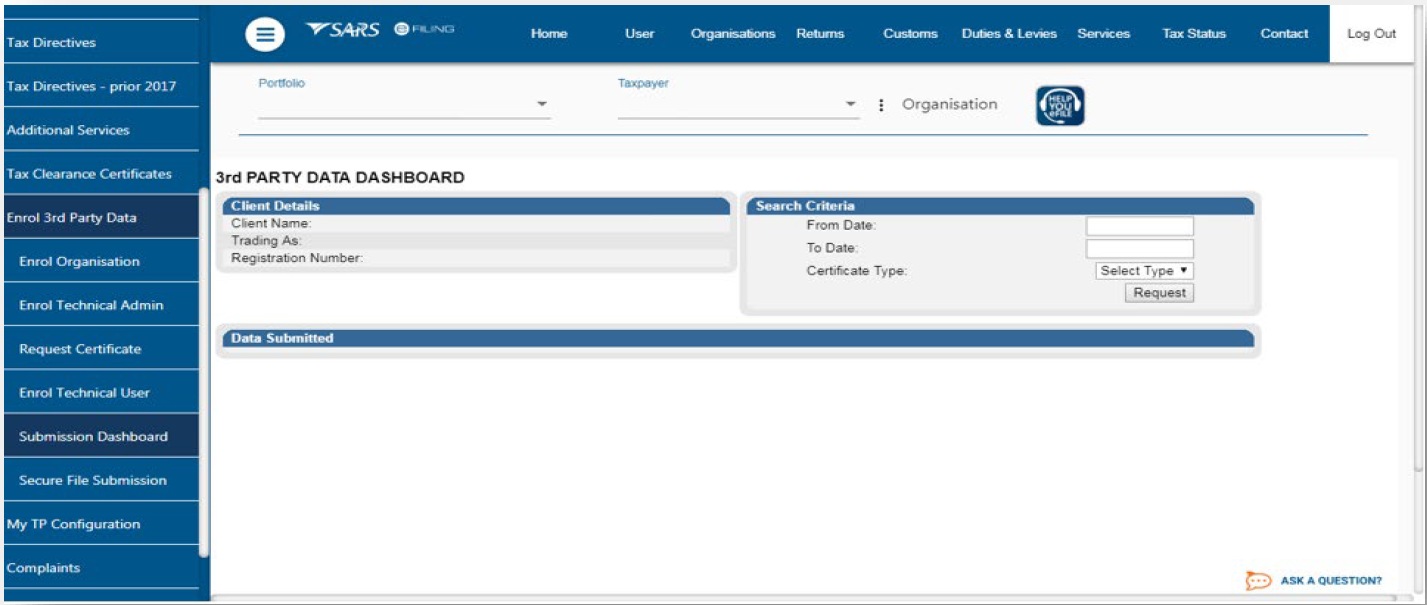
In the Search Criteria, the entities are able to select the desired dates using the From Date and To Date fields.
Declare Submitted Third-Party Data File
The declaration of submitted data is done by submitting the applicable data type return to SARS via eFiling. This implies that the data type declaration return must be submitted for every third-party data file submitted via the Connect: Direct channel. Do note that the declaration return to be submitted will have a suffix of 02. (E.g., the FTI-02 return will be the declaration return of the FTI data submission, the IT3-02 return will be the declaration return of the IT3 data submission, etc.)
Below is a demonstration of the declaration for the submission of the IT3 third party data file submission made. Do note that the same principle should be applied when declaring all other third-party tax data types. Also do note the suffix of the return tax type will be 02.
To declare your submitted IT3 data file, proceed as follows:
- Click on Returns
- Click on Third Party Data button on the left side menu.
- Click on the Request Return button.
- Click on IT3 button, if there are issued or saved returns a list will be displayed on the screen.
- Select the applicable third-party data type (e.g. IT3(b)) from the dropdown list.
- On the date dropdown list you will be presented with tax period. Select the applicable period.

Once the period has been selected and the user has clicked on File Return button, eFiling will display a prepopulated IT3-02 return.
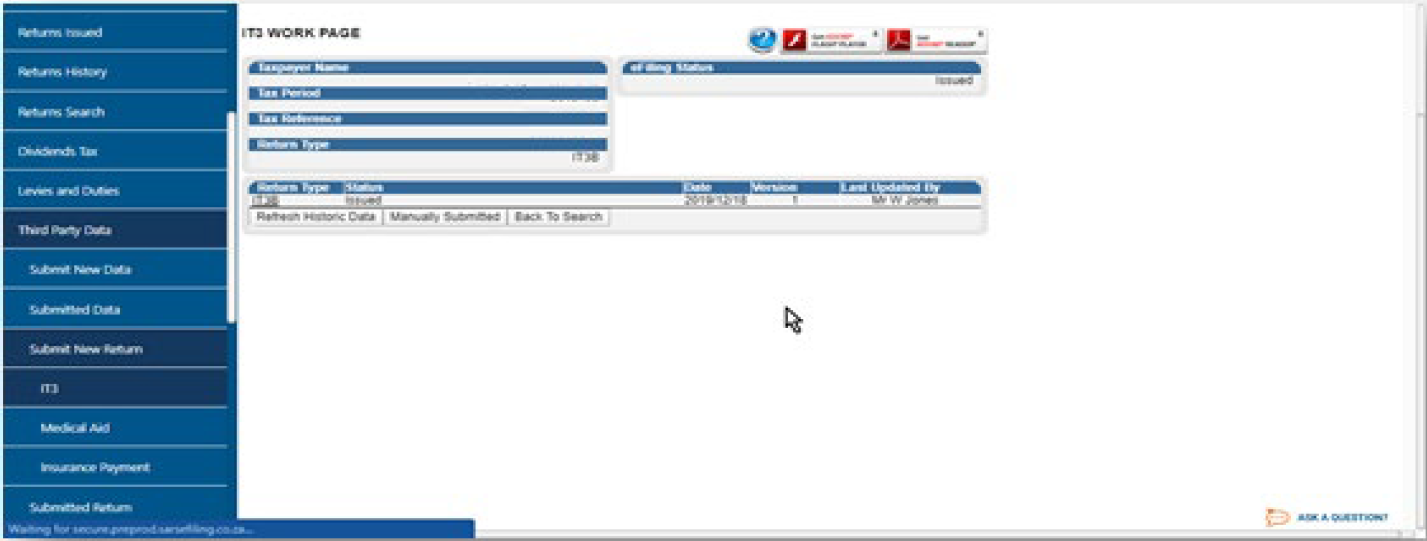
Where no data was submitted eFiling will display the message: “No data found for Data Type IT3B, Tax Reference Number xxxxxxxxxx and Tax Year xxxx”.
- On the IT3 work page, click on the IT3B hyperlink to open the IT3-02 declaration form.
The IT3-02 Declaration form will be displayed for verification and submission.
- The Declaration Details container will be pre-populated with the type of return selection made.
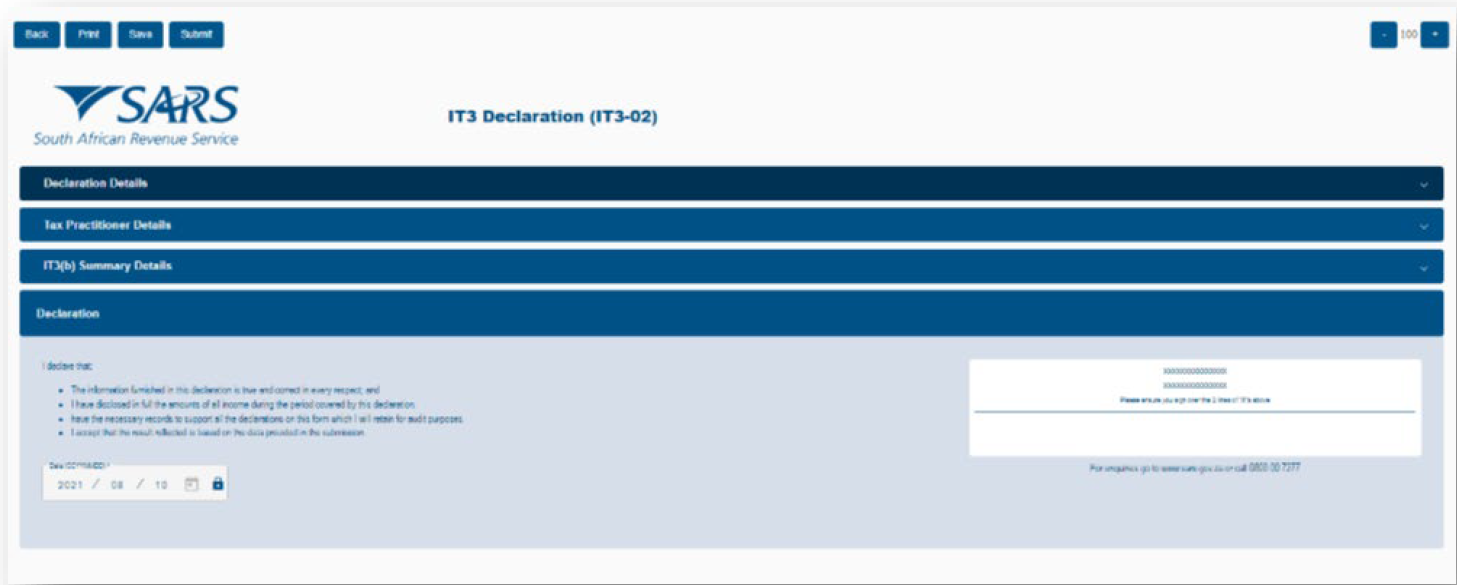
| Note: Validate whether the pre-populated information is accurate and corresponds to your submitted data. |
To declare that the summary information captured on the IT3-02 return contains correct figures, submit the return by clicking on Submit Return.
| Note: You can save the return and work on it later. |
How to correct or update the submitted third-party data file
The user may perform a request for correction (RFC) on previously submitted and declared data. This is done by resubmitting the updated data file via Secure Web: HTTPS.
Definitions, acronyms and abbreviations
The definitions, acronyms and abbreviations can be accessed here – Glossary webpage.
Legal disclaimer: In the event of conflict or inconsistency between this webpage and the PDF version of the guide, the latter shall prevail.