
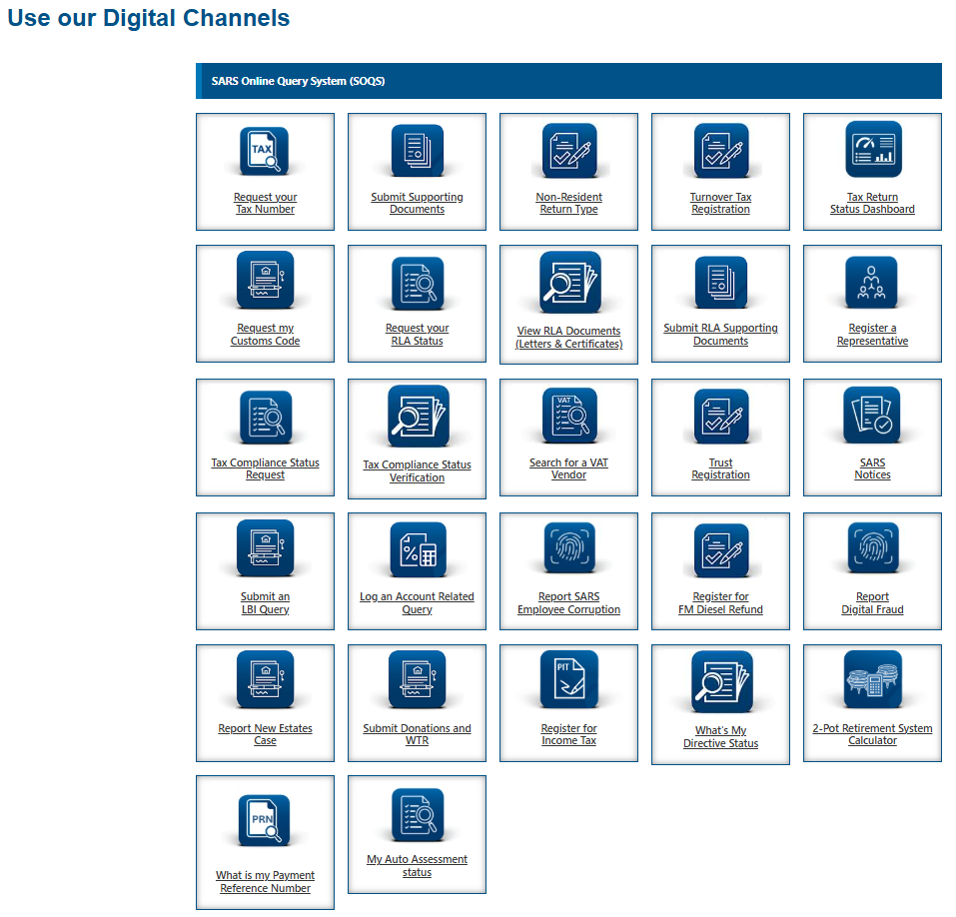
Summary
- The SARS Online Query System (SOQS) is designed to facilitate convenient engagement with SARS, enabling taxpayers to interact with SARS without the need for physical visits to SARS offices or telephonic engagement where applicable.
- This webpage is intended to assist taxpayers in using services that are available on SOQS so that they do not have to go to a branch for such services.
Scope
- This webpage covers SOQS tax related services including but not limited to registrations, requests, queries, reporting, and submissions.
- The webpage provides brief guidance on how to access, complete and submit information to SARS for each of these tax related services.
- This webpage excludes all Customs and Excise related services. Users requiring guidance on such services must refer to “SC-CF-60 – Customs and Excise SOQS – External Guide”.
- To initiate a query, taxpayers simply need to complete the online form by selecting a query type; complete a set of required information fields; attach supporting documentation where necessary and submit the data to SARS for processing and review.
How to access SOQS?
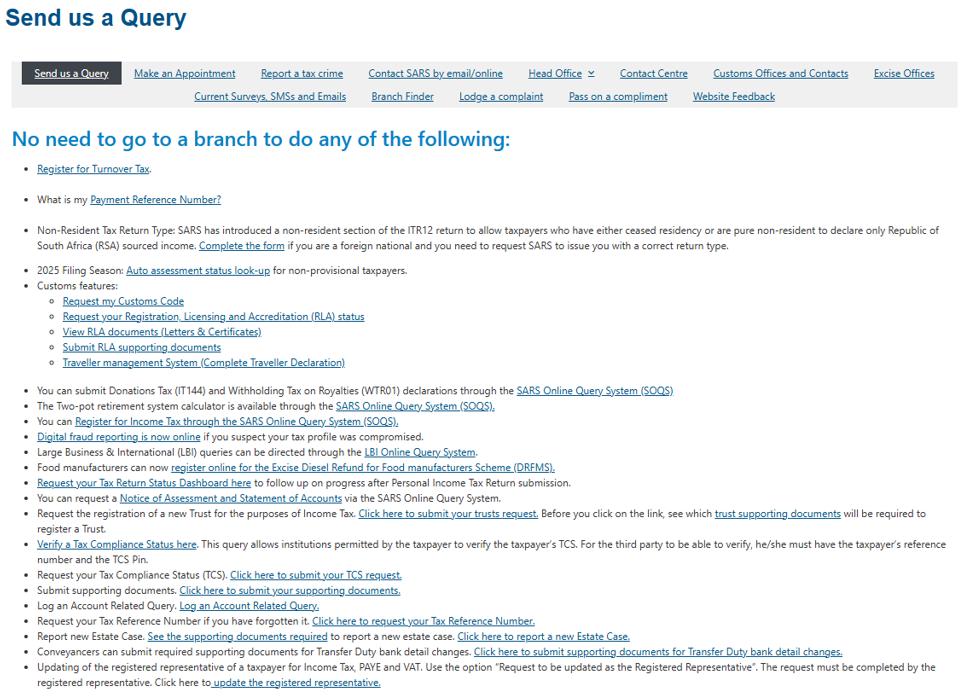
There are two options to access SOQS on SARS website www.sars.gov.za:
- Option 1: On the “Home Page” click on “SARS Online Query System” to display the SOQS screen with the available services.
- Option 2: On the “Home Page” select “Contact Us” at the top of the screen to display the SOQS screen with the available services.

Note: On the “Contact Us” page click the “Send us a Query” link to view the services in a list format (see next screen). Select the link next to the applicable service to proceed.
Guidance on Submission of the Queries
Report Digital Fraud
- This query can be used to report digital fraud where the taxpayer’s profile has been compromised.
- Either the taxpayer or the Tax Practitioner or Registered Representative can report fraud.
- The reporter must have all the required supporting documents to be able to submit the Digital Fraud query.
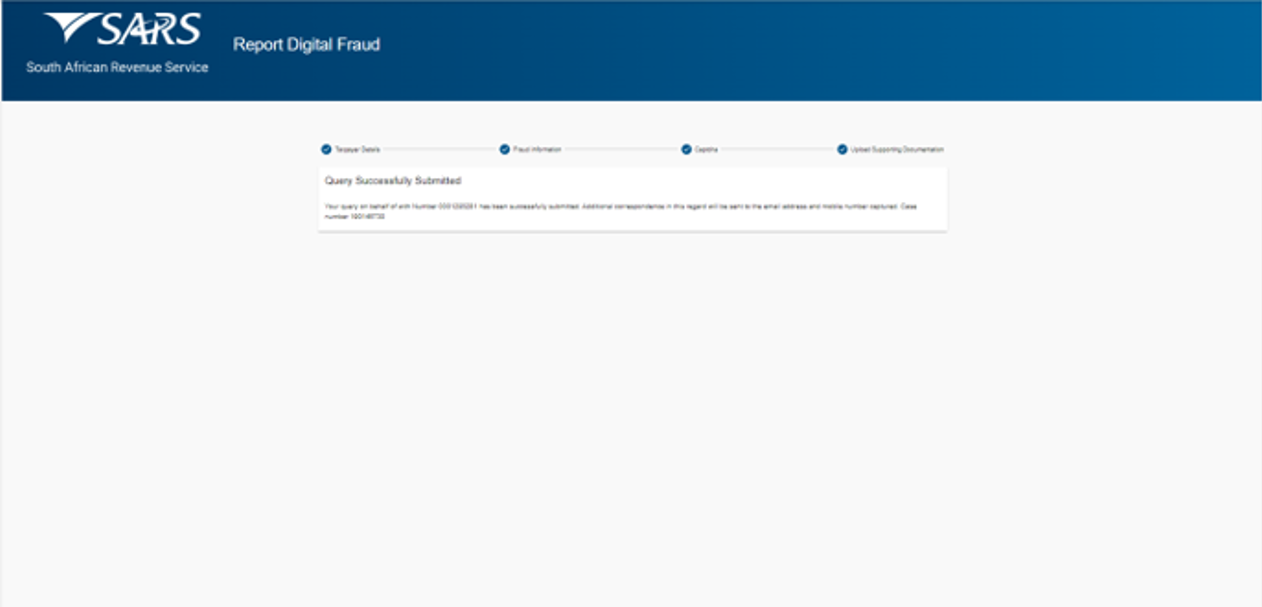
- Once all the mandatory information has been captured and the required supporting documents attached submit the query to SARS. A case will be created for SARS to investigate possible fraud.
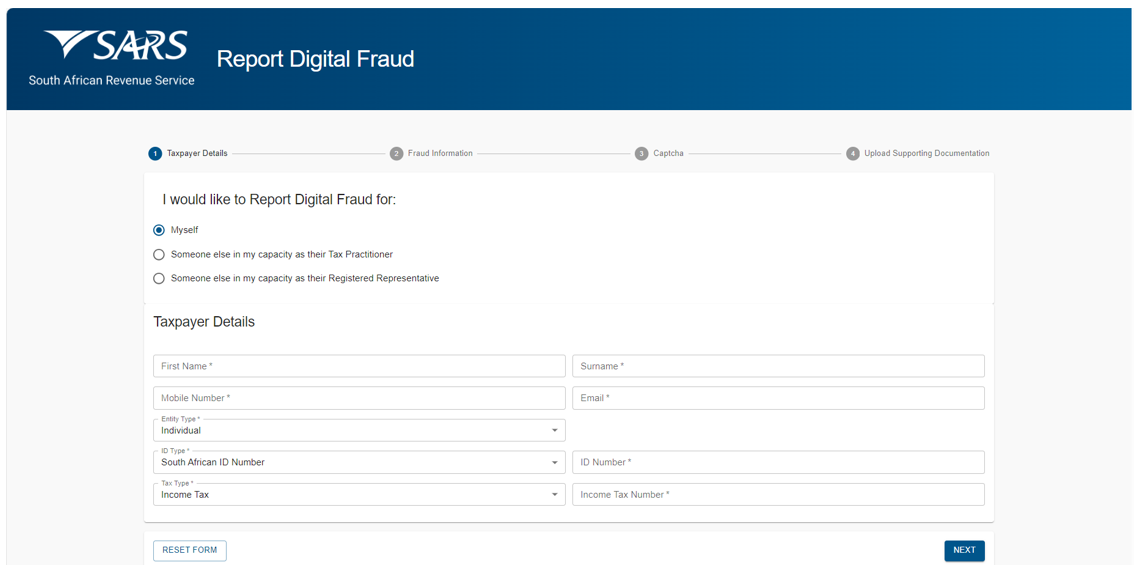
- If Report Digital Fraud query has been selected the “Report Digital Fraud” screen above will be displayed.
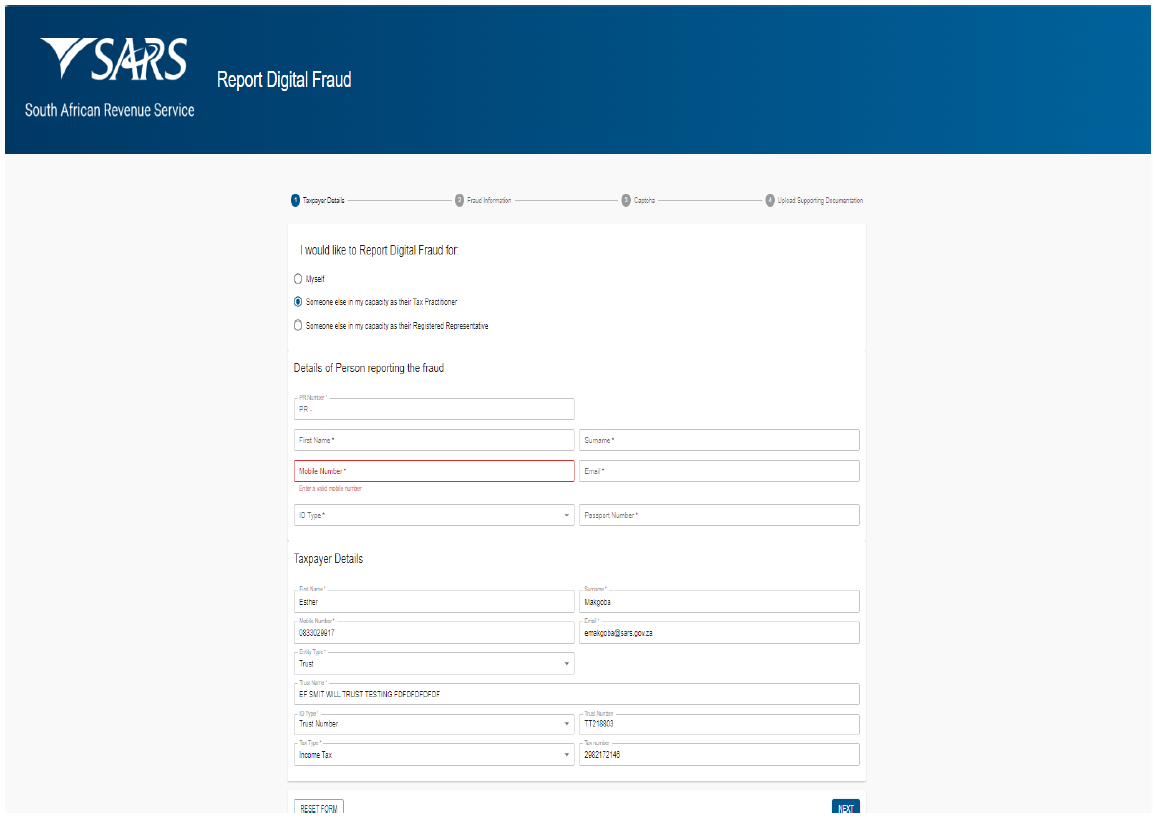
- Click on the relevant radio button next to “I would like to Report Digital Fraud for:”
- Click on the radio button next to “Myself” if the person reporting digital fraud is the taxpayer requesting for himself/herself.
- Click on the radio button next to “Someone else in my capacity as their Tax Practitioner” if the person reporting digital fraud is the Tax Practitioner representing a taxpayer.
- Click on the radio button next to “Someone else in my capacity as their Registered Representative” if the person reporting digital fraud is the Registered Representative representing a taxpayer.
- If “Myself” is selected the following screen will be displayed:
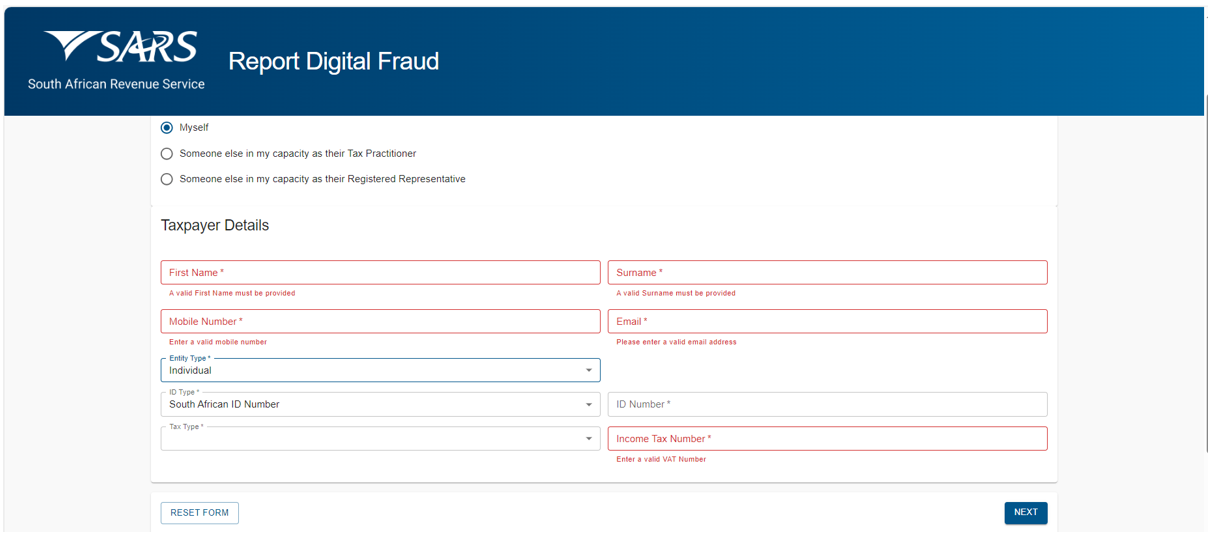
- For Taxpayer Details capture the following:
- Capture the “First Name” in the first name field.
- Capture “Surname” in the surname field.
- Capture “Mobile Number” in the mobile number field.
- Capture “Email” in the email address field.
- Select the “Entity Type” from the dropdown list. The following can be selected:
- Individual if the entity is an individual.
- The “ID Type” will default to South African ID Number.
- Select the “ID Type” from the dropdown list.
- South African ID Number – If the taxpayer is an individual and a South African resident, only a valid ID number will be accepted.
- Passport Number – If the taxpayer is an individual and a foreigner, a valid passport number must be used.
- The “Tax Type” will default to Income Tax.
- Capture the “Income Tax Number” of the individual.
- Company if the entity is a company.
- Capture the Company Name.
- The “ID Type” will default to the Company Registration Number.
- Capture the Company Registration Number.
- The “Tax Type” will default to Income Tax.
- Capture the “Income Tax Number” of the company.
- Trust if the entity is a trust.
- Capture the Trust Name.
- The “ID Type” will default to the Trust Number.
- Capture the Trust Number.
- The “Tax Type” will default to Income Tax.
- Capture the “Income Tax Number” of the trust.
- Other if the entity is none of the above.
- Capture Entity Name.
- Capture Registration Number.
- Select the “Tax Type” from the dropdown list. The following can be selected:
- Income Tax, capture Income Tax Number.
- PAYE, capture the PAYE Number
- VAT, capture the VAT Number.
- Individual if the entity is an individual.
- If “Someone else in my capacity as their Tax Practitioner” is selected the following screen will be displayed:
- Complete Details of Person Reporting the fraud as follows:
- Capture the “PR Number” of the Tax Practitioner.
- Capture “First Name” of the Tax Practitioner.
- Capture “Surname” of the Tax Practitioner.
- Capture “Mobile Number” of the Tax Practitioner.
- Capture “Email” address of the Tax Practitioner.
- Select the “ID Type” from the dropdown list.
- Select South African ID Number if the Tax Practitioner is a South African Resident and capture a valid ID Number.
- Select Passport Number if the Tax Practitioner is a Foreigner and capture a valid Passport number.
- Capture Taxpayer Details as per paragraph “For Taxpayer Details capture the following:” and “Select the “Entity Type” from the dropdown list. The following can be selected:” above.
- If “Someone else in my capacity as their Registered Representative” is selected, the following screen will be displayed:
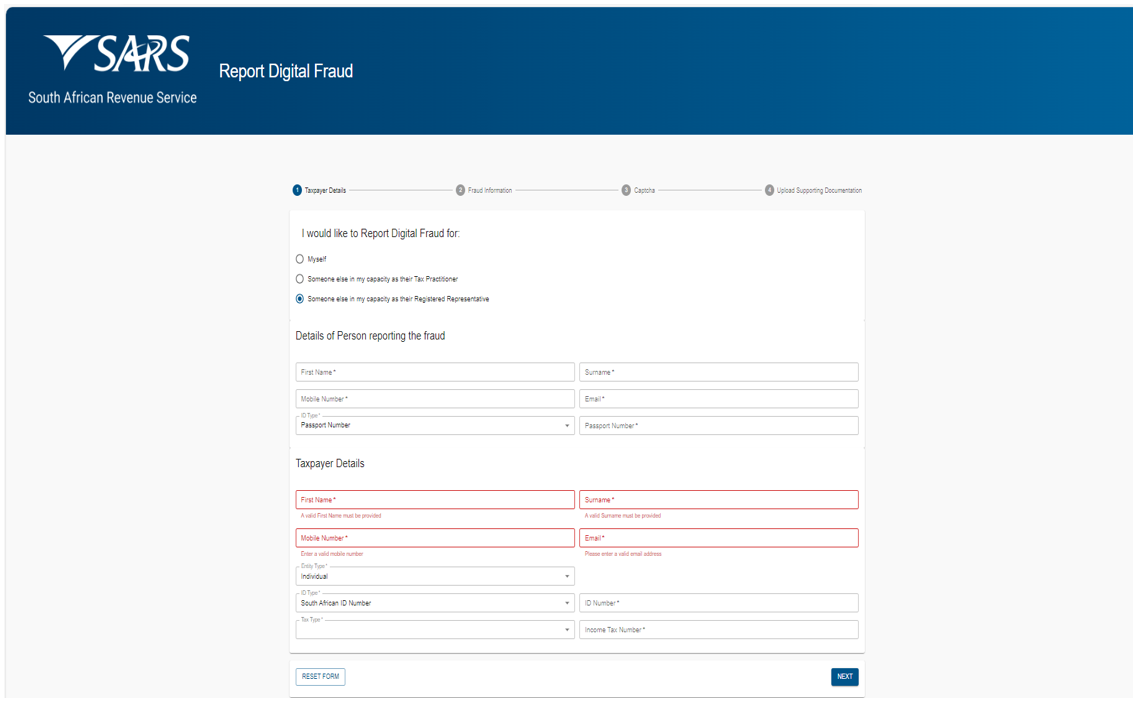
- Complete Details of Person reporting the fraud as follows:
- Capture “First Name” of the Registered Representative.
- Capture “Surname” of the Registered Representative.
- Capture “Mobile Number” of the Registered Representative.
- Capture “Email” address of the Registered Representative.
- Select the “ID Type” from the drop-down list.
- Select South African ID Number if the Registered Representative is a South African Resident and capture a valid ID Number.
- Select Passport Number if the Registered Representative is a Foreigner and capture a valid Passport number.
- Capture Taxpayer Details as per paragraph “For Taxpayer Details capture the following:” and “Select the “Entity Type” from the dropdown list. The following can be selected:” above.
- Click on “Next” the Digital Fraud Information screen will be displayed:
- Select the relevant check box next to the digital channel(s) involved. The following can be selected:
- eFiling if the fraud happened on eFiling.
- MobiApp if the fraud happened on MobiApp.
- e@syFile if the fraud happened on e@syFile.
- Capture the “Username” for the selected channel.
- Select the Date when fraud was identified from the date picker.
- Capture Security Contact mobile.
- Capture Security Contact Email.
- Capture Alternative Security Contact mobile if the Security Contact mobile is compromised.
- Capture Alternative Security Contact Email address if the Security Contact Email address is compromised.
- Capture Details of suspected fraudster if available.
- The following information should be captured e.g., names, surname, contact details, address etc.
- Describe the nature of fraudulent activity, please add as much details as possible to enable the SARS user to understand the type of fraud that took place.
- Answer the following questions:
- Were your Security Contact Details compromised? The following can be selected:
- Yes, if the reporter is aware that the security contact details have been compromised.
- No, If the reporter knows that the security contact details are not compromised.
- Unsure, if the reporter is not sure if the security contact details were compromised.
- Were you registered for eFiling without your consent?
- Yes, if the taxpayer was registered on eFiling without consent.
- No, if the taxpayer was not registered on eFiling without consent.
- Unsure, if the taxpayer is not sure.
- Were your bank details changed?
- Yes, if the reporter is aware that the bank details were changed.
- No, If the reporter knows that the bank details were not changed.
- Unsure, if the reporter is not sure if the bank details were changed or not.
- Was a refund paid into incorrect bank account?
- Yes, if the reporter is aware that the refund was paid into incorrect account.
- No, If the reporter knows that the refund was not paid into incorrect account.
- Unsure, if the reporter is not sure if the refund was paid into incorrect account or not.
- Was your tax type moved from a Tax Practitioner without your consent?
- Yes, if the reporter is aware that the tax type was moved from Tax Practitioner.
- No, If the reporter knows that the tax type was not moved from Tax Practitioner.
- Unsure, if the reporter is not sure if the tax type was moved from Tax Practitioner or not.
- Was a return fraudulently filed?
- Yes, if the reporter is aware that a return was filed fraudulently. The system will give an option to “ADD RETURN DETAILS”.
- Click on “ADD RETURN DETAILS”.
- Select the Tax Type from the dropdown list.
- Select Tax Return Type from the dropdown list.
- Select the Tax Year/Tax Period from the date picker.
- Yes, if the reporter is aware that a return was filed fraudulently. The system will give an option to “ADD RETURN DETAILS”.
- Were your Security Contact Details compromised? The following can be selected:
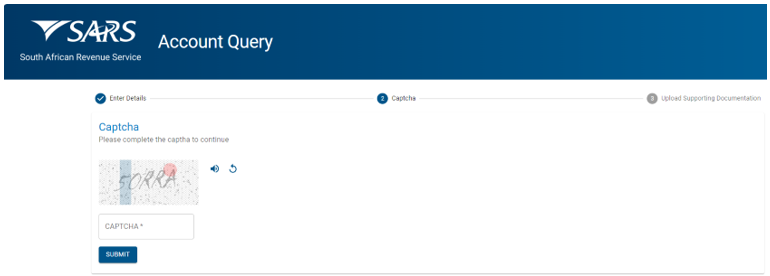
- Click “NEXT” the following CAPTCHA screen will be displayed:
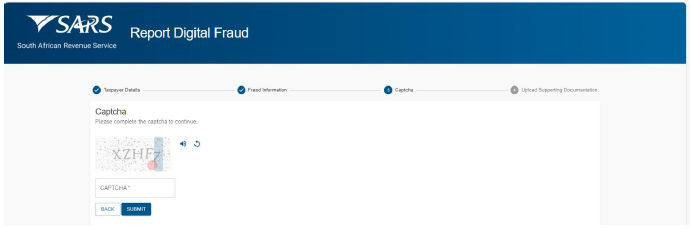
- Complete the onscreen CAPTCHA field.
- Click on the “Submit” button to go to the Upload Supporting Documents screen.
- The Upload Supporting Documents screen will be displayed.
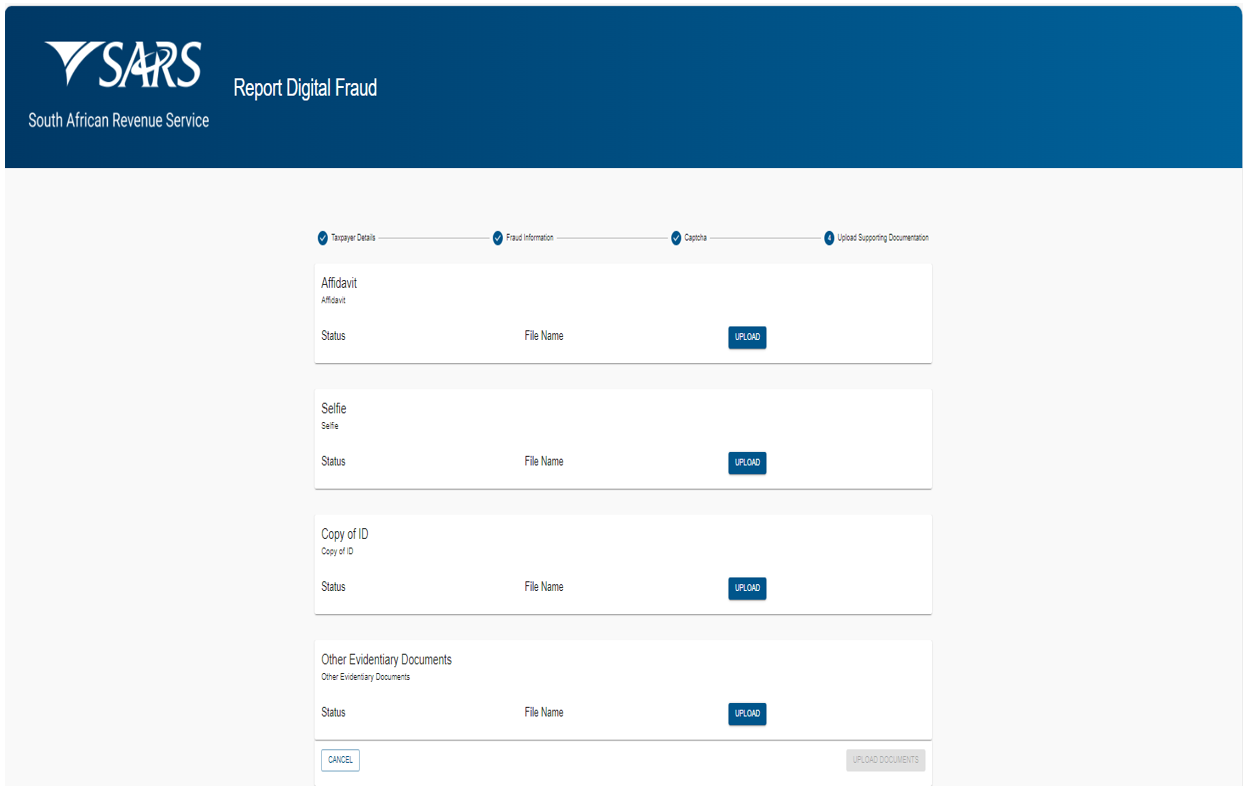
- There will be an upload button next to each supporting document required as per the screen above.
- Upload only the specific document and/or item indicated per upload section.
- Once all the supporting documents have been uploaded the system will enable the “UPLOAD DOCUMENTS” button.
- Click on Upload Documents button to submit the request. The following message will be displayed:
Log an Account Related Query
This query can be used to request the allocation of payments in respect of Income Tax, PAYE, and VAT.
If “Log an Account Related Query” query was selected, the “Account Query” screen will be displayed. The mandatory fields will have an asterisk (*) next to them. All the mandatory fields must be completed.
Complete Personal Details as follows:
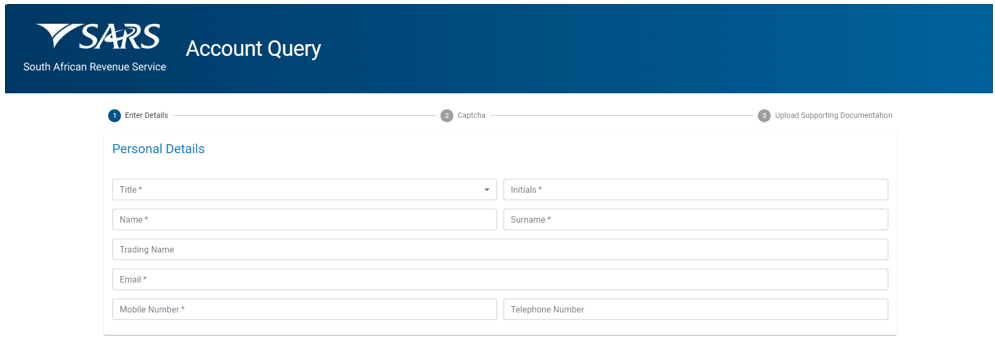
- Select the Title from the dropdown list. The following can be selected:
- Ms for women irrespective of the marital status.
- Mr for men.
- Mrs for married women.
- Rev for Reverend.
- Prof for Professor.
- Dr for Doctor.
- Adv for Advocate.
- Hon for Honourable.
- Capture the “Initials” in the Initials field.
- Enter the “Name” in the Name field.
- Enter the “Surname” in the Surname field.
- Enter the “Trading Name” if it is a business. This field is optional.
- Enter the “Email” address in the Email address field.
- Enter the “Mobile” number in the Mobile field.
- Enter “Telephone” number in the Telephone number field. This field is optional.
Complete Tax Details as follows:
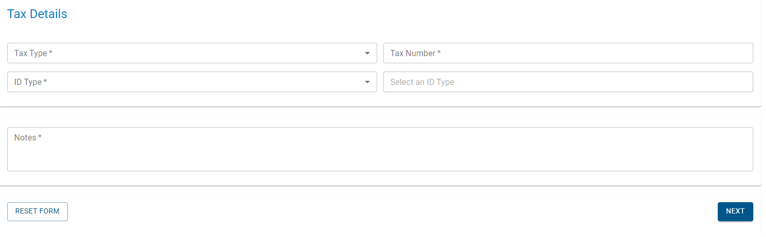
- Select the Tax Type from the dropdown list:
- PAYE.
- VAT.
- Income Tax.
- Enter the “Tax Number” relating to the Tax Type selected.
- Select the ID Type from the dropdown list:
- South African ID Number – If the taxpayer is an individual and a South African resident, only a valid ID number will be accepted.
- Passport Number – If the taxpayer is an individual and a foreigner, a valid passport number must be used.
- Company Registration Number – If the taxpayer is a Company. Only a valid Company Registration number will be accepted.
- Trust Number – If the taxpayer is a Trust. Only a valid Master of the High Court Trust registration number will be accepted.
- Capture the “ID No” depending on the ID Type selected.
- Add notes in the “Notes” field to explain how the payments must be allocated. Make sure the notes are clear and understandable.
At any point, the taxpayer can click on the “Reset” button to clear all the captured information on the screen, this would also remove all the attached supporting documents, allowing the taxpayer to start the process again.
- Note that the “Reset” button should only be used if all the information on the screen is incorrect.
Click the “NEXT” button to proceed. The “Captcha” screen will be displayed.
Complete the onscreen Captcha as follows:
- Complete the onscreen CAPTCHA field.
- Click the “SUBMIT” button. The upload supporting documents screen will be displayed.
Upload Supporting Documentation (Optional):
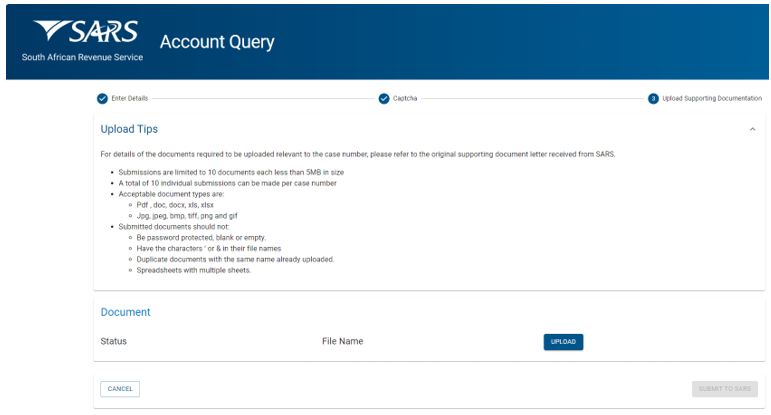
- If there is a supporting document to be uploaded, review the upload tips and ensure adherence to the rules.
- Click on the “Upload” button next to “File Name” to browse your PC and locate the supporting documents to be uploaded.
- Once the supporting document is attached, a “Delete” icon is enabled next to the attached supporting document.
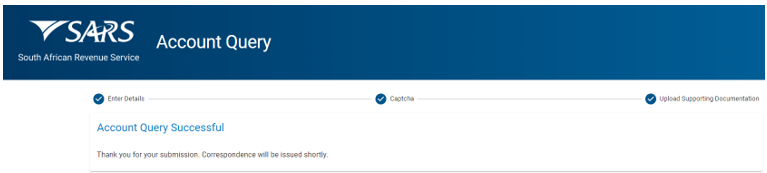
Once complete, click the “SUBMIT TO SARS” button to send the captured details and attached documents to SARS. The following “Account Query Successful” message will be displayed:
Request your Tax Reference Number
Taxpayers who are registered for Income Tax but do not know their tax reference number, can request it via the SOQS system using the “What’s My Tax Number” query type.
No supporting documents or tax reference details are required for this query type.
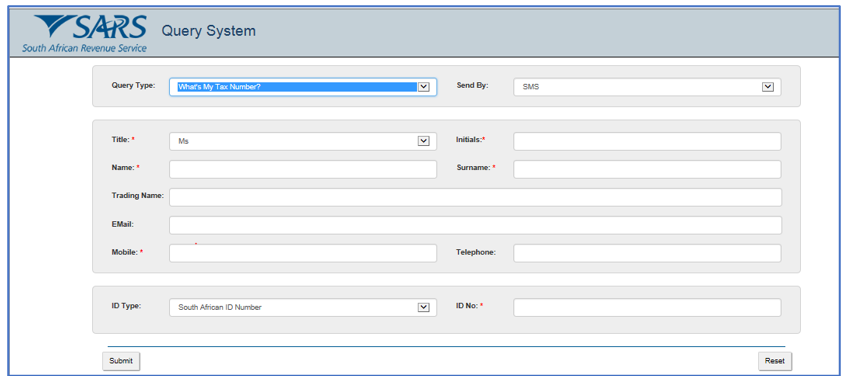
- If the “Request your Tax Number” query was selected, the query type will default to “What’s My Tax Number?”
- Select the preferred channel to receive the tax number from the “Send By” dropdown list:
- Email – if the taxpayer wants to receive the tax reference number via email.
- SMS – if the taxpayer wants to receive the tax reference number via SMS.
Note: Please note that the information will be sent to the email address or cell phone number of the taxpayer that exist on SARS system. If any of the above contact details changed, the taxpayer must first update the contact details either on eFiling or by making an appointment to visit the SARS Branch before requesting the tax reference number.
- Select the Title from the dropdown list. The following can be selected:
- Ms for women irrespective of the marital status.
- Mr for men.
- Mrs for married women.
- Rev for Reverend.
- Prof for Professor.
- Dr for Doctor.
- Adv for Advocate.
- Hon for Honourable.
- Capture the “Initials” in the Initials field.
- Enter the “Name” in the Name field.
- Enter the “Surname” in the Surname field.
- Enter the “Trading Name” if it is a business. This field is optional.
- Enter the “Email” address in the Email address field.
- Enter the “Mobile” number in the Mobile field.
- Enter “Telephone” number in the Telephone number field. This field is optional.
- Select the ID Type from the dropdown list:
- South African ID Number – If the taxpayer is an individual and is a South African resident, only a valid ID number will be accepted.
- Passport Number – If the taxpayer is an individual and is a foreigner, a valid passport number must be used.
- Company Registration Number – If the taxpayer is a Company. Only a valid Company Registration number will be accepted.
- Trust Number – If the taxpayer is a Trust. Only a valid Trust number will be accepted.
- Capture the “ID No” depending on the ID type selected.
- The taxpayer can click on the “Reset” button at any point to clear all the captured information on the screen to start the process again.
- Please note that the “Reset” button must only be used if all the information on the screen is incorrect.
- Once complete, press the Submit button to send the captured details to SARS.
- Complete an onscreen CAPTCHA field before the submission is processed.
- Click the “Validate” button to validate the captured information. Once the CAPTCHA is completed correctly, the submission will be accepted and uploaded for processing.
- If a successful match is made, the taxpayer will be presented with the message “Thank you for your query. Your Tax Reference Number will be issued shortly”.
- If there is no match, the taxpayer will be presented with the message “Thank you for your query. Unfortunately, a tax reference number could not be found for the details that you supplied”.
Tax Return Status Dashboard
This query can be used to request tax return status via SOQS system (this is only available for Personal Income Tax)
The tax return status dashboard is per tax year, currently limited to two years (current and previous financial years).
For the taxpayer to request tax return status, the Tax Return Status Dashboard query type must be used.
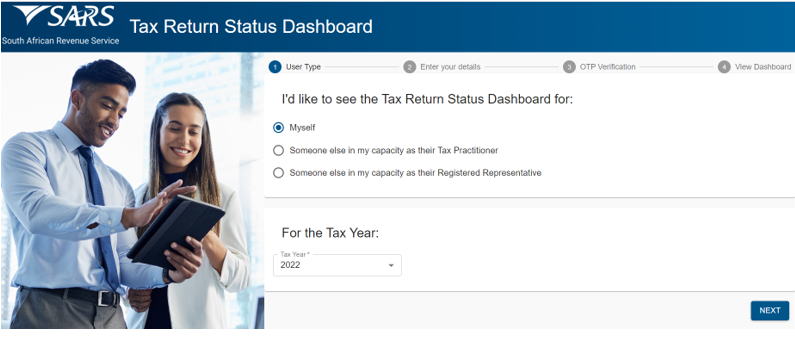
If the Request for Tax Return Status Dashboard query has been selected the “Tax Return Status Dashboard” screen above will be displayed.
Click on the relevant radio button next to “I’d like to see the Tax Return Status Dashboard for:”
- Click on the radio button next to “Myself” if the person requesting the tax return status dashboard is the taxpayer requesting for himself/herself.
- Click on the radio button next to “Someone else in my capacity as their Tax Practitioner” if the person requesting the tax return status dashboard is the Tax Practitioner representing a taxpayer.
- Click on the radio button next to “Someone else in my capacity as their Registered Representative” if the person requesting the tax return status dashboard is the Registered Representative of a taxpayer.
If “MySelf” is selected, select the preferred “Tax Year” from the dropdown list and click “NEXT”, the following screen will be displayed:
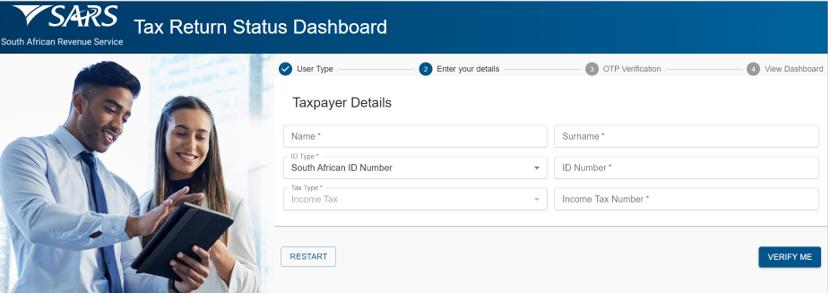
- Enter the “Name”.
- Enter the “Surname”.
- Select the ID Type from the dropdown list:
- South African ID Number – If the taxpayer is an individual and is a South African resident, only a valid ID number will be accepted.
- Passport Number – If the taxpayer is an individual and is a foreigner, a valid passport number must be used.
- Capture the “ID No” depending on the ID Type selected.
- The “Tax Type” will default to Income Tax.
- Enter the “Income Tax Number”.
If “Someone else in my capacity as their Tax Practitioner” is selected, select the preferred “Tax Year” from the dropdown list and click “NEXT” the following screen will be displayed:
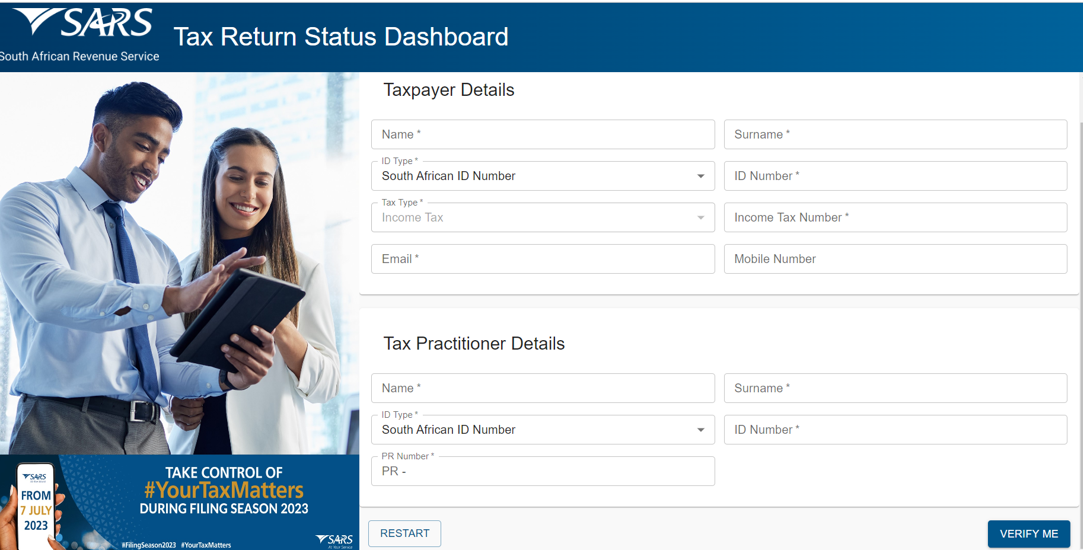
- Complete details of the taxpayer you are representing as follows:
- Enter the “Name”.
- Enter the “Surname”.
- Select the “ID Type” from the dropdown list.
- South African ID Number – If the taxpayer is an individual and is a South African resident, only a valid ID number will be accepted.
- Passport Number – If the taxpayer is an individual and is a foreigner, a valid passport number must be used.
- Capture the “ID No” depending on the ID Type selected.
- The “Tax Type” will default to Income Tax.
- Enter the “Income Tax Number”.
- Capture the “Email”.
- Capture the “Mobile Number”.
- Complete your Tax Practitioner Details as follows:
- Enter the “Name”.
- Enter the “Surname”.
- Select the “ID Type” from the dropdown list.
- South African ID Number – If the taxpayer is an individual and is a South African resident, only a valid ID number will be accepted.
- Passport Number – If the taxpayer is an individual and is a foreigner, a valid passport number must be used.
- Capture the “ID No” depending on the ID Type selected.
- Enter the “PR Number”.
If “Someone else in my capacity as their Registered Representative” is selected, select the preferred “Tax Year” from the dropdown list and click “NEXT” the following screen will be displayed:
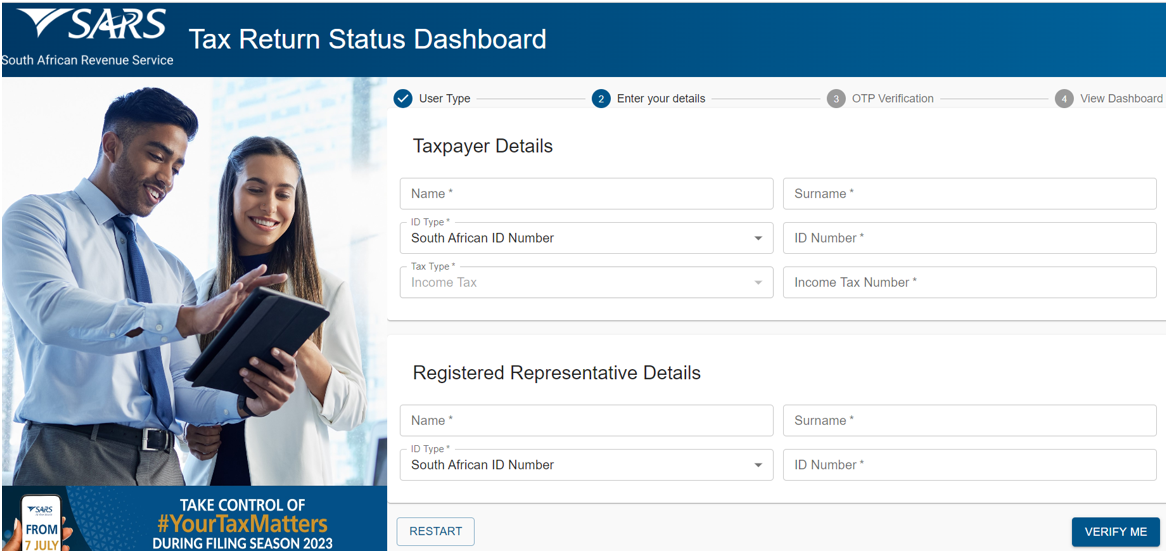
- Complete the details of the taxpayer you are representing as follows:
- Enter the “Name”.
- Enter the “Surname”.
- Select the “ID Type” from the dropdown list.
- South African ID Number – If the taxpayer is an individual and is a South African resident, only a valid ID number will be accepted.
- Passport Number – If the taxpayer is an individual and is a foreigner, a valid passport number must be used.
- Capture the “ID Number” depending on the ID Type selected.
- The “Tax Type” will default to Income Tax.
- Enter the “Income Tax Number”.
- Complete your Registered Representative Details as follows:
- Enter the “Name”.
- Enter the “Surname”.
- Select the “ID Type” from the dropdown list.
- South African ID Number – If the taxpayer is an individual and is a South African resident, only a valid ID number will be accepted.
- Passport Number – If the taxpayer is an individual and is a foreigner, a valid passport number must be used.
- Capture the “ID Number” depending on the ID Type selected.
Click on the “RESTART” button if you wish to clear the captured information and restart the service request. The following message will be displayed:
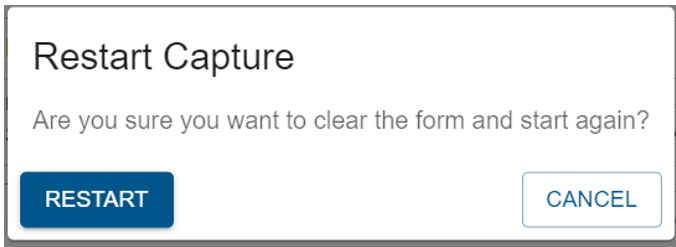
- Click on “RESTART” to clear the form and start the process again.
- Click on “CANCEL” to continue with the captured information.
Click on “VERIFY ME” the following screen will be displayed if the user type selected as Myself or Registered Representative:

- Select an OTP Verification Method. The following methods can be selected:
- SMS where the OTP will be sent to the SMS using the mobile number.
- Email where the OTP will be sent to the email address.
- Click on the preferred method. The following screen will be displayed with a timer of 3 minutes:
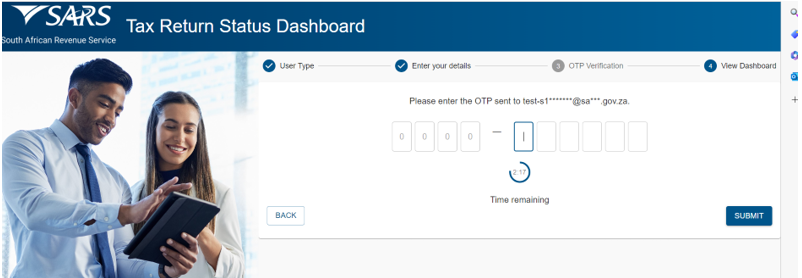
- Capture the OTP number received via the preferred method.
- Click on the “SUBMIT” button to view the Tax Return Status Dashboard:
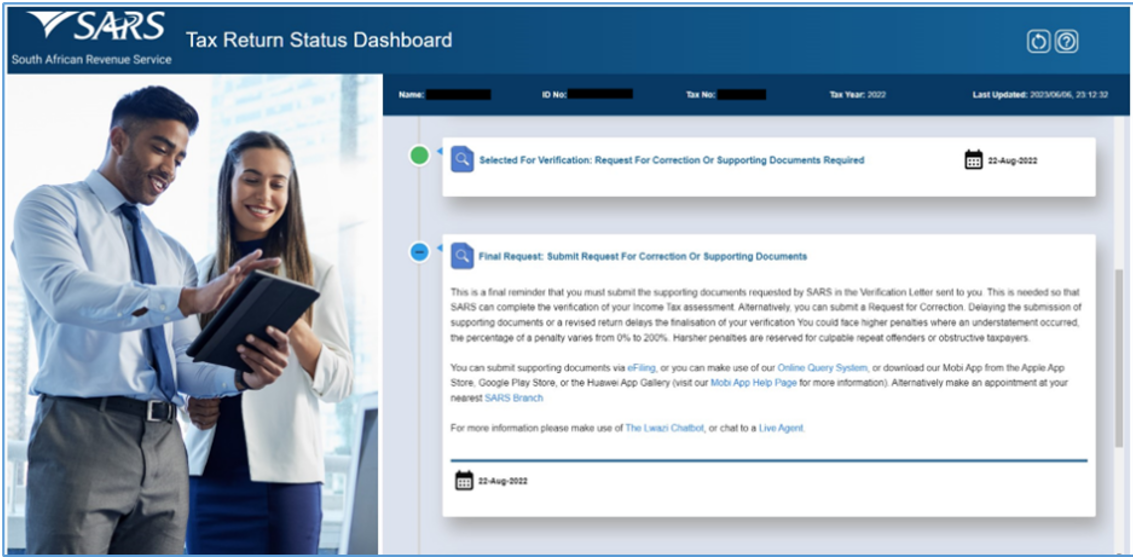
- The tax return status dashboard displays the past, current and possible future Income Tax return status data in the form of a timeline.
- The information bar shows the name, ID Number, Tax number and Tax Year used to create tax return status dashboard.
- The following icons on the screen header are for:

- Restart button for allowing the user to restart the process.
- Legend which allows the user to view the tax return dashboard legend.
- Click on Legend, the following timeline legend explanation will be displayed:
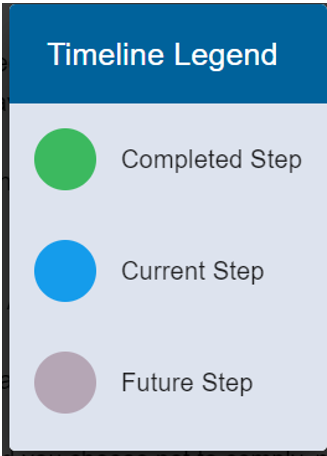
- The green circular icon represents a completed step. The calendar icon indicates the date on which the previous step was concluded (where applicable).

- The blue circular icon represents the current step in the process with a detailed description of the step. The calendar icon indicates the date on which the step occurred (where applicable). The Clock icon represents the remaining time within which SARS endeavours to finalise the process.
- The grey circular icon represents the next steps in the process till conclusion of the process.

Submit Supporting Documents
- Where the taxpayer received a letter from SARS requesting supporting documents, the taxpayer can upload the requested supporting documents using this functionality for the following tax products:
- Income Tax
- PAYE.
- VAT.
- Transfer Duty.
- To submit supporting documents to SARS, the taxpayer must use the Submit Supporting Document Query to upload them along with a set of mandatory data.
- If the “Submit Supporting Documents” query was selected, the “Supporting Documents” screen will be displayed.
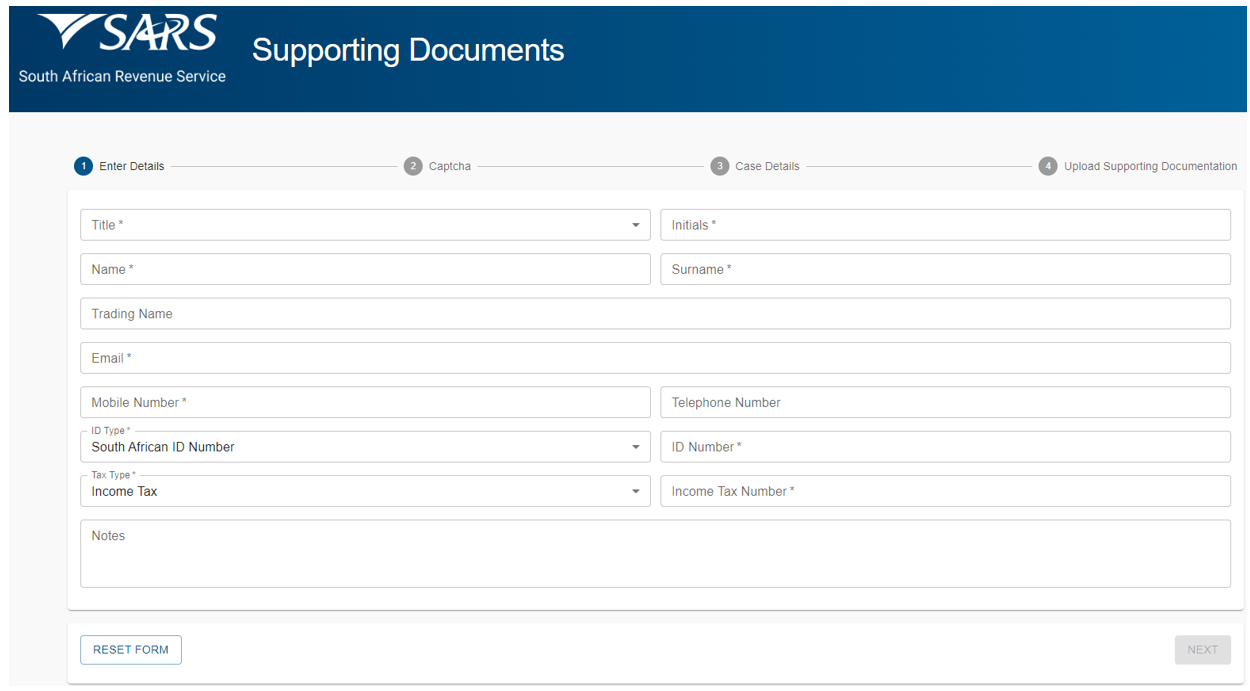
- Select the Title from the dropdown list. The following can be selected:
- Ms for women irrespective of the marital status.
- Mr for men.
- Mrs for married women.
- Rev for Reverend.
- Prof for Professor.
- Dr for Doctor.
- Adv for Advocate.
- Hon for Honourable.
- Capture the “Initials” in the Initials field.
- Enter the “Name” in the Name field.
- Enter the “Surname” in the Surname field.
- Enter the “Trading Name” if it is a business. This field is optional.
- Enter the “Email” address in the email address field.
- Enter the “Mobile” number in the mobile field.
- Enter the “Telephone” number in the telephone number field. This field is optional.
- Select the ID Type from the dropdown list:
- South African ID Number – If the taxpayer is an individual and is a South African resident, only a valid ID number will be accepted.
- Passport Number – If the taxpayer is an individual and is a foreigner, a valid passport number must be used.
- Company Registration Number – If the taxpayer is a Company. Only a valid Company Registration number will be accepted.
- Trust Number – If the taxpayer is a Trust. Only a valid Trust number will be accepted.
- Capture the “ID Number” depending on the ID Type selected.
- Select the Tax Type from the dropdown list:
- Income Tax.
- PAYE.
- VAT.
- Transfer Duty.
- Enter the Tax Number applicable to the Tax Type selected.
- Add notes in the “Notes” field to explain the reason for submitting the supporting documents. Make sure that the notes are clear and understandable.
- Click on the “Next” button once all the mandatory fields have been completed. The Captcha screen will be displayed.
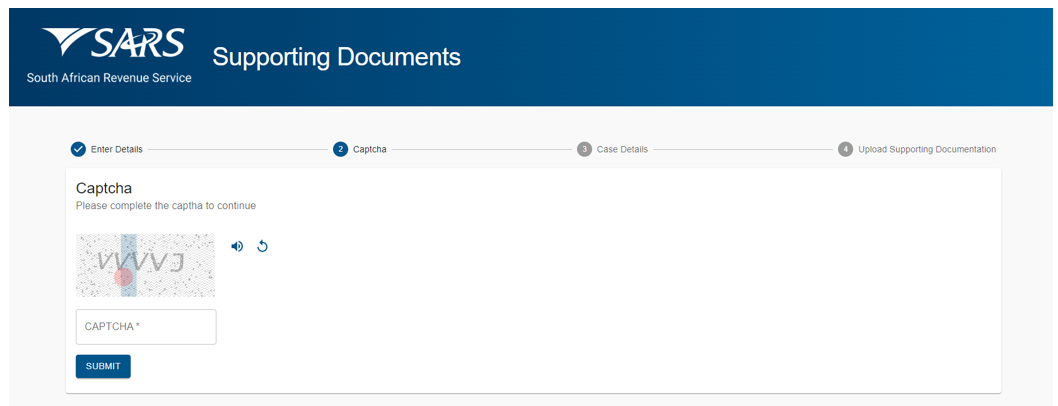
- Complete the onscreen CAPTCHA field and click on the “SUBMIT” button. The Case Details screen will be displayed. Where there are multiple active case numbers, they will be displayed.
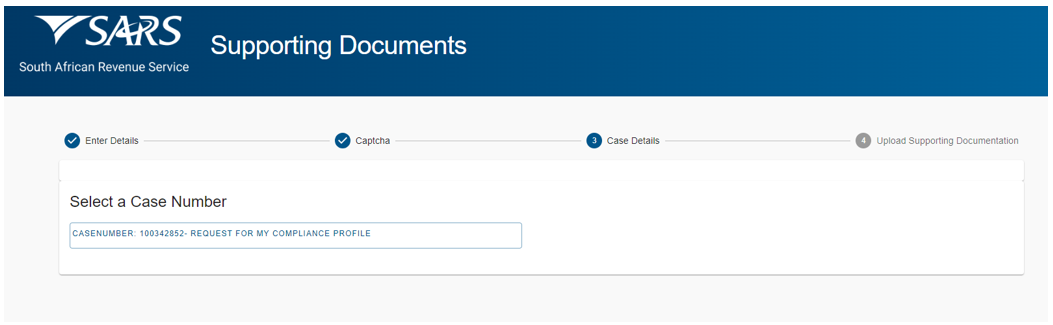
- Select the case number relating to the supporting documents that must be attached. The upload supporting documents screen will be displayed.
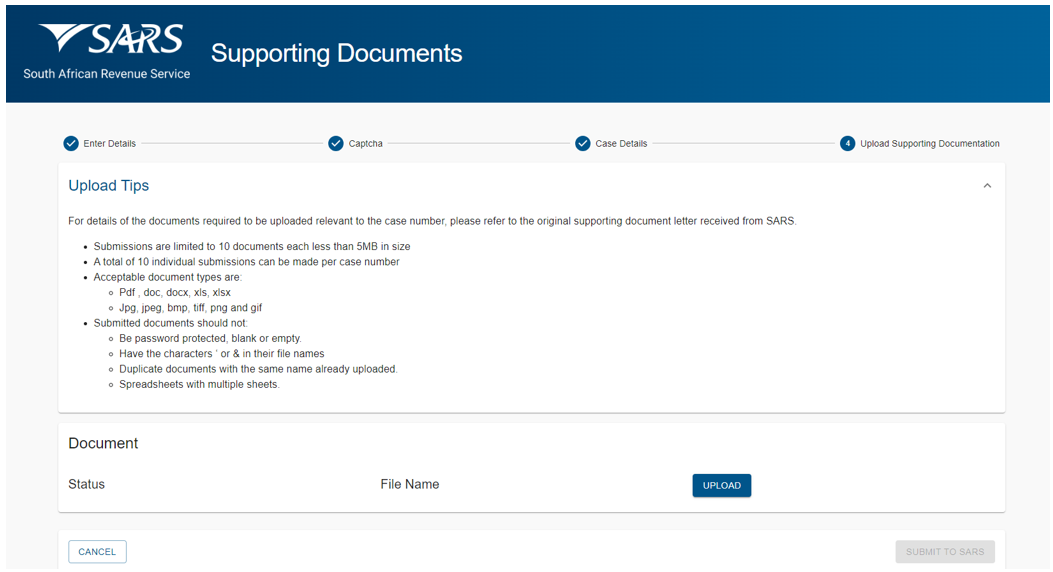
- View the upload tips and ensure adherence to the rules.
- Click on the “Upload” button to browse your PC and locate the supporting documents to be uploaded.
- Once the supporting document is attached, a “Delete” Icon is enabled next to the attached supporting document.
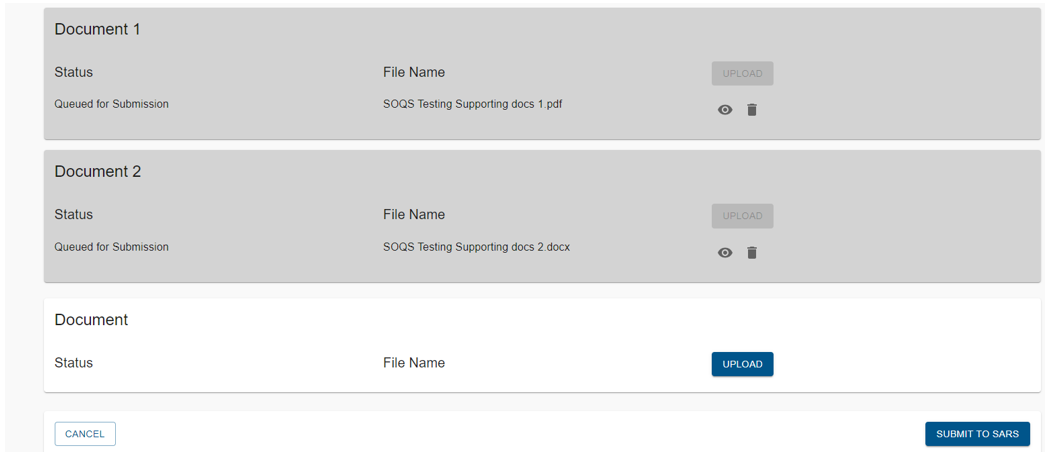
- View the list of attached documents to ensure that all the relevant supporting documents have been attached.
- Count the documents to ensure that the correct number of documents have been attached as indicated on the tips above.
- Where the taxpayer has attached an incorrect document click on the “Delete” Icon next to the specific document and delete it.
- Once complete, click the “SUBMIT TO SARS” button to send the captured details and attached documents to SARS. The following “Query Successfully Submitted” confirmation message will be displayed.
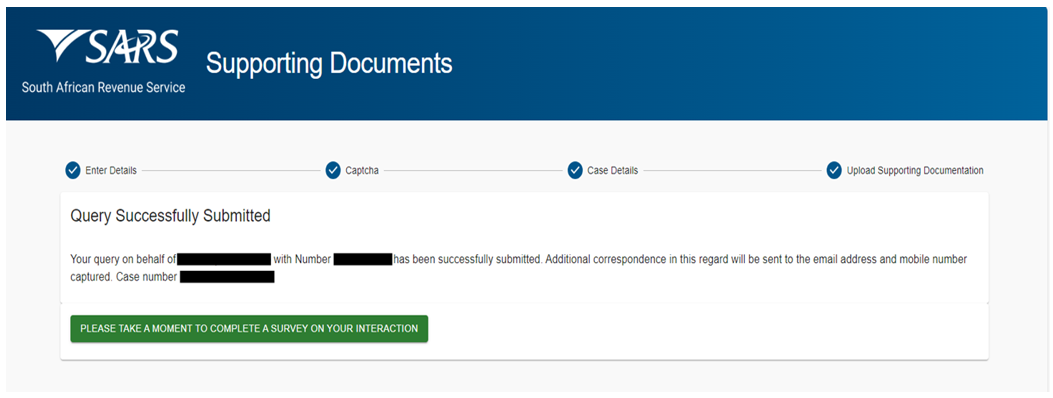
- SARS will send an email with a message to notify whether the documents have been successfully received or that there is an error. The emails will provide specific messages relating to the error and the action that is required by the taxpayer.
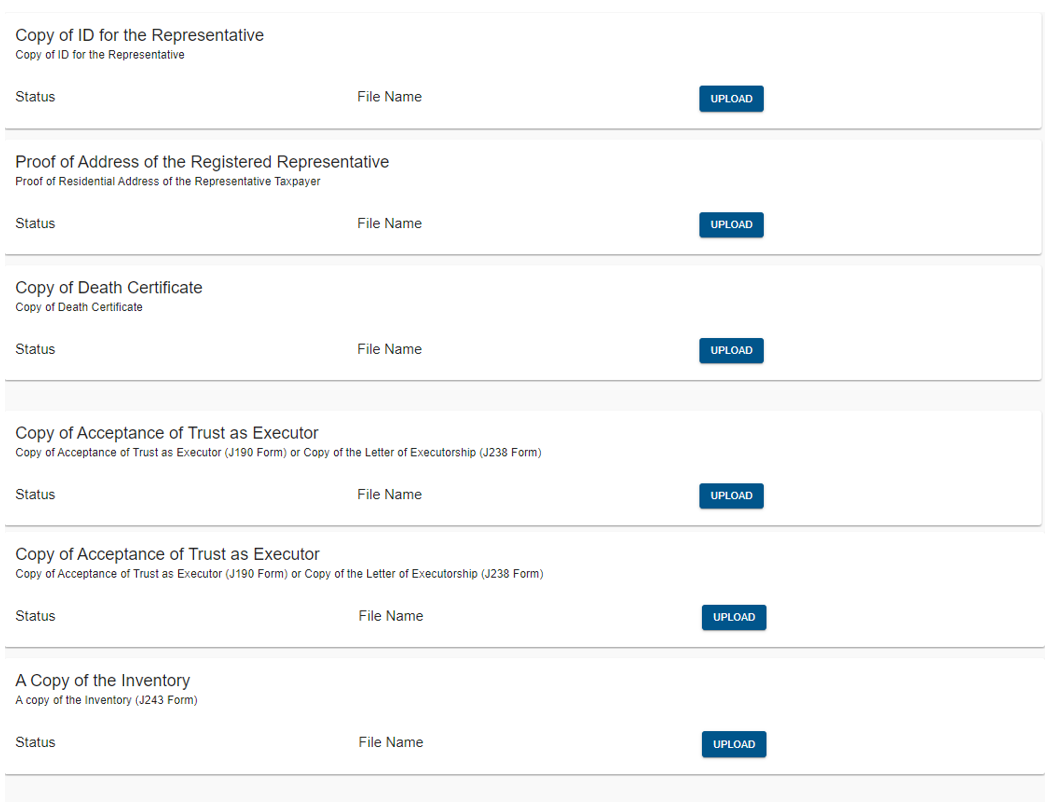
Report New Estate Case
Queries relating to reporting a taxpayer as an estate in respect of Income Tax, PAYE, and VAT, can be submitted using query type “Report New Estate Case”.
Capture the required mandatory information and you will be able to attach the supporting documents required for this query.
Once the query is submitted, the system will determine if there is an existing estate coding case.
- If there is an existing case, SARS will inform the taxpayer of the existing case, and the supporting documents submitted will be attached to the existing case.
- If there is no case, a new estate coding case will be created, and the supporting documents submitted will be attached to the case.
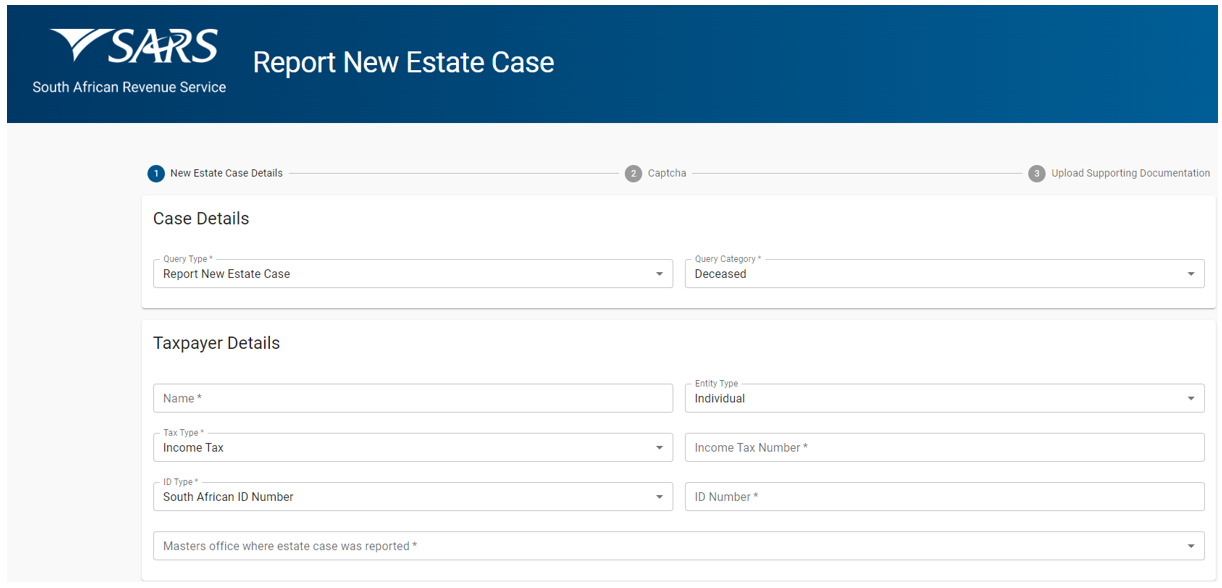
If the “Report New Estates Case” query was selected” the Query Type will default to “Report New Estate Case”.
Select the Category from the dropdown list as follows:
- Deceased – If the individual is deceased.
- Liquidation – If the company is liquidated.
- Sequestration – If the taxpayer is sequestrated. This option is for all the types of taxpayers Individual, Company, Trust or Other.
- Insolvency – If the taxpayer is insolvent. This option is for all the types of taxpayers Individual, Company, Trust or Other.
Capture Taxpayer (Estate) Details as follows:
- Capture the Name of the estate taxpayer.
- Select the “Entity Type” from the dropdown list. The list will be limited as per the Category selected above:
- If “Deceased” is selected above, the Entity Type will be limited to an Individual.
- If “Liquidation” is selected above, the Entity Type will be limited to a Company.
- If “Insolvency/Sequestration” is selected above, all the Entity Types will be available.
- Select the “Tax Type” from the dropdown list. This list will be limited as per the Entity Type of taxpayer selected above:
- If “Individual” is selected, the Tax Type will default to Income Tax.
- If “Company” is selected, the Tax Type will default to Income Tax.
- If “Trust” is selected the Tax Type will default to Income Tax.
- If “Other” is selected the following Tax Types will be available for selection:
- Income Tax.
- PAYE.
- VAT.
- Capture the Tax Number depending on the Tax Type selected.
- Select the ID Type from the dropdown list. The list will be limited to the Entity Type of taxpayer selected above.
- If an Individual was selected as Entity Type, the list will consist of a South African ID Number and Passport Number only.
- South African ID Number – If the taxpayer is an individual and is a South African resident, only a valid ID number will be accepted.
- Passport Number – If the taxpayer is an individual and is a foreigner, a valid passport number must be used.
- If a Company was selected as a Type of taxpayer, the list will consist of Company Registration Number only.
- If a Trust was selected as a Type of taxpayer, the list will consist of a Trust Number only.
- If “Other” was selected as a Type of taxpayer, the ID type, and ID Number. will be disabled and cannot be completed.
- If an Individual was selected as Entity Type, the list will consist of a South African ID Number and Passport Number only.
- Capture the “ID Number” depending on the ID Type selected.
- The system will validate that the tax reference number and the ID number of the estate taxpayer belong to the same entity. If not, an error message will be displayed upon submission.
- Select the Masters Office where the estate case was reported from the dropdown list.
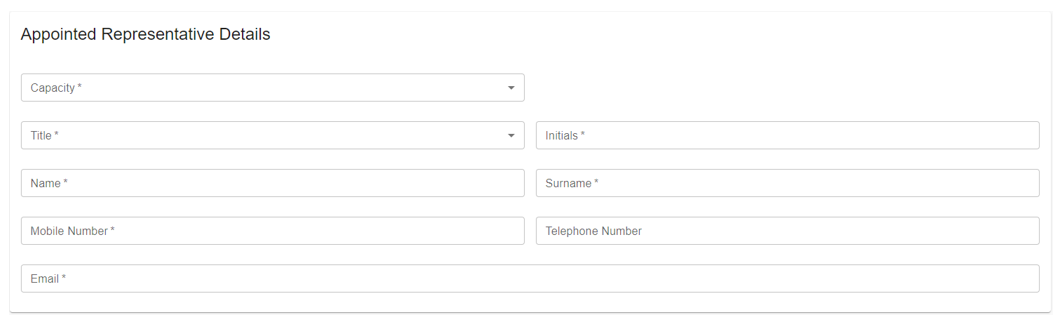
Capture Appointed Representative Details (these are the details of the person that is submitting this query to SARS) as follows:
- Select the Capacity from the dropdown list. The following can be selected:
- Delegated Representative.
- Tax Practitioner.
- Administrator (Estate).
- Executor.
- Liquidator.
- Curator.
- Enter the PR No: in the PR number field. This field will be displayed if the Capacity is Tax Practitioner. The PR Number and the ID Number of the Appointed Representative will be validated to ensure that they belong to the same entity. If not, an error message will be displayed on submission.
- Select the Title from the dropdown list. The following can be selected:
- Ms for women irrespective of the marital status.
- Mr for men.
- Mrs for married women.
- Rev for Reverend.
- Prof for Professor.
- Dr for Doctor.
- Adv for Advocate.
- Hon for Honourable.
- Capture the “Initials” in the Initials field.
- Enter the “Name” in the Name field.
- Enter the “Surname” in the Surname field.
- Enter the “Mobile” number in the Mobile Number field.
- Enter “Telephone” number in the Telephone number field. This field is optional.
- Enter the “Email” address in the Email address field.
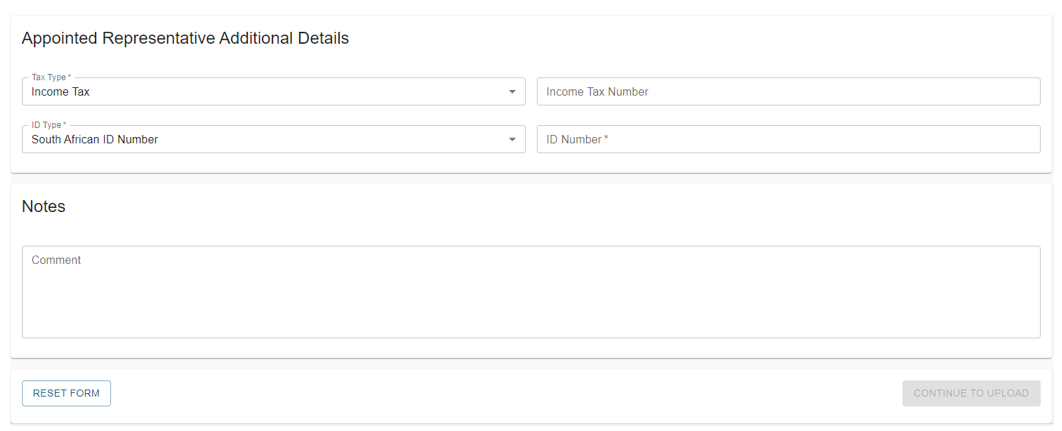
Capture Appointed Representative Additional Details as follows:
- Select the Tax Type from the dropdown list.
- The drop down will only have Income Tax as an option.
- Enter the “Income Tax Number” for the Appointed Representative. This field will be mandatory if the Capacity selected is Tax Practitioner.
- Select the ID Type from the dropdown list:
- South African ID Number – If the taxpayer is an individual and is a South African resident, only a valid ID number will be accepted.
- Passport Number – If the taxpayer is an individual and is a foreigner, a valid passport number must be used.
- Capture the “ID Number” depending on the ID Type selected.
- The system will validate that the ID number and Income tax reference number of the Appointed Representative belong to the same entity where the information has been completed. If not, an error message will be displayed on submission.
- Capture additional information in the Notes field about the estate that will be useful in coding the estate.
Click on the “CONTINUE TO UPLOAD” button once all the mandatory fields have been completed. The Captcha screen will be displayed.
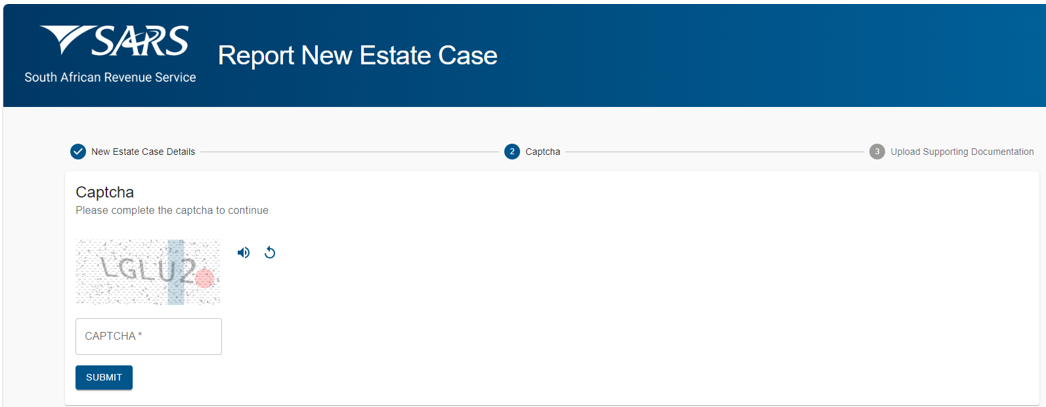
Complete the onscreen CAPTCHA field and click on the “SUBMIT” button. The upload supporting documents screen will be displayed.
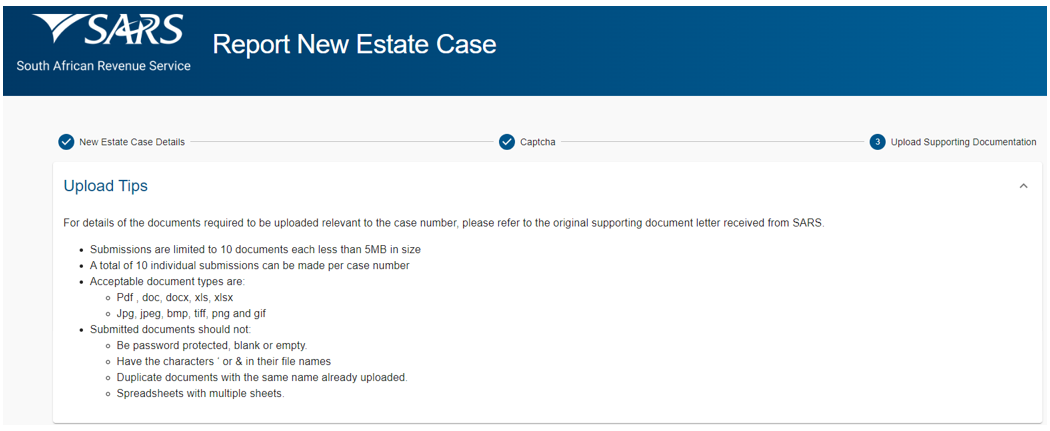
Read the upload tips and ensure adherence to the rules.
Click on the “Upload” button next to each required supporting documents to browse your PC and locate the supporting documents to be uploaded.
- Once the supporting document is attached, a “Delete” Icon is enabled next to the attached supporting document.
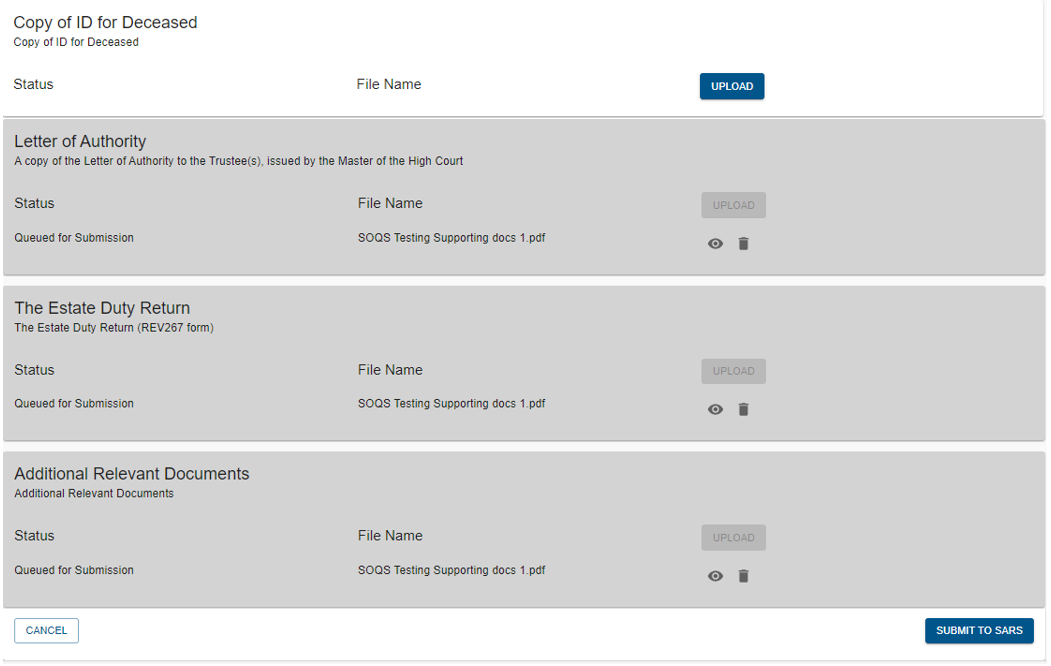
- View the list of attached documents to ensure that all the relevant supporting documents have been attached.
- Count the documents to ensure that the correct number of documents have been attached as indicated on the tips above.
- Where the taxpayer has attached an incorrect document click on the “Delete” Icon next to the specific document and delete it.
Once complete, click the “SUBMIT TO SARS” button to send the captured details and attached documents to SARS. The following “Case Successfully Submitted” confirmation message will be displayed.
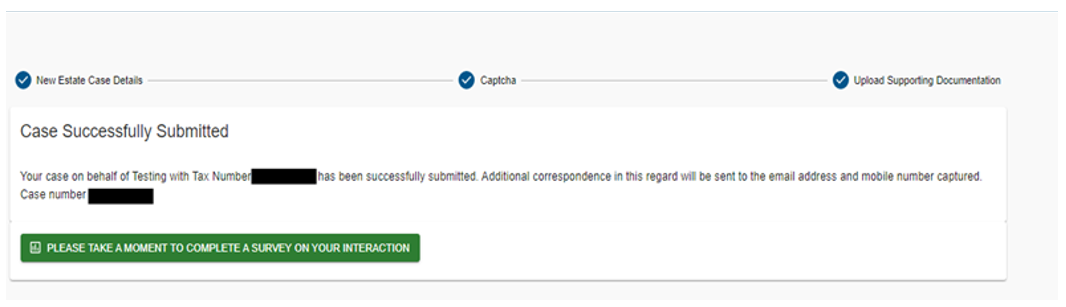
No existing estate coding case – SARS will send an email with a message to notify the requestor that the request to report new estate case has been successfully received with the new case number.
Existing estate coding case – SARS will send an email with a message to notify the requestor that the request to report new estate case has been successfully received with an existing case number.
Updating of Registered Representative
Queries relating to updating of registered representative of a taxpayer in respect of Income Tax, PAYE and VAT can be submitted using query type “Request to be updated as the Registered Representative”.
This request must be completed by the registered representative.
The requestor captures the required mandatory information and attaches the supporting documents required for this query.
Once the query is submitted a case will be created for a SARS official to resolve.
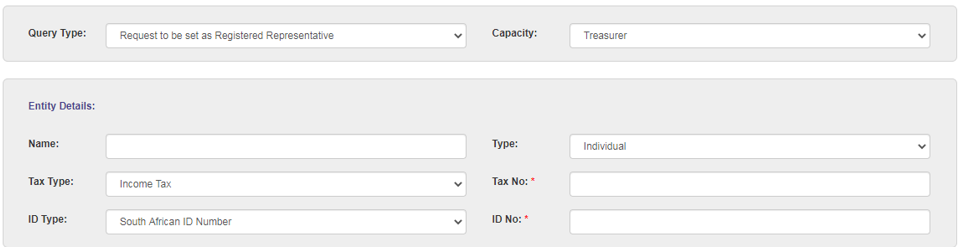
- If the “Register a Representative” query was selected” the Query Type will default to “Request to be set as the Registered Representative”.
- Select the Capacity from the dropdown list as follows:
- Treasurer – If you are a treasurer for the entity.
- Curator – If you have been appointed as the Curator for the taxpayer.
- Liquidator/ Executor/ Administrator (Estates).
- Main Partner – If you are the main partner in a partnership.
- Main Trustee – If you are the main trustee of the trust.
- Public Officer – If you a public officer of the company.
- Main Member – If you are the main member of the Close Corporation.
- Parent/Guardian – If you are a parent / guardian of a child; or
- Accounting Officer – If you are an accounting officer of the entity.
- Capture Entity Details (these are the details of the taxpayer who will be represented) as follows:
- Capture the Entity Name.
- Select the “Type” of taxpayer from the dropdown list. The following can be selected:
- Individual.
- Company.
- Trust; or
- Other.
- Select the “Tax Type” from the dropdown list. This list will be limited as per the Type of taxpayer selected above:
- If Individual is selected, the Tax Type will default to Income Tax.
- If Company is selected, the Tax Type will default to Income Tax.
- If Trust is selected the Tax Type will default to Income Tax.
- If Other is selected the following Tax Types will be available for selection:
- Income Tax.
- PAYE.
- VAT.
- Capture the Tax No depending on the Type of taxpayer selected above.
- Select the ID Type from the dropdown list, the list will be limited to the Type of taxpayer selected above.
- If an Individual was selected as Type of taxpayer, the list will consist of a South African ID Number and Passport Number only.
- South African ID Number – If the taxpayer is an individual and is a South African resident, only a valid ID number will be accepted.
- Passport Number – If the taxpayer is an individual and is a foreigner, a valid passport number must be used.
- If a Company was selected as a Type of taxpayer, the list will consist of Company Registration Number only.
- If a Trust was selected as a Type of taxpayer, the list will consist of a Trust Number only.
- If “Other” was selected as a Type of taxpayer, the ID type and ID number are not required.
- If an Individual was selected as Type of taxpayer, the list will consist of a South African ID Number and Passport Number only.
- Capture the ID No/ Reg No depending on the ID Type selected above.
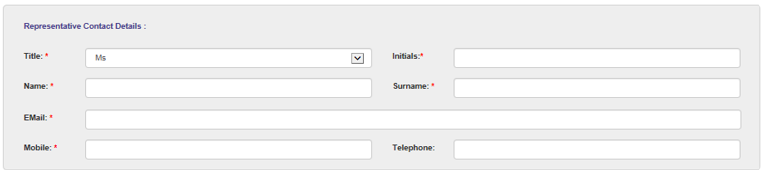
- Capture Representative Contact Details (these are the details of the person that must be recorded as the Registered Representative of the taxpayer in the selected Capacity) details as follows:
- Select the Title from the dropdown list. The following can be selected:
- Ms for women irrespective of the marital status.
- Mr for men.
- Mrs for married women.
- Rev for Reverend.
- Prof for Professor.
- Dr for Doctor.
- Adv for Advocate.
- Hon for Honourable.
- Capture the “Initials” in the Initials field.
- Enter the “Name” in the Name field.
- Enter the “Surname” in the Surname field.
- Enter the “Mobile” number in the Mobile field.
- Enter “Telephone” number in the Telephone number field. This field is optional.
- Select the Title from the dropdown list. The following can be selected:
Note: The contact details must be the details of the representative and not the contact details of the practitioner.
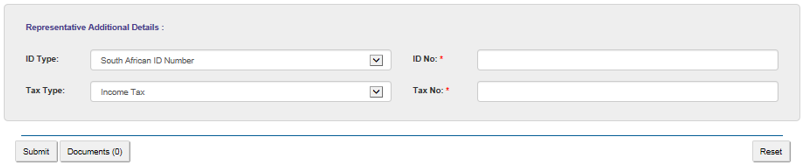
- Capture Representative Additional Details as follows.
- Select the ID Type from the dropdown list:
- South African ID Number – If the taxpayer is an individual and is a South African resident, only a valid ID number will be accepted.
- Passport Number – If the taxpayer is an individual and is a foreigner, a valid passport number must be used.
- Capture the ID No depending on the ID Type selected.
- Select the Tax Type from the dropdown list:
- Income Tax.
- Enter the Tax Number applicable to the Tax Type selected.
- Select the ID Type from the dropdown list:
- Click on the “Documents” button to add the supporting documents. The screen for “Documents for Submission” will display:
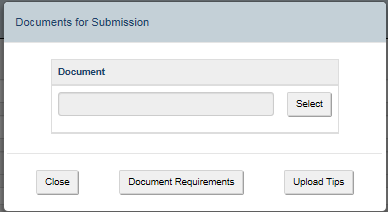
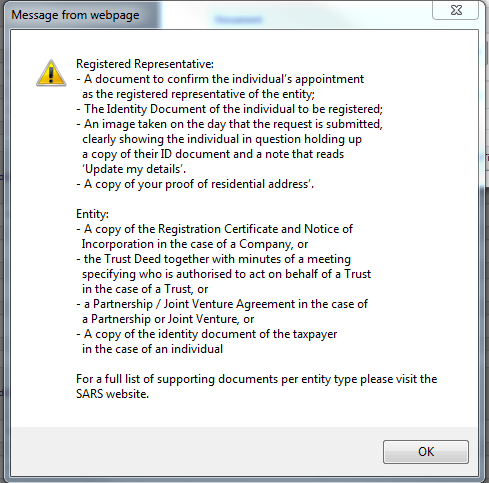
- Click on the “Document Requirements” button to view the list of supporting documents required. The following message will be displayed:
- Click on the “Upload Tips” button to view the following tips for downloading supporting documents. The following message will be displayed:
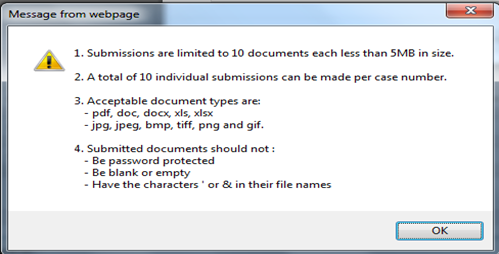
- Click on the “OK” button to close the message.
- Click on the “Select” button to browse your PC and locate the supporting documents to be uploaded.
- Once the supporting document is attached, a “Delete” button is enabled next to the attached supporting document.
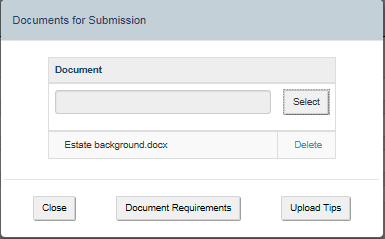
- View the list of attached documents to ensure that all the relevant supporting documents have been attached.
- Count the documents to ensure that the correct number of documents have been attached as indicated on the tips above.
- Where an incorrect document has been attached, click on the “Delete” button next to the specific document and delete it.
- Click the “Close” button to go back to the detail screen once the documents have been downloaded and attached.
- Once complete, press the “Submit” button to send the captured details and attached documents to SARS.
- Complete the onscreen CAPTCHA field before the submission is processed.
- Click on the “Validate” button to validate the captured information. Once the CAPTCHA is completed correctly, the submission is accepted and uploaded for processing.
- The message: “Thank you for your submission. Correspondence will be issued shortly” will display.
- SARS will send an email with a message to notify the requestor that the request to be updated as the registered representative has been received successfully with the allocated case number.
Request Trust Registration for Income Tax
This query will enable a Trust representative to apply for Income Tax registration via SOQS.
The requestor captures the required mandatory information on the screen and uploads the supporting documents required for this query.
Once the query is submitted a case will be created for a SARS official to resolve.
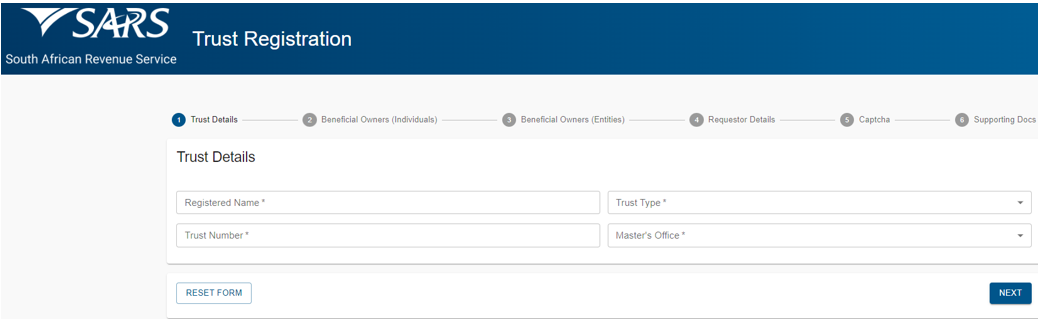
- If a “Trust Registration” query was selected, the Trust Registration screen above will be displayed.
- The mandatory fields will have an asterisk (*) next to them.
- For the Trust Details Section – All the fields in this part are mandatory.
- Capture the Registered Name of the Trust.
- Select the Trust Type from the dropdown list. The following Trust types can be selected:
- Inter-vivos Trust – This is a Trust which is created during the lifetime of a person by way of an agreement (contract) between the founder and the trustee(s).
- Testamentary Trust – This trust is set up in terms of the will of a person and comes into effect after their death.
- Foreign Trust (Non-Resident Trust) – is a trust that is not a resident in the Republic.
- Collective Investment Schemes in Securities.
- Special Trust Type A – Inter-vivos Trust created solely for the benefit of a person with a mental or physical disability as defined in section 6B (1) of the Income Tax Act during the lifetime of a person.
- Special Trust Type A – Testamentary Trust created solely for the benefit of a person with a mental or physical disability as defined in section 6B (1) of the Income Tax Act set up in terms of the will of a person.
- Special Trust Type B – Testamentary Trust created solely for the benefit of a person(s) who is a relative of a person who died and who are alive on the date of death of that deceased person (including those conceived but not yet born), and the youngest of the beneficiaries is younger than 18 years on the last day of the year of assessment.
- Capture the Trust Number – This is the number obtained from the master’s office on registration. The number will be on the Letter of Authority. (Please note: This is not the Unique Reference Number (URN)).
- Select the relevant master’s office from the dropdown list.
- If the requestor completed the incorrect information, click on “RESET FORM” to clear all the completed information.
- A confirmation message “Are you sure you want to clear the form?” will be displayed.
- Click on “CLEAR” to continue clearing the form.
- A blank form will be displayed. Complete the blank form with the correct details.
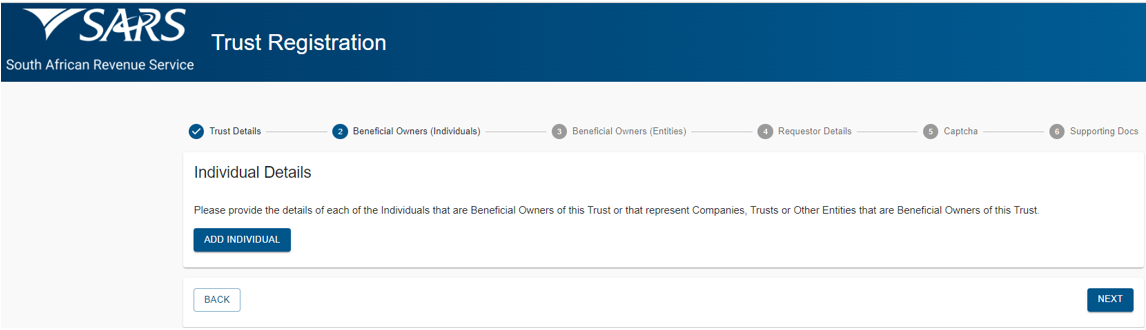
- Click on “NEXT” once all the mandatory fields have been completed to go to the next screen. The Beneficial Owner for Individuals screen will be displayed.
- The following types of beneficial owners may be found in the Trust environment:
- Founder – The person who creates the Trust and defines the terms of the Trust.
- Trustee – The person(s) that are appointed to manage the affairs and the assets of the Trust.
- Beneficiary – Any person who has a vested or contingent interest in all or a part of the receipts, accruals, or assets of a Trust. Beneficiaries will be identifiable when interpreting the Trust instrument.
- Donor – A person who donates assets, income or any other property to the Trust through a deed of donation or by any other means.
- Protector – A person who is appointed by the Founder to exercise control over all or certain assets or income in the Trust; usually after the Founder has become incapacitated or has died.
Note: Please note that the ultimate beneficial owner will always be a natural person where the type of beneficial owner is identified as a legal entity, legal arrangement or other (e.g., partnership), sufficient detail should be provided to clearly identify the ultimate natural person that will benefit from the assets or income of a Trust.
- Determine if the Trust has beneficial owners that are individuals (natural persons) or legal entities/legal arrangements/other or both.
- If a Trust has individuals (natural persons) as beneficial owners, complete Individual Details.
- If a Trust has legal entities/legal arrangements/other as beneficial owners, complete the Entity Details.
- If a Trust has both, complete both the Individual and Entity Details.
- Click on the “ADD INDIVIDUAL” button to capture the beneficial owner details. Please note that a maximum of 10 individuals (across all types of beneficial owners) per Trust can be captured.
- Should the Trust have more than 10 individuals (natural persons) as beneficial owners, please upload an organogram indicating the other natural beneficial owners and the type of beneficial ownership.
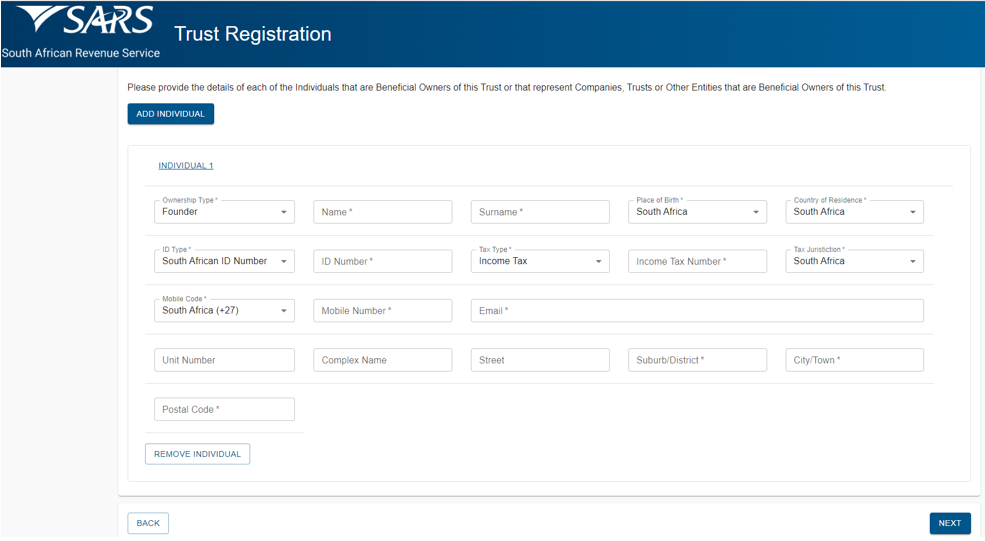
- The system will populate the information where possible. If the information is populated, review the information for completeness. If not populated, complete the following information:
- Select Ownership Type from the dropdown list. The following can be selected:
- Founder (Settlor or Donor)
- Trustee
- Beneficiary
- Donor (in relation to a donation made to the Trust – not the Founder)
- Protector
- Capture the Name of the beneficial owner.
- Capture the Surname of the beneficial owner.
- Select Place of Birth from the dropdown list.
- Select Country of Residence from the dropdown list.
- Select ID Type from the dropdown list.
- If the South African ID number was selected, capture the ID number.
- If the Passport number was selected, capture the passport number.
- Select the Tax Type from the dropdown list. The following can be selected:
- Income Tax – If the beneficial owner is registered for Income Tax.
- Not Registered – If the beneficial owner is not registered.
- If Income Tax was selected, capture the Income Tax Number.
- Select the Tax Jurisdiction from the dropdown list.
- Select the Mobile Code from the dropdown list.
- Capture the Mobile Number of the beneficial owner.
- Capture the Email address of the beneficial owner.
- Capture the Residential address of the beneficial owner.
- Click on the “Remove Individual” button to remove an individual who is no longer a beneficial owner.
- Click on “NEXT” to go to the next screen.
- Select Ownership Type from the dropdown list. The following can be selected:
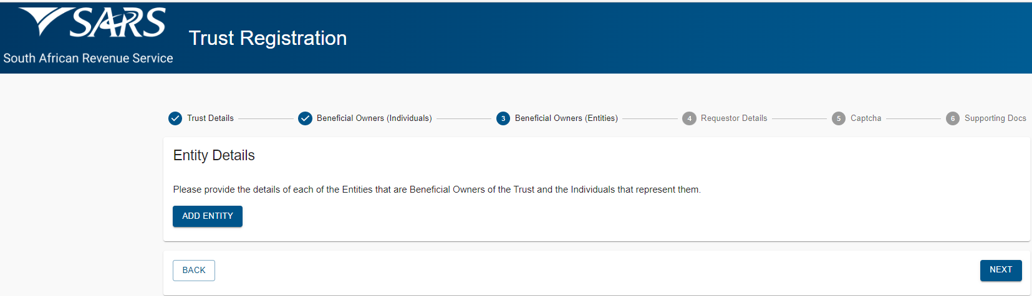
- Click on the “ADD ENTITY” button to capture the beneficial owner details.
- Please note that a maximum of 3 entities per Trust can be captured. If there are more than 3 entities for the specific Trust, an organogram indicating the detail and type of beneficial owner should be provided. This diagram should include the relevant additional beneficial ownership detail of the additional entity(s).
- If an entity (legal entity, legal arrangement or other) is selected, upload an organogram that provides detail on the beneficial ownership of the entity.
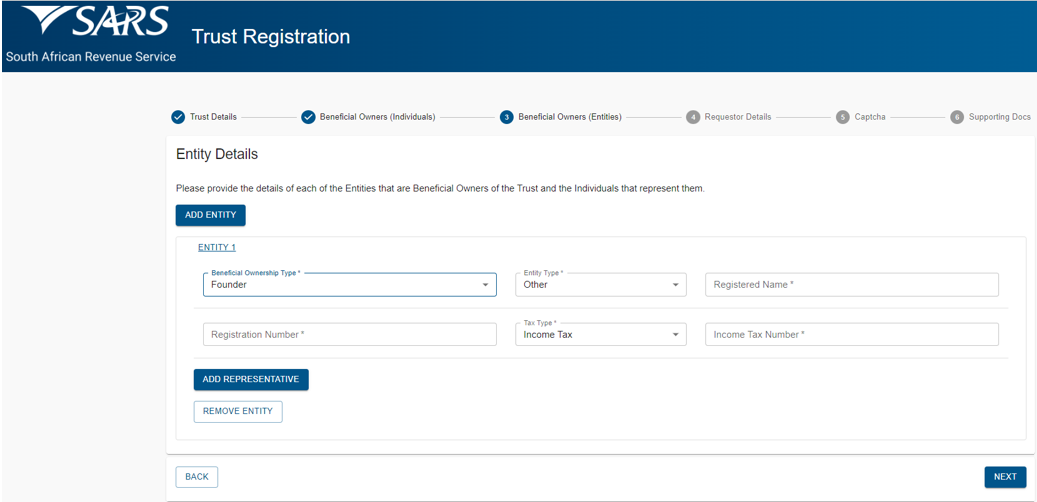
- The system will automatically populate the information where possible. If the information is populated review the information for completeness. If not populated complete the following information:
- Select Ownership Type from the dropdown list. The following can be selected:
- Founder (Settlor or Donor)
- Trustee
- Beneficiary
- Donor (in relation to a donation made to the Trust – not the Founder)
- Protector
- Select Entity Type from the dropdown list. The following can be selected:
- Company
- Trust
- Other
- Capture the Registered Name of the entity.
- Capture the Registration Number of the entity.
- Select the Tax Type from the dropdown list. The following can be selected:
- Income Tax – If the beneficial owner is registered for Income Tax.
- PAYE – If the beneficial owner is registered for PAYE.
- VAT – If the beneficial owner is registered for VAT.
- Depending on the Tax Type selected, capture the relevant Number.
- Click on the “Remove Entity” button to remove an entity which is no longer a beneficial owner.
- Click on “ADD REPRESENTATIVE” to capture the representative details. Please note that a maximum of 3 Individual Representatives can be captured per Entity.
- Select Ownership Type from the dropdown list. The following can be selected:
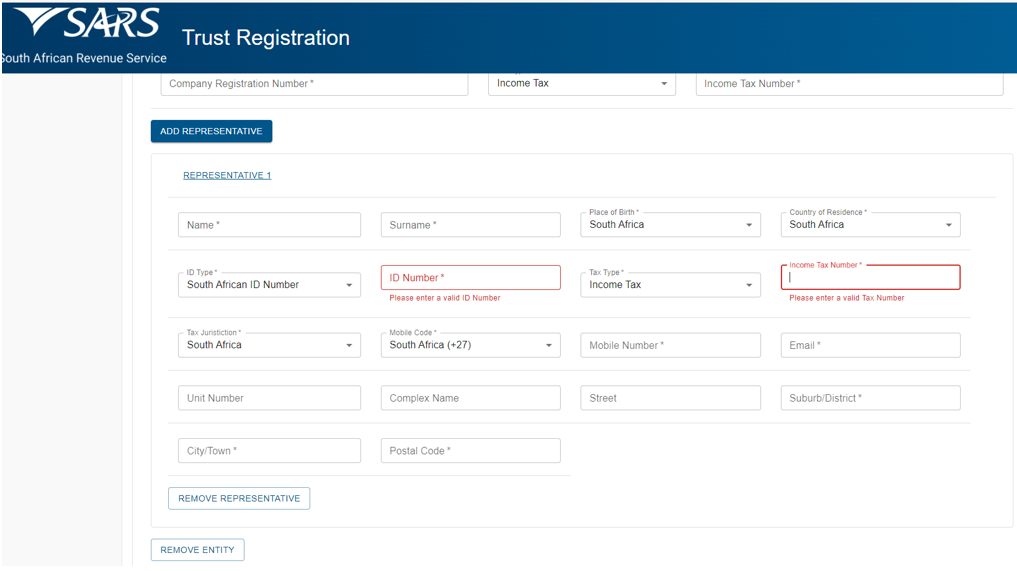
- The system will populate the information where possible. If the information is populated review the information for completeness. If not populated complete the following information:
- Capture the Name of the entity’s representative.
- Capture the Surname of the entity’s representative.
- Select Place of Birth from the dropdown list.
- Select Country of Residence from the dropdown list.
- Select ID Type from the dropdown list.
- If the South African ID number was selected, capture the ID number.
- If the Passport number was selected, capture the passport number.
- Select the Tax Type from the dropdown list. The following can be selected:
- Income Tax – If the beneficial owner is registered for Income Tax.
- Not Registered – If the beneficial owner is not registered.
- If Income Tax was selected, capture the Income Tax Number.
- Select the Tax Jurisdiction from the dropdown list.
- Select the Mobile Code from the dropdown list.
- Capture the Mobile Number of the entity’s representative.
- Capture Email address of the entity’s representative.
- Capture the residential address of the entity’s representative.
- Click on the “Remove Representative” button to remove the representative.
- Click on “NEXT” to go to the next screen.
- The system will populate the information where possible. If the information is populated review the information for completeness. If not populated complete the following information:
- The Requestor (person applying for the registration of Trust with SARS) Details screen will be displayed:
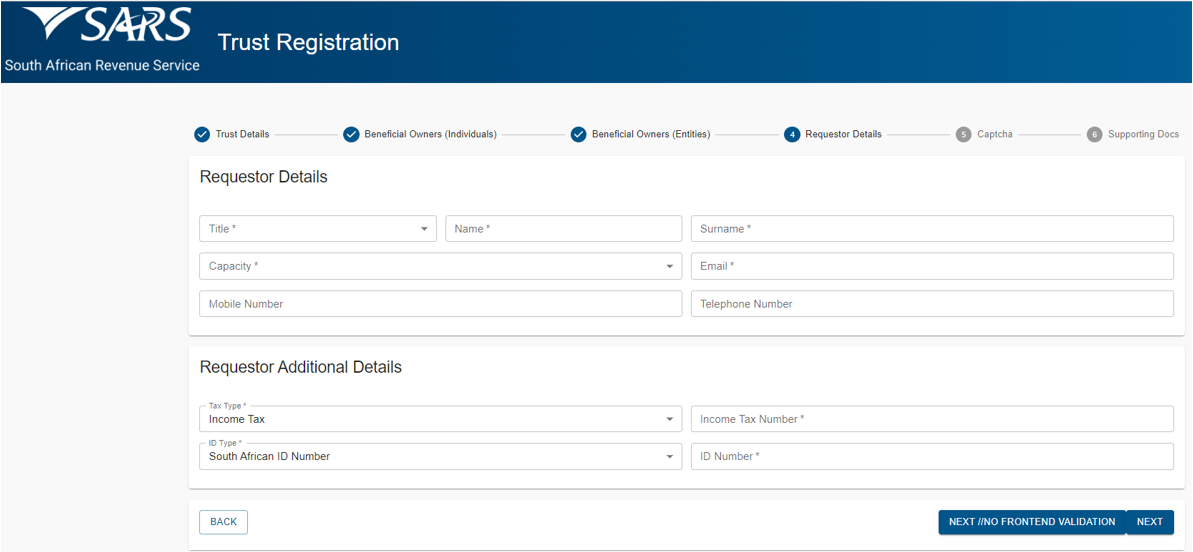
- Select the Title from the dropdown list. The following can be selected:
- Ms for women irrespective of the marital status.
- Mr for men.
- Mrs for married women.
- Rev for Reverend.
- Prof for Professor.
- Dr for Doctor.
- Adv for Advocate.
- Hon for Honourable.
- Capture the Requestor’s Name.
- The Initials will be pre-populated from the Name field, but the requestor can amend the initials.
- Capture the Requestor’s Surname.
- Select the Capacity from the dropdown list. The following can be selected:
- Tax Practitioner – If a Tax practitioner has been selected the PR Number must be captured.
- Main Trustee.
- Administrator (Estates).
- Executor.
- Liquidator.
- Curator.
- Once-off Mandate –The mandate is only for a specific transaction e.g., Trust registration, and then it expires.
- Capture the email address of the requestor.
- Capture the mobile number.
- Capture the telephone number.
- The Tax Type will default to Income Tax.
- Capture the Requestor’s Income Tax Number. The Income Tax number is mandatory, but under the following circumstances is optional:
- Trust type is a Foreign Trust type.
- Requestor’s capacity is a “Once off Mandate”.
- Requestor’s ID Type is Passport.
- Select the ID Type from the dropdown list. The following can be selected:
- South African ID Number – If the taxpayer is an individual and is a South African resident, only a valid ID number will be accepted.
- Passport Number – If the taxpayer is an individual and is a foreigner, a valid passport number must be used.
- Capture the ID No depending on the ID Type selected.
- If any of the mandatory fields are not completed, when you click “NEXT”, the system will display a message with all the errors.
- Click on the “NEXT” button once all the mandatory fields have been completed to go to the screen where supporting documents can be uploaded.
- Select the Title from the dropdown list. The following can be selected:
- The “Captcha” screen below will be displayed.
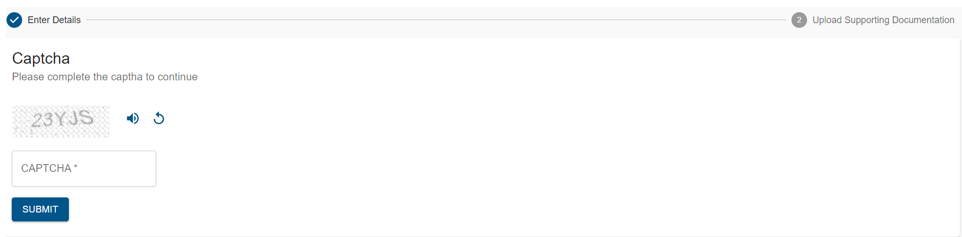
- Complete the onscreen CAPTCHA field and click on “SUBMIT” to proceed to the next page which will allow for the upload of supporting documents.
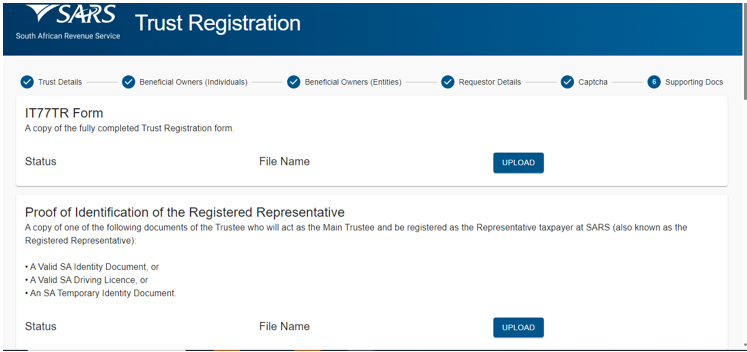
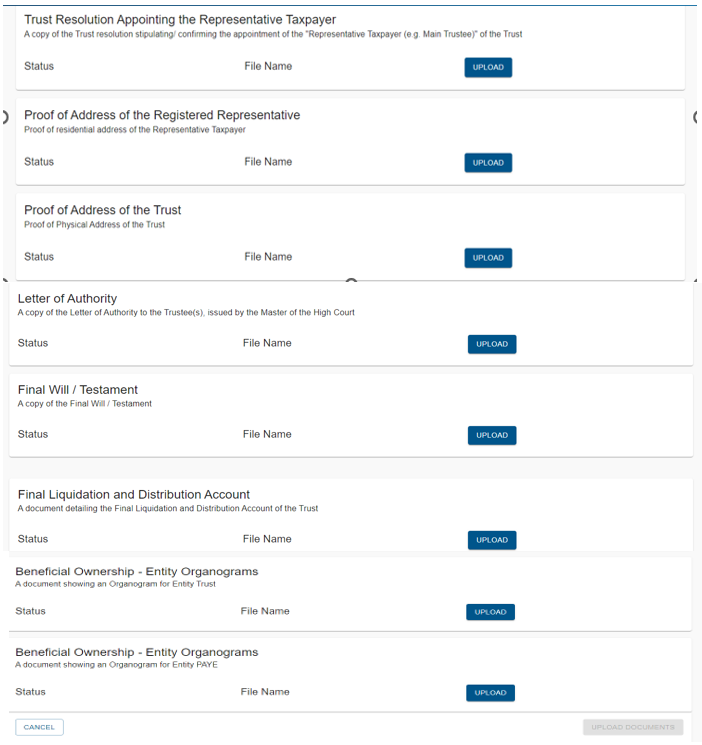
- The supporting documents screen will be displayed.
- Only the supporting documents relating to the Trust type and the requestor capacity selected will be displayed on the screen.
- There will be an upload button next to each supporting document required as per the screen below.
- Upload only the specific document and / or item indicated per upload section.
Note: You must upload a document for each upload section.
Example of Supporting documents screen for Testamentary Trust:
- Click on the “CANCEL” button if you want to go back to the previous page.
- A confirmation message “Are you sure you want to cancel upload and return to previous page?” will be displayed.
- Click on “CANCEL UPLOADING” to go back to the previous page.
- Click the “UPLOAD” button next to each supporting document to locate the relevant supporting document on your PC and upload it.
- Perform the same steps for all the supporting documents, and once all the supporting documents have been attached the “UPLOAD DOCUMENTS” button will be enabled to allow the requestor to finalise the registration request and to submit data to SARS.
- Once the application is submitted a message will be displayed for the Requestor that: “Registration Request Successfully Submitted. Your request to register XXXX Trust with Number 0000000 for Trust Income Tax has been successfully submitted. Additional correspondence in this regard will be sent to the email address and mobile number captured”.
Request SARS Notices
This query type is used to request the following:
- Notice of Assessment (ITA34) for a tax year.
- Statement of Account (SOA) for 6 months or date range.
- Notice of Registration.
- Penalty Statement of Account for a date range.
If the “SARS Notices” query type has been selected the “Request Documents” screen below will be displayed.
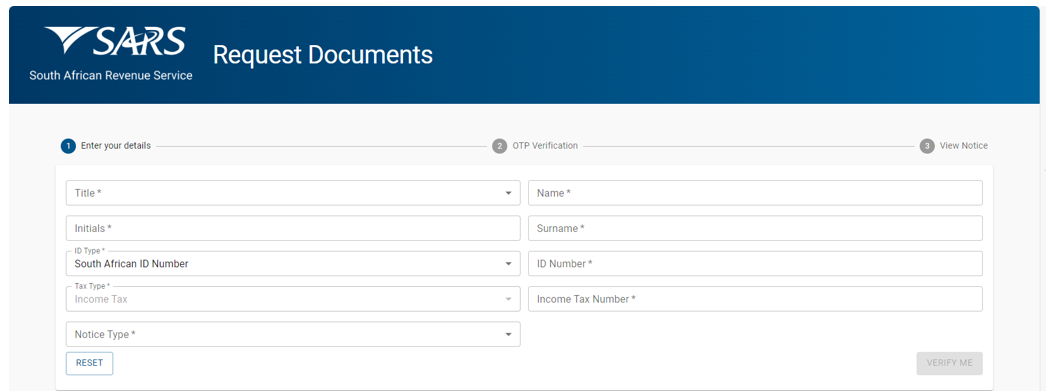
- The mandatory fields will have an asterisk (*) next to them. All the mandatory fields should be captured to be able to submit the query.
- Select the Title from the dropdown list. The following can be selected:
- Ms for women irrespective of the marital status.
- Mr for men.
- Mrs for married women.
- Rev for Reverend.
- Prof for Professor.
- Dr for Doctor.
- Adv for Advocate.
- Hon for Honourable.
- Enter the “Name” in the Name field.
- The “Initials” will default as per the “Name captured”. Capture the “Initials” in the Initials field’.
- Enter the “Surname” in the Surname field.
- The “ID type” will default to South African ID number. Select the ID type from the dropdown list:
- South African ID number – If the taxpayer is an individual and is a South African resident, only a valid ID number will be accepted.
- Passport number – If the taxpayer is an individual and is a foreigner, a valid passport number must be used.
- Capture the “ID No” depending on the ID type selected.
- The Tax Type will default to Income Tax.
- Capture the Income Tax number.
- Select the type of notice required:
- If “Notice of Assessment” is required click on “Notice of Assessment”, then the tax year will be mandatory.
- Select the relevant Tax Year from the list.
- If “Statement of Account” is required, choose the option of 6 months or date range.
- If the “Statement of Account 6 months” option is selected the “From Date” and “To Date” will be defaulted by the system.
- If the “Statement of Account Date Range” is selected, select the “From” date using the calendar and the system will default the “To” date to today’s date.
- If “Penalty Statement of Account” is required, select the “From Date” using the calendar and the system will default the “To Date” to today’s date.
- If “Notice of Assessment” is required click on “Notice of Assessment”, then the tax year will be mandatory.
- Once the correct option has been selected click on the “VERIFY ME” button.
- The system will validate the captured information and the following message will be displayed if the information captured does not match the information on the SARS system:
- “Thank you for your Query. Unfortunately, we were not able to process your request to view a SARS Notice. Please retry your selection and if you are still not successful, visit www.sars.gov.za and use our online services to confirm your details or make an appointment to visit your nearest SARS Branch for additional assistance.”
- The taxpayer can also call the Contact Centre to obtain the ITA34 and SOA.
- If the information captured matched SARS information the following screen will be displayed prompting the taxpayer to select the OTP verification method:

Note 1: For additional security, the system will send the OTP to the taxpayer to confirm taxpayer’s identity before displaying sensitive information.
- The screen will display the masked version of the email address and mobile phone number that is on SARS records.
- Verify that the information displayed on the screen is the correct information.
- Select an OTP verification method by clicking on the relevant method preferred by the taxpayer to receive the OTP.
- An OTP number will be sent to the taxpayer via the preferred method and the following OTP verification screen will be displayed:

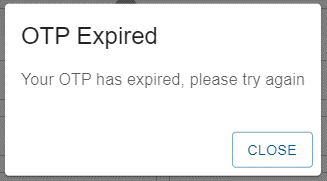
Note 2: The taxpayer will be given a total of 3 minutes to have their OTP successfully validated.
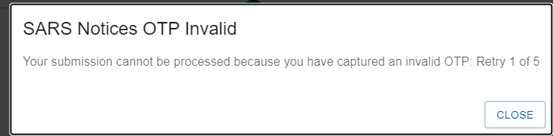
- Capture the OTP number received on the above screen and click “Submit”.
- If an invalid OTP number was captured the following message will be displayed:
- If the OTP has expired the following message will be displayed:
- If the correct OTP number was captured within the prescribed time and was successful, the View Notice screen below will be displayed.
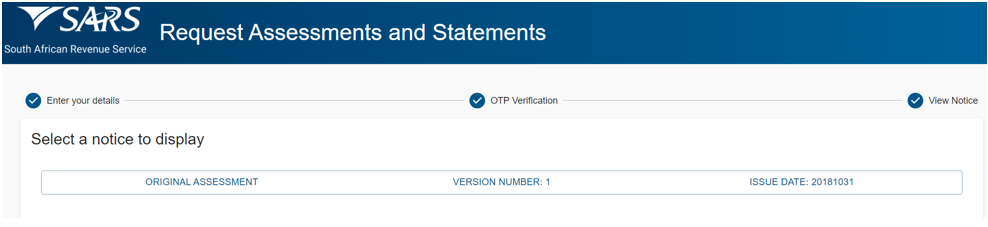
- Select the notice and click on view to display the notice.
Request your Tax Compliance Status (TCS)
Taxpayers can use this query to request their TCS PIN. Any of the following TCS types can be requested:
- Good Standing.
- Approval International Transfer.
If the “Tax Compliance Status Request” query was selected, the “Tax Compliance System” screen will be displayed. The mandatory fields will have an asterisk (*) next to them. All the mandatory fields should be captured to be able to submit the TCS request.
Complete the Request Details as follows:
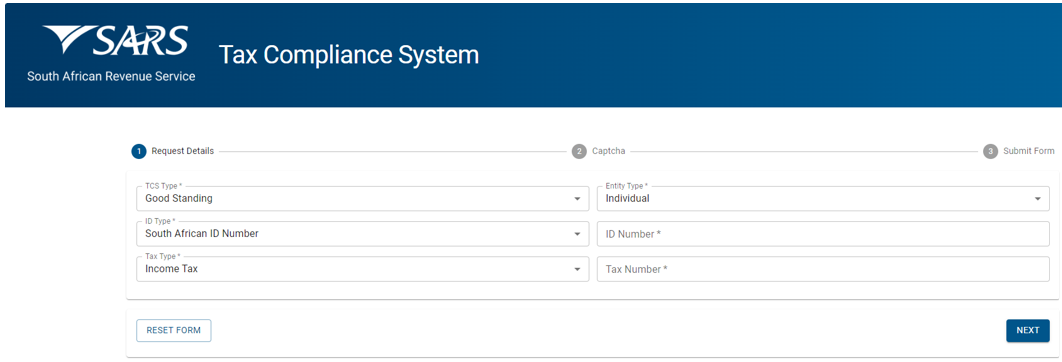
- Select the TCS Type from the dropdown list. The following types can be selected:
- Good Standing.
- Approval International Transfer.
- Select the “Entity Type” from the dropdown list. The following can be selected:
- Individual.
- Company.
- Trust,
- Other.
Note: For Approval International Transfer the Entity Type defaults to “Individual” as only individuals can apply for this type of TCS.
- Select the Identity Type from the dropdown list. The list will be limited to the Type of entity selected above.
- If an Individual was selected as the Entity Type, the list will consist of a South African ID number and Passport Number only.
- South African ID number – If the taxpayer is an individual and is a South African resident, only a valid ID number will be accepted.
- Passport Number – If the taxpayer is an individual and is a foreigner, a valid Passport Number must be used.
- If a Company was selected as the Entity Type, the list will consist of Company Registration Number only.
- If a Trust was selected as the Entity Type, the list will consist of a Trust Number only.
- If “Other” was selected as the Entity Type, the Identity Type and ID Number are not required.
- If an Individual was selected as the Entity Type, the list will consist of a South African ID number and Passport Number only.
- Capture the ID Number/Reg Number depending on the Identity Type selected above.
- Select the “Tax Type” from the dropdown list. This list will be limited as per the Type of entity selected above:
- If Individual is selected, the Tax Type will default to Income Tax.
- If Company is selected, the Tax Type will default to Income Tax
- If Trust is selected, the Tax Type will default to Income Tax.
- If Other is selected, the following Tax Types will be available for selection:
- PAYE.
- VAT.
- Income Tax.
- Capture the Tax Number depending on the Type of taxpayer selected above.
Click on the “NEXT” button to proceed to the next step. The “Captcha” screen will be displayed.
Complete the onscreen Captcha as follows:
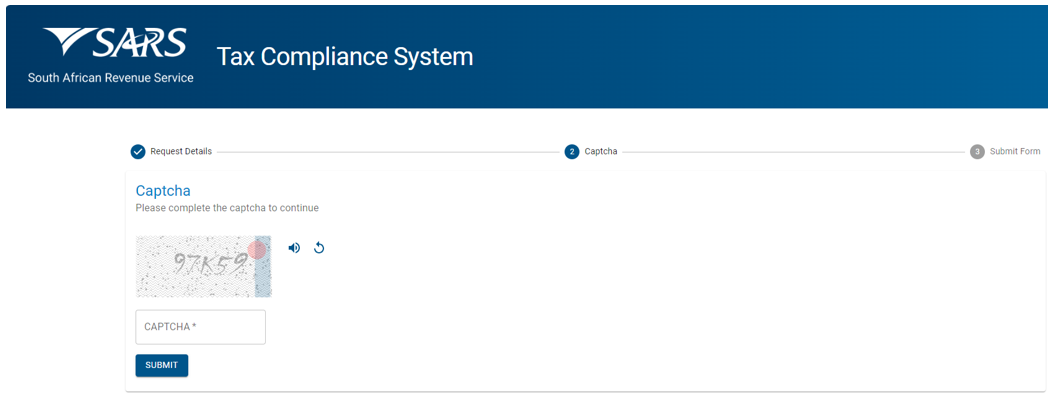
- Complete the onscreen CAPTCHA field.
- Click on the “SUBMIT” button. The Tax Compliance Request form (TCR01) will be displayed to complete. The following containers will be displayed in the form:
Review the Taxpayer Details:
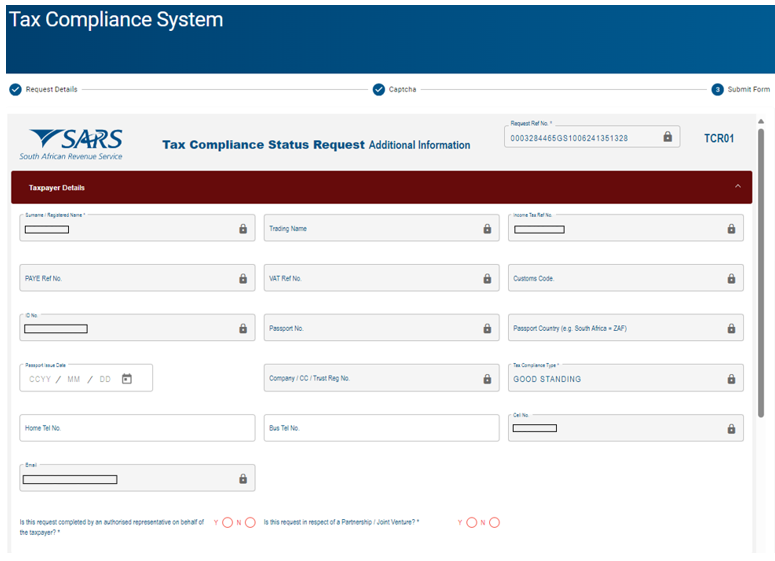
- This container will always be displayed for all TCS types and pre-populated with the following information, where applicable:
- Surname/Registered Name.
- Trading Name.
- Income Tax Number
- PAYE Number
- VAT Number
- Customs Code
- ID Number
- Passport Number
- Passport Country
- Passport Issue Date
- Company/CC/Trust Reg No
- TCS Type (this field will be pre-populated based on the TCS type selected in the first screen)
- Home Tel No
- Bus Tel No
- Cell No
- Review the pre-populated information to ensure that it is correct.
Click on the radio button “Y” next to the question “Is the request completed by an authorised representative on behalf of the taxpayer” if this request is being completed by an authorised representative. The “Representative Authorised to request the tax compliance status on behalf of the taxpayer” screen will be displayed. The mandatory fields will have a red asterisk (*) next to them.
Complete the Representative Authorised to request the tax compliance status on behalf of the taxpayer details:
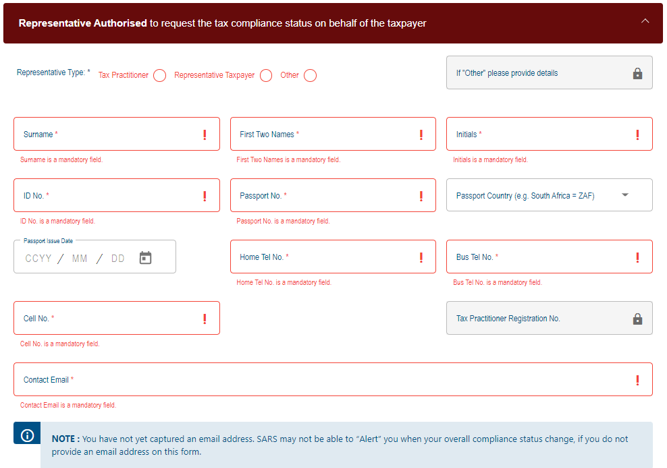
- Select the relevant Representative Type that is completing the form. The following can be selected.
- Tax Practitioner.
- Taxpayer Representative; or
- Other.
- If “Other” is selected as the representative type, capture the description for Other.
- Capture the Surname of the authorised representative.
- Capture the First two names of the authorised representative.
- Capture the Initials of the authorised representative.
- Capture the ID Number of the authorised representative if the taxpayer is an individual and is a South African resident. Only a valid ID number will be accepted.
- Capture the Passport Number if the taxpayer is an individual and is a foreigner. A valid passport number must be used.
- Select the Passport Country from the dropdown list.
- Select Passport Issue Date on the calendar.
- Capture any of the following contact numbers:
- Home Telephone Number.
- Business Telephone Number; and/or
- Cell Number.
- Capture the Tax Practitioner Registration Number if the Tax Practitioner was selected as the representative type.
- Capture the Contact Email Address of the authorised representative.
Click on the radio button “Y” next to the question “Is this request in respect of a Partnership/Joint Venture?” if this request is for either a Partnership or a Joint Venture. The “Partnership/Joint Venture Details” screen will be displayed. The mandatory fields will have a red asterisk (*) next to them.
Complete the Partnership/Joint Venture Details:

- Capture the Partnership/Joint Venture Name on the screen.
- Capture the PAYE Reference Number if applicable.
- Capture the VAT Reference Number if applicable.
If this application is being completed by the taxpayer and is not in respect of Partnership or Joint Venture, click on the radio button N next to all the questions and sign the declaration.
Click on the “Expiry Details – required for the initial pin issued on approval of this tax compliance request” container/heading.
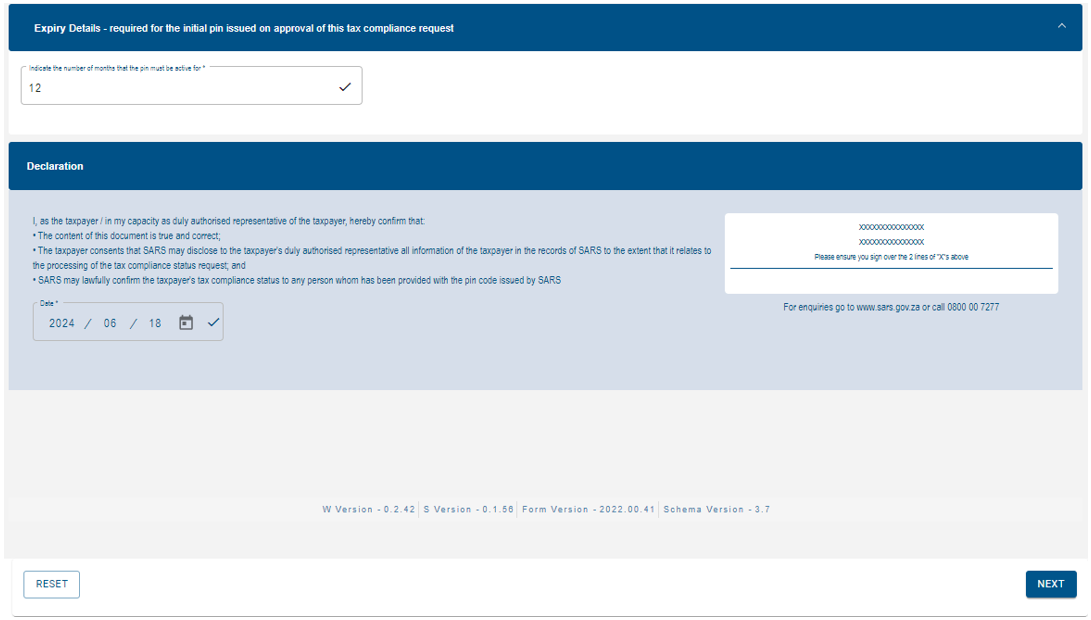
The number of months that the PIN must be active for is defaulted to 12. If a lesser period is required, change the 12 months to the required number of the months for the TCS PIN to be active. The taxpayer can enter any number between 1 and 12 as this is in months. For example, if a taxpayer enters 6 months in this field, the TCS PIN will be active only for 6 months.
Click on the “NEXT” button to submit the request. An email will be generated for the requestor.
For Approval International Transfer (AIT) TCS Type, the “International Transfer Details”, “Source(s) where the value to be transferred arose from Details”, and “Assets and Liabilities Details additional” containers/headings will be added to the form. The mandatory fields will have a red asterisk (*) next to them.
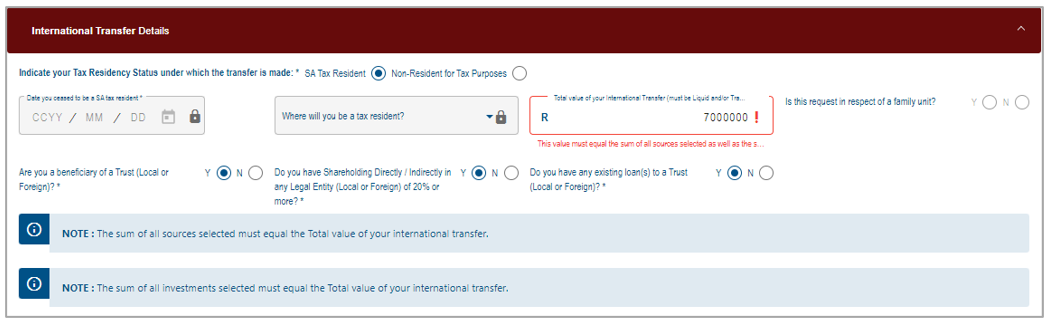
Complete the International Transfer Details:
- Click the “International Transfer Details” container/heading and complete the details as follows:

- Indicate your Tax Residency Status under which the transfer is made.
- If “SA Tax Resident” is selected, the “International Investment Type Details” container will be added to the form.
- If “Non-Resident for Tax Purposes” is selected (this means that you ceased to be a SA tax resident and you have the relevant documents from SARS that you ceased to be an SA tax resident), the “Date you ceased to be a SA resident” and the country “Where will you be a tax resident” fields will be unlocked and mandatory.
- Complete the “Total value of your International Transfers (must be liquid and/or transferrable Source Type)”. This refers to the total value that the Taxpayer wishes to transfer internationally.
- Please note that the individual amounts captured under the Source Details and Investment Details headings (only applicable to SA Tax Residents) must equal the “Total value of your International Transfer”.
- Example: If a taxpayer received a donation of R1M, inherited R4M and has an investment of R1M and the taxpayer wants to transfer all this money internationally. The amount that must be completed in the “Total value of your International Transfers…” field is R6M.
- Indicate whether you are a beneficiary of a Trust (Local or Foreign).
- If “Yes” is selected, the Interest in Trust(s) Details container will be added to the form. Complete the Local and Foreign Trust Details sub-container in the Interest in Trust(s) Details container.
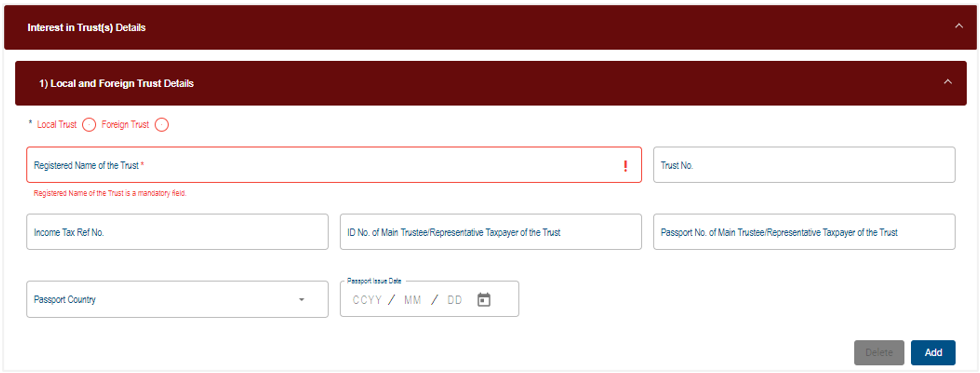
- Indicate if it is a Local or Foreign Trust.
- Complete the Registered Name of the Trust.
- Complete Trust Number (mandatory for Local Trust).
- Complete Income Tax Number (only applicable to Local Trust).
- Complete ID Number of the Main Trustee/Representative Taxpayer of the Trust (only applicable to Local Trust).
- Complete Passport Number of the Main Trustee/Representative Taxpayer of the Trust (only applicable to Foreign Trust).
- Select Passport Country from the dropdown list.
- Select Passport Issue Date on the calendar.
- If you wish to add additional Local and Foreign Trust details container, click the “Add” button. For example, this may be where you are a beneficiary to multiple Trusts.
- Indicate whether you have Shareholding Directly/Indirectly in any Legal Entity (Local or Foreign) of 20% or more.
- If “Yes” is selected, the “Legal Entity Shareholding Details” container will be added to the form. Complete the Local and Foreign Shareholding Details sub-container in the Legal Entity Shareholding Details container.
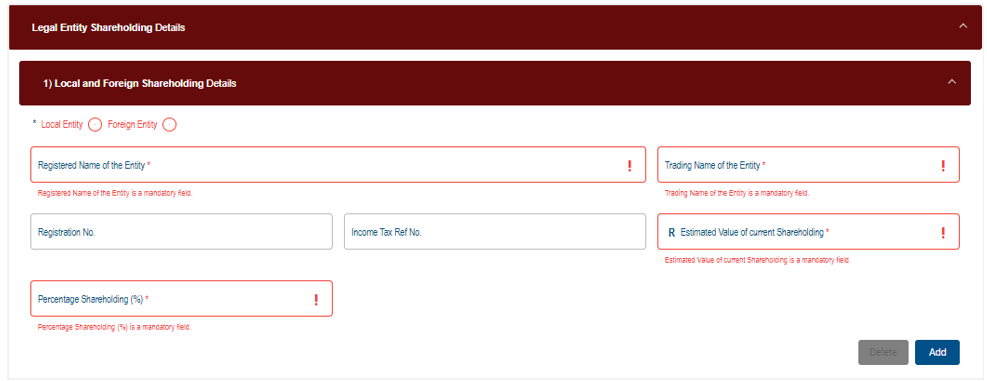
- Indicate if it is a Local Entity or Foreign Entity.
- For Local Entity, all fields are mandatory.
- Complete Registered Name of the Entity.
- Complete Trading Name of the Entity.
- Complete Registration Number (applicable to Local Entity)
- Complete Income Tax Reference Number (applicable to Local Entity).
- Complete Estimated Value of current Shareholding.
- Complete Percentage Shareholding (%).
- If you wish to add additional Local and Foreign Shareholding Details container, click the “Add” button.
- Indicate whether you have any existing loan(s) to a Trust (Local or Foreign).
- If “Yes” is selected, the “Loans to a Trust(s) Details” container will be added to the form. Complete the Local and Foreign Shareholding Details sub-container in the Loans to a Trust(s) Details container.
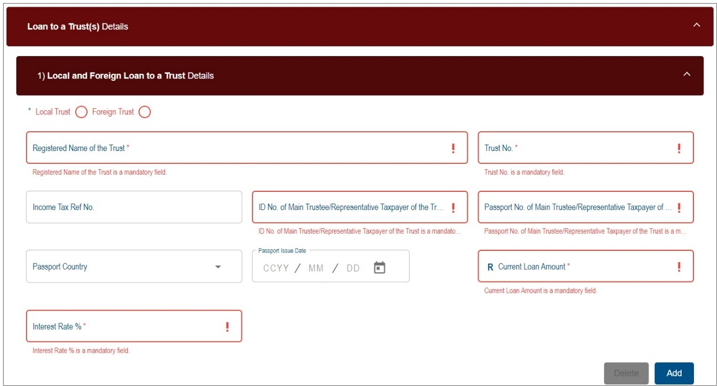
- Indicate if it is a Local or Foreign Trust.
- Complete Registered Name of the Trust
- Complete Trust Number (this is optional for Foreign Trust).
- Complete Income Tax Number (only applicable to Local Trust).
- Complete ID Number of the Main Trustee/Representative Taxpayer of the Trust (only applicable to Local).
- Capture Passport Number of Main Trustee/Representative Taxpayer of the Trust (only applicable to Foreign).
- Select the Passport Country from the dropdown list.
- Select Passport Issue Date on the calendar.
- Complete Current Loan Amount.
- Complete Interest Rate %.
- If you wish to add additional Local and Foreign Loan to a Trust Details container, click the “Add” button.
- If Non-Resident for Tax Purposes is selected complete the following information in addition to the above:

- Select the Date you ceased to be an SA tax resident on the calendar.
- Note: If the date you ceased to be an SA tax resident is greater than 5 years, the Foreign Assets and Liabilities Details container will be optional for completion.
- Select the country where will you be a tax resident from the dropdown list.
- Indicate if the request is in respect of a family unit. If “Yes” is selected, a warning message will be displayed.
- Select the Date you ceased to be an SA tax resident on the calendar.
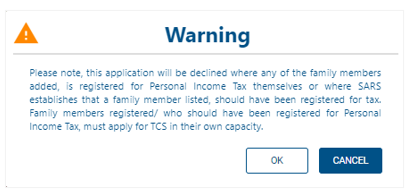
- Click “OK” on the warning message to continue after reading the message. The Family Member Details container will be added to the form. Complete the Family Member Details. The mandatory fields will have a red asterisk (*) next to them.
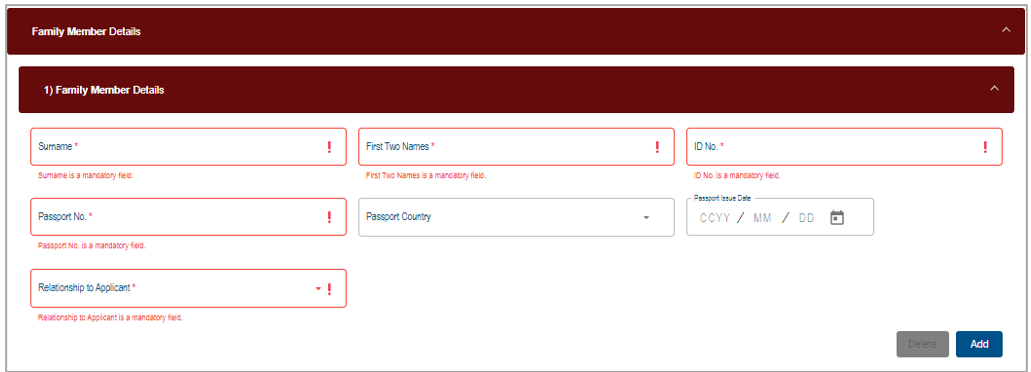
- Capture the Surname
- Capture the First Two Names
- Capture either the ID Number or Passport Number.
- If the Passport Number was completed, select the Passport Country from the dropdown list and select the Passport Issue Date on the calendar.
- Select the Relationship to Applicant from the dropdown list.
- If more than one family member must be added, click the “Add” button to add more family members. The second Family Member Details container will be presented. Complete all the relevant fields.
- If SA Tax Resident is selected, the “International Investment Type Details” container will be added to the form. Click the “International Investment Type Details” container and complete the following mandatory information in addition to the above:
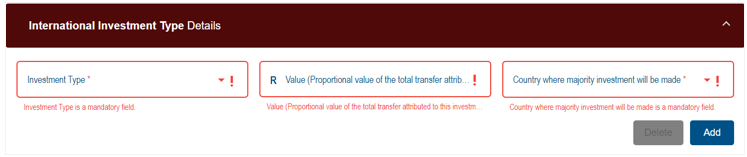
- Select the applicable Investment Type from the dropdown list. The following options are available:
- Cash
- Crypto Assets
- Exchange Traded Funds
- Insurance Products
- Listed Equities
- Listed Bonds
- Property
- Unit Trust
- Other
- Capture the proportional value of the total transfer.
- Select the Country where the majority investment will be made from the dropdown list.
- Click on the “Add” button to add more investment types where the taxpayer has more than one type of international investment.
- Depending on the investment type(s) selected, ensure that the sum of the individual proportional values from the various investment types equals the “Total Value of your International Transfer” amount.
- Below is an example on how to complete International Investment Type Details with multiple investment types:
- The total value of your international Transfer is R7M.
- Select the applicable Investment Type from the dropdown list. The following options are available:
- Illustration of multiple investment types.

Complete the Source(s) where the value to be transferred arose from Details:
- Click the “Source(s) where the value to be transferred arose from Details” container and complete the details as follows:
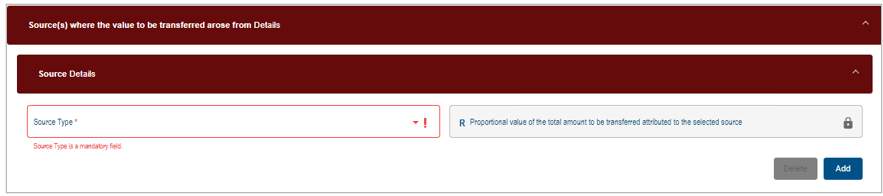
- Select one or more of the following Source Types:
- Cash/Savings – If the money is from the savings or cash was received.
- Inheritance – If the money was inherited from the deceased person.
- Distribution from Trust as a beneficiary – If the source is the distribution received from a trust.
- Donations – If the money was donated.
- Dividends distribution from a Company – If the source was the dividends distribution from a company because you are a shareholder.
- Loan – If the money was lent either from a bank or company.
- Sale of Property – If the money was generated through the selling of the property.
- Sale of Shares and other securities – If the money was generated by selling shares and other securities.
- Sale of Crypto Asset – If the money was generated by selling crypto asset.
- Transfer of Listed Securities
- Other – If the source is not on the list, select other and type the description.
- Select one or more of the following Source Types:
- The “Proportional value of the total amount to be transferred attributed to the selected source” field will be auto calculated from the details captured for each source added. The sum of all sources captured must equal the total value of your international transfers as captured in the International Transfer Details container.
- Click on the “Add” button to add more source types if the value to be transferred arose from different entities or accounts.
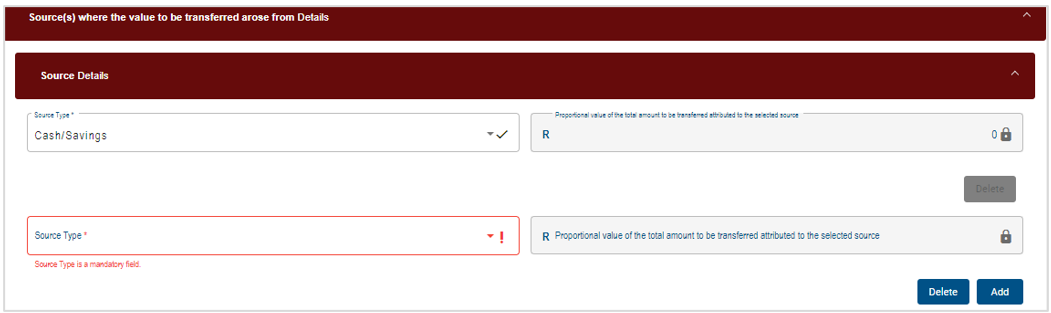
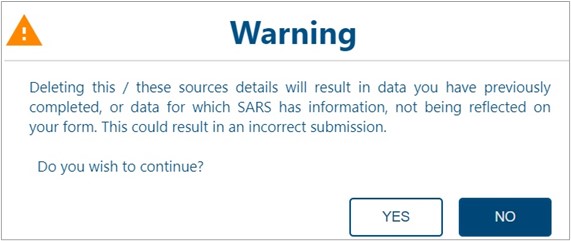
- If you wish to delete the additional Source row, click the “Delete” button. A warning message will be displayed. Click “Yes” or “No” to proceed.
- Depending on the Source Type selected the details screen per source type will be displayed. Below is an example of how to complete Source Details if sources where the value to be transferred arose from cash/savings, distribution from trusts as a beneficiary, inheritance, dividends distribution from a company, and Inheritance.
- If Cash / Savings is selected as the source, the “Cash / Savings Details” container will be added to the form. Complete the following details in the “Cash / Saving Additional Details” sub-container:
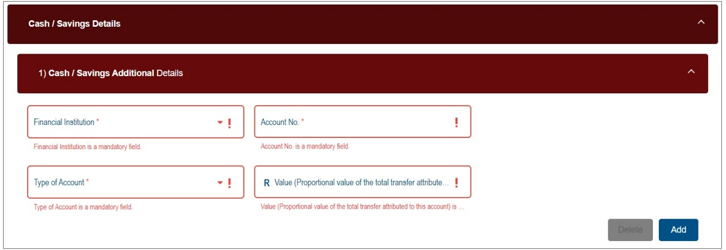
- Select the Financial Institution from the dropdown list.
- Capture the Account Number
- Select the Type of Account from the dropdown list.
- Capture the Value (Proportional value of the total transfer attributed to this account)
- Click the “Add” button to include additional Cash/Savings source(s).
- If Distribution from Trusts as a beneficiary is selected as the source, the “Distribution from Trust Details” container will be added to the form. Complete the following details in the “Distribution from Trust Additional Details” sub-container:
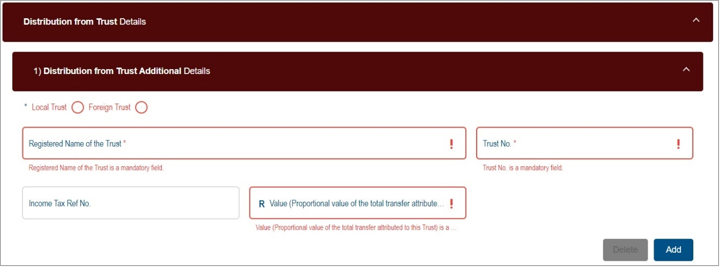
- Registered Name of the Trust
- Trust Number.
- Income Tax Ref Number.
- Value (Proportional value of the total transfer attributed to this Trust).
- If Dividends distribution from a Company is selected as the source, the “Dividends Distribution from a Company Details” container will be added to the form. Complete the following details in the “Dividends Distribution from a Company Additional Details” sub-container”:
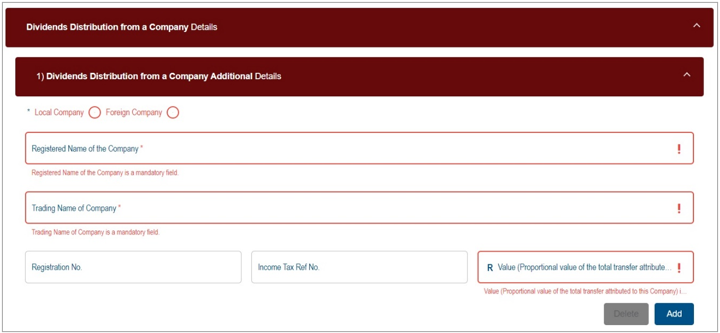
- Indicate Local or Foreign Company.
- Registered Name of the Company.
- Trading Name of the Company.
- Registration Number.
- Income Tax Reference Number.
- Value (Proportional value of the total transfer attributed to this Company).
- If Inheritance is selected as the source, the “Inheritance Details” container will be added to the form. Complete the following details in the “Inheritance Additional Details” sub-container:
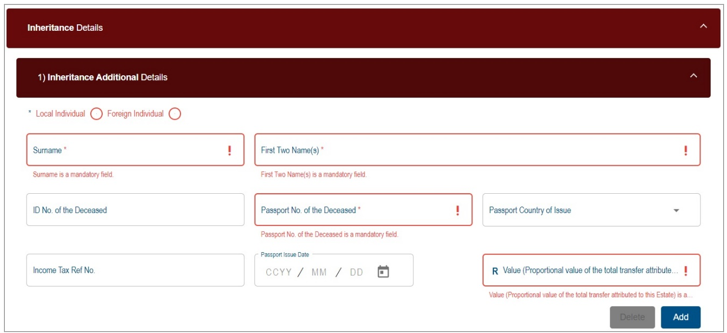
- Indicate Local or Foreign Individual
- Surname
- First Two Name(s)
- ID No of the Deceased – mandatory if Local Individual is selected.
- Passport Number of the Deceased
- Passport Country of Issue
- Passport Issue Date (CCYYMMDD).
- Income Tax Reference Number – mandatory if Local Individual is selected.
- Value (Proportional value of the total transfer attributed to this Estate)
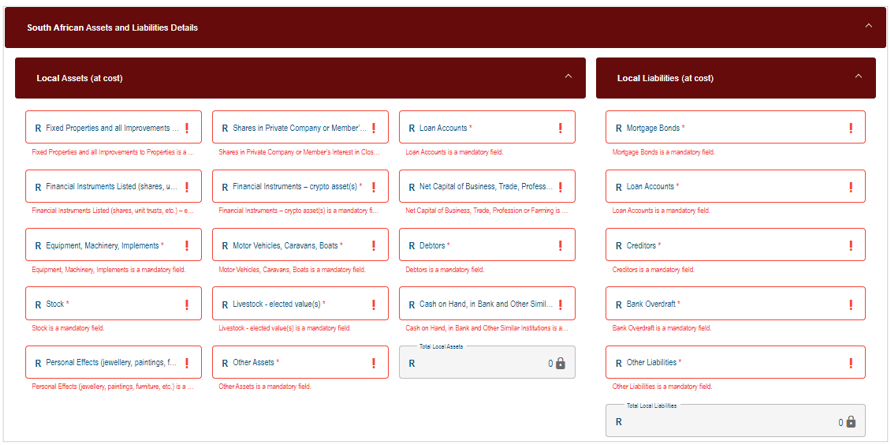
Complete the Assets and Liabilities Details
- Click on the “Assets and Liabilities Details” container and complete the “South African Assets and Liabilities” and “Foreign Assets and Liabilities” details respectively. The assets and liabilities must be fully disclosed. Incorrect amounts or asset omissions will result in the rejection of the TCS request.
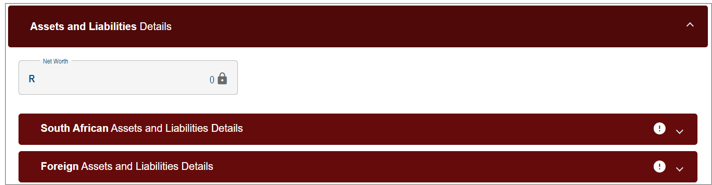
- Select the “South African Assets and Liabilities Details” sub-container and complete all the mandatory fields.
- Select the “Foreign Assets and Liabilities Details” sub-container and complete all the mandatory fields.
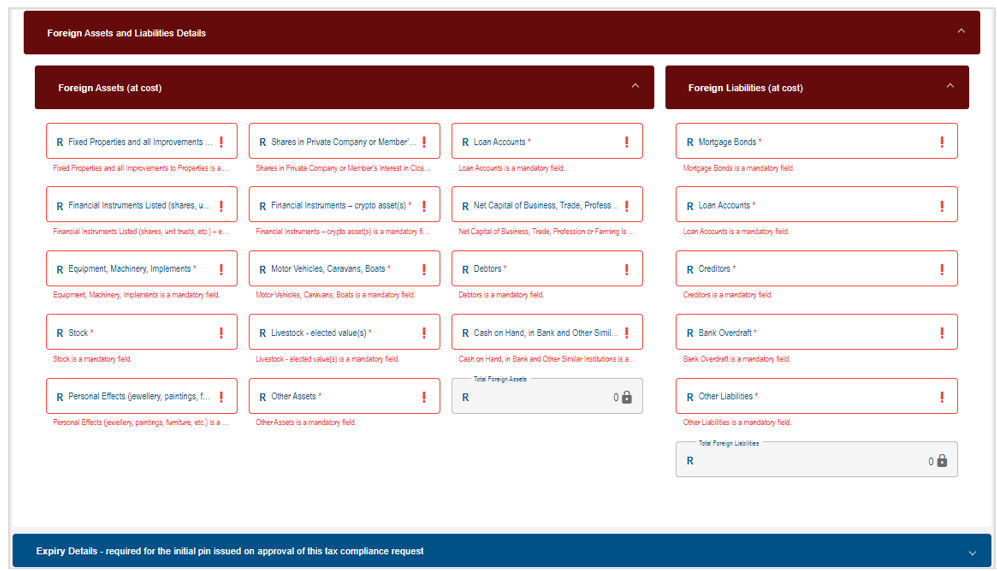
- For the AIT application, where the ‘Non-Resident for Tax Purposes’ is selected and the ‘Date you ceased to be a SA Tax Resident’ is more than five years from the date the AIT application was submitted, the ‘Foreign Assets and Liabilities Details’ fields will be optional.
Complete the Expiry Details – required for the initial PIN issued upon approval of this tax compliance request.
- Click on the “Expiry Details – required for the initial pin issued on approval of this tax compliance request” container and confirm the number of months after which the pin must expire.

- The number of months that the PIN must be active for is default to 12. If a lesser period is required, change the 12 months to the required number of months the TCS PIN to be active. Two digits are required in the field, e.g., 05 or 12 etc.
Click on “NEXT” button to submit the request to SARS. The message: “Thank you for your submission. Correspondence will be issued shortly” will display. SARS will send an email with a message to notify the requestor that the request for TCS has been received successfully with the allocated case number.
Ensure that you submit all the relevant supporting documents listed on the SARS website and the “Guide to the Tax Compliance Status functionality on eFiling” webpage. Refer to the “Submit Supporting Documents” query above on how to submit the supporting documents to SARS.
Verify Tax Compliance Status
This query type allows institutions permitted by the taxpayer to verify the taxpayer’s TCS. For the third party to be able to verify, he/she must have the taxpayer’s reference number and the TCS Pin.
The third-party must capture all the mandatory fields to be able to verify the TCS.
If the “Tax Compliance Status Verification” query type was selected the “Tax Compliance System” screen will be displayed.
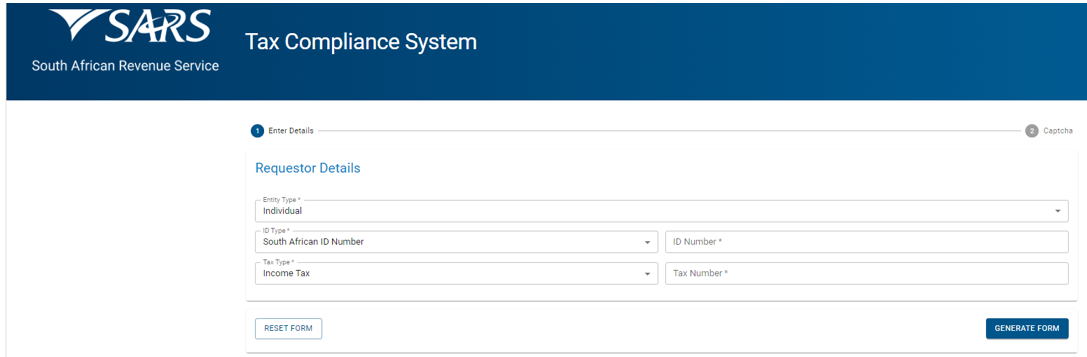
Complete the Requestor Details as follows:
- The mandatory fields will have a red asterisk (*) next to them.
- Select the “Entity Type” from the dropdown list. The following can be selected:
- Individual.
- Company.
- Trust.
- Other.
- Select the “ID Type” from the dropdown list. The list of ID types available will be prepopulated depending on the Type of entity selected above.
- If an Individual is selected as the Type of taxpayer, the ID type list will consist of a South African ID number and Passport Number only.
- South African ID number – If the taxpayer is an individual and is a South African resident, only a valid ID number will be accepted.
- Passport Number – If the taxpayer is an individual and is a foreigner, a valid Passport Number must be used.
- If a Company is selected as the Type of taxpayer, the list will consist of the Company Registration Number only.
- If a Trust is selected as the Type of taxpayer, the list will consist of a Trust Number only.
- If “Other” is selected as the Type of taxpayer, the ID type and ID number are not required.
- If an Individual is selected as the Type of taxpayer, the ID type list will consist of a South African ID number and Passport Number only.
- Capture the ID Number / Registration Number depending on the ID Type selected above.
- Select the “Tax Type” from the dropdown list. This list will be limited as per the Type of entity selected above:
- If Individual is selected, the Tax Type will default to Income Tax.
- If Company is selected, the Tax Type will default to Income Tax.
- If Trust is selected, the Tax Type will default to Income Tax.
- If Other is selected, the following Tax Types will be available for selection:
- PAYE.
- VAT.
- Income Tax.
- Capture the “Tax Number” depending on the Type of taxpayer selected above.
- Click on the “Generate Form” button to display the “next screen.
Complete the TCS Verification Information details as follows:

- Select the “Entity Type” from the dropdown list. The following can be selected:
- Individual.
- Company.
- Trust.
- Other.
- Capture the “Tax Number” depending on the type of entity selected above.
- Capture the “TCS PIN” linked to the tax number captured.
- Click on the “NEXT” button once all the mandatory fields have been completed. The Captcha screen will be displayed.

Complete the onscreen CAPTCHA field and click on the “SUBMIT” button. The system will validate the captured information against the information on the SARS system.
- If the captured information fails, the validation the system will display one of the following messages:
- In the instance where the tax reference number and the PIN number do not match to an existing TCS Request the following error message will be displayed “SARS cannot match the information captured against any existing Tax Compliance request. Please enter the correct information and try again.”
- If the PIN is not valid “The PIN number you have captured is invalid and the verification could not be processed. Please capture the correct PIN to proceed.”
- Where the tax reference number and the PIN match but the PIN is no longer “Active” “The PIN you have entered is no longer active and your request cannot be processed”.
- Once the captured information passes the validation the “TCS Verification Successful” message will be displayed.
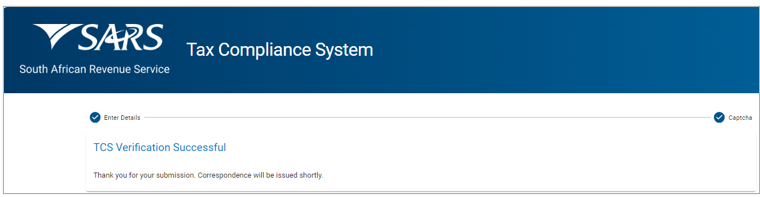
- The TCS verification outcome letter will be issued to the requestor using the email that is displayed in the “Requestor Details” section.
- An SMS will be issued to inform the taxpayer that a third party has verified their TCS status.
My Auto Assessment Status
This query enables the taxpayers to query whether they are part of the SARS Auto Assessment population or not.
All mandatory fields indicated with an asterisk (*) must be completed.
If “My Auto Assessment Status” query was selected, the “Filing Season Auto Assessment Lookup” screen will be displayed.
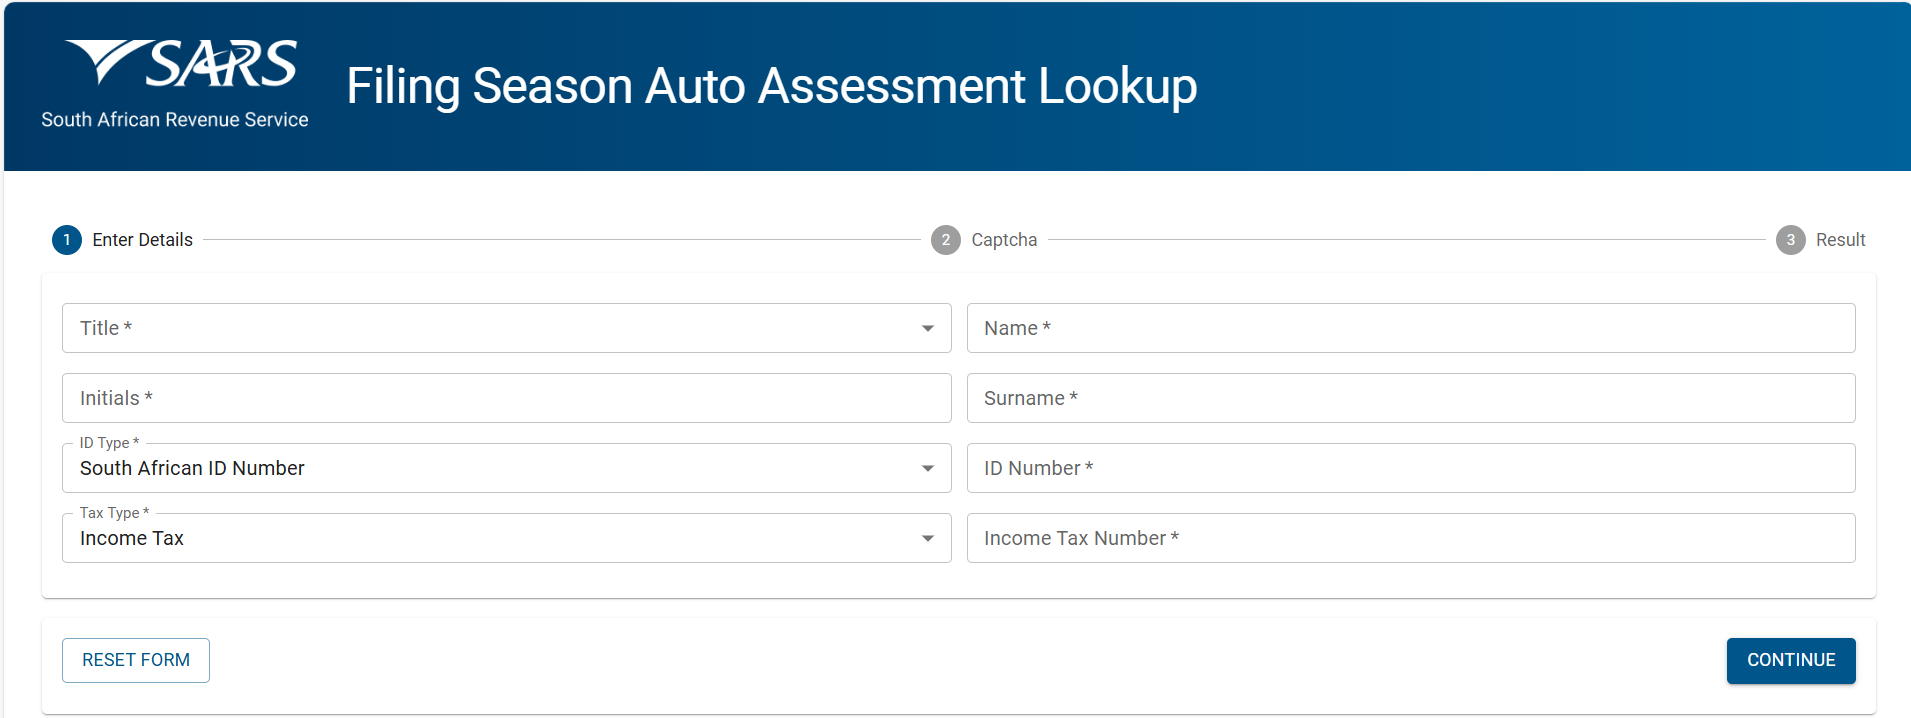
- Select the Title from the dropdown list.
- Enter the “Name” in the Name field.
- Capture the “Initials” in the Initials field.
- Enter the “Surname” in the Surname field.
- Select the ID Type from the dropdown list:
- South African ID Number – If the taxpayer is an individual and a South African resident, only a valid ID Number will be accepted.
- Passport Number – If the taxpayer is an individual and a foreigner, a valid passport number must be used.
- Capture the “ID Number” depending on the ID Type selected.
- The “Tax Type” field defaults to Income Tax.
- Enter the “Income Tax Number” in the Income Tax Number field.
- Click on the “CONTINUE” button once all the mandatory fields have been completed. The Captcha screen will be displayed.
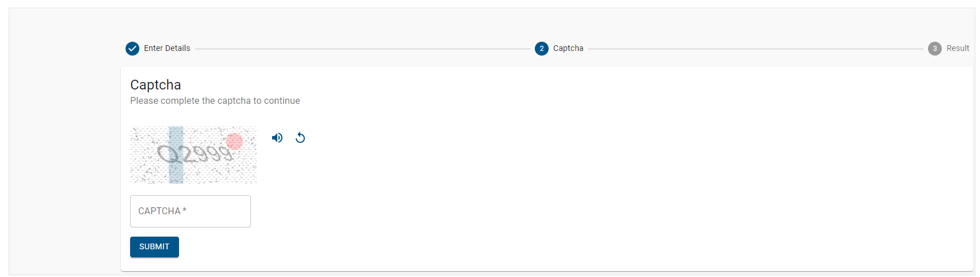
- Complete the onscreen CAPTCHA field and click on “SUBMIT” button. Once data has been successfully validated, the taxpayer is shown one of the following four messages to indicate their Auto Assessment Lookup status:
Checks only carried out before the Auto Assessment system run has taken place | ||
No | Scenario | Auto Assessment Results |
1 | Taxpayer was Auto Assessed last year but might not be Auto Assessed this year. | You were selected for Auto Assessment in the [Previous Tax Year] tax year, but you might not be auto assessed this year. Please check your status on [Auto Assessment Release Date]. |
2 | New taxpayer who could possibly be Auto Assessed this year. | You could possibly be Auto Assessed this year. Please check your status on [Auto Assessment Release Date]. |
3 | Taxpayer who was not Auto Assessed last year, however, could possibly be Auto Assessed this year. | You were not selected for Auto Assessment in the [Previous Tax Year] tax year, but you might be auto assessed this year. Please check your status on [Auto Assessment Release Date]. |
4 | Taxpayer who was not required to file last year, however, could possibly be Auto Assessed this year. | You might not have been required to file your return in the [Previous Tax Year] tax year, however, should you want to file a return please check your status on [Auto Assessment Release Date]. |
5 | Taxpayer was not Auto Assessed last year due to the limit, however, could possibly be Auto-Assessed this year | You were not selected for Auto Assessment in the [Previous Tax Year] tax year, but you might be auto assessed this year. |
6 | Default Message for all other cases when all of the above conditions cannot be satisfied. | You could possibly be Auto Assessed this year. Please check your status on [Auto Assessment Release Date]. |
Checks only carried out after the Auto Assessment system run has taken place | ||
No | Scenario | Auto Assessment Results |
7 | Taxpayer is part of the Auto Assessment Population. | You have been selected for Auto Assessment for the [Previous Tax Year] tax year and you will receive communication from SARS in this regard. If you do not receive the auto assessment related communication within 21 days, you can log onto SARS eFiling or SARS MobiApp to view the auto assessment. |
8 | Taxpayer is not part of the Auto Assessment population and one or more of their IRP5’s has not been received. | You have not been selected for Auto Assessment for the [Current Tax Year] tax year as we do not have your IRP5s for this tax year on record or your IRP5 was submitted with incomplete information. Please ask your employer to submit the correct and complete EMP501 reconciliation with the related IRP5’s. |
9 | Taxpayer is not part of the Auto Assessment population and all IRP5s have been submitted for the taxpayer. | You have not been selected for Auto Assessment as, according to our records, you have additional information (e.g. additional income, expenses) to declare. |
10 | Taxpayer is not found within the table of taxpayers on the SOQS database. | You have not been selected for Auto Assessment for the [Current Tax Year] year. |
- Below is an example of scenario 7 message where the taxpayer is part of Auto Assessment Population:
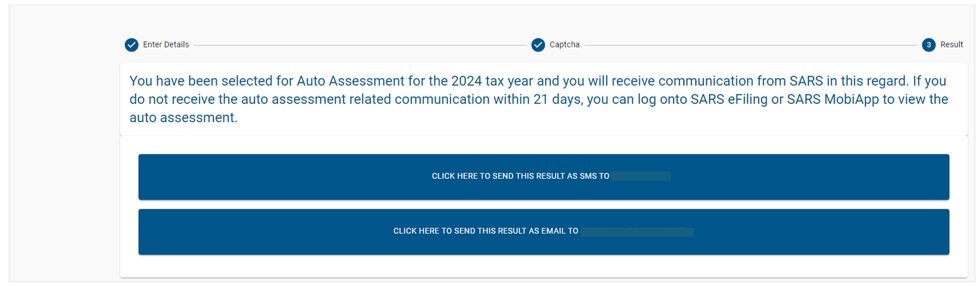
- The taxpayer is then able to request to have the Auto Assessment Lookup results sent to the email address or mobile number that SARS has on record. Once the preferred option is selected, the Auto Assessment Lookup results will be sent, and the “Query Successful” confirmation message will be displayed:

Submit Large Business & International (LBI) Query
This query type can be used to direct queries to LBI.
The taxpayer must capture all the mandatory fields to be able to attach the supporting documents and submit an LBI query.
Once all the mandatory information has been captured and the required supporting documents attached, submit the query to SARS. A case will be created for LBI to process the query.
If the “Submit an LBI Query” is selected, the “Large Business and International” screen below will be displayed.
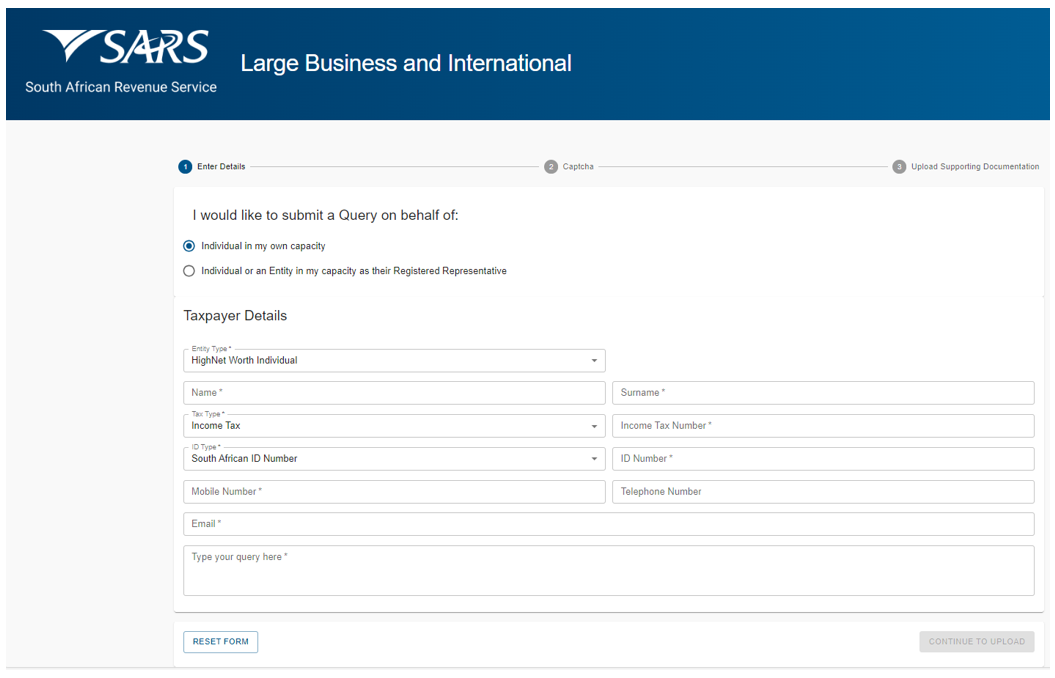
Click on the relevant radio button below “I would like to submit a Query on behalf of:
- Click on the radio button next to “Individual in my own capacity” if the taxpayer submitting a query is submitting for himself/herself.
- Click on the radio button next to “Individual or an Entity in my capacity as their Registered Representative” if the person submitting a query is the Registered Representative of a taxpayer.
Complete taxpayer details as follows:
- Select the Entity type from the dropdown list.
- If “Individual in my own capacity” is selected, the “High Net Worth Individual” will be the only entity type from the dropdown list.
- Capture the name in the “Name” field.
- Capture the surname in the “Surname” field.
- The “Tax Type” will default to Income Tax.
- Capture the income tax number in the “Income Tax Number” field.
- Select the “ID Type” from the dropdown list.
- South African ID Number – If the taxpayer is an individual and a South African resident, only a valid ID number will be accepted.
- Passport Number – If the taxpayer is an individual and a foreigner, a valid passport number must be used.
- Capture the “ID Number” depending on the ID Type selected.
- Capture the mobile number in the “Mobile Number” field.
- Capture the telephone number in the “Telephone Number” field (optional).
- Capture the email in the “Email” field.
- Capture the details of your query in the “Type your query here” field.
- If an Individual or an Entity in my capacity as their Registered Representative” is selected, the “High Net Worth Individual” and the “Large Business Centre” will be available for selection. If “Large Business Centre” is selected as the Entity Type, the following screen will be displayed:
- If “Individual in my own capacity” is selected, the “High Net Worth Individual” will be the only entity type from the dropdown list.
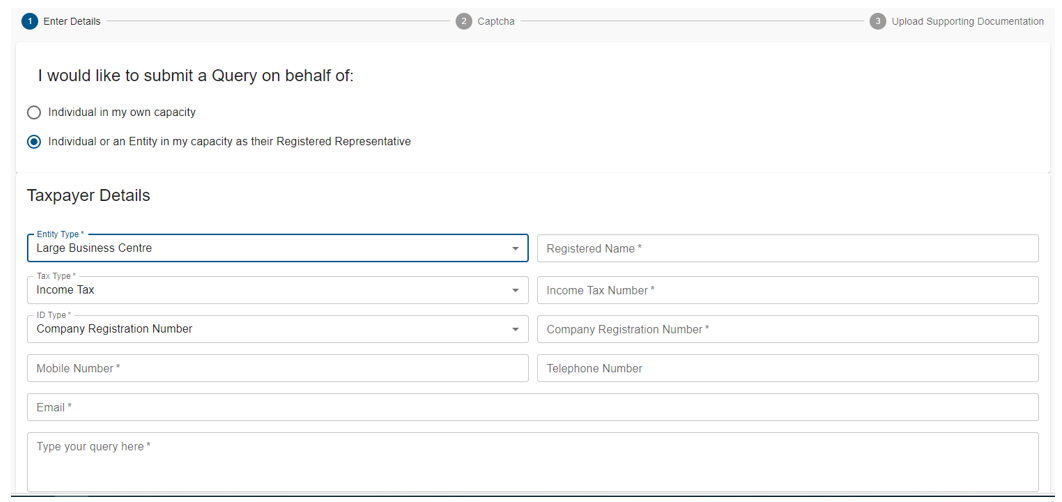
- Capture the Company Registered Name.
- Select the Tax Type from the dropdown list:
- Income Tax
- PAYE
- VAT
- Mineral and Petroleum Resource Royalty
- Securities Transfer Tax
- Capture the Tax Number applicable to the Tax Type selected.
- Select the ID Type from the dropdown list:
- Company Registration Number
- Trust Number
- Funds
- Other
- Capture the Registration Number depending on the ID Type selected.
- Capture the mobile number in the “Mobile Number” field.
- Capture the telephone number in the “Telephone Number” field (optional).
- Capture the email in the “Email” field.
- Capture the details of your query in the “Type your query here” field.
If an Individual or an Entity in my capacity as their Registered Representative” is selected, complete the Representative Details:
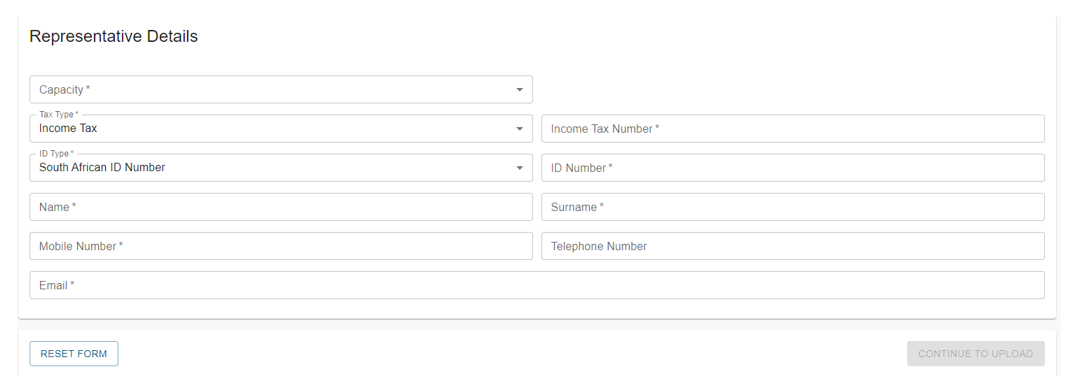
- Select the Representative “Capacity” from the dropdown.
- Tax Practitioner
- Main Trustee
- Administrator (Estate)
- Executor
- Liquidator
- Curator
- Once-off Mandate
- Public Officer
- Employee With Mandate
- Third-Party With Mandate
- Select the Tax Type
- Income Tax
- VAT
- Capture the Income Tax Number or VAT Number depending on the Tax Type selected
- Select the “ID Type” from the dropdown list.
- South African ID Number – If the taxpayer is an individual and a South African resident, only a valid ID number will be accepted.
- Passport Number – If the taxpayer is an individual and a foreigner, a valid passport number must be used.
- Capture the “ID Number” depending on the ID Type selected.
- Capture the name in the “Name” field.
- Capture the surname in the “Surname” field.
- Capture the mobile number in the “Mobile Number” field.
- Capture the email in the “Email” field.

Click the “CONTINUE TO UPLOAD” button once all the mandatory fields have been completed. The Captcha screen will be displayed.
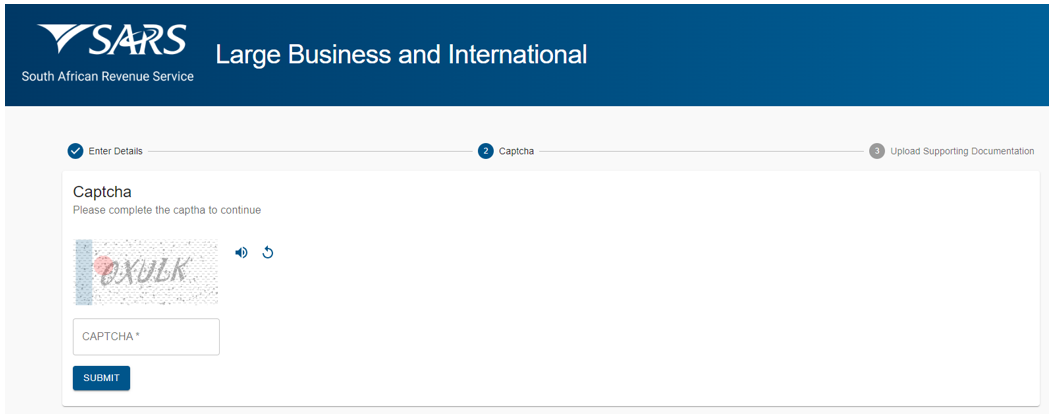
Complete the onscreen CAPTCHA field and click on the “SUBMIT” button. The upload supporting documents screen will be displayed.
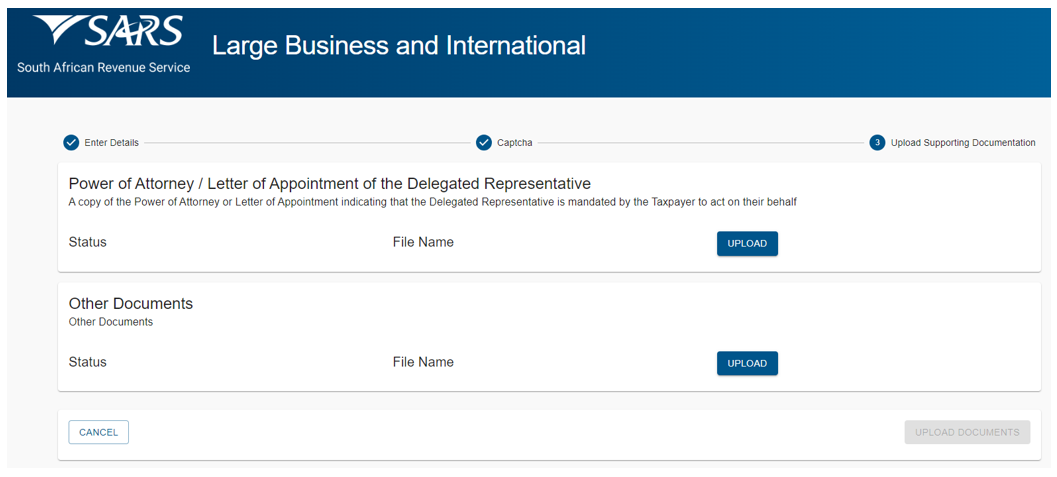
Click the “Upload” button next to “Power of Attorney / Letter of Appointment of the Delegated Representative” to browse your PC and locate the supporting documents to be uploaded.
- If there is an additional supporting document to be uploaded, Click on “Upload” button next to “Other Documents” to browse your PC and locate the supporting documents to be uploaded.
- Once the supporting document is attached, a “Delete” Icon is enabled next to the attached supporting document.
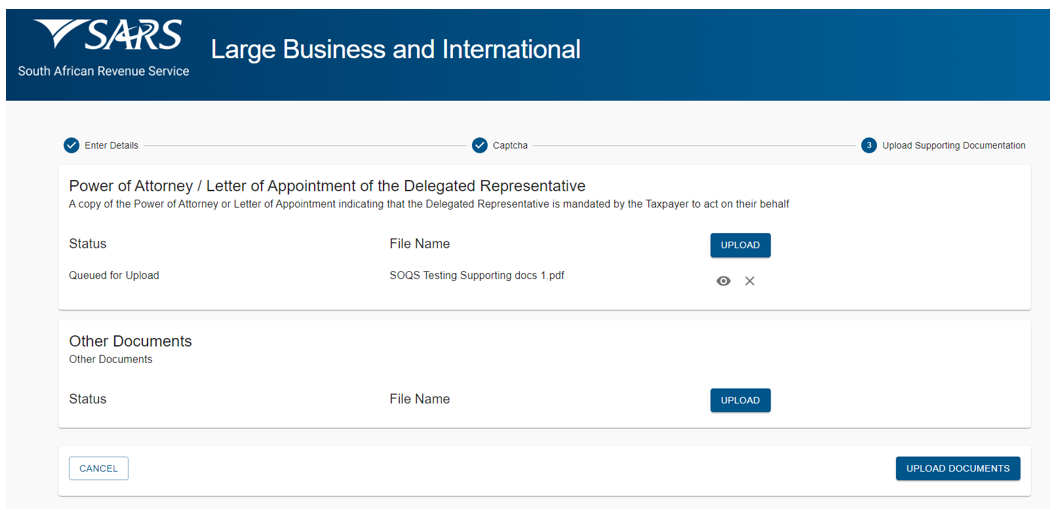
Once complete, click the “UPLOAD DOCUMENTS” button to send the LBI query and attached documents to SARS. The “Query Successfully Submitted” confirmation message will be displayed:
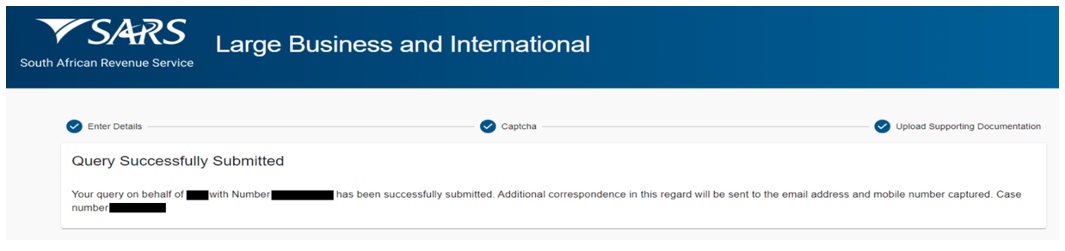
Report SARS Employee Corruption
This query can be used to report SARS employee corruption where the reporting person has identified possible corruption by a SARS employee.
After capturing all the mandatory information, submit the query to SARS. This action will prompt the creation of a case for SARS to investigate potential instances of corruption.
If the “Report SARS Employee Corruption” query has been selected, the “Report SARS Employee Corruption” screen will be displayed.
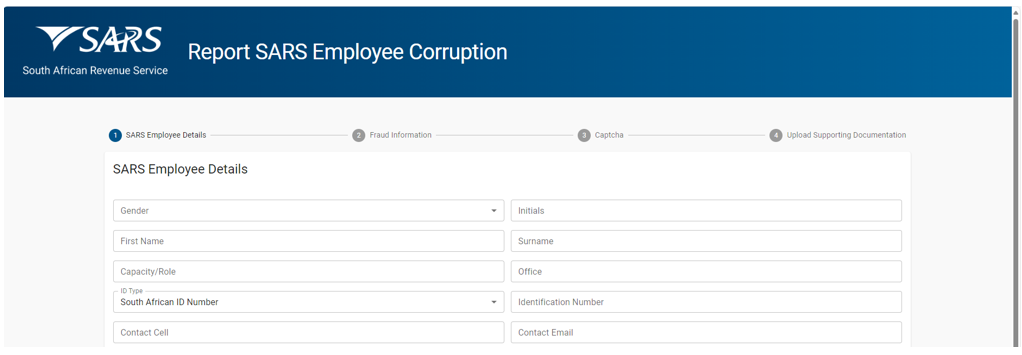
All mandatory fields will be marked with an asterisk (*). To submit the query, ensure that all mandatory fields are captured.
Complete SARS Employee Details as follows:
- Select the gender from the ‘Gender” dropdown list.
- Capture the initials in the “Initials” field.
- Capture the first name in the “First Name” field.
- Capture surname in the “Surname” field.
- Capture the capacity or role in the “Capacity/Role” field.
- Capture the office name in the “Office” field.
- Select the identity type from the “ID Type” dropdown list.
- South African ID Number – If the SARS employee is an individual and a South African resident, only a valid ID number will be accepted.
- Passport Number – If the SARS employee is an individual and a foreigner, a valid passport number must be used.
- Capture the identity number depending on the “ID Type” selected.
- Capture mobile number in the “Contact Cell” field.
- Capture email in the “Contact Email” field.
Details of Reporter (Optional):
- Indicate whether “SARS may contact you for further information”. If “Yes” is selected, the reporter’s details are mandatory. Therefore, complete your details as follows:
- Capture your first name in the “First Name” field.
- Capture your surname in the “Surname” field.
- Capture your mobile number in the “Contact Cell” field.
- Capture your email in the “Contact Email” field.
- Click the “Next” button. The “Alleged Corruption Information” screen will be displayed.
Complete the Alleged Corruption Information details as follows:
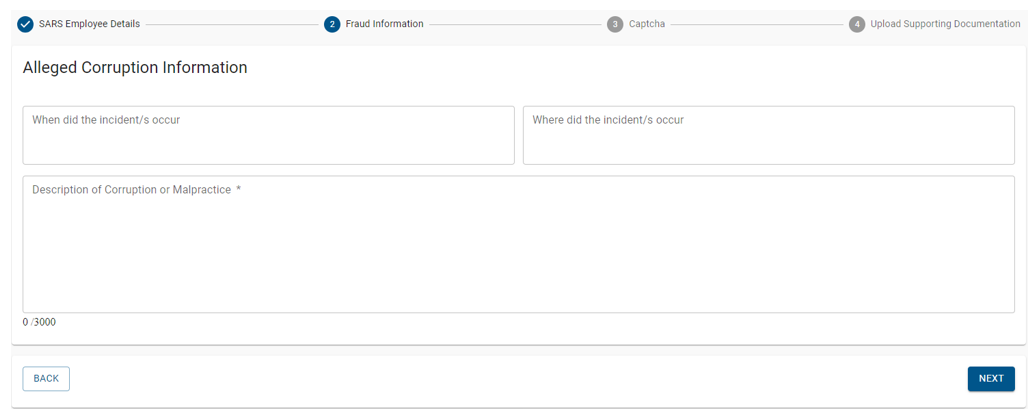
- Enter the date of the incident in the “When did the incident/s occur” field.
- Enter the place/office where the incident/s occurred in the “Where did the incident/s occur” field.
- Describe the nature of the corruption or malpractice activity. Please provide as much detail as possible to enable the SARS user to understand the type of corruption that took place.
- Click the “NEXT” button to proceed. The “Captcha” screen will be displayed.
Complete the onscreen Captcha as follows:
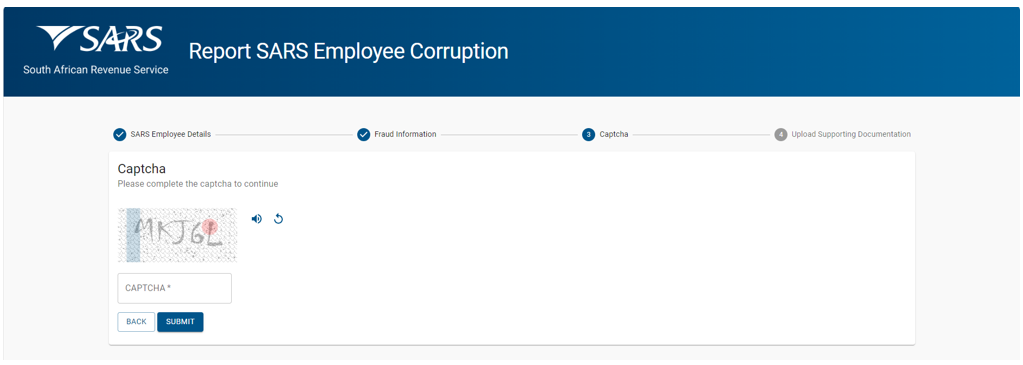
- Complete the information in the CAPTCHA field.
- Click on the “SUBMIT” button. The upload supporting documents screen will be displayed.
Upload Supporting Documentation (Optional):
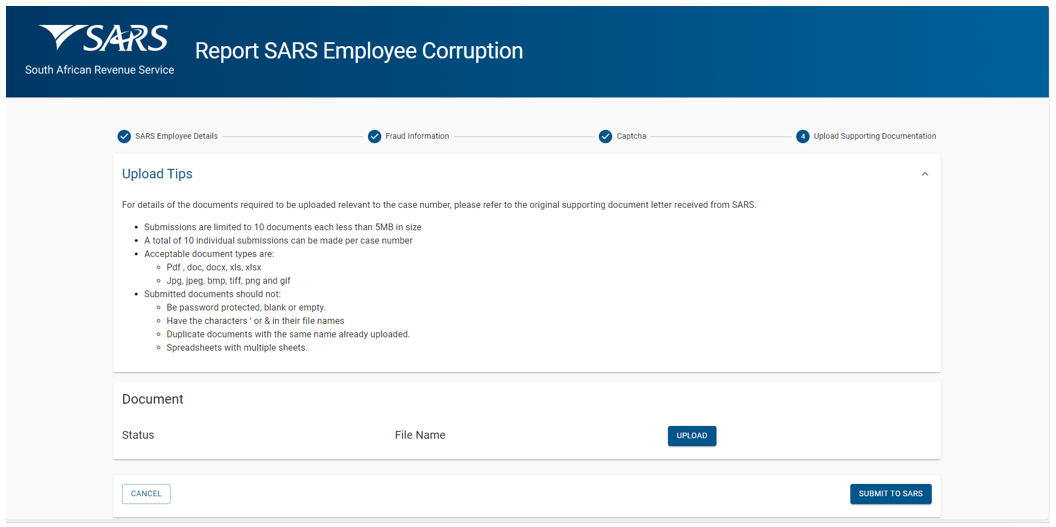
- If there is a supporting document to be uploaded, view the upload tips and ensure adherence to the rules.”
- Click on the “Upload” button next to “File Name” to browse your PC and locate the supporting documents to be uploaded.
- Once the supporting document is attached, a “Delete” icon is enabled next to the attached supporting document.
Once complete, click the “SUBMIT TO SARS” button to send the Report SARS Employee Corruption query to SARS. The “Query Successfully Submitted” confirmation message will be displayed.

Two-Pot Retirement System Calculator
This query type provides the taxpayers with information to assist them in their decision regarding a withdrawal from their retirement funds saving component before requesting the Funds to submit their Two Pot Savings Withdrawal Benefit (SWB) tax directive applications.
All mandatory fields indicated with an asterisk (*) must be completed.
If the “2-Pot Retirement System Calculator” query was selected, the “Two-Pot Retirement System Calculator” screen will be displayed.
Complete the Request Details as follows:
- Capture the name.
- Capture the surname.
- The “ID type” will default to a South African ID number. Select the ID type from the dropdown list:
- South African ID number – If the taxpayer is an individual and is a South African resident, only a valid ID number will be accepted.
- Passport number – If the taxpayer is an individual and is a foreigner, a valid passport number must be used.
- Capture the ID number or passport number (depending on the ID type selected).
- Capture the tax reference number.
- If you don’t know your tax reference number, request for it as per paragraph “Request your tax reference number”.
- If you don’t have a tax reference number, trigger the registration process as per paragraph “Register for Personal Income Tax”.
- Capture the total annual income (gross annual income).
- Capture the amount you plan to withdraw from your fund.
- Click the “NEXT” button. The screen prompting you to select the One Time Password (OTP) verification method will be displayed.
Complete the OTP Details as follows:
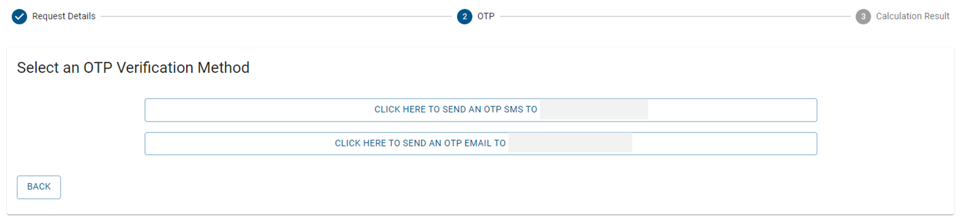
Select the preferred OTP verification method (SMS or Email). The screen prompting you to enter the OTP that was sent to your selected verification method will be displayed.
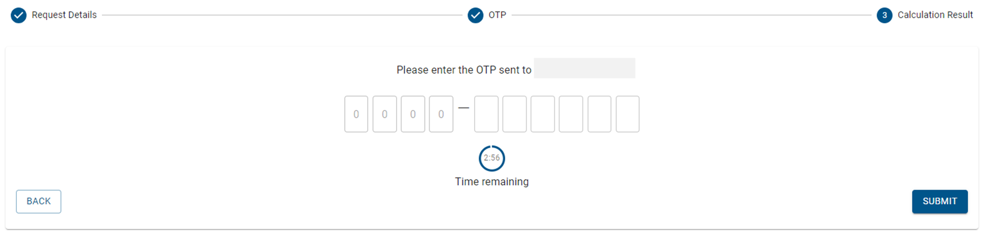
- Capture the OTP and select the “SUBMIT” button. The tax calculation screen will be displayed.
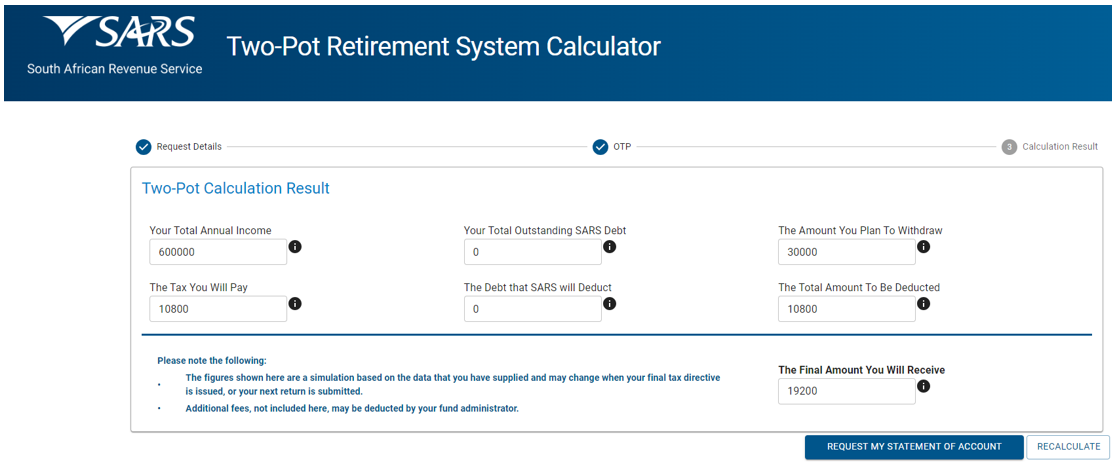
- The tax calculation screen displays the following key information:
- The total outstanding SARS debt (including penalties and provisional debt amounts).
- The outstanding assessed tax debt that SARS will deduct. Refer to paragraph “Please note that, if there is an outstanding assessed tax debt, it will be deducted from your savings withdrawal amount unless” below for details.
- The possible payable tax based on the total annual income you supplied.
- The total amount to be deducted (the sum of “The outstanding assessed tax debt that SARS will deduct” and “The possible payable tax based on the total annual income you supplied” above).
- The final amount you will receive after the total amount to be deducted has been subtracted from the amount you plan to withdraw.
- An explanatory note about the simulated results.
- The link to request your statement of account – “REQUEST MY STATEMENT OF ACCOUNT” button.
- When the REQUEST MY STATEMENT OF ACCOUNT” button is selected the “Request Documents” screen will be displayed.
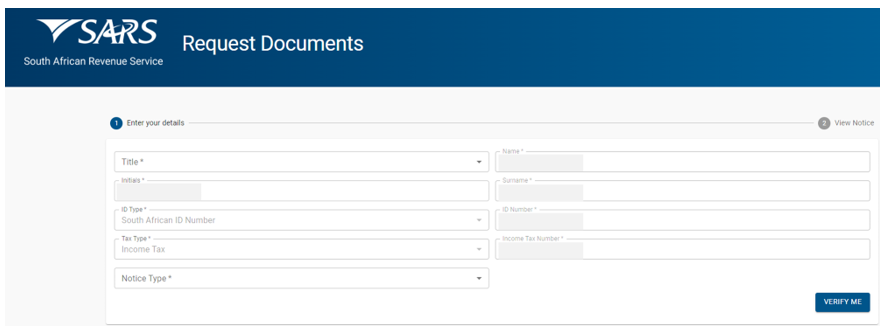
- Refer to the “REQUEST SARS NOTICES” query for details on how to request your statement of account.
- Please note that, if there is an outstanding assessed tax debt, it will be deducted from your savings withdrawal amount unless:
- There is an active deferment of payment arrangement with SARS.
- There is an active suspension of payment.
Request your tax reference number:

- Click the “I DON’T KNOW MY TAX NUMBER” button. The “What’s My Tax Reference Number” screen will be displayed:
- Confirm your details and click the “SUBMIT” button. The “Captcha” screen will be displayed.
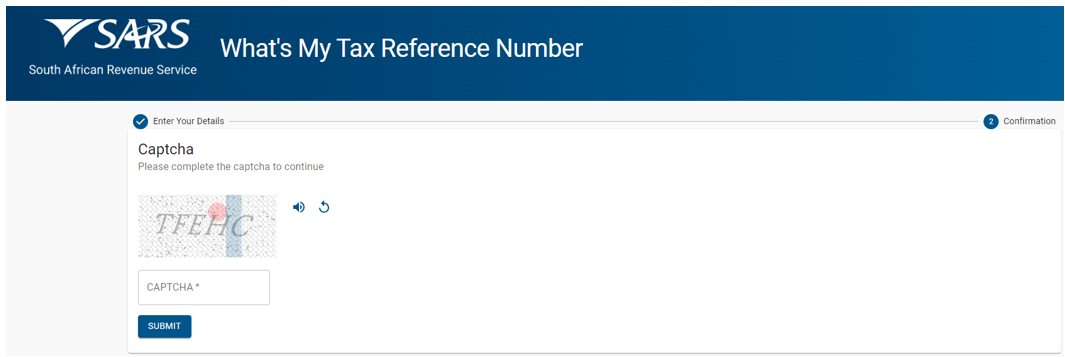
- Complete the onscreen CAPTCHA field and click the “SUBMIT” button. The screen that allows you to select your preferred communication channel will be displayed.
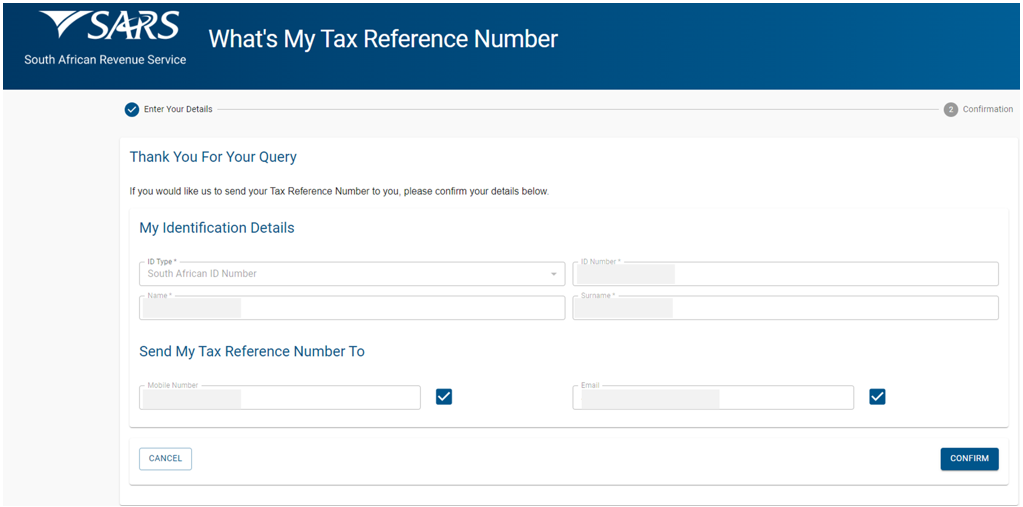
- Select the preferred communication channel under the “Send My Tax Reference Number To” heading. Please note that the information will be sent to the email address or cell phone number that exist on the SARS system. If any of the above contact details changed, you must first update the contact details either on eFiling or by making an appointment to visit the SARS Branch before requesting the tax reference number.
- Click the “CONFIRM” button. The Confirmation screen will be displayed. Once you have received your tax reference number, return to paragraph “Complete the Request Details as follows” above to continue with the “Two-Pot Retirement System Calculator” query.
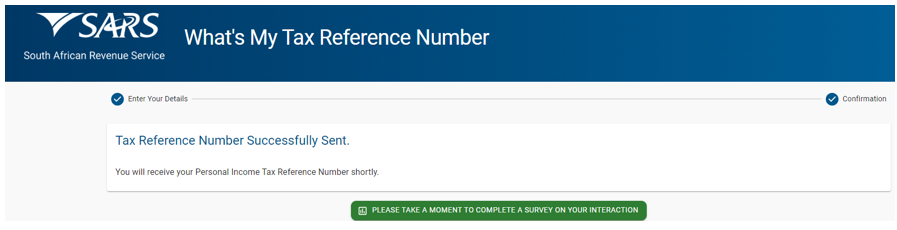
Register for Personal Income Tax:
- Click the “I DON’T HAVE A TAX NUMBER” button, the “Register for Personal Income Tax” screen will be displayed.
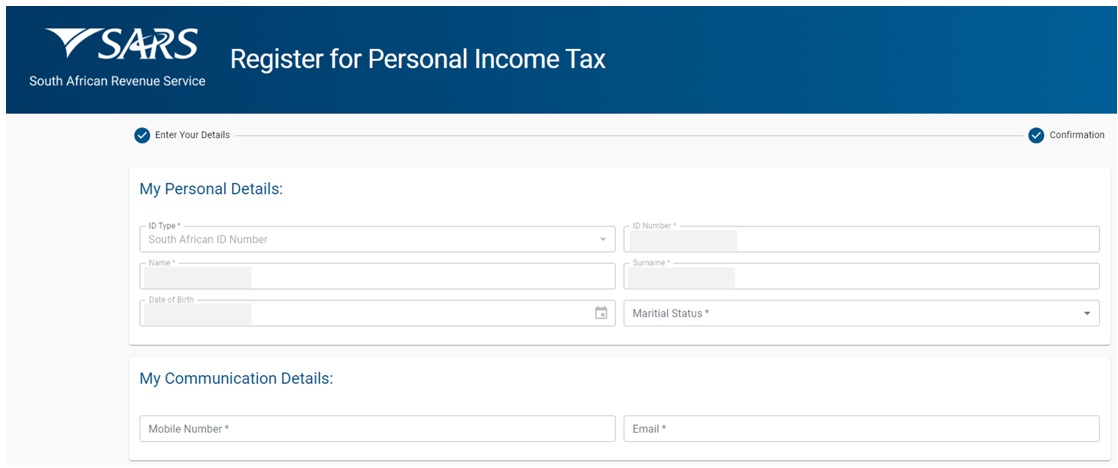
- Complete the personal details:
- The identity number, name, surname and date of birth will be auto populated from the previous screens.
- Select the marital status from the dropdown list.
- Complete the communication details:
- Capture the mobile number.
- Capture the email address.
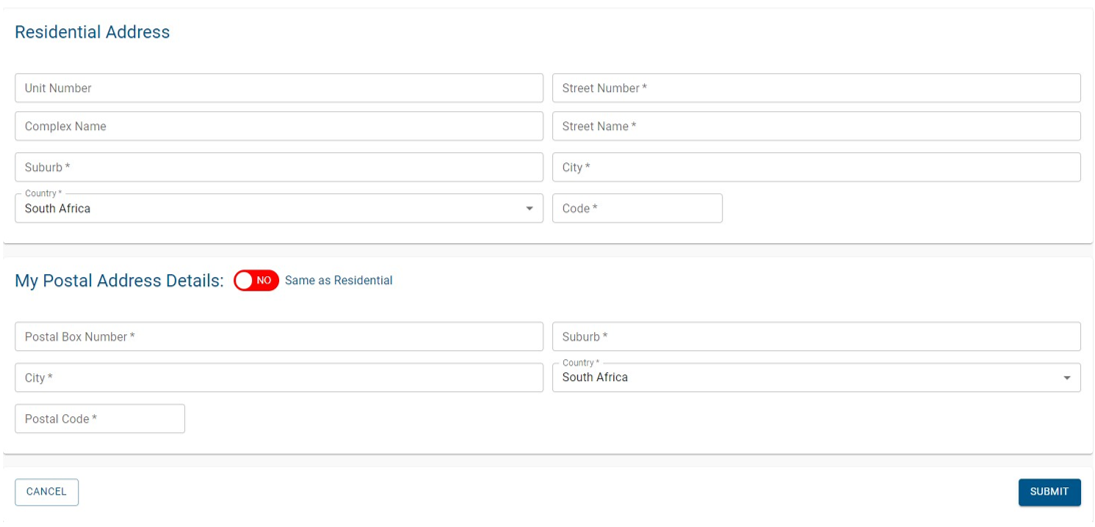
- Complete the Residential Address and Postal Address:
- All mandatory fields marked with an asterisk (*) must be completed.
- If the postal address is the same as the residential address, select the “No” indicator to change it to the “Yes” indicator.

- Click the “SUBMIT” button.
- If indeed you are not registered for personal income tax, the confirmation screen will with the message that your personal income tax reference number will be sent to you will be displayed.
- If you are already registered for personal income tax, the following confirmation screen will be displayed.
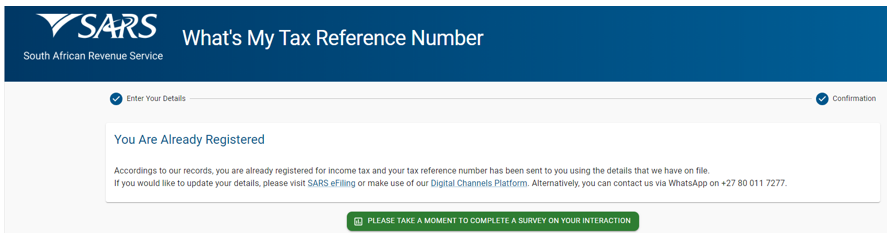
- Once you have received your tax reference number, return to paragraph “Complete the Request Details as follows” above to continue with the “Two-Pot Retirement System Calculator” query.
What’s my Directive Status
This query type allows the taxpayers to query the status of any tax directive that has been sent to SARS for processing.
All mandatory fields indicated with an asterisk (*) must be completed.
If the “What’s My Directive Status” query was selected, the “Tax Directive Status Query” screen will be displayed.
Complete the Request Details as follows:
- Capture the name.
- Capture the surname.
- The “ID type” will default to a South African ID number. Select the ID type from the dropdown list:
- South African ID number – If the taxpayer is an individual and is a South African resident, only a valid ID number will be accepted.
- Passport number – If the taxpayer is an individual and is a foreigner, a valid passport number must be used.
- Capture the ID number or passport number (depending on the ID type selected).
- Capture the tax reference number.
- Click the “NEXT” button. The screen prompting you to select the One Time Password (OTP) verification method will be displayed.
Complete the OTP Details as follows:
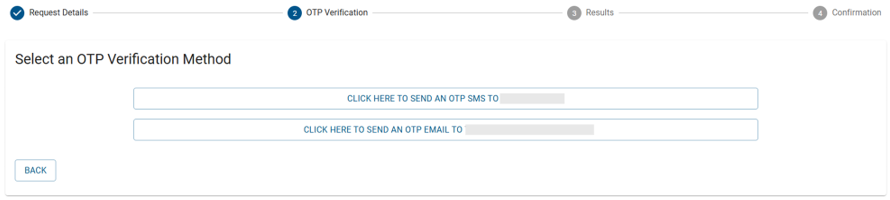
- Select the preferred OTP verification method (SMS or Email). The screen prompting you to enter the OTP that was sent to your selected verification method will be displayed.
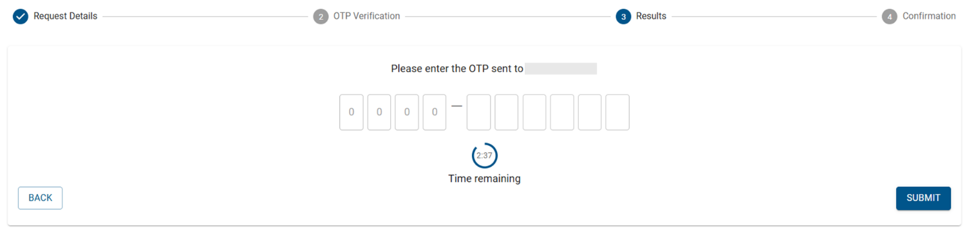
- Capture the OTP and select the “SUBMIT” button. The query results screen will be displayed.

- The results status will be any of the following:
- There are no tax directive applications received on the tax reference number provided.
- Your Tax Directive is In Progress, please contact your fund administrator for further information.
- Your Tax Directive has been Declined, please contact your fund administrator for further information.
- Your Tax Directive has been Finalised, please contact your fund administrator for further information.
- Your Tax Directive has been Cancelled, please contact your fund administrator for further information.
If you want the results to be sent to the previously selected OTP verification method (SMS or Email), select the displayed communication The tax directive results will be sent to the selected communication channel and the confirmation screen will be displayed.
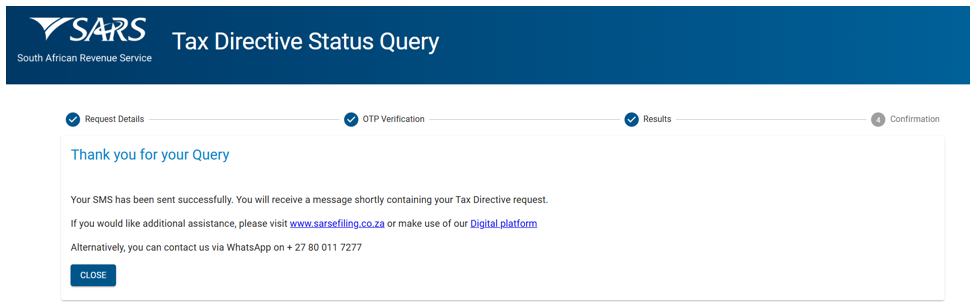
Donations Tax and Withholding Tax on Royalties’ Declaration
- This query type allows the taxpayers to submit Donations Tax (DT) and Withholding Tax on Royalties (WTR) declaration supporting documents to SARS.
- If the “Submit Donations and WTR Submissions Upload” query was selected, the “Donations Tax and Withholding Tax on Royalties” screen will be displayed.
- The mandatory fields will have an asterisk (*) next to them. All the mandatory fields should be captured to be able to submit the query.
- Complete the Taxpayer Details as follows:
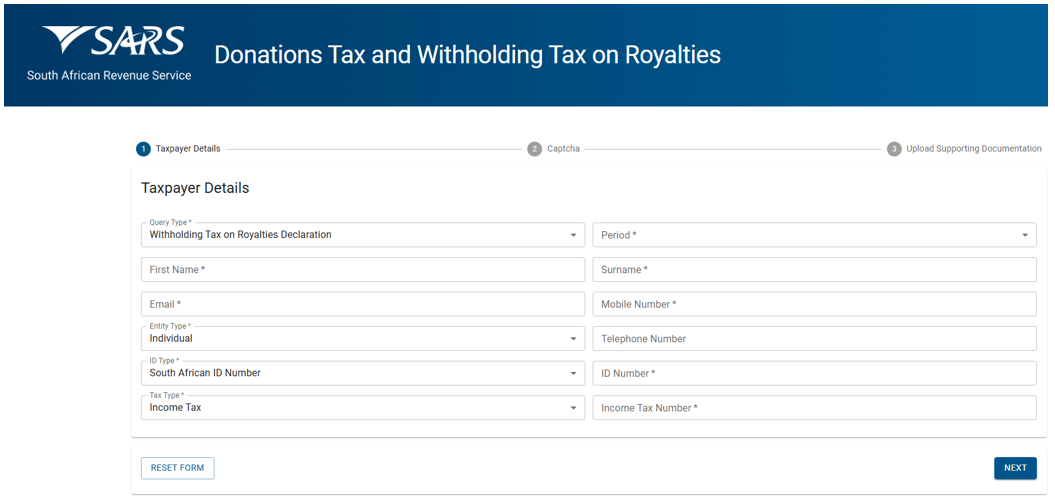
- Select the Query Type from the dropdown list. The following types can be selected:
- Withholding Tax on Royalties Declaration.
- Donations Tax Declaration.
- Depending on selected query type, select the Period or Donation Date from the dropdown list.
- Capture the First Name, Surname, Email and Mobile Number in the applicable fields.
- Select the Entity Type” from the dropdown list. The following can be selected:
- Individual.
- Company.
- Trust.
- Capture the Telephone Number (if different from the Mobile Number captured above).
- Select the Identity Type from the dropdown list. The list will be limited to the Type of entity selected above.
- If an Individual was selected as the Entity Type, the list will consist of a South African ID number and Passport Number only.
- South African ID number – If the taxpayer is an individual and is a South African resident, only a valid ID number will be accepted.
- Passport Number – If the taxpayer is an individual and is a foreigner, a valid Passport Number must be used.
- If a Company was selected as the Entity Type, the list will consist of Company Registration Number only.
- If a Trust was selected as the Entity Type, the list will consist of a Trust Number only.
- If an Individual was selected as the Entity Type, the list will consist of a South African ID number and Passport Number only.
- Capture the ID Number/Reg Number depending on the Identity Type selected above.
- The Tax Type dropdown list for all the entities will be limited to Income Tax.
- Capture the Tax Number depending on the Type of taxpayer selected above.
- Select the Query Type from the dropdown list. The following types can be selected:
- Click on the “NEXT” button to proceed to the next step. The “Captcha” screen will be displayed.
- Complete the onscreen Captcha as follows:
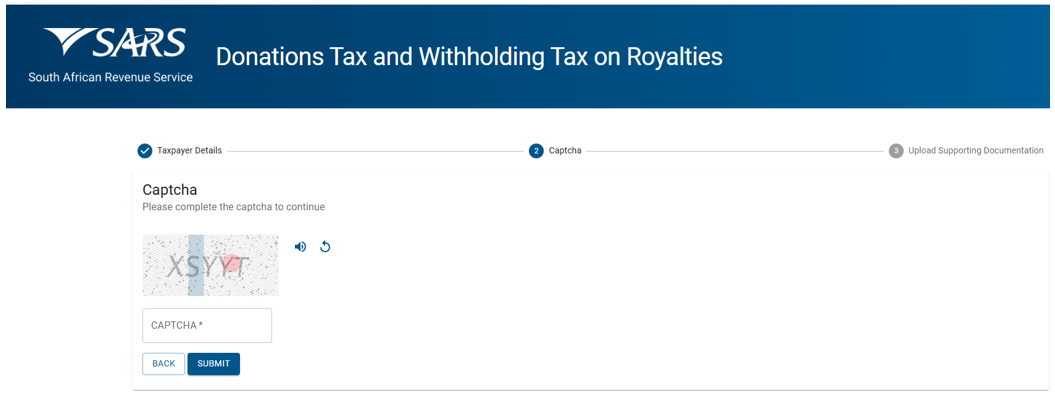
- Complete the onscreen CAPTCHA field.
- Click on the “SUBMIT” button. The upload supporting documents screen will be displayed.
- Upload Supporting Documents as follows:
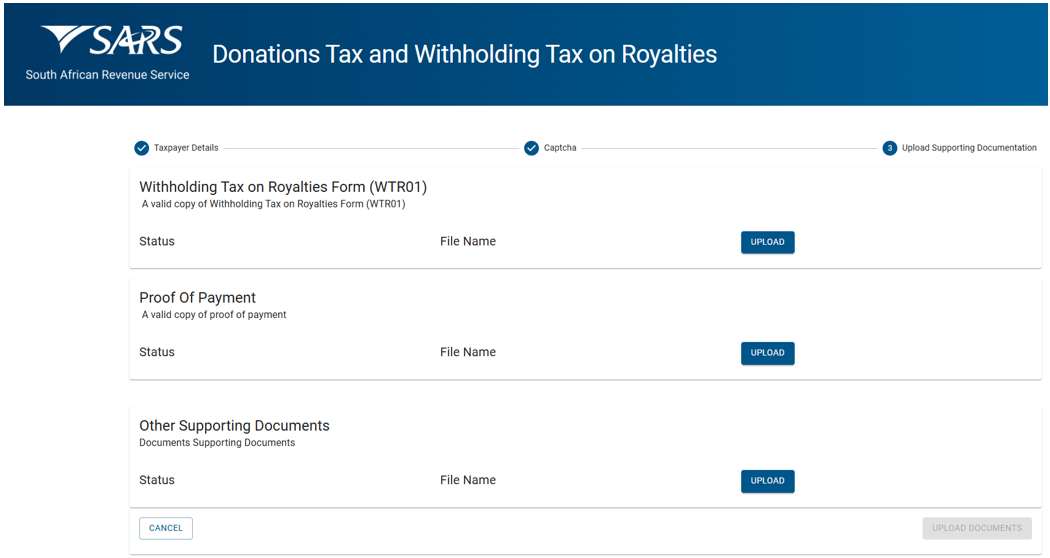
- Click on the “Upload” button to browse your computer and locate the supporting documents to be uploaded. Please note that the depending on the Query Type selected, the following supporting documents are mandatory:
- For Withholding Tax on Royalties Declaration
- Withholding Tax Form (WRT01).
- Proof of Payment.
- For Donations Tax Declaration
- Donation Form (IT144).
- Proof of Payment.
- If there is an additional supporting document to be uploaded, click the “Upload” button next to “Other Supporting Documents” to browse your PC and locate the supporting documents to be uploaded.
- Once the supporting document is attached, a “Delete” Icon is enabled next to the attached supporting document. If you have attached an incorrect document, click on the “Delete” Icon next to the specific document to delete it.
- For Withholding Tax on Royalties Declaration
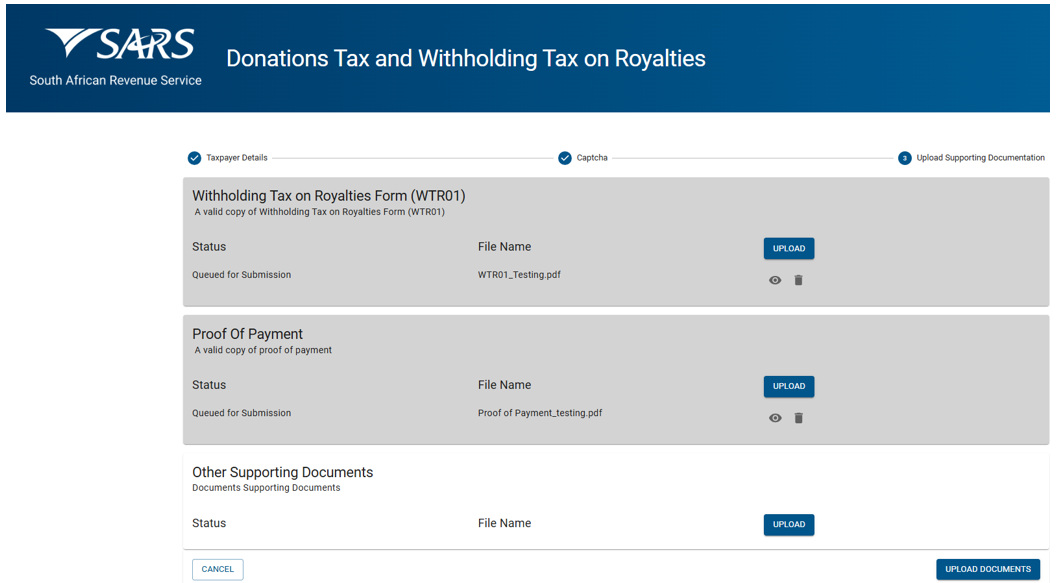
- View the list of attached documents to ensure that all the relevant supporting documents have been attached.
- Once complete, click the “UPLOAD DOCUMENTS” button to send the captured details and attached documents to SARS. The following confirmation message will be displayed.
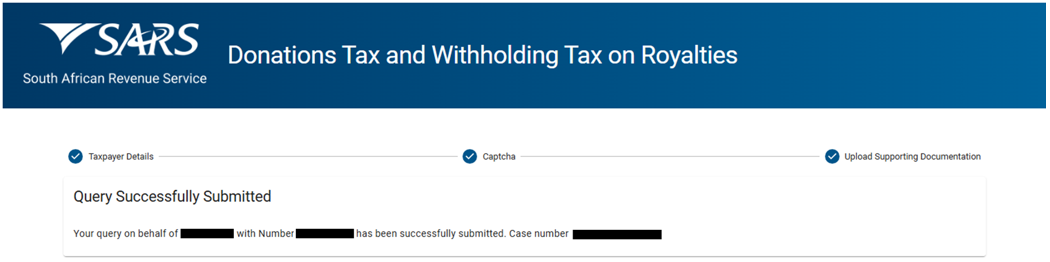
- An automatic acknowledgment of receipt with the case reference number will be sent to the taxpayer through email.
Provisional Taxpayer Auto Assessment Request
- This query type enables eligible provisional taxpayers, who received corresponding notifications from SARS, to request inclusion in the auto assessment population for the 2025 year of assessment.
- All mandatory fields indicated with an asterisk (*) must be completed.
- If the “Provisional Taxpayer Auto Assessment Request” query was selected, the “Provisional Taxpayer Auto Assessment” screen will be displayed.
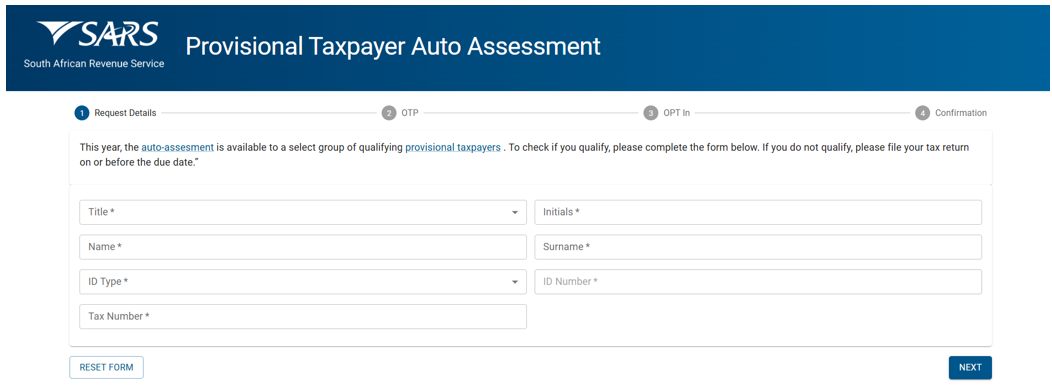
Complete the Request Details as follows:
- Select the title from the dropdown list.
- Capture the initials.
- Capture the name.
- Capture the surname.
- Select the ID type from the dropdown list:
- South African ID number – If the taxpayer is an individual and is a South African resident, only a valid ID number will be accepted.
- Passport number – If the taxpayer is an individual and is a foreigner, a valid passport number must be used.
- Capture the ID number or passport number (depending on the ID type selected).
- Capture the tax reference number.
- Click the “NEXT” button. The screen prompting you to select the One Time Password (OTP) verification method will be displayed.
Complete the OTP Details as follows
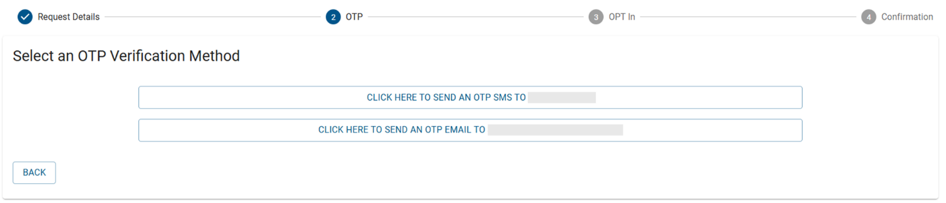
- Select the preferred OTP verification method (SMS or Email). The screen prompting you to enter the OTP that was sent to your selected verification method will be displayed.
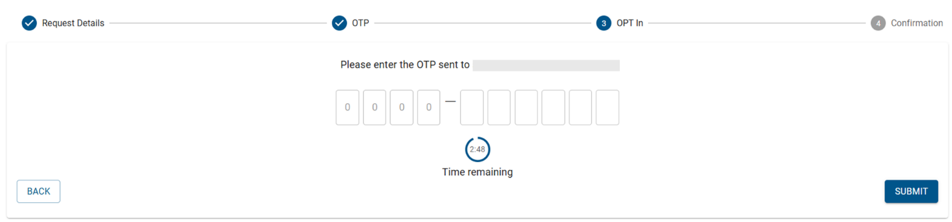
- Capture the OTP and select the “SUBMIT” button. The OPT In screen will be displayed.
Complete the OPT In screen as follows:

- If you want to be included in the auto assessment population for the 2025 year of assessment, change the “No” indicator to “Yes”.

- Click the “SUBMIT” button. The confirmation message will be displayed.
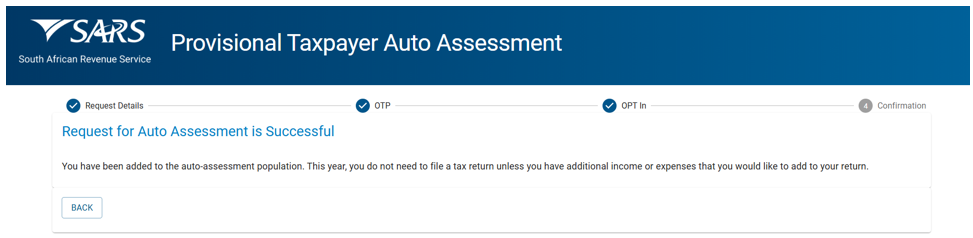
Non-Resident Tax Return Type
This query type enables foreign national taxpayers who have either ceased residency or are non-resident to request SARS to issue the correct return type that will allow them to declare their Republic of South Africa (RSA) sourced income.
All mandatory fields indicated with an asterisk (*) must be completed.
If the “Non-Resident Return Type” query is selected, the “Non-Resident Tax Return Type” screen will be displayed.
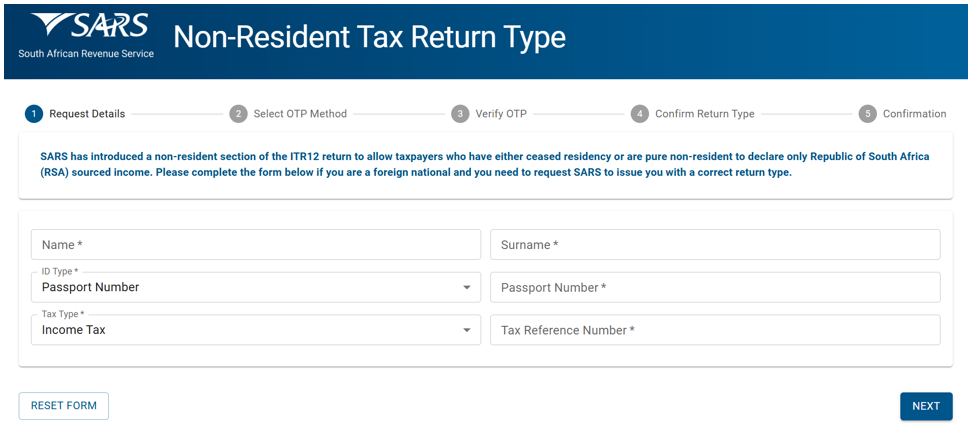
Complete the Request Details as follows:
- Complete the following mandatory fields:
- Name
- Surname.
- Passport Number (this should be the foreign passport number)
- Tax Reference Number
- Click the “NEXT” button. The screen prompting you to select the One Time Password (OTP) verification method will be displayed.
Select OTP Method as follows:
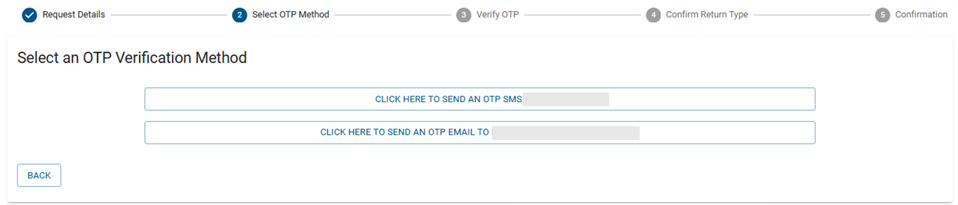
- Select the preferred OTP verification method (SMS or Email). The screen prompting you to enter the OTP that was sent to your selected verification method will be displayed.
Verify OTP as follows:
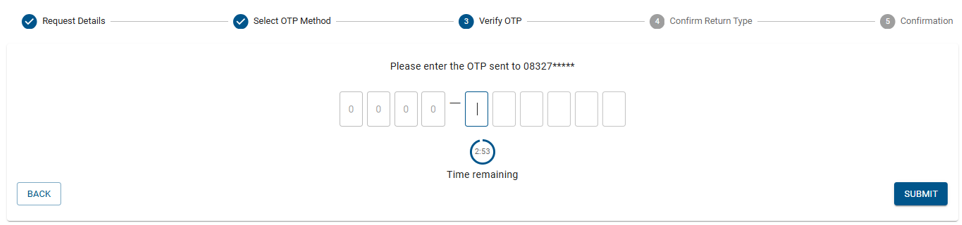
- Capture the OTP and select the “SUBMIT” button. The “Confirm Return Type” screen will be displayed.
Complete the Confirm Return Type screen as follows:
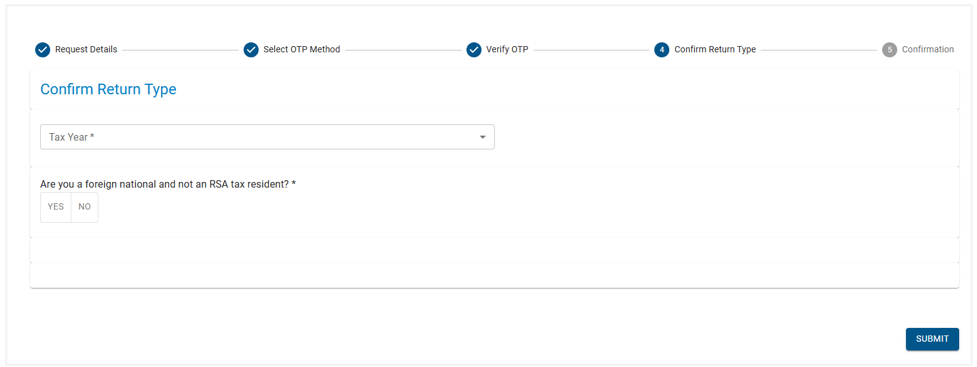
- Select the applicable Tax Year from the dropdown list.
- Select “Yes” or “No” to answer the question “Are you a foreign national and not an RSA tax resident?”.
- Since this service is designed for taxpayers who have either ceased residency or are non-residents, the response to this question is expected to be a “Yes”.
- If “No” is selected, the following message will be displayed: “Thank you. You will be issued with a resident return” and the query will be completed.
- If “Yes” is selected, a further question will be displayed:
- Select “Yes” or “No” to answer the question “Are you a foreign national and not an RSA tax resident?”.
- Select “Yes” or “No” to answer the further question “Were you ever an RSA tax resident?”
- If “No” is selected (to be selected by non-resident who has never been RSA tax resident), the following message will be displayed: “Thank you. You will be issued with a non-resident return”.
- If “Yes” is selected, the following message will be displayed:
- For details on the ceased to be a resident process, refer to “Guide to Complete the Registration, Amendments and Verification Form (RAV01)” on SARS website.
- Click the “SUBMIT” button. The confirmation screen will be displayed.
- In addition to the above message, a confirmation message that inform the taxpayer about the requested updated return status will be sent to the taxpayer’s previously selected communication method (SMS or Email).
What is my Payment Reference Number
This query type allows the taxpayers who intend to make payment to SARS to request their Payment Reference Number (PRN).
All mandatory fields indicated with an asterisk (*) must be completed.
If the “What is My Payment Reference Number” query was selected, the “What is my Payment Reference Number” screen will be displayed.
Complete the Request Details as follows:
- Select the title from the dropdown list.
- Capture the initials.
- Capture the name.
- Capture the surname.
- Select the Identity Type from the dropdown list depending on the entity type.
- South African ID Number – If the taxpayer is an individual and is a South African resident, only a valid ID number will be accepted.
- Passport Number – If the taxpayer is an individual and is a foreigner, a valid passport number must be used.
- Company Registration Number – If the taxpayer is a Company. Only a valid Company Registration number will be accepted.
- Trust Number – If the taxpayer is a Trust. Only a valid Trust number will be accepted.
- Other – If other is selected, the ID Number is not required.
- If South African ID Number or Passport Number is selected, capture a valid applicable ID or passport number.
- If Company Registration Number, Trust Number or Other is selected, complete the following details:
- Capture the applicable Company number or Trust number or Other number.
- Capture the applicable registered name.
- Select the Tax Type from the dropdown list. The dropdown list entries for this field will depend on the selected Identity type.
- If PAYE/SDF/UIF or VAT is selected, complete the following:
- Capture the PAYE or VAT reference number.
- Select the Period from the dropdown list.
- If Assessed Tax is selected, capture the income tax number.
- If Provisional Tax is selected, complete the following:
- Capture the income tax number.
- Select the Period from the dropdown list.
- Select the Tax Year from the dropdown list.
- If Dividends Tax is selected, capture the dividends tax number. This option is only available where Company Registration Number was selected.
- If Secondary Tax on Companies is selected, capture the income tax number. This option is only available where Company Registration Number was selected.
- If PAYE/SDF/UIF or VAT is selected, complete the following:
- Click the “NEXT” button. The screen prompting you to select the One Time Password (OTP) verification method will be displayed.
Complete the OTP Details as follows:
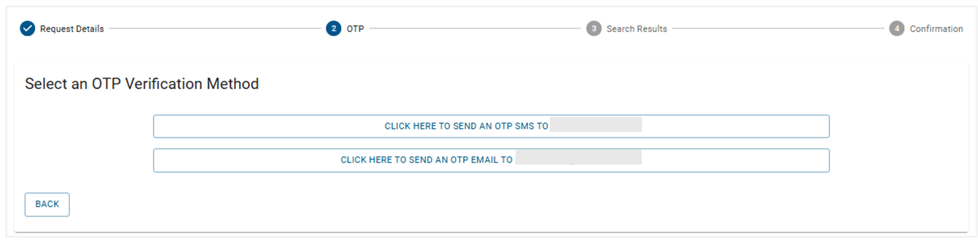
- Select the preferred OTP verification method (SMS or Email). The screen prompting you to enter the OTP that was sent to your selected verification method will be displayed.

- Capture the OTP and select the “SUBMIT” button. The “Search Results” screen will be displayed.
- Complete the Search Results screen as follows:

- The screen details will be prepopulated. Select the communication methods for receiving the PRN.
- If your Mobile Number and Email address are available on SARS database, they will both be selected.
- If you do not want the PRN to be sent to both communication methods (SMS and Email), deselect the unpreferred communication method.
- Select the “Confirm” button. The PRN will be sent to the selected communication method(s) and the confirmation screen will be displayed.
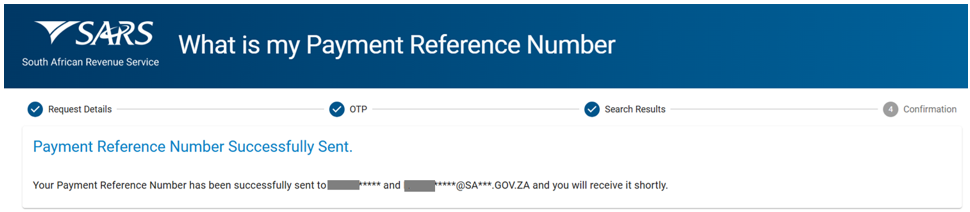
Register for Income Tax
- This query type allows an individual with a valid South African ID to register for Personal Income Tax.
- All mandatory fields indicated with an asterisk (*) must be completed.
- If the “Register for Income Tax” query was selected, the “Register for Personal Income Tax” screen will be displayed.
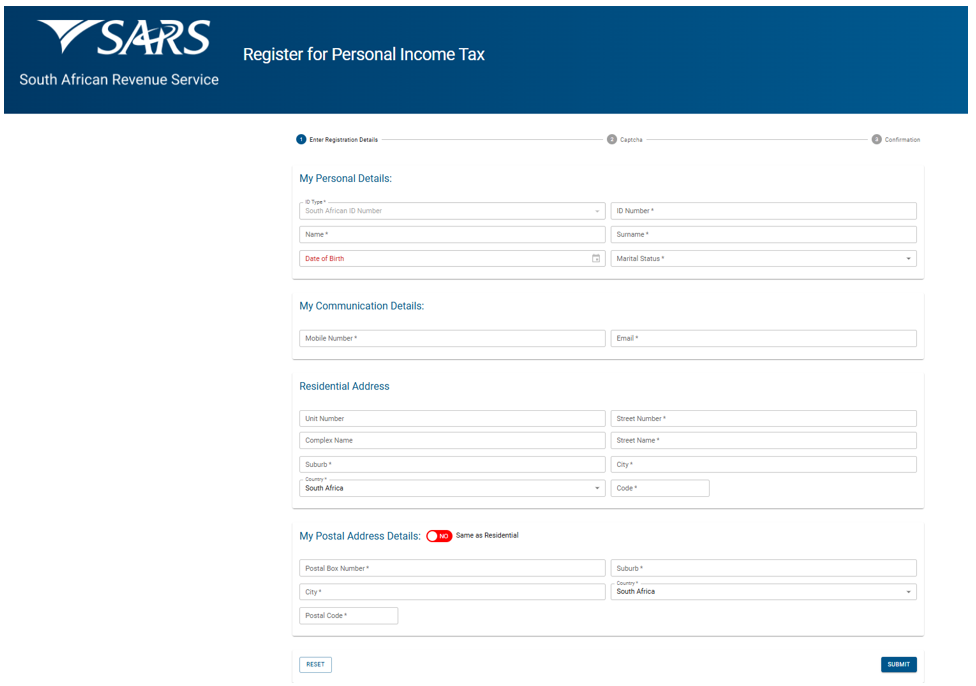
- Complete the Personal Details:

- The ID Type will always be South African ID Number and will not be editable.
- Capture the ID Number, Name and Surname respectively.
- The Date of Birth field is auto populated based on the ID Number captured.
- Select the marital status from the dropdown list.
- Complete the Communication Details:

- Capture the Mobile Number and the Email respectively.
- Complete the Residential Address:
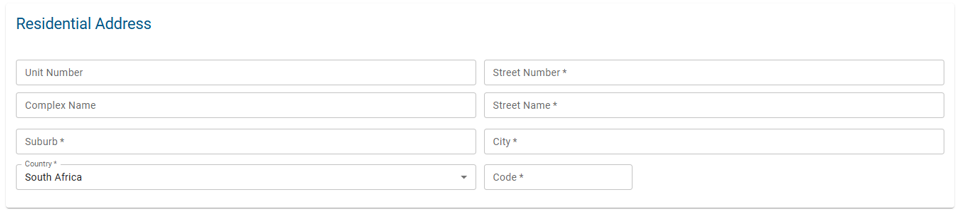
- Capture the address details accordingly.
- Complete the Postal Address Details:
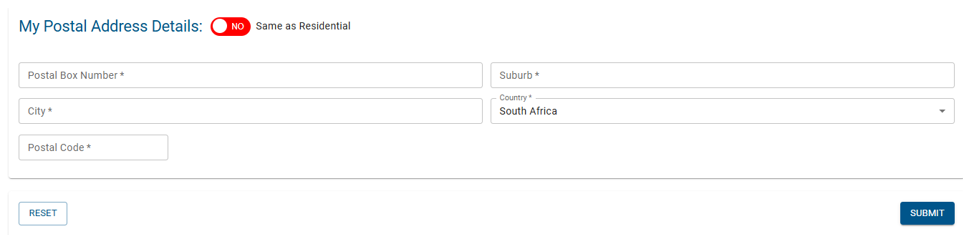
- Capture postal address where the postal address differs from the residential address.
- Select “Yes” where the postal address is the same as the residential address which will result in the postal address fields being hidden.
- Click on the “SUBMIT” button to proceed to the “Captcha” step.
- Complete the onscreen Captcha:
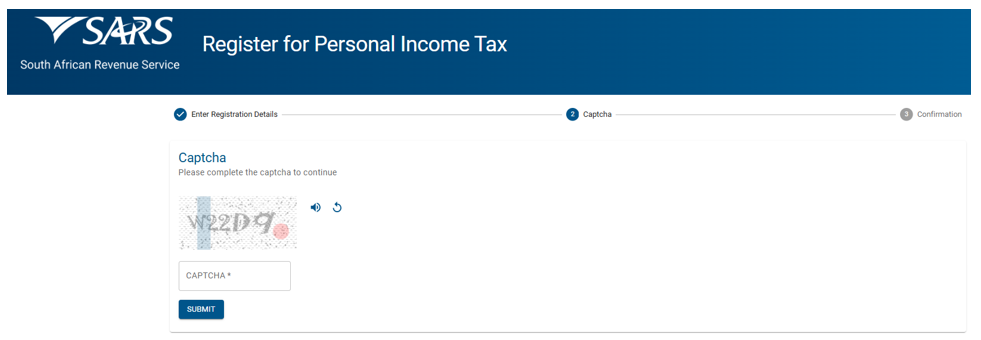
- Complete the onscreen CAPTCHA field.
- Click on the “SUBMIT” button to initiate the registration process. Depending on the outcome, one of the following messages will be displayed:
No | Scenario | Message Content |
1. | PIT Registration is successful SOQS on-screen displayed message | Registration Successful You have been successfully registered for Personal Income Tax. Your new Income Tax Reference Number is: [Tax Ref No] Confirmation of this registration will be sent to the email address and mobile numbers captured. |
2. | PIT Registration is successful SMS | [Initials, Surname] has been registered for Income Tax with the following tax reference number [Tax Ref No]. SARS |
3. | The PIT registration could not be completed due to unsuccessful verification of the captured details. SOQS on-screen displayed message | Thank You For Your Query Unfortunately, the details that you supplied could not be sufficiently verified and we are unable to process your request. If you require additional assistance, please visit SARS eFiling or make use of our Digital Channels Platform. Alternatively, you can contact us via WhatsApp on +27 80 011 7277 |
4. | PIT Registration could not be completed due to a system error SOQS on-screen displayed message | Thank You For Your Query Unfortunately, we are unable to process your request. If you require additional assistance, please visit SARS eFiling or make use of our Digital Channels Platform. Alternatively, you can contact us via WhatsApp on +27 80 011 7277 |
5. | The ID Number captured has previously registered for PIT SOQS on-screen displayed message | You Are Already Registered According to our records, you are already registered for income tax. If you would like to update your details, please visit SARS eFiling or make use of our Digital Channels Platform. Alternatively, you can contact us via WhatsApp on +27 80 011 7277 |
- See an example of message five below:
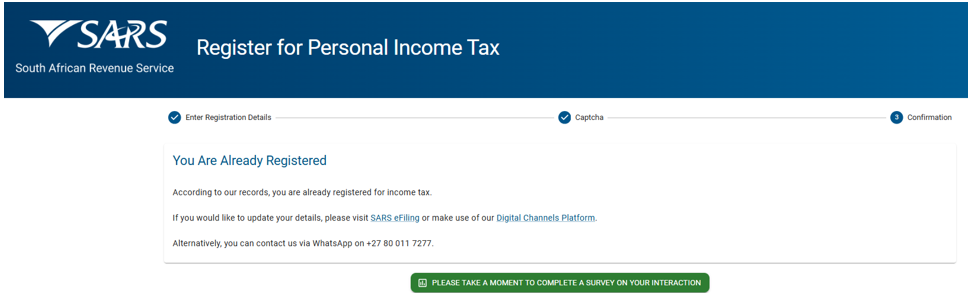
Definitions, acronyms and abbreviations
The definitions, acronyms and abbreviations can be accessed here – Glossary webpage
Legal disclaimer: In the event of conflict or inconsistency between this webpage and the PDF version of the guide, the latter shall prevail.