How to add users to your Tax Practitioner portfolio on eFiling
Tax Practitioners can add users to their eFiling profiles to assist with tasks like completing tax returns, making payments, submitting returns, and editing returns. This section explains how to invite users, organise them into categories, and delegate responsibilities.
- Step 1: Invite user – Performed by the Tax Practitioner
- In this step the Tax Practitioners link a user to their portfolio and set their access rights for the Tax Practitioner portfolio.
- Step 2: Request user to accept invite – Performed by the user
- In this step request the user to accept the invite. This step shows how the user accepts the invitation.
Note that the user being added to the eFiling profile must have an existing eFiling profile. |
Step 1: Invite User – Performed by the Tax Practitioner
- Login to the Tax Practitioner profile.
- On the Landing page, select User displayed on the main menu.
- Select User displayed on the left menu.
- Select Invite User.
The Invite a user screen will be displayed.
- Select the applicable Identification Type
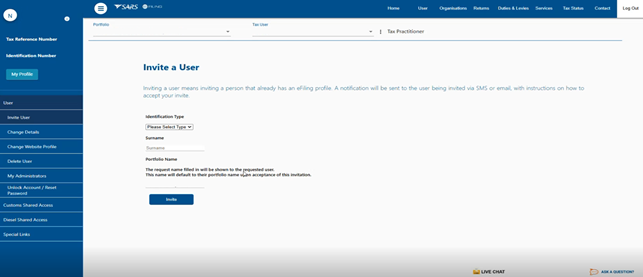
- Complete the demographic information and click on Invite.
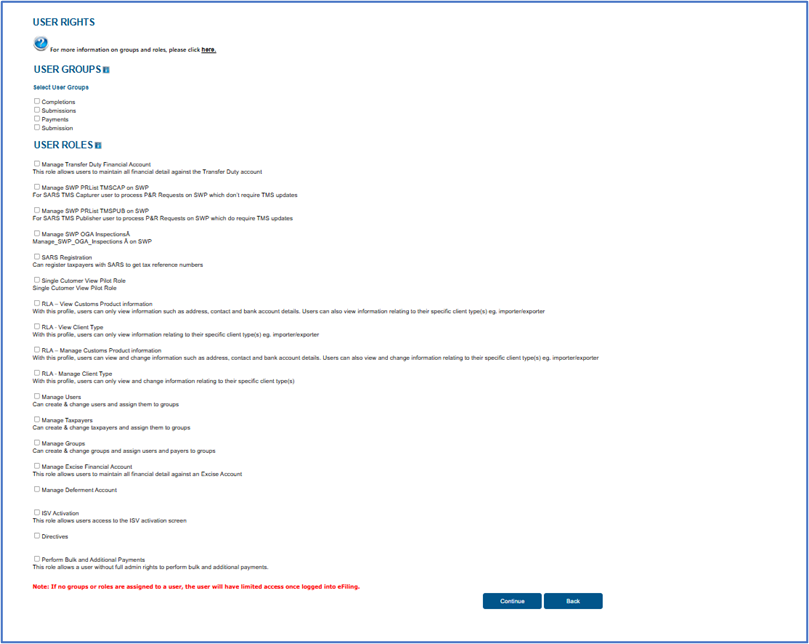
The User Rights/ User Groups will be displayed.
- Proceed to select the applicable group for the User and click on Continue.
The User Summary screen will be displayed:
- Click on Continue.
- The Change Details screen will be displayed showing the information of the invited user.
| Note that an email and SMS invite notification will be sent through to the invited user. |
Step 2: Request User to accept invite – Performed by the User
- Login to eFiling (the User logs into their eFiling account).
On the Landing page.
- Click on My Profile.
- Select Portfolio Management.
- Scroll down to User Invitation(s).

On the applicable Portfolio Name.
- Click on Accept.
- A One-Time Pin will be sent to the user.
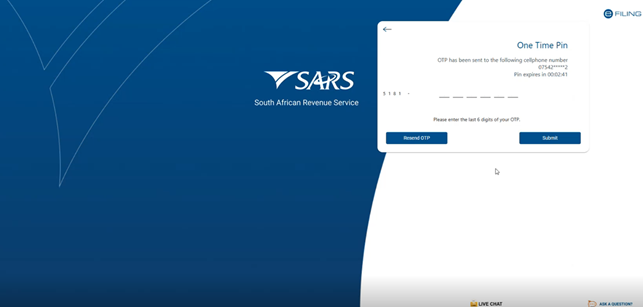
- Complete the OTP number and click on Submit.
Once completed correctly, the following pop-up message will be displayed.

Note the following:
If you experience any difficulties, please refer to the Guide to Register for eFiling and Manage your User Profile. |
How to create a group for users and clients (Performed by Tax Practitioners)
To establish a designated group for the added/invited users, the Tax Practitioner follows these steps to create the group.
On the main menu, select Organisation, then choose Organisation from the left menu:
- Select Rights Groups.
- Select Manage Groups.
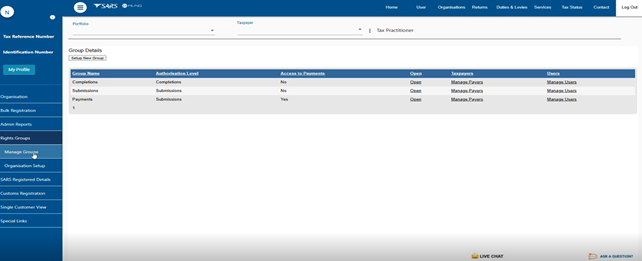
The Group Details screen will appear.
- Click on Setup New Group.
The Create New Group Screen will be displayed.
Enter the group name under Group Name.
Select the appropriate Administration Level, for which the group will be responsible.
Choose the relevant function:
- Submissions
- Enables users to view, complete, and submit or file returns.
- View Only
- Allows users to access and review returns without making changes.
- Completion
- Permits users to view and complete returns but does not include submission capabilities.
Mark the Access to Payments checkbox if the group will be authorised to make payments as well.
Indicate the tax types for which the group will assume responsibility.

- Once all required fields have been completed, click Add to proceed.
The newly created group will then appear on the Group Details.
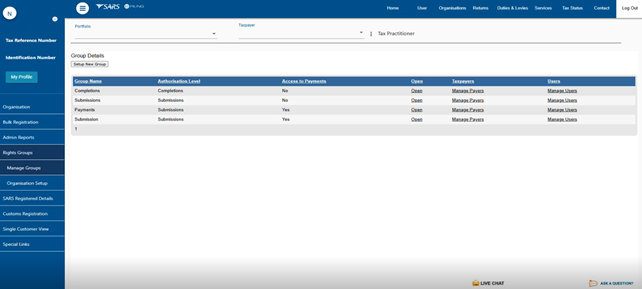
Note the hyperlink Manage Payers under the Taxpayers column allows you to view taxpayers linked to the group, while Manage Users under the Users column allows you to view invited users/tax administrators who have been assigned to the group.
For more information on how to create a group refer to the Guide to Register for eFiling and Manage your User Profile. |
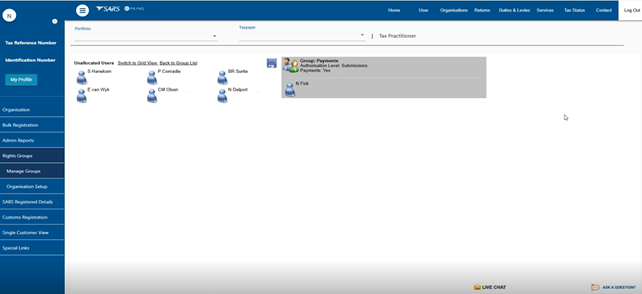
After selecting the Manage Users hyperlink and completing the required steps, the list of users associated with the related group will be displayed.
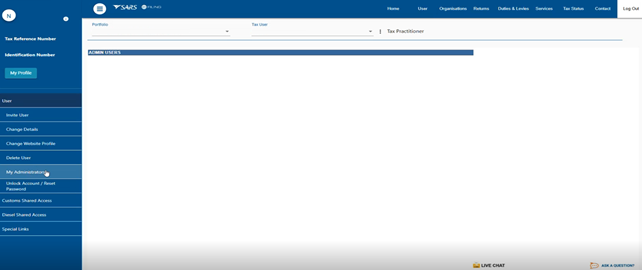
To view Users linked to your Tax Practitioner portfolio.
- From the main menu, select User.
- In the left menu, choose User then choose My Administrators.
Your Administrators/Users who have accepted your invitation will appear on this page.
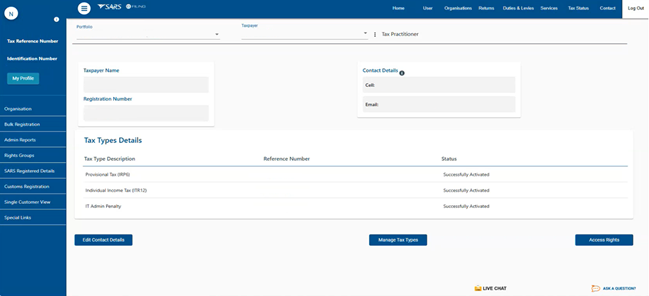
To update the User Rights of your Tax Practitioner portfolio.
- Select Organisation on the main menu.
- Select Right Groups.
- On the Tax Types Details page select the Access Rights button.
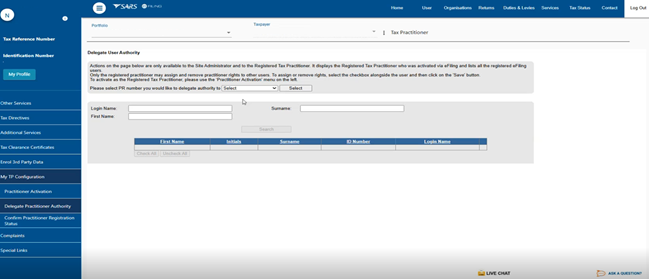
How to delegate authority from your Tax Practitioner portfolio
Tax Practitioners have the capability to associate users with their Tax Practitioner portfolio, thereby delegating appropriate authority. This process is especially beneficial when organisational staff members are required to perform eFiling tasks on behalf of the Tax Practitioner.
To delegate authority of your tax administrators:
- Select Services on the main menu.
- Select My TP Configuration.
- Select Delegate Practitioner Authority.
The Delegate User Authority page will be displayed.
The Delegate Practitioner Authority page is shown only when you are an Activated Tax Practitioner.
|
- Select your PR number from the drop-down list.
- Click on Select.
The Tax Administrators you invited will be displayed.
To assign delegation rights to the Tax Administrator/s.
- Click on the applicable check box besides the user/s and click on Save.
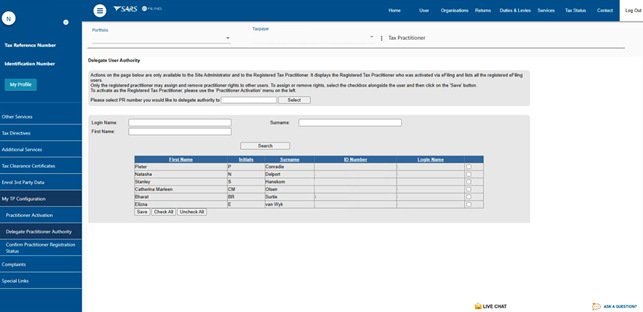
A message will be displayed indicating that the list of users has been successfully updated.
- Confirm your selection by clicking OK.
For a detailed overview of this process, please refer to the following guide: |