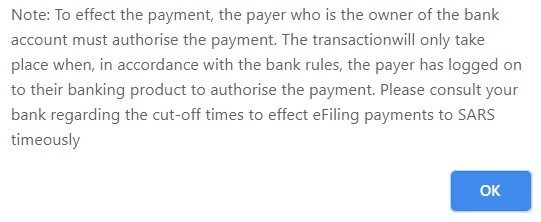
With an eFiling payment, the payment can be initiated by any eFiler, e.g. the taxpayer, tax practitioner, representative, but this payment must be approved by the bank account holder. When making a payment to SARS, eFiling will send a payment request to your bank which will indicate the amount that needs to be approved and gives a payment reference number. The bank account holder must then log on to his/her bank product and authorise this request, which acts as an instruction to the bank to make the payment to SARS.
eFiling payments are irrevocable and cannot be recalled or reversed.
To see how to set up once-off eFiling payment bank details, follow these easy steps.
The steps to set up a once-off eFiling payment bank details set up are:
Before you can use the eFiling payment functionality, you must first make sure that your bank supports credit push transactions.
Top Tip: Engage your bank about accessing an account which supports the credit push functionality.
For individuals, click on ‘Home’ on the navigation bar at the top:

Followed by ‘User’ on the navigation bar on the left and then ‘Banking Details’:

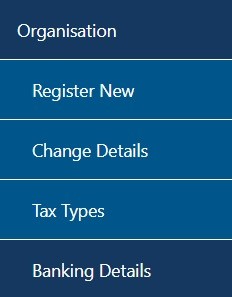
For organisations or tax practitioners, click on ‘Organisations’ on the navigation bar at the top:

Followed by ‘Organisation’ on the navigation bar on the left and then ‘Banking Details’:
Should you need to set up a new account, click ‘Setup New Account’:

Alternatively, you can follow the steps below to set up bank details.
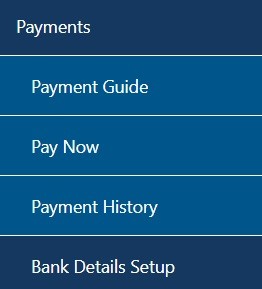
Click “Returns”, then “Payments” on the navigation bar on the left and “Bank Details Setup” to setup your bank details on eFiling.
The menu bars will differ between the Individual, Organisation and Tax Practitioner Profiles. Below is an example of the Individual and Organisation profile menu bar.


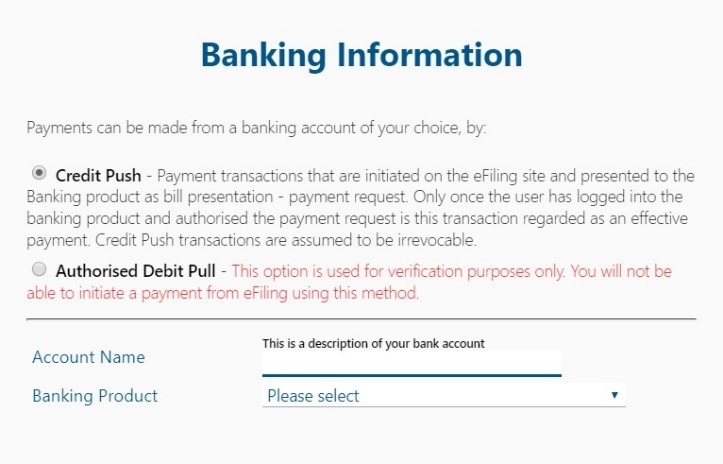
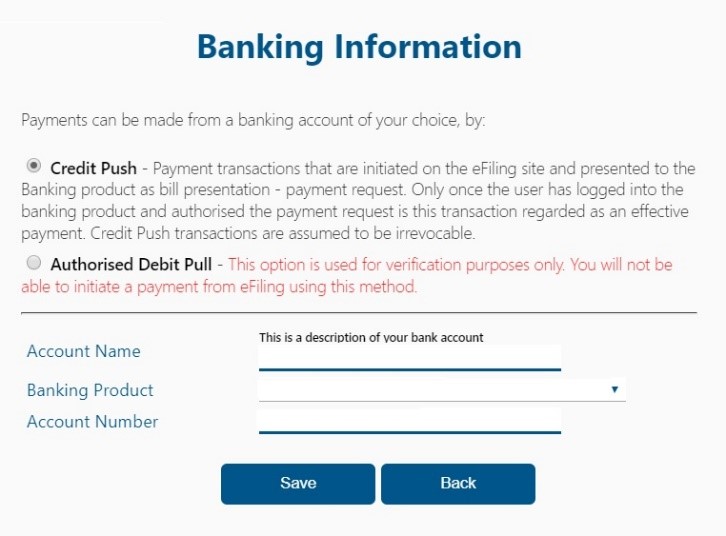
The “Banking Information” screen will be displayed. The Credit Push option will be automatically selected.
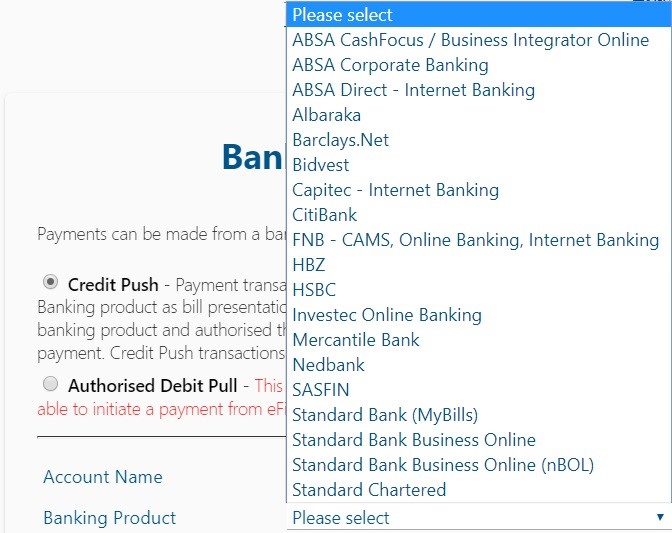
If you select the “Banking Product” field, a list of banks will be displayed. Select the relevant bank.
After selecting the bank, the Account Number field will be displayed for completion. Complete this field and select “Save” to proceed or “Back” to make changes to the bank information captured.
After you have saved the bank details, the details will be saved on eFiling as indicated below.

If you click the “Open” hyperlink, the banking Information page will be displayed.
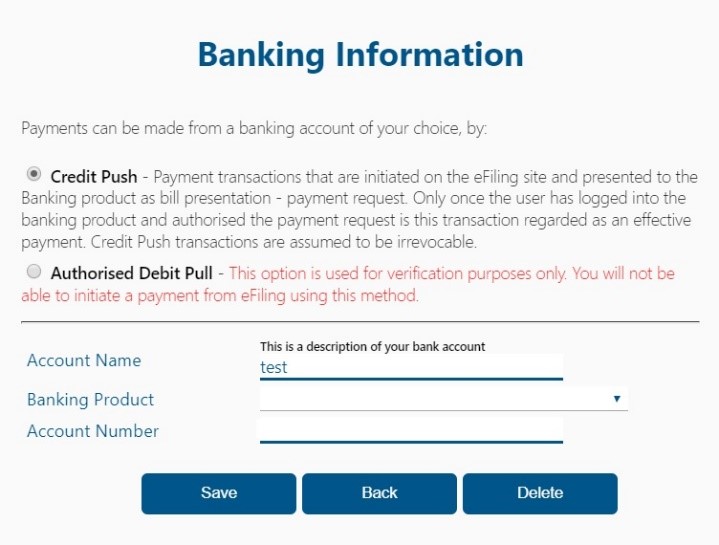
To remove the bank details, click the “Delete” button. Click “OK” to confirm the deletion of the bank details or “Cancel” to close the message.

After you have confirmed the deletion of the bank details, no bank details will be displayed on the banking details page on eFiling.

Top Tips: A Credit Push only needs to be set up once.
Once the payment has been processed on eFiling you will need to log onto your banking product and authorise the transaction.
BANK DETAILS VERIFICATION when setting up a credit push payment
- When Investec bank, Citi bank SASFIN Bank and Albaraka Bank clients set up their banking details for payments on eFiling; the bank details get verified by the bank to ensure that the entity is correct.
- Below are the client’s details that verified against bank account details; during the credit push payment process for above banks.
- Banking details.
- Entity which will be Identity number for individuals.
- Company registration number (if an organization) and trust number if it is a trust.
- Once the bank details have been captured for the credit push payment process, click on the “save” button. In instances where the clients’ eFiling profile details are the same as the banks’ details, the captured bank details will pass the verification process.
- If the entity registration number such as the Identity number / CK number / Trust number on the eFiling profile is not aligned with the bank’s. The “Account verification request not successful – The entity registration number does not match the identification registered for this account/profile” failed verification message will be displayed.
- Client’s register eFiling details on eFiling profile that do not match with the details at the bank fails the validation process; or if there is a financial hold on the bank account and the “Account verification request not successful, there is a hold /profile that does not allow this transaction to be processed” message will be displayed.
- Clients are advised to compare bank account registration details against the eFiling profile registration details and make necessary updates where applicable.
-
Once you have set up your banking details on eFiling you can now start initiating payments.
Payment from a return:
Payments can be initiated after you have submitted a return/declaration or received an assessment that indicates that you must pay SARS.
You can do this by:- Clicking on the ‘Make payment’ button where it is available:

Select ‘Pay Now’ to proceed: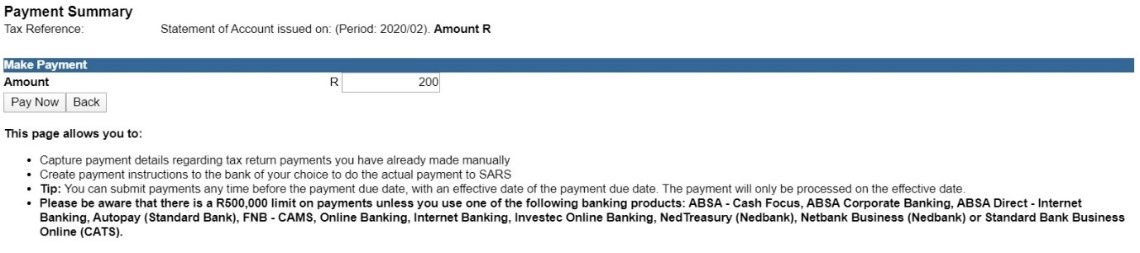
Click ‘OK’:

Top Tip: Where you selected ‘Cancel’, the payment will now be under ‘Payments – General Unpaid’:
OR
Process an additional payment:
Alternatively, an additional payment can be initiated.
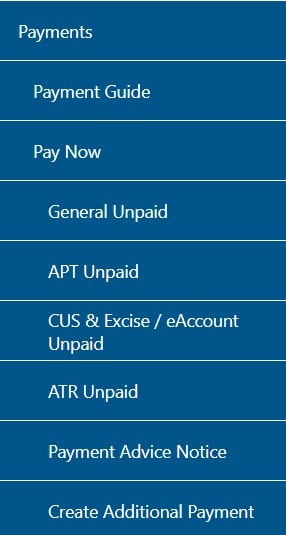
Navigate to ‘Returns’ on the navigation bar at the top and then select ‘Payments’ on the navigation bar on the left. Select ‘Pay Now’ and then ‘Create Additional Payment’ :
Select the tax type you wish to pay, and complete the details, as needed.
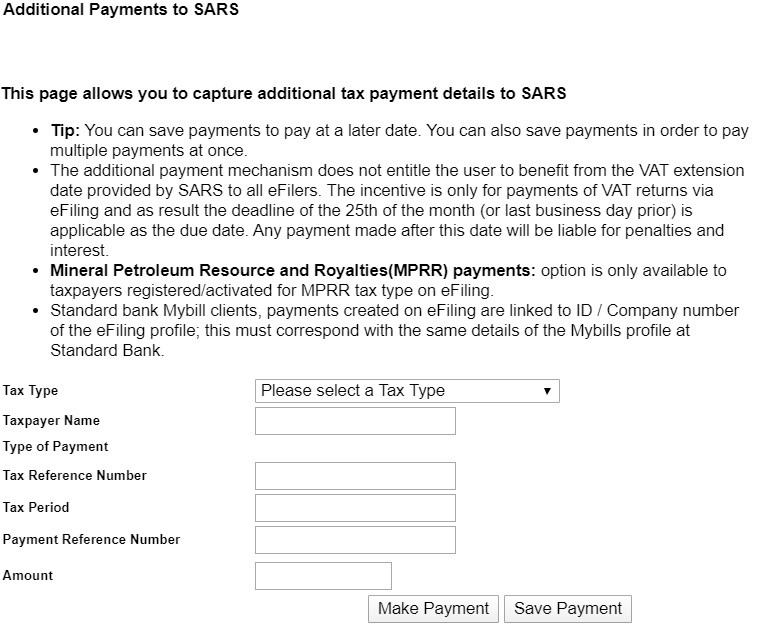
Click ‘Make Payment’ to proceed or ‘Save Payment’ to come back at a later stage and complete the payment process.

Click ‘OK’ to continue or to save the payment.
Top Tip: Where you selected ‘Save Payment’, the payment will now be under ‘Payments – General Unpaid’.
NOTE: When the following message is displayed “This return has been issued to the taxpayer register for eFiling and submitted, but not yet paid via eFiling. Please submit payment from this return via the eFiling website”. This mean you cannot make an additional payment. You need to go back to the return that was submitted and make payment from there by following the steps as indicated “make payment”.
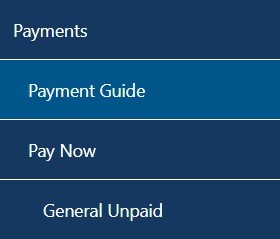
Make a payment from the list of unpaid items:
Navigate to ‘Payments, select ‘Pay Now’ and then ‘General Unpaid’ in the left hand menu under ‘Returns’.
A list of outstanding payments will appear.
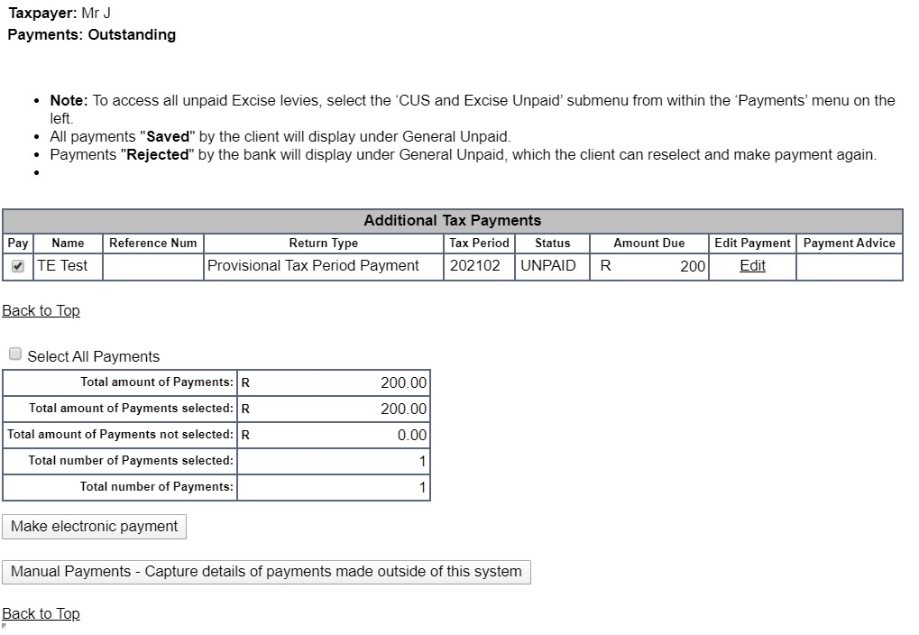
Select the payment(s) you want to process
Click ‘Make electronic payment’.
Top Tip: If you select ‘Manual Payments’ this means you will not be processing a payment through eFiling but will use a different payment channel, e.g. EFT (Electronic Funds Transfer).
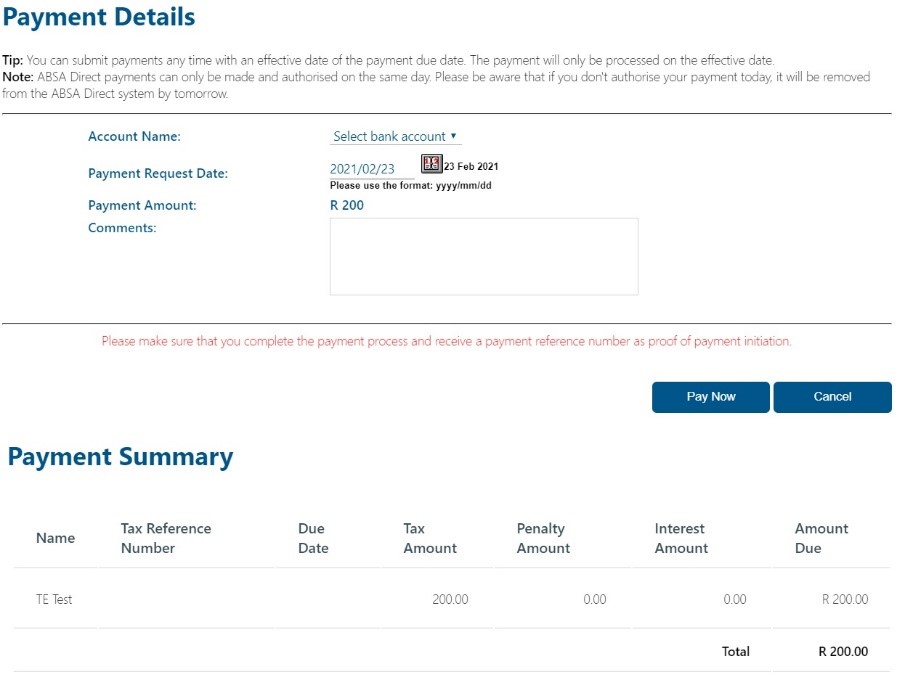
You will be directed to the Payments Details page, where you will have the option of selecting the account from which you would like to make payment and the ‘Payment Request date’. The payment request date is the date on which the payment should be authorised or processed against the selected account, once authorised by you on your online banking. Please note that a payment instruction cannot be approved on the bank platform after the date selected on eFiling.
A notification message will be displayed. Click ‘OK’ to proceed.
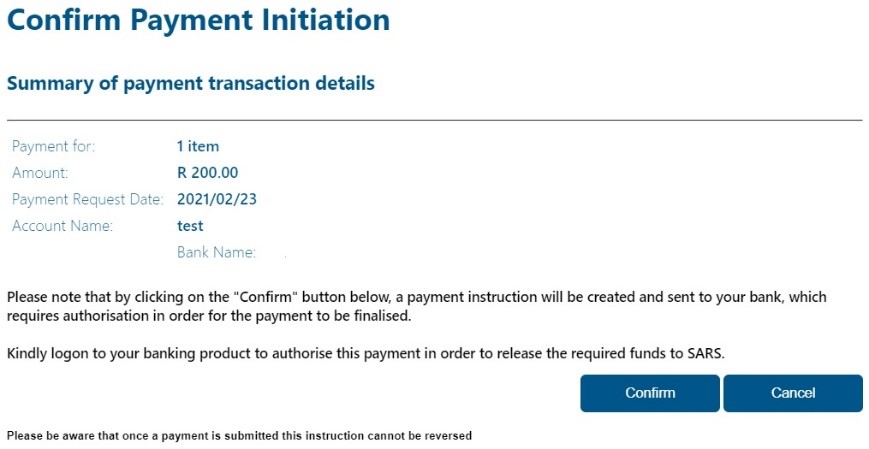
Select ‘Pay Now’ and then the ‘Confirm Payment Initiation’ page will be displayed. Please check that the details you have captured are correct. Click ‘Confirm’ to continue. Selecting ‘Cancel’ will cancel the transaction.
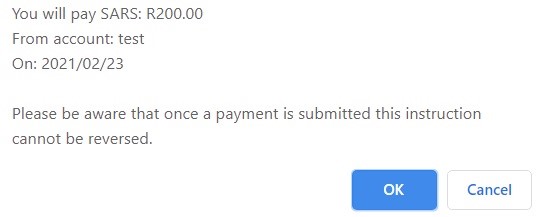
Your payment details will appear, please check and click ‘OK’ to continue.
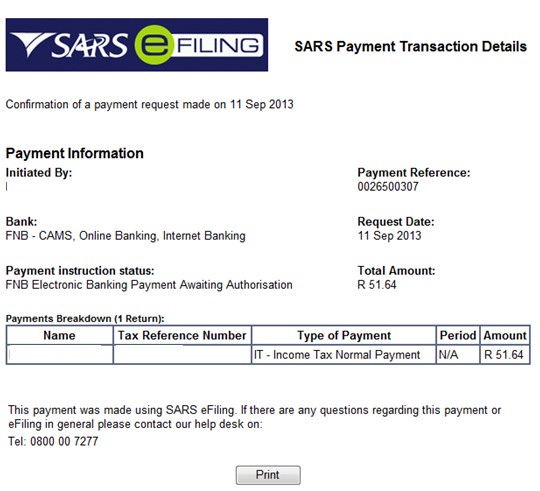
The ‘Payment Initiation Result’ page will be displayed, which provides a summary of the payment transaction and informs you that your payment request has been successfully submitted to your bank for authorisation.
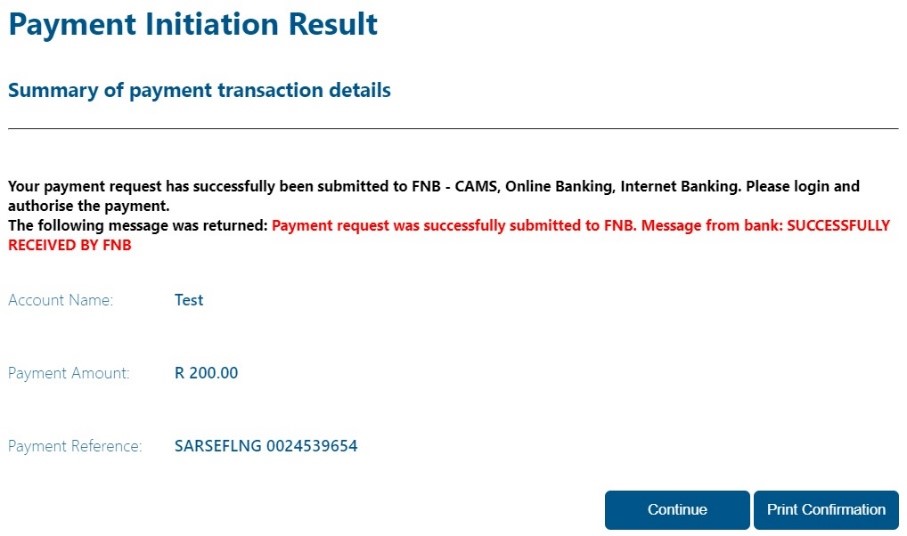
An error message in red will appear should your bank reject the payment instruction, together with the reason why it was rejected by the bank.
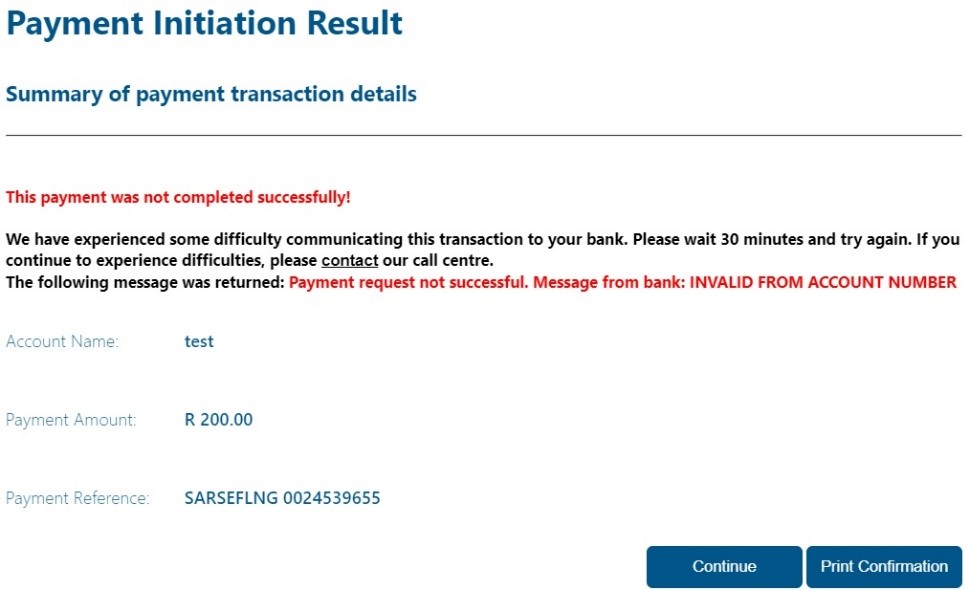
Click ‘Print Confirmation’, to print a copy of the transaction details for your records.
Click ‘Print’:
Click ‘Continue’ to proceed.
The ‘Payment History’ page will be displayed. The credit push payment status will be indicated as ‘Awaiting Authorisation’. Once you have approved it from the bank side, the status will indicate ‘Successful’ which serves as your proof of payment.


Once you have processed your payment on SARS eFiling, you need to authorise the payment on your bank platform to be released to SARS. Select your banking product from the menu to obtain the required information about the steps you need to follow.
- ABSA
- Bidvest Bank
- Capitec
- CitiBank
- First National Bank (FNB)
- Investec
- JP Morgan
- Nedbank
- Standard Bank MyBills
- Standard Bank Business Online Banking
- Standard Chartered Bank
- Albaraka Bank
- HBZ Bank LTD
The following fields will be required dependent on the banking product selected.
Top tip: You need to familiarise yourself with your bank’s cut-off time for processing payment to avoid for penalties and interest be charged by SARS, because of payments received late (after the bank’s daily cut-off time).
- If you wish to cancel a payment that has not yet been authorised on your internet banking, follow the below steps.
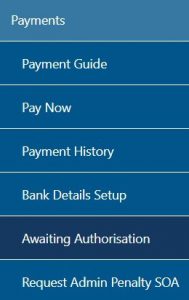
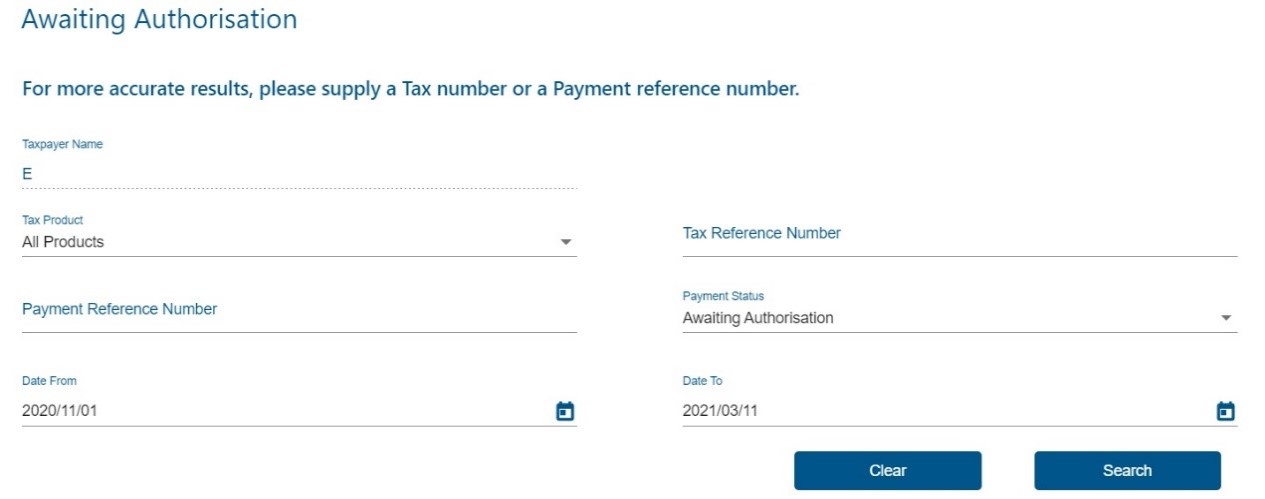
- Select the “Awaiting Authorisation” item under the Payments navigation bar on the left to view all payments that have not been processed yet.
- The ‘Awaiting Authorisation’ page will allow the user to search or filter for the payments according to the following fields:
- Taxpayer Name;
- If you enter a specific Taxpayer Name in the “Taxpayer Name” field, the Awaiting Authorisation page will display all payments related to the captured Taxpayer name when “Select All” has been selected from the Taxpayer drop down list;
- If a specific Taxpayer has been selected from the Taxpayer drop down list, the “Taxpayer Name” field will be disabled and the selected taxpayer name at the top will be populated into this field.
- Tax Product;
- If the user selects a specific product from the Tax Product drop down list, the payment history page will display all payments for all the taxpayers related to the selected Tax Product.
- Tax Reference Number;
- Payment Reference Number;
- Payment Status;
- Date From
- Date To
- Taxpayer Name;
- If no payments have been made, the results section on the screen will be blank. A warning message will be displayed to indicate that no records exist for the search criteria. Click ‘OK’ on the message to proceed.

If you have made payments, the results section will display the payment(s).

- Select the ‘View’ button and the ‘Payment Details’ screen will be displayed.
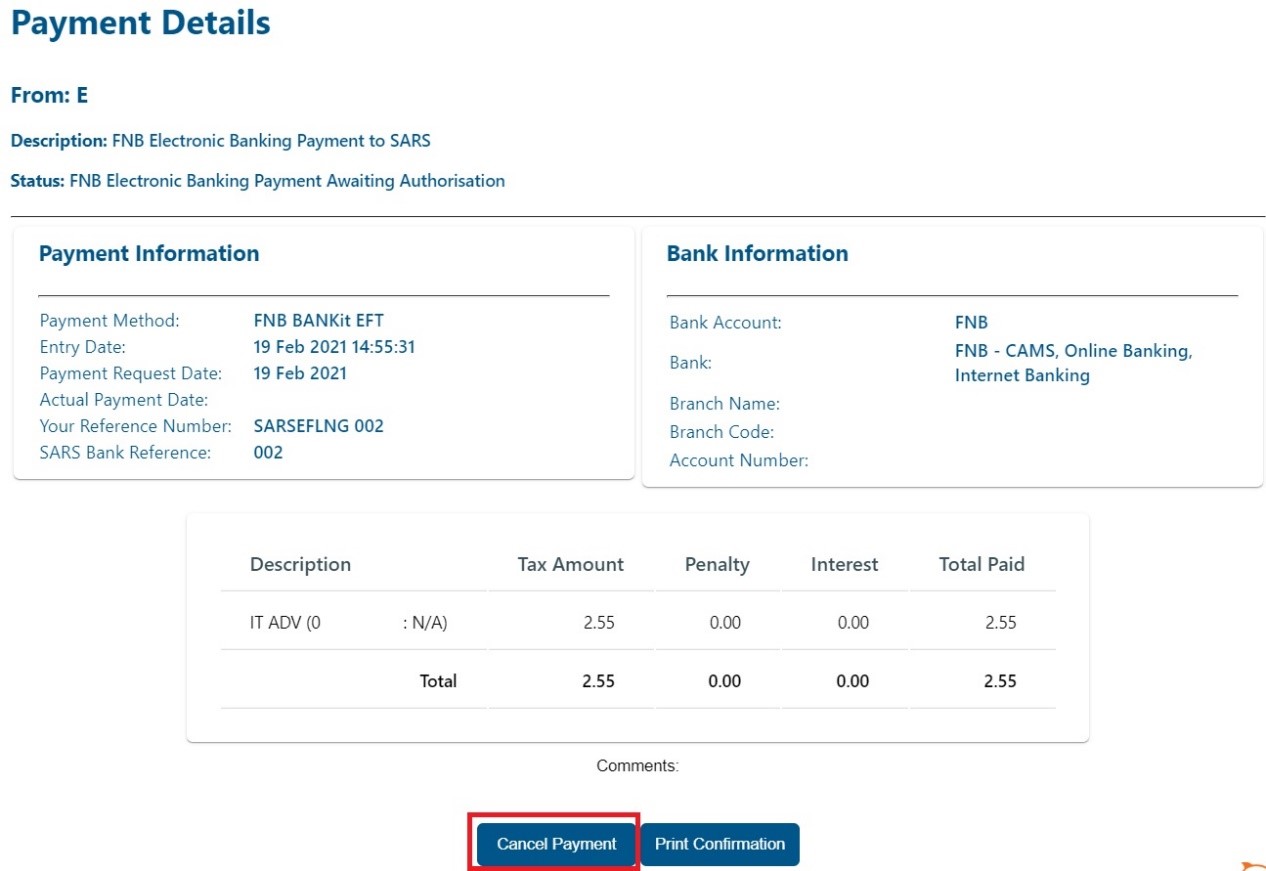
- To cancel the payment, click the ‘Cancel Payment’ button. A confirmation message will be displayed. Click ‘OK’ to confirm the cancellation of the payment.

- Once the payment has been cancelled, a message will be displayed to indicate that the payment has been cancelled successfully.
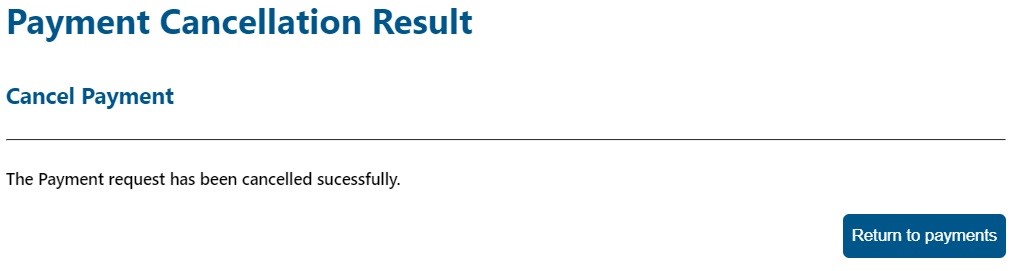
- The cancelled payment will be moved to Payments History and the status will be indicated as ‘Cancelled’.

Top Tip: A Credit Push transaction can only be cancelled before it is authorised on the banking profile.
How do I search for my eFiling payment (credit push) transaction?
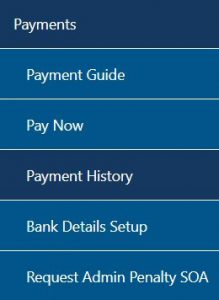
- Select the “Payment History” item under the Payments tab to view all payments made to SARS via eFiling.
- The “Payment History” search screen will be displayed. Complete all relevant fields to search for payments made to SARS.
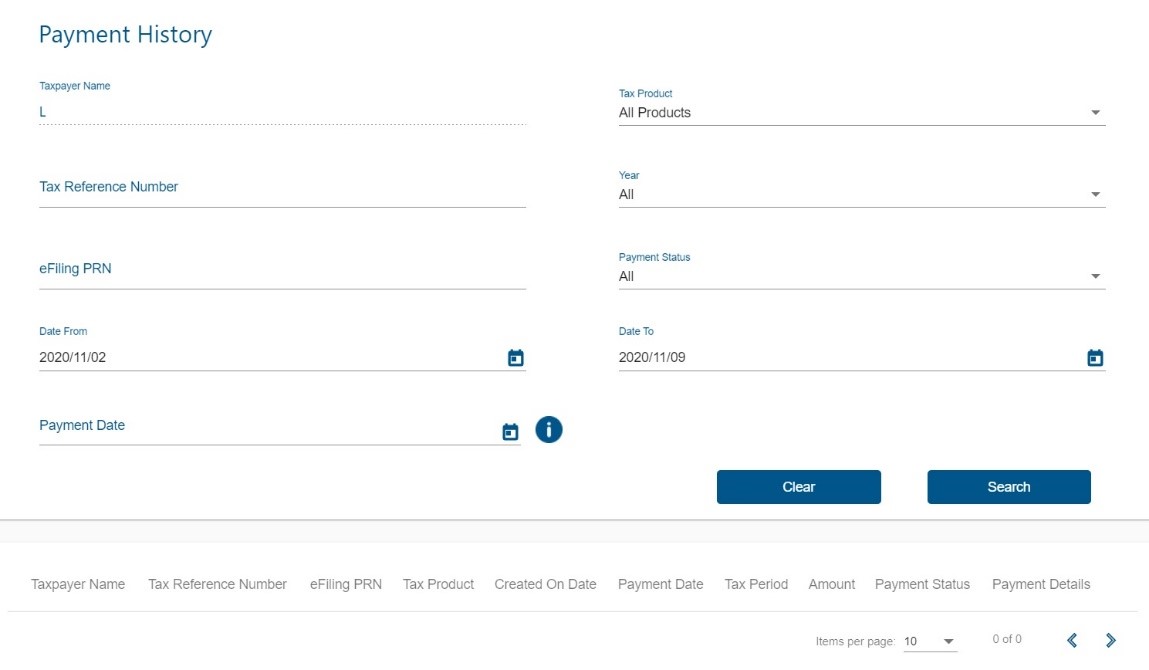
- On the payment history screen, the “Date From” field will be defaulted to 3 days prior to the selected Payment Date and the “Date To” field will be defaulted to 3 days post the selected Payment Date (this will be inclusive of weekends).
Note: The Selection of payment “Date From” and “Date To” range must be limited to 6 months to avoid a delay in obtaining the results.
- If no payments have been made, the results section on the screen will be blank.

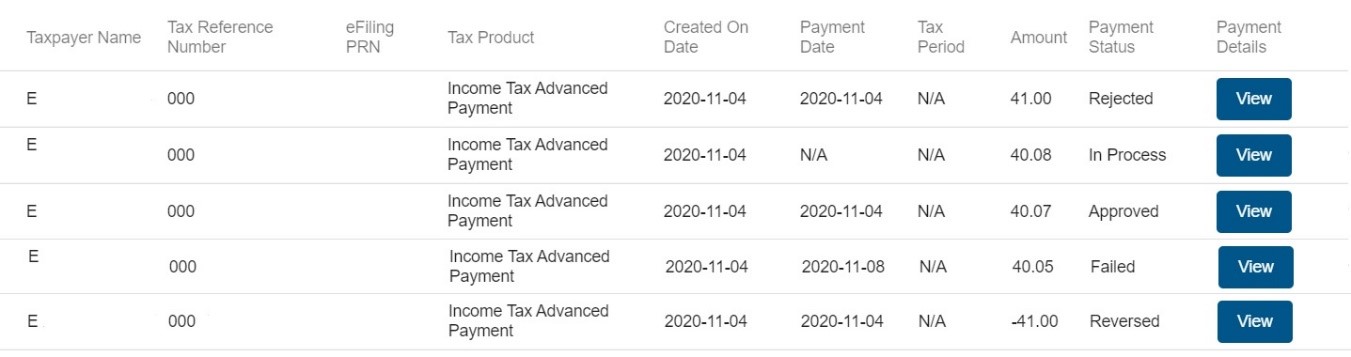
- If you have made payments, the results section will display the payment(s). Below are examples of the different payment statuses displayed on the payment history screen.
- Manually Paid – this payment was made outside of eFiling and recorded on eFiling.

- Awaiting Authorisation – this payment must be finalised on your internet banking profile and is awaiting authorization.
- In-progress – the payment is pending;
- Rejected – the payment was rejected;
- Failed – the payment failed;
- Approved – the payment was successful;
- Reversed – the payment was reversed; and
- Cancelled – the payment was cancelled.

How to trace a payment when receiving notification of payment not approved
- Notifications will be send via SMS and email for all payments that have not been approved and are in awaiting authorisation status.
- The notifications will contain a 10 digit payment reference E.g.
Dear Taxpayer
REMINDER TO AUTHORISE PAYMENT
Your Payment Reference 0012345678 for R xxx on the SARS eFiling system is scheduled on…..
- In order to track the payment on eFiling you can search of the payment under History payment as follow:
- Click on Pay now on the left

- Followed by Payment History

Enter the 10 digit payment reference that was in the notification into the payment reference field and click search

- You will then be able to see all the tax numbers and value related to the payment.
What are the available alternative methods of payment to SARS other than payments via eFiling?
For the latest payments option click here.
For the latest payments option click here.